a complete introductory orienteering activity package … · a complete introductory orienteering...
TRANSCRIPT
A complete introductory orienteering activity package for schools
Introduction
Tri-O is a package of simple orienteering activities.
Each activity can be a stand alone exercise used within curriculum lessons or an after school club or used together to provide the basis for a festival of introductory orienteering and appropriate multi skills stations (ideally suited for KS2).
These activities are designed to enable the teaching of basic orienteering skills and associated physical skills in a fun and exciting manner.
Resources required to run the activities and organise a festival are included in this pack, the only specialised equipment needed is orienteering punches for activity 5.
The stations provide plenty of opportunities to encourage teamwork and co-operation.
Orienteering Festival
If ran as a Festival:
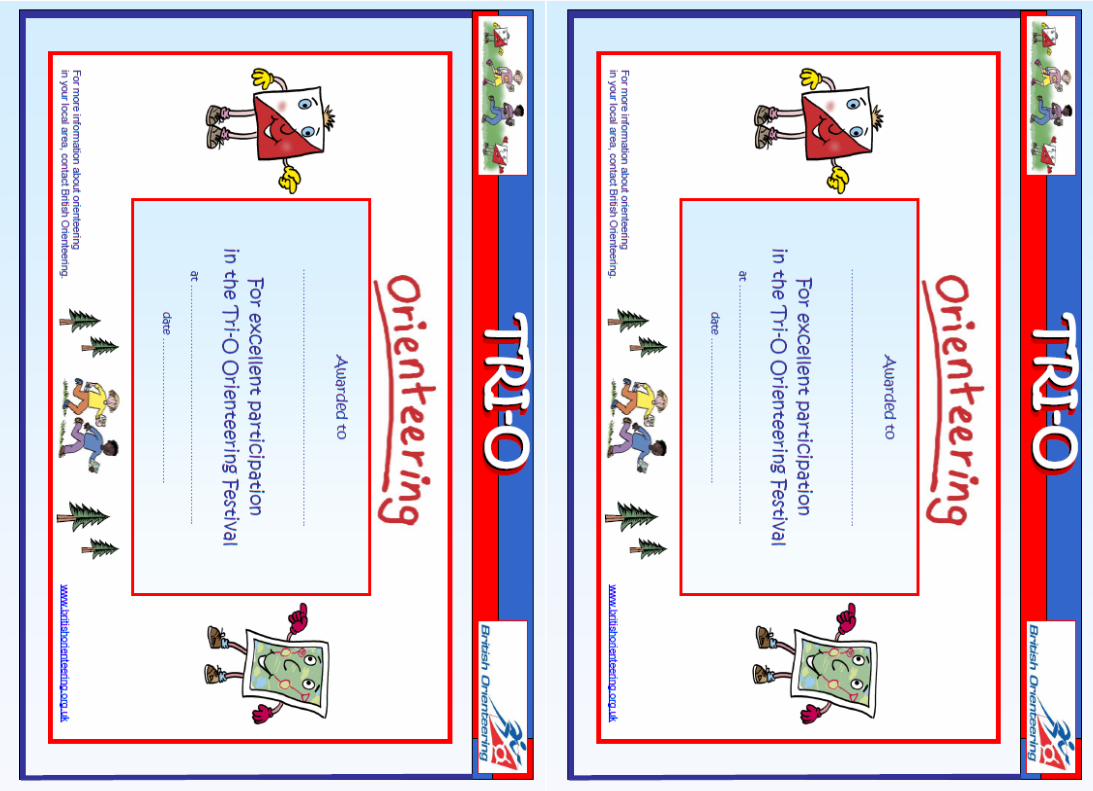
A template certificate is available at the end of this package.
The running activity card can be used as a warm up.
The ideal location would be a large astro turf pitch.
Teams should consist of 8 -12 pupils maximum.
A maximum of 8 school teams can participate.
Each activity will last 10 -12 minutes, with a festival lasting for approximately 120 minutes, with a 10 minute break after the first 4 activities.
Combine activities 1-4 and 5-8 together to create a balance in each half of the festival. Activity 9 can be substituted or added in as required.
Secondary school sports leaders will be required to run each activity with preferably 2 leaders on each station.
Warm Up – Running Drills Aim
Development of Agility
Organisation
Teach Mechanics for Running Movement.
Step 1: legs together
Step 2: legs shoulder width apart
Step 3: ‘Sl-iii-de’ - slide one leg back still shoulder width apart, both feet facing forward
Step 4: ‘Sink’ - knees bent, back straight (drop your bottom)
Step 5: ‘Arms’ - 90 degree elbows, opposite arm to leg forward
Step 6: ‘Roll’ – roll onto balls of feet so heels off ground and balanced
Step 7: ‘GO’ – move forward on balls of feet, increasing stride after 3 steps
Mark running distance of 15-20m with flat spot. Ask pupils to increase stride as they come
out of third step. As they approach the spot they need to shorten stride for stopping. Push
off from spot with lead leg and return.
Repeat making sure each ‘step’ is followed.
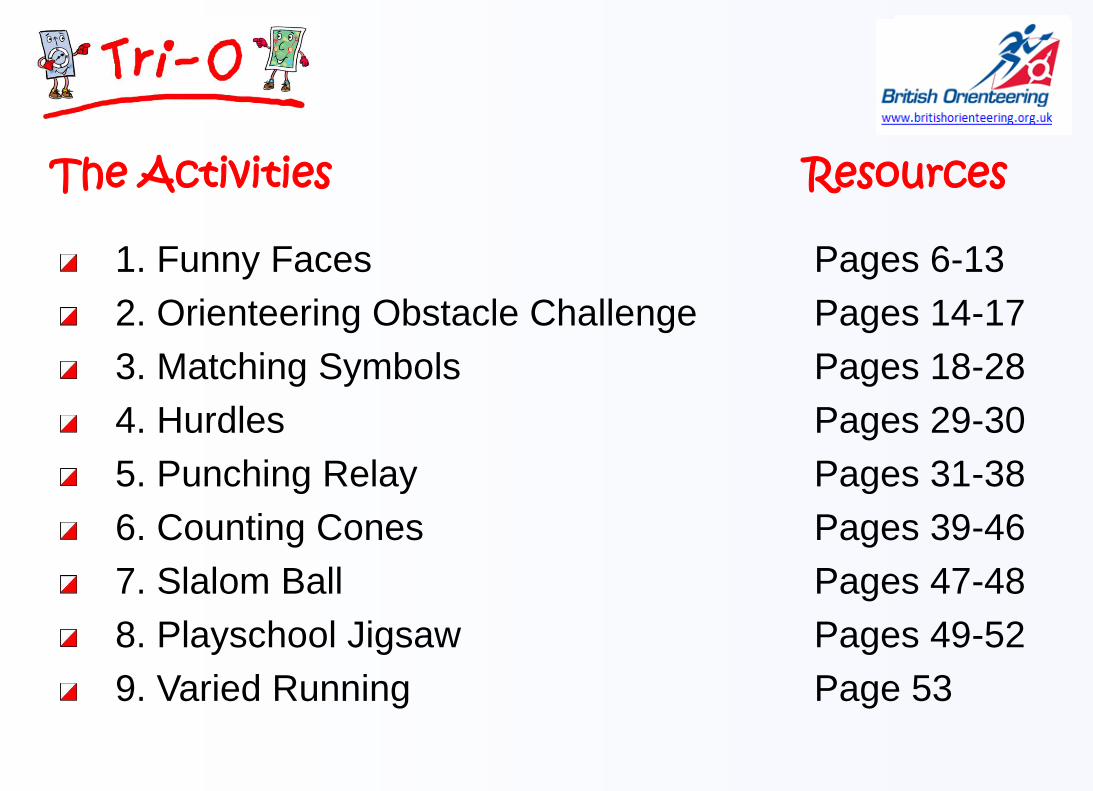
1. Funny Faces Pages 6-13
2. Orienteering Obstacle Challenge Pages 14-17
3. Matching Symbols Pages 18-28
4. Hurdles Pages 29-30
5. Punching Relay Pages 31-38
6. Counting Cones Pages 39-46
7. Slalom Ball Pages 47-48
8. Playschool Jigsaw Pages 49-52
9. Varied Running Page 53
The Activities Resources
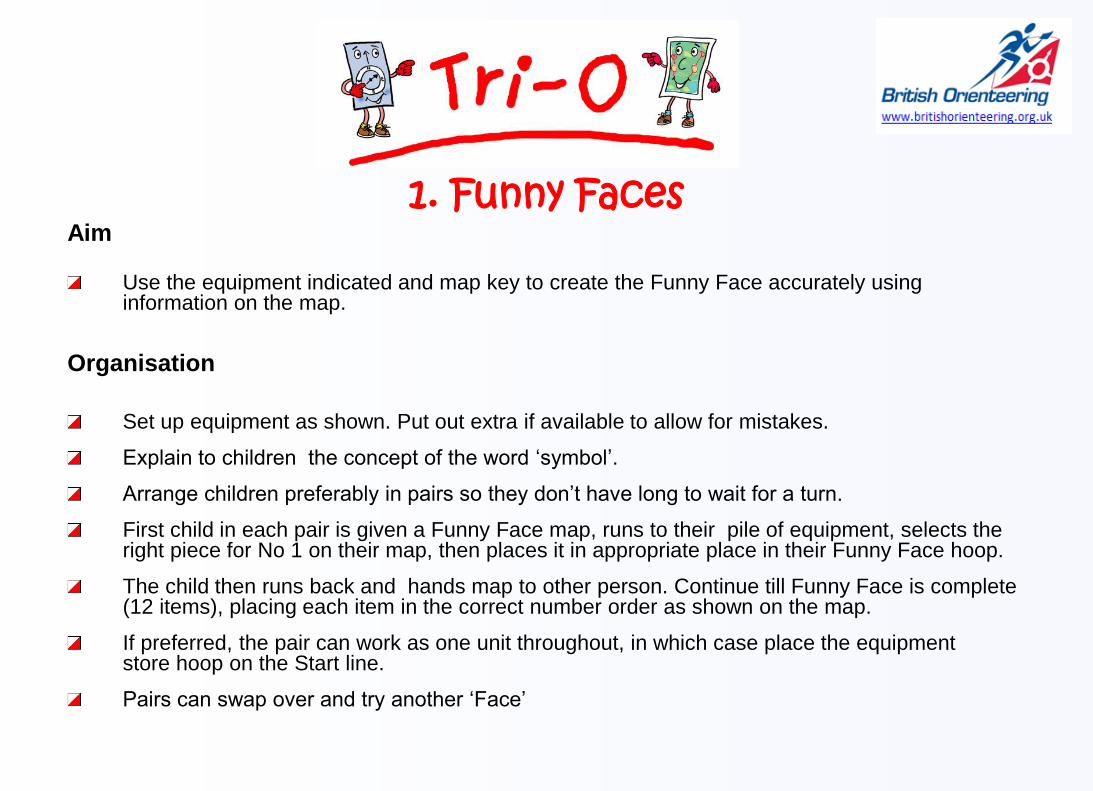
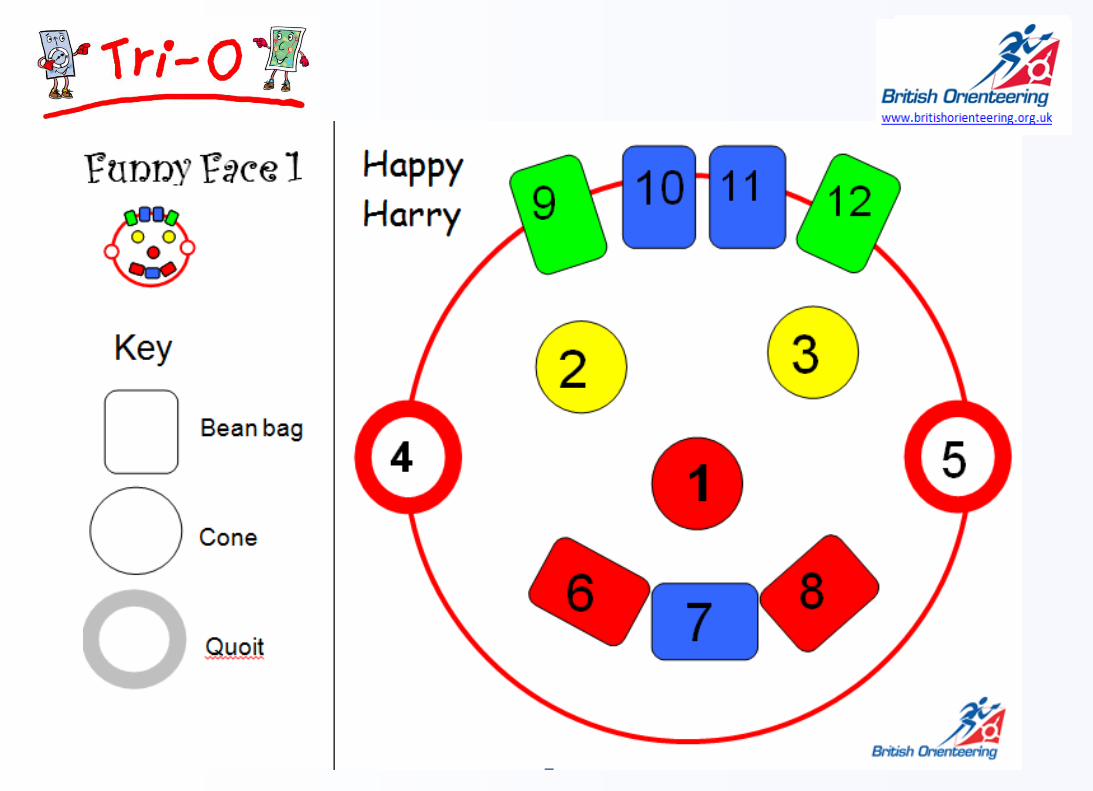
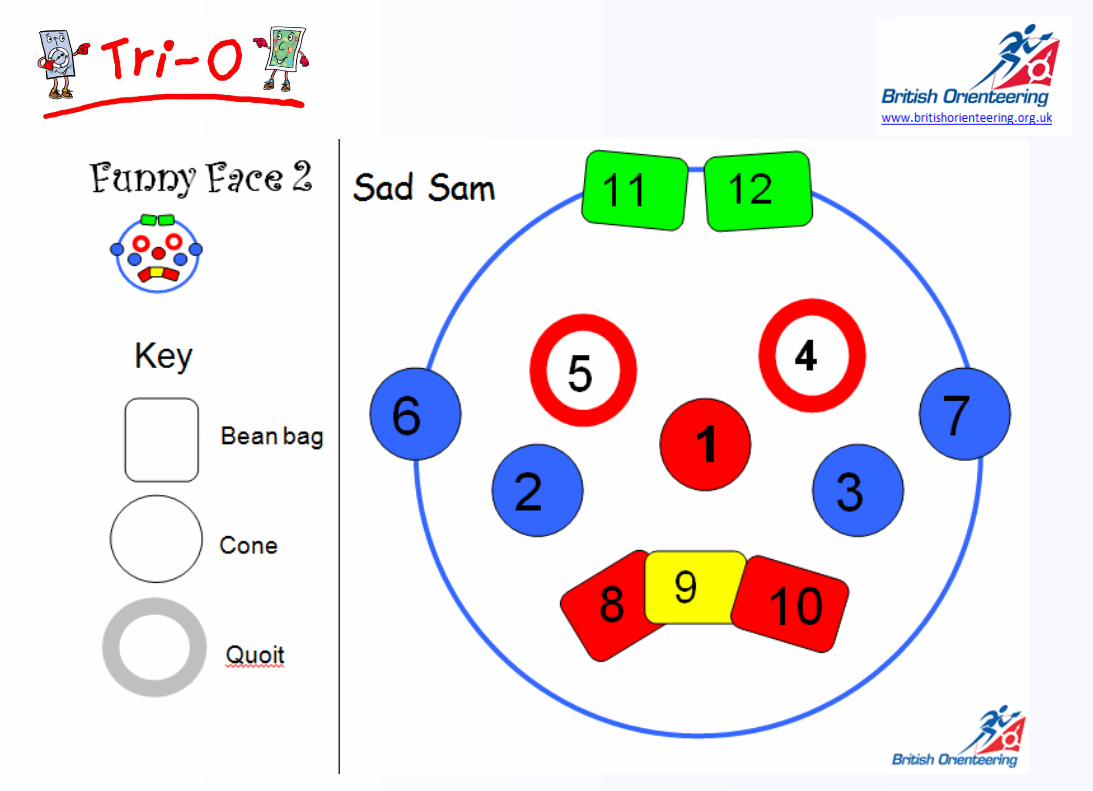
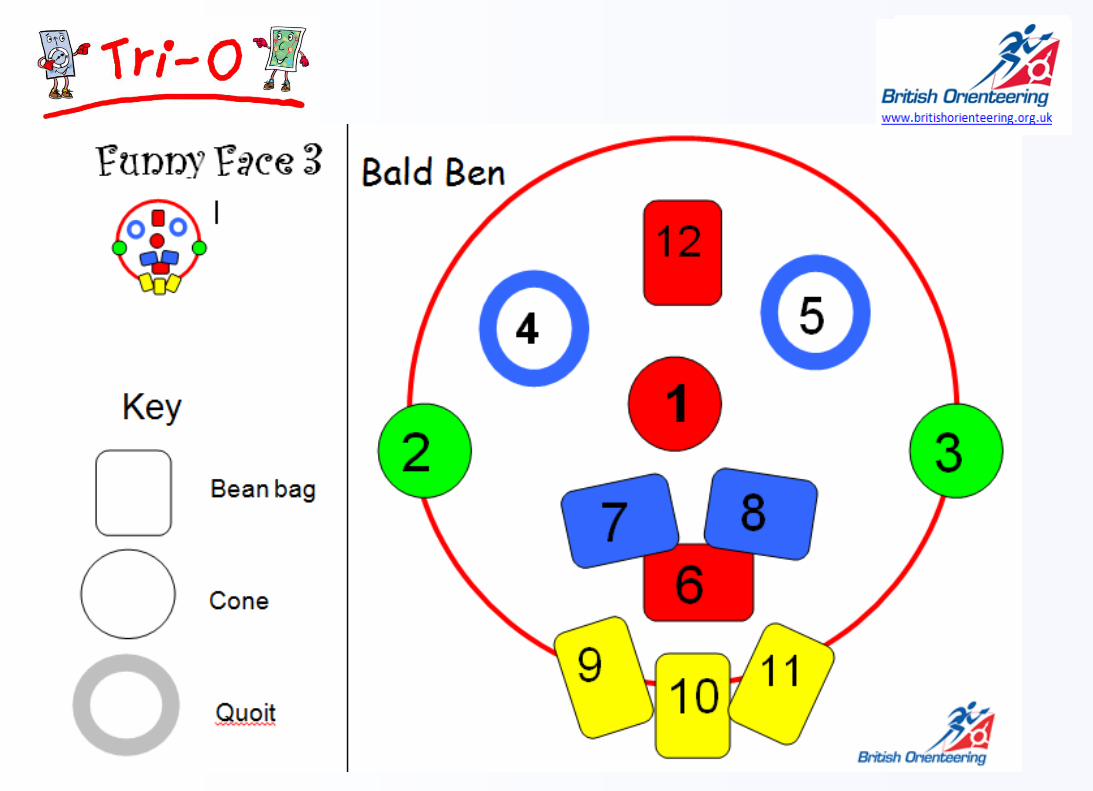
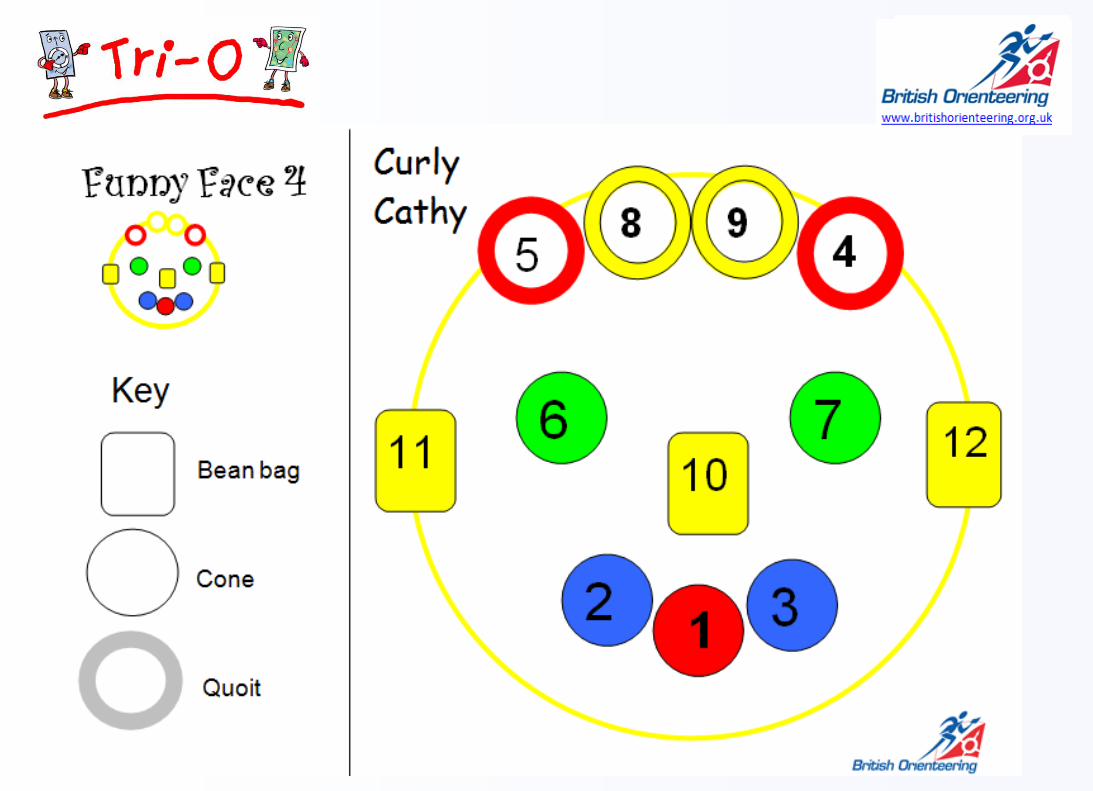
1. Funny Faces Aim
Use the equipment indicated and map key to create the Funny Face accurately using information on the map.
Organisation
Set up equipment as shown. Put out extra if available to allow for mistakes.
Explain to children the concept of the word ‘symbol’.
Arrange children preferably in pairs so they don’t have long to wait for a turn.
First child in each pair is given a Funny Face map, runs to their pile of equipment, selects the right piece for No 1 on their map, then places it in appropriate place in their Funny Face hoop.
The child then runs back and hands map to other person. Continue till Funny Face is complete (12 items), placing each item in the correct number order as shown on the map.
If preferred, the pair can work as one unit throughout, in which case place the equipment store hoop on the Start line.
Pairs can swap over and try another ‘Face’
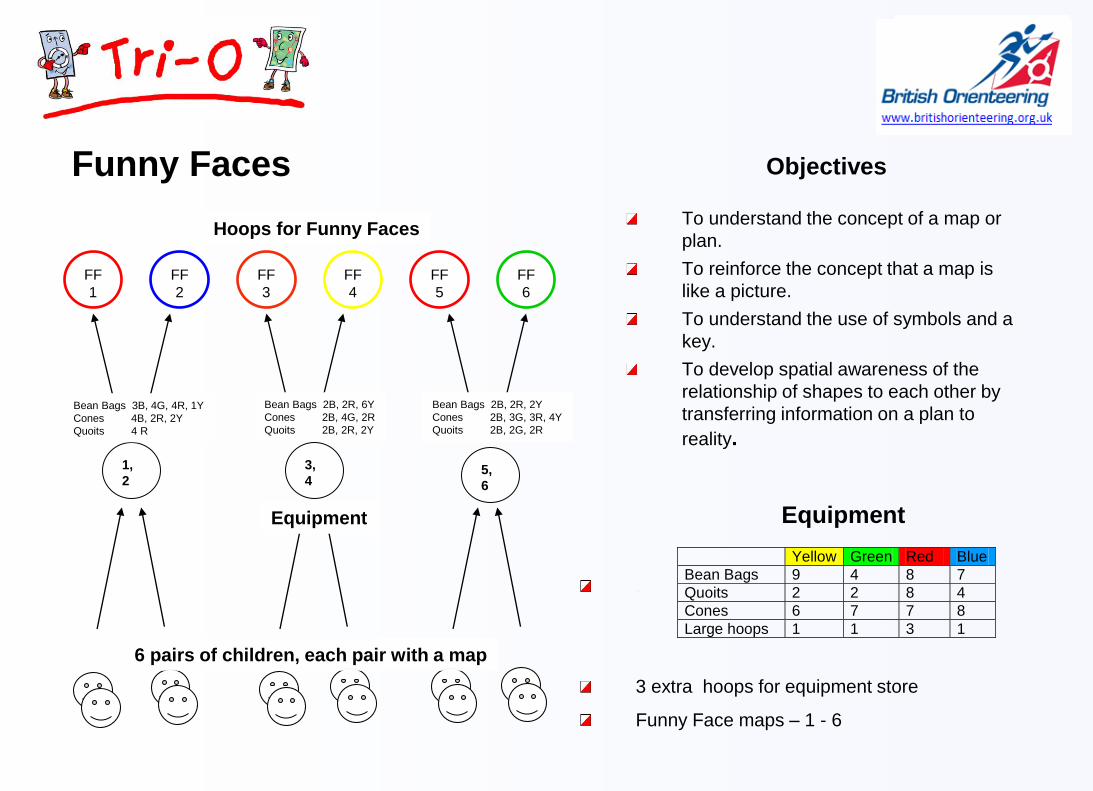
Objectives
To understand the concept of a map or
plan.
To reinforce the concept that a map is
like a picture.
To understand the use of symbols and a
key.
To develop spatial awareness of the
relationship of shapes to each other by
transferring information on a plan to
reality.
Funny Faces
Equipment
FF
1
FF
2
FF
3
FF
4
FF
5
FF
6
1,
2
3,
4 5,
6
Hoops for Funny Faces
6 pairs of children, each pair with a map
Equipment
Yellow Green Red Blue
Bean Bags 9 4 8 7
Quoits 2 2 8 4
Cones 6 7 7 8
Large hoops 1 1 3 1
.
3 extra hoops for equipment store
Funny Face maps – 1 - 6
Bean Bags 2B, 2R, 2Y
Cones 2B, 3G, 3R, 4Y
Quoits 2B, 2G, 2R
Bean Bags 3B, 4G, 4R, 1Y
Cones 4B, 2R, 2Y
Quoits 4 R
Bean Bags 2B, 2R, 6Y
Cones 2B, 4G, 2R
Quoits 2B, 2R, 2Y
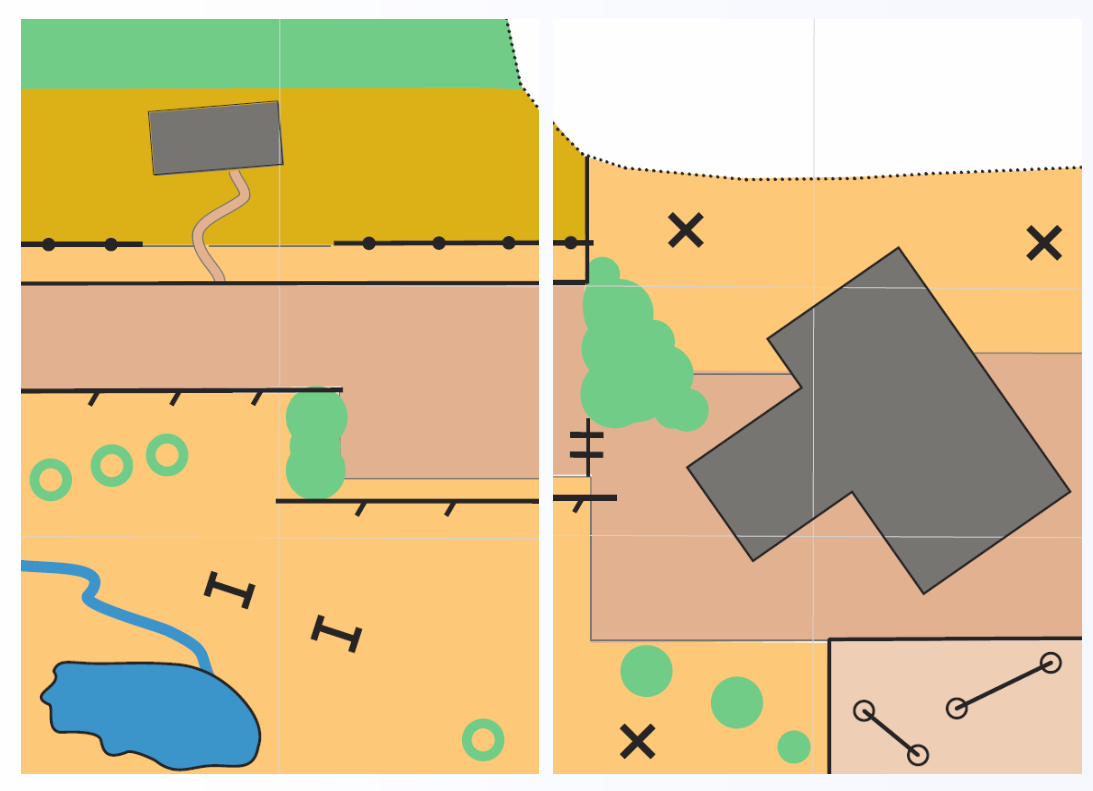
2. Orienteering Obstacle Challenge
Aim
To simulate a cross country leg of an orienteering course. A scoring option is available to introduce an element of competition.
Organisation
Set up the equipment using the full length of space available. The equipment/layout shown is a suggestion and may be altered or adapted. One set of equipment is needed for each group.
Put the children into small groups. These do not have to be the same size. For instance, with 10 children, split into 2 x 3, 1 x 4.
The course is run as a relay. Each child picks up a map at the start, negotiates the course as shown, holding the map, and deposits the map in the box at the end of the line.
The child then run back round the outside of the line of equipment to tag the next person, who then starts.
Carry on until the final whistle is blown. Allow practice time, then time the ‘competition’ for a set time which is the same for each group – e.g. 5 minutes
The total number of maps deposited in all the boxes at the far end is then the team score.
Objectives
To introduce a competitive element.
To encourage team support
To demonstrate all the physical skills
needed for orienteering: agility, balance,
co-ordination whilst holding or looking at
the map.
Orienteering Obstacle Challenge
Equipment
Dodge through the trees.
Walk carefully over the footbridge.
Pick up a bean bag, walk to cone,
balancing bean bag on head.
For each group:
2 map boxes
6 cones
5 mini hurdles or a ladder
4 spots or small hoops
2 large hoops or buckets
Stop watch (one for the whole activity)
Resource Obstacle map
Resource Score sheet. Only 1 copy is
needed per team.
Cross the swamp by jumping from
stepping stone to stepping stone.
map box bucket or hoop
hoop for
bean bags
spots or small
hoops
ladder or
mini hurdles
cones
map box
Step over fallen branches.
Start. Pick up a map.
cone Throw bean bag into bucket from
cone, then place map in box.
Run back to start. Tag next person.

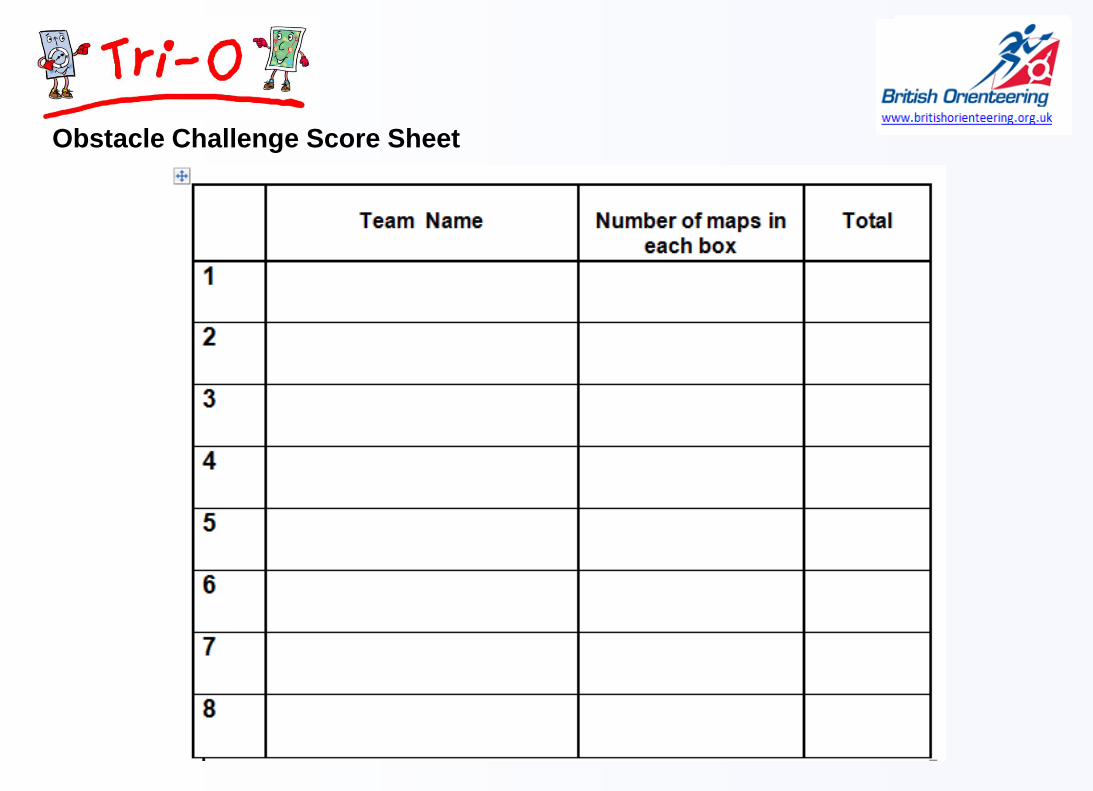
Obstacle Challenge Score Sheet
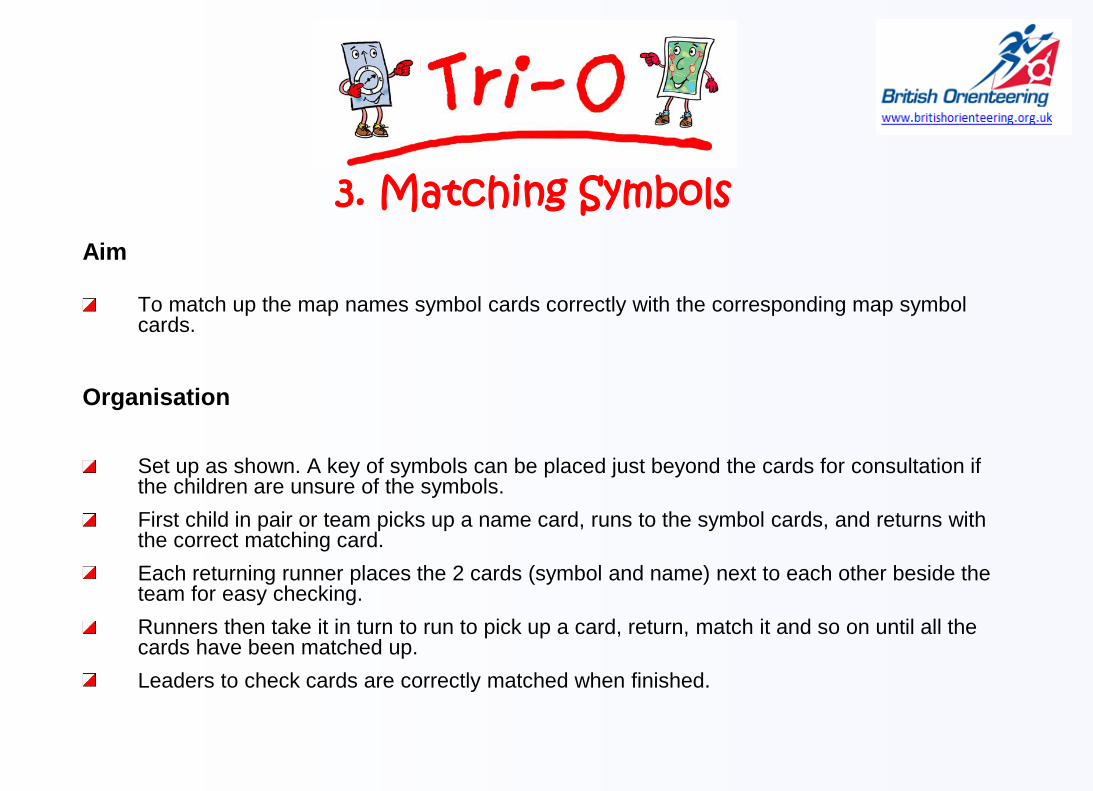
Aim
To match up the map names symbol cards correctly with the corresponding map symbol cards.
Organisation
Set up as shown. A key of symbols can be placed just beyond the cards for consultation if the children are unsure of the symbols.
First child in pair or team picks up a name card, runs to the symbol cards, and returns with the correct matching card.
Each returning runner places the 2 cards (symbol and name) next to each other beside the team for easy checking.
Runners then take it in turn to run to pick up a card, return, match it and so on until all the cards have been matched up.
Leaders to check cards are correctly matched when finished.
3. Matching Symbols
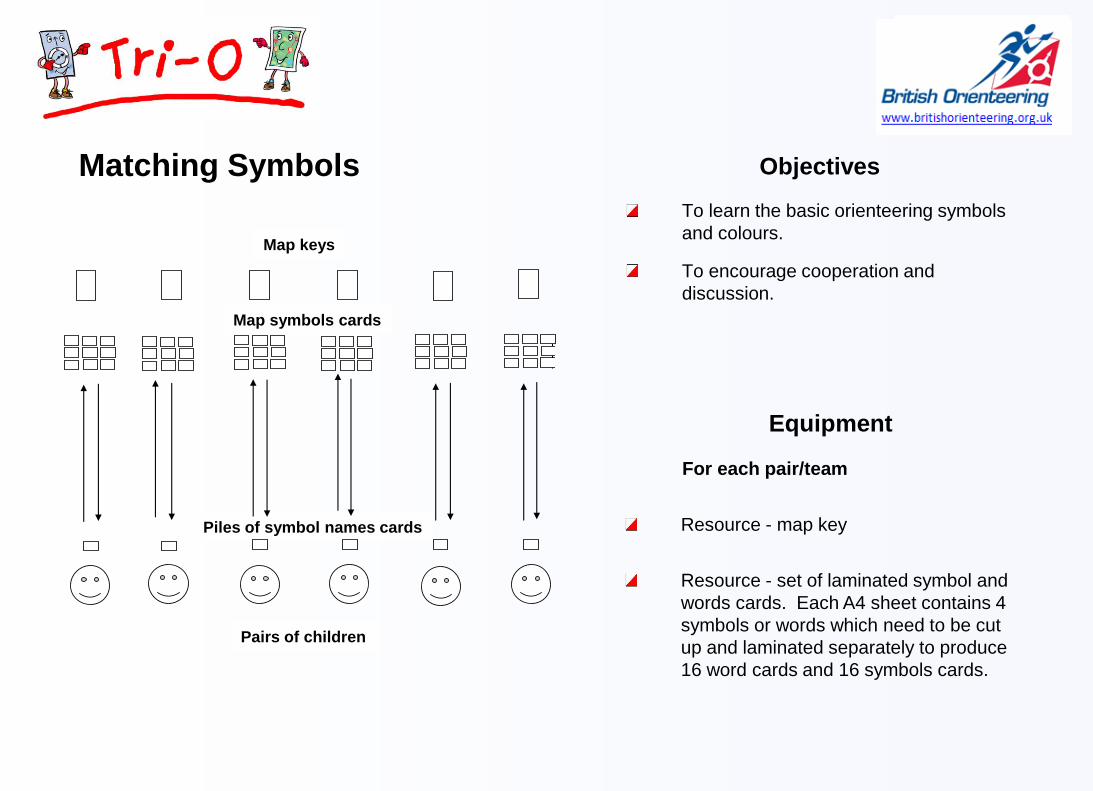
Objectives
To learn the basic orienteering symbols
and colours.
To encourage cooperation and
discussion.
Matching Symbols
Equipment
Pairs of children
Map keys
Piles of symbol names cards
For each pair/team
Resource - map key
Resource - set of laminated symbol and
words cards. Each A4 sheet contains 4
symbols or words which need to be cut
up and laminated separately to produce
16 word cards and 16 symbols cards.
Map symbols cards
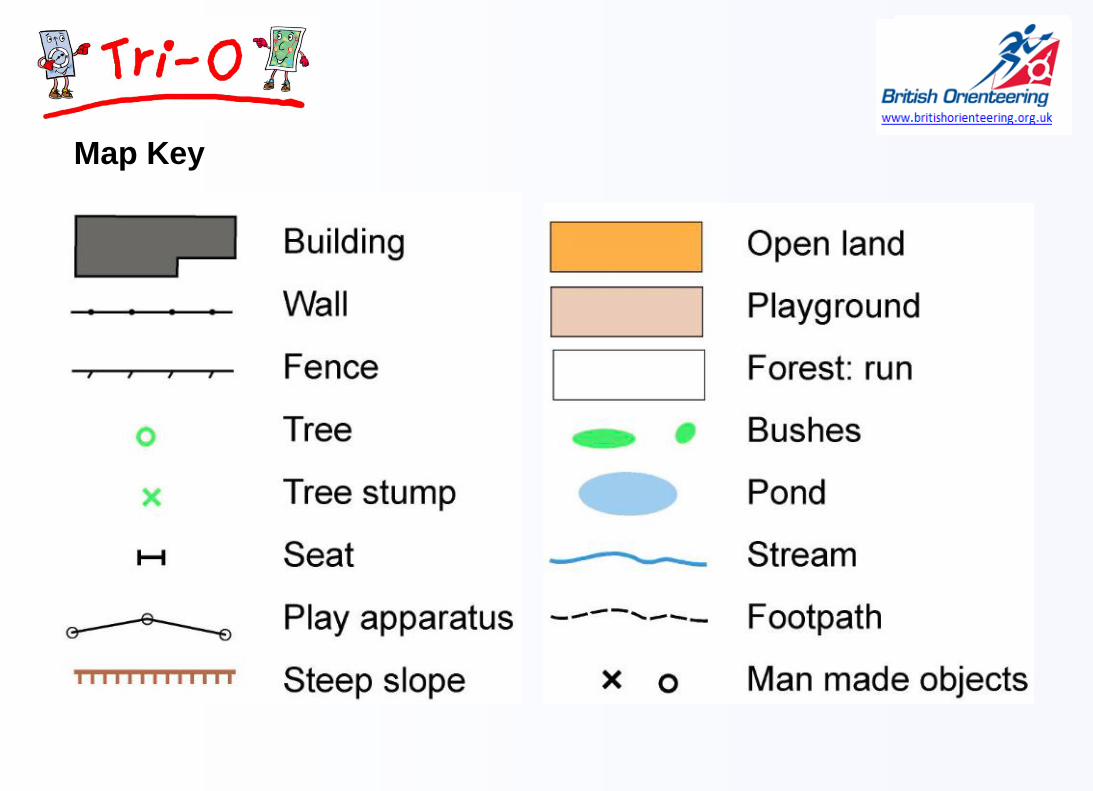
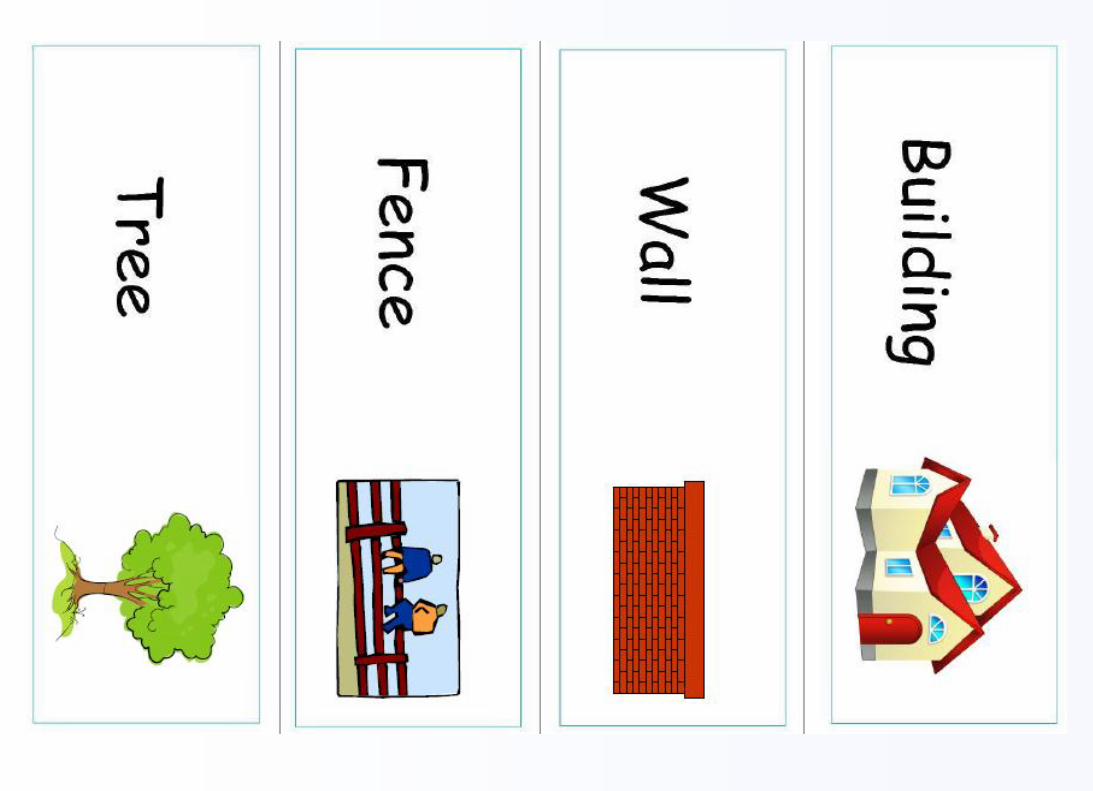
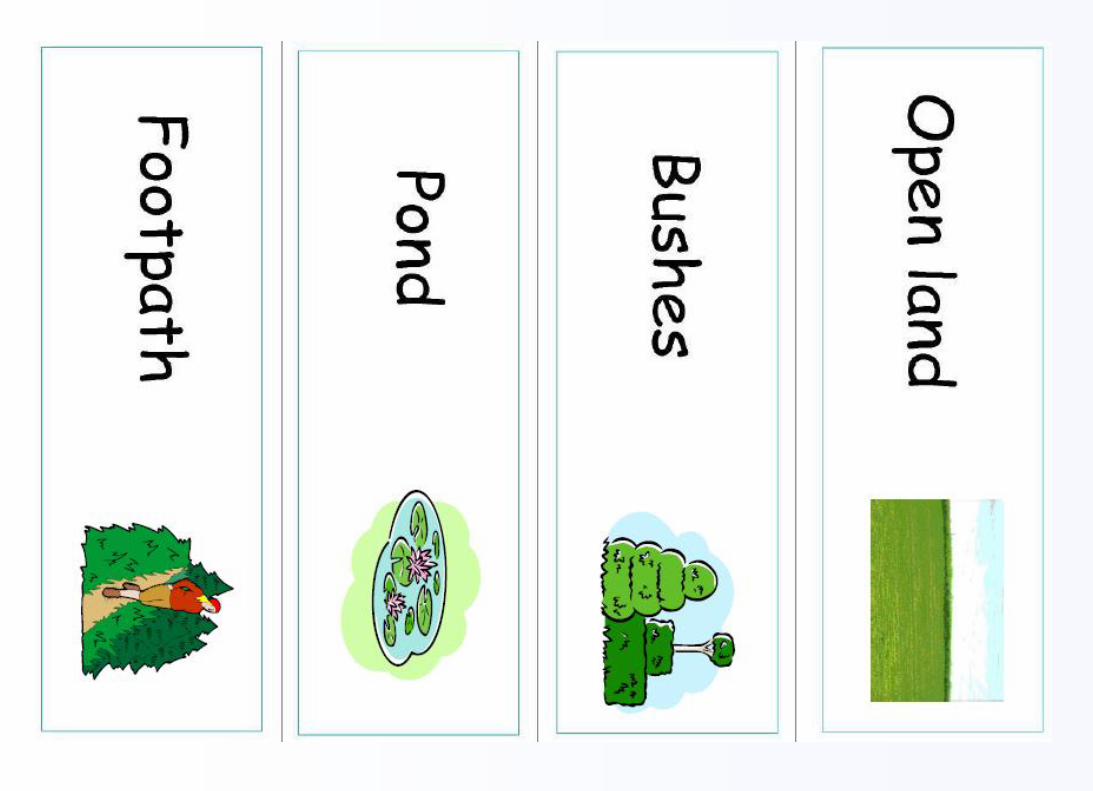
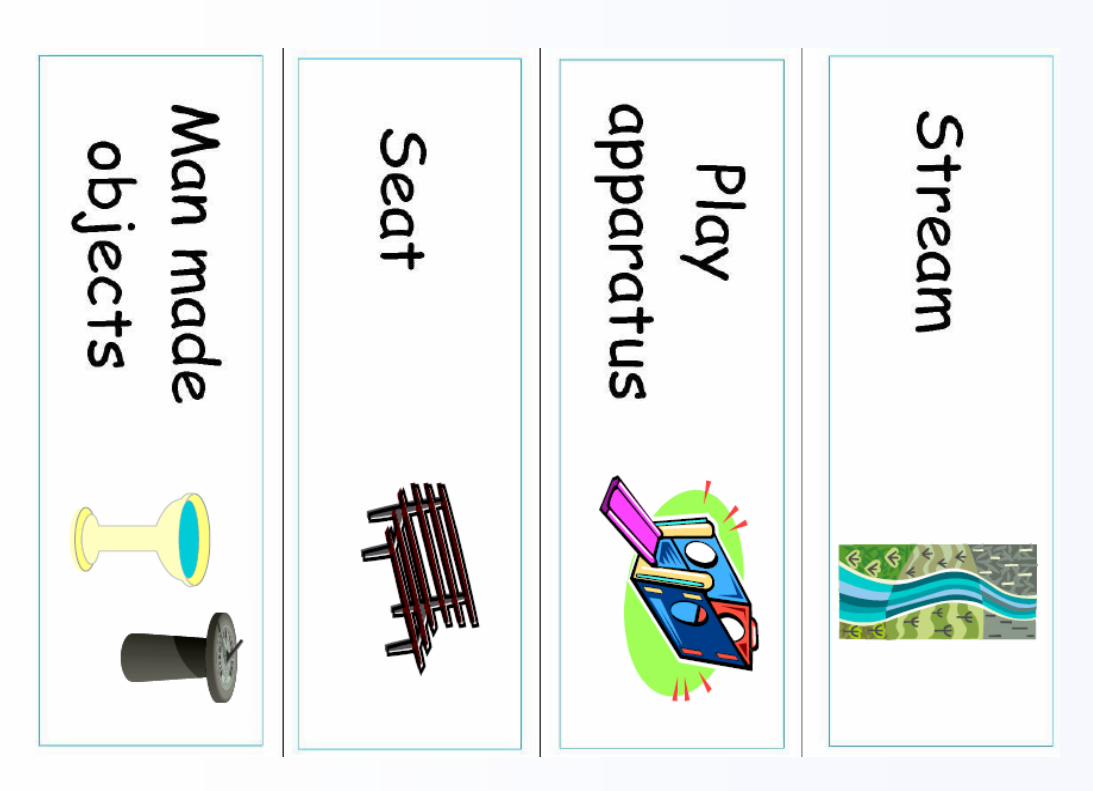
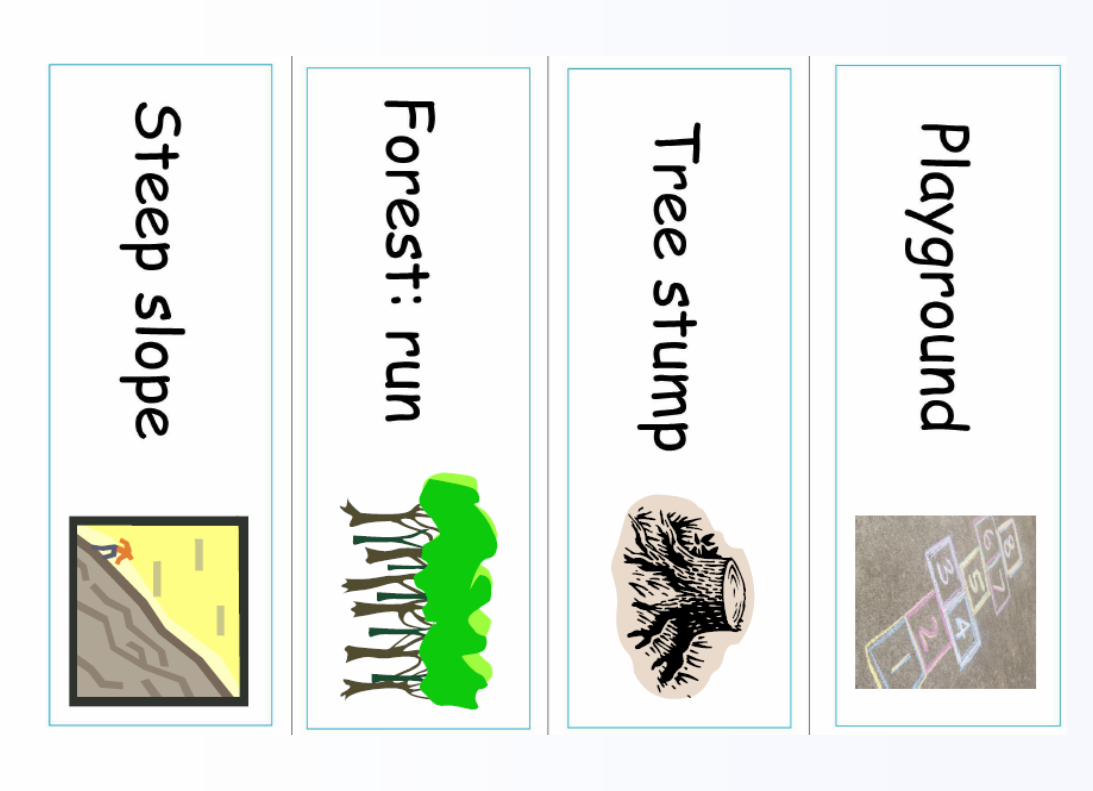
Map Key
Aim
Development of agility and running technique for through terrain.
Organisation
Lay out 2 sets of equipment. Place 3 hurdles using length of hurdle as a guide for distance.
between each. Place flat spot 15m beyond last hurdle. Feet of hurdles should face feet of child.
Arrange children into 2 groups in front of hurdles.
Left leg only over hurdle.
Right leg only over hurdle – move spots to left side of hurdle.
Both legs over hurdles – move spots to middle of hurdle, both feet down between each hurdle,
right leg lead and left leg lead.
Step over hurdles – one foot between each hurdle.
Continue all steps by jogging through hurdles, if time allows continue increasing speed.
Check: Foot placement should be forward, head up, no looking down, arms in 90 degree
position.
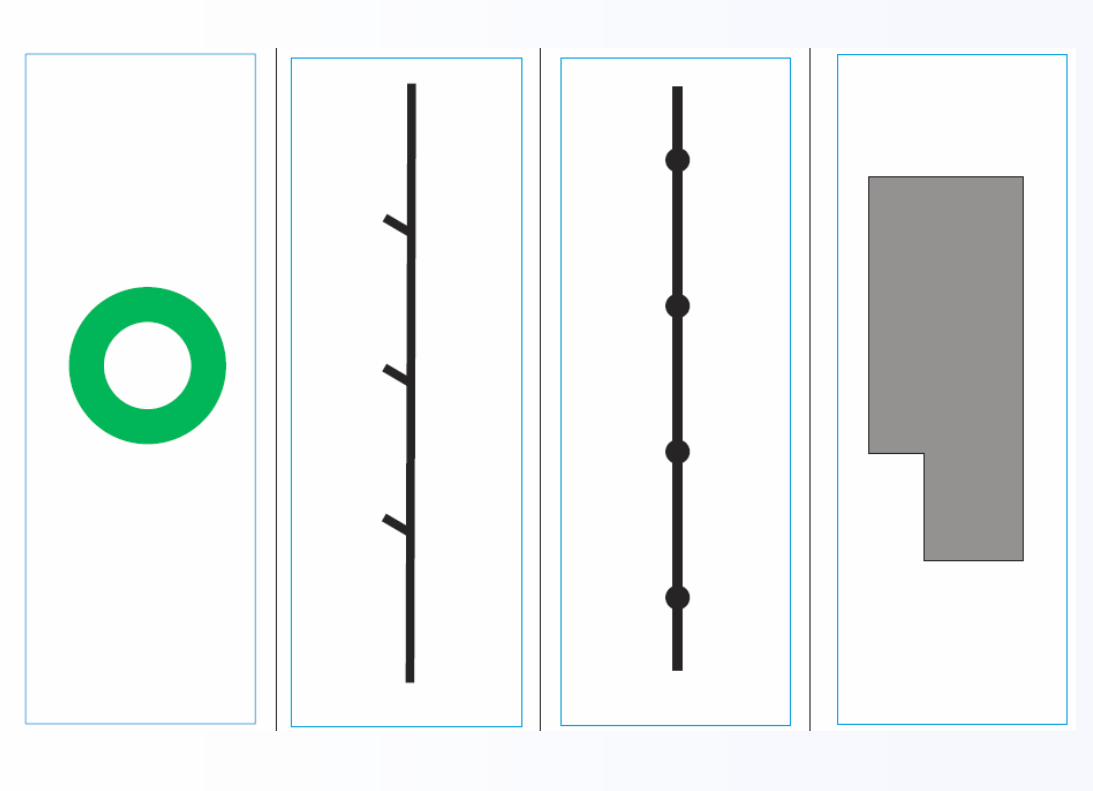
4. Hurdles
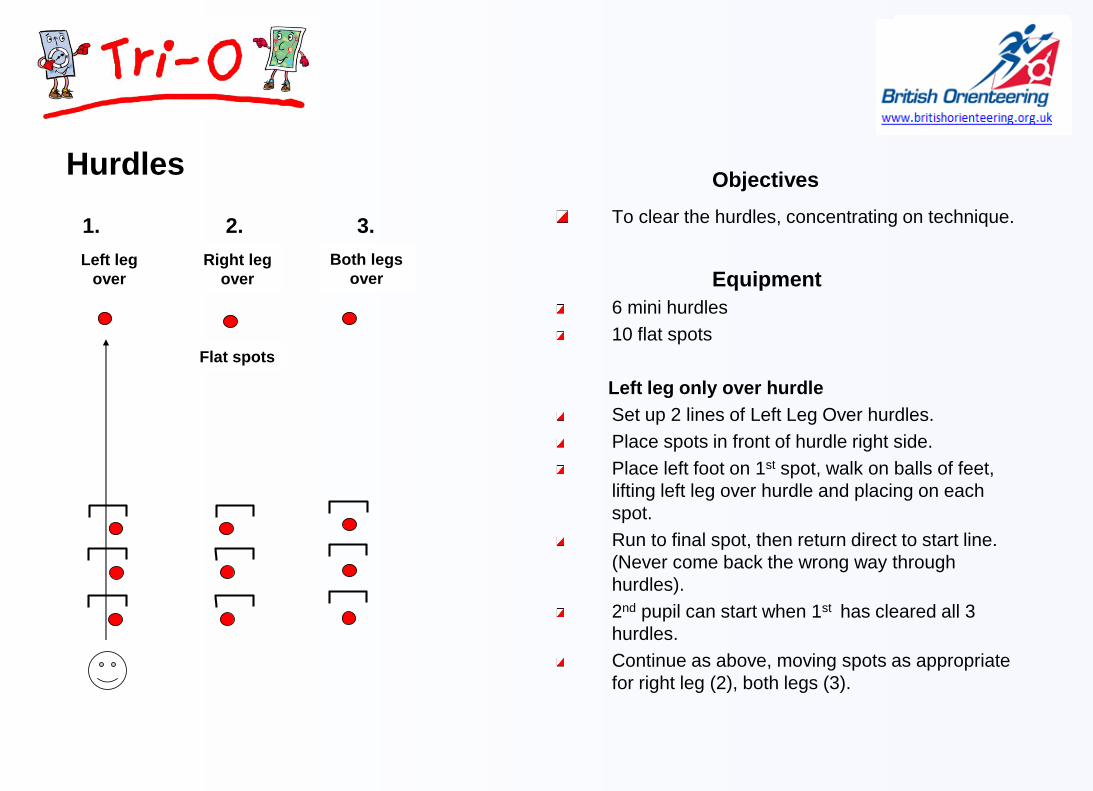
Hurdles Objectives
To clear the hurdles, concentrating on technique.
Equipment
6 mini hurdles
10 flat spots
Left leg only over hurdle
Set up 2 lines of Left Leg Over hurdles.
Place spots in front of hurdle right side.
Place left foot on 1st spot, walk on balls of feet,
lifting left leg over hurdle and placing on each
spot.
Run to final spot, then return direct to start line.
(Never come back the wrong way through
hurdles).
2nd pupil can start when 1st has cleared all 3
hurdles.
Continue as above, moving spots as appropriate
for right leg (2), both legs (3).
Flat spots
Left leg
over
Right leg
over
Both legs
over
1. 2. 3.
Aim
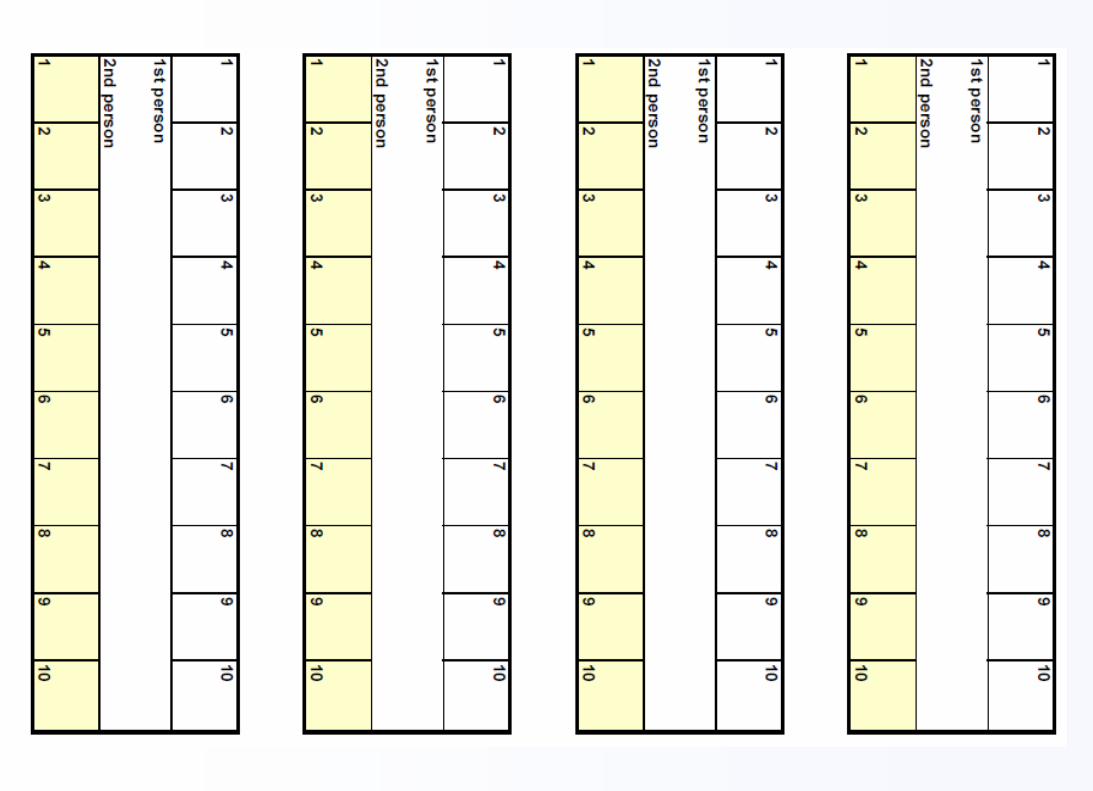
To punch the control card accurately, with the correct punch patterns in the corresponding numbered boxes on the card.
Organisation
Hang the 10 markers in number order with punches attached spaced out along one side of the boundary. Tie to fence, or if none is available, tie on to a rounders posts or cones.
Line the pairs up, spaced out, opposite the punches/markers. Give each pair a control card.
The first child runs to the marker opposite, and punches the control card in the correct square on the top row, then returns and hands over to the 2nd child.
The 2nd child runs to the same marker and punches the card in the correct square on the bottom row, then returns and hands the card back to the 1st child.
Children continue, taking it in turns, until they have each completed their row on the control card. They can punch each square in any order after their first turn.
Leader to check cards are punched correctly when finished.
5. Punching Relay
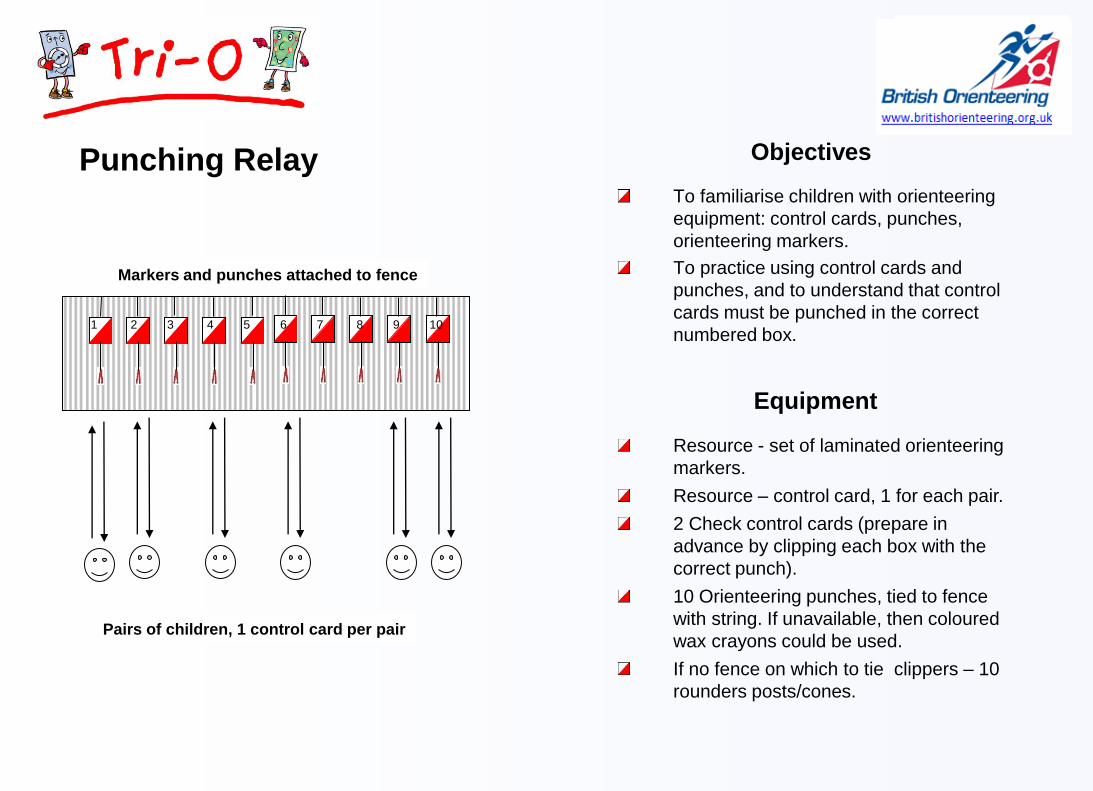
Objectives
To familiarise children with orienteering
equipment: control cards, punches,
orienteering markers.
To practice using control cards and
punches, and to understand that control
cards must be punched in the correct
numbered box.
Punching Relay
Equipment
Pairs of children, 1 control card per pair
Markers and punches attached to fence
Resource - set of laminated orienteering
markers.
Resource – control card, 1 for each pair.
2 Check control cards (prepare in
advance by clipping each box with the
correct punch).
10 Orienteering punches, tied to fence
with string. If unavailable, then coloured
wax crayons could be used.
If no fence on which to tie clippers – 10
rounders posts/cones.
1 2 3 4 5 6 7 8 9 10


Aim
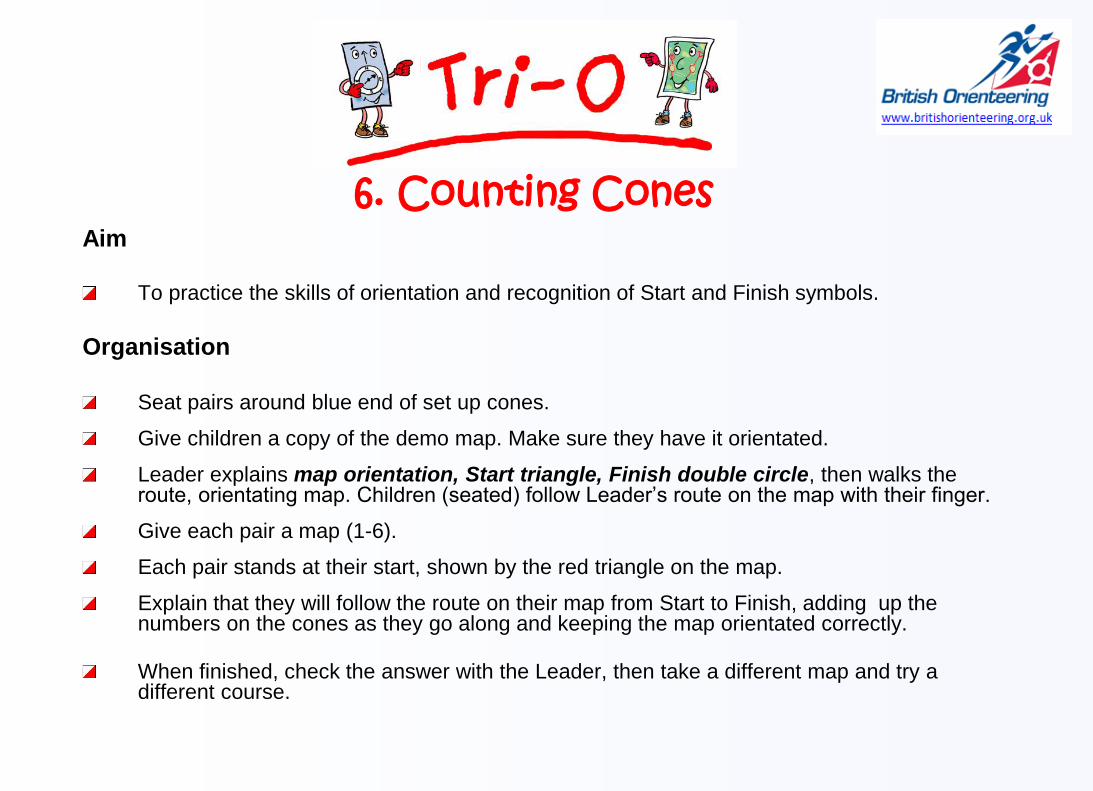
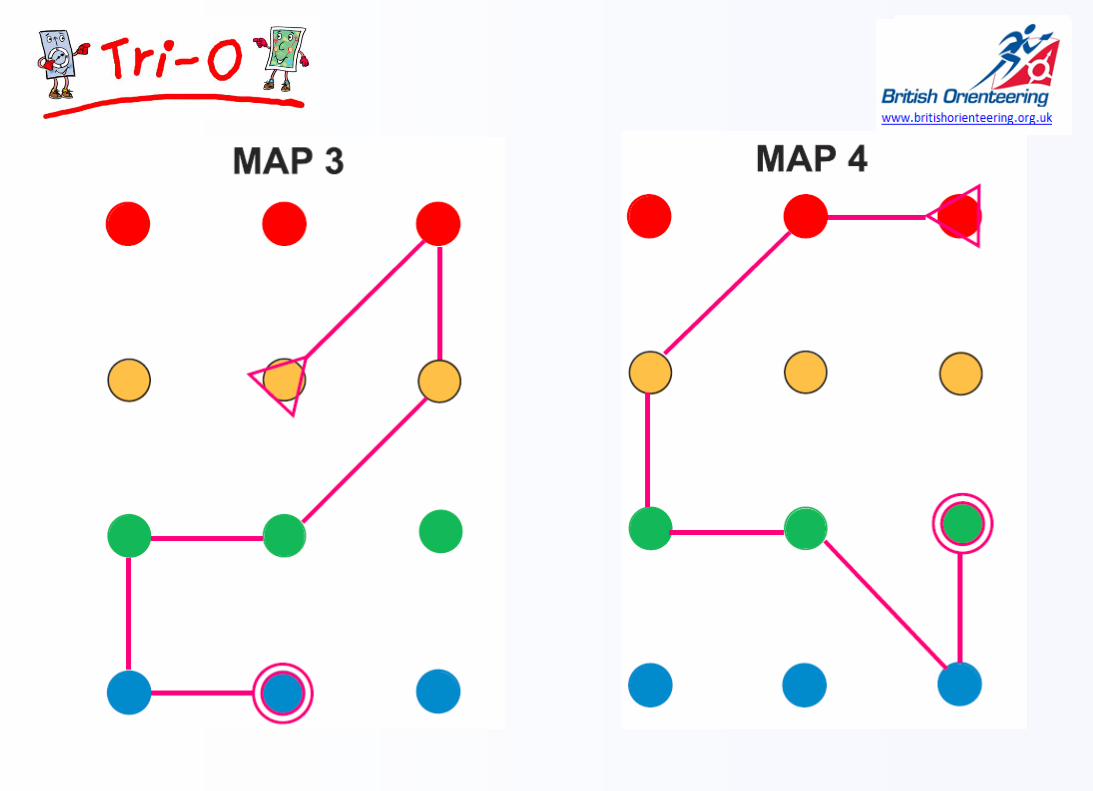
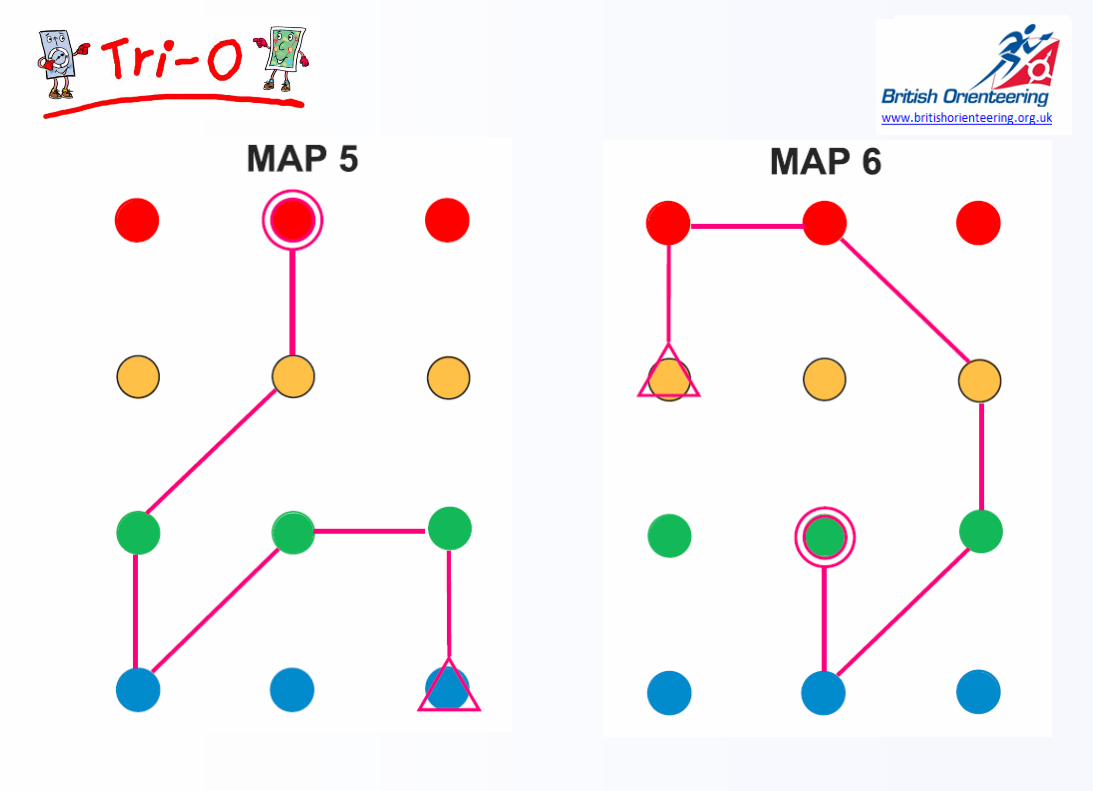
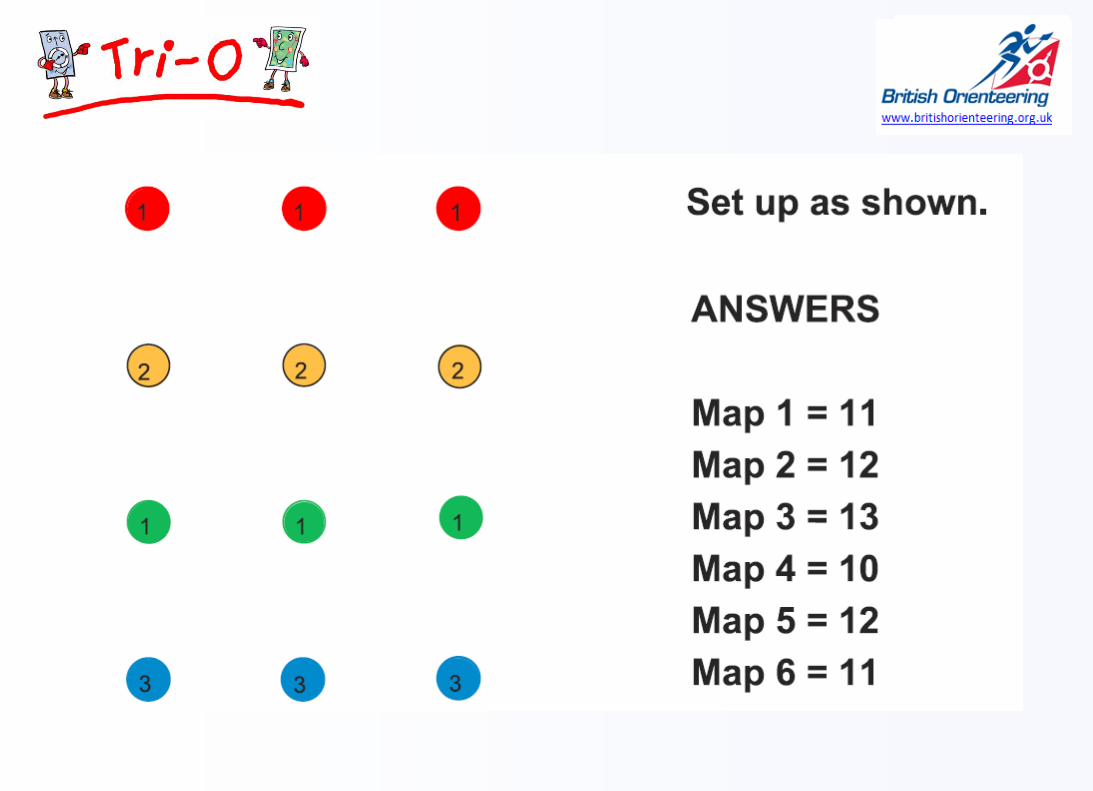
To practice the skills of orientation and recognition of Start and Finish symbols.
Organisation
Seat pairs around blue end of set up cones.
Give children a copy of the demo map. Make sure they have it orientated.
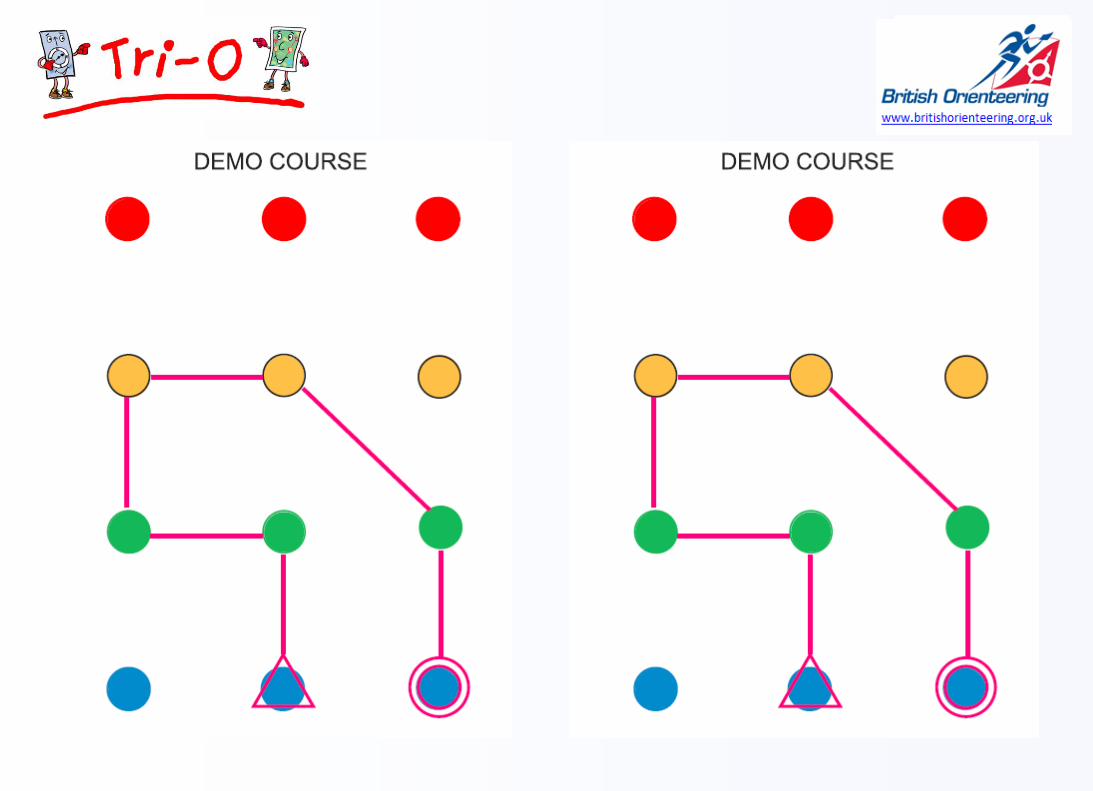
Leader explains map orientation, Start triangle, Finish double circle, then walks the route, orientating map. Children (seated) follow Leader’s route on the map with their finger.
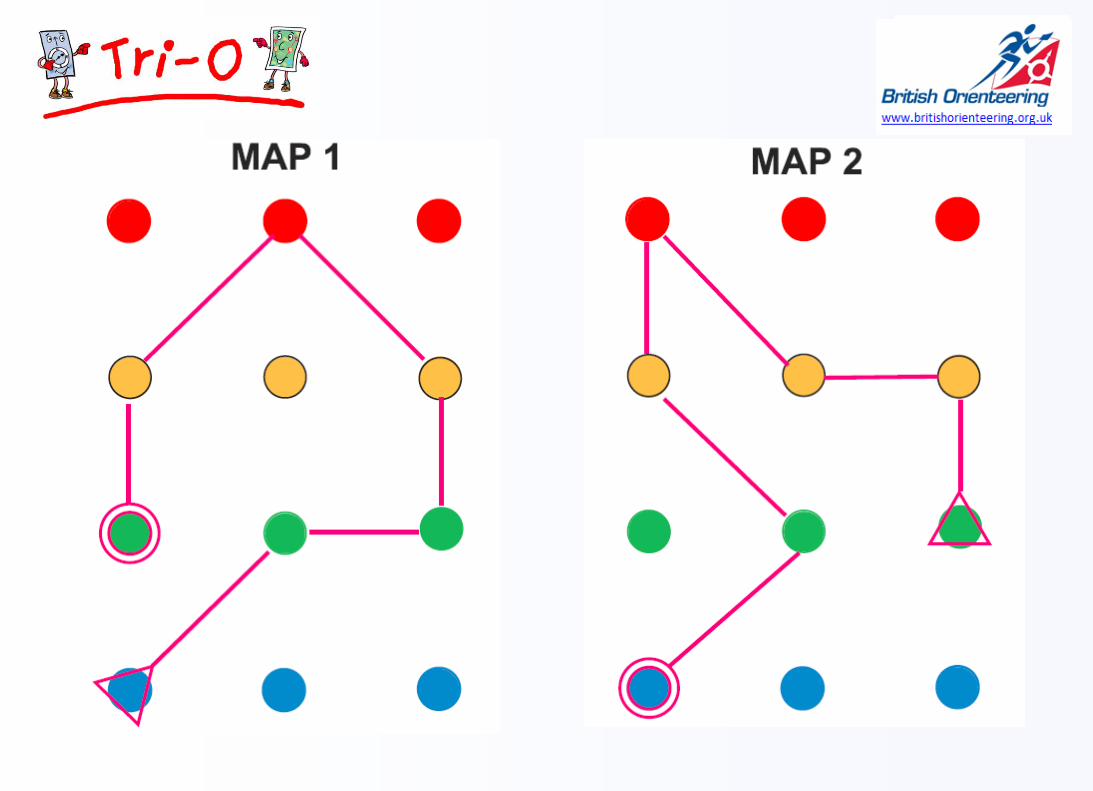
Give each pair a map (1-6).
Each pair stands at their start, shown by the red triangle on the map.
Explain that they will follow the route on their map from Start to Finish, adding up the numbers on the cones as they go along and keeping the map orientated correctly.
When finished, check the answer with the Leader, then take a different map and try a different course.
6. Counting Cones
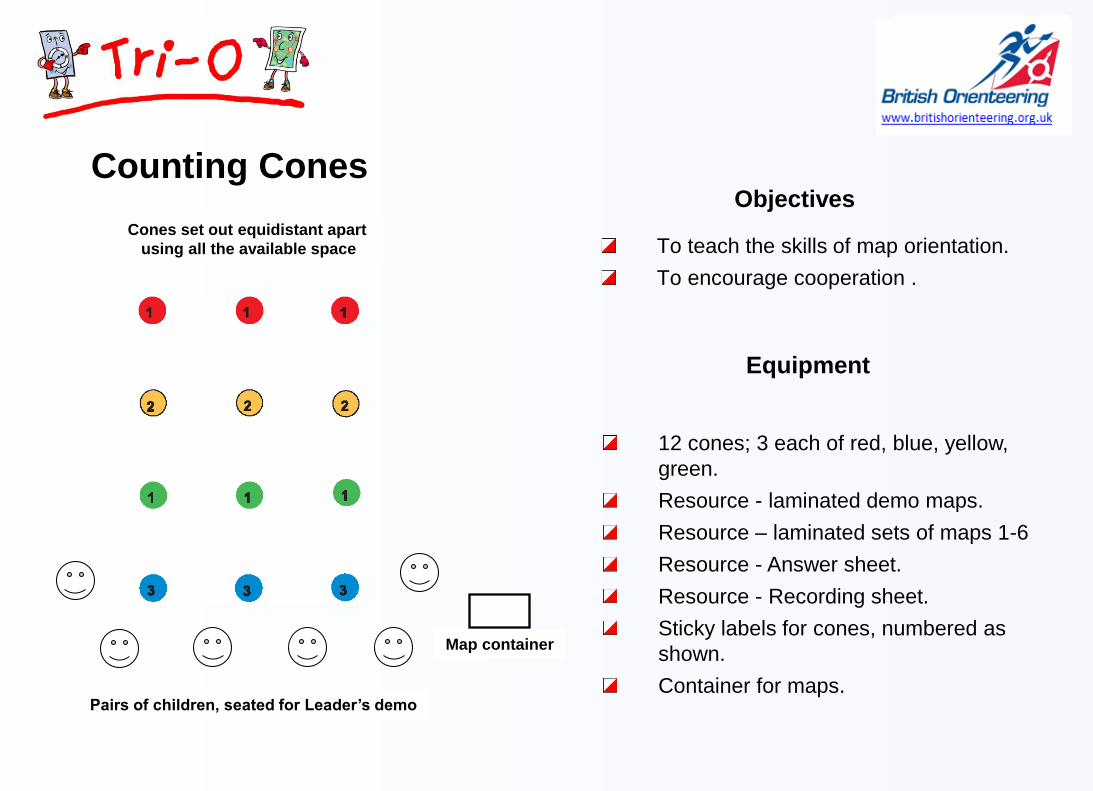
Objectives
To teach the skills of map orientation.
To encourage cooperation .
Counting Cones
Equipment
Pairs of children, seated for Leader’s demo
Cones set out equidistant apart
using all the available space
Map container
12 cones; 3 each of red, blue, yellow,
green.
Resource - laminated demo maps.
Resource – laminated sets of maps 1-6
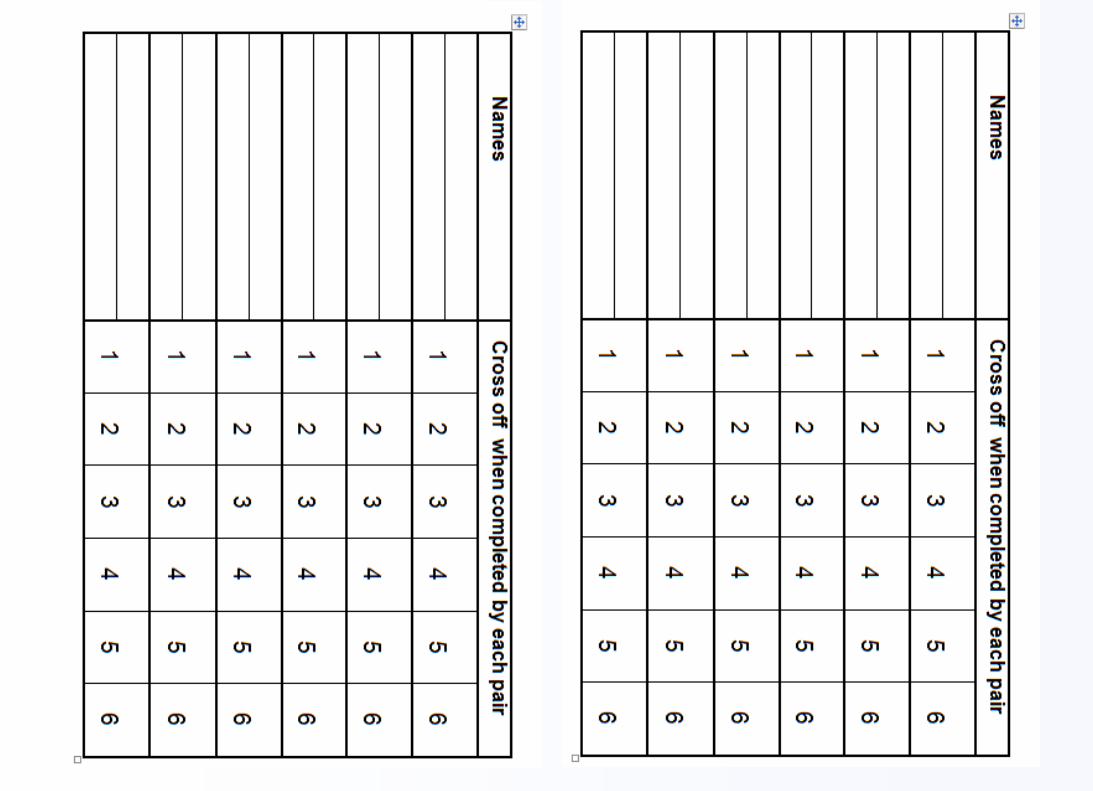
Resource - Answer sheet.
Resource - Recording sheet.
Sticky labels for cones, numbered as
shown.
Container for maps.
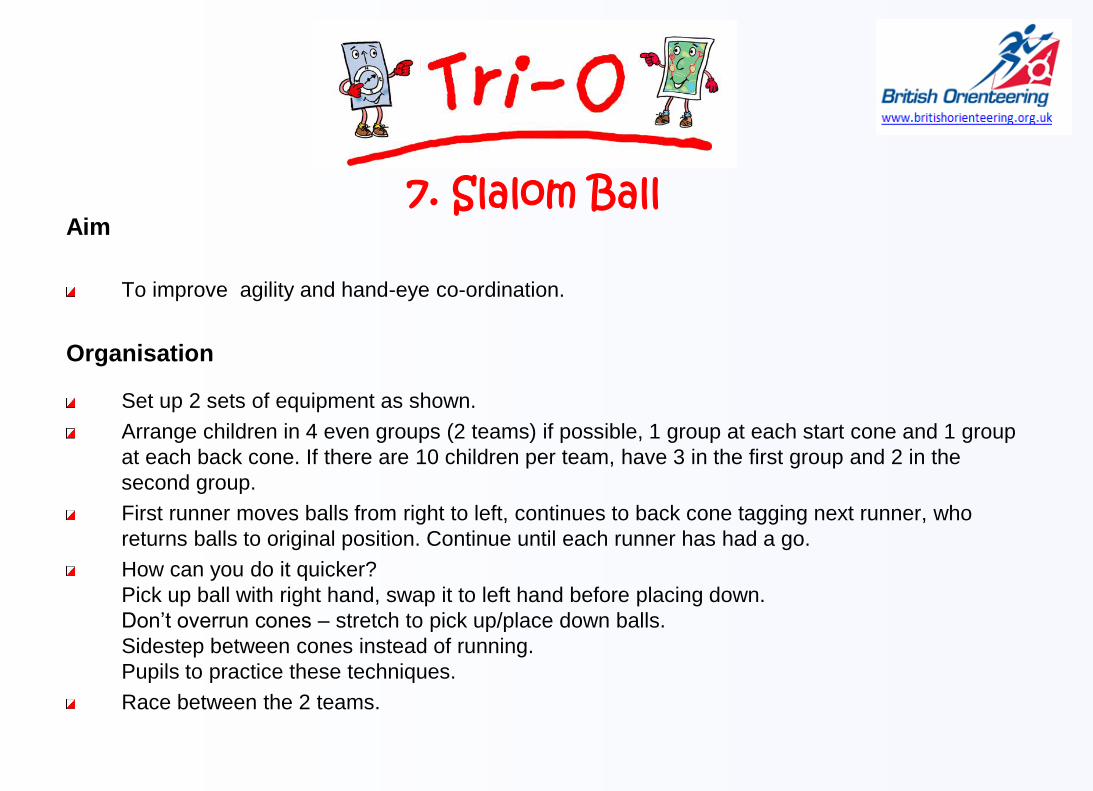
Aim
To improve agility and hand-eye co-ordination.
Organisation
Set up 2 sets of equipment as shown.
Arrange children in 4 even groups (2 teams) if possible, 1 group at each start cone and 1 group
at each back cone. If there are 10 children per team, have 3 in the first group and 2 in the
second group.
First runner moves balls from right to left, continues to back cone tagging next runner, who
returns balls to original position. Continue until each runner has had a go.
How can you do it quicker?
Pick up ball with right hand, swap it to left hand before placing down.
Don’t overrun cones – stretch to pick up/place down balls.
Sidestep between cones instead of running.
Pupils to practice these techniques.
Race between the 2 teams.
7. Slalom Ball
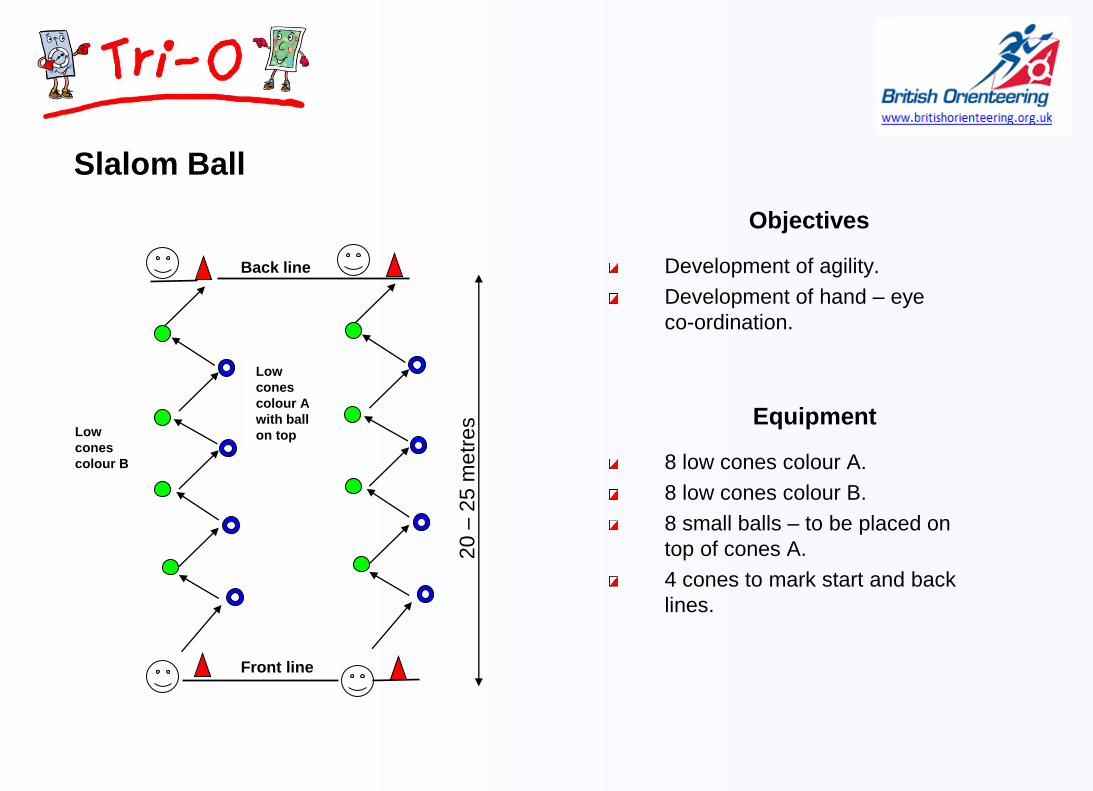
Slalom Ball
Objectives
Development of agility.
Development of hand – eye
co-ordination.
Equipment
8 low cones colour A.
8 low cones colour B.
8 small balls – to be placed on
top of cones A.
4 cones to mark start and back
lines.
Back line
Front line
Low
cones
colour B
Low
cones
colour A
with ball
on top
20
– 2
5 m
etr
es
Aim
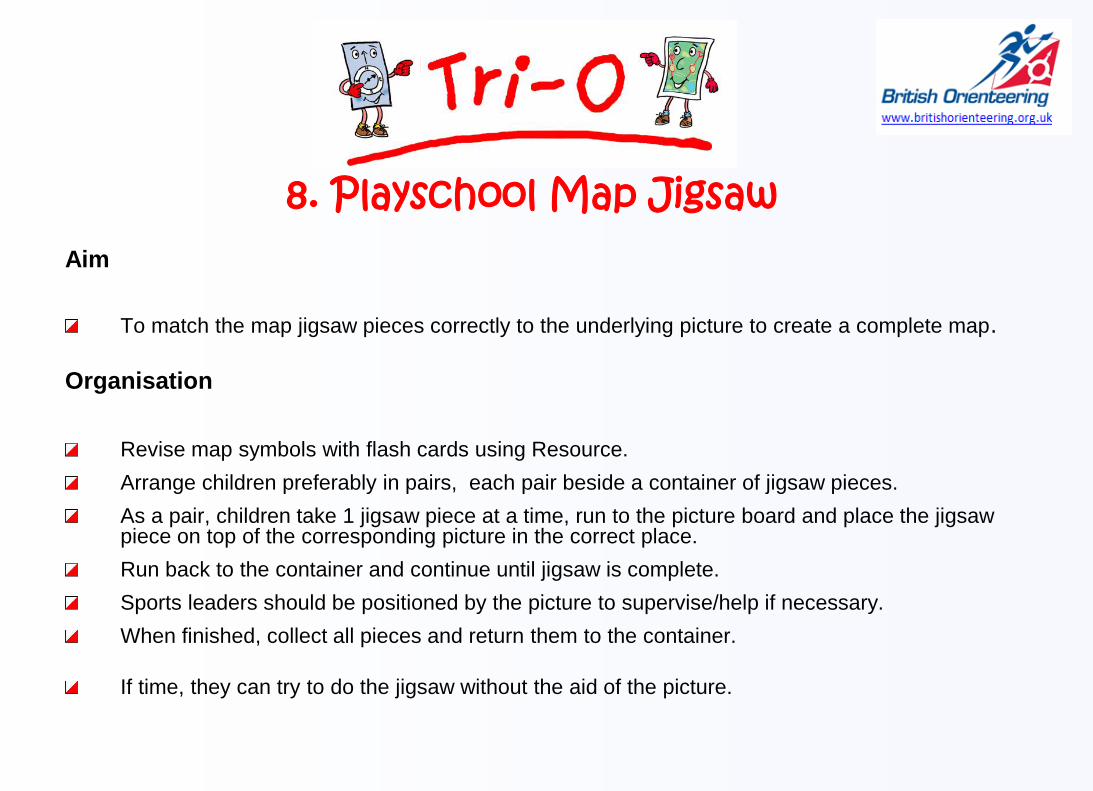
To match the map jigsaw pieces correctly to the underlying picture to create a complete map.
Organisation
Revise map symbols with flash cards using Resource.
Arrange children preferably in pairs, each pair beside a container of jigsaw pieces.
As a pair, children take 1 jigsaw piece at a time, run to the picture board and place the jigsaw piece on top of the corresponding picture in the correct place.
Run back to the container and continue until jigsaw is complete.
Sports leaders should be positioned by the picture to supervise/help if necessary.
When finished, collect all pieces and return them to the container.
If time, they can try to do the jigsaw without the aid of the picture.
8. Playschool Map Jigsaw
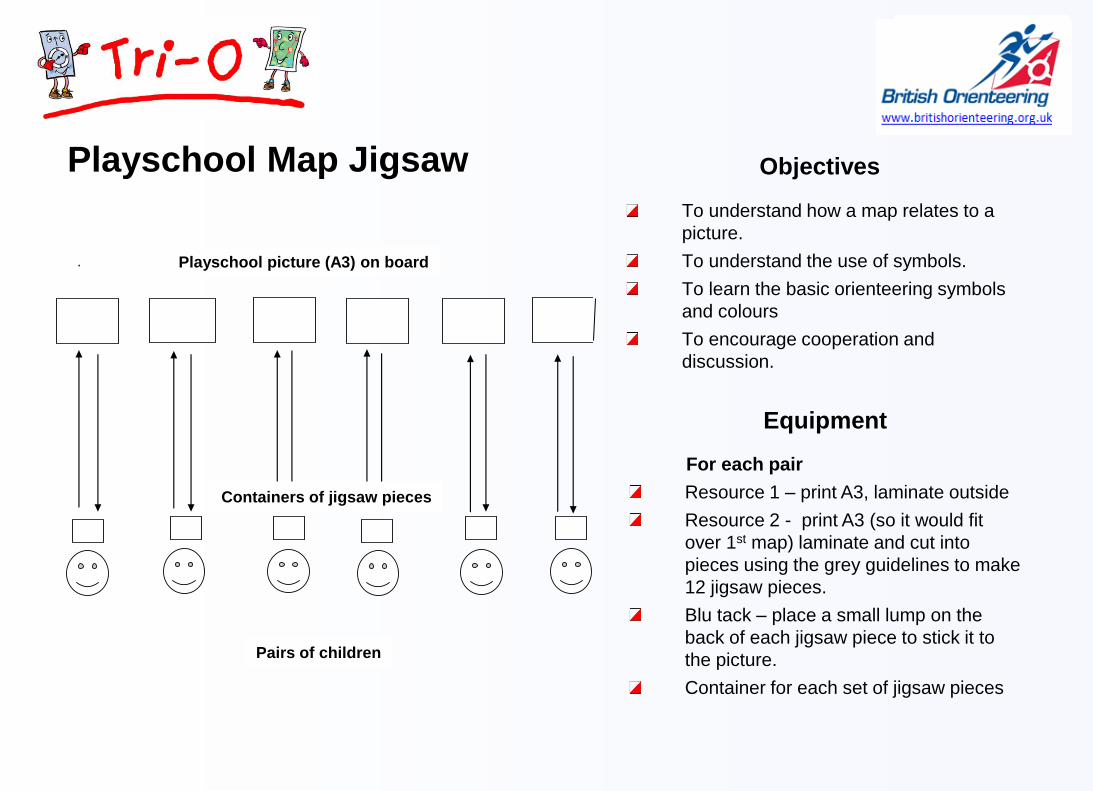
Objectives
To understand how a map relates to a
picture.
To understand the use of symbols.
To learn the basic orienteering symbols
and colours
To encourage cooperation and
discussion.
Playschool Map Jigsaw
Equipment
Pairs of children
Playschool picture (A3) on board
.
Containers of jigsaw pieces
For each pair
Resource 1 – print A3, laminate outside
Resource 2 - print A3 (so it would fit
over 1st map) laminate and cut into
pieces using the grey guidelines to make
12 jigsaw pieces.
Blu tack – place a small lump on the
back of each jigsaw piece to stick it to
the picture.
Container for each set of jigsaw pieces

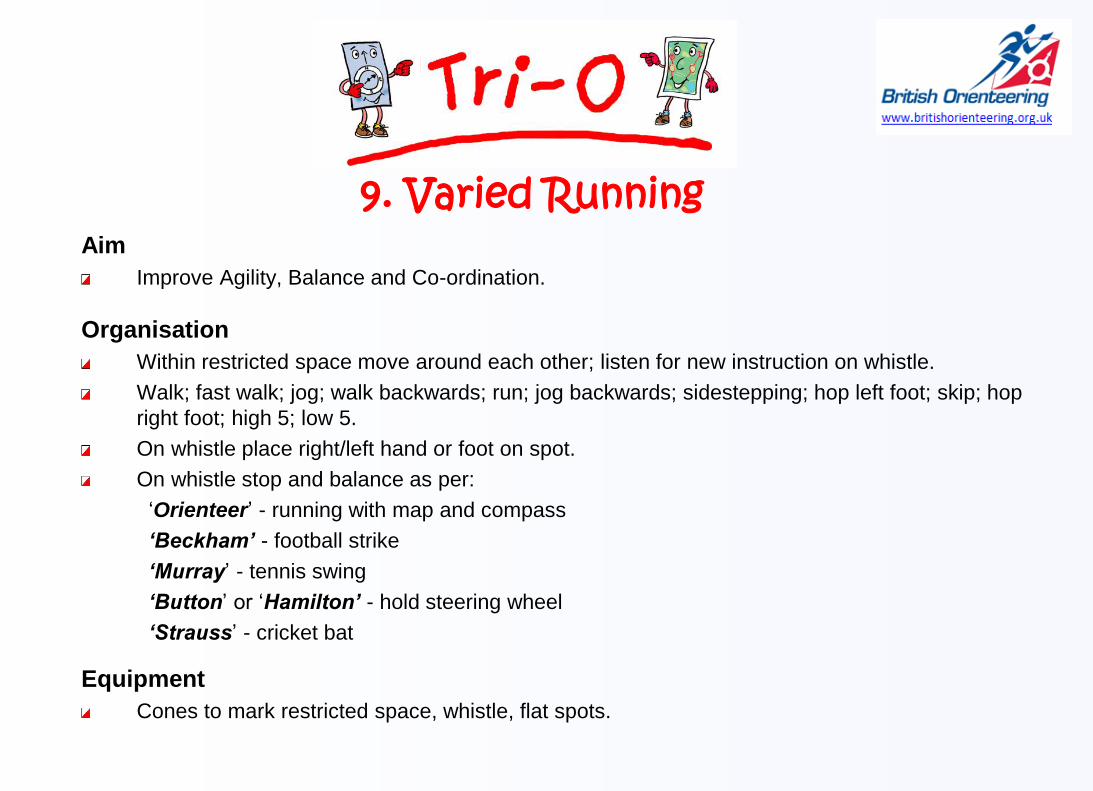
Aim
Improve Agility, Balance and Co-ordination.
Organisation
Within restricted space move around each other; listen for new instruction on whistle.
Walk; fast walk; jog; walk backwards; run; jog backwards; sidestepping; hop left foot; skip; hop
right foot; high 5; low 5.
On whistle place right/left hand or foot on spot.
On whistle stop and balance as per:
‘Orienteer’ - running with map and compass
‘Beckham’ - football strike
‘Murray’ - tennis swing
‘Button’ or ‘Hamilton’ - hold steering wheel
‘Strauss’ - cricket bat
Equipment
Cones to mark restricted space, whistle, flat spots.
9. Varied Running