9 free uilt patterns - vw · pdf filehandi quilter and american patchwork & quilting®...
TRANSCRIPT
Pattern may be downloaded for personal use only. No electronic or printed reproduction permitted without the prior written consent of Meredith Corporation. ©Meredith Corporation 2016. All rights reserved.
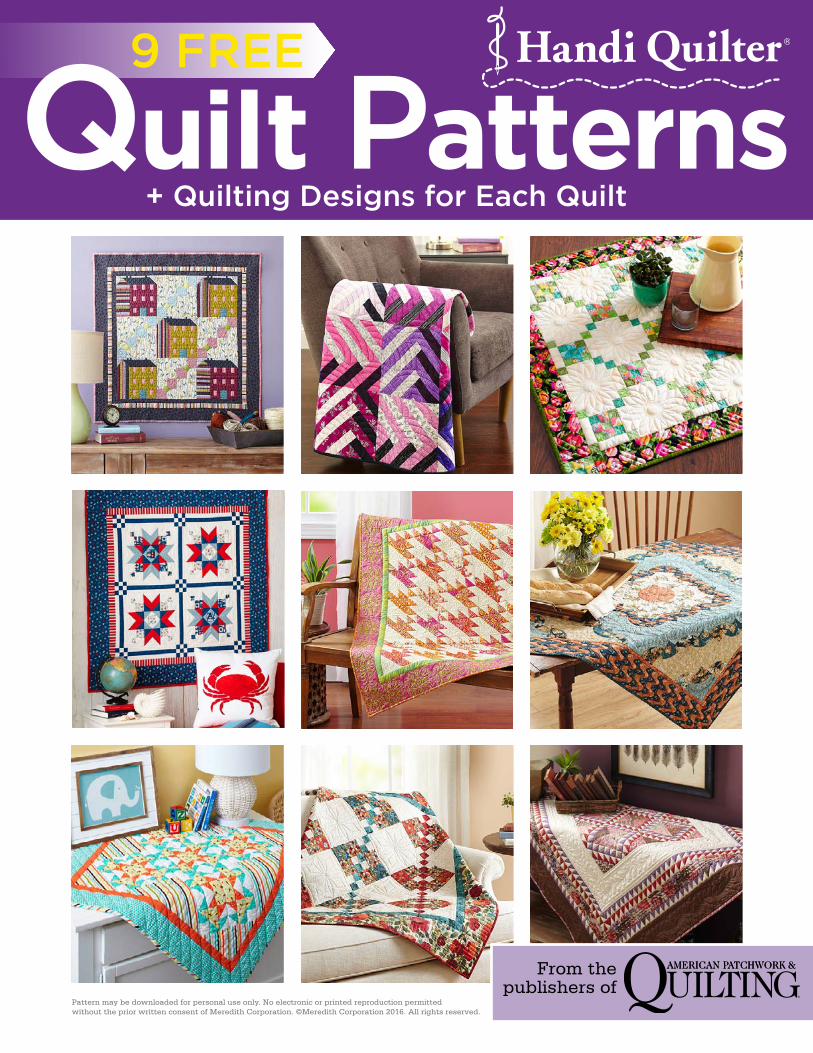
+ Quilting Designs for Each QuiltQuilt Patterns
9 FREE
From the publishers of
Pattern may be downloaded for personal use only. No electronic or printed reproduction permitted without the prior written consent of Meredith Corporation. ©Meredith Corporation 2016. All rights reserved. 2
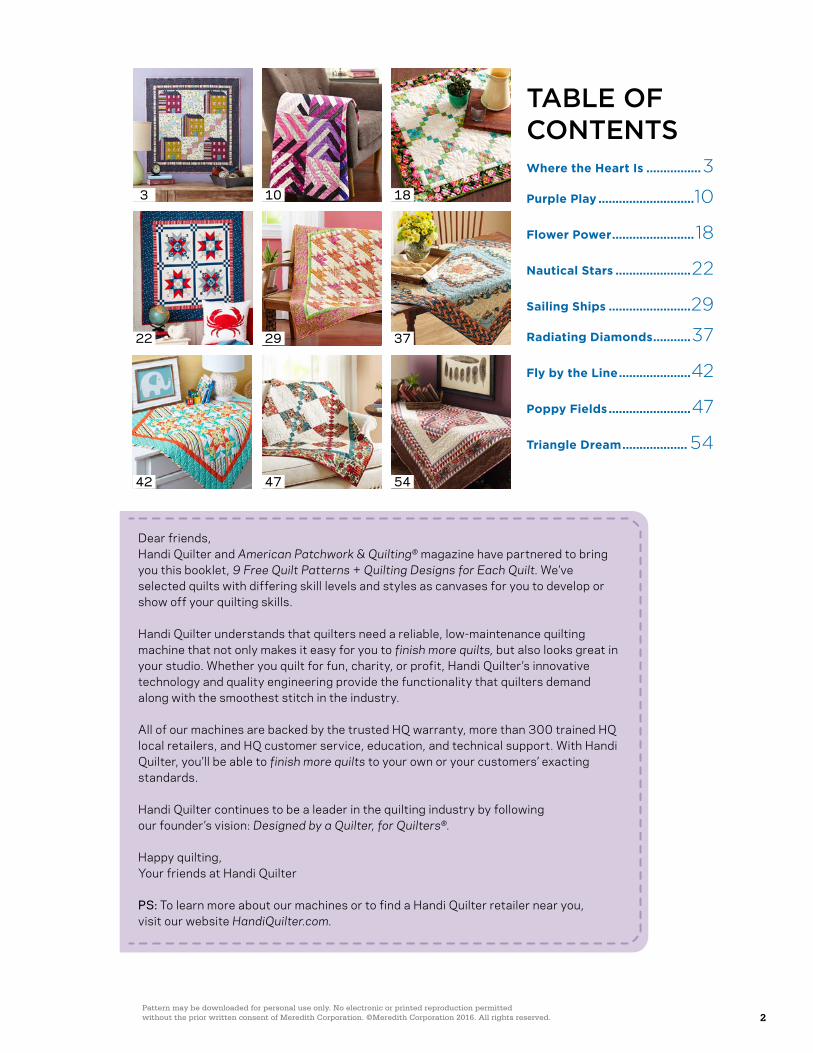
TABLE OF CONTENTSWhere the Heart Is ................3
Purple Play ............................10
Flower Power ........................18
Nautical Stars ......................22
Sailing Ships ........................29
Radiating Diamonds ...........37
Fly by the Line .....................42
Poppy Fields ........................47
Triangle Dream ................... 54
3
22
42
10
29
47
18
37
54
Dear friends,Handi Quilter and American Patchwork & Quilting® magazine have partnered to bring you this booklet, 9 Free Quilt Patterns + Quilting Designs for Each Quilt. We’ve selected quilts with differing skill levels and styles as canvases for you to develop or show off your quilting skills.
Handi Quilter understands that quilters need a reliable, low-maintenance quilting machine that not only makes it easy for you to finish more quilts, but also looks great in your studio. Whether you quilt for fun, charity, or profit, Handi Quilter’s innovative technology and quality engineering provide the functionality that quilters demand along with the smoothest stitch in the industry.
All of our machines are backed by the trusted HQ warranty, more than 300 trained HQ local retailers, and HQ customer service, education, and technical support. With Handi Quilter, you’ll be able to finish more quilts to your own or your customers’ exacting standards.
Handi Quilter continues to be a leader in the quilting industry by following our founder’s vision: Designed by a Quilter, for Quilters®.
Happy quilting,Your friends at Handi Quilter
PS: To learn more about our machines or to find a Handi Quilter retailer near you, visit our website HandiQuilter.com.
Pattern may be downloaded for personal use only. No electronic or printed reproduction permitted without the prior written consent of Meredith Corporation. ©Meredith Corporation 2016. All rights reserved. 3
From the publishers of
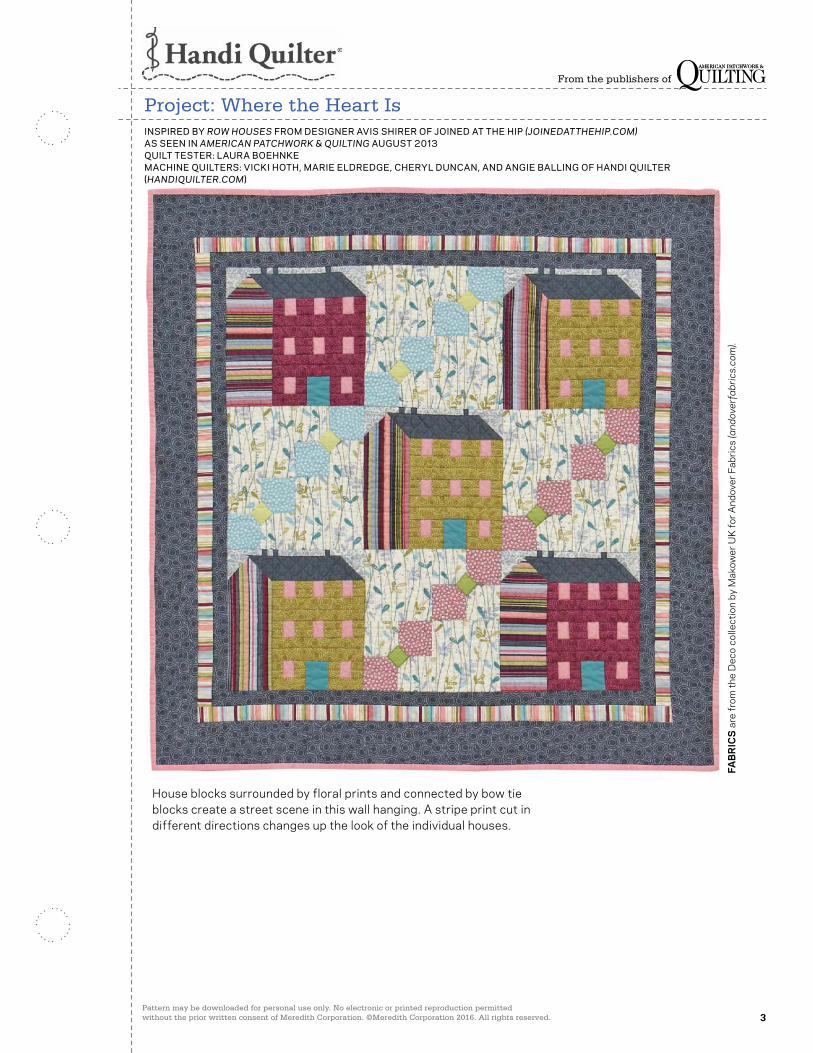
House blocks surrounded by floral prints and connected by bow tie blocks create a street scene in this wall hanging. A stripe print cut in different directions changes up the look of the individual houses.
INSPIRED BY ROW HOUSES FROM DESIGNER AVIS SHIRER OF JOINED AT THE HIP (JOINEDATTHEHIP.COM) AS SEEN IN AMERICAN PATCHWORK & QUILTING AUGUST 2013QUILT TESTER: LAURA BOEHNKEMACHINE QUILTERS: VICKI HOTH, MARIE ELDREDGE, CHERYL DUNCAN, AND ANGIE BALLING OF HANDI QUILTER (HANDIQUILTER.COM)
FAB
RIC
S a
re fr
om th
e D
eco
colle
ctio
n by
Mak
ower
UK
for A
ndov
er F
abric
s (a
ndov
erfa
bric
s.co
m).
Project: Where the Heart Is
Pattern may be downloaded for personal use only. No electronic or printed reproduction permitted without the prior written consent of Meredith Corporation. ©Meredith Corporation 2016. All rights reserved. 4
From the publishers of
Project: Where the Heart Is
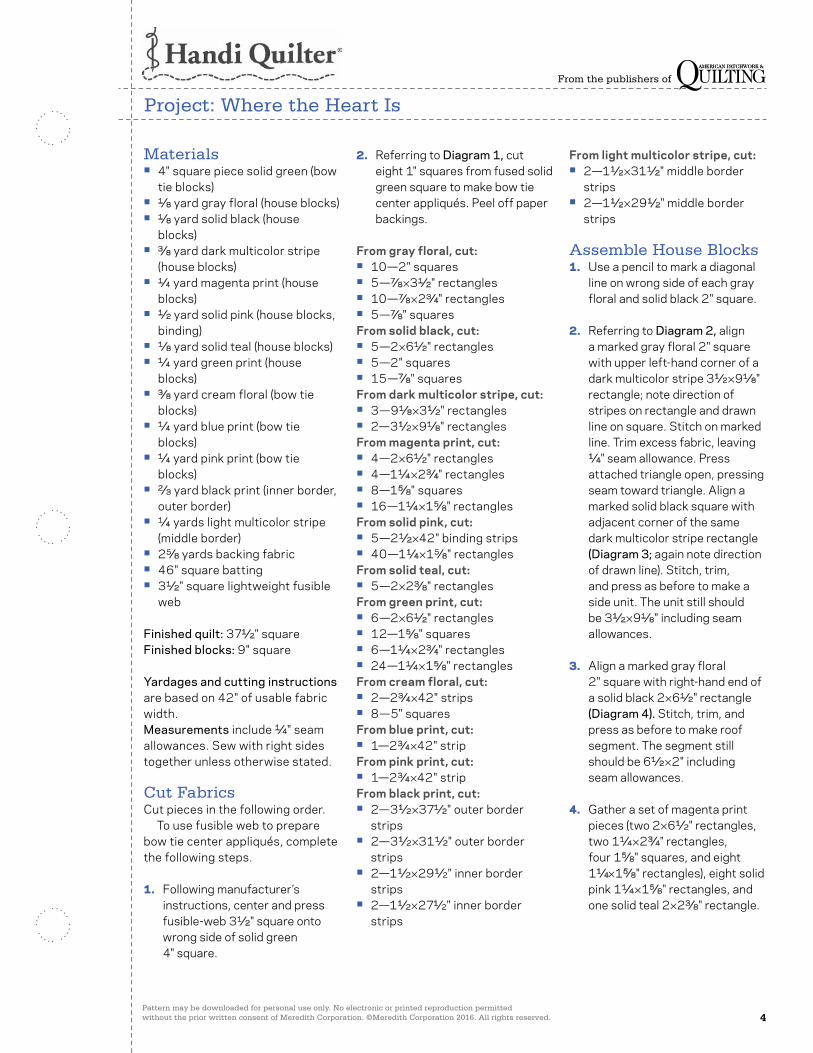
Materials• 4" square piece solid green (bow
tie blocks)• 1⁄8 yard gray floral (house blocks)• 1⁄8 yard solid black (house
blocks)• 3⁄8 yard dark multicolor stripe
(house blocks)• 1⁄4 yard magenta print (house
blocks)• 1⁄2 yard solid pink (house blocks,
binding)• 1⁄8 yard solid teal (house blocks)• 1⁄4 yard green print (house
blocks)• 3⁄8 yard cream floral (bow tie
blocks)• 1⁄4 yard blue print (bow tie
blocks)• 1⁄4 yard pink print (bow tie
blocks)• 2⁄3 yard black print (inner border,
outer border)• 1⁄4 yards light multicolor stripe
(middle border)• 25⁄8 yards backing fabric• 46" square batting• 31⁄2" square lightweight fusible
web
Finished quilt: 371⁄2" squareFinished blocks: 9" square
Yardages and cutting instructions are based on 42" of usable fabric width.Measurements include 1⁄4" seam allowances. Sew with right sides together unless otherwise stated.
Cut FabricsCut pieces in the following order. To use fusible web to prepare bow tie center appliqués, complete the following steps.
1. Following manufacturer’s instructions, center and press fusible-web 31⁄2" square onto wrong side of solid green 4" square.
2. Referring to Diagram 1, cut eight 1" squares from fused solid green square to make bow tie center appliqués. Peel off paper backings.
From gray floral, cut:• 10—2" squares• 5—7⁄8 ×31⁄2" rectangles• 10—7⁄8 ×23⁄4" rectangles• 5—7⁄8" squaresFrom solid black, cut:• 5—2×61⁄2" rectangles• 5—2" squares• 15—7⁄8" squaresFrom dark multicolor stripe, cut:• 3—91⁄8 ×31⁄2" rectangles• 2—31⁄2 ×91⁄8" rectanglesFrom magenta print, cut:• 4—2×61⁄2" rectangles• 4—11⁄4 ×23⁄4" rectangles• 8—15⁄8" squares• 16—11⁄4 ×15⁄8" rectanglesFrom solid pink, cut:• 5—21⁄2 ×42" binding strips• 40—11⁄4 ×15⁄8" rectanglesFrom solid teal, cut:• 5—2×23⁄8" rectanglesFrom green print, cut:• 6—2×61⁄2" rectangles• 12—15⁄8" squares• 6—11⁄4 ×23⁄4" rectangles• 24—11⁄4 ×15⁄8" rectanglesFrom cream floral, cut:• 2—23⁄4 ×42" strips• 8—5" squaresFrom blue print, cut:• 1—23⁄4 ×42" stripFrom pink print, cut:• 1—23⁄4 ×42" stripFrom black print, cut:• 2—31⁄2 ×371⁄2" outer border
strips• 2—31⁄2 ×311⁄2" outer border
strips• 2—11⁄2 ×291⁄2" inner border
strips• 2—11⁄2 ×271⁄2" inner border
strips
From light multicolor stripe, cut:• 2—11⁄2 ×311⁄2" middle border
strips• 2—11⁄2 ×291⁄2" middle border
strips
Assemble House Blocks1. Use a pencil to mark a diagonal
line on wrong side of each gray floral and solid black 2" square.
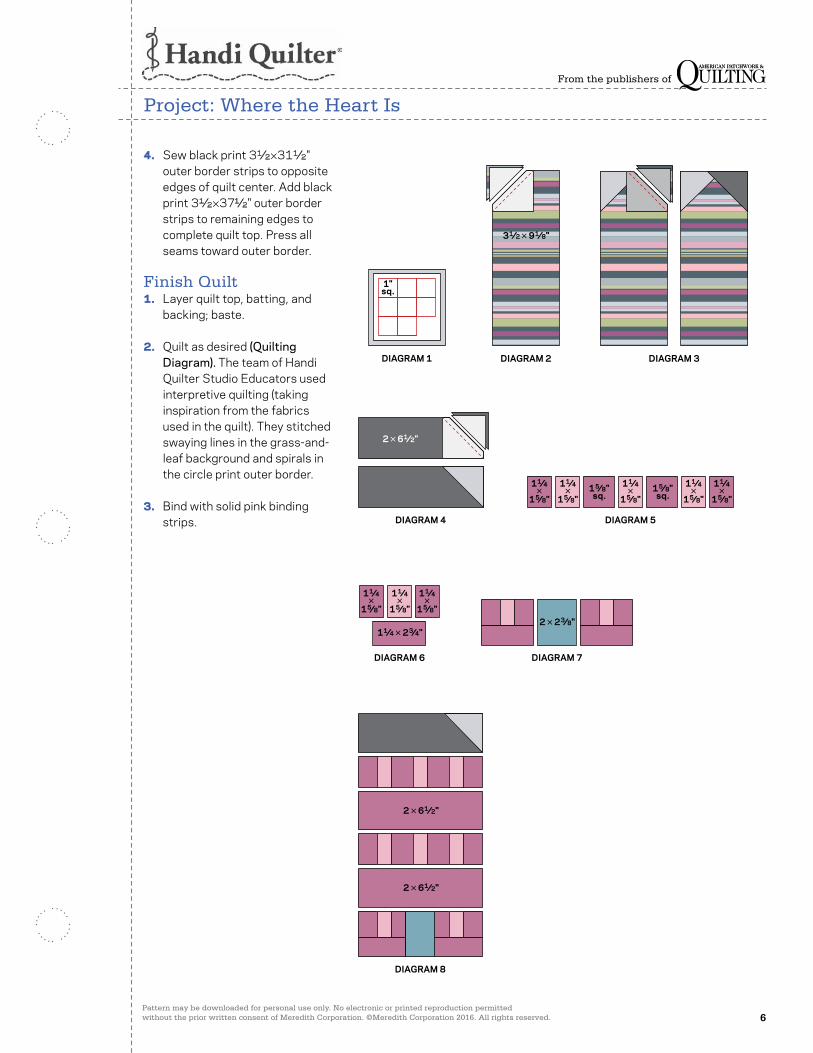
2. Referring to Diagram 2, align a marked gray floral 2" square with upper left-hand corner of a dark multicolor stripe 31⁄2 ×91⁄8" rectangle; note direction of stripes on rectangle and drawn line on square. Stitch on marked line. Trim excess fabric, leaving 1⁄4" seam allowance. Press attached triangle open, pressing seam toward triangle. Align a marked solid black square with adjacent corner of the same dark multicolor stripe rectangle (Diagram 3; again note direction of drawn line). Stitch, trim, and press as before to make a side unit. The unit still should be 31⁄2 ×91⁄8" including seam allowances.
3. Align a marked gray floral 2" square with right-hand end of a solid black 2×61⁄2" rectangle (Diagram 4). Stitch, trim, and press as before to make roof segment. The segment still should be 61⁄2 ×2" including seam allowances.
4. Gather a set of magenta print pieces (two 2×61⁄2" rectangles, two 11⁄4 ×23⁄4" rectangles, four 15⁄8" squares, and eight 11⁄4×15⁄8" rectangles), eight solid pink 11⁄4 ×15⁄8" rectangles, and one solid teal 2×23⁄8" rectangle.
Pattern may be downloaded for personal use only. No electronic or printed reproduction permitted without the prior written consent of Meredith Corporation. ©Meredith Corporation 2016. All rights reserved. 5
From the publishers of
Project: Where the Heart Is
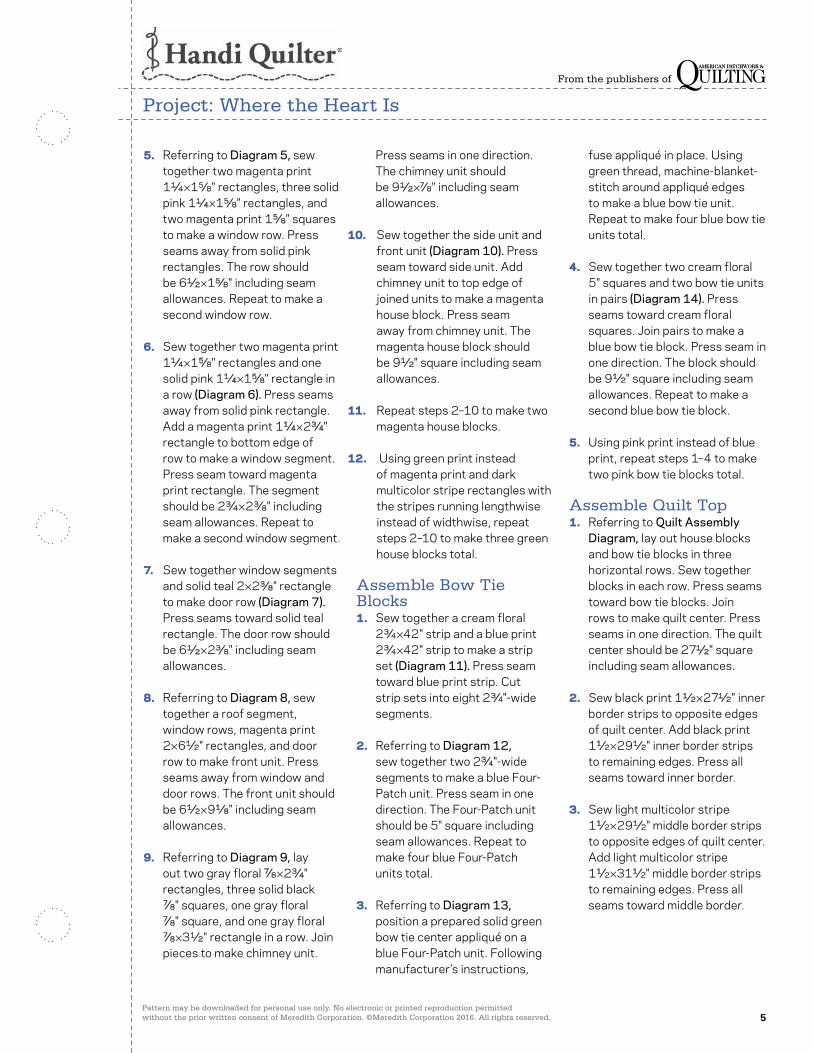
5. Referring to Diagram 5, sew together two magenta print 11⁄4 ×15⁄8" rectangles, three solid pink 11⁄4 ×15⁄8" rectangles, and two magenta print 15⁄8" squares to make a window row. Press seams away from solid pink rectangles. The row should be 61⁄2 ×15⁄8" including seam allowances. Repeat to make a second window row.
6. Sew together two magenta print 11⁄4 ×15⁄8" rectangles and one solid pink 11⁄4 ×15⁄8" rectangle in a row (Diagram 6). Press seams away from solid pink rectangle. Add a magenta print 11⁄4 ×23⁄4" rectangle to bottom edge of row to make a window segment. Press seam toward magenta print rectangle. The segment should be 23⁄4 ×23⁄8" including seam allowances. Repeat to make a second window segment.
7. Sew together window segments and solid teal 2×23⁄8" rectangle to make door row (Diagram 7). Press seams toward solid teal rectangle. The door row should be 61⁄2 ×23⁄8" including seam allowances.
8. Referring to Diagram 8, sew together a roof segment, window rows, magenta print 2×61⁄2" rectangles, and door row to make front unit. Press seams away from window and door rows. The front unit should be 61⁄2 ×91⁄8" including seam allowances.
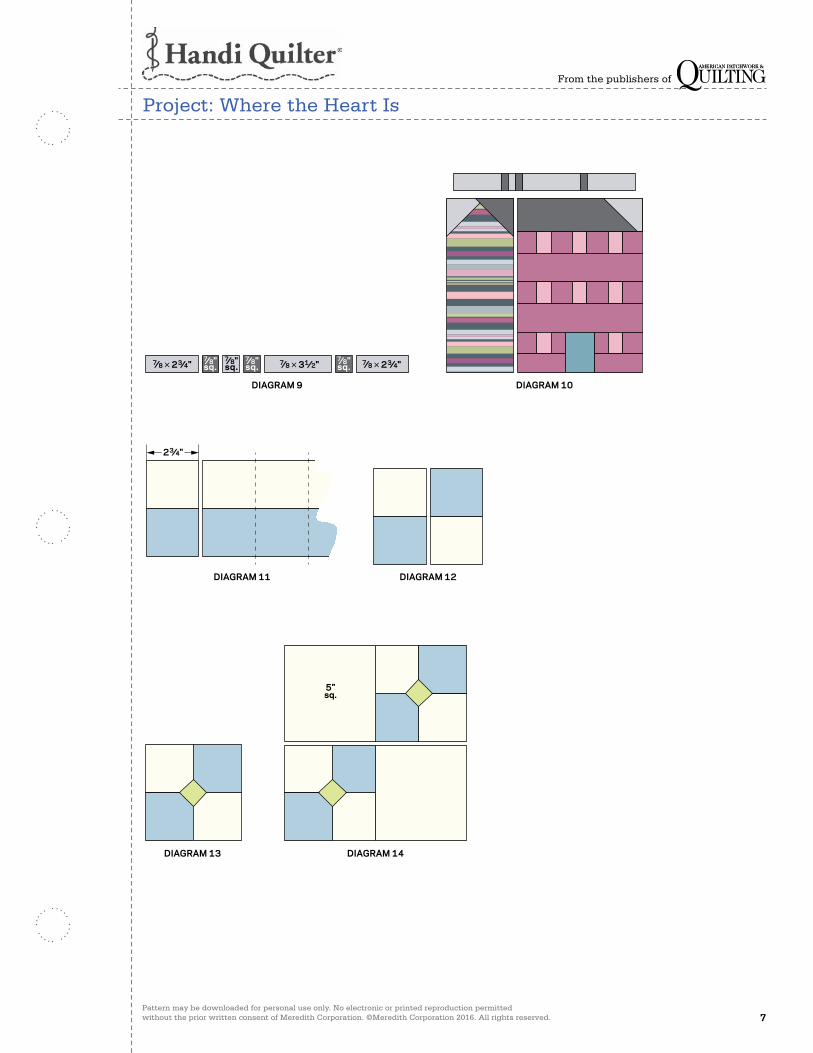
9. Referring to Diagram 9, lay out two gray floral 7⁄8 ×23⁄4" rectangles, three solid black 7⁄8" squares, one gray floral 7⁄8" square, and one gray floral 7⁄8 ×31⁄2" rectangle in a row. Join pieces to make chimney unit.
Press seams in one direction. The chimney unit should be 91⁄2 ×7⁄8" including seam allowances.
Assemble Bow Tie Blocks1. Sew together a cream floral
23⁄4 ×42" strip and a blue print 23⁄4 ×42" strip to make a strip set (Diagram 11). Press seam toward blue print strip. Cut strip sets into eight 23⁄4"-wide segments.
2. Referring to Diagram 12, sew together two 23⁄4"-wide segments to make a blue Four-Patch unit. Press seam in one direction. The Four-Patch unit should be 5" square including seam allowances. Repeat to make four blue Four-Patch units total.
3. Referring to Diagram 13, position a prepared solid green bow tie center appliqué on a blue Four-Patch unit. Following manufacturer’s instructions,
fuse appliqué in place. Using green thread, machine-blanket-stitch around appliqué edges to make a blue bow tie unit. Repeat to make four blue bow tie units total.
4. Sew together two cream floral 5" squares and two bow tie units in pairs (Diagram 14). Press seams toward cream floral squares. Join pairs to make a blue bow tie block. Press seam in one direction. The block should be 91⁄2" square including seam allowances. Repeat to make a second blue bow tie block.
5. Using pink print instead of blue print, repeat steps 1–4 to make two pink bow tie blocks total.
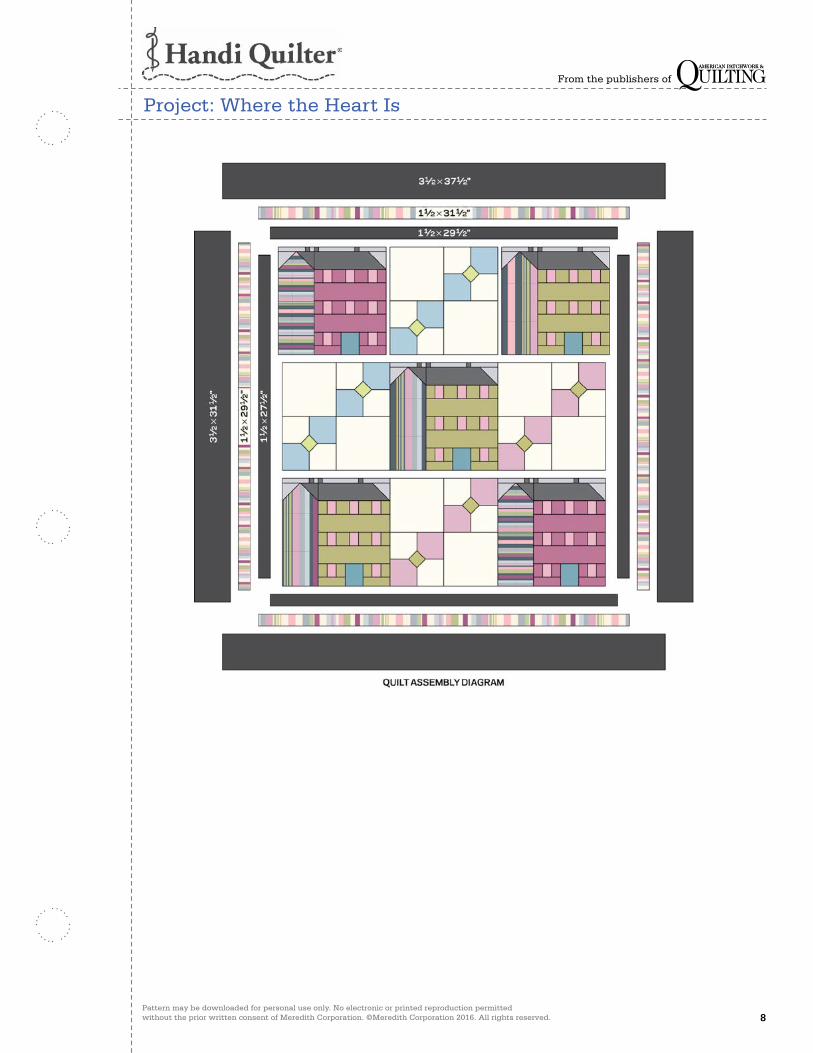
Assemble Quilt Top1. Referring to Quilt Assembly
Diagram, lay out house blocks and bow tie blocks in three horizontal rows. Sew together blocks in each row. Press seams toward bow tie blocks. Join rows to make quilt center. Press seams in one direction. The quilt center should be 271⁄2" square including seam allowances.
2. Sew black print 11⁄2 ×271⁄2" inner border strips to opposite edges of quilt center. Add black print 11⁄2 ×291⁄2" inner border strips to remaining edges. Press all seams toward inner border.
3. Sew light multicolor stripe 11⁄2 ×291⁄2" middle border strips to opposite edges of quilt center. Add light multicolor stripe 11⁄2 ×311⁄2" middle border strips to remaining edges. Press all seams toward middle border.
10. Sew together the side unit and front unit (Diagram 10). Press seam toward side unit. Add chimney unit to top edge of joined units to make a magenta house block. Press seam away from chimney unit. The magenta house block should be 91⁄2" square including seam allowances.
11. Repeat steps 2–10 to make two magenta house blocks.
12. Using green print instead of magenta print and dark multicolor stripe rectangles with the stripes running lengthwise instead of widthwise, repeat steps 2–10 to make three green house blocks total.
Pattern may be downloaded for personal use only. No electronic or printed reproduction permitted without the prior written consent of Meredith Corporation. ©Meredith Corporation 2016. All rights reserved. 6
From the publishers of
Project: Where the Heart Is
4. Sew black print 31⁄2 ×311⁄2" outer border strips to opposite edges of quilt center. Add black print 31⁄2 ×371⁄2" outer border strips to remaining edges to complete quilt top. Press all seams toward outer border.
Finish Quilt1. Layer quilt top, batting, and
backing; baste.
2. Quilt as desired (Quilting Diagram). The team of Handi Quilter Studio Educators used interpretive quilting (taking inspiration from the fabrics used in the quilt). They stitched swaying lines in the grass-and-leaf background and spirals in the circle print outer border.
3. Bind with solid pink binding strips.
DIAGRAM 1
1"sq.
APQ AUGUST 2013CMR 5114204 Bow Tie Houses OptionDiagram 1C. Neubauer 4-10-13100546037
DIAGRAM 2
31⁄2×91⁄8"
APQ AUGUST 2013CMR 5114204 Bow Tie Houses OptionDiagram 2C. Neubauer 4-10-13100546038
DIAGRAM 3
APQ AUGUST 2013CMR 5114204 Bow Tie Houses OptionDiagram 3C. Neubauer 4-10-13100546039
DIAGRAM 4
2×61⁄2"
APQ AUGUST 2013CMR 5114204 Bow Tie Houses OptionDiagram 4C. Neubauer 4-10-13100546040
DIAGRAM 5
11⁄4×
15⁄8"
11⁄4×
15⁄8"
11⁄4×
15⁄8"
11⁄4×
15⁄8"
11⁄4×
15⁄8"15⁄8"sq.
15⁄8"sq.
APQ AUGUST 2013CMR 5114204 Bow Tie Houses OptionDiagram 5C. Neubauer 4-10-13100546041
DIAGRAM 6
11⁄4×
15⁄8"
11⁄4×
15⁄8"
11⁄4×
15⁄8"
11⁄4×23⁄4"
APQ AUGUST 2013CMR 5114204 Bow Tie Houses OptionDiagram 6C. Neubauer 4-10-13100546042
DIAGRAM 7
2×23⁄8"
APQ AUGUST 2013CMR 5114204 Bow Tie Houses OptionDiagram 7C. Neubauer 4-10-13100546043
DIAGRAM 8
2×61⁄2"
2×61⁄2"
APQ AUGUST 2013CMR 5114204 Bow Tie Houses OptionDiagram 8C. Neubauer 4-10-13100546044
Pattern may be downloaded for personal use only. No electronic or printed reproduction permitted without the prior written consent of Meredith Corporation. ©Meredith Corporation 2016. All rights reserved. 7
From the publishers of
Project: Where the Heart Is
DIAGRAM 10
APQ AUGUST 2013CMR 5114204 Bow Tie Houses OptionDiagram 10C. Neubauer 4-10-13100546046
DIAGRAM 11
23⁄4"
APQ AUGUST 2013CMR 5114204 Bow Tie Houses OptionDiagram 11C. Neubauer 4-10-13100546047
DIAGRAM 12
APQ AUGUST 2013CMR 5114204 Bow Tie Houses OptionDiagram 12C. Neubauer 4-10-13100546048
DIAGRAM 13
APQ AUGUST 2013CMR 5114204 Bow Tie Houses OptionDiagram 13C. Neubauer 4-10-13100546049
DIAGRAM 14
5"sq.
APQ AUGUST 2013CMR 5114204 Bow Tie Houses OptionDiagram 14C. Neubauer 4-10-13100546050
DIAGRAM 9
7⁄8×23⁄4" 7⁄8×31⁄2" 7⁄8×23⁄4"7⁄8"sq.
7⁄8"sq.
7⁄8"sq.
7⁄8"sq.
APQ AUGUST 2013CMR 5114204 Bow Tie Houses OptionDiagram 9C. Neubauer 4-10-13100546045
Pattern may be downloaded for personal use only. No electronic or printed reproduction permitted without the prior written consent of Meredith Corporation. ©Meredith Corporation 2016. All rights reserved. 8
From the publishers of
Project: Where the Heart Is
Pattern may be downloaded for personal use only. No electronic or printed reproduction permitted without the prior written consent of Meredith Corporation. ©Meredith Corporation 2016. All rights reserved. 9
From the publishers of
Project: Where the Heart Is
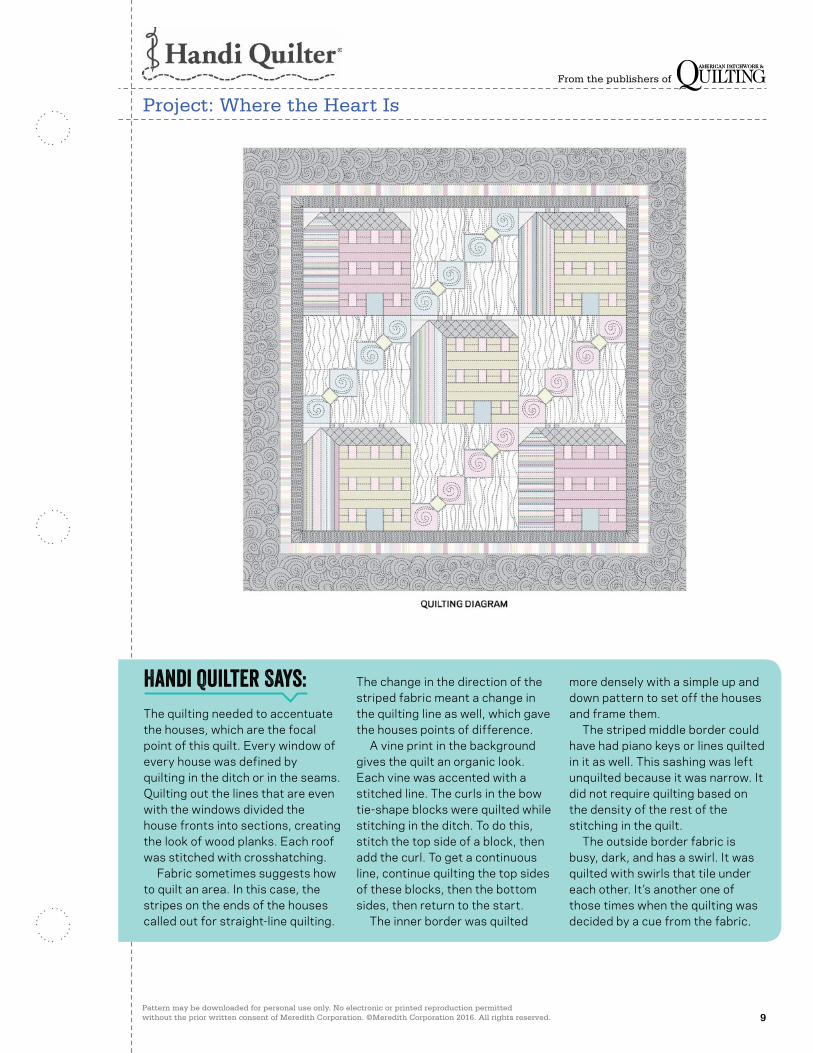
Handi Quilter Says:The quilting needed to accentuate the houses, which are the focal point of this quilt. Every window of every house was defined by quilting in the ditch or in the seams. Quilting out the lines that are even with the windows divided the house fronts into sections, creating the look of wood planks. Each roof was stitched with crosshatching. Fabric sometimes suggests how to quilt an area. In this case, the stripes on the ends of the houses called out for straight-line quilting.
The change in the direction of the striped fabric meant a change in the quilting line as well, which gave the houses points of difference. A vine print in the background gives the quilt an organic look. Each vine was accented with a stitched line. The curls in the bow tie-shape blocks were quilted while stitching in the ditch. To do this, stitch the top side of a block, then add the curl. To get a continuous line, continue quilting the top sides of these blocks, then the bottom sides, then return to the start. The inner border was quilted
more densely with a simple up and down pattern to set off the houses and frame them. The striped middle border could have had piano keys or lines quilted in it as well. This sashing was left unquilted because it was narrow. It did not require quilting based on the density of the rest of the stitching in the quilt. The outside border fabric is busy, dark, and has a swirl. It was quilted with swirls that tile under each other. It’s another one of those times when the quilting was decided by a cue from the fabric.

Pattern may be downloaded for personal use only. No electronic or printed reproduction permitted without the prior written consent of Meredith Corporation. ©Meredith Corporation 2016. All rights reserved. 10
From the publishers of
Project: Purple Play
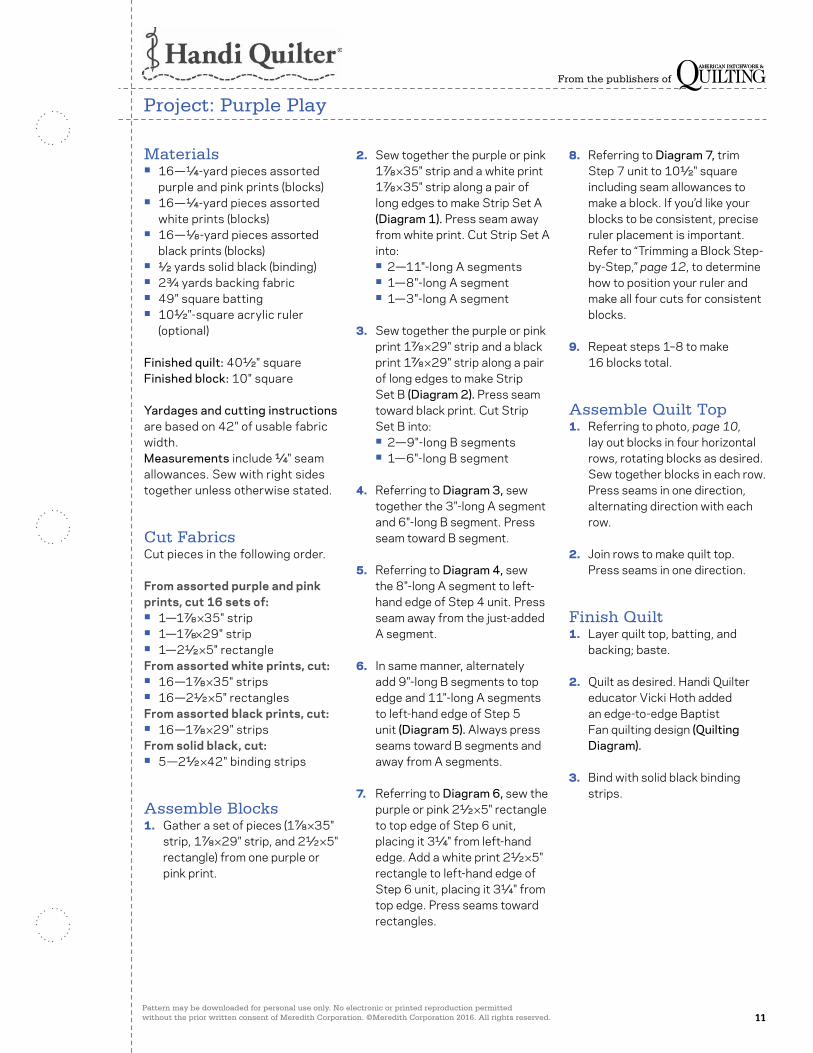
Use a narrow color palette of two brights (purple and pink) and two neutrals (black and white) to produce a bold wall hanging.
INSPIRED BY PATTERN PLAY FROM DESIGNER PAT BRAVO OF ART GALLERY FABRICS (ARTGALLERYFABRICS.COM)AS SEEN IN AMERICAN PATCHWORK & QUILTING JUNE 2014 QUILT TESTER: LAURA BOEHNKEMACHINE QUILTER: VICKI HOTH OF HANDI QUILTER (HANDIQUILTER.COM)
FAB
RIC
S a
re fr
om th
e Lo
la b
y S
tudi
o 8
, Mat
rix, a
nd Q
uilti
ng T
empt
atio
ns c
olle
ctio
ns, a
ll fr
om Q
uilti
ng T
reas
ures
(q
uilti
ngtr
easu
res.
com
).
Pattern may be downloaded for personal use only. No electronic or printed reproduction permitted without the prior written consent of Meredith Corporation. ©Meredith Corporation 2016. All rights reserved. 11
From the publishers of
Project: Purple Play
Materials• 16—1⁄4-yard pieces assorted
purple and pink prints (blocks)• 16—1⁄4-yard pieces assorted
white prints (blocks)• 16—1⁄8-yard pieces assorted
black prints (blocks)• 1⁄2 yards solid black (binding)• 23⁄4 yards backing fabric• 49" square batting• 101⁄2"-square acrylic ruler
(optional)
Finished quilt: 401⁄2" squareFinished block: 10" square
Yardages and cutting instructions are based on 42" of usable fabric width. Measurements include 1⁄4" seam allowances. Sew with right sides together unless otherwise stated.
Cut FabricsCut pieces in the following order.
From assorted purple and pink prints, cut 16 sets of:• 1—17⁄8 ×35" strip• 1—17⁄8×29" strip• 1—21⁄2 ×5" rectangleFrom assorted white prints, cut:• 16—17⁄8 ×35" strips• 16—21⁄2 ×5" rectanglesFrom assorted black prints, cut:• 16—17⁄8 ×29" stripsFrom solid black, cut:• 5—21⁄2 ×42" binding strips
Assemble Blocks1. Gather a set of pieces (17⁄8 ×35"
strip, 17⁄8 ×29" strip, and 21⁄2 ×5" rectangle) from one purple or pink print.
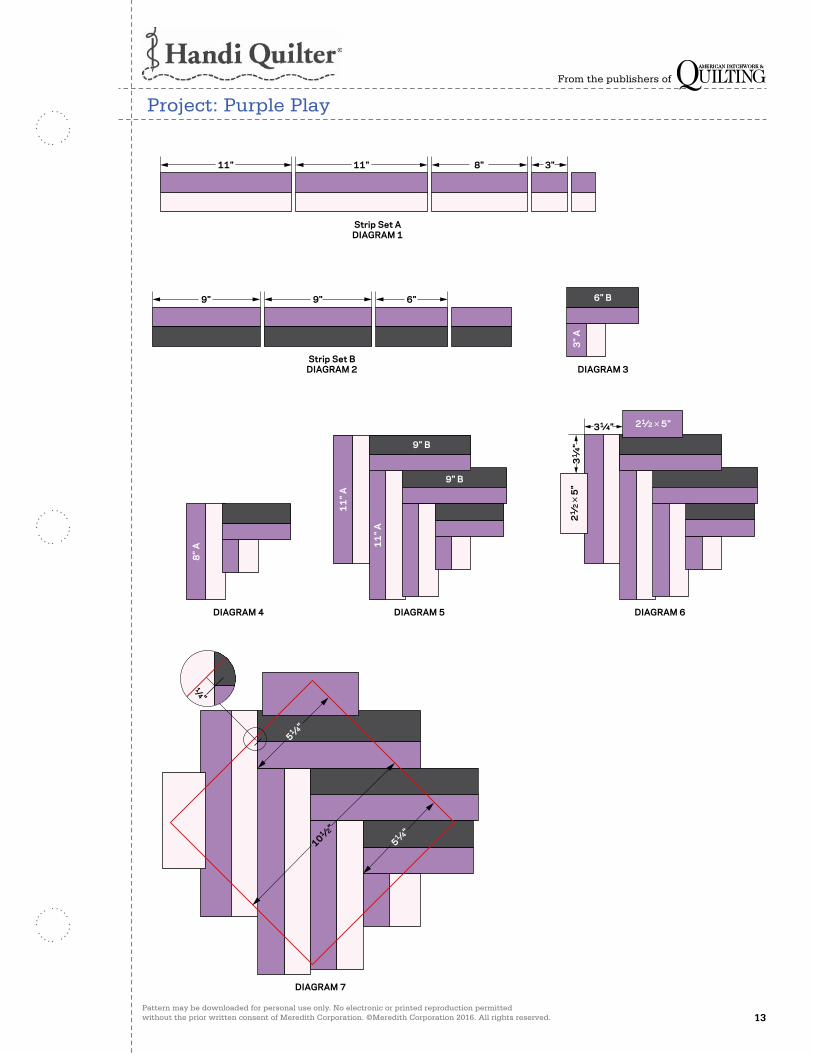
2. Sew together the purple or pink 17⁄8 ×35" strip and a white print 17⁄8 ×35" strip along a pair of long edges to make Strip Set A (Diagram 1). Press seam away from white print. Cut Strip Set A into:• 2—11"-long A segments• 1—8"-long A segment• 1—3"-long A segment
3. Sew together the purple or pink print 17⁄8 ×29" strip and a black print 17⁄8 ×29" strip along a pair of long edges to make Strip Set B (Diagram 2). Press seam toward black print. Cut Strip Set B into:• 2—9"-long B segments• 1—6"-long B segment
4. Referring to Diagram 3, sew together the 3"-long A segment and 6"-long B segment. Press seam toward B segment.
5. Referring to Diagram 4, sew the 8"-long A segment to left-hand edge of Step 4 unit. Press seam away from the just-added A segment.
6. In same manner, alternately add 9"-long B segments to top edge and 11"-long A segments to left-hand edge of Step 5 unit (Diagram 5). Always press seams toward B segments and away from A segments.
7. Referring to Diagram 6, sew the purple or pink 21⁄2 ×5" rectangle to top edge of Step 6 unit, placing it 31⁄4" from left-hand edge. Add a white print 21⁄2 ×5" rectangle to left-hand edge of Step 6 unit, placing it 31⁄4" from top edge. Press seams toward rectangles.
8. Referring to Diagram 7, trim Step 7 unit to 101⁄2" square including seam allowances to make a block. If you’d like your blocks to be consistent, precise ruler placement is important. Refer to “Trimming a Block Step-by-Step,” page 12, to determine how to position your ruler and make all four cuts for consistent blocks.
9. Repeat steps 1–8 to make 16 blocks total.
Assemble Quilt Top1. Referring to photo, page 10,
lay out blocks in four horizontal rows, rotating blocks as desired. Sew together blocks in each row. Press seams in one direction, alternating direction with each row.
2. Join rows to make quilt top. Press seams in one direction.
Finish Quilt1. Layer quilt top, batting, and
backing; baste.
2. Quilt as desired. Handi Quilter educator Vicki Hoth added an edge-to-edge Baptist Fan quilting design (Quilting Diagram).
3. Bind with solid black binding strips.

Pattern may be downloaded for personal use only. No electronic or printed reproduction permitted without the prior written consent of Meredith Corporation. ©Meredith Corporation 2016. All rights reserved. 12
From the publishers of
Project: Purple Play
Trimming a Block Step-by-StepWhile it’s not possible to match the seams of all adjacent blocks in the quilt top, trimming all the blocks in the same position will allow for a uniform look. Follow these steps to rotary-cut your blocks with consistency.
1. Place a Step 7 pieced unit on a cutting mat with the repeating V shapes upside down. Using a standard 6×24" acrylic ruler, line up the 51⁄4" mark with the seam intersections of the solid color strips (Photo A). Trim along the right-hand edge.
2. Rotate the pieced unit 180° so the trimmed edge is on your left. Using a 101⁄2"-square or larger acrylic ruler, trim the right-hand edge 101⁄2" from the previously trimmed edge (Photo B).
3. Rotate the unit 90° so the V shapes point to the right. Making sure the ruler is square with the previously trimmed edges, use the 6×24" ruler to trim the pieced unit 1⁄4" beyond the point of the bottom solid color V (Photo C).
4. Rotate the unit 180° so the only untrimmed edge is on your right. Use the square ruler to trim the unit to 101⁄2" wide to complete a block (Photo D).
PHOTO A
PHOTO C
PHOTO B
PHOTO D
10½"
¼"
Pattern may be downloaded for personal use only. No electronic or printed reproduction permitted without the prior written consent of Meredith Corporation. ©Meredith Corporation 2016. All rights reserved. 13
From the publishers of
Project: Purple Play
11" 11" 8" 3"
Strip Set ADIAGRAM 1
APQ JUNE 2014CMR 5396431Solid Chevrons(Pattern Play Optional)Diagram 1C. Neubauer 1-21-14100546922
9" 9" 6"
Strip Set BDIAGRAM 2
APQ JUNE 2014CMR 5396431Solid Chevrons(Pattern Play Optional)Diagram 2C. Neubauer 1-21-14100546923
DIAGRAM 3
6" B
3" A
APQ JUNE 2014CMR 5396431Solid Chevrons(Pattern Play Optional)Diagram 3C. Neubauer 1-21-14100546924
8" A
DIAGRAM 4
APQ JUNE 2014CMR 5396431Solid Chevrons(Pattern Play Optional)Diagram 4C. Neubauer 1-21-14100546925
9" B
9" B
11
" A
11
" A
DIAGRAM 5
APQ JUNE 2014CMR 5396431Solid Chevrons(Pattern Play Optional)Diagram 5C. Neubauer 1-21-14100546926
21 ⁄2×
5"
21⁄2×5"
31 ⁄4
"
31⁄4"
DIAGRAM 6
APQ JUNE 2014CMR 5396431Solid Chevrons(Pattern Play Optional)Diagram 6C. Neubauer 1-21-14100546927
1⁄4"
51 ⁄4"
51 ⁄4"
101 ⁄2"
DIAGRAM 7
APQ JUNE 2014CMR 5396431Solid Chevrons(Pattern Play Optional)Diagram 7C. Neubauer 1-21-14100546928
Pattern may be downloaded for personal use only. No electronic or printed reproduction permitted without the prior written consent of Meredith Corporation. ©Meredith Corporation 2016. All rights reserved. 14
From the publishers of
Handi Quilter Says:
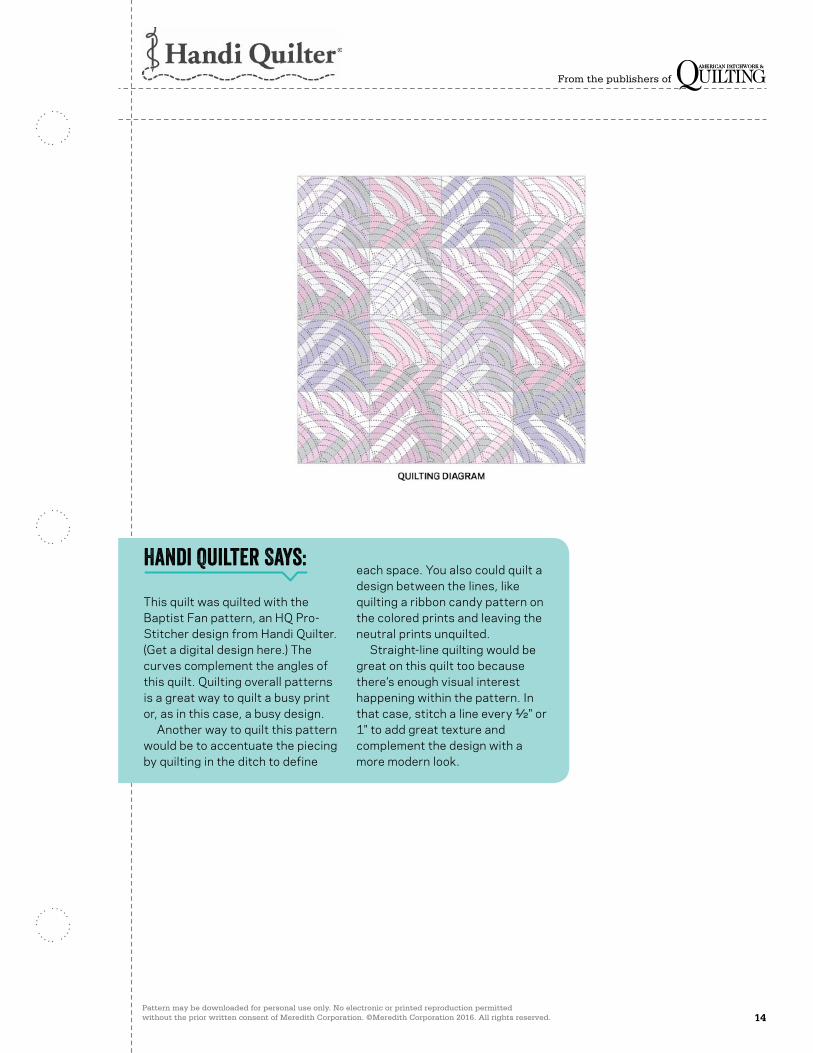
This quilt was quilted with the Baptist Fan pattern, an HQ Pro-Stitcher design from Handi Quilter. (Get a digital design here.) The curves complement the angles of this quilt. Quilting overall patterns is a great way to quilt a busy print or, as in this case, a busy design. Another way to quilt this pattern would be to accentuate the piecing by quilting in the ditch to define
each space. You also could quilt a design between the lines, like quilting a ribbon candy pattern on the colored prints and leaving the neutral prints unquilted. Straight-line quilting would be great on this quilt too because there’s enough visual interest happening within the pattern. In that case, stitch a line every 1⁄2" or 1" to add great texture and complement the design with a more modern look.
Pattern may be downloaded for personal use only. No electronic or printed reproduction permitted without the prior written consent of Meredith Corporation. ©Meredith Corporation 2016. All rights reserved. 15
From the publishers of
Pattern may be downloaded for personal use only. No electronic or printed reproduction permitted without the prior written consent of Meredith Corporation. ©Meredith Corporation 2016. All rights reserved. 15
From the publishers of
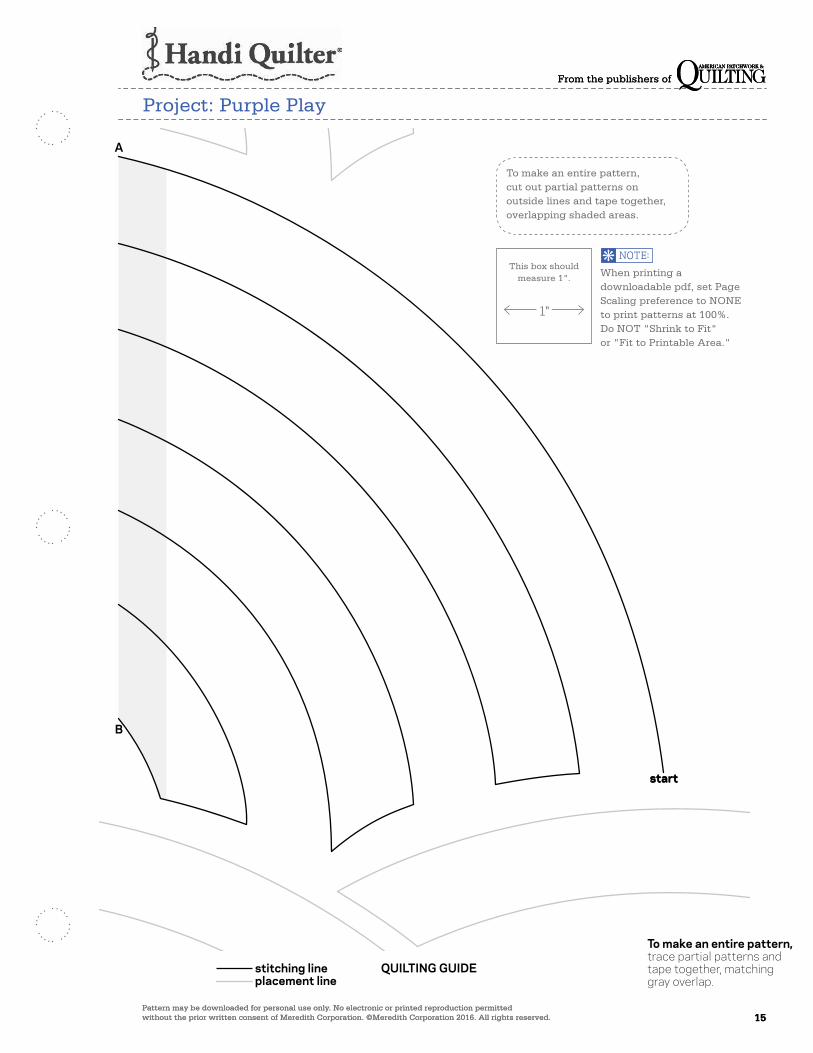
Project: Purple Play
To make an entire pattern,trace partial patterns andtape together, matchinggray overlap.
stitching line
start
placement line
start
A
B
QUILTING GUIDE
When printing a downloadable pdf, set Page Scaling preference to NONE to print patterns at 100%. Do NOT "Shrink to Fit" or "Fit to Printable Area."
This box should measure 1".
To make an entire pattern, cut out partial patterns on outside lines and tape together, overlapping shaded areas.
Pattern may be downloaded for personal use only. No electronic or printed reproduction permitted without the prior written consent of Meredith Corporation. ©Meredith Corporation 2016. All rights reserved. 16
From the publishers of
Project: Purple Play
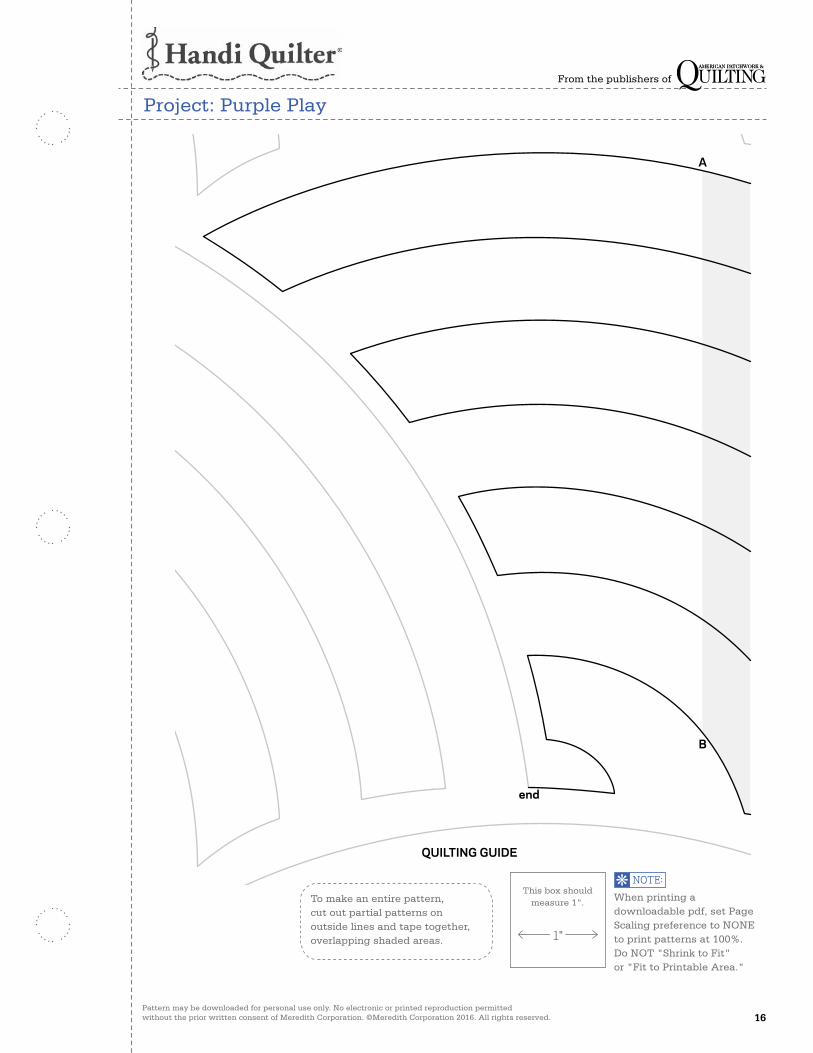
To make an entire pattern,trace partial patterns andtape together, matchinggray overlap.
end
A
B
QUILTING GUIDE
When printing a downloadable pdf, set Page Scaling preference to NONE to print patterns at 100%. Do NOT "Shrink to Fit" or "Fit to Printable Area."
This box should measure 1".To make an entire pattern,
cut out partial patterns on outside lines and tape together, overlapping shaded areas.

Pattern may be downloaded for personal use only. No electronic or printed reproduction permitted without the prior written consent of Meredith Corporation. ©Meredith Corporation 2016. All rights reserved. 17
From the publishers of
Pattern may be downloaded for personal use only. No electronic or printed reproduction permitted without the prior written consent of Meredith Corporation. ©Meredith Corporation 2016. All rights reserved. 17
From the publishers of
Project: Purple Play
7"
71 ⁄2"
star
t
QU
ILTI
NG
GU
IDE
end
Pattern may be downloaded for personal use only. No electronic or printed reproduction permitted without the prior written consent of Meredith Corporation. ©Meredith Corporation 2016. All rights reserved. 18
From the publishers of
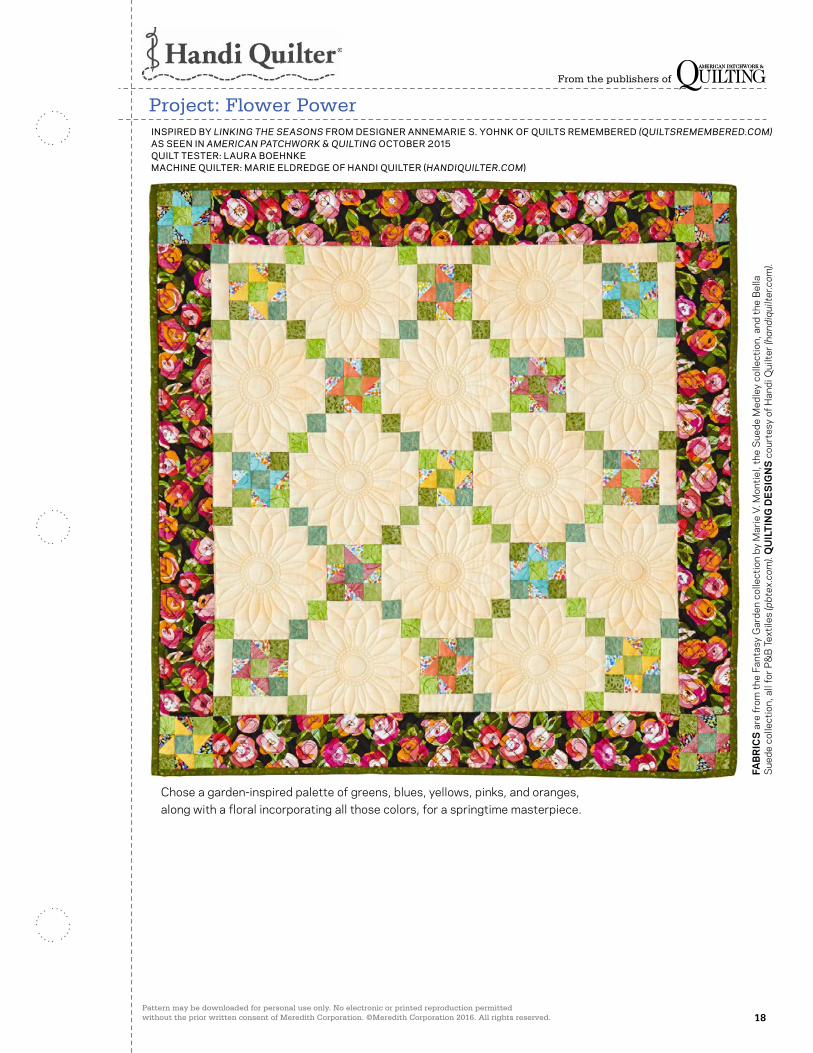
Project: Flower PowerINSPIRED BY LINKING THE SEASONS FROM DESIGNER ANNEMARIE S. YOHNK OF QUILTS REMEMBERED (QUILTSREMEMBERED.COM)AS SEEN IN AMERICAN PATCHWORK & QUILTING OCTOBER 2015 QUILT TESTER: LAURA BOEHNKEMACHINE QUILTER: MARIE ELDREDGE OF HANDI QUILTER (HANDIQUILTER.COM)
FAB
RIC
S a
re fr
om th
e Fa
ntas
y G
arde
n co
llect
ion
by M
arie
V. M
ontie
l, th
e S
uede
Med
ley
colle
ctio
n, a
nd th
e B
ella
S
uede
col
lect
ion,
all
for P
&B
Tex
tiles
(pbt
ex.c
om).
QU
ILTI
NG
DE
SIG
NS
cou
rtes
y of
Han
di Q
uilte
r (ha
ndiq
uilte
r.com
).
Chose a garden-inspired palette of greens, blues, yellows, pinks, and oranges, along with a floral incorporating all those colors, for a springtime masterpiece.
Pattern may be downloaded for personal use only. No electronic or printed reproduction permitted without the prior written consent of Meredith Corporation. ©Meredith Corporation 2016. All rights reserved. 19
From the publishers of
Project: Flower Power
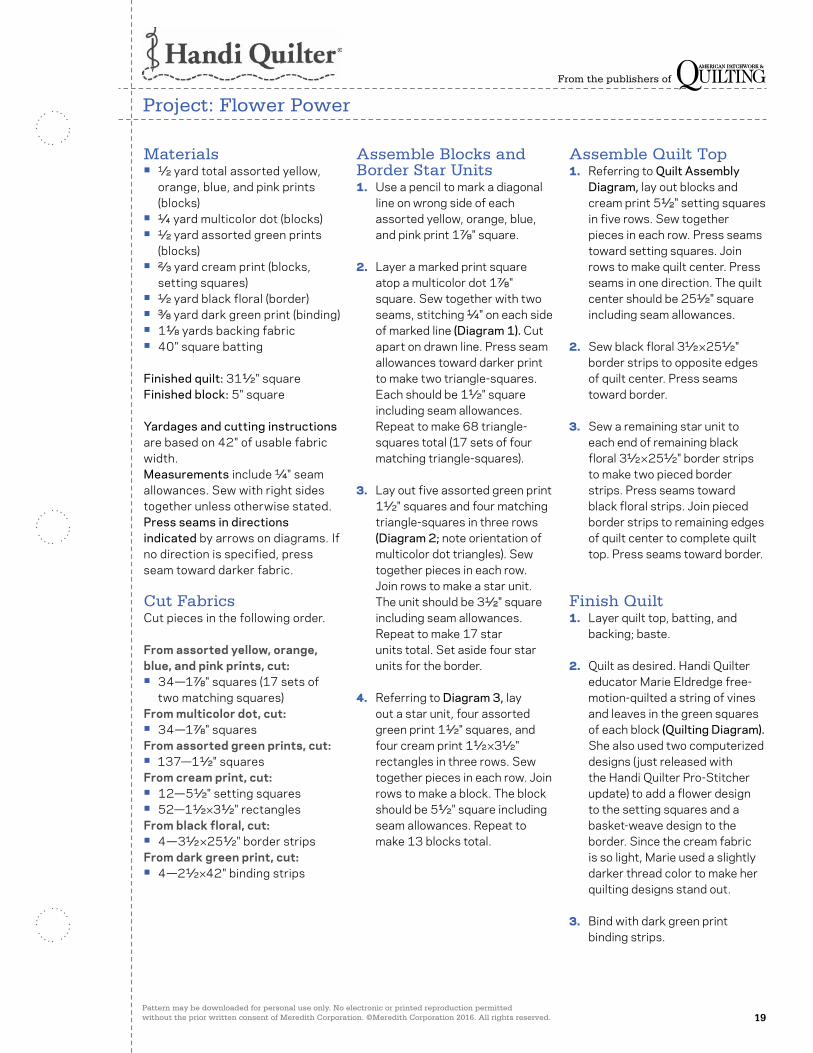
Materials• 1⁄2 yard total assorted yellow,
orange, blue, and pink prints (blocks)
• 1⁄4 yard multicolor dot (blocks)• 1⁄2 yard assorted green prints
(blocks)• 2⁄3 yard cream print (blocks,
setting squares)• 1⁄2 yard black floral (border)• 3⁄8 yard dark green print (binding)• 11⁄8 yards backing fabric• 40" square batting
Finished quilt: 311⁄2" squareFinished block: 5" square
Yardages and cutting instructions are based on 42" of usable fabric width.Measurements include 1⁄4" seam allowances. Sew with right sides together unless otherwise stated.Press seams in directions indicated by arrows on diagrams. If no direction is specified, press seam toward darker fabric.
Cut FabricsCut pieces in the following order.
From assorted yellow, orange, blue, and pink prints, cut:• 34—17⁄8" squares (17 sets of
two matching squares)From multicolor dot, cut:• 34—17⁄8" squaresFrom assorted green prints, cut:• 137—11⁄2" squares From cream print, cut:• 12—51⁄2" setting squares• 52—11⁄2 ×31⁄2" rectanglesFrom black floral, cut:• 4—31⁄2 ×251⁄2" border stripsFrom dark green print, cut:• 4—21⁄2 ×42" binding strips
Assemble Blocks and Border Star Units1. Use a pencil to mark a diagonal
line on wrong side of each assorted yellow, orange, blue, and pink print 17⁄8" square.
2. Layer a marked print square atop a multicolor dot 17⁄8" square. Sew together with two seams, stitching 1⁄4" on each side of marked line (Diagram 1). Cut apart on drawn line. Press seam allowances toward darker print to make two triangle-squares. Each should be 11⁄2" square including seam allowances. Repeat to make 68 triangle-squares total (17 sets of four matching triangle-squares).
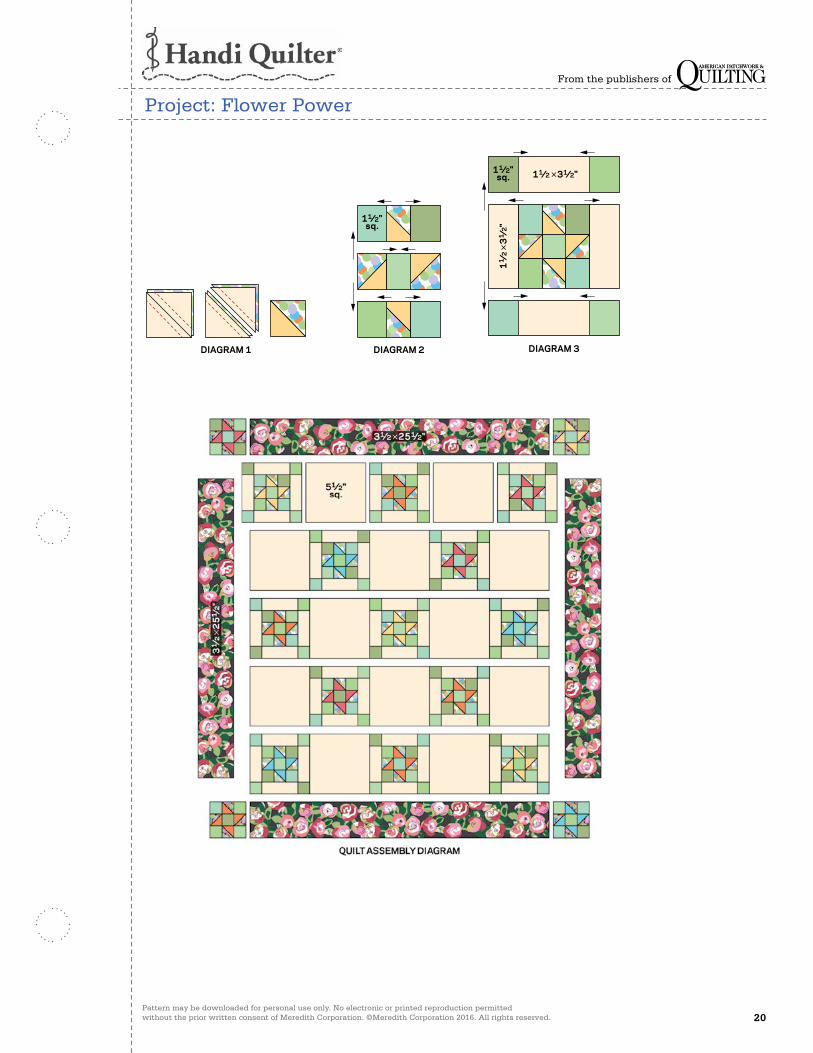
3. Lay out five assorted green print 11⁄2" squares and four matching triangle-squares in three rows (Diagram 2; note orientation of multicolor dot triangles). Sew together pieces in each row. Join rows to make a star unit. The unit should be 31⁄2" square including seam allowances. Repeat to make 17 star units total. Set aside four star units for the border.
4. Referring to Diagram 3, lay out a star unit, four assorted green print 11⁄2" squares, and four cream print 11⁄2 ×31⁄2" rectangles in three rows. Sew together pieces in each row. Join rows to make a block. The block should be 51⁄2" square including seam allowances. Repeat to make 13 blocks total.
Assemble Quilt Top1. Referring to Quilt Assembly
Diagram, lay out blocks and cream print 51⁄2" setting squares in five rows. Sew together pieces in each row. Press seams toward setting squares. Join rows to make quilt center. Press seams in one direction. The quilt center should be 251⁄2" square including seam allowances.
2. Sew black floral 31⁄2 ×251⁄2" border strips to opposite edges of quilt center. Press seams toward border.
3. Sew a remaining star unit to each end of remaining black floral 31⁄2 ×251⁄2" border strips to make two pieced border strips. Press seams toward black floral strips. Join pieced border strips to remaining edges of quilt center to complete quilt top. Press seams toward border.
Finish Quilt1. Layer quilt top, batting, and
backing; baste.
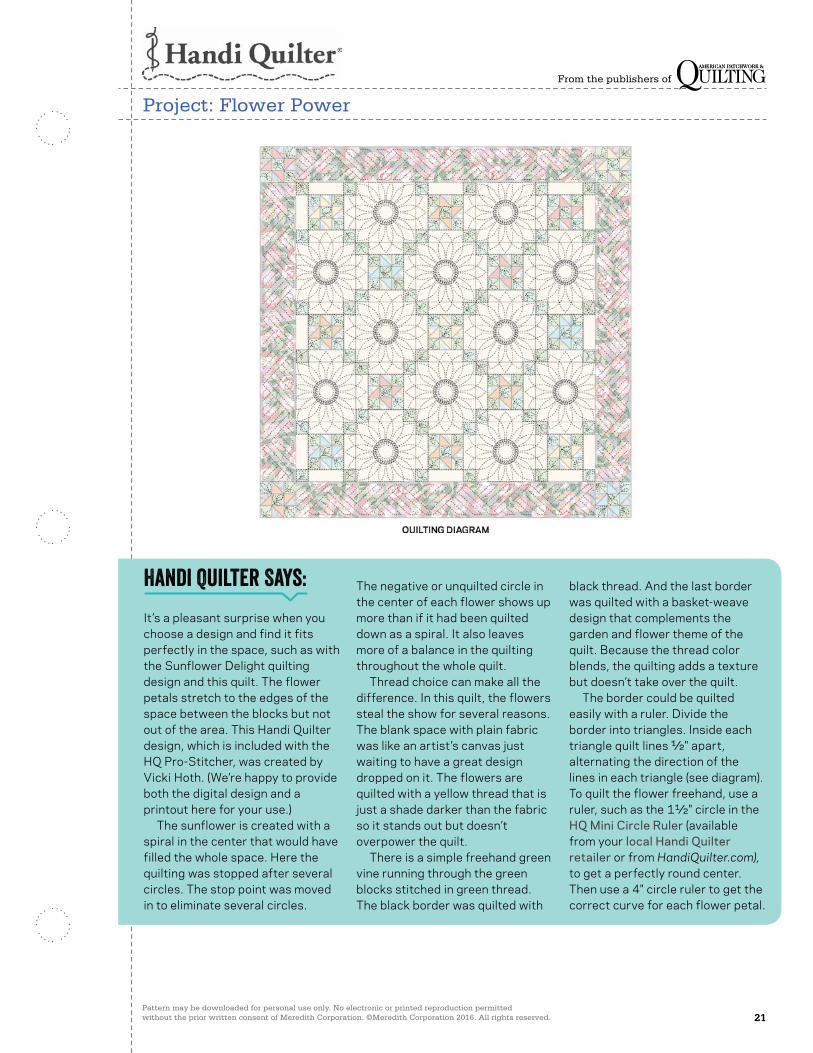
2. Quilt as desired. Handi Quilter educator Marie Eldredge free-motion-quilted a string of vines and leaves in the green squares of each block (Quilting Diagram). She also used two computerized designs ( just released with the Handi Quilter Pro-Stitcher update) to add a flower design to the setting squares and a basket-weave design to the border. Since the cream fabric is so light, Marie used a slightly darker thread color to make her quilting designs stand out.
3. Bind with dark green print binding strips.
Pattern may be downloaded for personal use only. No electronic or printed reproduction permitted without the prior written consent of Meredith Corporation. ©Meredith Corporation 2016. All rights reserved. 20
From the publishers of
Project: Flower Power
DIAGRAM 1
APQ OCTOBER 2015CMR 5813690 Friendship Irish Chain OptionalDiagram 1C. Neubauer 6-18-15100650273
DIAGRAM 2
11⁄2"sq.
APQ OCTOBER 2015CMR 5813690 Friendship Irish Chain OptionalDiagram 2C. Neubauer 6-18-15100650274
11⁄2×31⁄2"
11 ⁄2×
31 ⁄2
"
11⁄2"sq.
DIAGRAM 3
APQ OCTOBER 2015CMR 5813690 Friendship Irish Chain OptionalDiagram 3C. Neubauer 5-15-15100650275
Pattern may be downloaded for personal use only. No electronic or printed reproduction permitted without the prior written consent of Meredith Corporation. ©Meredith Corporation 2016. All rights reserved. 21
From the publishers of
Project: Flower Power
Handi Quilter Says:
It’s a pleasant surprise when you choose a design and find it fits perfectly in the space, such as with the Sunflower Delight quilting design and this quilt. The flower petals stretch to the edges of the space between the blocks but not out of the area. This Handi Quilter design, which is included with the HQ Pro-Stitcher, was created by Vicki Hoth. (We’re happy to provide both the digital design and a printout here for your use.) The sunflower is created with a spiral in the center that would have filled the whole space. Here the quilting was stopped after several circles. The stop point was moved in to eliminate several circles.
The negative or unquilted circle in the center of each flower shows up more than if it had been quilted down as a spiral. It also leaves more of a balance in the quilting throughout the whole quilt. Thread choice can make all the difference. In this quilt, the flowers steal the show for several reasons. The blank space with plain fabric was like an artist’s canvas just waiting to have a great design dropped on it. The flowers are quilted with a yellow thread that is just a shade darker than the fabric so it stands out but doesn’t overpower the quilt. There is a simple freehand green vine running through the green blocks stitched in green thread. The black border was quilted with
black thread. And the last border was quilted with a basket-weave design that complements the garden and flower theme of the quilt. Because the thread color blends, the quilting adds a texture but doesn’t take over the quilt. The border could be quilted easily with a ruler. Divide the border into triangles. Inside each triangle quilt lines 1⁄2" apart, alternating the direction of the lines in each triangle (see diagram). To quilt the flower freehand, use a ruler, such as the 11⁄2" circle in the HQ Mini Circle Ruler (available from your local Handi Quilter retailer or from HandiQuilter.com), to get a perfectly round center. Then use a 4" circle ruler to get the correct curve for each flower petal.
Pattern may be downloaded for personal use only. No electronic or printed reproduction permitted without the prior written consent of Meredith Corporation. ©Meredith Corporation 2016. All rights reserved. 22
From the publishers of
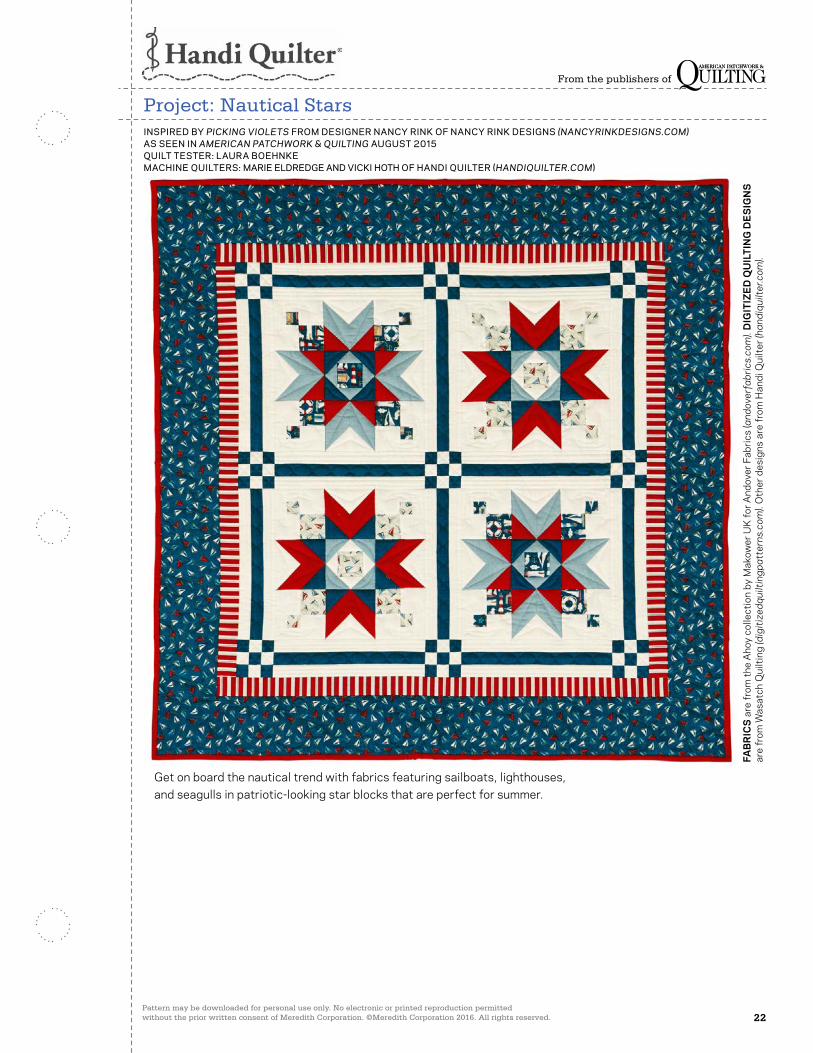
Project: Nautical Stars
Get on board the nautical trend with fabrics featuring sailboats, lighthouses, and seagulls in patriotic-looking star blocks that are perfect for summer.
INSPIRED BY PICKING VIOLETS FROM DESIGNER NANCY RINK OF NANCY RINK DESIGNS (NANCYRINKDESIGNS.COM)AS SEEN IN AMERICAN PATCHWORK & QUILTING AUGUST 2015 QUILT TESTER: LAURA BOEHNKEMACHINE QUILTERS: MARIE ELDREDGE AND VICKI HOTH OF HANDI QUILTER (HANDIQUILTER.COM)
FAB
RIC
S a
re fr
om th
e A
hoy
colle
ctio
n by
Mak
ower
UK
for A
ndov
er F
abric
s (a
ndov
erfa
bric
s.co
m).
DIG
ITIZ
ED
QU
ILTI
NG
DE
SIG
NS
ar
e fr
om W
asat
ch Q
uilti
ng (d
igiti
zedq
uilti
ngpa
tter
ns.c
om).
Oth
er d
esig
ns a
re fr
om H
andi
Qui
lter (
hand
iqui
lter.c
om).
Pattern may be downloaded for personal use only. No electronic or printed reproduction permitted without the prior written consent of Meredith Corporation. ©Meredith Corporation 2016. All rights reserved. 23
From the publishers of
Project: Nautical Stars
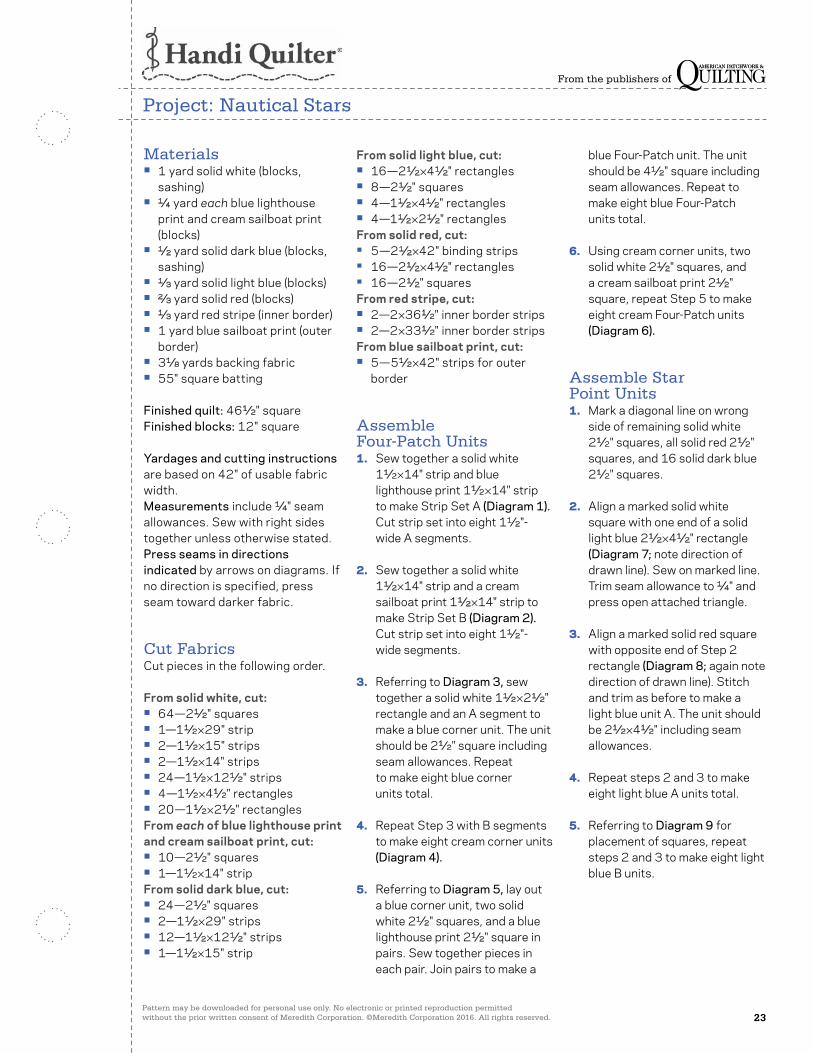
Materials• 1 yard solid white (blocks,
sashing)• 1⁄4 yard each blue lighthouse
print and cream sailboat print (blocks)
• 1⁄2 yard solid dark blue (blocks, sashing)
• 1⁄3 yard solid light blue (blocks)• 2⁄3 yard solid red (blocks)• 1⁄3 yard red stripe (inner border)• 1 yard blue sailboat print (outer
border)• 31⁄8 yards backing fabric• 55" square batting
Finished quilt: 461⁄2" squareFinished blocks: 12" square
Yardages and cutting instructions are based on 42" of usable fabric width.Measurements include 1⁄4" seam allowances. Sew with right sides together unless otherwise stated.Press seams in directions indicated by arrows on diagrams. If no direction is specified, press seam toward darker fabric.
Cut FabricsCut pieces in the following order. From solid white, cut:• 64—21⁄2" squares• 1—11⁄2 ×29" strip• 2—11⁄2 ×15" strips• 2—11⁄2 ×14" strips• 24—11⁄2 ×121⁄2" strips• 4—11⁄2 ×41⁄2" rectangles• 20—11⁄2 ×21⁄2" rectanglesFrom each of blue lighthouse print and cream sailboat print, cut:• 10—21⁄2" squares• 1—11⁄2 ×14" stripFrom solid dark blue, cut:• 24—21⁄2" squares• 2—11⁄2 ×29" strips• 12—11⁄2 ×121⁄2" strips• 1—11⁄2 ×15" strip
From solid light blue, cut:• 16—21⁄2 ×41⁄2" rectangles• 8—21⁄2" squares• 4—11⁄2 ×41⁄2" rectangles• 4—11⁄2 ×21⁄2" rectanglesFrom solid red, cut:• 5—21⁄2 ×42" binding strips• 16—21⁄2 ×41⁄2" rectangles• 16—21⁄2" squaresFrom red stripe, cut:• 2—2×361⁄2" inner border strips• 2—2×331⁄2" inner border stripsFrom blue sailboat print, cut:• 5—51⁄2 ×42" strips for outer
border
Assemble Four-Patch Units1. Sew together a solid white
11⁄2 ×14" strip and blue lighthouse print 11⁄2 ×14" strip to make Strip Set A (Diagram 1). Cut strip set into eight 11⁄2"-wide A segments.
2. Sew together a solid white 11⁄2 ×14" strip and a cream sailboat print 11⁄2 ×14" strip to make Strip Set B (Diagram 2). Cut strip set into eight 11⁄2"-wide segments.
3. Referring to Diagram 3, sew together a solid white 11⁄2 ×21⁄2" rectangle and an A segment to make a blue corner unit. The unit should be 21⁄2" square including seam allowances. Repeat to make eight blue corner units total.
4. Repeat Step 3 with B segments to make eight cream corner units (Diagram 4).
5. Referring to Diagram 5, lay out a blue corner unit, two solid white 21⁄2" squares, and a blue lighthouse print 21⁄2" square in pairs. Sew together pieces in each pair. Join pairs to make a
blue Four-Patch unit. The unit should be 41⁄2" square including seam allowances. Repeat to make eight blue Four-Patch units total.
6. Using cream corner units, two solid white 21⁄2" squares, and a cream sailboat print 21⁄2" square, repeat Step 5 to make eight cream Four-Patch units (Diagram 6).
Assemble Star Point Units1. Mark a diagonal line on wrong
side of remaining solid white 21⁄2" squares, all solid red 21⁄2" squares, and 16 solid dark blue 21⁄2" squares.
2. Align a marked solid white square with one end of a solid light blue 21⁄2 ×41⁄2" rectangle (Diagram 7; note direction of drawn line). Sew on marked line. Trim seam allowance to 1⁄4" and press open attached triangle.
3. Align a marked solid red square with opposite end of Step 2 rectangle (Diagram 8; again note direction of drawn line). Stitch and trim as before to make a light blue unit A. The unit should be 21⁄2 ×41⁄2" including seam allowances.
4. Repeat steps 2 and 3 to make eight light blue A units total.
5. Referring to Diagram 9 for placement of squares, repeat steps 2 and 3 to make eight light blue B units.

Pattern may be downloaded for personal use only. No electronic or printed reproduction permitted without the prior written consent of Meredith Corporation. ©Meredith Corporation 2016. All rights reserved. 24
From the publishers of
Project: Nautical Stars
6. Using solid red 21⁄2 ×41⁄2" rectangles, remaining marked solid white squares, and 16 marked solid dark blue squares, repeat steps 2 and 3 to make eight red A units and eight red B units (Diagram 10).
7. Sew together a light blue A unit and a light blue B unit to make a light blue star point unit (Diagram 11). Press seam open. The star point unit should be 41⁄2" square including seam allowances. Repeat to make eight light blue star point units total.
8. Repeat Step 7 using red A and B units to make eight red star point units (Diagram 12).
Assemble Center Units1. Mark a diagonal line on wrong
side of remaining solid dark blue and all solid light blue 21⁄2" squares.
2. Sew solid light blue 11⁄2 ×21⁄2" rectangles to opposite edges of a blue lighthouse 21⁄2" square (Diagram 13). Join solid light blue 11⁄2 ×41⁄2" rectangles to remaining edges.
3. Align marked solid dark blue squares with opposite corners of Step 2 unit (Diagram 14). Sew on marked lines. Trim seam allowances to 1⁄4"; press open attached triangles. Repeat with remaining corners to make a dark blue center unit. The center unit should be 41⁄2" square including seam allowances.
4. Repeat steps 2 and 3 to make two dark blue center units total.
5. Using solid white 11⁄2 ×21⁄2" and 11⁄2 ×41⁄2" rectangles, cream
sailboat print 21⁄2" squares, and marked solid light blue squares, repeat steps 2 and 3 to make two light blue center units (Diagram 15).
Assemble Blocks1. Referring to Diagram 16, lay out
four blue Four-Patch units, four light blue star point units, and a dark blue center unit in three horizontal rows. Sew together pieces in each row. Join rows to make Block A. The block should be 121⁄2" square including seam allowances. Repeat to make two A blocks total.
2. Using cream Four-Patch units, red star point units, and light blue center units, repeat Step 1 to make two B blocks (Diagram 17).
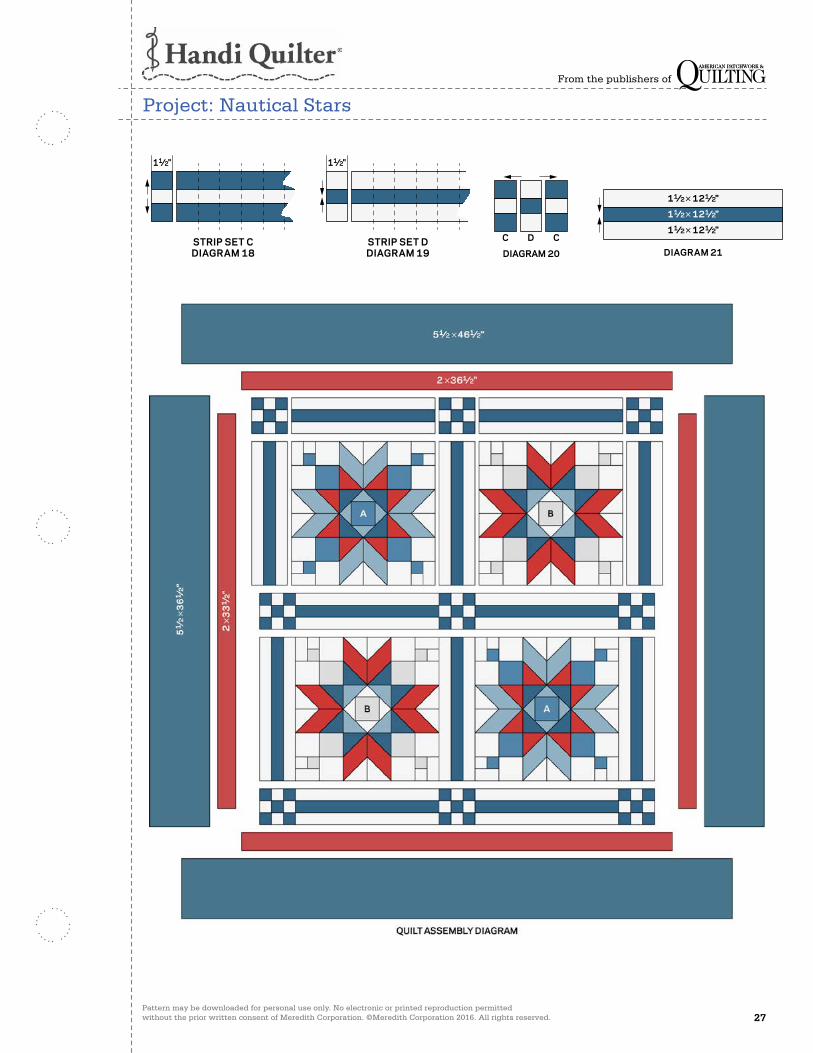
Assemble Sashing Squares and Rectangles1. Referring to Diagram 18,
sew together two solid dark blue 11⁄2 ×29" strips and one solid white 11⁄2 ×29" strip to make Strip Set C. Cut strip set into eighteen—11⁄2"-wide C segments.
2. Sew together two solid white 11⁄2 ×15" strips and one solid dark blue 11⁄2 ×15" strip to make Strip Set D (Diagram 19). Cut strip set into nine 11⁄2"-wide D segments.
3. Join two C segments and one D segment to make a sashing square (Diagram 20). The sashing square should be 31⁄2" square including seam allowances. Repeat to make nine sashing squares total.
4. Referring to Diagram 21, sew together two solid white 11⁄2 ×121⁄2" strips and a solid dark blue 11⁄2 ×121⁄2" strip to make a sashing rectangle. The sashing rectangle should be 31⁄2 ×121⁄2" including seam allowances. Repeat to make 12 sashing rectangles total.
Assemble Quilt Center1. Referring to Quilt Assembly
Diagram, lay out sashing squares, sashing rectangles, and alternating A and B blocks in five horizontal rows.
2. Sew together pieces in each row. Press seams toward sashing rectangles. Join rows to make quilt center; press seams away from block rows. The quilt center should be 331⁄2" square including seam allowances.
Add Inner and Outer Borders1. Sew red stripe 2×331⁄2" strips
to opposite edges of quilt center. Add red stripe 2×361⁄2" strips to remaining edges. Press all seams toward inner border.
2. Cut and piece blue sailboat print 51⁄2 ×42" strips to make:• 2—51⁄2 ×461⁄2" outer border
strips• 2—51⁄2 ×361⁄2" outer border
strips
3. Sew short blue sailboat print strips to opposite edges of quilt center. Add long blue sailboat print strips to remaining edges to complete quilt top. Press all seams toward outer border.
Pattern may be downloaded for personal use only. No electronic or printed reproduction permitted without the prior written consent of Meredith Corporation. ©Meredith Corporation 2016. All rights reserved. 25
From the publishers of
Project: Nautical Stars
Finish Quilt1. Layer quilt top, batting, and
backing; baste.
2. Quilt as desired. To give the quilting depth, Handi Quilter Educator Marie Eldredge and Handi Quilter Education Coordinator Vicki Hoth used two layers of batting—Hobbs 80⁄20 on the bottom and Hobbs wool on top. Marie first stitched in the ditch to stabilize the quilt top (Quilting Diagram). Then Vicki used the HQ Pro-Stitcher on the HQ Infinity machine to stitch an anchor motif in each block corner and tumbling along the outer border. Vicki used a ruler to stitch angled lines in the star points, parallel rows and a rope design in the sashing strips, and short straight lines following the inner border stripe.
3. Bind with solid red binding strips.

Pattern may be downloaded for personal use only. No electronic or printed reproduction permitted without the prior written consent of Meredith Corporation. ©Meredith Corporation 2016. All rights reserved. 26
From the publishers of
Project: Nautical Stars
11⁄2"
STRIP SET ADIAGRAM 1
APQ AUGUST 2015CMR 5769042 Purple Mill Works OptionalDiagram 1C. Neubauer 4-8-15100650111
11⁄2"
STRIP SET BDIAGRAM 2
APQ AUGUST 2015CMR 5769042 Purple Mill Works OptionalDiagram 2C. Neubauer 4-8-15100650112
11⁄2×21⁄2"
DIAGRAM 3
A
APQ AUGUST 2015CMR 5769042 Purple Mill Works OptionalDiagram 3C. Neubauer 4-8-15100650113
11⁄2×21⁄2"
DIAGRAM 4
B
APQ AUGUST 2015CMR 5769042 Purple Mill Works OptionalDiagram 4C. Neubauer 4-8-15100650114
DIAGRAM 5
21⁄2"sq.
APQ AUGUST 2015CMR 5769042 Purple Mill Works OptionalDiagram 5C. Neubauer 4-8-15100650115
DIAGRAM 6
21⁄2"sq.
APQ AUGUST 2015CMR 5769042 Purple Mill Works OptionalDiagram 6C. Neubauer 4-8-15100650116
DIAGRAM 7
21⁄2×
41⁄2"
APQ AUGUST 2015CMR 5769042 Purple Mill Works OptionalDiagram 7C. Neubauer 4-8-15100650117
DIAGRAM 8
A
APQ AUGUST 2015CMR 5769042 Purple Mill Works OptionalDiagram 8C. Neubauer 4-8-15100650118
DIAGRAM 9
B
APQ AUGUST 2015CMR 5769042 Purple Mill Works OptionalDiagram 9C. Neubauer 4-8-15100650119
BA
DIAGRAM 10
APQ AUGUST 2015CMR 5769042 Purple Mill Works OptionalDiagram 10C. Neubauer 4-8-15100650120
DIAGRAM 11
BA
APQ AUGUST 2015CMR 5769042 Purple Mill Works OptionalDiagram 11C. Neubauer 4-8-15100650121
DIAGRAM 12
BA
APQ AUGUST 2015CMR 5769042 Purple Mill Works OptionalDiagram 12C. Neubauer 4-8-15100650122
11⁄2×41⁄2"
21⁄2"sq.
11⁄2×
21⁄2"
DIAGRAM 13
APQ AUGUST 2015CMR 5769042 Purple Mill Works OptionalDiagram 13C. Neubauer 4-8-15100650123
DIAGRAM 14
APQ AUGUST 2015CMR 5769042 Purple Mill Works OptionalDiagram 14C. Neubauer 4-8-15100650124
DIAGRAM 15
APQ AUGUST 2015CMR 5769042 Purple Mill Works OptionalDiagram 15C. Neubauer 4-8-15100650125
BLOCK ADIAGRAM 16
APQ AUGUST 2015CMR 5769042 Purple Mill Works OptionalDiagram 16C. Neubauer 4-8-15100650126
BLOCK BDIAGRAM 17
APQ AUGUST 2015CMR 5769042 Purple Mill Works OptionalDiagram 17C. Neubauer 4-8-15100650127
Pattern may be downloaded for personal use only. No electronic or printed reproduction permitted without the prior written consent of Meredith Corporation. ©Meredith Corporation 2016. All rights reserved. 27
From the publishers of
Project: Nautical Stars
11⁄2"
STRIP SET CDIAGRAM 18
APQ AUGUST 2015CMR 5769042 Purple Mill Works OptionalDiagram 18C. Neubauer 4-8-15100650128
11⁄2"
STRIP SET DDIAGRAM 19
APQ AUGUST 2015CMR 5769042 Purple Mill Works OptionalDiagram 19C. Neubauer 4-8-15100650129
DIAGRAM 20
C D C
APQ AUGUST 2015CMR 5769042 Purple Mill Works OptionalDiagram 20C. Neubauer 4-8-15100650130
11⁄2×121⁄2"
11⁄2×121⁄2"
11⁄2×121⁄2"
DIAGRAM 21
APQ AUGUST 2015CMR 5769042 Purple Mill Works OptionalDiagram 21C. Neubauer 4-8-15100650131
Pattern may be downloaded for personal use only. No electronic or printed reproduction permitted without the prior written consent of Meredith Corporation. ©Meredith Corporation 2016. All rights reserved. 28
From the publishers of
Project: Nautical Stars
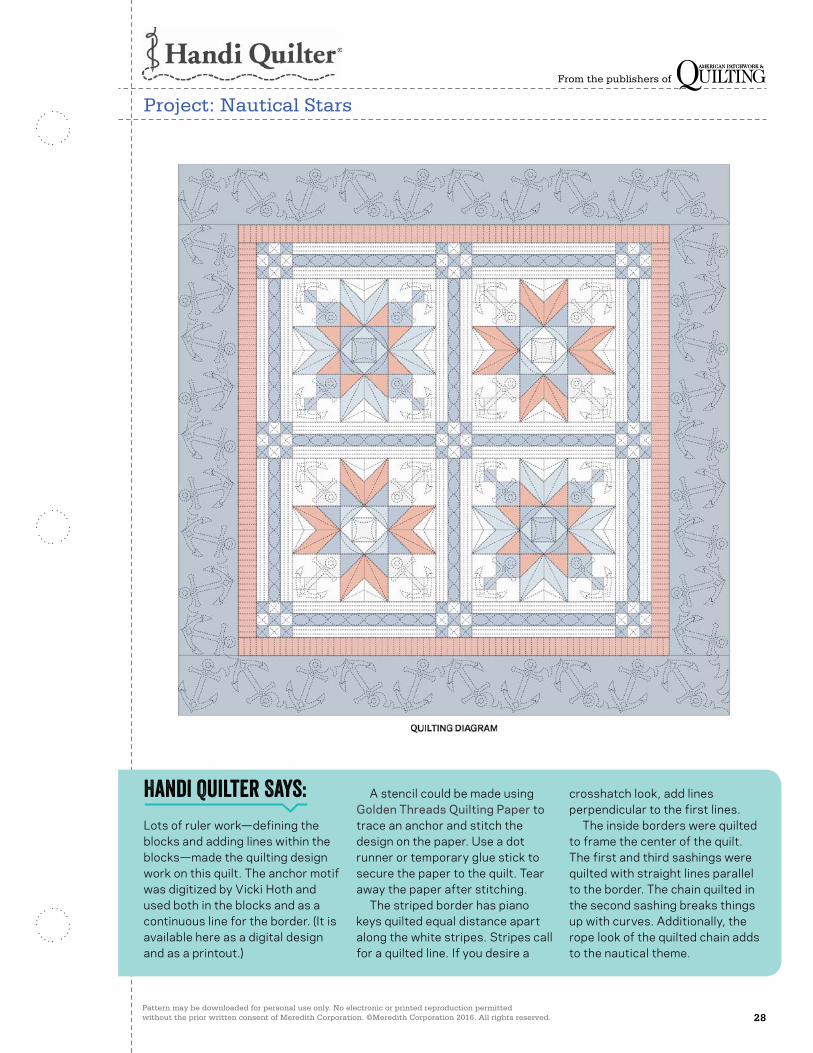
Handi Quilter Says:Lots of ruler work—defining the blocks and adding lines within the blocks—made the quilting design work on this quilt. The anchor motif was digitized by Vicki Hoth and used both in the blocks and as a continuous line for the border. (It is available here as a digital design and as a printout.)
A stencil could be made using Golden Threads Quilting Paper to trace an anchor and stitch the design on the paper. Use a dot runner or temporary glue stick to secure the paper to the quilt. Tear away the paper after stitching. The striped border has piano keys quilted equal distance apart along the white stripes. Stripes call for a quilted line. If you desire a
crosshatch look, add lines perpendicular to the first lines. The inside borders were quilted to frame the center of the quilt. The first and third sashings were quilted with straight lines parallel to the border. The chain quilted in the second sashing breaks things up with curves. Additionally, the rope look of the quilted chain adds to the nautical theme.
Pattern may be downloaded for personal use only. No electronic or printed reproduction permitted without the prior written consent of Meredith Corporation. ©Meredith Corporation 2016. All rights reserved. 29
From the publishers of
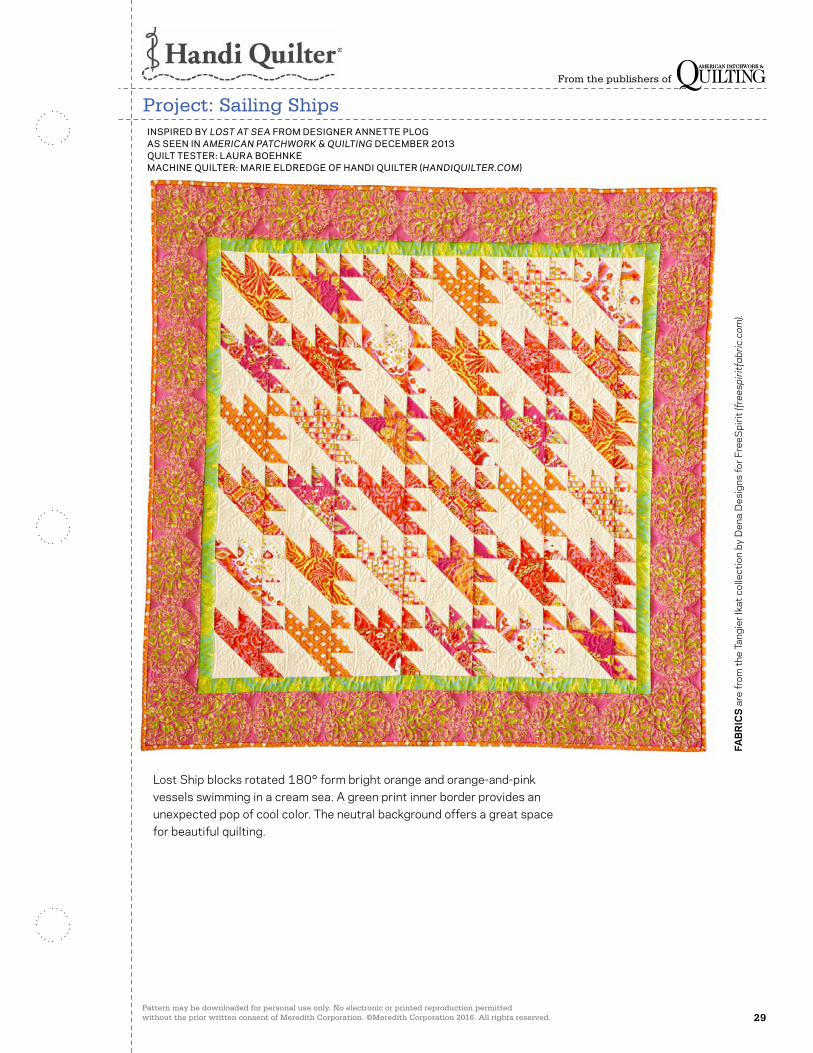
Project: Sailing ShipsINSPIRED BY LOST AT SEA FROM DESIGNER ANNETTE PLOG AS SEEN IN AMERICAN PATCHWORK & QUILTING DECEMBER 2013QUILT TESTER: LAURA BOEHNKE MACHINE QUILTER: MARIE ELDREDGE OF HANDI QUILTER (HANDIQUILTER.COM)
FAB
RIC
S a
re fr
om th
e Ta
ngie
r Ika
t col
lect
ion
by D
ena
Des
igns
for F
reeS
pirit
(fre
espi
ritfa
bric
.com
).
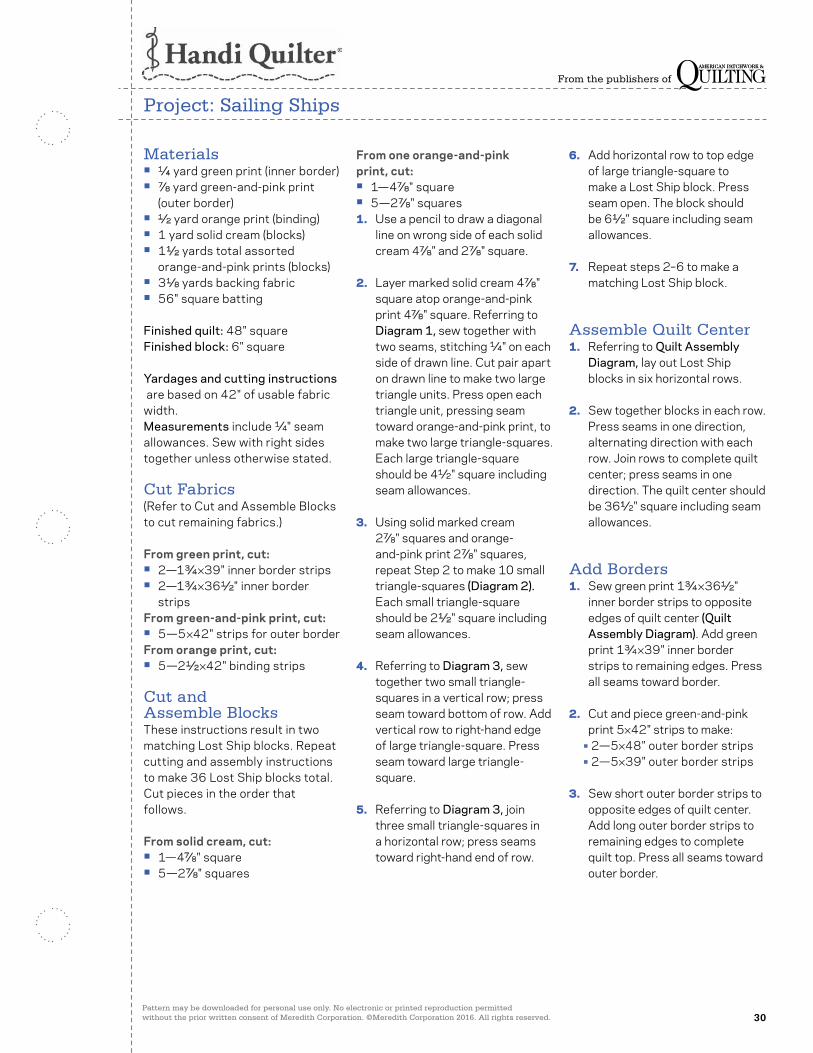
Lost Ship blocks rotated 180° form bright orange and orange-and-pink vessels swimming in a cream sea. A green print inner border provides an unexpected pop of cool color. The neutral background offers a great space for beautiful quilting.
Pattern may be downloaded for personal use only. No electronic or printed reproduction permitted without the prior written consent of Meredith Corporation. ©Meredith Corporation 2016. All rights reserved. 30
From the publishers of
Project: Sailing Ships
Materials• 1⁄4 yard green print (inner border)• 7⁄8 yard green-and-pink print
(outer border)• 1⁄2 yard orange print (binding)• 1 yard solid cream (blocks)• 11⁄2 yards total assorted
orange-and-pink prints (blocks)• 31⁄8 yards backing fabric• 56" square batting
Finished quilt: 48" squareFinished block: 6" square
Yardages and cutting instructions are based on 42" of usable fabric width.Measurements include 1⁄4" seam allowances. Sew with right sides together unless otherwise stated.
Cut Fabrics(Refer to Cut and Assemble Blocks to cut remaining fabrics.)
From green print, cut:• 2—13⁄4 ×39" inner border strips• 2—13⁄4 ×361⁄2" inner border
stripsFrom green-and-pink print, cut:• 5—5 ×42" strips for outer borderFrom orange print, cut:• 5—21⁄2 ×42" binding strips
Cut and Assemble BlocksThese instructions result in two matching Lost Ship blocks. Repeat cutting and assembly instructions to make 36 Lost Ship blocks total. Cut pieces in the order that follows.
From solid cream, cut:• 1—47⁄8" square• 5—27⁄8" squares
From one orange-and-pink print, cut:• 1—47⁄8" square• 5—27⁄8" squares1. Use a pencil to draw a diagonal
line on wrong side of each solid cream 47⁄8" and 27⁄8" square.
2. Layer marked solid cream 47⁄8" square atop orange-and-pink print 47⁄8" square. Referring to Diagram 1, sew together with two seams, stitching 1⁄4" on each side of drawn line. Cut pair apart on drawn line to make two large triangle units. Press open each triangle unit, pressing seam toward orange-and-pink print, to make two large triangle-squares. Each large triangle-square should be 41⁄2" square including seam allowances.
3. Using solid marked cream 27⁄8" squares and orange-and-pink print 27⁄8" squares, repeat Step 2 to make 10 small triangle-squares (Diagram 2). Each small triangle-square should be 21⁄2" square including seam allowances.
4. Referring to Diagram 3, sew together two small triangle-squares in a vertical row; press seam toward bottom of row. Add vertical row to right-hand edge of large triangle-square. Press seam toward large triangle-square.
5. Referring to Diagram 3, join three small triangle-squares in a horizontal row; press seams toward right-hand end of row.
6. Add horizontal row to top edge of large triangle-square to make a Lost Ship block. Press seam open. The block should be 61⁄2" square including seam allowances.
7. Repeat steps 2–6 to make a matching Lost Ship block.
Assemble Quilt Center1. Referring to Quilt Assembly
Diagram, lay out Lost Ship blocks in six horizontal rows.
2. Sew together blocks in each row. Press seams in one direction, alternating direction with each row. Join rows to complete quilt center; press seams in one direction. The quilt center should be 361⁄2" square including seam allowances.
Add Borders1. Sew green print 13⁄4 ×361⁄2"
inner border strips to opposite edges of quilt center (Quilt Assembly Diagram). Add green print 13⁄4 ×39" inner border strips to remaining edges. Press all seams toward border.
2. Cut and piece green-and-pink print 5×42" strips to make:
• 2—5×48" outer border strips • 2—5×39" outer border strips
3. Sew short outer border strips to opposite edges of quilt center. Add long outer border strips to remaining edges to complete quilt top. Press all seams toward outer border.
Pattern may be downloaded for personal use only. No electronic or printed reproduction permitted without the prior written consent of Meredith Corporation. ©Meredith Corporation 2016. All rights reserved. 31
From the publishers of
Project: Sailing Ships
Finish Quilt1. Layer quilt top, batting, and
backing; baste.
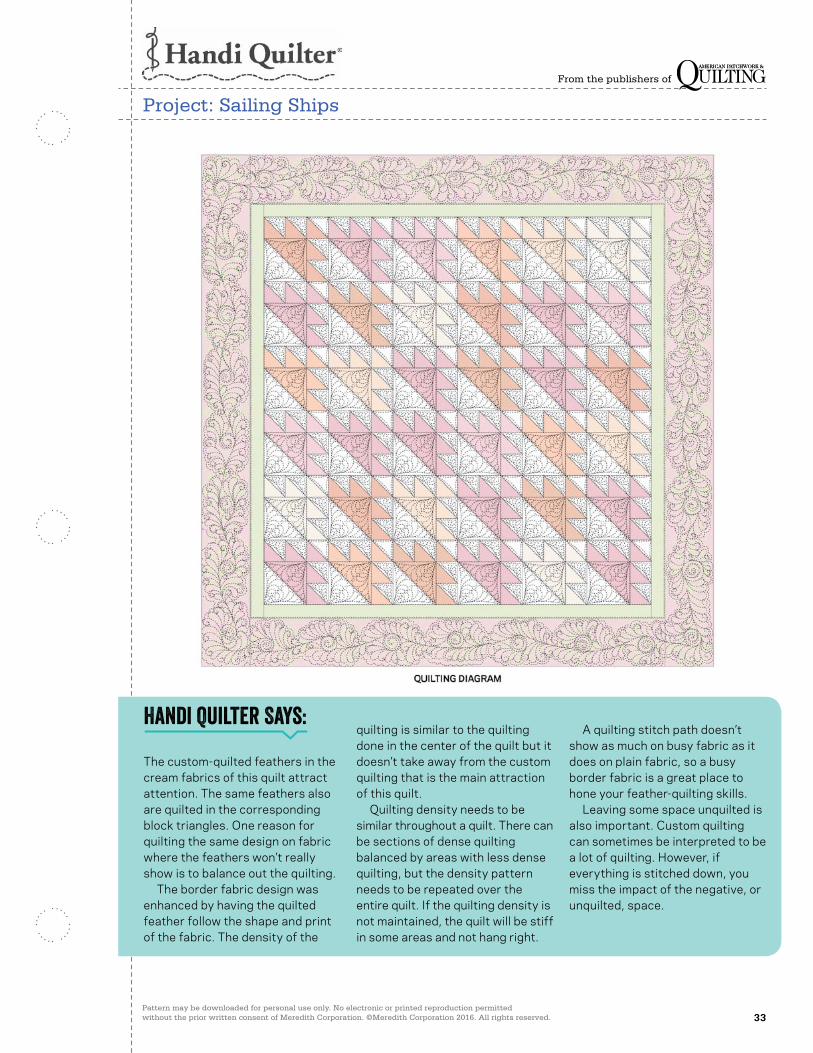
2. Quilt as desired. Handi Quilter educator Marie Eldredge machine-quilted a cluster of feathers over each circular motif in the outer border (Quilting Diagram). She highlighted the large triangles and small cream triangles in each Lost Ship block with simpler feathers and connected the triangles with stitched arcs. By using two layers of batting and not stitching in the orange or orange-and-pink small triangles, Marie made those areas stand out.
3. Bind with orange print binding strips.

Pattern may be downloaded for personal use only. No electronic or printed reproduction permitted without the prior written consent of Meredith Corporation. ©Meredith Corporation 2016. All rights reserved. 32
From the publishers of
Project: Sailing Ships
DIAGRAM 1
APQ DECEMBER 2013CMRLost Ships Optional QuiltDiagram 1C. Neubauer 8-21-13100546467
DIAGRAM 2
APQ DECEMBER 2013CMRLost Ships Optional QuiltDiagram 2C. Neubauer 8-21-13100546468
DIAGRAM 3
APQ DECEMBER 2013CMRLost Ships Optional QuiltDiagram 3C. Neubauer 8-21-13100546469
Pattern may be downloaded for personal use only. No electronic or printed reproduction permitted without the prior written consent of Meredith Corporation. ©Meredith Corporation 2016. All rights reserved. 33
From the publishers of
Project: Sailing Ships
Handi Quilter Says:
The custom-quilted feathers in the cream fabrics of this quilt attract attention. The same feathers also are quilted in the corresponding block triangles. One reason for quilting the same design on fabric where the feathers won’t really show is to balance out the quilting. The border fabric design was enhanced by having the quilted feather follow the shape and print of the fabric. The density of the
quilting is similar to the quilting done in the center of the quilt but it doesn’t take away from the custom quilting that is the main attraction of this quilt. Quilting density needs to be similar throughout a quilt. There can be sections of dense quilting balanced by areas with less dense quilting, but the density pattern needs to be repeated over the entire quilt. If the quilting density is not maintained, the quilt will be stiff in some areas and not hang right.
A quilting stitch path doesn’t show as much on busy fabric as it does on plain fabric, so a busy border fabric is a great place to hone your feather-quilting skills. Leaving some space unquilted is also important. Custom quilting can sometimes be interpreted to be a lot of quilting. However, if everything is stitched down, you miss the impact of the negative, or unquilted, space.
Pattern may be downloaded for personal use only. No electronic or printed reproduction permitted without the prior written consent of Meredith Corporation. ©Meredith Corporation 2016. All rights reserved. 34
From the publishers of
Project: Sailing Ships
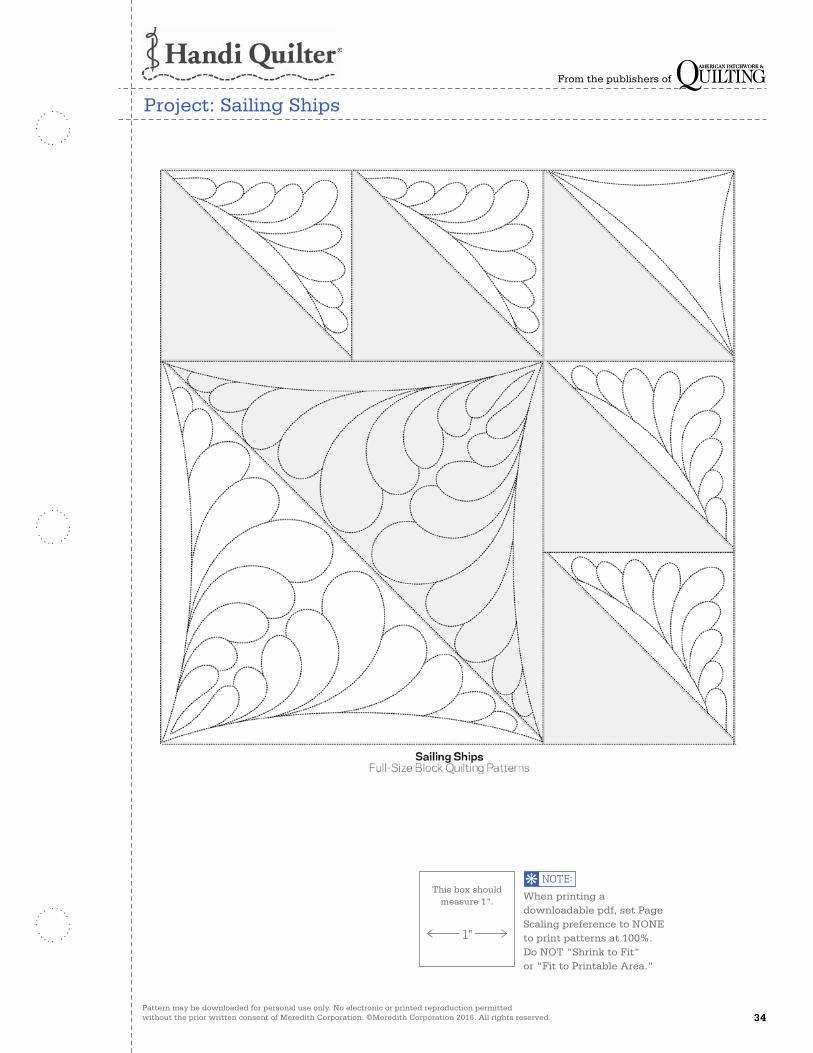
When printing a downloadable pdf, set Page Scaling preference to NONE to print patterns at 100%. Do NOT "Shrink to Fit" or "Fit to Printable Area."
This box should measure 1".
Pattern may be downloaded for personal use only. No electronic or printed reproduction permitted without the prior written consent of Meredith Corporation. ©Meredith Corporation 2016. All rights reserved. 35
From the publishers of
Project: Sailing Ships
A
B
C
D
C
D
A
B
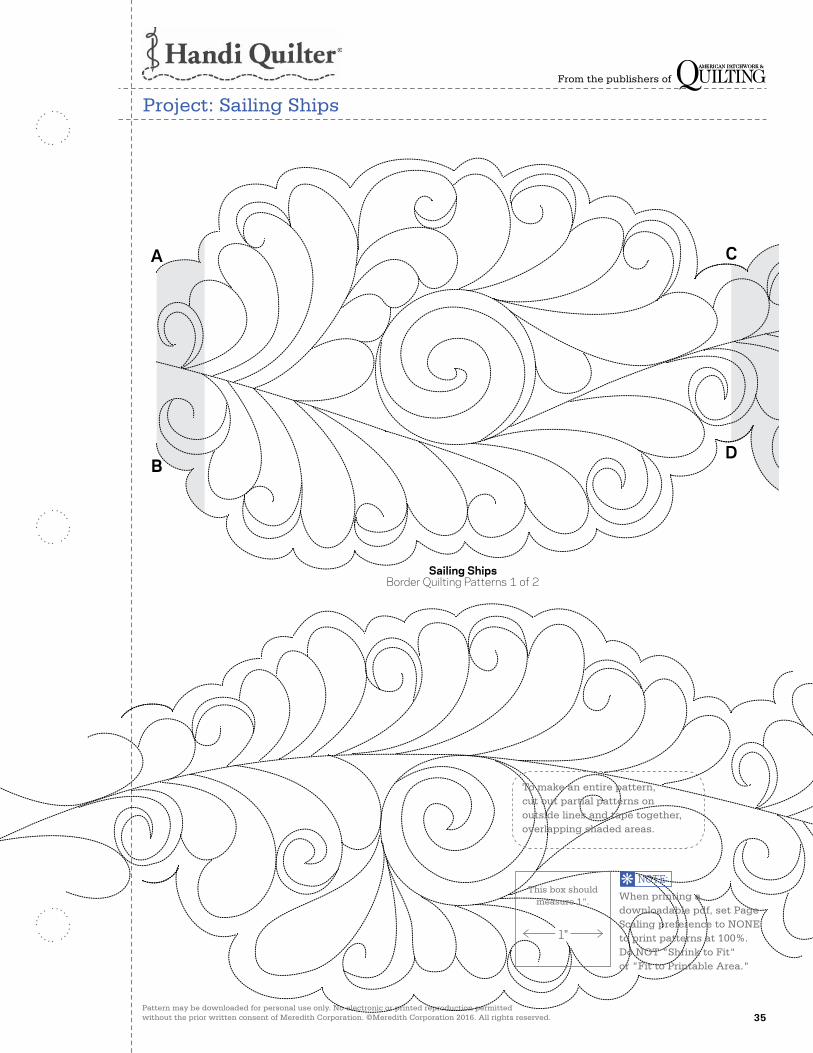
APQ DECEMBER 2013CMR Lost Ships Optional QuiltFull-Size Border Quilting PatternC. Neubauer 8-21-13100546475
Sailing ShipsBorder Quilting Patterns 1 of 2
Sailing ShipsBorder Quilting Patterns 2 of 2
When printing a downloadable pdf, set Page Scaling preference to NONE to print patterns at 100%. Do NOT "Shrink to Fit" or "Fit to Printable Area."
This box should measure 1".
To make an entire pattern, cut out partial patterns on outside lines and tape together, overlapping shaded areas.
Pattern may be downloaded for personal use only. No electronic or printed reproduction permitted without the prior written consent of Meredith Corporation. ©Meredith Corporation 2016. All rights reserved. 36
From the publishers of
Project: Sailing Ships
A
B
C
D
C
D
A
B
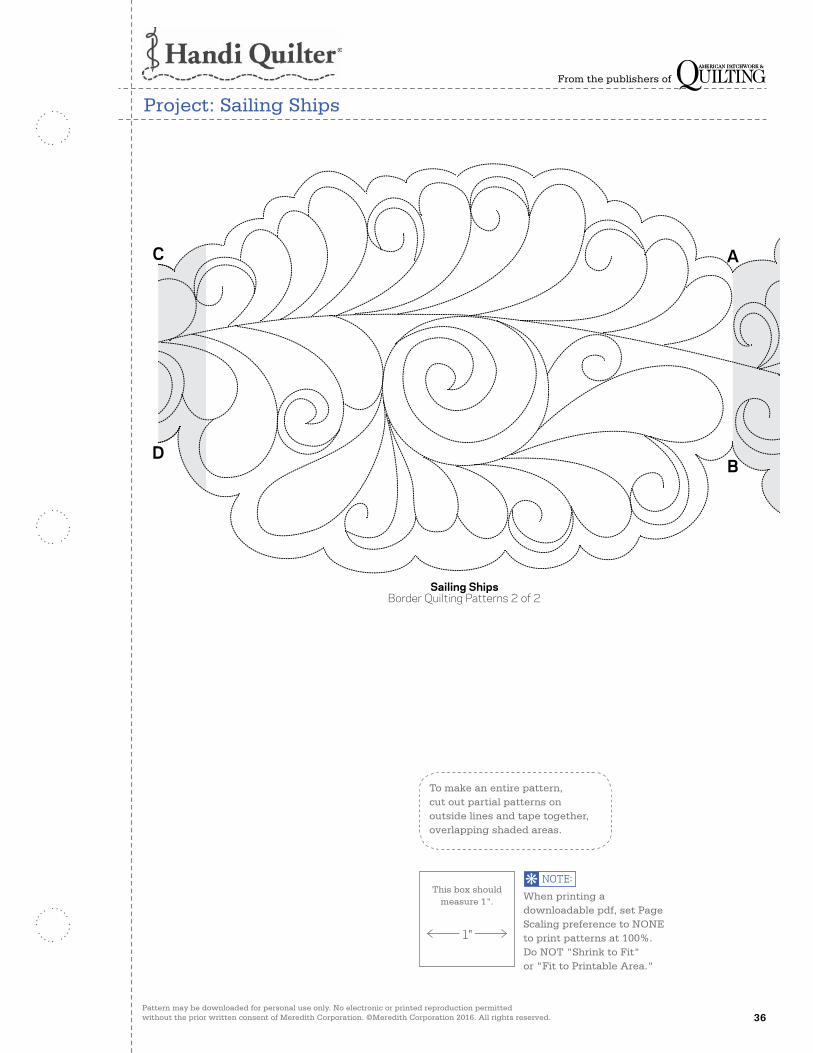
APQ DECEMBER 2013CMR Lost Ships Optional QuiltFull-Size Border Quilting PatternC. Neubauer 8-21-13100546475
Sailing ShipsBorder Quilting Patterns 1 of 2
Sailing ShipsBorder Quilting Patterns 2 of 2
When printing a downloadable pdf, set Page Scaling preference to NONE to print patterns at 100%. Do NOT "Shrink to Fit" or "Fit to Printable Area."
This box should measure 1".
To make an entire pattern, cut out partial patterns on outside lines and tape together, overlapping shaded areas.
Pattern may be downloaded for personal use only. No electronic or printed reproduction permitted without the prior written consent of Meredith Corporation. ©Meredith Corporation 2016. All rights reserved. 37
From the publishers of
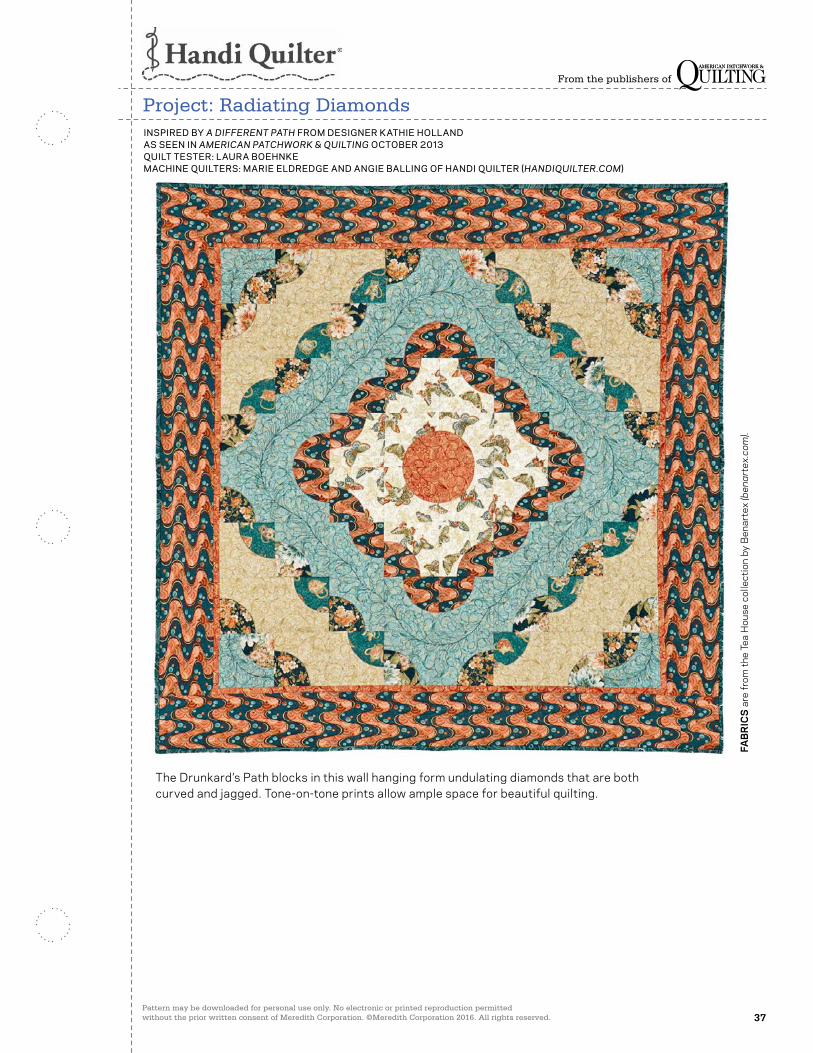
Project: Radiating Diamonds
The Drunkard’s Path blocks in this wall hanging form undulating diamonds that are both curved and jagged. Tone-on-tone prints allow ample space for beautiful quilting.
INSPIRED BY A DIFFERENT PATH FROM DESIGNER KATHIE HOLLAND AS SEEN IN AMERICAN PATCHWORK & QUILTING OCTOBER 2013QUILT TESTER: LAURA BOEHNKEMACHINE QUILTERS: MARIE ELDREDGE AND ANGIE BALLING OF HANDI QUILTER (HANDIQUILTER.COM)
FAB
RIC
S a
re fr
om th
e Te
a H
ouse
col
lect
ion
by B
enar
tex
(ben
arte
x.co
m).
Pattern may be downloaded for personal use only. No electronic or printed reproduction permitted without the prior written consent of Meredith Corporation. ©Meredith Corporation 2016. All rights reserved. 38
From the publishers of
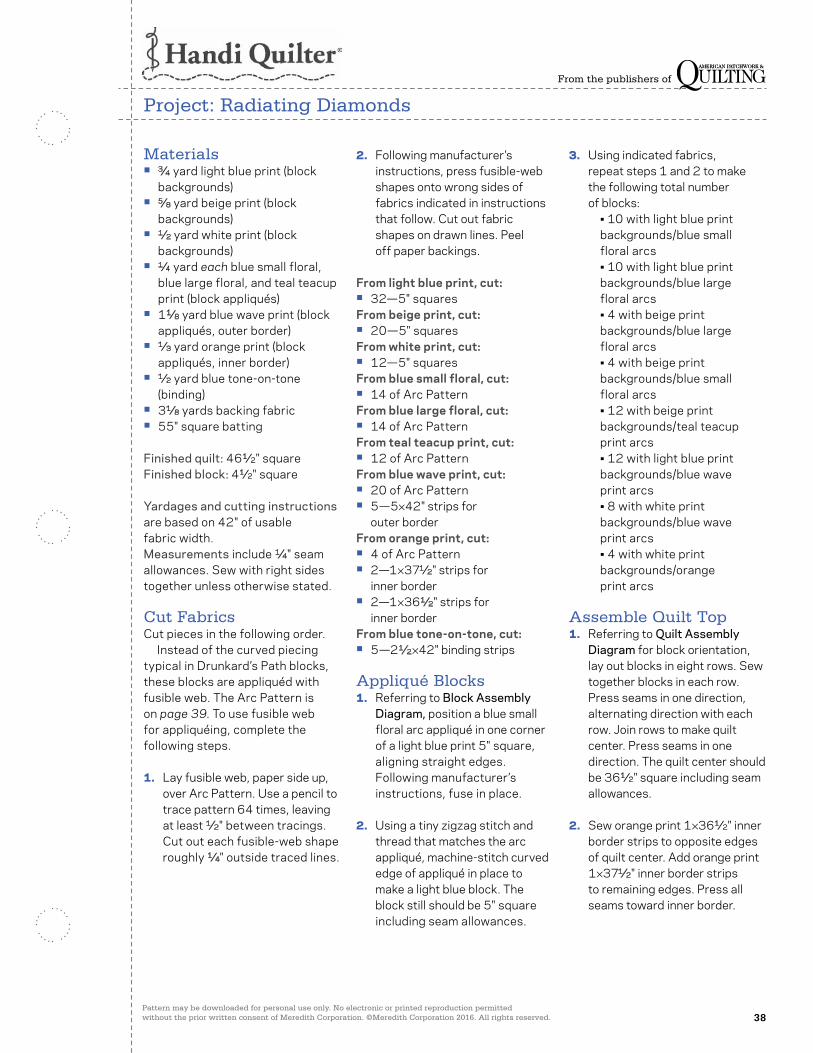
Project: Radiating Diamonds
Materials• 3⁄4 yard light blue print (block
backgrounds)• 5⁄8 yard beige print (block
backgrounds)• 1⁄2 yard white print (block
backgrounds)• 1⁄4 yard each blue small floral,
blue large floral, and teal teacup print (block appliqués)
• 11⁄8 yard blue wave print (block appliqués, outer border)
• 1⁄3 yard orange print (block appliqués, inner border)
• 1⁄2 yard blue tone-on-tone (binding)
• 31⁄8 yards backing fabric• 55" square batting
Finished quilt: 461⁄2" squareFinished block: 41⁄2" square
Yardages and cutting instructions are based on 42" of usable fabric width.Measurements include 1⁄4" seam allowances. Sew with right sides together unless otherwise stated.
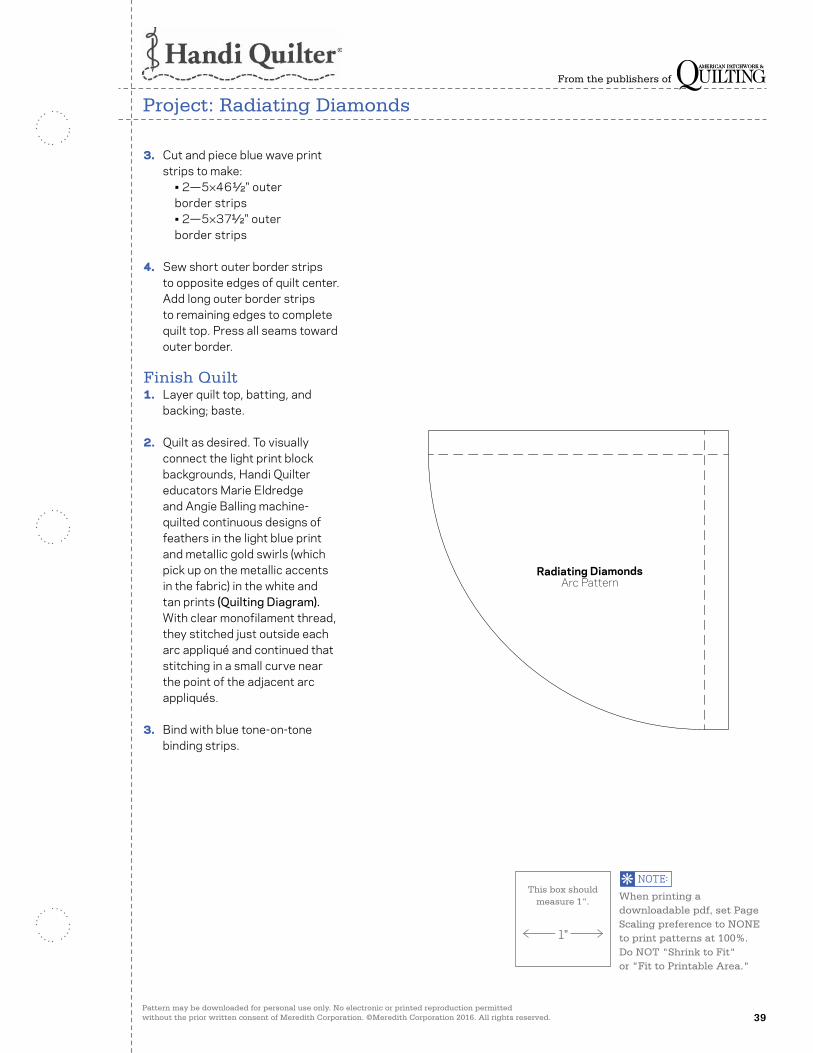
Cut FabricsCut pieces in the following order. Instead of the curved piecing typical in Drunkard’s Path blocks, these blocks are appliquéd with fusible web. The Arc Pattern is on page 39. To use fusible web for appliquéing, complete the following steps.
1. Lay fusible web, paper side up, over Arc Pattern. Use a pencil to trace pattern 64 times, leaving at least 1⁄2" between tracings. Cut out each fusible-web shape roughly 1⁄4" outside traced lines.
2. Following manufacturer’s instructions, press fusible-web shapes onto wrong sides of fabrics indicated in instructions that follow. Cut out fabric shapes on drawn lines. Peel off paper backings.
From light blue print, cut:• 32—5" squaresFrom beige print, cut:• 20—5" squaresFrom white print, cut:• 12—5" squaresFrom blue small floral, cut:• 14 of Arc PatternFrom blue large floral, cut:• 14 of Arc PatternFrom teal teacup print, cut:• 12 of Arc PatternFrom blue wave print, cut:• 20 of Arc Pattern• 5—5×42" strips for
outer borderFrom orange print, cut:• 4 of Arc Pattern• 2—1×371⁄2" strips for
inner border• 2—1×361⁄2" strips for
inner borderFrom blue tone-on-tone, cut:• 5—21⁄2 ×42" binding strips
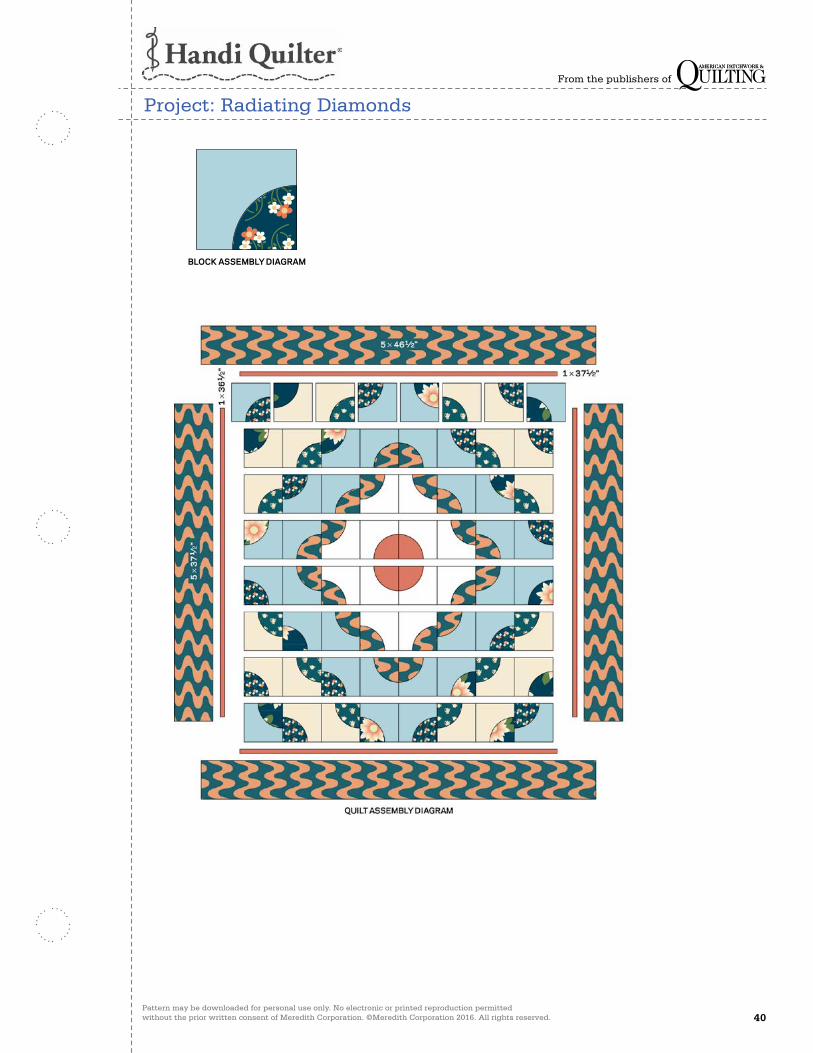
Appliqué Blocks1. Referring to Block Assembly
Diagram, position a blue small floral arc appliqué in one corner of a light blue print 5" square, aligning straight edges. Following manufacturer’s instructions, fuse in place.
2. Using a tiny zigzag stitch and thread that matches the arc appliqué, machine-stitch curved edge of appliqué in place to make a light blue block. The block still should be 5" square including seam allowances.
3. Using indicated fabrics, repeat steps 1 and 2 to make the following total number of blocks: • 10 with light blue print
backgrounds/blue small floral arcs
• 10 with light blue print backgrounds/blue large floral arcs
• 4 with beige print backgrounds/blue large floral arcs
• 4 with beige print backgrounds/blue small floral arcs
• 12 with beige print backgrounds/teal teacup print arcs
• 12 with light blue print backgrounds/blue wave print arcs
• 8 with white print backgrounds/blue wave print arcs
• 4 with white print backgrounds/orange print arcs
Assemble Quilt Top1. Referring to Quilt Assembly
Diagram for block orientation, lay out blocks in eight rows. Sew together blocks in each row. Press seams in one direction, alternating direction with each row. Join rows to make quilt center. Press seams in one direction. The quilt center should be 361⁄2" square including seam allowances.
2. Sew orange print 1×361⁄2" inner border strips to opposite edges of quilt center. Add orange print 1×371⁄2" inner border strips to remaining edges. Press all seams toward inner border.
Pattern may be downloaded for personal use only. No electronic or printed reproduction permitted without the prior written consent of Meredith Corporation. ©Meredith Corporation 2016. All rights reserved. 39
From the publishers of
Project: Radiating Diamonds
3. Cut and piece blue wave print strips to make: • 2—5×461⁄2" outer
border strips • 2—5×371⁄2" outer
border strips
4. Sew short outer border strips to opposite edges of quilt center. Add long outer border strips to remaining edges to complete quilt top. Press all seams toward outer border.
Finish Quilt1. Layer quilt top, batting, and
backing; baste.
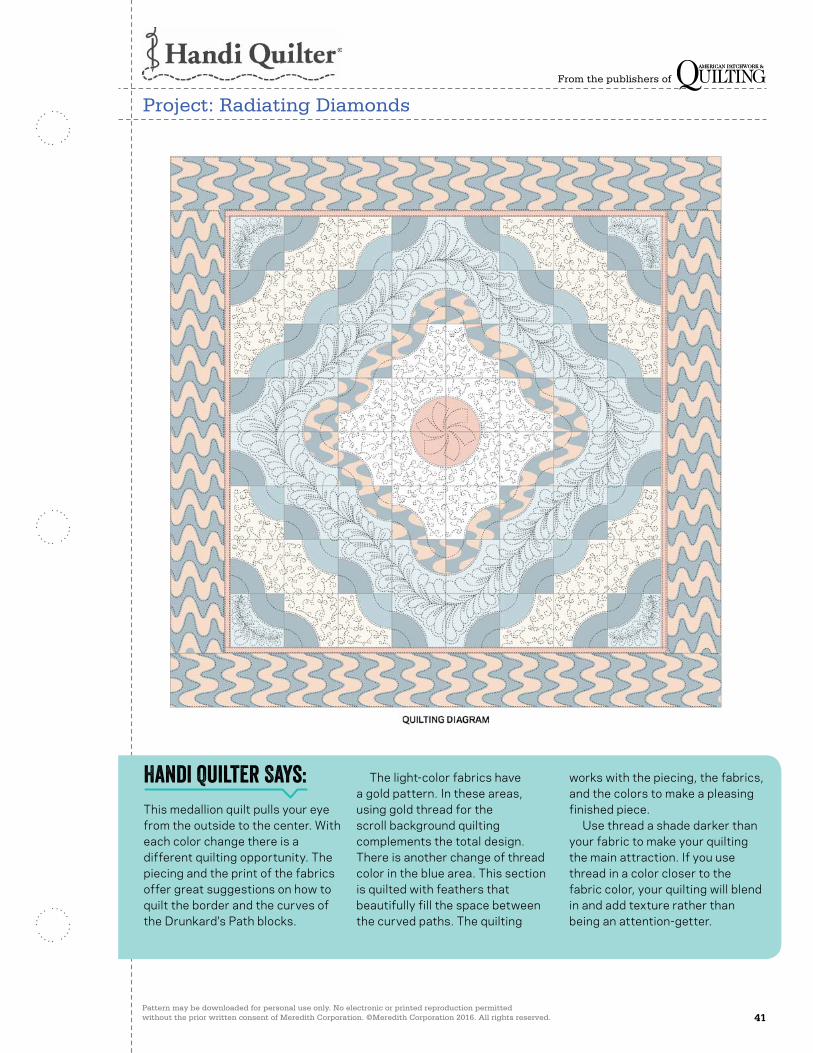
2. Quilt as desired. To visually connect the light print block backgrounds, Handi Quilter educators Marie Eldredge and Angie Balling machine-quilted continuous designs of feathers in the light blue print and metallic gold swirls (which pick up on the metallic accents in the fabric) in the white and tan prints (Quilting Diagram). With clear monofilament thread, they stitched just outside each arc appliqué and continued that stitching in a small curve near the point of the adjacent arc appliqués.
3. Bind with blue tone-on-tone binding strips.
Radiating DiamondsArc Pattern
APQ OCTOBER 2013CMR 5124506 Drunkard PathFull-Size PatternC. Neubauer 4-25-13100546079
RenamedK. Kunkel100535136
When printing a downloadable pdf, set Page Scaling preference to NONE to print patterns at 100%. Do NOT "Shrink to Fit" or "Fit to Printable Area."
This box should measure 1".
Pattern may be downloaded for personal use only. No electronic or printed reproduction permitted without the prior written consent of Meredith Corporation. ©Meredith Corporation 2016. All rights reserved. 40
From the publishers of
Project: Radiating Diamonds
BLOCK ASSEMBLY DIAGRAM
APQ OCTOBER 2013CMR Drunkards Path OptionDiagram 2C. Neubauer 6-14-13100546243
Pattern may be downloaded for personal use only. No electronic or printed reproduction permitted without the prior written consent of Meredith Corporation. ©Meredith Corporation 2016. All rights reserved. 41
From the publishers of
Project: Radiating Diamonds
Handi Quilter Says:This medallion quilt pulls your eye from the outside to the center. With each color change there is a different quilting opportunity. The piecing and the print of the fabrics offer great suggestions on how to quilt the border and the curves of the Drunkard's Path blocks.
The light-color fabrics have a gold pattern. In these areas, using gold thread for the scroll background quilting complements the total design. There is another change of thread color in the blue area. This section is quilted with feathers that beautifully fill the space between the curved paths. The quilting
works with the piecing, the fabrics, and the colors to make a pleasing finished piece. Use thread a shade darker than your fabric to make your quilting the main attraction. If you use thread in a color closer to the fabric color, your quilting will blend in and add texture rather than being an attention-getter.
Pattern may be downloaded for personal use only. No electronic or printed reproduction permitted without the prior written consent of Meredith Corporation. ©Meredith Corporation 2016. All rights reserved. 42
From the publishers of
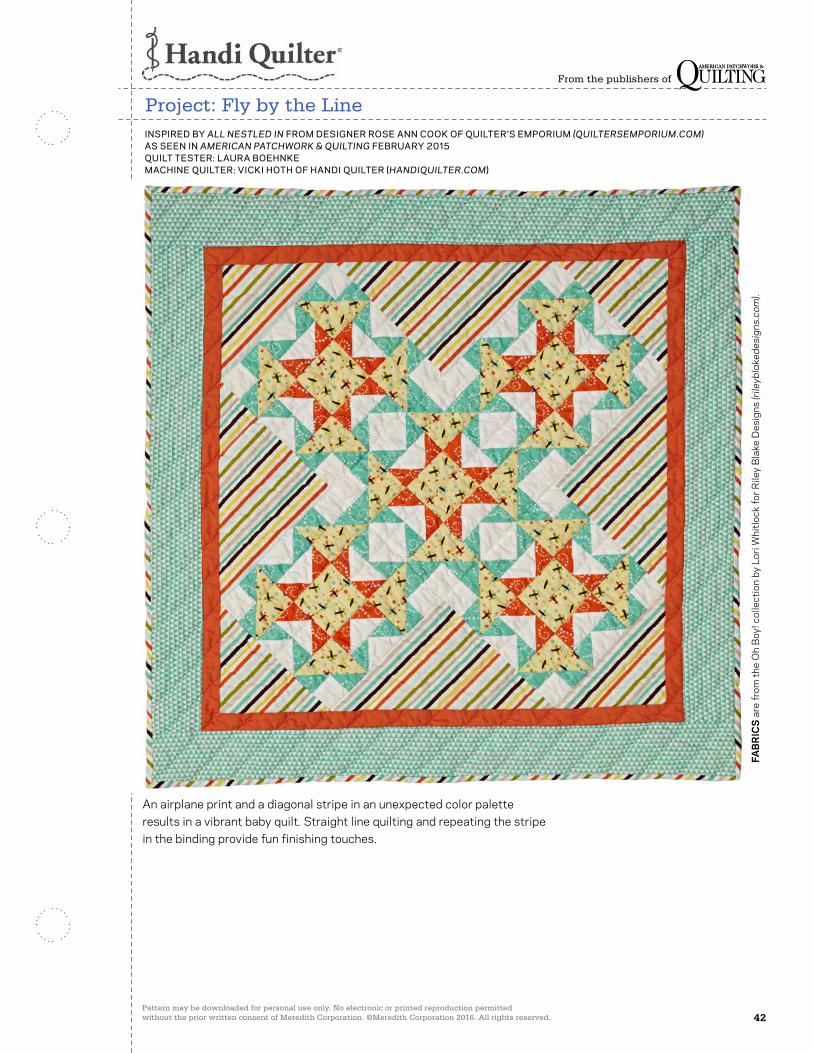
Project: Fly by the Line
An airplane print and a diagonal stripe in an unexpected color palette results in a vibrant baby quilt. Straight line quilting and repeating the stripe in the binding provide fun finishing touches.
INSPIRED BY ALL NESTLED IN FROM DESIGNER ROSE ANN COOK OF QUILTER’S EMPORIUM (QUILTERSEMPORIUM.COM) AS SEEN IN AMERICAN PATCHWORK & QUILTING FEBRUARY 2015QUILT TESTER: LAURA BOEHNKEMACHINE QUILTER: VICKI HOTH OF HANDI QUILTER (HANDIQUILTER.COM)
FAB
RIC
S a
re fr
om th
e O
h B
oy! c
olle
ctio
n by
Lor
i Whi
tlock
for R
iley
Bla
ke D
esig
ns (r
ileyb
lake
desi
gns.
com
).
Pattern may be downloaded for personal use only. No electronic or printed reproduction permitted without the prior written consent of Meredith Corporation. ©Meredith Corporation 2016. All rights reserved. 43
From the publishers of
Project: Fly by the Line
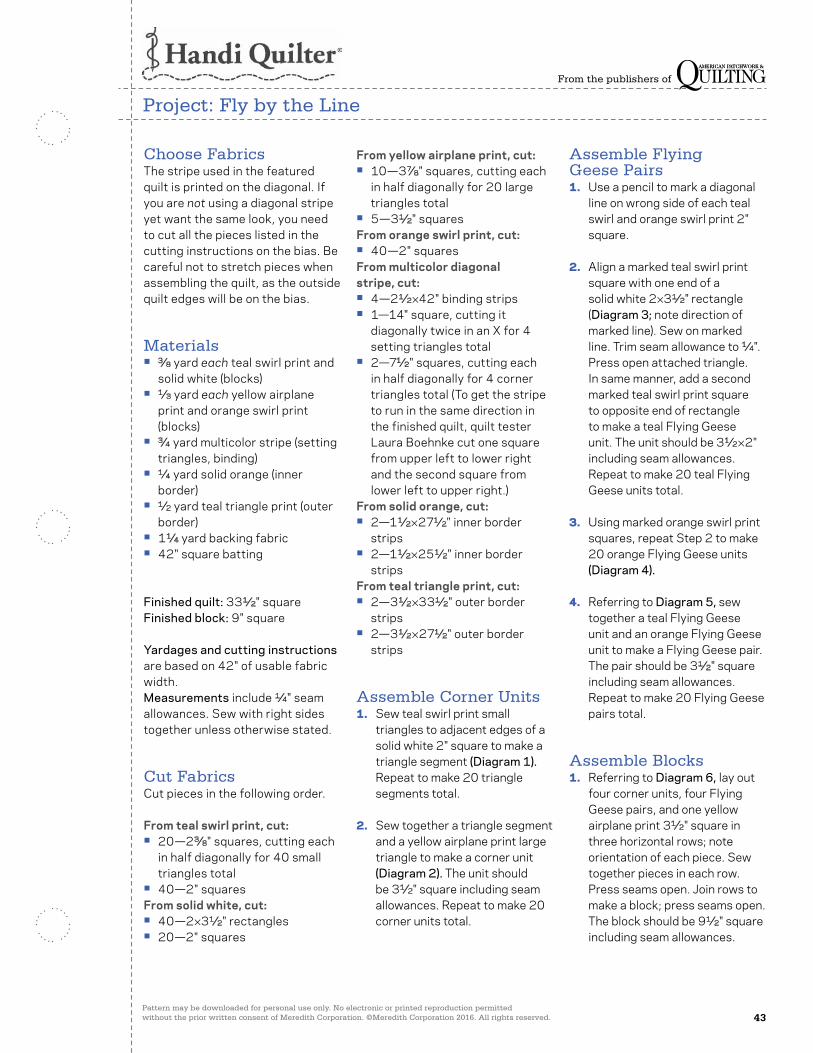
Choose FabricsThe stripe used in the featured quilt is printed on the diagonal. If you are not using a diagonal stripe yet want the same look, you need to cut all the pieces listed in the cutting instructions on the bias. Be careful not to stretch pieces when assembling the quilt, as the outside quilt edges will be on the bias.
Materials• 3⁄8 yard each teal swirl print and
solid white (blocks)• 1⁄3 yard each yellow airplane
print and orange swirl print (blocks)
• 3⁄4 yard multicolor stripe (setting triangles, binding)
• 1⁄4 yard solid orange (inner border)
• 1⁄2 yard teal triangle print (outer border)
• 11⁄4 yard backing fabric• 42" square batting
Finished quilt: 331⁄2" squareFinished block: 9" square
Yardages and cutting instructions are based on 42" of usable fabric width.Measurements include 1⁄4" seam allowances. Sew with right sides together unless otherwise stated.
Cut FabricsCut pieces in the following order.
From teal swirl print, cut:• 20—23⁄8" squares, cutting each
in half diagonally for 40 small triangles total
• 40—2" squaresFrom solid white, cut:• 40—2×31⁄2" rectangles• 20—2" squares
From yellow airplane print, cut:• 10—37⁄8" squares, cutting each
in half diagonally for 20 large triangles total
• 5—31⁄2" squaresFrom orange swirl print, cut:• 40—2" squaresFrom multicolor diagonal stripe, cut:• 4—21⁄2 ×42" binding strips• 1—14" square, cutting it
diagonally twice in an X for 4 setting triangles total
• 2—71⁄2" squares, cutting each in half diagonally for 4 corner triangles total (To get the stripe to run in the same direction in the finished quilt, quilt tester Laura Boehnke cut one square from upper left to lower right and the second square from lower left to upper right.)
From solid orange, cut:• 2—11⁄2 ×271⁄2" inner border
strips• 2—11⁄2 ×251⁄2" inner border
stripsFrom teal triangle print, cut:• 2—31⁄2 ×331⁄2" outer border
strips• 2—31⁄2 ×271⁄2" outer border
strips
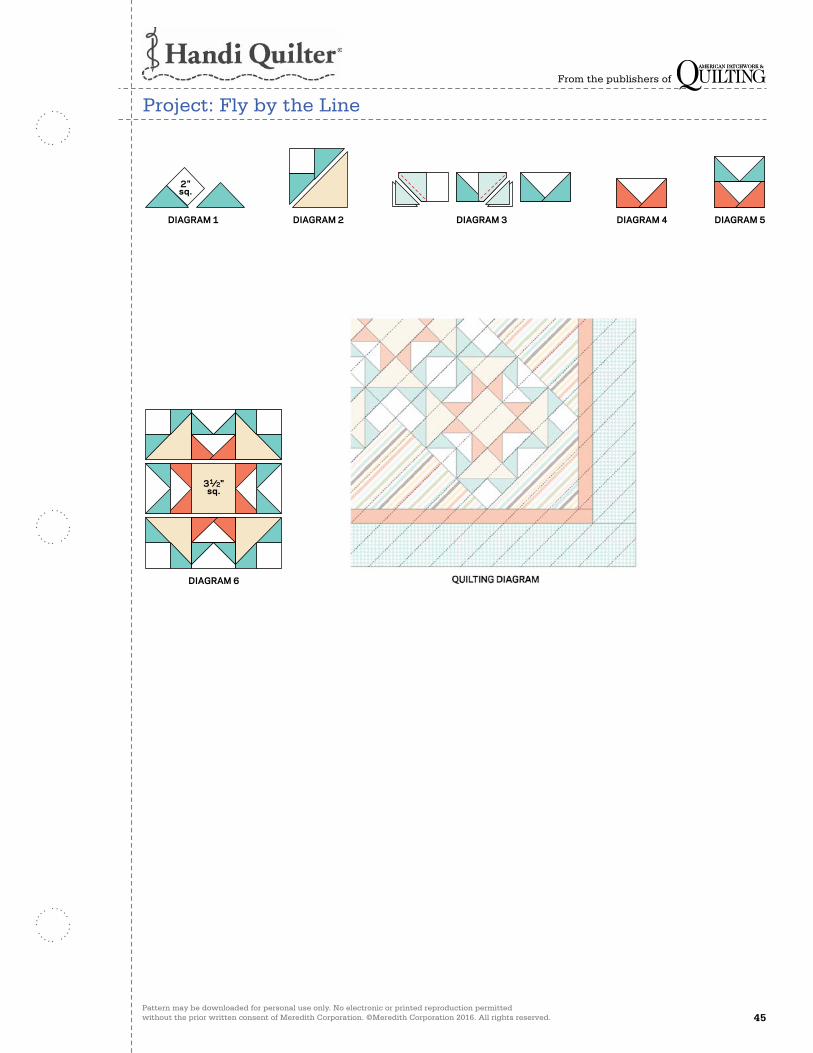
Assemble Corner Units1. Sew teal swirl print small
triangles to adjacent edges of a solid white 2" square to make a triangle segment (Diagram 1). Repeat to make 20 triangle segments total.
2. Sew together a triangle segment and a yellow airplane print large triangle to make a corner unit (Diagram 2). The unit should be 31⁄2" square including seam allowances. Repeat to make 20 corner units total.
Assemble Flying Geese Pairs1. Use a pencil to mark a diagonal
line on wrong side of each teal swirl and orange swirl print 2" square.
2. Align a marked teal swirl print square with one end of a solid white 2×31⁄2" rectangle (Diagram 3; note direction of marked line). Sew on marked line. Trim seam allowance to 1⁄4". Press open attached triangle. In same manner, add a second marked teal swirl print square to opposite end of rectangle to make a teal Flying Geese unit. The unit should be 31⁄2 ×2" including seam allowances. Repeat to make 20 teal Flying Geese units total.
3. Using marked orange swirl print squares, repeat Step 2 to make 20 orange Flying Geese units (Diagram 4).
4. Referring to Diagram 5, sew together a teal Flying Geese unit and an orange Flying Geese unit to make a Flying Geese pair. The pair should be 31⁄2" square including seam allowances. Repeat to make 20 Flying Geese pairs total.
Assemble Blocks 1. Referring to Diagram 6, lay out
four corner units, four Flying Geese pairs, and one yellow airplane print 31⁄2" square in three horizontal rows; note orientation of each piece. Sew together pieces in each row. Press seams open. Join rows to make a block; press seams open. The block should be 91⁄2" square including seam allowances.
Pattern may be downloaded for personal use only. No electronic or printed reproduction permitted without the prior written consent of Meredith Corporation. ©Meredith Corporation 2016. All rights reserved. 44
From the publishers of
Project: Fly by the Line
2. Repeat Step 1 to make five blocks total.
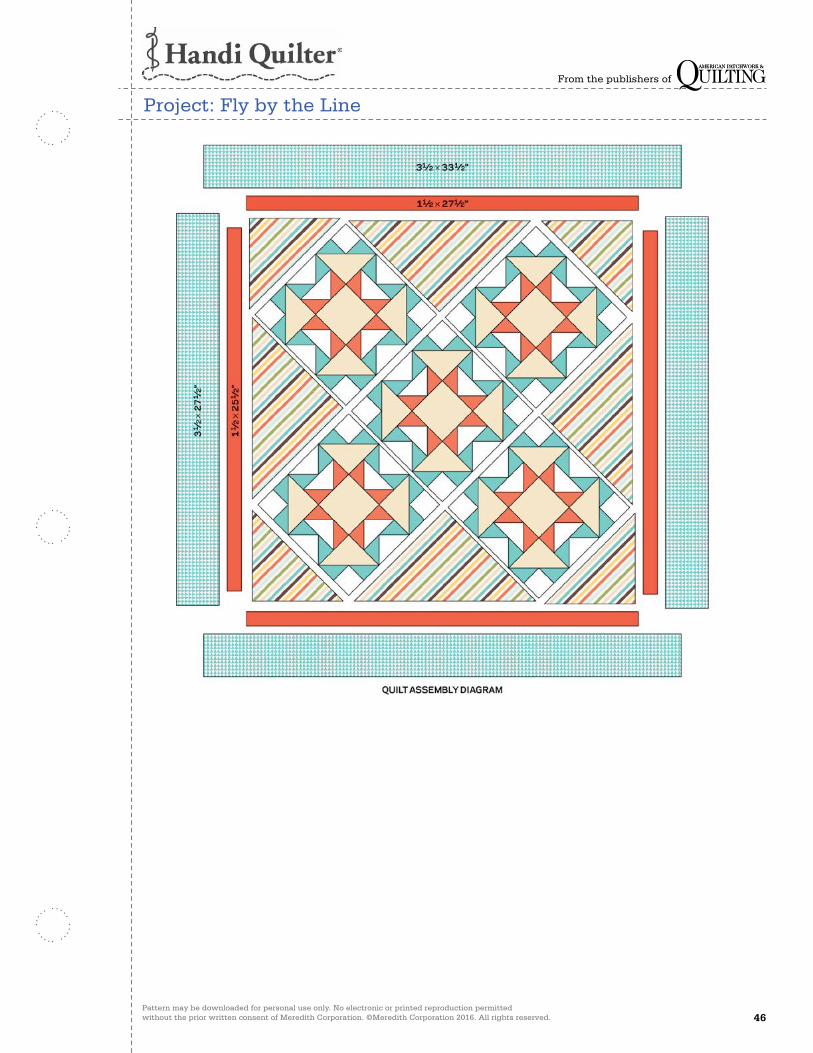
Assemble Quilt Center1. Referring to Quilt Assembly
Diagram, lay out blocks and multicolor stripe setting triangles in three diagonal rows. Sew together pieces in each row. Press seams in one direction, alternating direction with each row. Join rows; press seams in one direction.
2. Add stripe corner triangles to complete the quilt center. Press seams toward corner triangles. The quilt center should be 251⁄2" square including seam allowances.
Add Borders1. Sew solid orange 11⁄2 ×251⁄2"
inner border strips to opposite edges of quilt center. Add solid orange 11⁄2 ×271⁄2" inner border strips to remaining edges. Press all seams toward inner border.
2. Sew teal triangle print 31⁄2 ×271⁄2" outer border strips to opposite edges of quilt center. Add teal triangle print 31⁄2 ×331⁄2" outer border strips to remaining edges. Press seams toward outer border.
Finish Quilt1. Layer quilt top, batting, and
backing; baste.
2. Quilt as desired. Handi Quilter Education Coordinator Vicki Hoth decided to keep it simple when quilting, adding only parallel diagonal lines (Quilting Diagram). She used the piecing to let her know where to quilt the lines and continued the stitching into the setting triangles and borders.
3. Bind with multicolor diagonal stripe binding strips.
Pattern may be downloaded for personal use only. No electronic or printed reproduction permitted without the prior written consent of Meredith Corporation. ©Meredith Corporation 2016. All rights reserved. 45
From the publishers of
Project: Fly by the Line
2"sq.
DIAGRAM 1
APQ FEBRUARY 2015CMR 5633976 Prairie Christmas OptionDiagram 1C. Neubauer 10-10-14100547532
DIAGRAM 2
APQ FEBRUARY 2015CMR 5633976 Prairie Christmas OptionDiagram 2C. Neubauer 10-10-14100547533
DIAGRAM 3
APQ FEBRUARY 2015CMR 5633976 Prairie Christmas OptionDiagram 3C. Neubauer 10-10-14100547534
DIAGRAM 4
APQ FEBRUARY 2015CMR 5633976 Prairie Christmas OptionDiagram 4C. Neubauer 10-10-14100547535
DIAGRAM 5
APQ FEBRUARY 2015CMR 5633976 Prairie Christmas OptionDiagram 5C. Neubauer 10-10-14100547536
31⁄2"sq.
APQ FEBRUARY 2015CMR 5633976 Prairie Christmas OptionDiagram 6C. Neubauer 10-10-14100547537
DIAGRAM 6
Pattern may be downloaded for personal use only. No electronic or printed reproduction permitted without the prior written consent of Meredith Corporation. ©Meredith Corporation 2016. All rights reserved. 46
From the publishers of
Project: Fly by the Line
Pattern may be downloaded for personal use only. No electronic or printed reproduction permitted without the prior written consent of Meredith Corporation. ©Meredith Corporation 2016. All rights reserved. 47
From the publishers of
Project: Poppy Fields
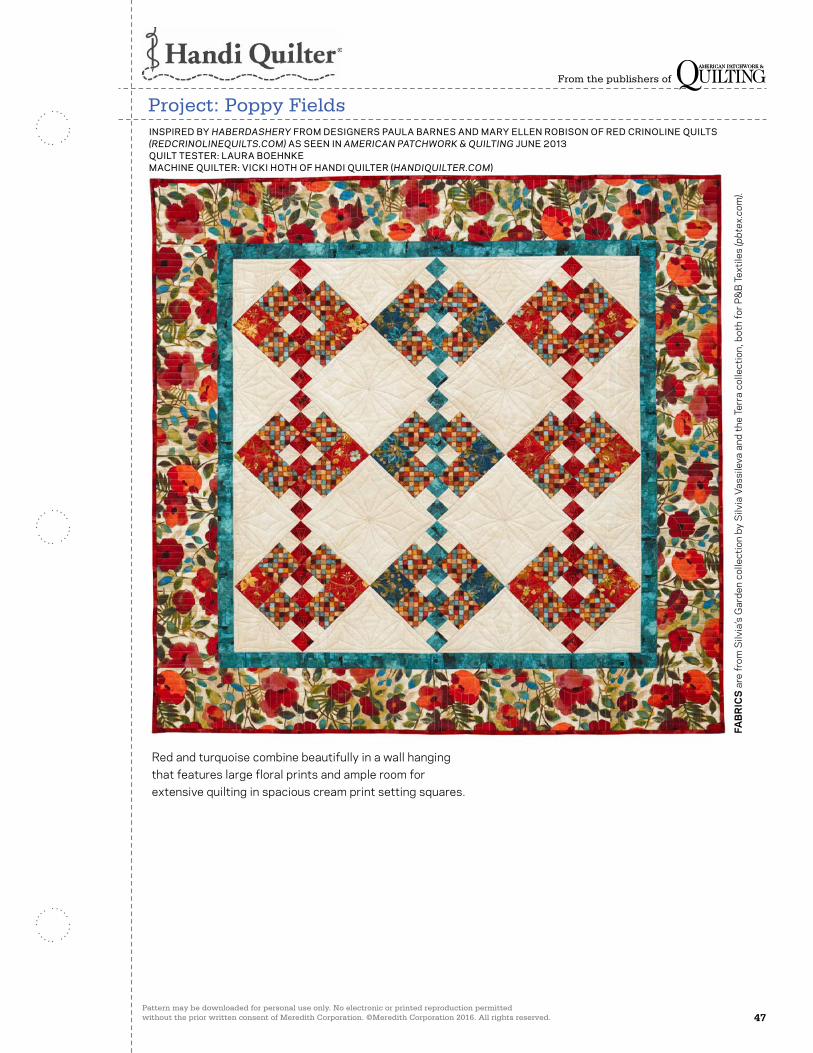
Red and turquoise combine beautifully in a wall hanging that features large floral prints and ample room for extensive quilting in spacious cream print setting squares.
INSPIRED BY HABERDASHERY FROM DESIGNERS PAULA BARNES AND MARY ELLEN ROBISON OF RED CRINOLINE QUILTS (REDCRINOLINEQUILTS.COM) AS SEEN IN AMERICAN PATCHWORK & QUILTING JUNE 2013QUILT TESTER: LAURA BOEHNKE MACHINE QUILTER: VICKI HOTH OF HANDI QUILTER (HANDIQUILTER.COM)
FAB
RIC
S a
re fr
om S
ilvia
’s G
arde
n co
llect
ion
by S
ilvia
Vas
sile
va a
nd th
e Te
rra
colle
ctio
n, b
oth
for P
&B
Tex
tiles
(pbt
ex.c
om).

Pattern may be downloaded for personal use only. No electronic or printed reproduction permitted without the prior written consent of Meredith Corporation. ©Meredith Corporation 2016. All rights reserved. 48
From the publishers of
Project: Poppy Fields
Materials• 5⁄8 yard red print (blocks, binding)• 11⁄8 yards cream print (blocks,
setting squares, setting and corner triangles)
• 3⁄8 yard blue print (blocks, inner border)
• 1⁄4 yard red floral (blocks)• 1⁄2 yard mosaic print (blocks)• 1⁄8 yard blue floral (blocks)• 11⁄8 yards cream floral (outer
border)• 31⁄2 yards backing fabric• 62" square batting
Finished quilt: 535⁄8" squareFinished block: 9" square
Yardages and cutting instructions are based on 42" of usable fabric width.Measurements include 1⁄4" seam allowances. Sew with right sides together unless otherwise stated.
Cut FabricsCut pieces in the following order.
From red print, cut:• 6—21⁄2 ×42" binding strips• 2—2×42" stripsFrom cream print, cut:• 3—2×42" strips• 2—14" squares, cutting each
diagonally twice in an X for 8 setting triangles total
• 4—91⁄2" setting squares• 2—71⁄4" squares, cutting each
in half diagonally for 4 corner triangles total
From blue print, cut:• 1—2×42" strip• 2—2×415⁄8" inner border strips• 2—2×385⁄8" inner border stripsFrom red floral, cut:• 12—31⁄2" squaresFrom mosaic print, cut:• 36—31⁄2" squaresFrom blue floral, cut:• 6—31⁄2" squaresFrom cream floral, cut:• 5—61⁄2 ×42" outer border strips
Assemble Blocks1. Sew together a red print
2×42" strip and a cream print 2×42" strip to make a strip set (Diagram 1). Press seam toward red print. Repeat to make two strip sets total. Cut strip sets into thirty-six 2"-wide red segments.
2. Sew together two 2"-wide segments to make a red Four-Patch unit (Diagram 2). Press seam in one direction. The unit should be 31⁄2" square including seam allowances. Repeat to make 18 red Four-Patch units total.
3. Using a blue print 2×42" strip and remaining cream print 2×42" strip, repeat Step 1 to make eighteen 2"-wide blue segments. Then repeat Step 2 to make nine blue Four-Patch units.
4. Referring to Diagram 3, lay out two red floral 31⁄2" squares, four mosaic print 31⁄2" squares, and three red Four-Patch units in three horizontal rows. Sew together pieces in each row. Press seams toward mosaic print squares. Join rows to make a red block. Press seams in one direction. The block should be 91⁄2" square including seam allowances. Repeat to make six red blocks total.
5. Repeat Step 4 using blue floral 31⁄2" squares, remaining mosaic print 31⁄2" squares, and blue Four-Patch units to make three blue blocks.
Assemble Quilt Top1. Referring to Quilt Assembly
Diagram, lay out red and blue blocks, cream print 91⁄2" setting squares, and cream print setting triangles in five diagonal rows. Sew together pieces in
each row. Press seams away from blocks.
2. Join rows; press seams in one direction. Add corner triangles to make quilt center. Press seams toward corner triangles. The quilt center should be 385⁄8" square including seam allowances.
Add Borders1. Sew blue print 2×385⁄8" inner
border strips to opposite edges of quilt center. Add blue print 2×415⁄8" inner border strips to remaining edges. Press all seams toward inner border.
2. Cut and piece cream floral 61⁄2×42" strips to make:• 2—61⁄2 ×535⁄8" outer border
strips• 2—61⁄2 ×415⁄8" outer border
strips
3. Sew short outer border strips to opposite edges of quilt center. Add long outer border strips to remaining edges to complete quilt top. Press all seams toward outer border.
Finish Quilt1. Layer quilt top, batting, and
backing; baste.
2. Quilt as desired. Machine-quilter Vicki Hoth of Handi Quilter used the cream print setting squares to showcase stunning curved and cross quilting designs (Quilting Diagram). She stabilized the blocks and setting triangles by stitching in the ditch, then added a variety of computerized motifs with the Pro-Stitcher. To quilt the top as Vicki did, refer to the Quilting Diagram and use the full-size patterns on pages 51–54.
3. Bind with red print binding strips.

Pattern may be downloaded for personal use only. No electronic or printed reproduction permitted without the prior written consent of Meredith Corporation. ©Meredith Corporation 2016. All rights reserved. 49
From the publishers of
Project: Poppy Fields
DIAGRAM 1
2"
APQ JUNE 2013CMR 5044281 Freedom Rings OptionalDiagram 1C. Neubauer 2-12-13100681906
DIAGRAM 2
APQ JUNE 2013CMR 5044281 Freedom Rings OptionalDiagram 2C. Neubauer 2-12-13100681907
DIAGRAM 3
31⁄2"sq.
31⁄2"sq.
APQ JUNE 2013CMR 5044281 Freedom Rings OptionalDiagram 3C. Neubauer 2-12-13100681908
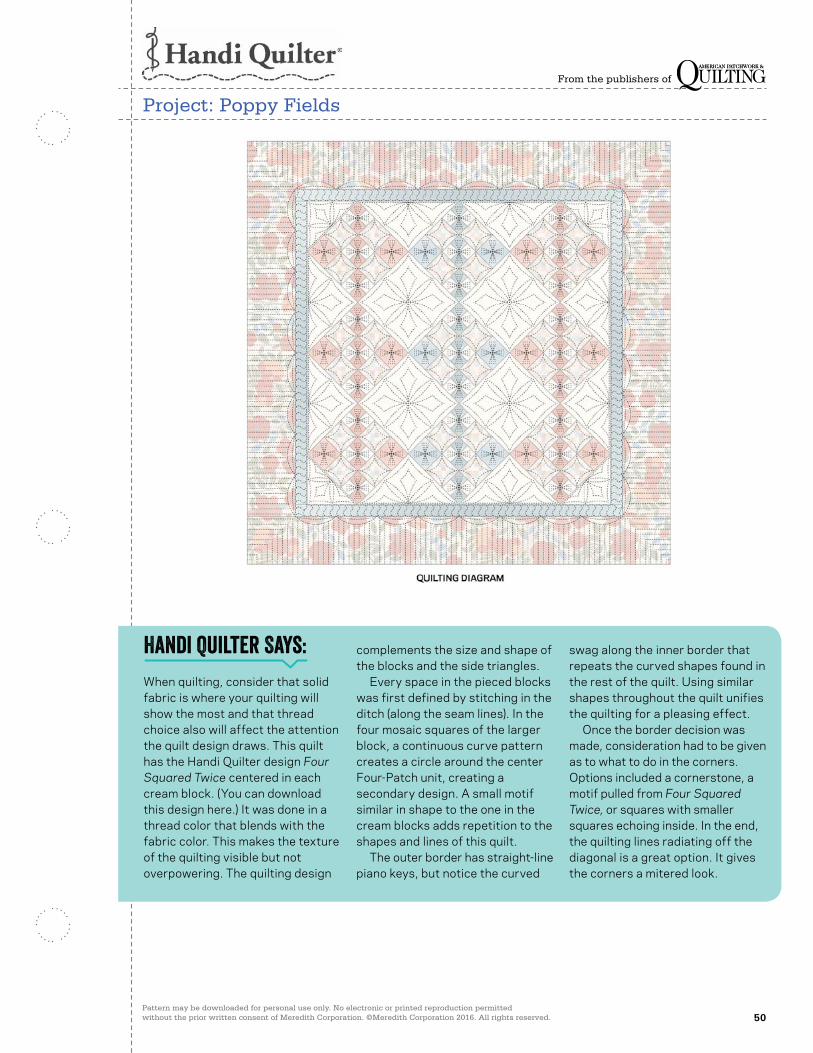
Pattern may be downloaded for personal use only. No electronic or printed reproduction permitted without the prior written consent of Meredith Corporation. ©Meredith Corporation 2016. All rights reserved. 50
From the publishers of
Project: Poppy Fields
Handi Quilter Says:When quilting, consider that solid fabric is where your quilting will show the most and that thread choice also will affect the attention the quilt design draws. This quilt has the Handi Quilter design Four Squared Twice centered in each cream block. (You can download this design here.) It was done in a thread color that blends with the fabric color. This makes the texture of the quilting visible but not overpowering. The quilting design
complements the size and shape of the blocks and the side triangles. Every space in the pieced blocks was first defined by stitching in the ditch (along the seam lines). In the four mosaic squares of the larger block, a continuous curve pattern creates a circle around the center Four-Patch unit, creating a secondary design. A small motif similar in shape to the one in the cream blocks adds repetition to the shapes and lines of this quilt. The outer border has straight-line piano keys, but notice the curved
swag along the inner border that repeats the curved shapes found in the rest of the quilt. Using similar shapes throughout the quilt unifies the quilting for a pleasing effect. Once the border decision was made, consideration had to be given as to what to do in the corners. Options included a cornerstone, a motif pulled from Four Squared Twice, or squares with smaller squares echoing inside. In the end, the quilting lines radiating off the diagonal is a great option. It gives the corners a mitered look.
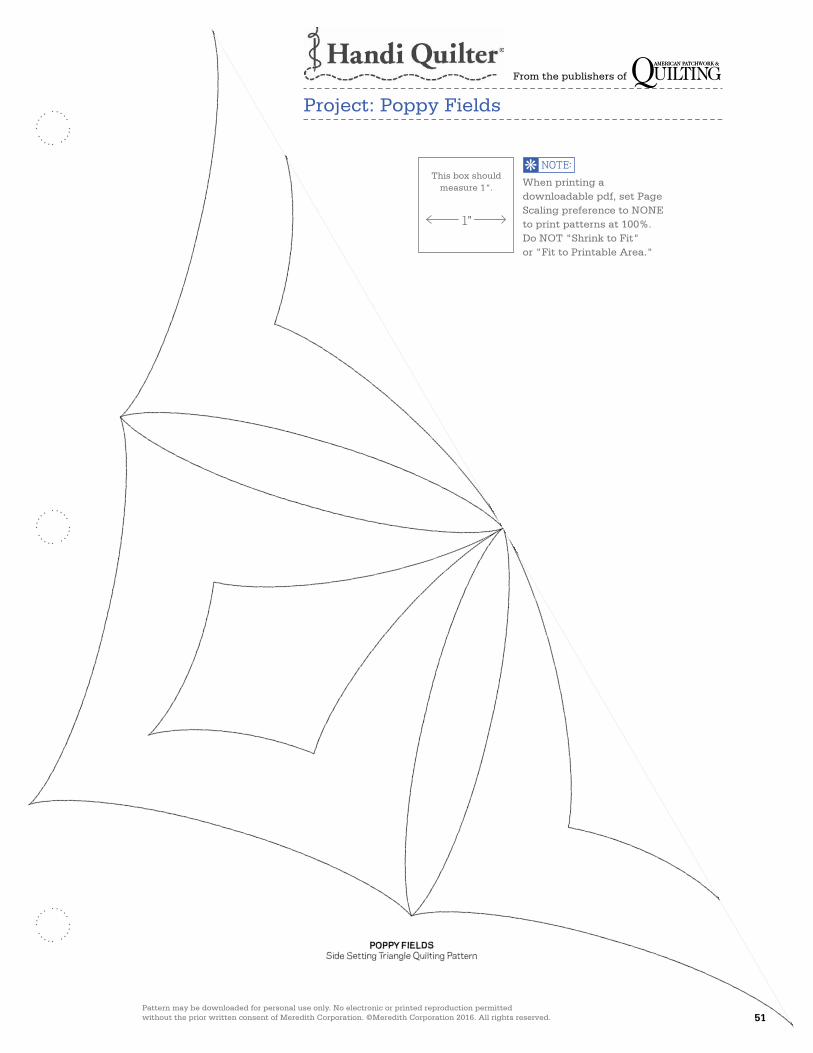
Pattern may be downloaded for personal use only. No electronic or printed reproduction permitted without the prior written consent of Meredith Corporation. ©Meredith Corporation 2016. All rights reserved. 51
From the publishers of
Project: Poppy Fields
When printing a downloadable pdf, set Page Scaling preference to NONE to print patterns at 100%. Do NOT "Shrink to Fit" or "Fit to Printable Area."
This box should measure 1".
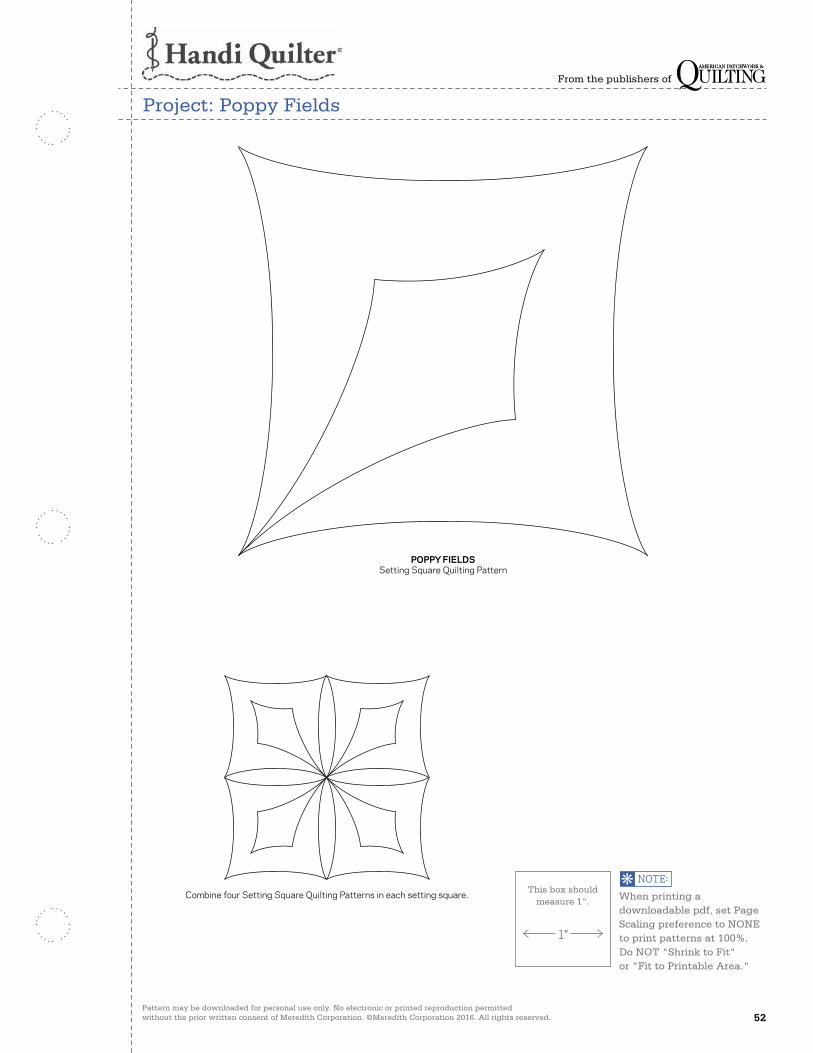
Pattern may be downloaded for personal use only. No electronic or printed reproduction permitted without the prior written consent of Meredith Corporation. ©Meredith Corporation 2016. All rights reserved. 52
From the publishers of
Project: Poppy Fields
POPPY FIELDSSetting Square Quilting Pattern
Combine four Setting Square Quilting Patterns in each setting square.
POPPY FIELDSSetting Square Quilting Pattern
Combine four Setting Square Quilting Patterns in each setting square. When printing a downloadable pdf, set Page Scaling preference to NONE to print patterns at 100%. Do NOT "Shrink to Fit" or "Fit to Printable Area."
This box should measure 1".
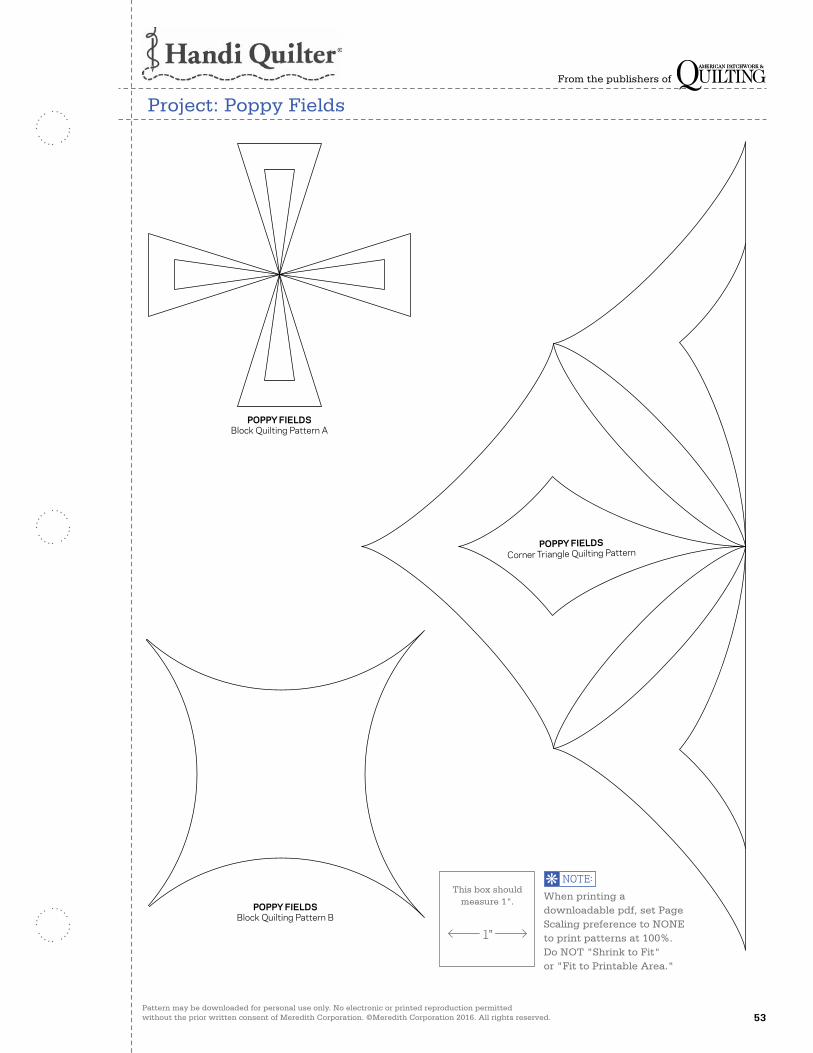
Pattern may be downloaded for personal use only. No electronic or printed reproduction permitted without the prior written consent of Meredith Corporation. ©Meredith Corporation 2016. All rights reserved. 53
From the publishers of
Project: Poppy Fields
POPPY FIELDSBlock Quilting Pattern B
POPPY FIELDS
Block Quilting Pattern A
POPPY FIELDS
Block Quilti
ng Pattern B
POPPY FIELDSBlock Quilting Pattern A
POPPY FIELDSCorner Triangle Quilting Pattern
When printing a downloadable pdf, set Page Scaling preference to NONE to print patterns at 100%. Do NOT "Shrink to Fit" or "Fit to Printable Area."
This box should measure 1".

Pattern may be downloaded for personal use only. No electronic or printed reproduction permitted without the prior written consent of Meredith Corporation. ©Meredith Corporation 2016. All rights reserved. 54
From the publishers of
Project: Poppy Fields
POPPY FIELDSInner Border Quilting Pattern
POPPY FIELDSInner Border Quilting Pattern
POPPY FIELDSOuter Border Quilting Pattern
Wh
en p
rin
tin
g a
d
own
load
able
pd
f, s
et P
age
Scal
ing
pre
fere
nce
to
NO
NE
to
pri
nt
pat
tern
s at
100
%.
Do
NO
T "
Shri
nk
to F
it"
or
"F
it t
o P
rin
tab
le A
rea.
"
Th
is b
ox s
hou
ld
mea
sure
1".
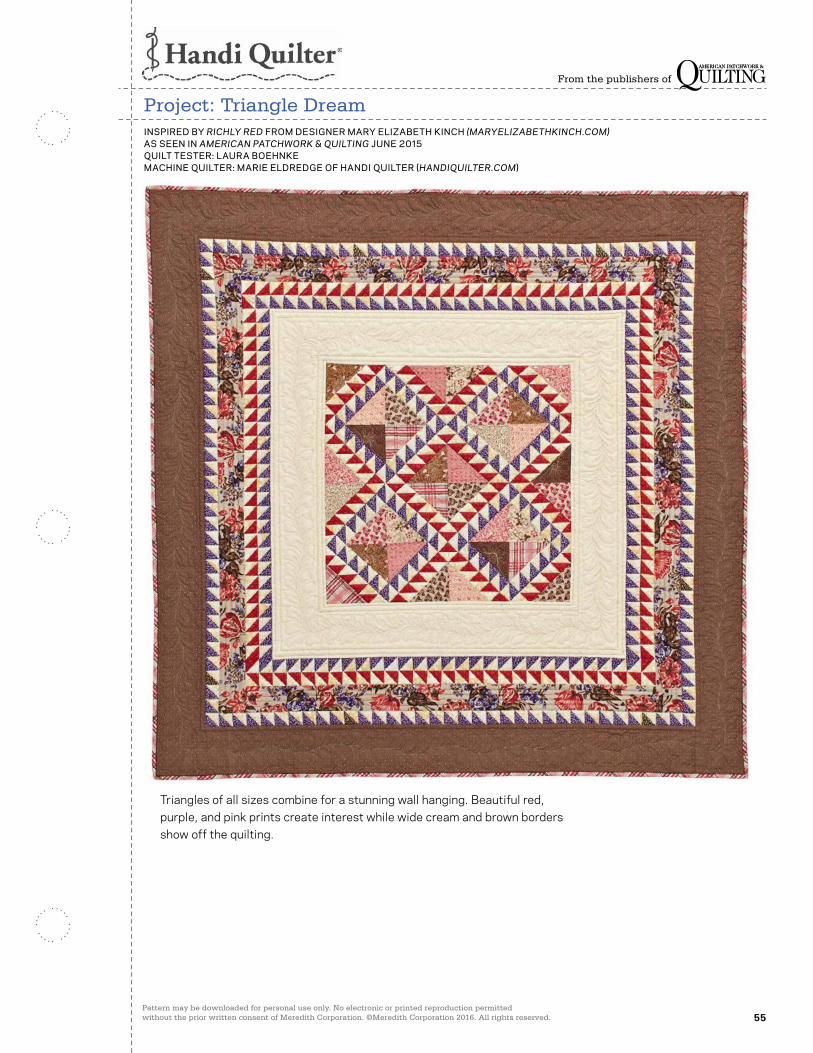
Pattern may be downloaded for personal use only. No electronic or printed reproduction permitted without the prior written consent of Meredith Corporation. ©Meredith Corporation 2016. All rights reserved. 55
From the publishers of
Project: Triangle Dream
Triangles of all sizes combine for a stunning wall hanging. Beautiful red, purple, and pink prints create interest while wide cream and brown borders show off the quilting.
INSPIRED BY RICHLY RED FROM DESIGNER MARY ELIZABETH KINCH (MARYELIZABETHKINCH.COM)AS SEEN IN AMERICAN PATCHWORK & QUILTING JUNE 2015 QUILT TESTER: LAURA BOEHNKEMACHINE QUILTER: MARIE ELDREDGE OF HANDI QUILTER (HANDIQUILTER.COM)
Pattern may be downloaded for personal use only. No electronic or printed reproduction permitted without the prior written consent of Meredith Corporation. ©Meredith Corporation 2016. All rights reserved. 56
From the publishers of
Project: Triangle Dream
Materials• 1 yard cream print (blocks,
borders 2 and 4)• 5⁄8 yard purple print (blocks,
borders 2 and 4)• 1⁄2 yard red print (blocks,
border 2)• 5⁄8 yard total assorted brown-
and-cream prints (blocks)• 5⁄8 yard total assorted pink
prints (blocks)• 5⁄8 yard cream tone-on-tone
(border 1)• 1⁄2 yard tan floral (border 3)• 7⁄8 yard brown tone-on-tone
(border 5)• 1⁄2 yard red plaid (binding)• 31⁄2 yards backing fabric• 63" square batting
Finished quilt: 541⁄4" squareFinished block: 71⁄2" square
Yardages and cutting instructions are based on 42" of usable fabric width.Measurements include 1⁄4" seam allowances. Sew with right sides together unless otherwise stated.Press seams in directions indicated by arrows on diagrams. If no direction is specified, press seam toward darker fabric.
Cut FabricsCut pieces in the following order.
Quilt tester Laura Boehnke cut her setting triangles as quarter-square triangles instead of half-square triangles to maintain the grain line. These instructions are for this method. Note: The quarter-square and half-square triangles are identical in size. Label your triangles so you will be sure to use the quarter-square triangles in the blocks and in setting units 1–4 and the half-square triangles in setting units 5–8.
From cream print, cut:• 256—21⁄8" squares• 2—21⁄8" squares, cutting each
in half diagonally for 4 small triangles total
From purple print, cut:• 160—21⁄8" squaresFrom red print, cut:• 96—21⁄8" squares• 2—21⁄8" squares, cutting each
in half diagonally for 4 small triangles total
From assorted brown-and-cream prints, cut:• 4—61⁄4" squares, cutting each
diagonally twice in an X for 16 quarter-square triangles total (you will use 14)
• 1—41⁄2" square, cutting it in half diagonally for 2 half-square triangles
From assorted pink prints, cut:• 4—61⁄4" squares, cutting each
diagonally twice in an X for 16 quarter-square triangles total (you will use 14)
• 1—41⁄2" square, cutting it in half diagonally for 2 half-square triangles
From cream tone-on-tone, cut:• 2—51⁄2 ×313⁄4" border 1 strips• 2—51⁄2 ×213⁄4" border 1 stripsFrom tan floral, cut:• 2—3×413⁄4" border 3 strips• 2—3×363⁄4" border 3 stripsFrom brown tone-on-tone, cut:• 5—51⁄2 ×42" strips for border 5From red plaid, cut:• 6—21⁄2 ×42" binding strips
(Note: the red plaid binding we used was printed on a diagonal. To achieve a similar look, you may need more yardage to cut strips on the bias.)
Assemble Triangle-Squares1. Use a pencil to mark a diagonal
line on wrong side of each cream print 21⁄8" square.
2. Layer a marked cream print square atop a purple print 21⁄8" square. Sew together with two seams, stitching 1⁄4" on each side of marked line (Diagram 1). Cut pair apart on marked line and press open to make two purple triangle-squares. Each should be 13⁄4" square including seam allowances. Repeat to make 320 purple triangle-squares total.
3. Using marked cream print squares and red print 21⁄8" squares, repeat Step 2 to make 192 red triangle-squares total.
Assemble Blocks1. Referring to Diagram 2, sew
together two brown-and-cream print quarter-square triangles and two pink print quarter-square triangles in pairs. Join pairs to make an hourglass unit. The hourglass unit should be 51⁄2" square including seam allowances. Repeat to make five hourglass units total.
2. Sew together four purple triangle-squares to make a short row (Diagram 3; note orientation of purple print triangles). Repeat to make eight purple short rows total.
3. Sew together six purple triangle-squares to make a long row (Diagram 4; again note orientation of purple print triangles). Repeat to make eight purple long rows total.
4. Sew short rows to brown-and-cream print edges of an hourglass unit (Diagram 5). Add long rows to pink print edges to make a block. The block should be 8" square including seam allowances. Repeat to make four purple blocks total.
Pattern may be downloaded for personal use only. No electronic or printed reproduction permitted without the prior written consent of Meredith Corporation. ©Meredith Corporation 2016. All rights reserved. 57
From the publishers of
Project: Triangle Dream
5. Using red triangle-squares, repeat steps 2 and 3 to make two red short rows and two red long rows. Sew red short rows to brown-and-cream print edges of an hourglass unit. Add long rows to pink print edges to make a red block.
Assemble Setting UnitsTo complete the following steps, refer to diagrams. Carefully note direction of triangle-square seam allowances, positions of red and cream prints in each setting unit, and pressing directions.
1. Sew together a pink print quarter-square triangle and a brown-and-cream print quarter-square triangle to make Unit A (Diagram 6). Repeat to make a second A unit.
2. Sew together a brown-and-cream print quarter-square triangle and a pink print quarter-square triangle to make Unit B (Diagram 7). Repeat to make a second B unit.
3. Referring to Diagram 8, lay a red triangle-square on cutting mat with seam running vertically and red print triangle on the left. Align 1⁄4" line of an acrylic ruler with left- and right-hand corners of the triangle-square. Cut along edge of ruler to make Unit C. Repeat to make four C units total.
4. Referring to Diagram 9, position red triangle-squares with cream print triangles on the left and repeat Step 3 to make four D units.
5. Referring to Diagram 10, sew together one cream print small
triangle and four red triangle-squares in a vertical row. Join one cream print small triangle and five red triangle-squares in a horizontal row. Sew vertical row to brown-and-cream print edge of an A unit; join horizontal row to pink print edge to make Setting Unit 1.
6. Referring to Diagram 11, sew together one Unit C and four red triangle-squares in a horizontal row. Join one Unit C and five red triangle-squares in a vertical row. Sew horizontal row to pink print edge of a Unit B; join vertical row to brown-and-cream print edge to make Setting Unit 2.
7. Referring to Diagram 12, sew together four red triangle-squares and one Unit D in a horizontal row. Join one Unit D and five triangle-squares in a vertical row. Sew horizontal row to pink print edge of a Unit B; join vertical row to brown-and-cream print edge to make Setting Unit 3.
8. Referring to Diagram 13, sew together one red print small triangle and four red triangle-squares in a vertical row. Join one red print small triangle and five red triangle-squares in a horizontal row. Sew vertical row to brown-and-cream print edge of an A unit; join horizontal row to pink print edge to make Setting Unit 4.
9. Referring to Diagram 14, sew together one Unit D, four red triangle-squares, and one red print small triangle in a horizontal row. Join row to long edge of a brown-and-cream print half-square triangle to make Setting Unit 5.
Assemble Quilt Center1. Referring to Quilt Assembly
Diagram, lay out blocks and setting units 1–4 in three diagonal rows; rotate blocks and units as shown to create an alternating triangle-square pattern. Join pieces in each row. Press seams in one direction, alternating direction with each row. Sew together rows; press seams in one direction.
2. Sew setting units 5–8 to designated corners of joined rows to make quilt center. Press seams toward setting units. The quilt center should be 213⁄4" square including seam allowances.
10. Referring to Diagram 15, sew together one red print small triangle, four red triangle-squares, and one Unit C in a horizontal row. Join row to long edge of a pink print half-square triangle to make Setting Unit 6.
11. Referring to Diagram 16, sew together one cream print small triangle, four red triangle-squares, and one Unit D in a horizontal row. Join row to long edge of a pink print half-square triangle to make Setting Unit 7.
12. Referring to Diagram 17, sew together one Unit C, four red triangle-squares, and one cream print small triangle in a horizontal row. Join row to long edge of a brown-and-cream print half-square triangle to make Setting Unit 8.
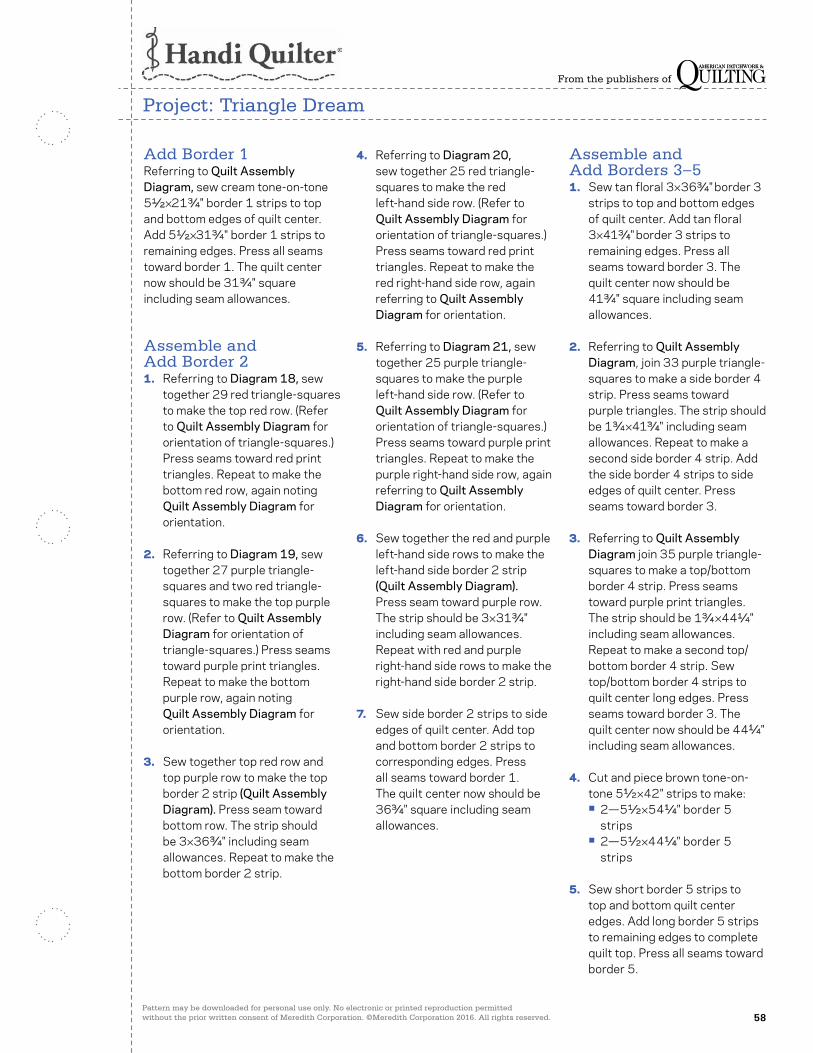
Pattern may be downloaded for personal use only. No electronic or printed reproduction permitted without the prior written consent of Meredith Corporation. ©Meredith Corporation 2016. All rights reserved. 58
From the publishers of
Project: Triangle Dream
Add Border 1Referring to Quilt Assembly Diagram, sew cream tone-on-tone 51⁄2 ×213⁄4" border 1 strips to top and bottom edges of quilt center. Add 51⁄2 ×313⁄4" border 1 strips to remaining edges. Press all seams toward border 1. The quilt center now should be 313⁄4" square including seam allowances.
Assemble and Add Border 21. Referring to Diagram 18, sew
together 29 red triangle-squares to make the top red row. (Refer to Quilt Assembly Diagram for orientation of triangle-squares.) Press seams toward red print triangles. Repeat to make the bottom red row, again noting Quilt Assembly Diagram for orientation.
2. Referring to Diagram 19, sew together 27 purple triangle-squares and two red triangle-squares to make the top purple row. (Refer to Quilt Assembly Diagram for orientation of triangle-squares.) Press seams toward purple print triangles. Repeat to make the bottom purple row, again noting Quilt Assembly Diagram for orientation.
3. Sew together top red row and top purple row to make the top border 2 strip (Quilt Assembly Diagram). Press seam toward bottom row. The strip should be 3×363⁄4" including seam allowances. Repeat to make the bottom border 2 strip.
4. Referring to Diagram 20, sew together 25 red triangle-squares to make the red left-hand side row. (Refer to Quilt Assembly Diagram for orientation of triangle-squares.) Press seams toward red print triangles. Repeat to make the red right-hand side row, again referring to Quilt Assembly Diagram for orientation.
5. Referring to Diagram 21, sew together 25 purple triangle-squares to make the purple left-hand side row. (Refer to Quilt Assembly Diagram for orientation of triangle-squares.) Press seams toward purple print triangles. Repeat to make the purple right-hand side row, again referring to Quilt Assembly Diagram for orientation.
6. Sew together the red and purple left-hand side rows to make the left-hand side border 2 strip (Quilt Assembly Diagram). Press seam toward purple row. The strip should be 3×313⁄4" including seam allowances. Repeat with red and purple right-hand side rows to make the right-hand side border 2 strip.
7. Sew side border 2 strips to side edges of quilt center. Add top and bottom border 2 strips to corresponding edges. Press all seams toward border 1. The quilt center now should be 363⁄4" square including seam allowances.
Assemble and Add Borders 3–51. Sew tan floral 3×363⁄4" border 3
strips to top and bottom edges of quilt center. Add tan floral 3×413⁄4" border 3 strips to remaining edges. Press all seams toward border 3. The quilt center now should be 413⁄4" square including seam allowances.
2. Referring to Quilt Assembly Diagram, join 33 purple triangle-squares to make a side border 4 strip. Press seams toward purple triangles. The strip should be 13⁄4 ×413⁄4" including seam allowances. Repeat to make a second side border 4 strip. Add the side border 4 strips to side edges of quilt center. Press seams toward border 3.
3. Referring to Quilt Assembly Diagram join 35 purple triangle-squares to make a top/bottom border 4 strip. Press seams toward purple print triangles. The strip should be 13⁄4 ×441⁄4" including seam allowances. Repeat to make a second top/bottom border 4 strip. Sew top/bottom border 4 strips to quilt center long edges. Press seams toward border 3. The quilt center now should be 441⁄4" including seam allowances.
4. Cut and piece brown tone-on-tone 51⁄2 ×42" strips to make:• 2—51⁄2 ×541⁄4" border 5
strips• 2—51⁄2 ×441⁄4" border 5
strips
5. Sew short border 5 strips to top and bottom quilt center edges. Add long border 5 strips to remaining edges to complete quilt top. Press all seams toward border 5.
Pattern may be downloaded for personal use only. No electronic or printed reproduction permitted without the prior written consent of Meredith Corporation. ©Meredith Corporation 2016. All rights reserved. 59
From the publishers of
Project: Triangle Dream
Finish Quilt1. Layer quilt top, batting, and
backing; baste.
2. Quilt as desired. Handi Quilter Studio Educator Marie Eldredge combined stitching in the ditch and free-motion quilting (Quilting Diagram) for a design that complements the piecing rather than distracting from it. “Every little triangle needed its space defined and deserved its own attention,” says Marie, who used monofilament thread to stitch in the ditch around each one. With free-motion quilting throughout the quilt, she produced a leafy feather design with slight variations (Triangle Motif Quilting Diagram), including in the quilt center larger triangles. Multiple lines of straight stitching 1⁄2" inside the seams on two of the borders defines those spaces and draws the eye to that area.
3. Bind with red plaid binding strips.
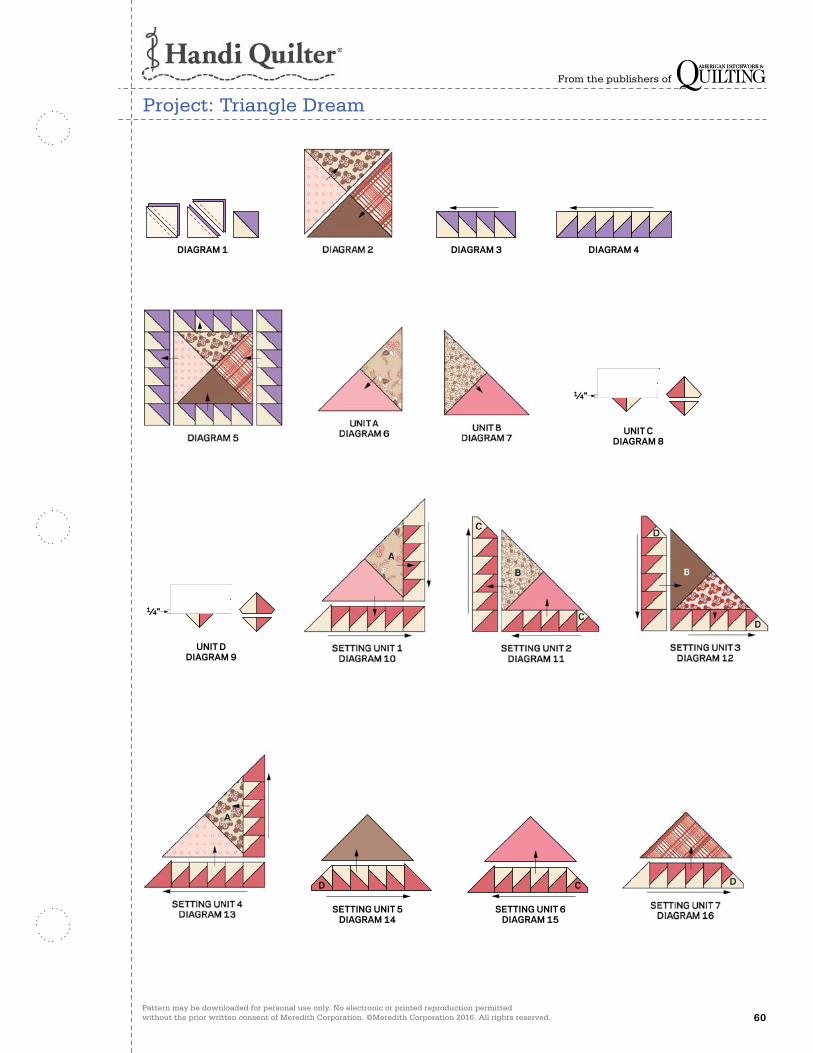
Pattern may be downloaded for personal use only. No electronic or printed reproduction permitted without the prior written consent of Meredith Corporation. ©Meredith Corporation 2016. All rights reserved. 60
From the publishers of
Project: Triangle Dream
DIAGRAM 1
APQ JUNE 2015CMR 5712969 Augusta OptionDiagram 1C. Neubauer 2-24-15100547928
DIAGRAM 3
APQ JUNE 2015CMR 5712969 Augusta OptionDiagram 3C. Neubauer 2-24-15100547930
DIAGRAM 4
APQ JUNE 2015CMR 5712969 Augusta OptionDiagram 4C. Neubauer 2-24-15100547931
1⁄4"
UNIT CDIAGRAM 8
APQ JUNE 2015CMR 5712969 Augusta OptionDiagram 8C. Neubauer 2-24-15100547935
1⁄4"
UNIT DDIAGRAM 9
APQ JUNE 2015CMR 5712969 Augusta OptionDiagram 9C. Neubauer 2-24-15100547936
SETTING UNIT 5DIAGRAM 14
APQ JUNE 2015CMR 5712969 Augusta OptionDiagram 14C. Neubauer 2-24-15
D
SETTING UNIT 6DIAGRAM 15
C
APQ JUNE 2015CMR 5712969 Augusta OptionDiagram 15C. Neubauer 2-24-15
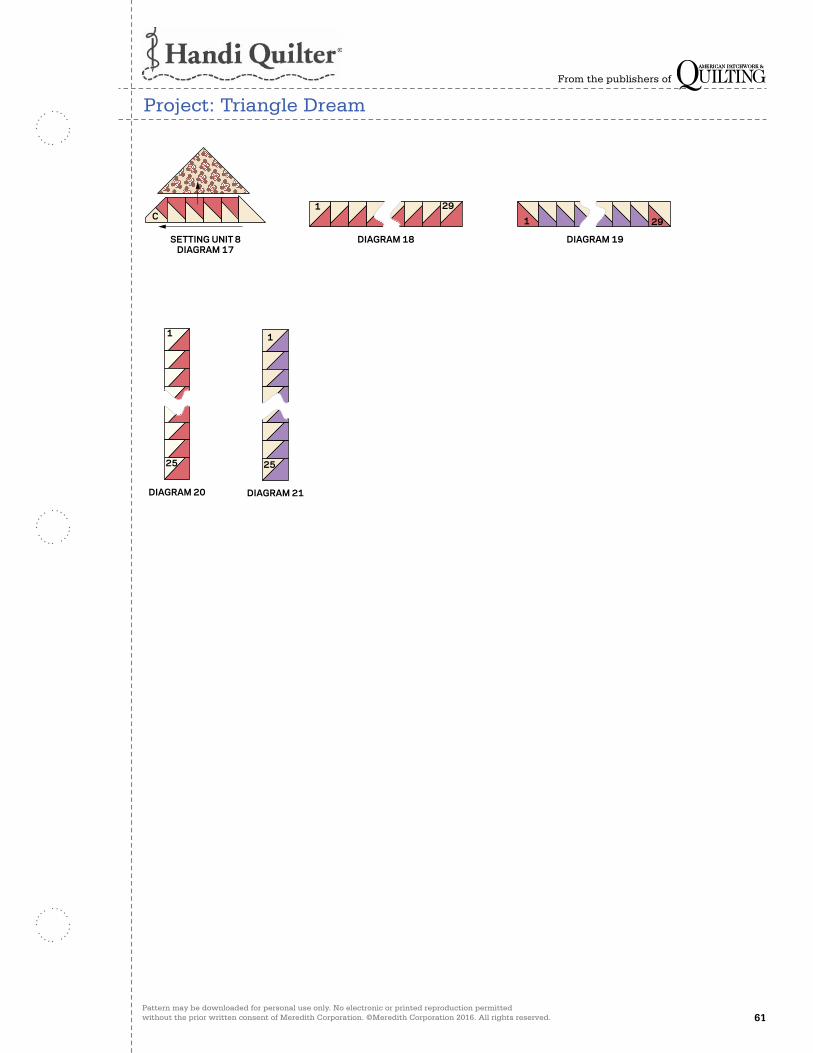
Pattern may be downloaded for personal use only. No electronic or printed reproduction permitted without the prior written consent of Meredith Corporation. ©Meredith Corporation 2016. All rights reserved. 61
From the publishers of
Project: Triangle Dream
SETTING UNIT 8DIAGRAM 17
C
APQ JUNE 2015CMR 5712969 Augusta OptionDiagram 17C. Neubauer 2-24-15100547942
DIAGRAM 18
1 29
APQ JUNE 2015CMR 5712969 Augusta OptionDiagram 19C. Neubauer 2-24-15100547944
DIAGRAM 19
1 29
APQ JUNE 2015CMR 5712969 Augusta OptionDiagram 18C. Neubauer 2-24-15100547943
1
25
DIAGRAM 20
APQ JUNE 2015CMR 5712969 Augusta OptionDiagram 21C. Neubauer 2-24-15100547946
1
25
DIAGRAM 21
APQ JUNE 2015CMR 5712969 Augusta OptionDiagram 20C. Neubauer 2-24-15100547945
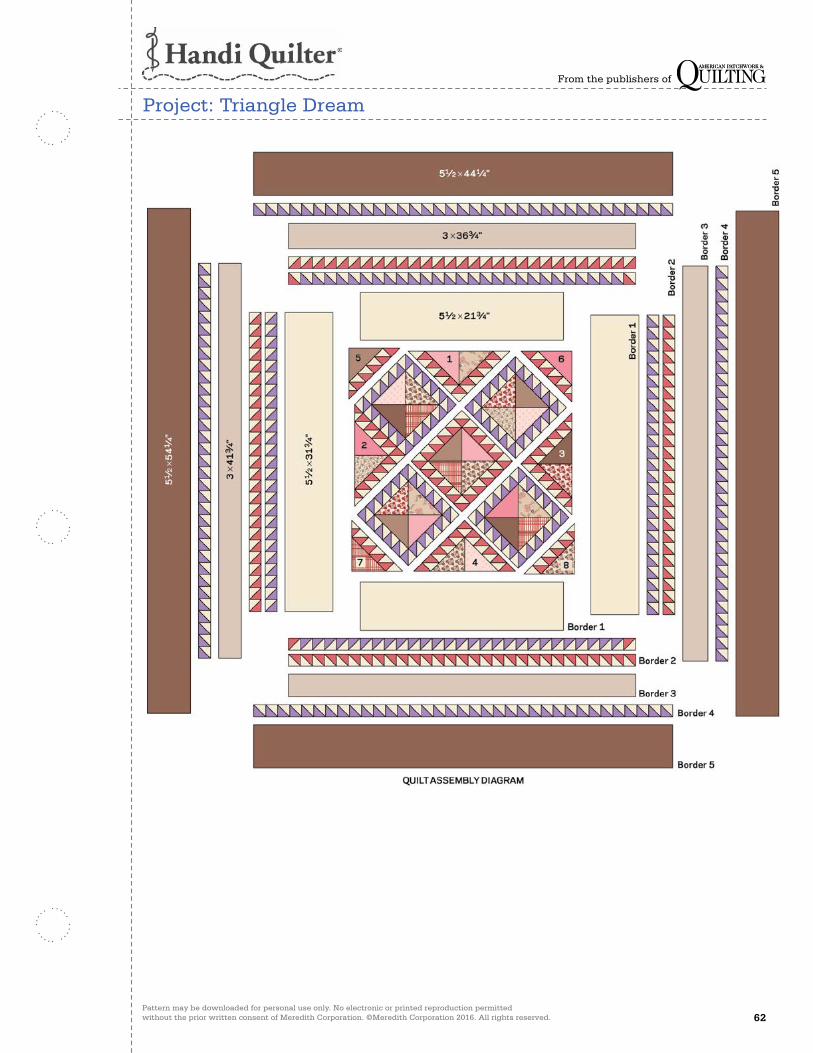
Pattern may be downloaded for personal use only. No electronic or printed reproduction permitted without the prior written consent of Meredith Corporation. ©Meredith Corporation 2016. All rights reserved. 62
From the publishers of
Project: Triangle Dream

Pattern may be downloaded for personal use only. No electronic or printed reproduction permitted without the prior written consent of Meredith Corporation. ©Meredith Corporation 2016. All rights reserved. 63
From the publishers of
Project: Triangle Dream
Handi Quilter Says:On this quilt, rulers were our best friend as every triangle was defined by stitching every seam in the ditch. We gave some thought to the direction of the stitching path to create as few stops and starts as possible. To stitch in the ditch, stitch in the low part of the seam (away from the fold), use a small stitch (14 stitches per inch), and use monofilament thread. The stitches will bury in the seam and the
monofilament thread makes jumps out of the ditch less visible. We filled the plain cream fabric border, the focal point of this quilt, with easy-to-quilt feathers. There isn’t any backtracking with these feathers, and they do not have to look exactly alike. The center or veins of these feathers could be drawn on your quilt with an HQ Wave D ruler. It has a nice gentle curve to it. Marking the vein first would give the option of less thread buildup in the center of the feather chain.
We broke up the space in the floral border with straight lines spaced ¼ and ¾ inch into the border. These lines were quilted parallel to the borders. This variation complements the small angles and curved feathers. Repeating the same style of feathers in the outer border brings repetition and harmony to the quilting. The best part of this quilt design is the way these feathers fit into a triangle, and when four come together in the pieced center, a whole new design emerges.
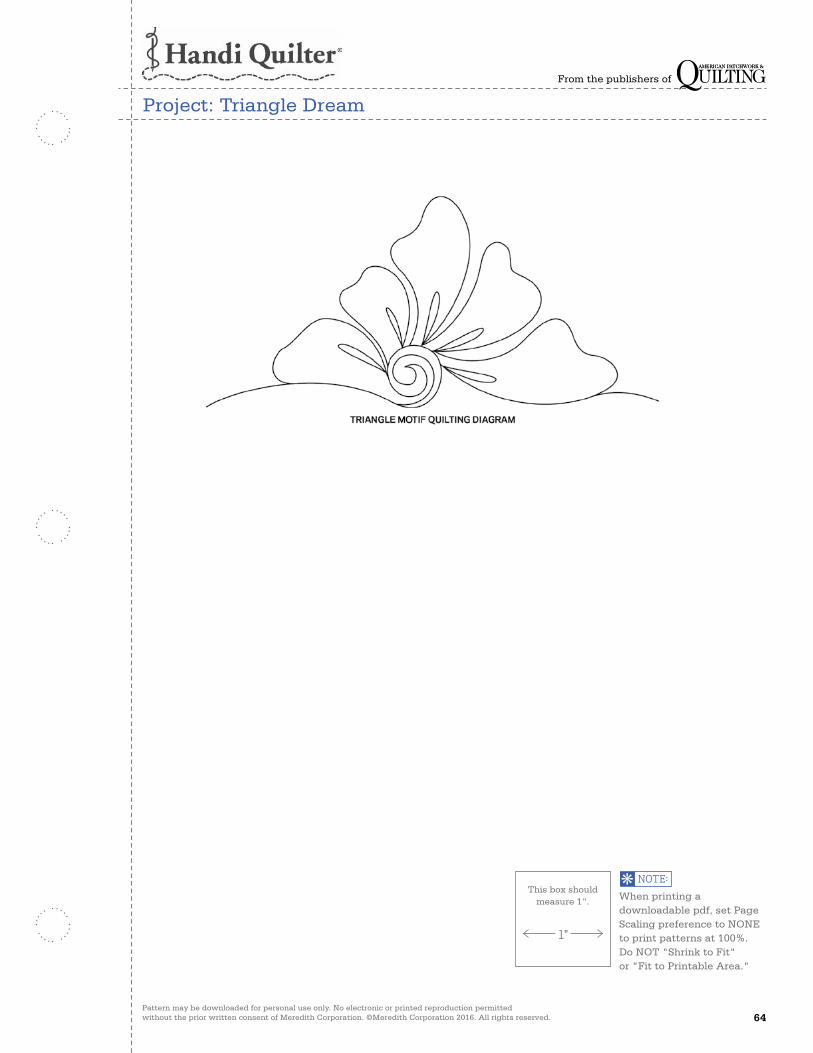
Pattern may be downloaded for personal use only. No electronic or printed reproduction permitted without the prior written consent of Meredith Corporation. ©Meredith Corporation 2016. All rights reserved. 64
From the publishers of
Project: Triangle Dream
When printing a downloadable pdf, set Page Scaling preference to NONE to print patterns at 100%. Do NOT "Shrink to Fit" or "Fit to Printable Area."
This box should measure 1".
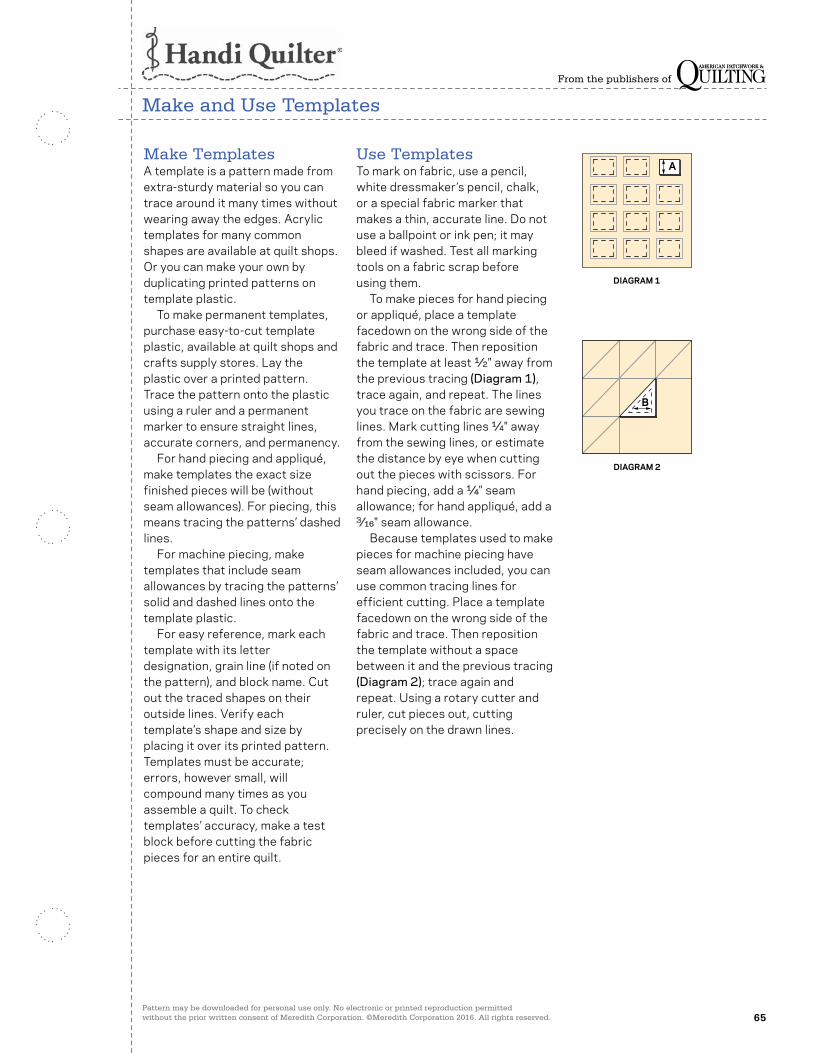
Pattern may be downloaded for personal use only. No electronic or printed reproduction permitted without the prior written consent of Meredith Corporation. ©Meredith Corporation 2016. All rights reserved. 65
From the publishers of
Make TemplatesA template is a pattern made from extra-sturdy material so you can trace around it many times without wearing away the edges. Acrylic templates for many common shapes are available at quilt shops. Or you can make your own by duplicating printed patterns on template plastic. To make permanent templates, purchase easy-to-cut template plastic, available at quilt shops and crafts supply stores. Lay the plastic over a printed pattern. Trace the pattern onto the plastic using a ruler and a permanent marker to ensure straight lines, accurate corners, and permanency. For hand piecing and appliqué, make templates the exact size finished pieces will be (without seam allowances). For piecing, this means tracing the patterns’ dashed lines. For machine piecing, make templates that include seam allowances by tracing the patterns’ solid and dashed lines onto the template plastic. For easy reference, mark each template with its letter designation, grain line (if noted on the pattern), and block name. Cut out the traced shapes on their outside lines. Verify each template’s shape and size by placing it over its printed pattern. Templates must be accurate; errors, however small, will compound many times as you assemble a quilt. To check templates’ accuracy, make a test block before cutting the fabric pieces for an entire quilt.
Use TemplatesTo mark on fabric, use a pencil, white dressmaker’s pencil, chalk, or a special fabric marker that makes a thin, accurate line. Do not use a ballpoint or ink pen; it may bleed if washed. Test all marking tools on a fabric scrap before using them. To make pieces for hand piecing or appliqué, place a template facedown on the wrong side of the fabric and trace. Then reposition the template at least 1⁄2" away from the previous tracing (Diagram 1), trace again, and repeat. The lines you trace on the fabric are sewing lines. Mark cutting lines 1⁄4" away from the sewing lines, or estimate the distance by eye when cutting out the pieces with scissors. For hand piecing, add a 1⁄4" seam allowance; for hand appliqué, add a 3⁄16" seam allowance. Because templates used to make pieces for machine piecing have seam allowances included, you can use common tracing lines for efficient cutting. Place a template facedown on the wrong side of the fabric and trace. Then reposition the template without a space between it and the previous tracing (Diagram 2); trace again and repeat. Using a rotary cutter and ruler, cut pieces out, cutting precisely on the drawn lines.
A
DIAGRAM 1
B
DIAGRAM 2
Make and Use Templates

Pattern may be downloaded for personal use only. No electronic or printed reproduction permitted without the prior written consent of Meredith Corporation. ©Meredith Corporation 2016. All rights reserved. 66
From the publishers of
prepquilt layersBoth the batting and the
backing should be 6"–8" wider and longer than the quilt top. Confirm this measurement with your quilter if you’re sending a quilt out for finishing.
Make sure the quilt top lays flat by using consistent ¼" seams, pressing seams to one side, and watching for seams that twist and cause a bump. Give a finished quilt top a final press to ensure it is ready to be quilted.
Clip all loose threads and fabric, and trim dog-ears. Any of these can cause a shadow behind lighter fabrics if not removed. Loose fabric can bulk up in a quilt sandwich and make it look bumpy.
Repair raveling seams and stay-stitch quilt top edges. Especially if you have a pieced border, it’s a good idea to stay-stitch a scant 1⁄4" from quilt top edges to secure unintersected seams. It prevents them from popping open when the quilt layers are loaded onto the machine.
To preventraveling seams, stay-stitch quilt edges.
do’s & DON’TSIT IS RECOMMENDED NOT TO USE BED SHEETS AS BACKING. Sheets have a higher thread count than quilting cotton and can cause tension issues and can cause the thread to break. If you choose to use sheets, prewash them to take out sizing and use fabric softener to relax the fibers.DO REALIZE THAT A BACKING WITH A BORDER, A PIECED BACKING WITH A DESIGN, OR A REVERSIBLE QUILT means the quilt top needs to be centered with the backing for quilting. A reasonable effort can be made to do this, but the quilt layers shifting as they are rolled up, bias in the quilt, or a quilt top that is not quite square can lead to the backing being off-center.DON’T PUT EMBELLISHMENTS (crystals, buttons, beads, etc.) on your quilt prior to quilting as they might get broken during the quilting process or they could break the needle and damage the quilt.DO MAKE SURE YOU PRESS BACKING SEAMS OPEN. Because there’s no way you can predict exactly where seam lines on the backing will fall in relation to the quilt top seams and because most seams on the quilt top are pressed in one direction, pressing backing seams open prevents bulk where seams might overlap. Use a 1⁄2" seam or a true 1⁄4" seam (not a scant 1⁄4") for the backing seams.DON’T BASTE QUILT LAYERS TOGETHER prior to loading them on the long-arm frame or taking them to a long-arm machine quilter.
Tips for Longarm Quilting
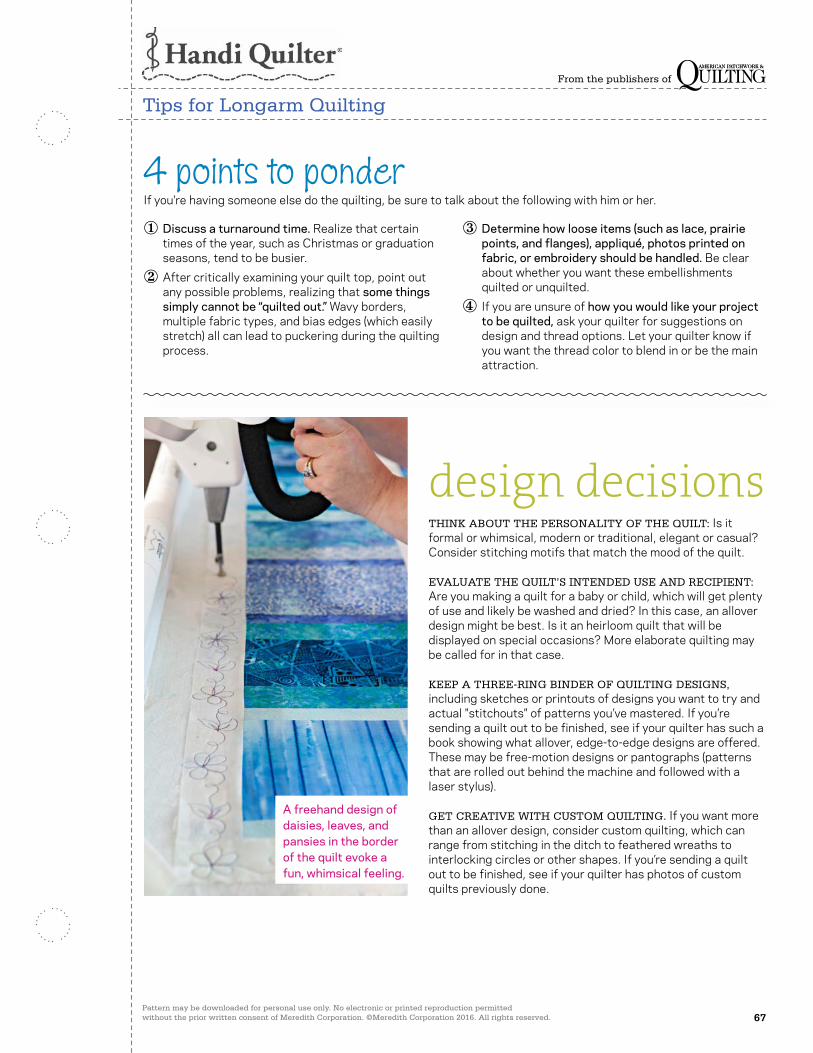
Pattern may be downloaded for personal use only. No electronic or printed reproduction permitted without the prior written consent of Meredith Corporation. ©Meredith Corporation 2016. All rights reserved. 67
From the publishers of
Tips for Longarm Quilting
① Discuss a turnaround time. Realize that certain times of the year, such as Christmas or graduation seasons, tend to be busier.
② After critically examining your quilt top, point out any possible problems, realizing that some things simply cannot be “quilted out.” Wavy borders, multiple fabric types, and bias edges (which easily stretch) all can lead to puckering during the quilting process.
③ Determine how loose items (such as lace, prairie points, and flanges), appliqué, photos printed on fabric, or embroidery should be handled. Be clear about whether you want these embellishments quilted or unquilted.
④ If you are unsure of how you would like your project to be quilted, ask your quilter for suggestions on design and thread options. Let your quilter know if you want the thread color to blend in or be the main attraction.
design decisionsTHINK ABOUT THE PERSONALITY OF THE QUILT: Is it formal or whimsical, modern or traditional, elegant or casual? Consider stitching motifs that match the mood of the quilt.
EVALUATE THE QUILT’S INTENDED USE AND RECIPIENT: Are you making a quilt for a baby or child, which will get plenty of use and likely be washed and dried? In this case, an allover design might be best. Is it an heirloom quilt that will be displayed on special occasions? More elaborate quilting may be called for in that case.
KEEP A THREE-RING BINDER OF QUILTING DESIGNS, including sketches or printouts of designs you want to try and actual "stitchouts" of patterns you’ve mastered. If you’re sending a quilt out to be finished, see if your quilter has such a book showing what allover, edge-to-edge designs are offered. These may be free-motion designs or pantographs (patterns that are rolled out behind the machine and followed with a laser stylus).
GET CREATIVE WITH CUSTOM QUILTING. If you want more than an allover design, consider custom quilting, which can range from stitching in the ditch to feathered wreaths to interlocking circles or other shapes. If you’re sending a quilt out to be finished, see if your quilter has photos of custom quilts previously done.
A freehand design of daisies, leaves, and pansies in the border of the quilt evoke a fun, whimsical feeling.
4 points to ponderIf you're having someone else do the quilting, be sure to talk about the following with him or her.
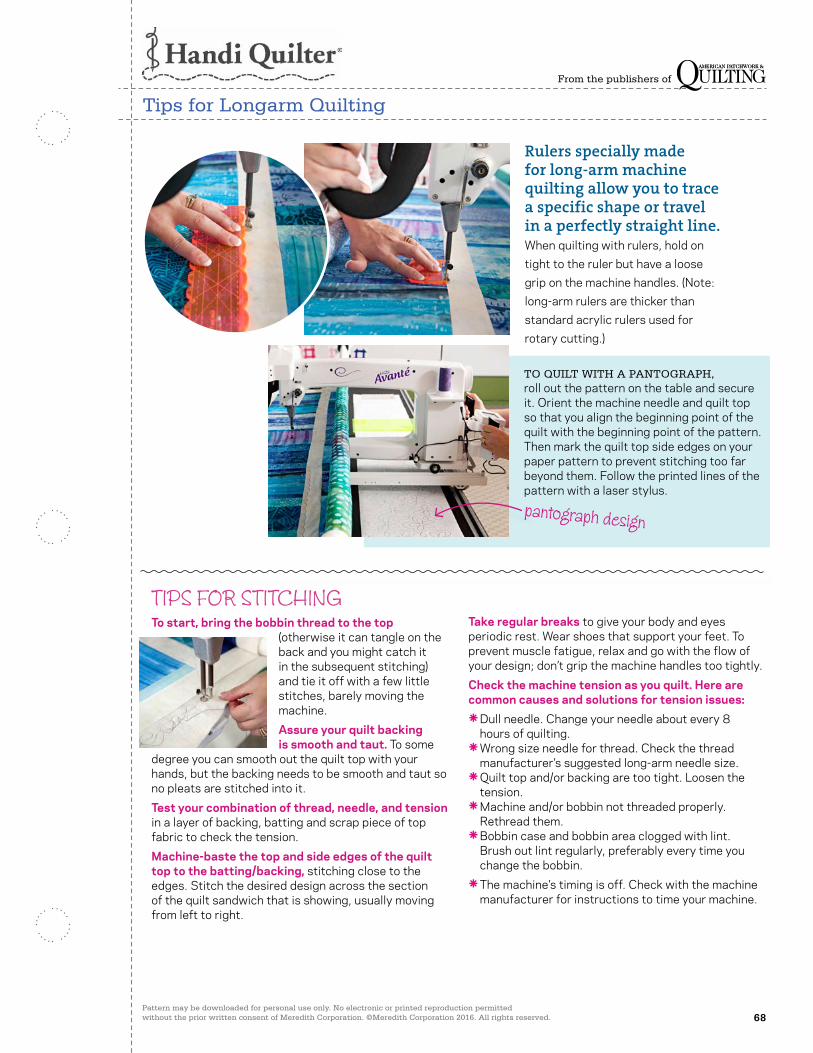
Pattern may be downloaded for personal use only. No electronic or printed reproduction permitted without the prior written consent of Meredith Corporation. ©Meredith Corporation 2016. All rights reserved. 68
From the publishers of
Tips for Longarm Quilting
pantograph design
TO QUILT WITH A PANTOGRAPH, roll out the pattern on the table and secure it. Orient the machine needle and quilt top so that you align the beginning point of the quilt with the beginning point of the pattern. Then mark the quilt top side edges on your paper pattern to prevent stitching too far beyond them. Follow the printed lines of the pattern with a laser stylus.
Rulers specially made for long-arm machine quilting allow you to trace a specific shape or travel in a perfectly straight line. When quilting with rulers, hold on tight to the ruler but have a loose grip on the machine handles. (Note: long-arm rulers are thicker than standard acrylic rulers used for rotary cutting.)
TIPS FOR STITCHINGTo start, bring the bobbin thread to the top
(otherwise it can tangle on the back and you might catch it in the subsequent stitching) and tie it off with a few little stitches, barely moving the machine.Assure your quilt backing is smooth and taut. To some
degree you can smooth out the quilt top with your hands, but the backing needs to be smooth and taut so no pleats are stitched into it.Test your combination of thread, needle, and tension in a layer of backing, batting and scrap piece of top fabric to check the tension. Machine-baste the top and side edges of the quilt top to the batting/backing, stitching close to the edges. Stitch the desired design across the section of the quilt sandwich that is showing, usually moving from left to right.
Take regular breaks to give your body and eyes periodic rest. Wear shoes that support your feet. To prevent muscle fatigue, relax and go with the flow of your design; don’t grip the machine handles too tightly.Check the machine tension as you quilt. Here are common causes and solutions for tension issues: Dull needle. Change your needle about every 8
hours of quilting. Wrong size needle for thread. Check the thread
manufacturer’s suggested long-arm needle size. Quilt top and/or backing are too tight. Loosen the
tension. Machine and/or bobbin not threaded properly.
Rethread them. Bobbin case and bobbin area clogged with lint.
Brush out lint regularly, preferably every time you change the bobbin.
The machine’s timing is off. Check with the machine manufacturer for instructions to time your machine.