7cfi-5glsta, 7cfi-4glsa, 7cfi-3glsta, · mantenimiento instrucciones para el instalador...
TRANSCRIPT
1
7CFI-5GLSTA, 7CFI-4GLSA, 7CFI-3GLSTA,3MCF-2GSAXA, 5FI-5GLSTXA, 7FI-4GLSXA, 2MF-CI2GSA
ES PLACA DE COCCIÓN - MANUAL DEL USUARIO
DE KOCHFELD - BENUTZERHANDBUCH
FR PLAN DE CUISSON - MANUEL DE L’UTILISATEUR
GB HOB - USER MANUAL
IT PIANO COTTURA - MANUALE UTENTE
NL KOOKPLAAT - GEBRUIKSAANWIJZING
PT FOGÃO - MANUAL DE UTILIZAÇÃO
RU
AR
, 5FI-75GLSTXA

2
3
Estimado Cliente,
le agradecemos mucho y le felicitamos por su elección.Este nuevo producto, cuidadosamente estudiado y construido con materiales de primera calidad, ha sido probado esmeradamente para poder satisfacer todas sus exigencias de una perfecta cocción.Por lo tanto le rogamos lea y respete las fáciles instrucciones que le permitirán llegar a resultados excelentes desde la primera utilización.Con este moderno aparato le expresamos nuestras mejores felicitaciones.
EL FABRICANTE
INDICE
MODELOS QUE INCLUYEN PILAS
Garantía
Paquete
Instalación y eficiencia
INSTRUCCIONES PARA EL USUARIO
Instalación
Utilización
Mantenimiento
INSTRUCCIONES PARA EL INSTALADOR
Instalación
Conexión gas
Conexión eléctrica
Características inyectores
ESTE PRODUCTO FUE CONCEBIDO PARA UN USO DE TIPO DOMÉSTICO. EL CONSTRUCTOR DECLINA CUALQUIER RESPONSABILIDAD EN EL CASO DE DAÑOS EVENTUALES A COSAS O PERSONAS QUE DERIVEN DE UNA INSTALACIÓN INCORRECTA O DE UN USO IMPROPIO, ERRADO O ABSURDO.
ES
4
: Indicaciones de segu-
ridad
Lea atentamente estas ins-
trucciones. Solo entonces
podr� manejar su aparato
de manera efectiva y segura.
Conserve las instrucciones
de uso e instalaci�n y entr�-
guelas con el aparato si este
cambia de due�o.
El fabricante queda exento
de toda responsabilidad si
no se cumplen las disposi-
ciones de este manual.
Las im�genes representa-
das en estas instrucciones
tienen car�cter orientativo.
No saque el aparato del
embalaje protector hasta el
momento del encastre. Si
observa alg�n da�o en el
aparato, no lo conecte. P�n-
gase en contacto con nues-
tro Servicio T�cnico.
Este aparato corresponde a
la clase 3, seg�n la norma
EN 30-1-1 para aparatos a
gas: aparato encastrado en
un mueble.
Antes de instalar su nueva
placa de cocci�n aseg�rese
de que la instalaci�n se rea-
liza siguiendo las instruccio-
nes de montaje.
Este aparato no puede ser
instalado en yates o carava-
nas.
Este aparato se debe utilizar
-
cientemente ventilados.
Este aparato no est� previs-
to para el funcionamiento
con un reloj temporizador
externo o un mando a dis-
tancia.
Todos los trabajos de ins-
talaci�n, conexi�n, regula-
ci�n y adaptaci�n a otros
tipos de gas deben ser rea-
lizados por un t�cnico au-
torizado, respetando toda
la normativa y legislaci�n
aplicables y las prescrip-
ciones de las compa��as
5
locales proveedoras de
gas y electricidad. Se pon-
dr� especial atenci�n a las
disposiciones aplicables
en cuanto a la ventilaci�n.
Este aparato sale de f�brica
adaptado al tipo de gas que
indica la placa de caracte-
r�sticas. Si fuera necesario
cambiarlo, consulte las ins-
trucciones de montaje. Se
recomienda llamar a nues-
tro Servicio T�cnico para la
adaptaci�n a otros tipos de
gas.
Este aparato ha sido dise-
�ado solo para uso dom�s-
tico, no est� permitido su
uso comercial o profesional.
Utilice el aparato �nicamen-
te para cocinar, nunca como
calefacci�n. La garant�a �ni-
camente tendr� validez en
caso de que se respete el
uso para el que fue dise�a-
do.
Durante el funcionamiento,
el aparato no debe dejarse
sin vigilancia.
No use tapas o barreras de
protecci�n para ni�os que
no est�n recomendadas por
el fabricante de la placa de
cocci�n. Pueden provocar
accidentes, p. ej. debido al
sobrecalentamiento, igni-
ci�n o desprendimiento de
fragmentos de materiales.
Este aparato puede ser uti-
lizado por ni�os a partir de
8 a�os y personas que pre-
senten limitaciones en sus
facultades f�sicas, sensoria-
les o ps�quicas o que carez-
can de experiencia y conoci-
mientos si son supervisados
o han sido instruidos res-
pecto al uso seguro del apa-
rato y son conscientes de
los peligros que conlleva su
uso.
No dejar que los ni�os jue-
guen con el aparato. La lim-
pieza y el mantenimiento
rutinario no debe encomen-
darse a los ni�os a menos
que est�n supervisados.

6
La acumulaci�n de gas sin
quemar en un recinto cerra-
-
graci�n. No someta el apa-
rato a corrientes de aire. Los
quemadores podr�an apa-
garse. Lea atentamente las
instrucciones y advertencias
relativas al funcionamiento
de los quemadores de gas.
ÁPeligro de intoxicaci�n!
El uso de un aparato de coc-
ci�n a gas produce calor, hu-
medad y productos de com-
busti�n en el local donde
est� instalado. Asegure una
buena ventilaci�n de la coci-
na, especialmente mientras
la placa de cocci�n est� en
funcionamiento: mantenga
-
tilaci�n natural o instale un
dispositivo de ventilaci�n
mec�nica (campana extrac-
tora). La utilizaci�n intensa
y prolongada del aparato
puede necesitar una ventila-
ci�n complementaria o m�s
aumente la potencia de la
ventilaci�n mec�nica.
Las zonas de cocci�n y ad-
yacentes se calientan mu-
cho. No toque nunca las
-
tenga alejados a los ni�os
menores de 8 a�os.
calientan mucho.
-
bles sobre la placa de coc-
ci�n. No almacene objetos
sobre la placa de cocci�n.
No almacene ni utilice pro-
ductos qu�micos corrosivos,
-
bles ni productos no alimen-
ticios debajo de este elec-
trodom�stico ni cerca de �l.
Las grasas o aceites sobre-
-
mente. No se ausente mien-
tras caliente grasa o aceite.
7
el fuego con agua. Cubra el
recipiente con una tapa para
sofocar el fuego y desco-
necte la zona de cocci�n.
-
senten da�os, tengan un
tama�o inadecuado, reba-
sen los bordes de la placa
de cocci�n o est�n mal si-
tuados pueden provocar le-
siones graves. Observe los
consejos y advertencias re-
lativos a los recipientes de
cocinado.
la alimentaci�n el�ctrica y
de gas del aparato. Para la
reparaci�n, llame a nuestro
servicio t�cnico.
aparato. Si fuera necesario,
llame a nuestro servicio t�c-
nico.
no se puede girar, no lo fuer-
ce. Llame inmediatamente
al servicio t�cnico para que
proceda a su reparaci�n o
sustituci�n.
ÁPeligro de descarga el�c-
No utilice m�quinas de lim-
pieza a vapor para limpiar el
aparato.
8
INSTRUCCIONES PARA EL USUARIO
Instalación
Todas las operaciones relativas a la instalación (conexión eléctrica) tienen que ser efectuadas por personal cualificado según las normas vigentes.Para las instrucciones específicas véase la parte reservada al instalador.
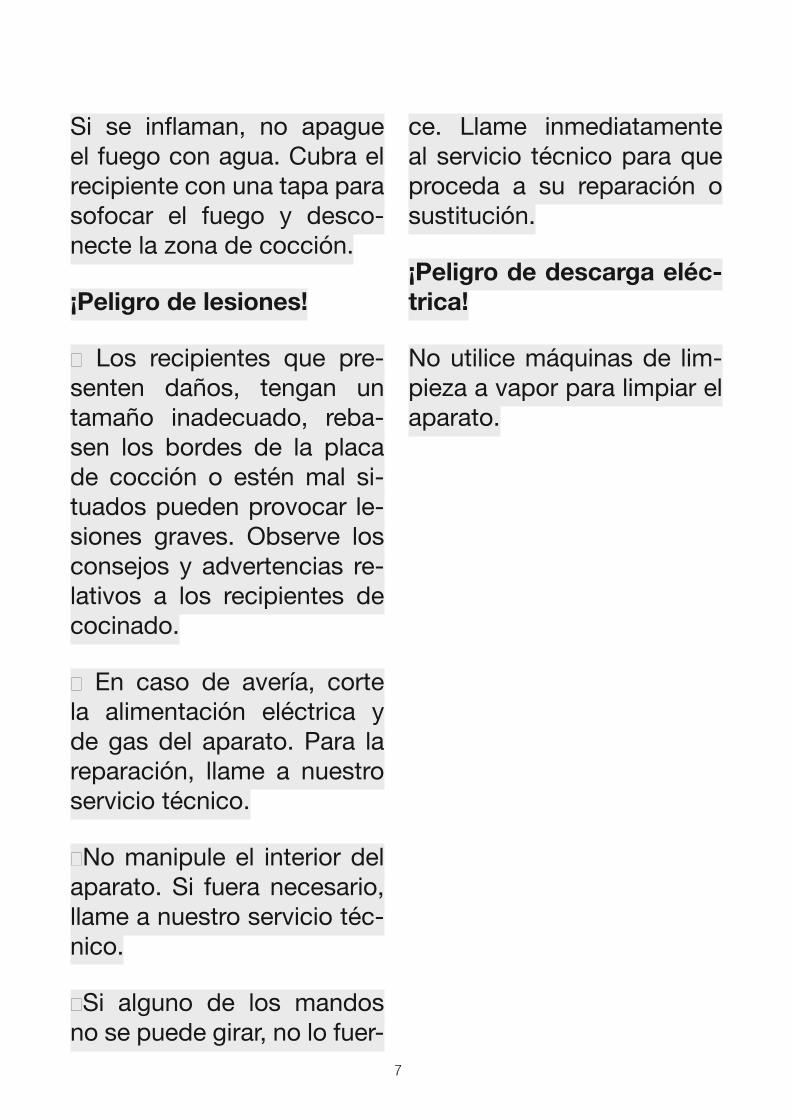
UtilizaciónQuemadores de gas (Fig. 1).
El encendido del quemador tiene lugar acercando una llama a los agujeros de la parte de arriba del mismo quemador presionando y girando en sentido antihorario el puño correspondiente hasta que su indicador coincida con la posición de máximo. Una vez efectuado el encendido regular la llama según la necesidad. La posición de mínimo está al final de la rotación antihoraria.En los modelos con encendido automático actuar sobre el puño como descrito arriba, presionando contemporáneamente el apropiado pulsador. En los modelos con encendido automático/simultáneo (con una mano) es suficiente accionar el mando respectivo como se indicó anteriormente.La descarga eléctrica entre bujía y quemador provoca el encendido del quemador interesado. Una vez efectuado el encendido soltar inmediatamente el pulsador regulando la llama según la necesidad.El encendido de los quemadores en los modelos con seguridad termoeléctrica se efectúa como en los casos ya descritos, manteniendo el mando presionado a fondo en la posición de máximo durante unos 3/5 segundos. Al soltar la perrilla asegurarse que el quemador permanezca encendido.N.B.: - se aconseja utilicen sartenes de diámetro apto a los quemadores evitando que la llama al máximo salga del fondo de las mismas
- no dejar ollas vacías con el fuego encendido- sobre los planos Crystal no usar accesorios de cocción a la parrilla.
Al final de la cocción se aconseja cierren el grifo principal del tubo y/o de la bombona.
rápido 12 x 26semi-rápido 12 x 24auxiliar 12 x 22
pesciera* 12 x 26
GAS
* con rejilla de reducción
Fig. 1
9
MODELOS QUE INCLUYEN PILAS
Garantía
La garantía (servicio de garantía) no cubre las pilas.El fabricante de la placa de gas está exento de responsabilidad alguna por fallos de las pilas.
Paquete
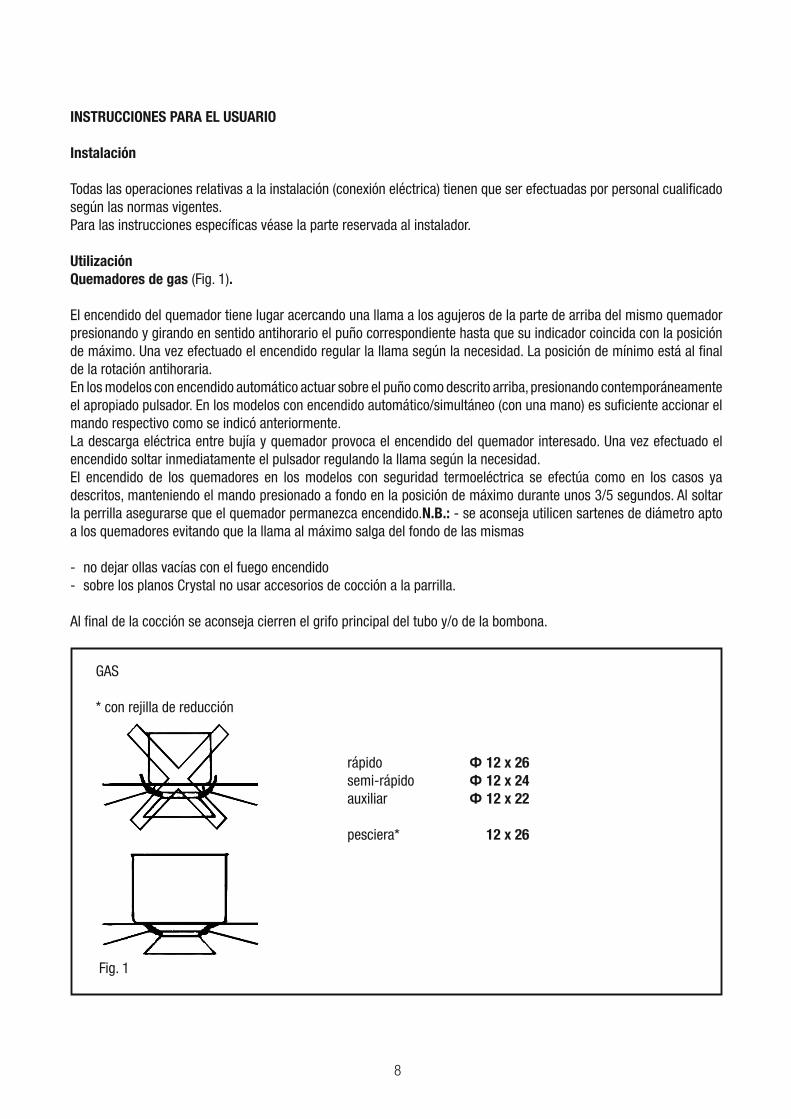
Algunos modelos incluyen pilas (tipo D o LR20 o R20S; 1,5 V) para la función de autoencendido. Compartimento (dispositivo) para instalar la pila situado en la parte trasera inferior izquierda de la placa, representado en la figura.
Si la pila no está incluida, hay que comprarla por separado.
Instalación y eficiencia
Antes de instalar la placa en una encimera, insertar una pila (prestando atención a la orientación de los polos «+» y «–») en el dispositivo especial situado en la parte trasera inferior izquierda de la placa, representado en la figura.
Antes de fijar la placa en una encimera de forma definitiva con sellante especial (relleno) con base adhesiva (incluida), asegurarse de que el autoencendido funciona correctamente. Para ello, presionar cualquier botón y girarlo en sentido contrario a las agujas del reloj de forma que la marca señale hacia el símbolo de la llama. Esperar a que se produzcan chispas seguidas de los característicos sonidos crepitantes.Si el autoencendido no funciona bien, comprobar si la pila está desgastada y cambiarla.Si el problema persiste, llamar al Servicio de Atención al Cliente o al de mantenimiento.
MantenimientoGas/EléctricoAntes de cualquier operación desconectar eléctricamente el aparato.Para una mayor duración del aparato es indispensable efectuar periódicamente una cuidadosa limpieza general teniendo en cuenta lo siguiente:
encontrar a la venta) no abrasivos ni corrosivos. Eviten productos a base de cloro (lejía de algas, ecc.)
caliente y detergente teniendo el cuidado de quitar toda incrustación, tienen que ser secados cuidadosamente, y hay que controlar que ninguno de los agujeros de los rompellamas esté obturado, ni siquiera parcialmente.
estén todavía tibias.
daña su calidad. Para que vuelvan a su apariencia original utilicen un producto ligeramente abrasivo.
N.B.: - La eventual lubricación de los grifos tiene que ser efectuada por personal cualificado con el cual se aconseja ponerse en contacto en caso de anomalías de funcionamiento.Controlar periódicamente el estado de conservación del tubo flexible de alimentación gas. En caso de pérdidas solicitar la intervención inmediata del personal cualificado para su sustitución.
10
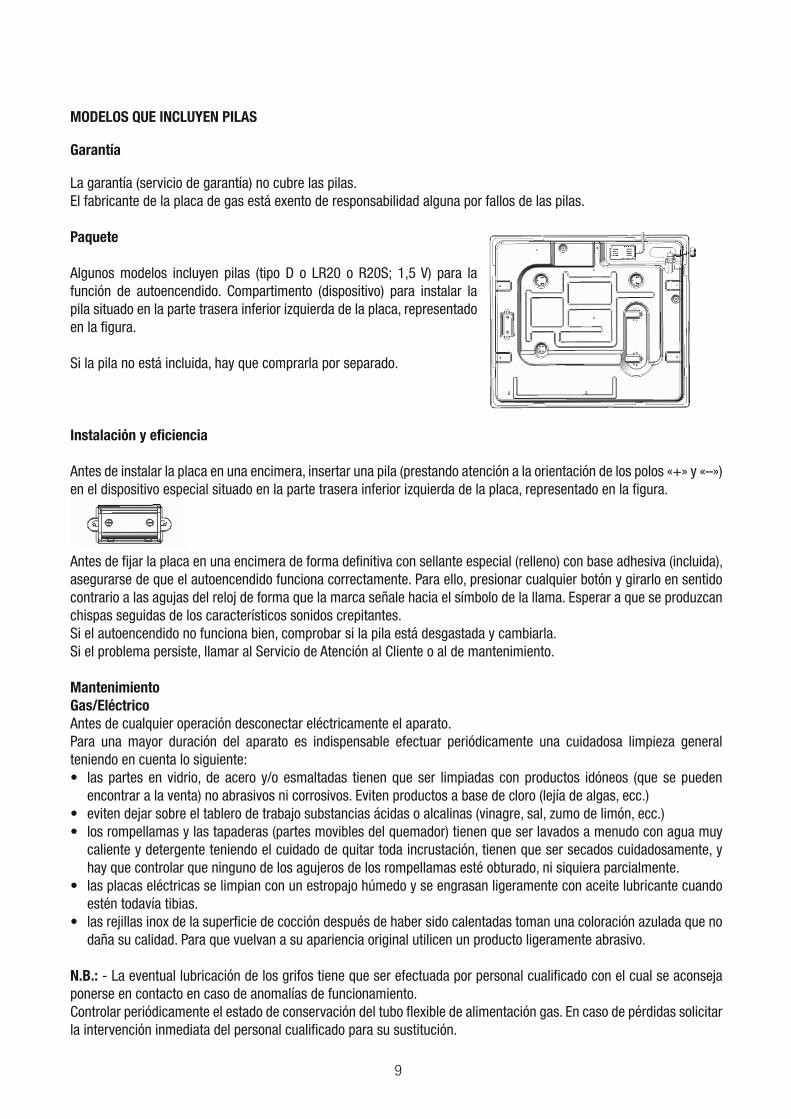
Mantenimiento vidriocerámico
(Fig. 2) Antes de todo quitar los residuos de comida y las salpicaduras de grasa de la superficie de cocción con una raedera. Luego limpiar en la zona caliente con Sidol o Stahifix con papel de cocina. Luego aclarar con agua y secar con un trapo limpio.Trazas de papel de aluminio, de objetos de plástico, azúcar o comidas muy sacaríferas tienen que ser quitadas inmediatamente de la zona caliente de cocción con una raedera para evitar posibles daños a la superficie de cocción.En ningún caso utilicen e-sponjas o estropajos; eviten también utilizar detergentes químicos agresivos como Fornospray o quitamanchas.
No utilice aparatos de vapor para limpiar el plano de cocción.
Fig. 2
INSTRUCCIONES PARA EL INSTALADOR
Instalación
Este aparato no tiene un dispositivo de descarga de los productos de la combustión. Se aconseja instalarlo en locales suficientemente aireados según las disposiciones de ley vigentes. La cantidad de aire necesaria a la combustión no tiene que ser menos que 2.0 m3/h por cada kW de potencia instalado. Véase tabla potencias quemadores.
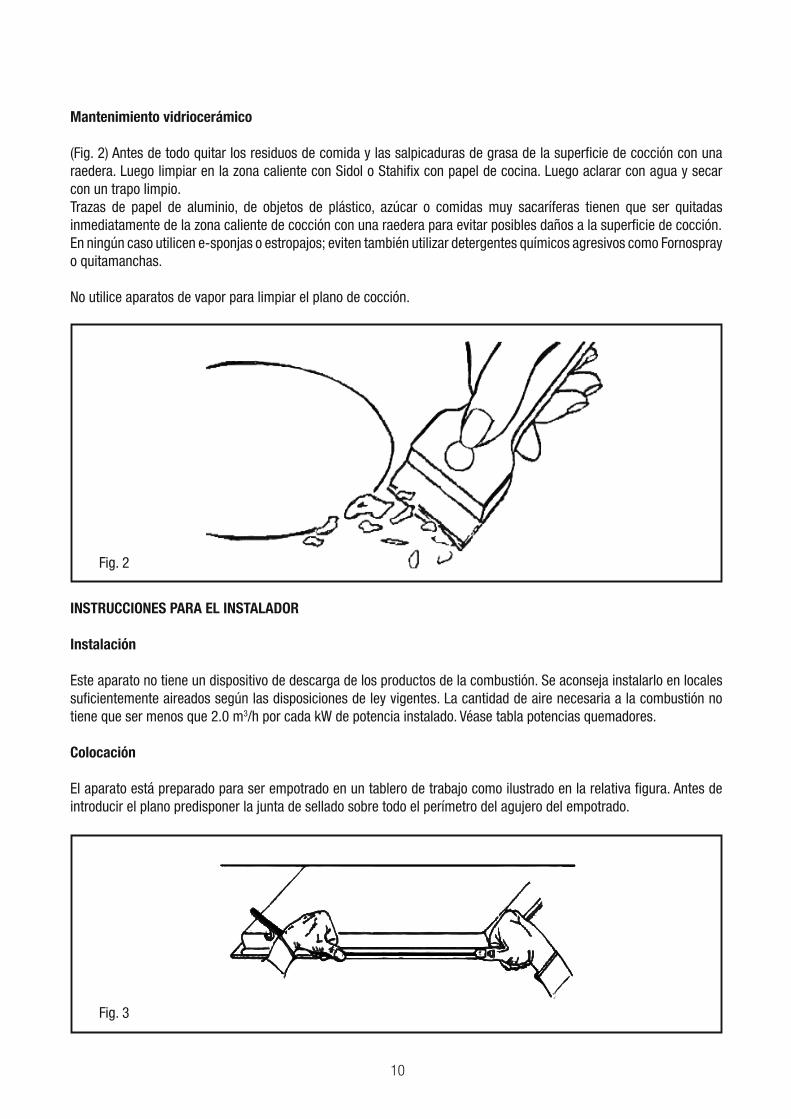
Colocación
El aparato está preparado para ser empotrado en un tablero de trabajo como ilustrado en la relativa figura. Antes de introducir el plano predisponer la junta de sellado sobre todo el perímetro del agujero del empotrado.
Fig. 3
11
La puesta a tierra es obligatoria por ley.En el caso de que el aparato no tenga el cable y/o el relativo enchufe utiíizar material apto para la absorción indicado en la placa matrícula y para la temperatura de trabajo. El cable en ningún punto tendrá que llegar a una temperatura superior de 50ºC a la temperatura ambiente.Si se quiere una conexión directa a la red, es necesario interponer un interruptor omnipolar con abertura mínima entre los contactos de 3 mm dimensionado para la carga de placa y responder a las normas vigentes (el cable de tierra amarillo/verde no tiene que ser interrumpido por el interruptor). El enchufe o el interruptor omnipolar tienen que ser fácilmente alcanzables con el aparato instalado.El constructor declina cualquier responsabilidad en el caso de que lo dicho arriba y las usuales normas contra los infortunios no sean respetadas.
Si el cable de alimentación está dañado, debe ser sustituido por un cable o conjunto especial a suministrar por el fabricante o servicio post venta.
Se prohibe la utilizacion de silicona para el sellado. Solo se permite utilizar la junta de estanqueidad suministrada.
Se prohibe el uso de ollas de barro y difusores.
CONEXIÓN GAS
(Fig. 4) Conectar el aparato a la bombona o a la instalación según las prescripciones de las normas vigentes comprobando antes que el aparato esté preparado para el tipo de gas disponible. En caso contrario véase: “Adaptación a un distinto tipo de gas”. Además comprobar que la presión de alimentación esté dentro de los valores citados en la tabla “Características inyectores”.
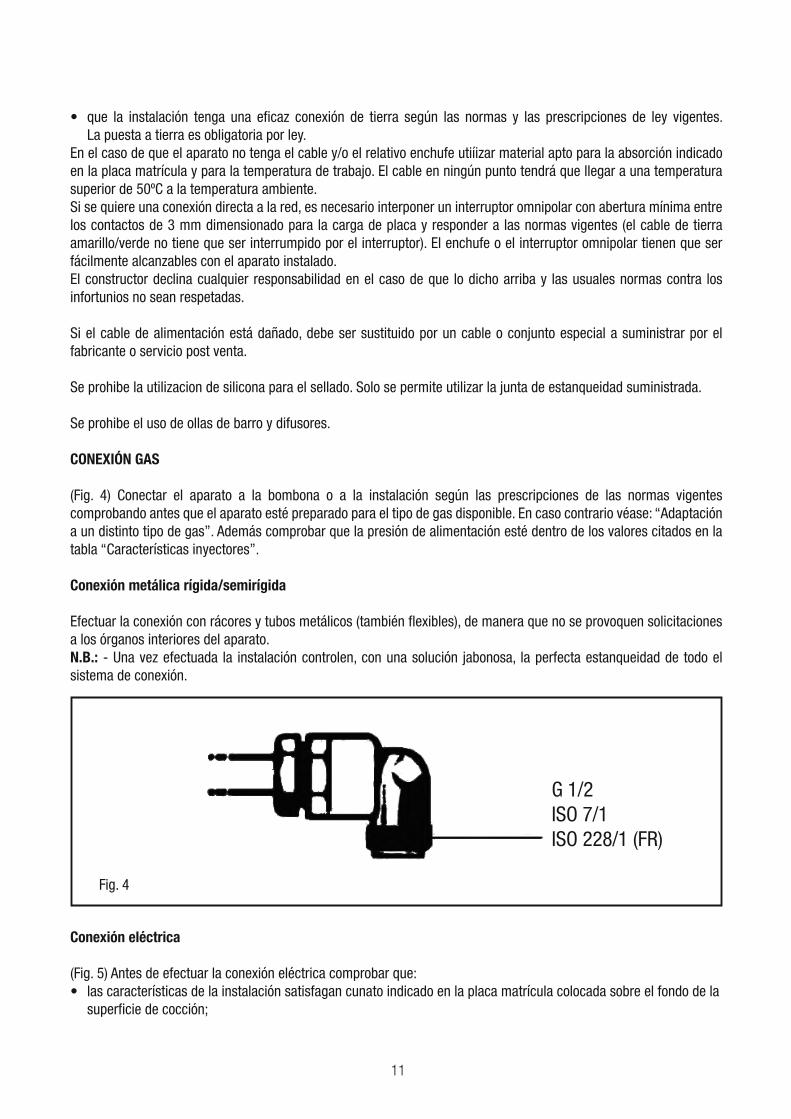
Conexión metálica rígida/semirígida
Efectuar la conexión con rácores y tubos metálicos (también flexibles), de manera que no se provoquen solicitaciones a los órganos interiores del aparato.N.B.: - Una vez efectuada la instalación controlen, con una solución jabonosa, la perfecta estanqueidad de todo el sistema de conexión.
G 1/2ISO 7/1ISO 228/1 (FR)
Fig. 4
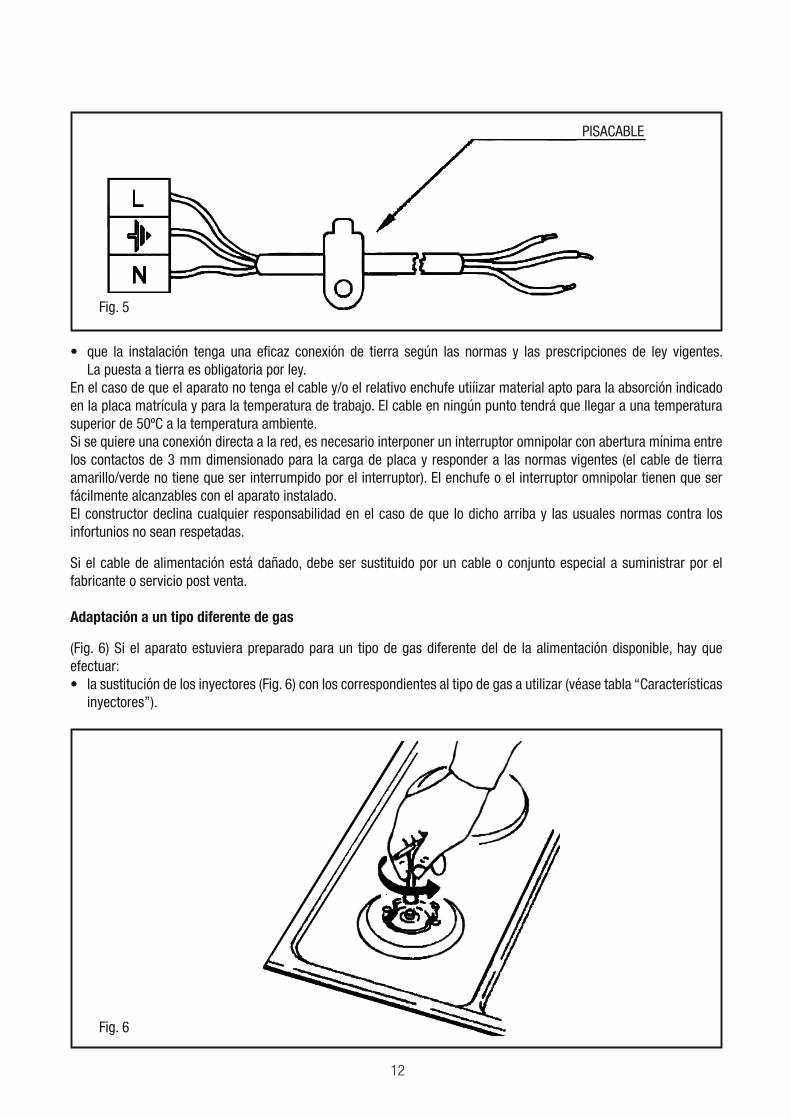
Conexión eléctrica
(Fig. 5) Antes de efectuar la conexión eléctrica comprobar que:las características de la instalación satisfagan cunato indicado en la placa matrícula colocada sobre el fondo de la superficie de cocción;
12
Fig. 5
PISACABLE
La puesta a tierra es obligatoria por ley.En el caso de que el aparato no tenga el cable y/o el relativo enchufe utiíizar material apto para la absorción indicado en la placa matrícula y para la temperatura de trabajo. El cable en ningún punto tendrá que llegar a una temperatura superior de 50ºC a la temperatura ambiente.Si se quiere una conexión directa a la red, es necesario interponer un interruptor omnipolar con abertura mínima entre los contactos de 3 mm dimensionado para la carga de placa y responder a las normas vigentes (el cable de tierra amarillo/verde no tiene que ser interrumpido por el interruptor). El enchufe o el interruptor omnipolar tienen que ser fácilmente alcanzables con el aparato instalado.El constructor declina cualquier responsabilidad en el caso de que lo dicho arriba y las usuales normas contra los infortunios no sean respetadas.
Si el cable de alimentación está dañado, debe ser sustituido por un cable o conjunto especial a suministrar por el fabricante o servicio post venta.
Adaptación a un tipo diferente de gas
(Fig. 6) Si el aparato estuviera preparado para un tipo de gas diferente del de la alimentación disponible, hay que efectuar:
inyectores”).
Fig. 6

13
de haberlo girado en la posición de mínimo. Para GPL (Butano / propano) atornillar a fondo.
Fig. 7
Fig. 8
(cm)
R L1 L2 L3 L4
1 6 4 10 70
(cm)
R L1 L2 L3 L4
1 6 4 10 70

14
G25 G27 G2.350 G30
Burner
(kW) kW kW (mm) (mm) (mm) kW (mm) (mm) (mm)
(A)0.90 69 0.90 69 0.90 69 0.90 75 0.90 96 0.90 50 44 43
97 97 97 64 60
2.40 2.40 2.40 2.40 2.40 2.40 72
(TR)3.40 3.40 3.40 3.40 3.40 3.40
20mbar 25mbar 25mbar 20mbar 13mbar 30mbar
37mbar
50mbar
At 15°C and 1013 mbar-dry gas
P.C.I.G20 37.78 MJ/m³ P.C.I.G25.1 32.51 MJ/m³
P.C.I.G25 32.49 MJ/m³ P.C.I.G27 30.98 MJ/m³
P.C.I.G2.350 27.20MJ/ m³ P.C.I.G30 49.47MJ/Kg
I2H3+
BurnerType of
Gas
PressureNozzle
diameterNominal Charge Reduced Charge
mbar 1/100mm g/h l/h kW kcal/h kW kcal/h
Auxiliary
Natural
G2020 69 — 85.7 0.90 774 0.40 344
Natural
G2525 69 — 99.7 0.90 774 0.40 344
Natural
G25.125 69 — 99.6 0.90 774 0.40 344
Natural
G2720 75 — 104.5 0.90 774 0.40 344
Natural
G2.35013 96 — 119 0.90 774 0.40 344
Butane
G30
30 50 65 — 0.90 774 0.40 344
37 44 65 — 0.90 774 0.40 344
50 43 65 — 0.90 774 0.40 344

15
Semi-
rapid
Natural
G2020 97 — 179 1.88 1617 0.60 516
Natural
G2525 97 — 208.3 1.88 1617 0.60 516
Natural
G25.125 97 — 208.1 1.88 1617 0.60 516
Natural
G2720 106 — 218.5 1.88 1617 0.60 516
Natural
G2.35013 131 — 248.8 1.88 1617 0.60 516
Butane
G30
30 68 136 — 1.88 1617 0.60 516
37 64 136 — 1.88 1617 0.60 516
50 60 136 — 1.88 1617 0.60 516
Rapid
Natural
G2020 110 — 228 2.4 2064 0.90 774
Natural
G2525 110 — 265.9 2.4 2064 0.90 774
Natural
G25.125 110 — 265.7 2.4 2064 0.90 774
Natural
G2720 121 — 278.8 2.4 2064 0.90 774
Natural
G2.35013 147 — 317.6 2.4 2064 0.90 774
Butane
G30
30 78 174 — 2.4 2064 0.90 774
37 72 174 — 2.4 2064 0.90 774
50 68 174 — 2.4 2064 0.90 774
Triple-ring
Natural
G2020 123 — 323 3.4 2924 1.50 1290
Natural
G2525 123 — 376.7 3.4 2924 1.50 1290
Natural
G25.125 123 — 376.5 3.4 2924 1.50 1290
Natural
G2720 145 — 395 3.4 2924 1.50 1290
Natural
G2.35013 180 — 450 3.4 2924 1.50 1290
Butane
G30
30 91 247 — 3.4 2924 1.50 1290
37 86 247 — 3.4 2924 1.50 1290
50 83 247 — 3.4 2924 1.50 1290
16
Sehr geehrter Kunde,
wir danken Ihnen und beglückwünschen uns für Ihre Wahl. Dieses neue Produkt, sorgfältig entworfen und mit erstklassigen Materialien hergeslellt, wurde genau geprüft um alle Ihre Forderungen an ein perfektes Kochen zu erfüllen.Wir bitten Sie deshalb die einfachen Anweisungen zu lesen und einzuhalten, damit von der ersten Anwendung an ausgezeichnete Ergebnisse erreicht werden können.Mit diesem modernen Apparat wünschen wir Ihnen das Beste.
DER HERSTELLER.
INHALTSVERZEICHNIS
MODELLE MIT AKKU
Garantie
Paket
Einbau und Effizienz
ANWEISUNGEN FÜR DEN BENUTZER
Installation
Gebrauch
Wartung
ANWEISUNGEN FÜR DEN INSTALLATEUR
Installation
Gasanschluß
Elektroanschluß
Technische Daten der Düse
DIESES PRODUKT ISl ALS HAUSHALTSGERÄT GEDACHT. FÜR SCHADEN AN SACHEN ODER PERSONEN, DIE AUF FALSCHE INSTALLATION BZW. UNGEEIGNETEN GEBRAUCH ODER MISSBRAUCH ZURÜCKZUFÜHREN SIND, ÜBERNIMMT DER HERSTELLER KEINERLEI VERANTWORTUNG.
DE
17
: Sicherheitshinweise
Lesen Sie diese Gebrau-
chsanweisung aufmerksam
durch. Nur so k�nnen Sie
Ihr Ger�t effektiv und sicher
benutzen. Bewahren Sie die
Installations- und Gebrau-
chsanweisungen gut auf
und geben Sie sie an einen
eventuellen Nachbesitzer
des Ger�ts weiter.
Der Hersteller ist jeglicher
Verantwortung enthoben,
wenn die Bestimmungen
dieses Handbuchs nicht
eingehalten werden. Die in
dieser Anleitung enthaltenen
Abbildungen sind orientativ.
Belassen Sie das Ger�t bis
zum Einbau in der Schutzh�-
lle. Falls Sie einen Scha-
den am Ger�t feststellen,
schlie§en Sie es nicht an.
Rufen Sie unseren Kunden-
dienst.
Dieses Ger�t entspricht
Klasse 3 gem�§ DIN EN 30-
1-1 f�r Gasger�te: Einbau-
ger�te.
Vor dem Einbau Ihres neuen
Kochfelds stellen Sie sicher,
dass bei der Installation
der Einbauanleitung gefolgt
wird.
Dieses Ger�t darf nicht auf
Yachten oder in Wohnwagen
eingebaut werden.
Dieses Ger�t darf nur an ei-
nem ausreichend bel�fteten
Ort genutzt werden.
Dieses Ger�t ist nicht f�r
den Betrieb mit einer exter-
nen Zeitschaltuhr oder einer
Fernsteuerung bestimmt.
Alle Installations-, Ans-
chluss-, Regelungs- und
Umstellungsarbeiten auf
eine andere Gasart m�s-
sen von einem autorisier-
ten Fachmann und unter
Beachtung der jeweils
anwendbaren Regelungen
und gesetzlichen Vorga-
ben sowie der Vorschriften
der �rtlichen Strom- und
18
Gasversorger vorgenom-
men werden. Besondere
Aufmerksamkeit ist den
f�r die Bel�ftung gelten-
den Bestimmungen und
Richtlinien zuzuwenden.
Dieses Ger�t ist werkseitig
auf die auf dem Typenschild
angegebene Gasart einges-
tellt.
Informationen zur Umste-
llung auf eine andere
Einbauanleitung. F�r Ums-
tellungsarbeiten auf eine an-
dere Gasart empfehlen wir,
den Kundendienst zu rufen.
Dieses Ger�t wur-
de ausschlie§lich f�r die
Verwendung in Privathaus-
halten entworfen; eine kom-
merzielle oder gewerbliche
Nutzung ist nicht gestattet.
Benutzen Sie das Ger�t nur
zum Kochen, niemals als
Heizger�t. Die Garantie gilt
nur dann, wenn das Ger�t
ausschlie§lich f�r seinen
vorgesehenen Zweck gen-
utzt wird. W�hrend des Be-
triebs, sollte das Ger�t nicht
unbeaufsichtigt gelassen
werden.
Verwenden Sie keine Ab-
deckungen oder
Kindersicherungen, die ni-
cht vom Hersteller des Ko-
chfelds empfohlen werden.
Es kann zu Unf�llen kom-
men, beispielsweise durch
-
teilen.
Dieses Ger�t kann von Kin-
dern ab 8 Jahren und Per-
sonen mit reduzierten phy-
sischen, sensorischen oder
mentalen F�higkeiten oder
Wissen benutzt werden,
wenn sie beaufsichtigt oder
bez�glich des sicheren Ge-
brauchs des Ger�tes un-
terwiesen wurden und die
daraus resultierenden Ge-
fahren verstanden haben.
19
Kinder d�rfen nicht mit dem
Ger�t spielen. Reinigung
und Benutzer-Wartung d�r-
fen nicht durch Kinder ohne
Beaufsichtigung durchge-
f�hrt werden.
Bei Ansammlung von unver-
branntem Gas in geschlos-
senen R�umen besteht Ver-
puffungsgefahr. Das Ger�t
nicht der Zugluft aussetzen.
Die Brenner k�nnen sonst
ausgehen. Lesen Sie die
Warnhinweise bez�glich der
Funktionsweise der Gas-
brenner aufmerksam durch.
Die Benutzung eines Gas-
kochger�ts erzeugt in dem
Raum, in dem es betrieben
wird, W�rme, Feuchtigkeit
und Verbrennungsprodukte.
Stellen Sie sicher, dass die
K�che gut durchl�ftet ist,
vor allem wenn das Kochfeld
in Betrieb ist: halten Sie die
nat�rlichen Bel�ftungs�ff-
nungen frei oder installieren
Sie eine mechanische Be-
l�ftung (Abzugshaube). Ein
langer und dauerhafter Be-
trieb des Ger�ts kann eine
Bel�ftung erfordern: �ffnen
Sie ein Fenster oder erh�hen
Sie die Leistung der Abzugs-
haube.
Kochstellen und deren Um-
gebung werden sehr hei§.
Ber�hren Sie niemals hei§e
-
der unter 8 Jahren fern.
sehr hei§. Brennbare Ge-
genst�nde niemals auf das
Kochfeld stellen. Keine Ge-
genst�nde auf dem Kochfeld
abstellen.
chemischen Reinigungsmit-
tel oder Produkte, Dampfrei-
20
oder andere Produkte, die
keine Lebensmittel sind, un-
ter diesem Haushaltsger�t
bzw. benutzen Sie diese ni-
cht in unmittelbarer N�he.
leicht entz�ndlich. Entfernen
Sie sich nicht, wenn Sie Fett
-
chen Sie das Feuer nicht mit
Wasser. Decken Sie das Ko-
chgef�§ zum Ersticken der
Flamme mit einem Deckel
ab und schalten Sie die Ko-
chstelle aus.
-
digt sind, die nicht die richti-
ge Gr�§e aufweisen, deren
Rand �ber das Kochfeld
hinausragt oder die schle-
cht aufgestellt sind, k�nnen
schwere Sch�den verursa-
chen. Beachten Sie die Ti-
pps und Warnhinweise zu
den Kochgef�§en.
St�rung stellen Sie die Gas-
und Stromzufuhr des Ger�ts
ab. F�r Reparaturarbeiten
rufen Sie bitte unseren Kun-
dendienst.
im Ger�teinneren vor. Gege-
benenfalls rufen Sie bitte un-
seren Kundendienst.
nicht drehen l�sst, versu-
chen Sie es nicht gewaltsam.
Rufen Sie unverz�glich den
Kundendienst, damit er ihn
repariert oder austauscht.
Benutzen Sie keine Dam-
pfreiniger zur Reinigung des
Ger�ts.
21
ANWEISUNGEN FÜR DEN BENUTZER
Installation
Sämtliche Installationsarbeiten (Elektroanschluß, Gasanschluß, Anpassung an einen anderen Gastype, darauffolgende Einstellungen, usw.) müssen laut der geltenden Vorschriften durch Fachpersonal ausgeführt werden.Für die spezifischen Anleitungen verweisen wir an den dem Installateur vorbehaltenen Teil.
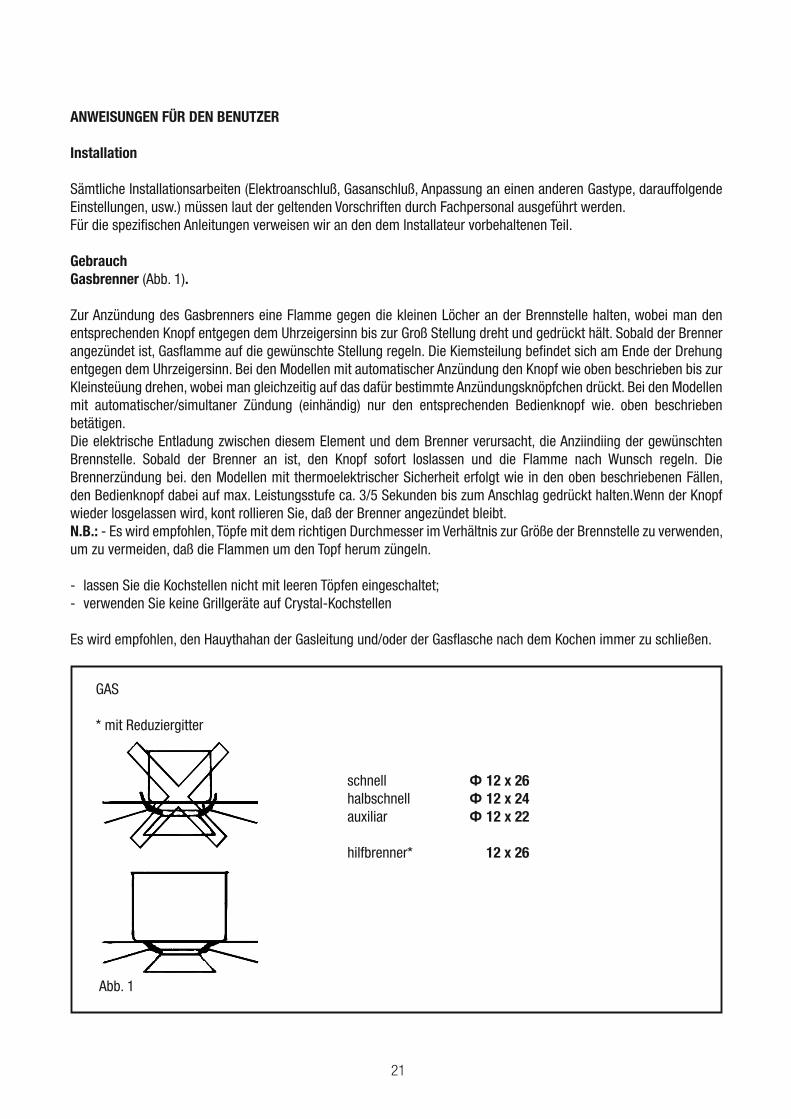
GebrauchGasbrenner (Abb. 1).
Zur Anzündung des Gasbrenners eine Flamme gegen die kleinen Löcher an der Brennstelle halten, wobei man den entsprechenden Knopf entgegen dem Uhrzeigersinn bis zur Groß Stellung dreht und gedrückt hält. Sobald der Brenner angezündet ist, Gasflamme auf die gewünschte Stellung regeln. Die Kiemsteilung befindet sich am Ende der Drehung entgegen dem Uhrzeigersinn. Bei den Modellen mit automatischer Anzündung den Knopf wie oben beschrieben bis zur Kleinsteüung drehen, wobei man gleichzeitig auf das dafür bestimmte Anzündungsknöpfchen drückt. Bei den Modellen mit automatischer/simultaner Zündung (einhändig) nur den entsprechenden Bedienknopf wie. oben beschrieben betätigen.Die elektrische Entladung zwischen diesem Element und dem Brenner verursacht, die Anziindiing der gewünschten Brennstelle. Sobald der Brenner an ist, den Knopf sofort loslassen und die Flamme nach Wunsch regeln. Die Brennerzündung bei. den Modellen mit thermoelektrischer Sicherheit erfolgt wie in den oben beschriebenen Fällen, den Bedienknopf dabei auf max. Leistungsstufe ca. 3/5 Sekunden bis zum Anschlag gedrückt halten.Wenn der Knopf wieder losgelassen wird, kont rollieren Sie, daß der Brenner angezündet bleibt.N.B.: - Es wird empfohlen, Töpfe mit dem richtigen Durchmesser im Verhältnis zur Größe der Brennstelle zu verwenden, um zu vermeiden, daß die Flammen um den Topf herum züngeln.
- lassen Sie die Kochstellen nicht mit leeren Töpfen eingeschaltet;- verwenden Sie keine Grillgeräte auf Crystal-Kochstellen
Es wird empfohlen, den Hauythahan der Gasleitung und/oder der Gasflasche nach dem Kochen immer zu schließen.
schnell 12 x 26halbschnell 12 x 24auxiliar 12 x 22
hilfbrenner* 12 x 26
GAS
* mit Reduziergitter
Abb. 1
22
MODELLE MIT AKKU
Garantie
Die Garantie (Garantieleistung) umfasst nicht die Akkus.Der Hersteller der Kochplatte haftet nicht für Fehler an den Akkus.
Paket
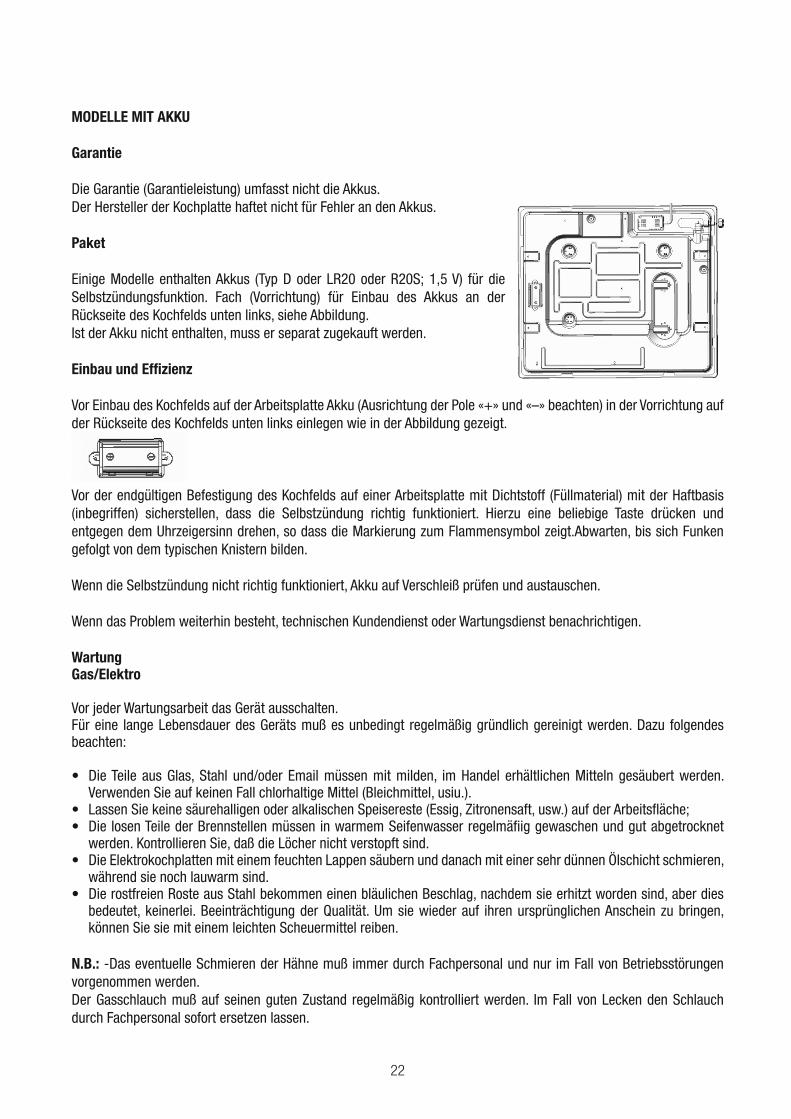
Einige Modelle enthalten Akkus (Typ D oder LR20 oder R20S; 1,5 V) für die Selbstzündungsfunktion. Fach (Vorrichtung) für Einbau des Akkus an der Rückseite des Kochfelds unten links, siehe Abbildung.Ist der Akku nicht enthalten, muss er separat zugekauft werden.
Einbau und Effizienz
Vor Einbau des Kochfelds auf der Arbeitsplatte Akku (Ausrichtung der Pole «+» und «–» beachten) in der Vorrichtung auf der Rückseite des Kochfelds unten links einlegen wie in der Abbildung gezeigt.
Vor der endgültigen Befestigung des Kochfelds auf einer Arbeitsplatte mit Dichtstoff (Füllmaterial) mit der Haftbasis (inbegriffen) sicherstellen, dass die Selbstzündung richtig funktioniert. Hierzu eine beliebige Taste drücken und entgegen dem Uhrzeigersinn drehen, so dass die Markierung zum Flammensymbol zeigt.Abwarten, bis sich Funken gefolgt von dem typischen Knistern bilden.
Wenn die Selbstzündung nicht richtig funktioniert, Akku auf Verschleiß prüfen und austauschen.
Wenn das Problem weiterhin besteht, technischen Kundendienst oder Wartungsdienst benachrichtigen.
WartungGas/Elektro
Vor jeder Wartungsarbeit das Gerät ausschalten.Für eine lange Lebensdauer des Geräts muß es unbedingt regelmäßig gründlich gereinigt werden. Dazu folgendes beachten:
Verwenden Sie auf keinen Fall chlorhaltige Mittel (Bleichmittel, usiu.).
werden. Kontrollieren Sie, daß die Löcher nicht verstopft sind.
während sie noch lauwarm sind.
bedeutet, keinerlei. Beeinträchtigung der Qualität. Um sie wieder auf ihren ursprünglichen Anschein zu bringen, können Sie sie mit einem leichten Scheuermittel reiben.
N.B.: -Das eventuelle Schmieren der Hähne muß immer durch Fachpersonal und nur im Fall von Betriebsstörungen vorgenommen werden.Der Gasschlauch muß auf seinen guten Zustand regelmäßig kontrolliert werden. Im Fall von Lecken den Schlauch durch Fachpersonal sofort ersetzen lassen.
23
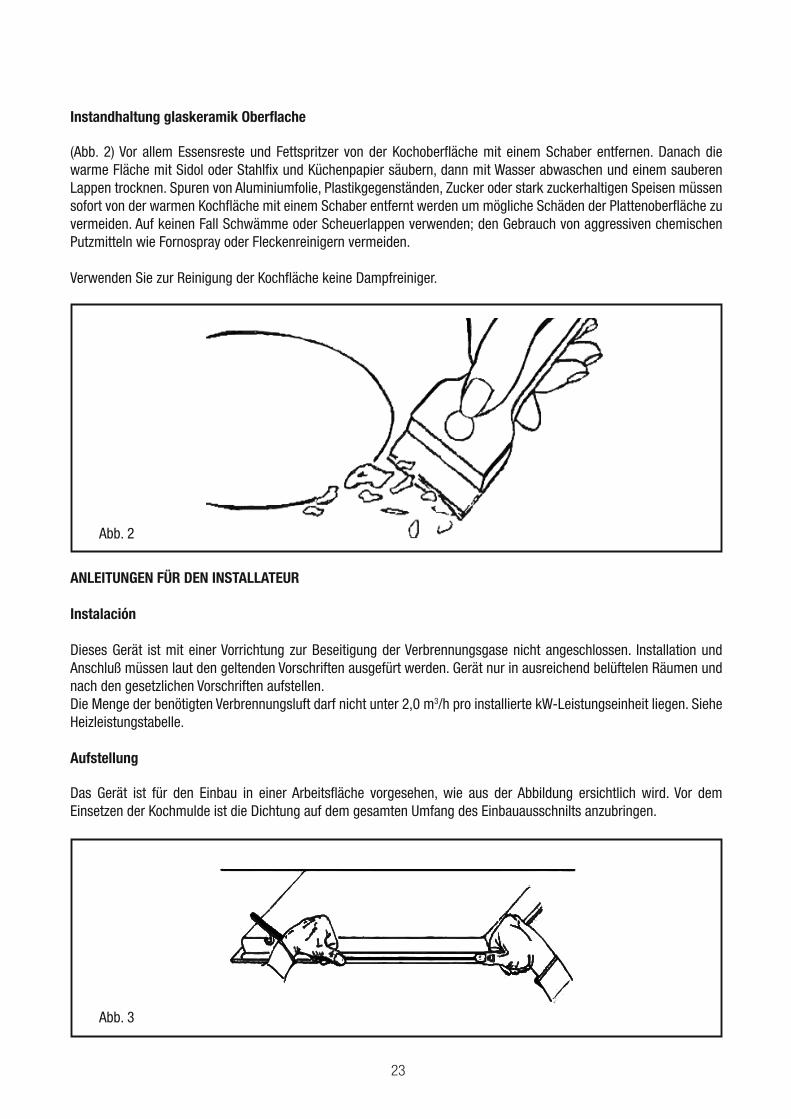
Instandhaltung glaskeramik Oberflache
(Abb. 2) Vor allem Essensreste und Fettspritzer von der Kochoberfläche mit einem Schaber entfernen. Danach die warme Fläche mit Sidol oder Stahlfix und Küchenpapier säubern, dann mit Wasser abwaschen und einem sauberen Lappen trocknen. Spuren von Aluminiumfolie, Plastikgegenständen, Zucker oder stark zuckerhaltigen Speisen müssen sofort von der warmen Kochfläche mit einem Schaber entfernt werden um mögliche Schäden der Plattenoberfläche zu vermeiden. Auf keinen Fall Schwämme oder Scheuerlappen verwenden; den Gebrauch von aggressiven chemischen Putzmitteln wie Fornospray oder Fleckenreinigern vermeiden.
Verwenden Sie zur Reinigung der Kochfläche keine Dampfreiniger.
Abb. 2
ANLEITUNGEN FÜR DEN INSTALLATEUR
Instalación
Dieses Gerät ist mit einer Vorrichtung zur Beseitigung der Verbrennungsgase nicht angeschlossen. Installation und Anschluß müssen laut den geltenden Vorschriften ausgefürt werden. Gerät nur in ausreichend belüftelen Räumen und nach den gesetzlichen Vorschriften aufstellen.Die Menge der benötigten Verbrennungsluft darf nicht unter 2,0 m3/h pro installierte kW-Leistungseinheit liegen. Siehe Heizleistungstabelle.
Aufstellung
Das Gerät ist für den Einbau in einer Arbeitsfläche vorgesehen, wie aus der Abbildung ersichtlich wird. Vor dem Einsetzen der Kochmulde ist die Dichtung auf dem gesamten Umfang des Einbauausschnilts anzubringen.
Abb. 3

24
Falls das Gerät kein Kabel und/oder keinen Stecker besitzt, verwenden Sie. den Kenndaten und der Betriebstemperatur entsprechendes Material. Das Kabel darf an keiner Stelle eine Temperatur erreichen, die mehr als 50°C über der Raumtemperatur liegt.
Kontakte von 3 mm entsprechend der Kenndaten und der geltenden Vorschriften (das gelb/grüne Erdungskabe darf nicht vom Schalter unterbrochen werden) benötigt.Die Steckdose oder der allpoliger Schalter müssen bei installiertem Gerät einfach zu erreichen sein.
Der Hersteller übernimmt keinerlei Verantwortung falIs die angeführten Sicherheitsvorschriften nicht eingehalten werden.
Wenn das Netzkabel schadhaft ist, muss es durch ein Kabel oder Spezialset ersetzt werden, das beim Hersteller oder beim After-Sales-Service angefordert werden muss.
Bitte verwenden Sie kein Silikon für die Abdichtung. Verwenden Sie nur das mitgelieferte Dichtband.
Bitte verwenden Sie keine Tontöpfe und Flammenverteiler.
GASANSCHLUSS
(s. Abb. 4) Das Gerät an die Gasflasche oder an das Gasversorgungsnetz nach den geltenden Vorschriften anschließen und dabei sicherstellen, daß das Gerät auf den vorhandenen Gastyp eingestellt ist (wenn es nicht der Fall sein sollte, wird auf das Kapitel “Anpassung an einen anderen Gastyp” verwiesen). Man sollte außerdem kontrollieren, daß der Förderdruck den in Tab. “Technische Daten der Düse” angegebenen Werten entspricht.
Anschluß mit Metallanschlußstutzen und - röhren, fest/halbfest
Den Anschluß mit Anschlußstutzen und (ev. flexiblen) Röhren aus Metall so ausführen, daß die inneren Teile des Geräts nicht belastet werden. Hinweis: - Bei vollendeter Installation muß die gesamte Anschlußleitung mit einer Seifenlösung auf vollständige Dichtigkeit überprüft werden.
G 1/2ISO 7/1ISO 228/1 (FR)
Abb. 4
Elektroanschluß
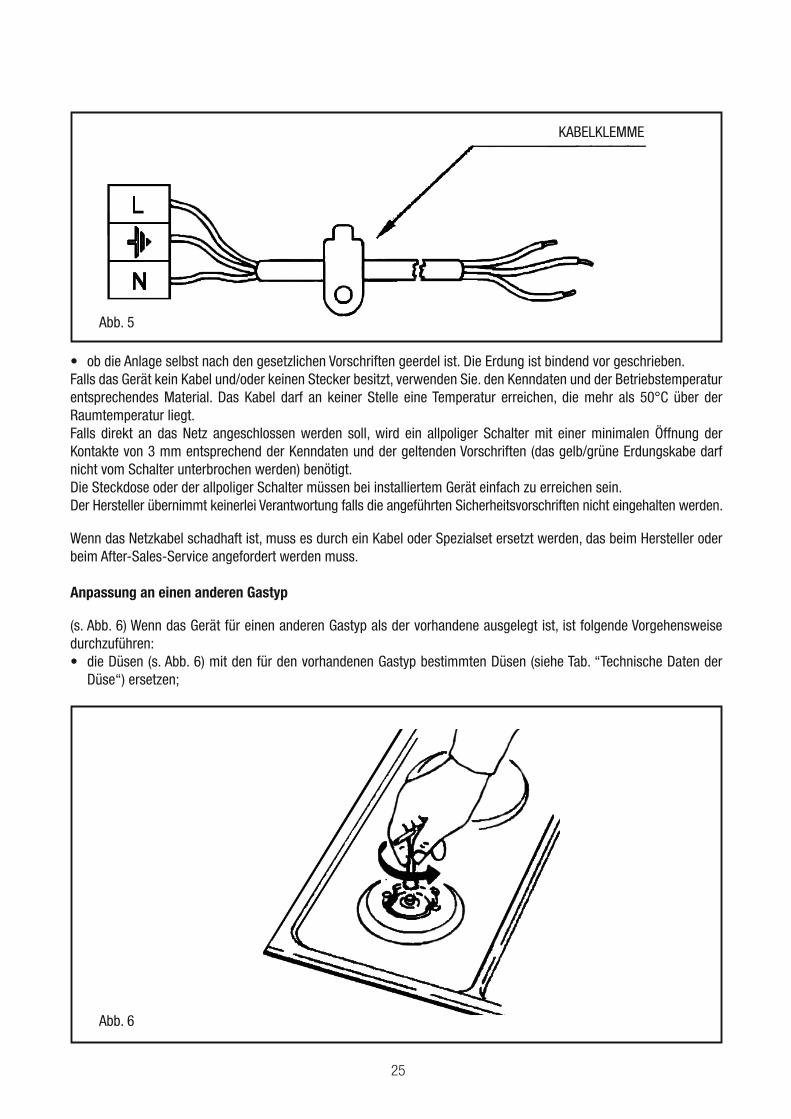
(Abb. 5) Bevor der Elektroanschluß hergestellt wird, versichern Sie sich:ob die Merkmale der Anlage den Angaben des Kenndatenschilds an der Unterseite der Kochfläche entsprechen;
25
Abb. 5
KABELKLEMME
Falls das Gerät kein Kabel und/oder keinen Stecker besitzt, verwenden Sie. den Kenndaten und der Betriebstemperatur entsprechendes Material. Das Kabel darf an keiner Stelle eine Temperatur erreichen, die mehr als 50°C über der Raumtemperatur liegt.
Kontakte von 3 mm entsprechend der Kenndaten und der geltenden Vorschriften (das gelb/grüne Erdungskabe darf nicht vom Schalter unterbrochen werden) benötigt.Die Steckdose oder der allpoliger Schalter müssen bei installiertem Gerät einfach zu erreichen sein.Der Hersteller übernimmt keinerlei Verantwortung falIs die angeführten Sicherheitsvorschriften nicht eingehalten werden.
Wenn das Netzkabel schadhaft ist, muss es durch ein Kabel oder Spezialset ersetzt werden, das beim Hersteller oder beim After-Sales-Service angefordert werden muss.
Anpassung an einen anderen Gastyp
(s. Abb. 6) Wenn das Gerät für einen anderen Gastyp als der vorhandene ausgelegt ist, ist folgende Vorgehensweise durchzuführen:
Düse“) ersetzen;
Abb. 6
26
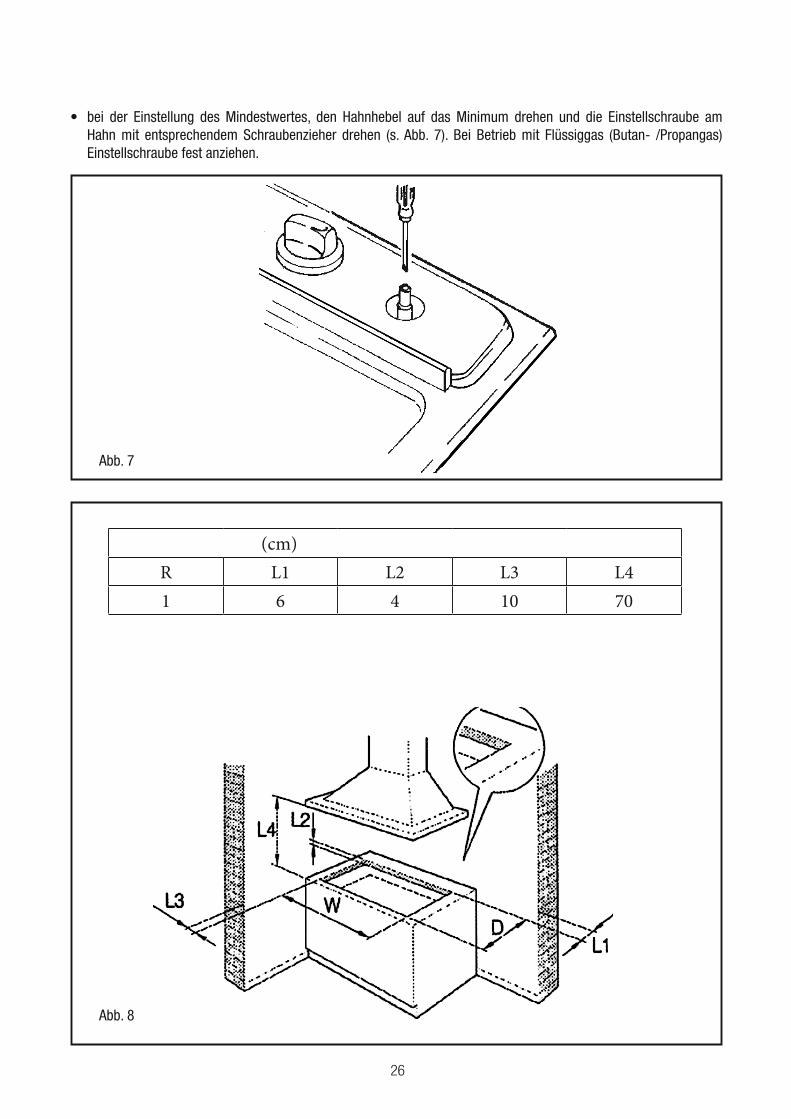
Hahn mit entsprechendem Schraubenzieher drehen (s. Abb. 7). Bei Betrieb mit Flüssiggas (Butan- /Propangas) Einstellschraube fest anziehen.
Abb. 7
Abb. 8
(cm)
R L1 L2 L3 L4
1 6 4 10 70

27
G25 G27 G2.350 G30
Burner
(kW) kW kW (mm) (mm) (mm) kW (mm) (mm) (mm)
(A)0.90 69 0.90 69 0.90 69 0.90 75 0.90 96 0.90 50 44 43
97 97 97 64 60
2.40 2.40 2.40 2.40 2.40 2.40 72
(TR)3.40 3.40 3.40 3.40 3.40 3.40
20mbar 25mbar 25mbar 20mbar 13mbar 30mbar
37mbar
50mbar
At 15°C and 1013 mbar-dry gas
P.C.I.G20 37.78 MJ/m³ P.C.I.G25.1 32.51 MJ/m³
P.C.I.G25 32.49 MJ/m³ P.C.I.G27 30.98 MJ/m³
P.C.I.G2.350 27.20MJ/ m³ P.C.I.G30 49.47MJ/Kg
I2H3+
BurnerType of
Gas
PressureNozzle
diameterNominal Charge Reduced Charge
mbar 1/100mm g/h l/h kW kcal/h kW kcal/h
Auxiliary
Natural
G2020 69 — 85.7 0.90 774 0.40 344
Natural
G2525 69 — 99.7 0.90 774 0.40 344
Natural
G25.125 69 — 99.6 0.90 774 0.40 344
Natural
G2720 75 — 104.5 0.90 774 0.40 344
Natural
G2.35013 96 — 119 0.90 774 0.40 344
Butane
G30
30 50 65 — 0.90 774 0.40 344
37 44 65 — 0.90 774 0.40 344
50 43 65 — 0.90 774 0.40 344
28
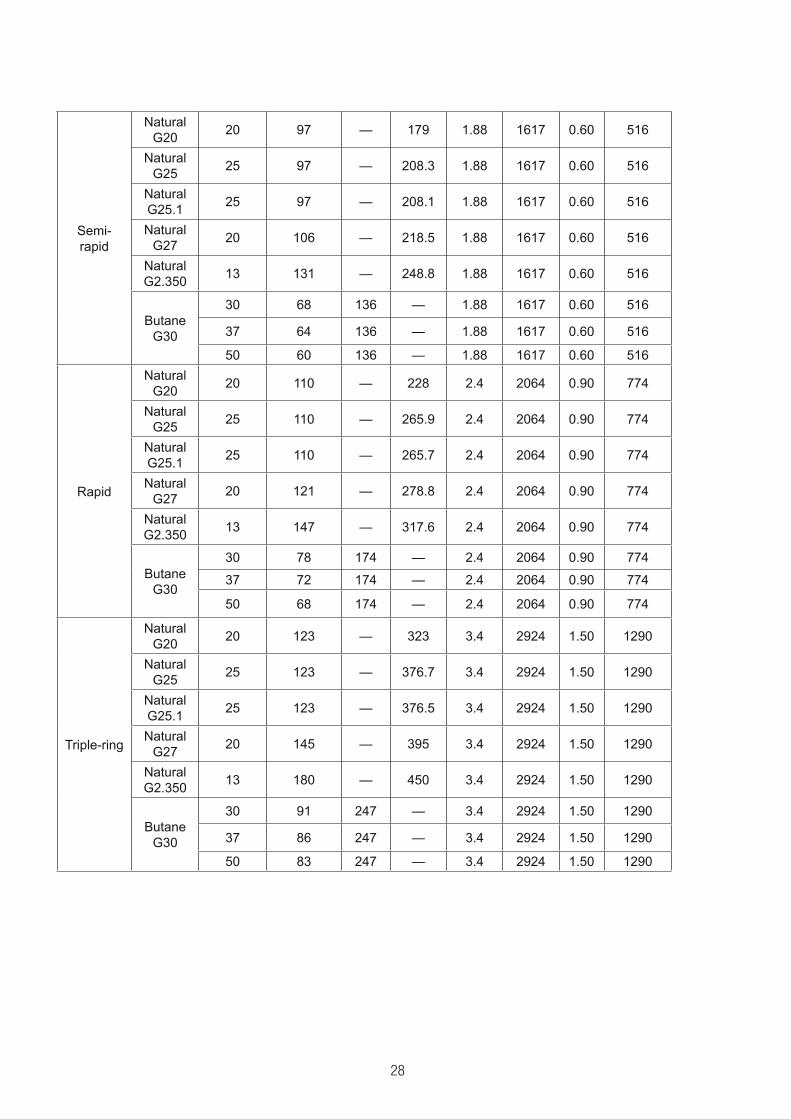
Semi-
rapid
Natural
G2020 97 — 179 1.88 1617 0.60 516
Natural
G2525 97 — 208.3 1.88 1617 0.60 516
Natural
G25.125 97 — 208.1 1.88 1617 0.60 516
Natural
G2720 106 — 218.5 1.88 1617 0.60 516
Natural
G2.35013 131 — 248.8 1.88 1617 0.60 516
Butane
G30
30 68 136 — 1.88 1617 0.60 516
37 64 136 — 1.88 1617 0.60 516
50 60 136 — 1.88 1617 0.60 516
Rapid
Natural
G2020 110 — 228 2.4 2064 0.90 774
Natural
G2525 110 — 265.9 2.4 2064 0.90 774
Natural
G25.125 110 — 265.7 2.4 2064 0.90 774
Natural
G2720 121 — 278.8 2.4 2064 0.90 774
Natural
G2.35013 147 — 317.6 2.4 2064 0.90 774
Butane
G30
30 78 174 — 2.4 2064 0.90 774
37 72 174 — 2.4 2064 0.90 774
50 68 174 — 2.4 2064 0.90 774
Triple-ring
Natural
G2020 123 — 323 3.4 2924 1.50 1290
Natural
G2525 123 — 376.7 3.4 2924 1.50 1290
Natural
G25.125 123 — 376.5 3.4 2924 1.50 1290
Natural
G2720 145 — 395 3.4 2924 1.50 1290
Natural
G2.35013 180 — 450 3.4 2924 1.50 1290
Butane
G30
30 91 247 — 3.4 2924 1.50 1290
37 86 247 — 3.4 2924 1.50 1290
50 83 247 — 3.4 2924 1.50 1290
29
Chère cliente, Cher client,
merci et sincères félicitations pour le choix que vous avez fait.Ce nouveau produit, développé avec soin et fabriqué avec des matières de toute première qualité, a été soigneusement rodé pour satisfaire toutes Vos exigences d’une cuisson parfaite.Veuillez lire attentivement les instructions simples portées sur cette notice qui vous permettront d’obtenir d’excellents résultats dès la première utilisation. Nous vous souhaitons une entière et pleine satisfaction quant à l’utilisation de cet appareil moderne.
FABRICANT
INDEX
MODÈLES COMPRENANT DES PILES
Garantie
Paquet
Installation et efficacité
NOTICE D’EMPLOI
Installation
Mode d’emploi
Entretien
MODALITÉS D’INSTALLATION
Installation
Connexion gaz
Branchement électrique
Caractéristiques injecteurs
CE PRODUIT EST CONÇU EXCLUSIVEMENT POUR USAGE DOMESTIQUE. LE CONSTRUCTEUR DÉCLINE TOUTE RESPONSABILITÉ POUR DOMMAGES ET BLESSURES CAUSÉES PAR UNE INSTALLATION INCORRECTE OU PAR UN USAGE IMPROPRE, ERRONÉ OU ABSURDE.
FR
30
: Consignes de s�curit�
Lisez attentivement ces
instructions. Ce nÕest quÕ�
cette condition que vous
pourrez utiliser votre appa-
s�curit�.Conservez la notice
dÕutilisation et dÕinstallation,
et remettez-la avec lÕappareil
si celui-ci change de pro-
pri�taire.
Le fabricant est exempt de
toute responsabilit� si les
instructions de cette noti-
ce ne sont pas respect�es.
Les images de cette notice
sont propos�es � titre indi-
catif.
Ne retirez lÕappareil de son
emballage protecteur quÕau
moment de son encastre-
ment. Si vous constatez des
dommages sur lÕappareil,
ne le branchez pas.Contac-
tez notre Service Technique.
Cet appareil correspond � la
classe 3, selon la norme EN
30-1-1 pour les appareils �
gaz : appareil encastr� dans
un meuble.
Assurez-vous que
lÕinstallation de votre plaque
de cuisson est r�alis�e dans
le respect de la notice de
montage.
Cet appareil ne peut pas �tre
install� dans des yachts ou
des caravanes.
Cet appareil doit �tre utilis�
uniquement dans des en-
Cet appareil nÕest pas con�u
pour un fonctionnement
avec une minuterie externe
ou une commande � distan-
ce.
Tous les travaux
dÕinstallation, de bran-
chement, de r�glage et
dÕadaptation � un autre
type de gaz doivent �tre
r�alis�s par un technicien
agr�� qui doit respecter
les normes et la l�gislation
applicables, ainsi que les
prescriptions des soci�-
t�s locales de distribution
31
dÕ�lectricit� et de gaz. Les
dispositions applicables
quant � la ventilation se-
ront attentivement respec-
t�es.
En sortie dÕusine, cet appa-
reil est adapt� au type de
gaz indiqu� sur la plaque
signal�tique. SÕil �tait n�ces-
saire de le changer, veuillez
consulter la notice de mon-
tage.Il est recommand� de
faire appel � notre service
technique pour lÕadaptation
� un autre type de gaz.
Cet appareil a �t� con�u
pour une utilisation domes-
tique ; son utilisation � titre
commercial ou profession-
nel est interdite. NÕutilisez
lÕappareil que pour cuisiner,
jamais comme chauffage.La
garantie ne sera valable que
si lÕutilisation pour laquelle il
a �t� con�u a �t� respect�e.
Ne laissez pas lÕappareil sans
surveillance pendant son
fonctionnement. NÕutilisez
pas de couvercles ou de ba-
rri�res de protection pour
enfants non recommand�s
par le fabricant de la pla-
que de cuisson.Ils peuvent
provoquer des accidents,
notamment en raison de la
surchauffe, de la combus-
tion ou du d�collement de
fragments de mat�riaux. Cet
appareil peut �tre utilis�e par
des enfants �g�s de plus de
8 ans et par des personnes
ayant des capacit�s physi-
ques, sensorielles ou men-
tales restreintes ou ayant
un manque dÕexp�rience ou
de connaissances, sÕils sont
surveill�s ou si une personne
les a instruits de la manipu-
lation de lÕappareil en toute
s�curit� et sÕils ont compris
les dangers qui en r�sultent.
Les enfants ne doivent pas
jouer avec lÕappareil. Le
nettoyage et lÕentretien in-
combant � lÕutilisateur ne
doivent pas �tre effectu�s
par des enfants sans survei-
llance.
32
LÕaccumulation de gaz non
br�l�s dans un lieu ferm�
pourrait comporter un ris-
-
cez pas lÕappareil dans des
courants dÕair. Les br�leurs
pourraient sÕ�teindre. Lisez
attentivement les instruc-
tions et les avertissements
concernant le fonctionne-
ment des br�leurs � gaz.
LÕutilisation dÕun appareil
de cuisson � gaz produit de
la chaleur, de lÕhumidit� et
�met des produits de com-
bustion dans la pi�ce o� il
est install�. Assurez-vous
que la cuisine soit bien ven-
til�e, en particulier lorsque
la plaque de cuisson est en
fonctionnement: laissez les
-
turelle ouverts ou installez
un dispositif de ventilation
m�canique (hotte aspiran-
te).Lorsque lÕutilisation de
lÕappareil est intense et pro-
long�e, une ventilation com-
peut �tre n�cessaire: ouvrez
une fen�tre ou augmentez la
puissance de la ventilation
m�canique.
Les zones de cuisson et les
zones adjacentes chauffent
fortement.Ne touchez pas
les surfaces chaudes. Ne
laissez pas les enfants de
moins de 8 ans sÕapprocher.
chauffent fortement.Ne po-
-
mables sur la plaque de
cuisson.NÕentreposez pas
dÕobjets sur la plaque de
cuisson.
produits chimiques corrosi-
fs, de vapeurs, de mat�riels
non alimentaires sous cet
appareil, ni � proximit�.
33
facilement. Ne vous absen-
tez pas si vous avez mis de la
graisse ou de lÕhuile � chau-
nÕ�teignez pas le feu avec
de lÕeau. Couvrez le r�cipient
avec un couvercle herm�ti-
que pour �touffer le feu puis
�teignez la zone de cuisson.
-
teraient des dommages,
dont la taille ne serait pas
adapt�e, qui d�passeraient
de la plaque de cuisson
ou qui seraient mal plac�s,
pourraient occasionner des
l�sions graves. Respectez
les conseils et les avertisse-
ments concernant les r�ci-
pients de cuisson.
-
chez lÕalimentation �lectri-
que et de gaz de lÕappareil.
Pour la r�paration, contac-
tez notre service technique.
de lÕappareil. Si n�cessaire,
contactez notre service te-
chnique.
commande est bloqu�, ne
forcez pas. Appelez imm�-
diatement le service tech-
nique pour proc�der � sa
r�paration ou � son rempla-
cement.
Risque de d�charge �lec-
Ne pas utiliser de machines
de nettoyage � vapeur pour
nettoyer lÕappareil.
34
NOTICE D’EMPLOI
Installation
Toutes les opérations relatives à l’installation (branchement électrique) doivent être effectuées par des spécialistes suivant les normes en vigueur.Pour les instructions spécifiques, voir la partie qui concerne les modalités d’installation.
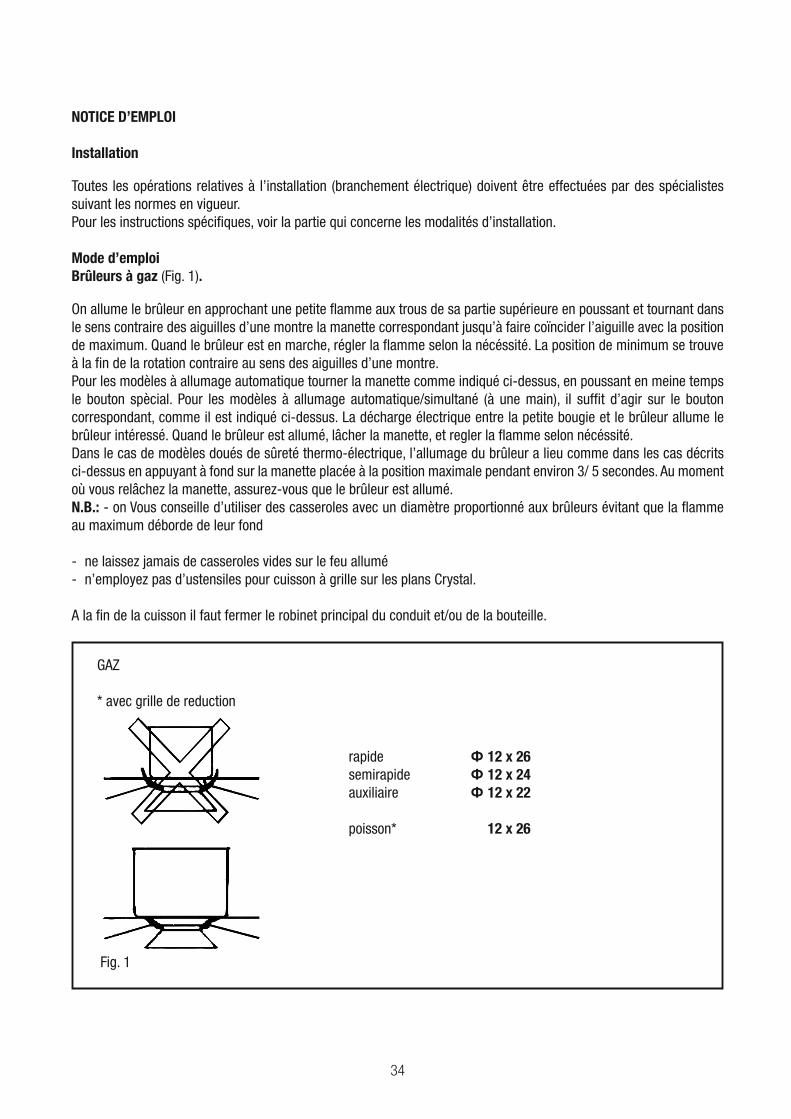
Mode d’emploiBrûleurs à gaz (Fig. 1).
On allume le brûleur en approchant une petite flamme aux trous de sa partie supérieure en poussant et tournant dans le sens contraire des aiguilles d’une montre la manette correspondant jusqu’à faire coïncider l’aiguille avec la position de maximum. Quand le brûleur est en marche, régler la flamme selon la nécéssité. La position de minimum se trouve à la fin de la rotation contraire au sens des aiguilles d’une montre.Pour les modèles à allumage automatique tourner la manette comme indiqué ci-dessus, en poussant en meine temps le bouton spècial. Pour les modèles à allumage automatique/simultané (à une main), il suffit d’agir sur le bouton correspondant, comme il est indiqué ci-dessus. La décharge électrique entre la petite bougie et le brûleur allume le brûleur intéressé. Quand le brûleur est allumé, lâcher la manette, et regler la flamme selon nécéssité.Dans le cas de modèles doués de sûreté thermo-électrique, l’allumage du brûleur a lieu comme dans les cas décrits ci-dessus en appuyant à fond sur la manette placée à la position maximale pendant environ 3/ 5 secondes. Au moment où vous relâchez la manette, assurez-vous que le brûleur est allumé.N.B.: - on Vous conseille d’utiliser des casseroles avec un diamètre proportionné aux brûleurs évitant que la flamme au maximum déborde de leur fond
- ne laissez jamais de casseroles vides sur le feu allumé- n’employez pas d’ustensiles pour cuisson à grille sur les plans Crystal.
A la fin de la cuisson il faut fermer le robinet principal du conduit et/ou de la bouteille.
rapide 12 x 26semirapide 12 x 24auxiliaire 12 x 22
poisson* 12 x 26
GAZ
* avec grille de reduction
Fig. 1
35
MODÈLES COMPRENANT DES PILES
Garantie
La garantie (service de garantie) ne couvre pas les piles.Le fabricant de la plaque de cuisson à gaz dégage toute responsabilité en cas de défaillance des piles.
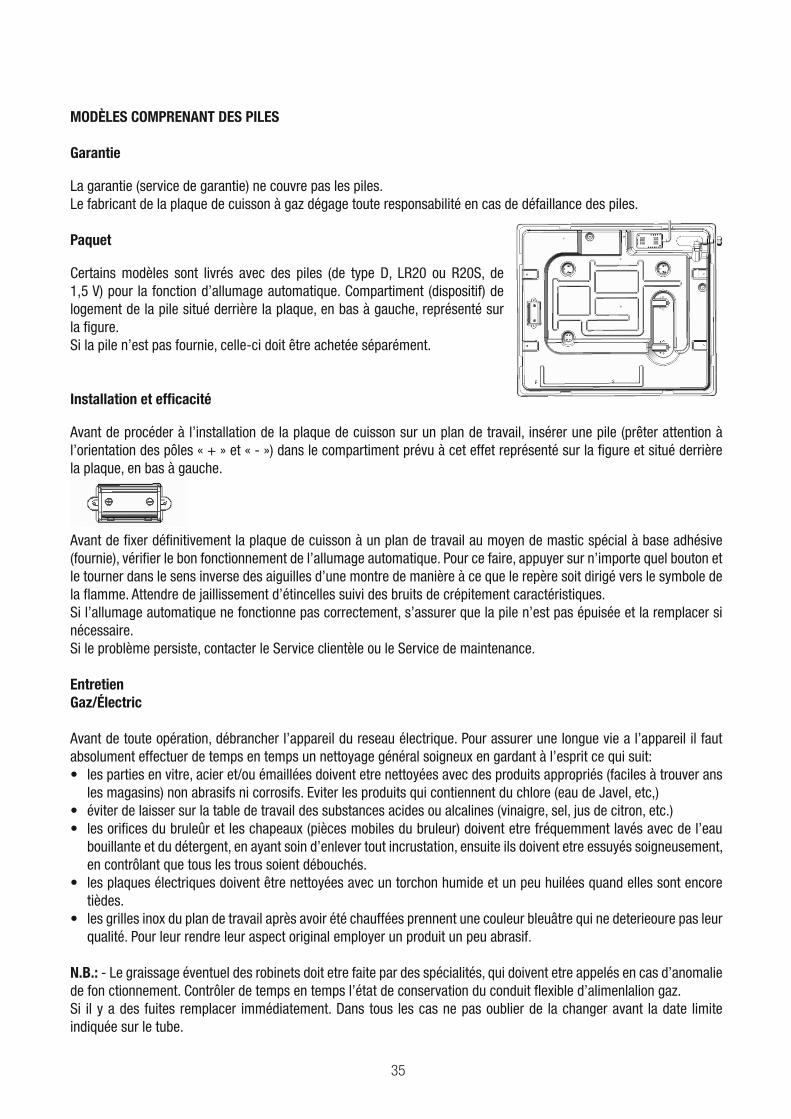
Paquet
Certains modèles sont livrés avec des piles (de type D, LR20 ou R20S, de 1,5 V) pour la fonction d’allumage automatique. Compartiment (dispositif) de logement de la pile situé derrière la plaque, en bas à gauche, représenté sur la figure.Si la pile n’est pas fournie, celle-ci doit être achetée séparément.
Installation et efficacité
Avant de procéder à l’installation de la plaque de cuisson sur un plan de travail, insérer une pile (prêter attention à l’orientation des pôles « + » et « - ») dans le compartiment prévu à cet effet représenté sur la figure et situé derrière la plaque, en bas à gauche.
Avant de fixer définitivement la plaque de cuisson à un plan de travail au moyen de mastic spécial à base adhésive (fournie), vérifier le bon fonctionnement de l’allumage automatique. Pour ce faire, appuyer sur n’importe quel bouton et le tourner dans le sens inverse des aiguilles d’une montre de manière à ce que le repère soit dirigé vers le symbole de la flamme. Attendre de jaillissement d’étincelles suivi des bruits de crépitement caractéristiques.Si l’allumage automatique ne fonctionne pas correctement, s’assurer que la pile n’est pas épuisée et la remplacer si nécessaire.Si le problème persiste, contacter le Service clientèle ou le Service de maintenance.
EntretienGaz/Électric
Avant de toute opération, débrancher l’appareil du reseau électrique. Pour assurer une longue vie a l’appareil il faut absolument effectuer de temps en temps un nettoyage général soigneux en gardant à l’esprit ce qui suit:
les magasins) non abrasifs ni corrosifs. Eviter les produits qui contiennent du chlore (eau de Javel, etc,)
bouillante et du détergent, en ayant soin d’enlever tout incrustation, ensuite ils doivent etre essuyés soigneusement, en contrôlant que tous les trous soient débouchés.
tièdes.
qualité. Pour leur rendre leur aspect original employer un produit un peu abrasif.
N.B.: - Le graissage éventuel des robinets doit etre faite par des spécialités, qui doivent etre appelés en cas d’anomalie de fon ctionnement. Contrôler de temps en temps l’état de conservation du conduit flexible d’alimenlalion gaz. Si il y a des fuites remplacer immédiatement. Dans tous les cas ne pas oublier de la changer avant la date limite indiquée sur le tube.
36
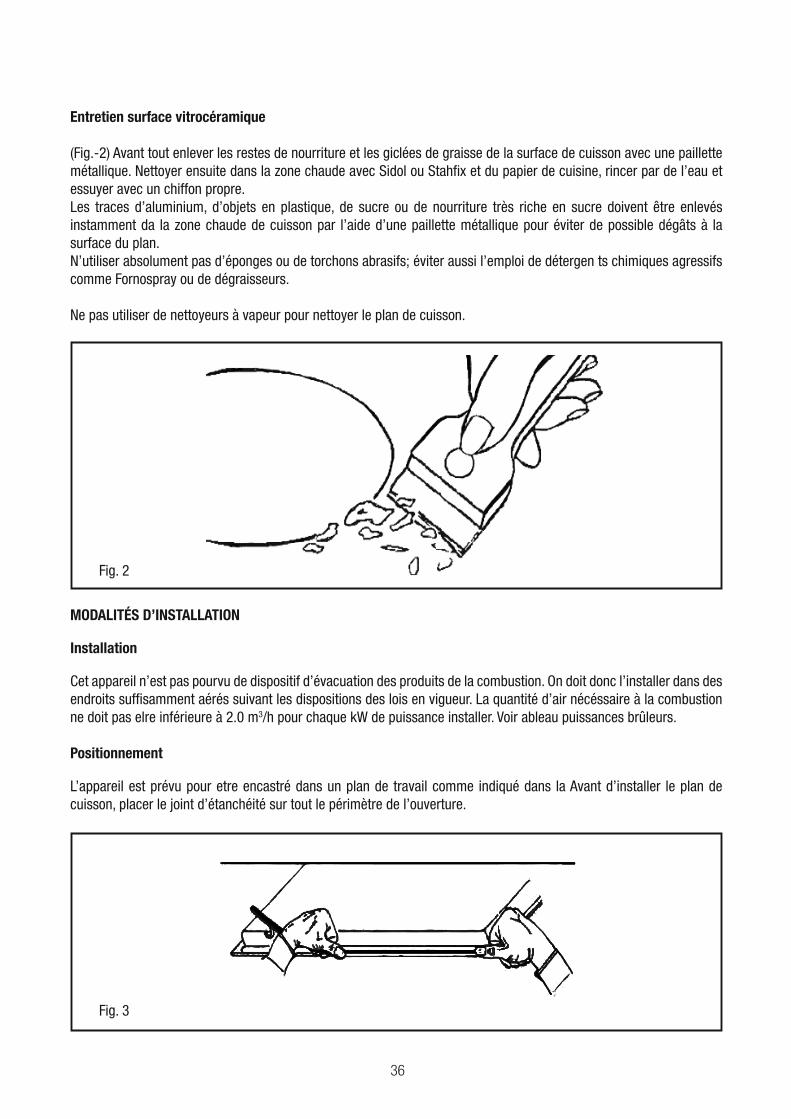
Entretien surface vitrocéramique
(Fig.-2) Avant tout enlever les restes de nourriture et les giclées de graisse de la surface de cuisson avec une paillette métallique. Nettoyer ensuite dans la zone chaude avec Sidol ou Stahfix et du papier de cuisine, rincer par de l’eau et essuyer avec un chiffon propre.Les traces d’aluminium, d’objets en plastique, de sucre ou de nourriture très riche en sucre doivent être enlevés instamment da la zone chaude de cuisson par l’aide d’une paillette métallique pour éviter de possible dégâts à la surface du plan.N’utiliser absolument pas d’éponges ou de torchons abrasifs; éviter aussi l’emploi de détergen ts chimiques agressifs comme Fornospray ou de dégraisseurs.
Ne pas utiliser de nettoyeurs à vapeur pour nettoyer le plan de cuisson.
Fig. 2
MODALITÉS D’INSTALLATION
Installation
Cet appareil n’est pas pourvu de dispositif d’évacuation des produits de la combustion. On doit donc l’installer dans des endroits suffisamment aérés suivant les dispositions des lois en vigueur. La quantité d’air nécéssaire à la combustion ne doit pas elre inférieure à 2.0 m3/h pour chaque kW de puissance installer. Voir ableau puissances brûleurs.
Positionnement
L’appareil est prévu pour etre encastré dans un plan de travail comme indiqué dans la Avant d’installer le plan de cuisson, placer le joint d’étanchéité sur tout le périmètre de l’ouverture.
Fig. 3
37
terre est obligatoire aux tenues delà loi.Si l’appareil n’a pas de câble et/ou de prise cor-respondante, ne utiliser que des câbles et des prises, selon les données indiquées sur la plaque signalétique et à la température de travail. Le câble ne devra jamais atteindre une température supérieure de 50°C à celle de l’ambiance.Si on désire une connexion directe au réseau, il faut prévoir un dispositif de coupure omnipolaire avec une distance d’ouverture entre les contacts de 3 mm dimensionné pour la puissance absorbée et qui suit les normes en vigueur (le fil de terre de couleur jau-ne/vert ne doit pas être coupé par l’interrupteur). La prise ou l’interrupteur omnipolaire doivent être facilement accessibles après la mise en place de l’appareil.Le Constructeur décline toute responsabilité au cas où ces normes et les autre nonnes contre les accidents ne seraient pas observées.
Si le câble d’alimentation est endommagé, le remplacer par un câble neuf ou par un kit spécial fourni par le fabricant ou par le service après-vente.
L’emploi de silicone d’étanchéité est interdit. Seul le joint d’étanchéité fourni doit être utilisé.
L’utilisation de marmites en terre cuite et de diffuseurs est interdite.
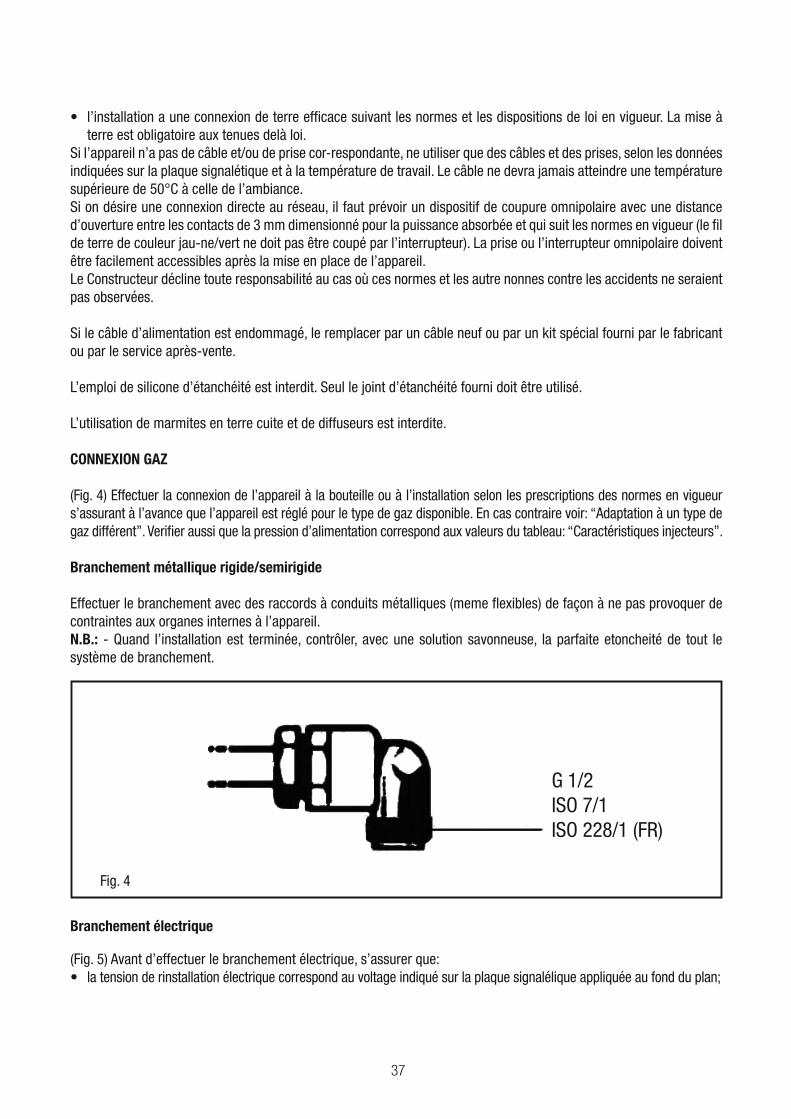
CONNEXION GAZ
(Fig. 4) Effectuer la connexion de l’appareil à la bouteille ou à l’installation selon les prescriptions des normes en vigueur s’assurant à l’avance que l’appareil est réglé pour le type de gaz disponible. En cas contraire voir: “Adaptation à un type de gaz différent”. Verifier aussi que la pression d’alimentation correspond aux valeurs du tableau: “Caractéristiques injecteurs”.
Branchement métallique rigide/semirigide
Effectuer le branchement avec des raccords à conduits métalliques (meme flexibles) de façon à ne pas provoquer de contraintes aux organes internes à l’appareil.N.B.: - Quand l’installation est terminée, contrôler, avec une solution savonneuse, la parfaite etoncheité de tout le système de branchement.
G 1/2ISO 7/1ISO 228/1 (FR)
Fig. 4
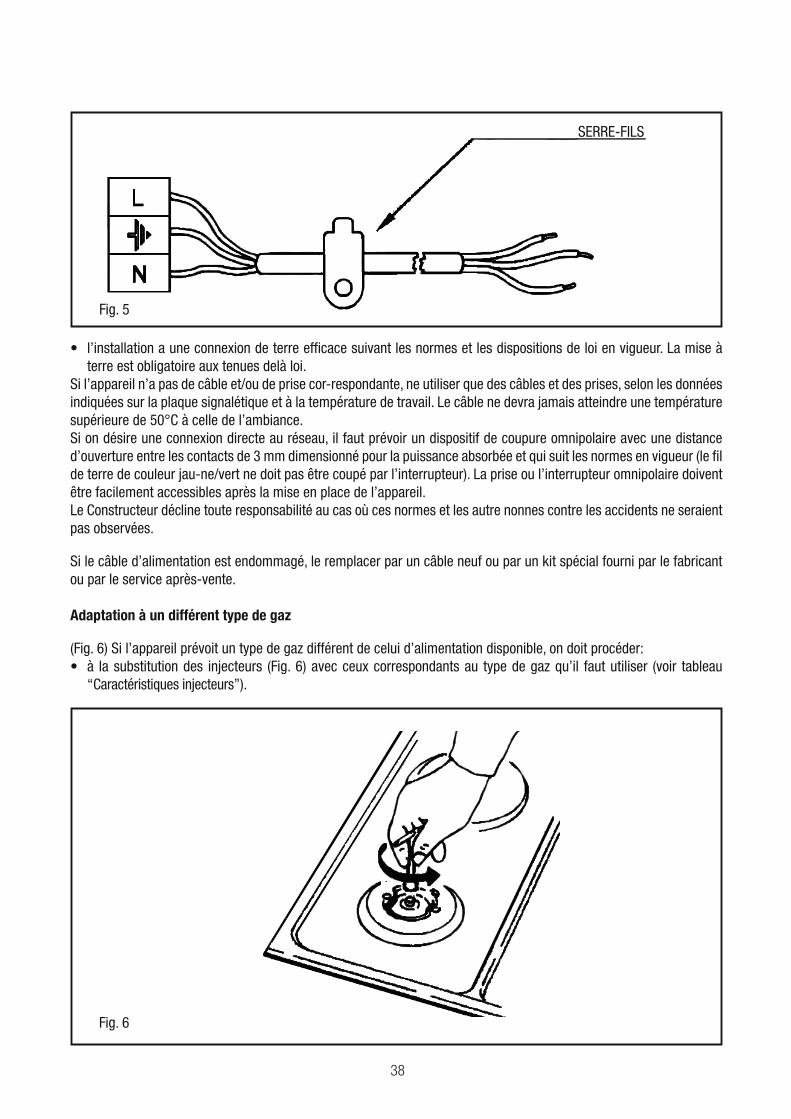
Branchement électrique
(Fig. 5) Avant d’effectuer le branchement électrique, s’assurer que: la tension de rinstallation électrique correspond au voltage indiqué sur la plaque signalélique appliquée au fond du plan;
38
Fig. 5
SERRE-FILS
terre est obligatoire aux tenues delà loi.Si l’appareil n’a pas de câble et/ou de prise cor-respondante, ne utiliser que des câbles et des prises, selon les données indiquées sur la plaque signalétique et à la température de travail. Le câble ne devra jamais atteindre une température supérieure de 50°C à celle de l’ambiance.Si on désire une connexion directe au réseau, il faut prévoir un dispositif de coupure omnipolaire avec une distance d’ouverture entre les contacts de 3 mm dimensionné pour la puissance absorbée et qui suit les normes en vigueur (le fil de terre de couleur jau-ne/vert ne doit pas être coupé par l’interrupteur). La prise ou l’interrupteur omnipolaire doivent être facilement accessibles après la mise en place de l’appareil.Le Constructeur décline toute responsabilité au cas où ces normes et les autre nonnes contre les accidents ne seraient pas observées.
Si le câble d’alimentation est endommagé, le remplacer par un câble neuf ou par un kit spécial fourni par le fabricant ou par le service après-vente.
Adaptation à un différent type de gaz
(Fig. 6) Si l’appareil prévoit un type de gaz différent de celui d’alimentation disponible, on doit procéder:
“Caractéristiques injecteurs”).
Fig. 6
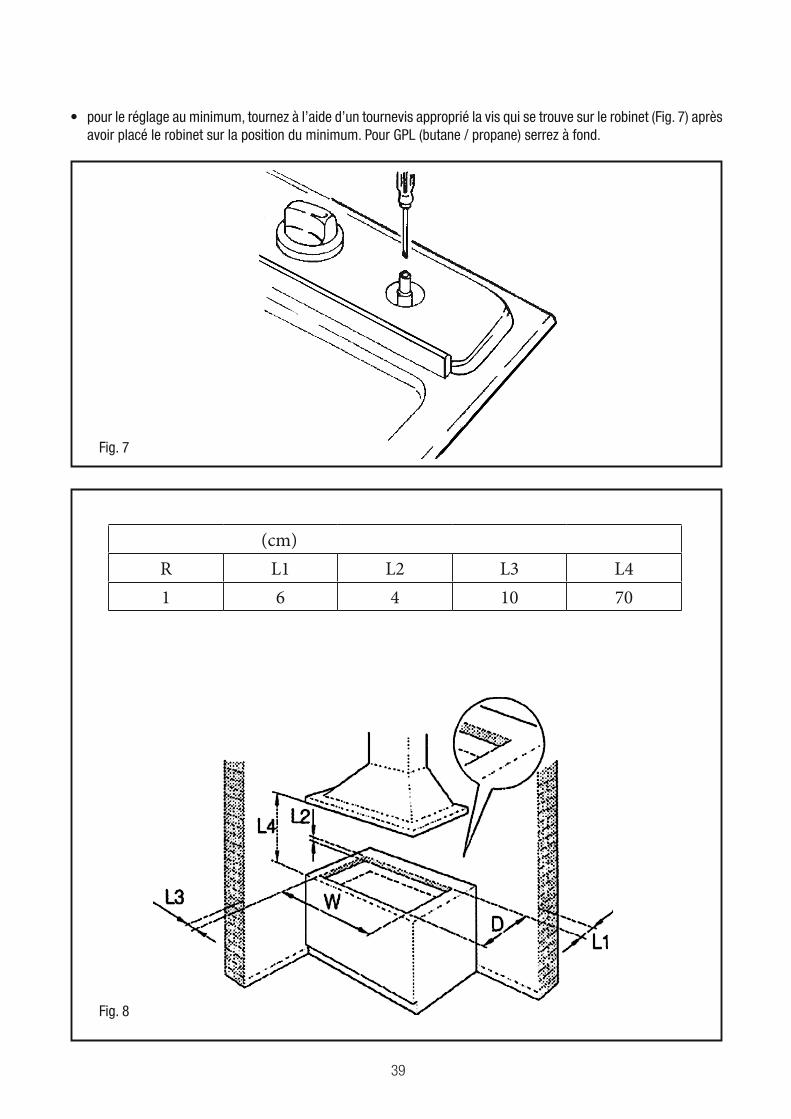
39
avoir placé le robinet sur la position du minimum. Pour GPL (butane / propane) serrez à fond.
Fig. 7
Fig. 8
(cm)
R L1 L2 L3 L4
1 6 4 10 70

40
G25 G27 G2.350 G30
Burner
(kW) kW kW (mm) (mm) (mm) kW (mm) (mm) (mm)
(A)0.90 69 0.90 69 0.90 69 0.90 75 0.90 96 0.90 50 44 43
97 97 97 64 60
2.40 2.40 2.40 2.40 2.40 2.40 72
(TR)3.40 3.40 3.40 3.40 3.40 3.40
20mbar 25mbar 25mbar 20mbar 13mbar 30mbar
37mbar
50mbar
At 15°C and 1013 mbar-dry gas
P.C.I.G20 37.78 MJ/m³ P.C.I.G25.1 32.51 MJ/m³
P.C.I.G25 32.49 MJ/m³ P.C.I.G27 30.98 MJ/m³
P.C.I.G2.350 27.20MJ/ m³ P.C.I.G30 49.47MJ/Kg
I2H3+
BurnerType of
Gas
PressureNozzle
diameterNominal Charge Reduced Charge
mbar 1/100mm g/h l/h kW kcal/h kW kcal/h
Auxiliary
Natural
G2020 69 — 85.7 0.90 774 0.40 344
Natural
G2525 69 — 99.7 0.90 774 0.40 344
Natural
G25.125 69 — 99.6 0.90 774 0.40 344
Natural
G2720 75 — 104.5 0.90 774 0.40 344
Natural
G2.35013 96 — 119 0.90 774 0.40 344
Butane
G30
30 50 65 — 0.90 774 0.40 344
37 44 65 — 0.90 774 0.40 344
50 43 65 — 0.90 774 0.40 344

41
Semi-
rapid
Natural
G2020 97 — 179 1.88 1617 0.60 516
Natural
G2525 97 — 208.3 1.88 1617 0.60 516
Natural
G25.125 97 — 208.1 1.88 1617 0.60 516
Natural
G2720 106 — 218.5 1.88 1617 0.60 516
Natural
G2.35013 131 — 248.8 1.88 1617 0.60 516
Butane
G30
30 68 136 — 1.88 1617 0.60 516
37 64 136 — 1.88 1617 0.60 516
50 60 136 — 1.88 1617 0.60 516
Rapid
Natural
G2020 110 — 228 2.4 2064 0.90 774
Natural
G2525 110 — 265.9 2.4 2064 0.90 774
Natural
G25.125 110 — 265.7 2.4 2064 0.90 774
Natural
G2720 121 — 278.8 2.4 2064 0.90 774
Natural
G2.35013 147 — 317.6 2.4 2064 0.90 774
Butane
G30
30 78 174 — 2.4 2064 0.90 774
37 72 174 — 2.4 2064 0.90 774
50 68 174 — 2.4 2064 0.90 774
Triple-ring
Natural
G2020 123 — 323 3.4 2924 1.50 1290
Natural
G2525 123 — 376.7 3.4 2924 1.50 1290
Natural
G25.125 123 — 376.5 3.4 2924 1.50 1290
Natural
G2720 145 — 395 3.4 2924 1.50 1290
Natural
G2.35013 180 — 450 3.4 2924 1.50 1290
Butane
G30
30 91 247 — 3.4 2924 1.50 1290
37 86 247 — 3.4 2924 1.50 1290
50 83 247 — 3.4 2924 1.50 1290
42
Dear customer,
We thank you and congratulate you on your choice.This new carefully designed product, manufactured with the highest quality materials, has been carefully tested to satisfy all your cooking demands. We would therefore request you to read and follow these easy instructions which will allow you to obtain excellent results right from the start.May we wish you all the very best with your modern appliance!
THE MANUFACTURER
INDEX
MODELS INCLUDING BATTERIES
Warranty
Package
Installation and efficiency
INSTRUCTIONS FOR USE
Installation
Use
Maintenance
INSTRUCTIONS FOR THE INSTALLATER
Installation
Gas connection
Electrical connection
Injectors characteristics
THIS APPLIANCE IS CONCEIVED FOR DOMESTIC USE ONLY. THE MANUFACTURER SHALL NOT IN ANY WAY BE HELD RESPONSIBLE FOR WHATEVER INJURIES OR DAMAGES ARE CAUSED BY INCORRECT INSTALLATION OR BY UNSUITABLE, WRONG OR ABSURD USE.
GB
43
: Safety precautions
Read these instructions ca-
refully. You will only be able
to use your appliance safely
and effectively when you
have read them. These ope-
rating and installation ins-
tructions should be retained,
and passed onto the buyer if
the appliance is sold.
The manufacturer is
exempt from all responsi-
bility if the requirements
of this manual are not
complied with. The images
shown in these instructions
are for guidance only.
Do not remove the applian-
ce from its protective packa-
ging until it is installed in the
unit. Do not switch on the
appliance if it is damaged in
any way. Contact our Techni-
cal Assistance Service. This
appliance is class 3 type,
according to the EN 30-1-1
regulation for gas applian-
ces: built-in appliance. Be-
fore installing your new hob,
ensure that it is being insta-
lled according to the assem-
bly instructions.
This appliance cannot be
installed on yachts or in ca-
ravans.
This appliance must only be
used in well ventilated pla-
ces.
This appliance is not inten-
ded for operation with an ex-
ternal clock timer or a remo-
te control.
All operations relating to
installation, connection,
regulation and conversion
to other gas types must be
performed by an authori-
sed technician, respecting
all applicable regulations,
standards and the speci-
and electricity suppliers.
Special attention shall be
paid to ventilation regula-
tions.

44
This appliance leaves the
factory set to the gas type
that is indicated on the
needs to be changed, plea-
se consult the assembly ins-
tructions. It is recommended
you contact the Technical
Assistance Service to chan-
ge to another gas type.
This appliance has been de-
signed for home use only,
not for commercial or pro-
fessional use. This appliance
is only intended for cooking
purposes, not as a heating
system. The warranty will
only be valid if the appliance
is used for the purpose for
which it was designed.
Never leave the appliance
unattended during opera-
tion.
Do not use lids or protective
barriers for children which
are not recommended by
the hob manufacturer. They
may cause accidents such
as those due to the overhea-
ting, ignition or detachment
of fragments of materials.
This appliance may be used
by children 8 years old and
older and by persons with
reduced physical, sensory
or mental capacity or a lack
of experience or knowledge
if they are supervised or they
have been instructed about
the safe use of the appliance
and have understood the as-
sociated dangers.
Never let children play with
the appliance. Cleaning and
user maintenance must not
be carried out by unsupervi-
sed children.
Accumulation of unburned
gas in an enclosed area ca-
Do not subject the applian-
ce to draughts. These might
blow out the burners. Ca-
refully read the instructions
and warnings on the opera-
tion of gas burners.
45
The kitchen will become hot
and humid and combustion
products produced when
this gas appliance is used.
ventilated, particularly when
the hob is in operation: either
keep the natural ventilation
apertures open, or install a
ventilation system (extractor
hood). Intense prolonged use
of the appliance may require
additional or more effective
ventilation: open a window
or increase the power of the
ventilation system.
The hotplates and their im-
mediate vicinity get very hot.
Never touch the hot surfa-
ces. Keep children under 8
years old well away from this
appliance.
-
jects on the hob. Do not sto-
re objects on the hob.
-
rrosive chemicals, products
-
mmable materials or non-
food products below or near
this domestic appliance.
-
-
ver leave fat or oil to heat up
unattended. If oil or fats do
out by covering the pan with
a lid and switch off the hot-
plate.
are not the right size, hang
over the edge of the hob or
are not positioned correctly
can cause serious injuries.
Follow the advice and war-
nings provided relating to
the cooking pans.

46
turn off the applianceÕs gas
and electricity supply. For
repairs, call our Technical
Assistance Service.
applianceÕs interior. If neces-
sary, call our Technical As-
sistance Service.
will not turn, do not force it.
Call the Technical Assistan-
ce Service immediately so
that they can repair or repla-
ce them.
Do not clean the appliance
using steam cleaners.
47
INSTRUCTIONS FOR USE
Installation
All the operations concerned with the installation (electrical connection) must be carried out by qualified technicians, in terms with the standards in force, for specific instructions, kindly read the part reserved for the installation technician.
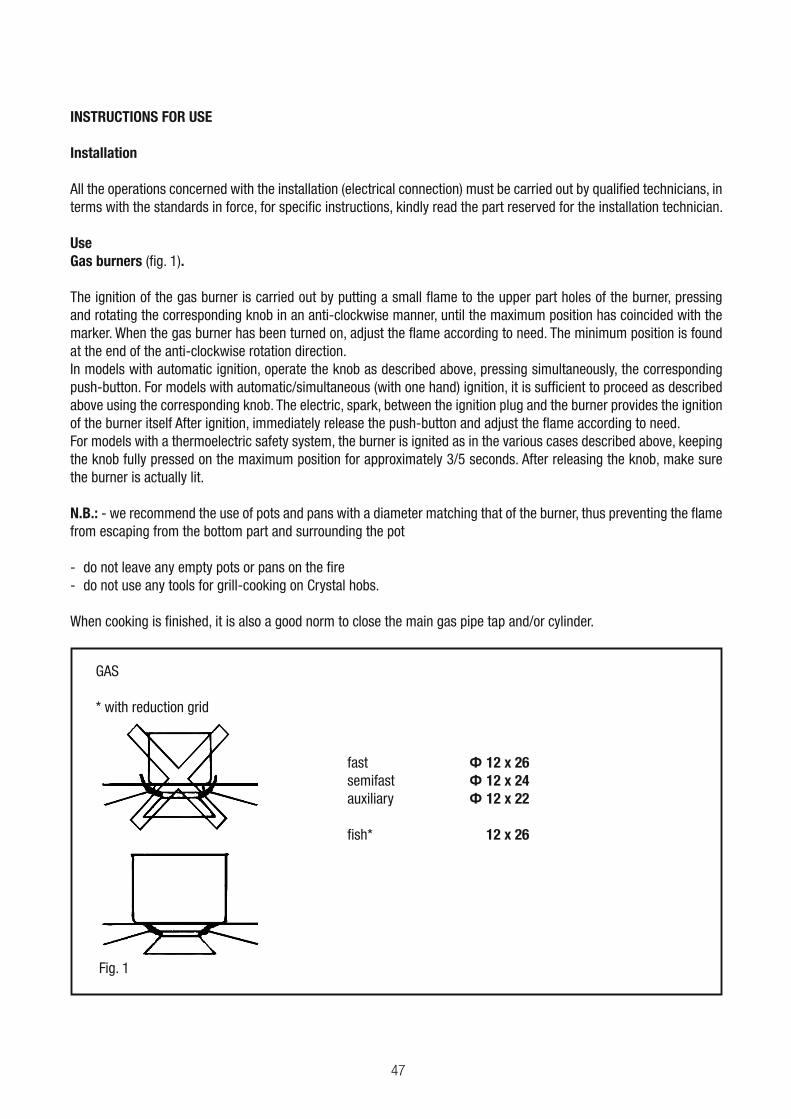
UseGas burners (fig. 1).
The ignition of the gas burner is carried out by putting a small flame to the upper part holes of the burner, pressing and rotating the corresponding knob in an anti-clockwise manner, until the maximum position has coincided with the marker. When the gas burner has been turned on, adjust the flame according to need. The minimum position is found at the end of the anti-clockwise rotation direction.In models with automatic ignition, operate the knob as described above, pressing simultaneously, the corresponding push-button. For models with automatic/simultaneous (with one hand) ignition, it is sufficient to proceed as described above using the corresponding knob. The electric, spark, between the ignition plug and the burner provides the ignition of the burner itself After ignition, immediately release the push-button and adjust the flame according to need.For models with a thermoelectric safety system, the burner is ignited as in the various cases described above, keeping the knob fully pressed on the maximum position for approximately 3/5 seconds. After releasing the knob, make sure the burner is actually lit.
N.B.: - we recommend the use of pots and pans with a diameter matching that of the burner, thus preventing the flame from escaping from the bottom part and surrounding the pot
- do not leave any empty pots or pans on the fire- do not use any tools for grill-cooking on Crystal hobs.
When cooking is finished, it is also a good norm to close the main gas pipe tap and/or cylinder.
fast 12 x 26semifast 12 x 24auxiliary 12 x 22
fish* 12 x 26
GAS
* with reduction grid
Fig. 1
48
MODELS INCLUDING BATTERIES
Warranty
Warranty (warranty service) does not include the battery. The gas hob manufacturer is exempt of any responsibility for the malfunction of batteries.
Package
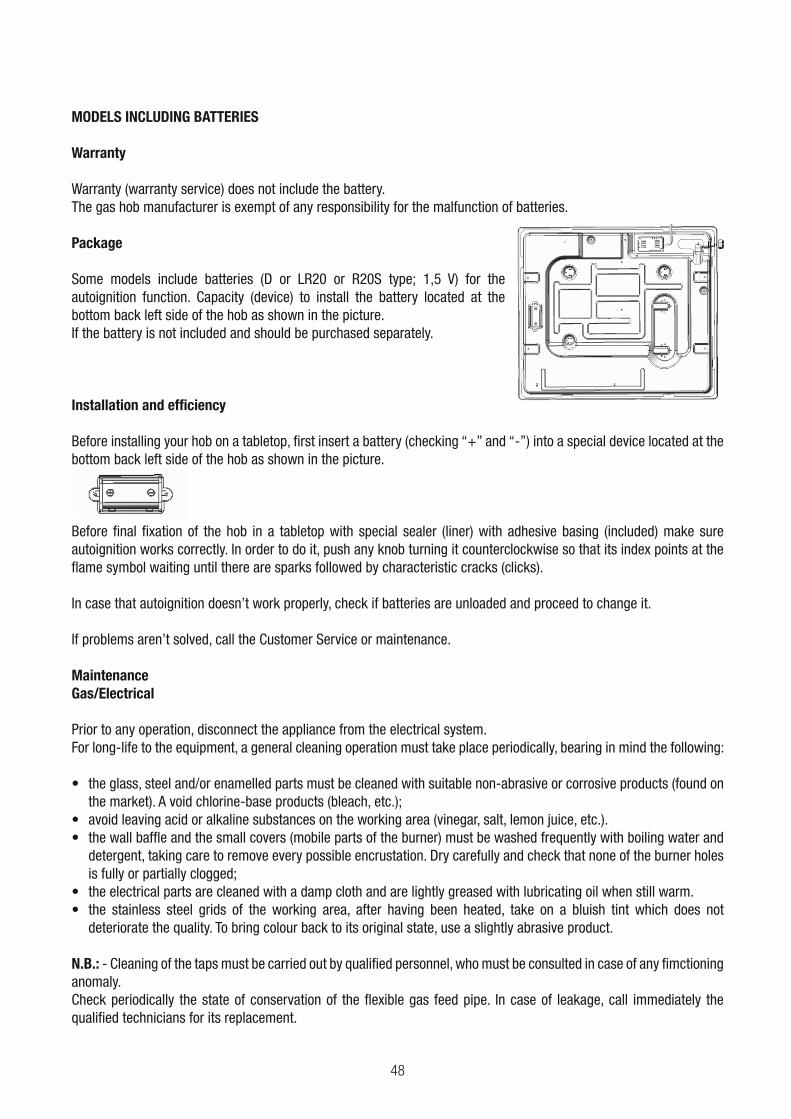
Some models include batteries (D or LR20 or R20S type; 1,5 V) for the autoignition function. Capacity (device) to install the battery located at the bottom back left side of the hob as shown in the picture.If the battery is not included and should be purchased separately.
Installation and efficiency
Before installing your hob on a tabletop, first insert a battery (checking “+” and “-”) into a special device located at the bottom back left side of the hob as shown in the picture.
Before final fixation of the hob in a tabletop with special sealer (liner) with adhesive basing (included) make sure autoignition works correctly. In order to do it, push any knob turning it counterclockwise so that its index points at the flame symbol waiting until there are sparks followed by characteristic cracks (clicks).
In case that autoignition doesn’t work properly, check if batteries are unloaded and proceed to change it.
If problems aren’t solved, call the Customer Service or maintenance.
MaintenanceGas/Electrical
Prior to any operation, disconnect the appliance from the electrical system.For long-life to the equipment, a general cleaning operation must take place periodically, bearing in mind the following:
the market). A void chlorine-base products (bleach, etc.);
detergent, taking care to remove every possible encrustation. Dry carefully and check that none of the burner holes is fully or partially clogged;
deteriorate the quality. To bring colour back to its original state, use a slightly abrasive product.
N.B.: - Cleaning of the taps must be carried out by qualified personnel, who must be consulted in case of any fimctioning anomaly. Check periodically the state of conservation of the flexible gas feed pipe. In case of leakage, call immediately the qualified technicians for its replacement.
49
Maintenance vitroceramic surface
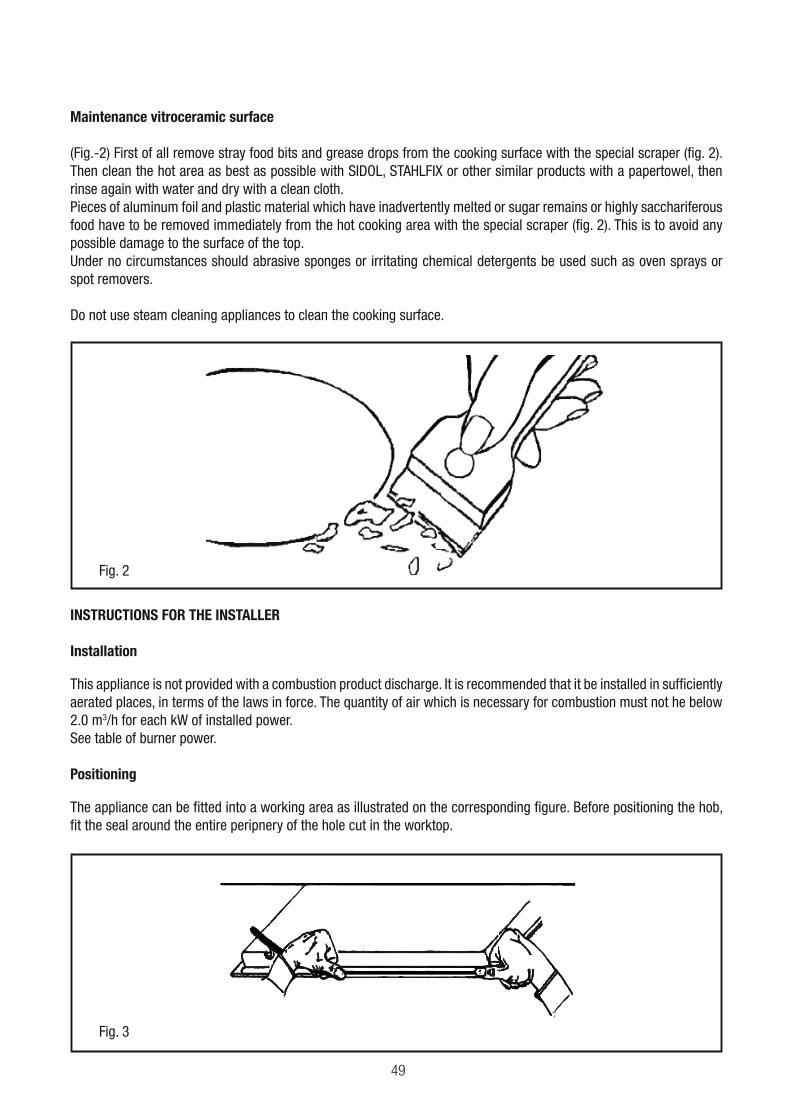
(Fig.-2) First of all remove stray food bits and grease drops from the cooking surface with the special scraper (fig. 2). Then clean the hot area as best as possible with SIDOL, STAHLFIX or other similar products with a papertowel, then rinse again with water and dry with a clean cloth.Pieces of aluminum foil and plastic material which have inadvertently melted or sugar remains or highly sacchariferous food have to be removed immediately from the hot cooking area with the special scraper (fig. 2). This is to avoid any possible damage to the surface of the top.Under no circumstances should abrasive sponges or irritating chemical detergents be used such as oven sprays or spot removers.
Do not use steam cleaning appliances to clean the cooking surface.
Fig. 2
INSTRUCTIONS FOR THE INSTALLER
Installation
This appliance is not provided with a combustion product discharge. It is recommended that it be installed in sufficiently aerated places, in terms of the laws in force. The quantity of air which is necessary for combustion must not he below 2.0 m3/h for each kW of installed power.See table of burner power.
Positioning
The appliance can be fitted into a working area as illustrated on the corresponding figure. Before positioning the hob, fit the seal around the entire peripnery of the hole cut in the worktop.
Fig. 3
50
The earth connection is compulsory in terms of the law. Should there be no cable and/or plug on the equipment, use suitable absorption material for the working temperature as well, as indicated on the matrix plate. Under no circumstance must the cable reach a temperature above 50 °C of the ambient temperature.Should a direct connection to the network be required, it will be necessary to interpose an omnipolar switch with minimum aperture between the 3 mm. contacts, dimensioned to bear the plate load and it must follow the standards in force (the yellow/green earth cable must not be interrupted by the switch). The plug or omnipolar switch must be easily reached on the installed equipment.The manufacturers decline any responsibility in the event of non-compliance with what is described above and the accident prevention norms not being respected and followed.
If the mains cable becomes damaged, replace it immediately with a cable or special cable set obtained from the manufacturer or from after sales service.
The use of silicone for the sealing is prohibited. It is only permitted to use the seal provided.
The use of clay pots and heat diffusers is prohibited.
GAS CONNECTION
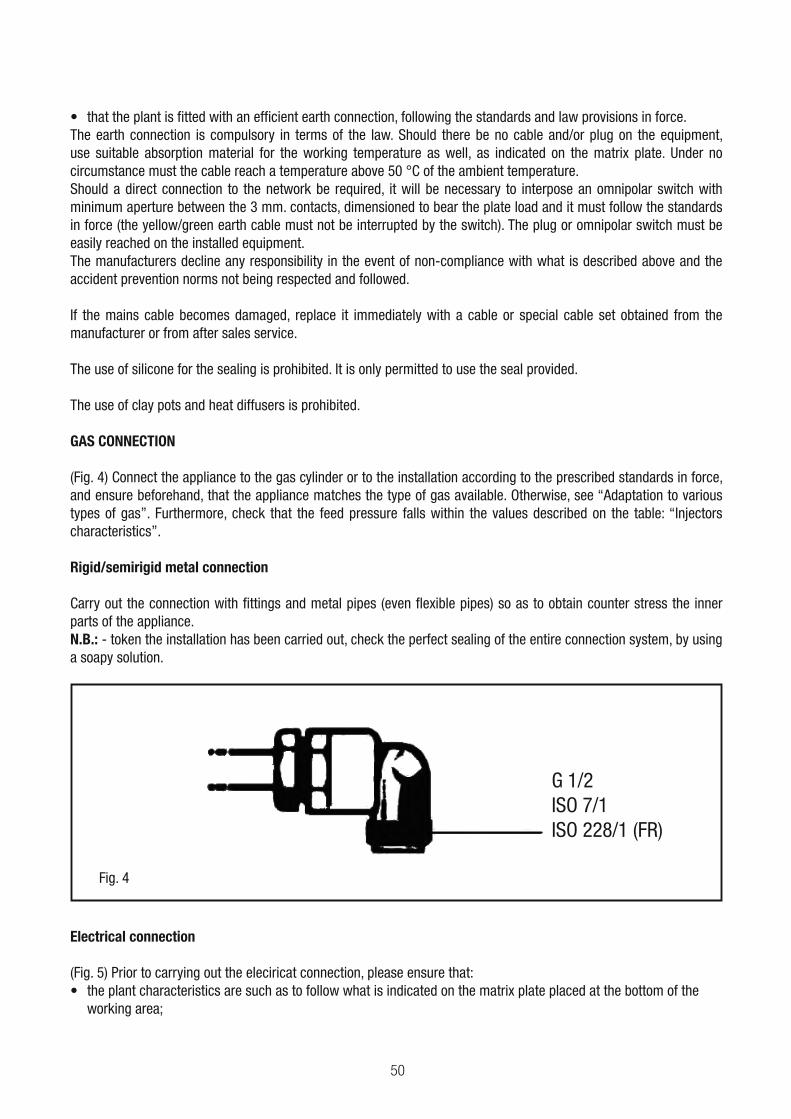
(Fig. 4) Connect the appliance to the gas cylinder or to the installation according to the prescribed standards in force, and ensure beforehand, that the appliance matches the type of gas available. Otherwise, see “Adaptation to various types of gas”. Furthermore, check that the feed pressure falls within the values described on the table: “Injectors characteristics”.
Rigid/semirigid metal connection
Carry out the connection with fittings and metal pipes (even flexible pipes) so as to obtain counter stress the inner parts of the appliance. N.B.: - token the installation has been carried out, check the perfect sealing of the entire connection system, by using a soapy solution.
G 1/2ISO 7/1ISO 228/1 (FR)
Fig. 4
Electrical connection
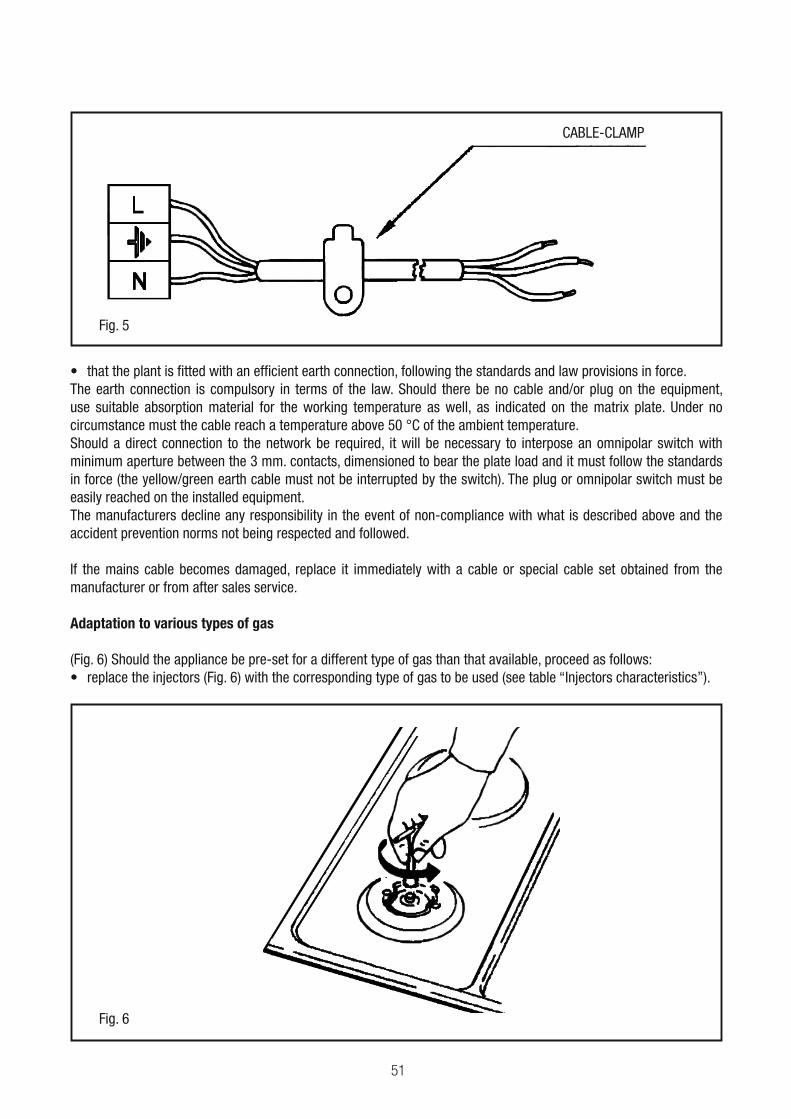
(Fig. 5) Prior to carrying out the eleciricat connection, please ensure that:the plant characteristics are such as to follow what is indicated on the matrix plate placed at the bottom of the working area;
51
Fig. 5
CABLE-CLAMP
The earth connection is compulsory in terms of the law. Should there be no cable and/or plug on the equipment, use suitable absorption material for the working temperature as well, as indicated on the matrix plate. Under no circumstance must the cable reach a temperature above 50 °C of the ambient temperature.Should a direct connection to the network be required, it will be necessary to interpose an omnipolar switch with minimum aperture between the 3 mm. contacts, dimensioned to bear the plate load and it must follow the standards in force (the yellow/green earth cable must not be interrupted by the switch). The plug or omnipolar switch must be easily reached on the installed equipment.The manufacturers decline any responsibility in the event of non-compliance with what is described above and the accident prevention norms not being respected and followed.
If the mains cable becomes damaged, replace it immediately with a cable or special cable set obtained from the manufacturer or from after sales service.
Adaptation to various types of gas
(Fig. 6) Should the appliance be pre-set for a different type of gas than that available, proceed as follows:
Fig. 6
52
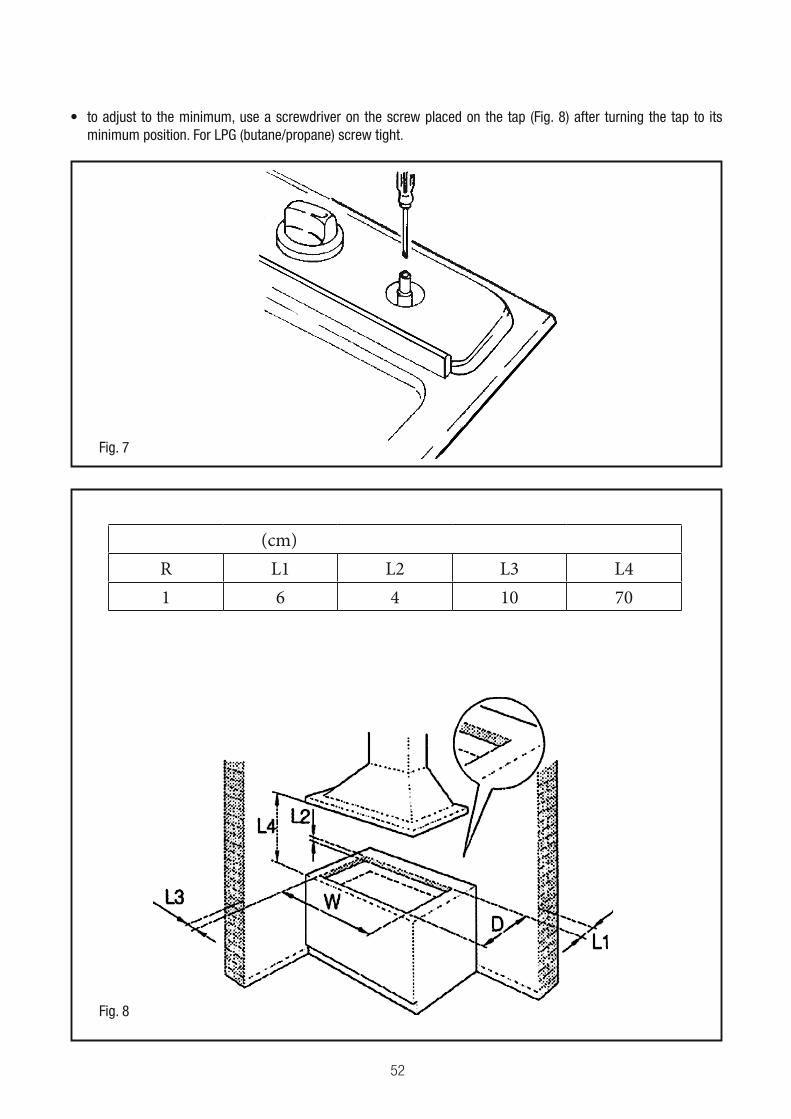
minimum position. For LPG (butane/propane) screw tight.
Fig. 7
Fig. 8
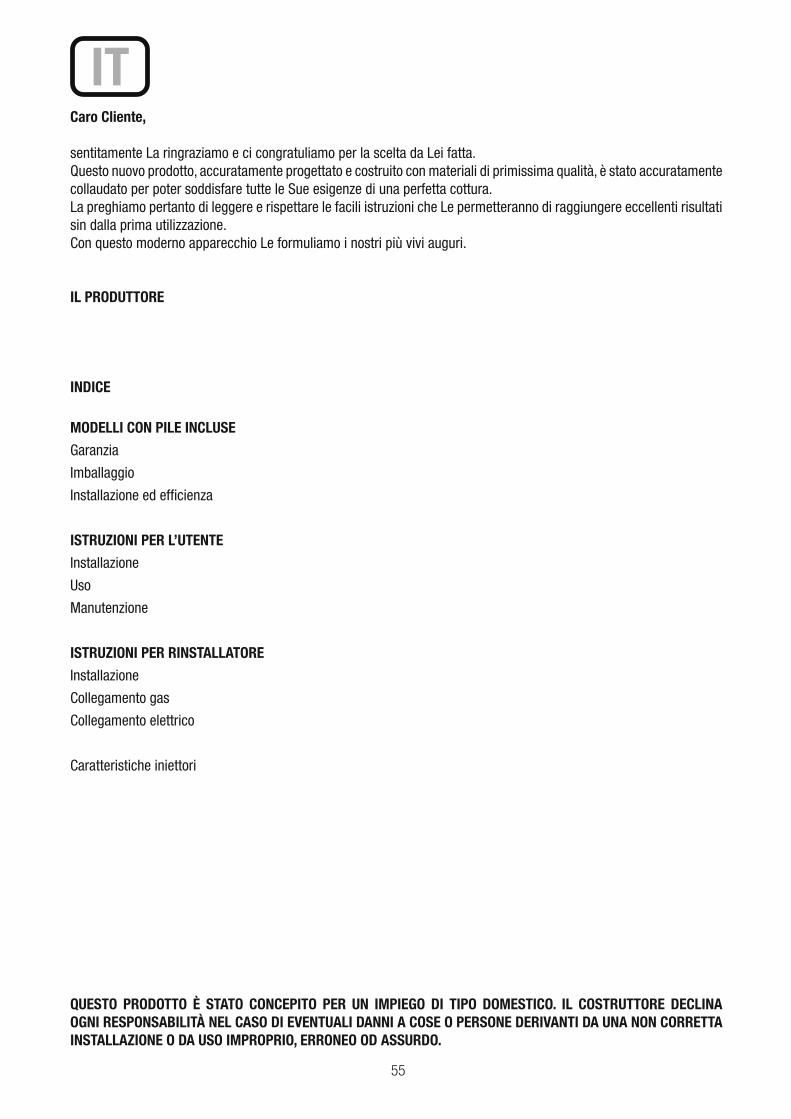
(cm)
R L1 L2 L3 L4
1 6 4 10 70

53
G25 G27 G2.350 G30
Burner
(kW) kW kW (mm) (mm) (mm) kW (mm) (mm) (mm)
(A)0.90 69 0.90 69 0.90 69 0.90 75 0.90 96 0.90 50 44 43
97 97 97 64 60
2.40 2.40 2.40 2.40 2.40 2.40 72
(TR)3.40 3.40 3.40 3.40 3.40 3.40
20mbar 25mbar 25mbar 20mbar 13mbar 30mbar
37mbar
50mbar
At 15°C and 1013 mbar-dry gas
P.C.I.G20 37.78 MJ/m³ P.C.I.G25.1 32.51 MJ/m³
P.C.I.G25 32.49 MJ/m³ P.C.I.G27 30.98 MJ/m³
P.C.I.G2.350 27.20MJ/ m³ P.C.I.G30 49.47MJ/Kg
I2H3+
BurnerType of
Gas
PressureNozzle
diameterNominal Charge Reduced Charge
mbar 1/100mm g/h l/h kW kcal/h kW kcal/h
Auxiliary
Natural
G2020 69 — 85.7 0.90 774 0.40 344
Natural
G2525 69 — 99.7 0.90 774 0.40 344
Natural
G25.125 69 — 99.6 0.90 774 0.40 344
Natural
G2720 75 — 104.5 0.90 774 0.40 344
Natural
G2.35013 96 — 119 0.90 774 0.40 344
Butane
G30
30 50 65 — 0.90 774 0.40 344
37 44 65 — 0.90 774 0.40 344
50 43 65 — 0.90 774 0.40 344

54
Semi-
rapid
Natural
G2020 97 — 179 1.88 1617 0.60 516
Natural
G2525 97 — 208.3 1.88 1617 0.60 516
Natural
G25.125 97 — 208.1 1.88 1617 0.60 516
Natural
G2720 106 — 218.5 1.88 1617 0.60 516
Natural
G2.35013 131 — 248.8 1.88 1617 0.60 516
Butane
G30
30 68 136 — 1.88 1617 0.60 516
37 64 136 — 1.88 1617 0.60 516
50 60 136 — 1.88 1617 0.60 516
Rapid
Natural
G2020 110 — 228 2.4 2064 0.90 774
Natural
G2525 110 — 265.9 2.4 2064 0.90 774
Natural
G25.125 110 — 265.7 2.4 2064 0.90 774
Natural
G2720 121 — 278.8 2.4 2064 0.90 774
Natural
G2.35013 147 — 317.6 2.4 2064 0.90 774
Butane
G30
30 78 174 — 2.4 2064 0.90 774
37 72 174 — 2.4 2064 0.90 774
50 68 174 — 2.4 2064 0.90 774
Triple-ring
Natural
G2020 123 — 323 3.4 2924 1.50 1290
Natural
G2525 123 — 376.7 3.4 2924 1.50 1290
Natural
G25.125 123 — 376.5 3.4 2924 1.50 1290
Natural
G2720 145 — 395 3.4 2924 1.50 1290
Natural
G2.35013 180 — 450 3.4 2924 1.50 1290
Butane
G30
30 91 247 — 3.4 2924 1.50 1290
37 86 247 — 3.4 2924 1.50 1290
50 83 247 — 3.4 2924 1.50 1290
55
Caro Cliente,
sentitamente La ringraziamo e ci congratuliamo per la scelta da Lei fatta. Questo nuovo prodotto, accuratamente progettato e costruito con materiali di primissima qualità, è stato accuratamente collaudato per poter soddisfare tutte le Sue esigenze di una perfetta cottura. La preghiamo pertanto di leggere e rispettare le facili istruzioni che Le permetteranno di raggiungere eccellenti risultati sin dalla prima utilizzazione.Con questo moderno apparecchio Le formuliamo i nostri più vivi auguri.
IL PRODUTTORE
INDICE
MODELLI CON PILE INCLUSE
Garanzia
Imballaggio
Installazione ed efficienza
ISTRUZIONI PER L’UTENTE
Installazione
Uso
Manutenzione
ISTRUZIONI PER RINSTALLATORE
Installazione
Collegamento gas
Collegamento elettrico
Caratteristiche iniettori
QUESTO PRODOTTO È STATO CONCEPITO PER UN IMPIEGO DI TIPO DOMESTICO. IL COSTRUTTORE DECLINA OGNI RESPONSABILITÀ NEL CASO DI EVENTUALI DANNI A COSE O PERSONE DERIVANTI DA UNA NON CORRETTA INSTALLAZIONE O DA USO IMPROPRIO, ERRONEO OD ASSURDO.
IT
56
: Indicazioni di sicurez-
za
Leggere attentamente le pre-
senti istruzioni. UnÕattenta
lettura garantir� una mani-
dellÕapparecchio. Conserva-
re le istruzioni dÕuso e insta-
llazione e lasciarle sempre a
corredo dellÕapparecchio in
caso di nuovo proprietario.
Il costruttore declina ogni
responsabilit� in caso di
mancata osservanza delle
disposizioni del presente
manuale.
Le immagini rappresentate in
queste istruzioni hanno ca-
rattere orientativo.
Non estrarre lÕapparecchio
dallÕimballaggio di pro-
-
to dellÕinstallazione. Se
lÕapparecchio risulta dan-
neggiato, non collegarlo
allÕalimentazione. Contattare
il nostro servizio tecnico.
Questo apparecchio rientra
nella classe 3 della norma
EN 30-1-1 per gli apparec-
chi a gas: apparecchio in-
cassato in un mobile. Per
lÕinstallazione del nuovo
piano di cottura, attenersi
strettamente alle istruzioni di
montaggio.
Questo apparecchio non
pu� essere installato in yacht
o camper.
LÕapparecchio deve essere
-
cientemente ventilati. Ques-
to apparecchio non � da uti-
lizzare con un timer esterno
o un telecomando separato.
Tutte le operazioni di ins-
tallazione, connessione,
regolazione e adattamen-
to ad altri tipi di gas devo-
no essere effettuate da un
tecnico autorizzato, nel ris-
petto della normativa e de-
lla legislazione applicabili,
nonch� delle prescrizioni
delle societ� locali di for-
nitura di gas ed elettricit�.
57
Fare particolare attenzione
alle disposizioni applicabili
in materia di ventilazione.
Questo apparecchio viene
predisposto in fabbrica per
il tipo di gas indicato sulla
-
sultare le istruzioni di mon-
taggio. Per lÕadattamento ad
altri tipi di gas, si consiglia di
rivolgersi al nostro servizio
tecnico.
Questo apparecchio � sta-
to concepito esclusivamen-
te per uso domestico, non
� consentito lÕuso a scopi
commerciali o professionali.
Utilizzare lÕapparecchio solo
per cucinare e non quale
fonte di riscaldamento. La
garanzia ha validit� solo se
viene rispettato lÕutilizzo per
il quale � stato concepito.
Non lasciare lÕapparecchio
incustodito quando � in fun-
zione.
Non utilizzare coperchi o
barriere di sicurezza per
bambini non consigliate dal
produttore del piano di co-
ttura. Possono provocare
degli incidenti, ad es. do-
vuti al surriscaldamento,
allÕaccensione o al distacco
di frammenti di materiale.
Il presente apparecchio pu�
essere utilizzato dai bambi-
ni di et� superiore a 8 anni
e da persone con capacit�
ridotte o sprovviste delle co-
noscenze adeguate, solo se
assistiti, se sono state forni-
te loro le informazioni neces-
sarie per un utilizzo sicuro e
se hanno compreso appieno
i pericoli derivanti da un im-
piego errato.
I bambini non devono uti-
lizzare lÕapparecchio come
un giocattolo. I bambini non
devono n� pulire n� utiliz-
zare lÕapparecchio senza
unÕadeguata assistenza da
parte di un adulto.
58
LÕaccumulo di gas incom-
busto in un locale chiuso
comporta pericolo di de-
lÕapparecchio a correnti
dÕaria. I bruciatori potreb-
bero spegnersi. Leggere at-
tentamente le istruzioni e le
avvertenze relative al funzio-
namento dei bruciatori a gas.
LÕuso di un apparecchio di
cottura a gas genera calore,
umidit� e prodotti di com-
bustione nel locale in cui �
installato. Ventilare bene la
cucina, specialmente quan-
do il piano di cottura � in
funzione: mantenere libere
le aperture di ventilazione
naturale oppure installare un
dispositivo di ventilazione
meccanica (cappa aspiran-
te). LÕuso intenso e prolun-
gato dellÕapparecchio pu�
richiedere una ventilazione
-
-
crementare la potenza della
ventilazione meccanica.
Le zone di cottura e le su-
molto. Non toccare mai le
-
ra. Tenere lontano i bambini
al di sotto degli 8 anni.
-
rriscaldano molto. Non co-
-
li sul piano di cottura. Non
conservare alcun oggetto sul
piano di cottura.
-
zare, sotto questo elettrodo-
mestico e nelle sue vicinan-
ze, prodotti chimici corrosivi,
o prodotti non alimentari.
-
-
cilmente. Non allontanarsi
dallÕapparecchio durante il
riscaldamento di grassi od
59
olio. In caso di incendio, non
-
mme con lÕacqua. Coprire
il recipiente per soffocare il
fuoco e scollegare la zona di
cottura.
dimensioni inadeguate, che
eccedano i bordi del piano di
cottura o siano mal posizio-
nati possono causare lesioni
gravi. Seguire le avvertenze e
i consigli relativi ai recipienti
da cucina.
-
dere il gas e scollegare
lÕalimentazione elettrica. Per
procedere a eventuali ripa-
razioni, contattare il nostro
servizio tecnico.
dellÕapparecchio. In caso di
necessit�, contattare il nos-
tro servizio tecnico.
risultasse impossibile ruotar-
le. Chiamare immediatamen-
proceda alla riparazione o
alla sostituzione.
Pericolo di scariche elet-
Non utilizzare dispo-
sitivi di pulizia a vapore per
pulire lÕapparecchio.
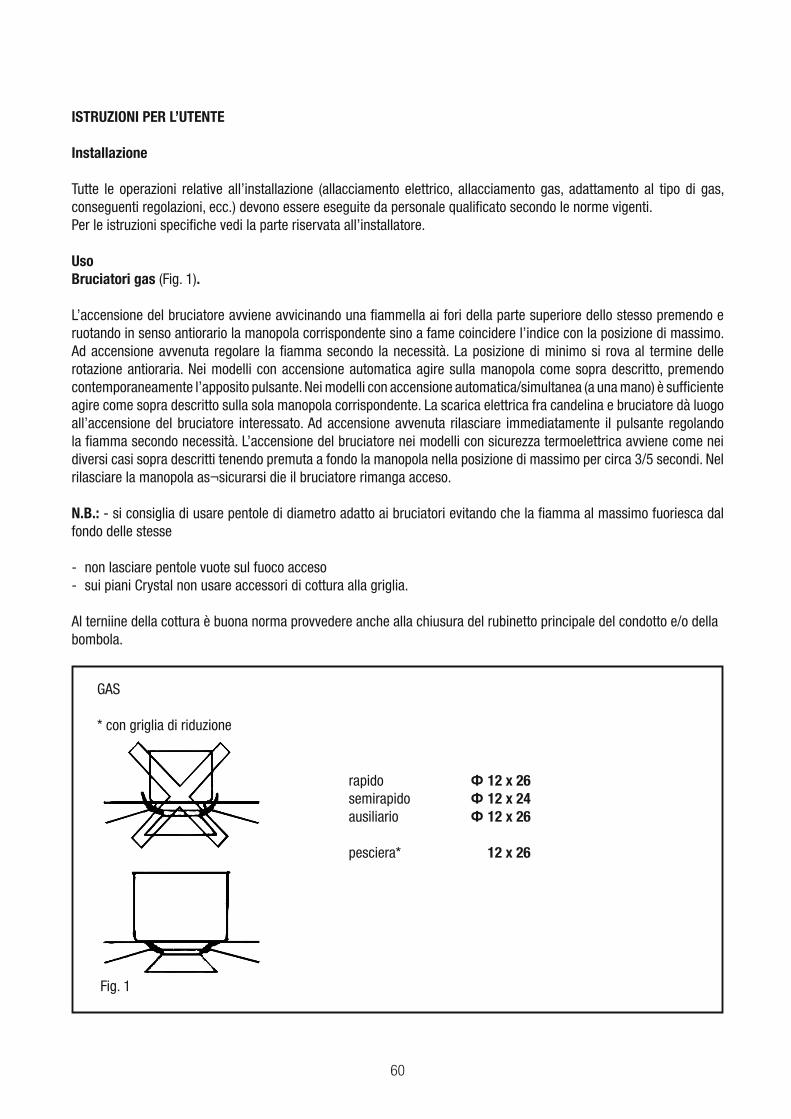
60
ISTRUZIONI PER L’UTENTE
Installazione
Tutte le operazioni relative all’installazione (allacciamento elettrico, allacciamento gas, adattamento al tipo di gas, conseguenti regolazioni, ecc.) devono essere eseguite da personale qualificato secondo le norme vigenti. Per le istruzioni specifiche vedi la parte riservata all’installatore.
UsoBruciatori gas (Fig. 1).
L’accensione del bruciatore avviene avvicinando una fiammella ai fori della parte superiore dello stesso premendo e ruotando in senso antiorario la manopola corrispondente sino a fame coincidere l’indice con la posizione di massimo. Ad accensione avvenuta regolare la fiamma secondo la necessità. La posizione di minimo si rova al termine delle rotazione antioraria. Nei modelli con accensione automatica agire sulla manopola come sopra descritto, premendo contemporaneamente l’apposito pulsante. Nei modelli con accensione automatica/simultanea (a una mano) è sufficiente agire come sopra descritto sulla sola manopola corrispondente. La scarica elettrica fra candelina e bruciatore dà luogo all’accensione del bruciatore interessato. Ad accensione avvenuta rilasciare immediatamente il pulsante regolando la fiamma secondo necessità. L’accensione del bruciatore nei modelli con sicurezza termoelettrica avviene come nei diversi casi sopra descritti tenendo premuta a fondo la manopola nella posizione di massimo per circa 3/5 secondi. Nel rilasciare la manopola as¬sicurarsi die il bruciatore rimanga acceso.
N.B.: - si consiglia di usare pentole di diametro adatto ai bruciatori evitando che la fiamma al massimo fuoriesca dal fondo delle stesse
- non lasciare pentole vuote sul fuoco acceso- sui piani Crystal non usare accessori di cottura alla griglia.
Al terniine della cottura è buona norma provvedere anche alla chiusura del rubinetto principale del condotto e/o della bombola.
rapido 12 x 26semirapido 12 x 24ausiliario 12 x 26
pesciera* 12 x 26
GAS
* con griglia di riduzione
Fig. 1
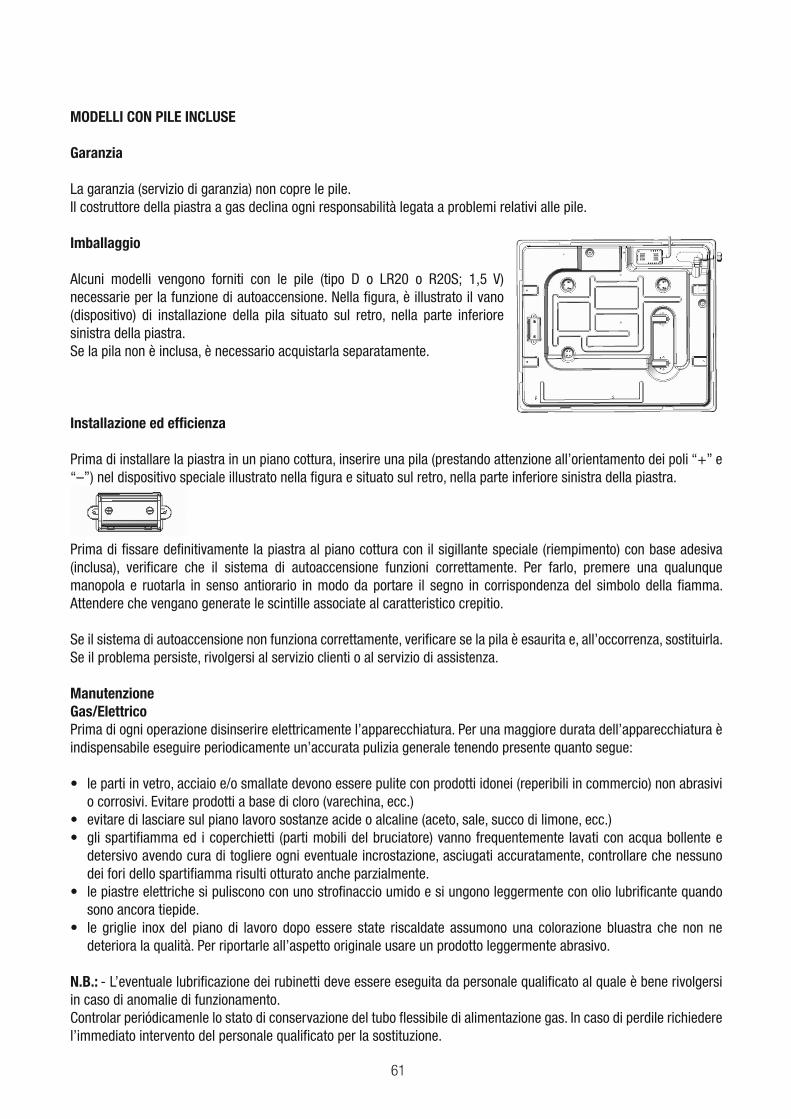
61
MODELLI CON PILE INCLUSE
Garanzia
La garanzia (servizio di garanzia) non copre le pile.Il costruttore della piastra a gas declina ogni responsabilità legata a problemi relativi alle pile.
Imballaggio
Alcuni modelli vengono forniti con le pile (tipo D o LR20 o R20S; 1,5 V) necessarie per la funzione di autoaccensione. Nella figura, è illustrato il vano (dispositivo) di installazione della pila situato sul retro, nella parte inferiore sinistra della piastra.Se la pila non è inclusa, è necessario acquistarla separatamente.
Installazione ed efficienza
Prima di installare la piastra in un piano cottura, inserire una pila (prestando attenzione all’orientamento dei poli “+” e “–”) nel dispositivo speciale illustrato nella figura e situato sul retro, nella parte inferiore sinistra della piastra.
Prima di fissare definitivamente la piastra al piano cottura con il sigillante speciale (riempimento) con base adesiva (inclusa), verificare che il sistema di autoaccensione funzioni correttamente. Per farlo, premere una qualunque manopola e ruotarla in senso antiorario in modo da portare il segno in corrispondenza del simbolo della fiamma. Attendere che vengano generate le scintille associate al caratteristico crepitio.
Se il sistema di autoaccensione non funziona correttamente, verificare se la pila è esaurita e, all’occorrenza, sostituirla.Se il problema persiste, rivolgersi al servizio clienti o al servizio di assistenza.
ManutenzioneGas/ElettricoPrima di ogni operazione disinserire elettricamente l’apparecchiatura. Per una maggiore durata dell’apparecchiatura è indispensabile eseguire periodicamente un’accurata pulizia generale tenendo presente quanto segue:
o corrosivi. Evitare prodotti a base di cloro (varechina, ecc.)
detersivo avendo cura di togliere ogni eventuale incrostazione, asciugati accuratamente, controllare che nessuno dei fori dello spartifiamma risulti otturato anche parzialmente.
sono ancora tiepide.
deteriora la qualità. Per riportarle all’aspetto originale usare un prodotto leggermente abrasivo.
N.B.: - L’eventuale lubrificazione dei rubinetti deve essere eseguita da personale qualificato al quale è bene rivolgersi in caso di anomalie di funzionamento. Controlar periódicamenle lo stato di conservazione del tubo flessibile di alimentazione gas. In caso di perdile richiedere l’immediato intervento del personale qualificato per la sostituzione.
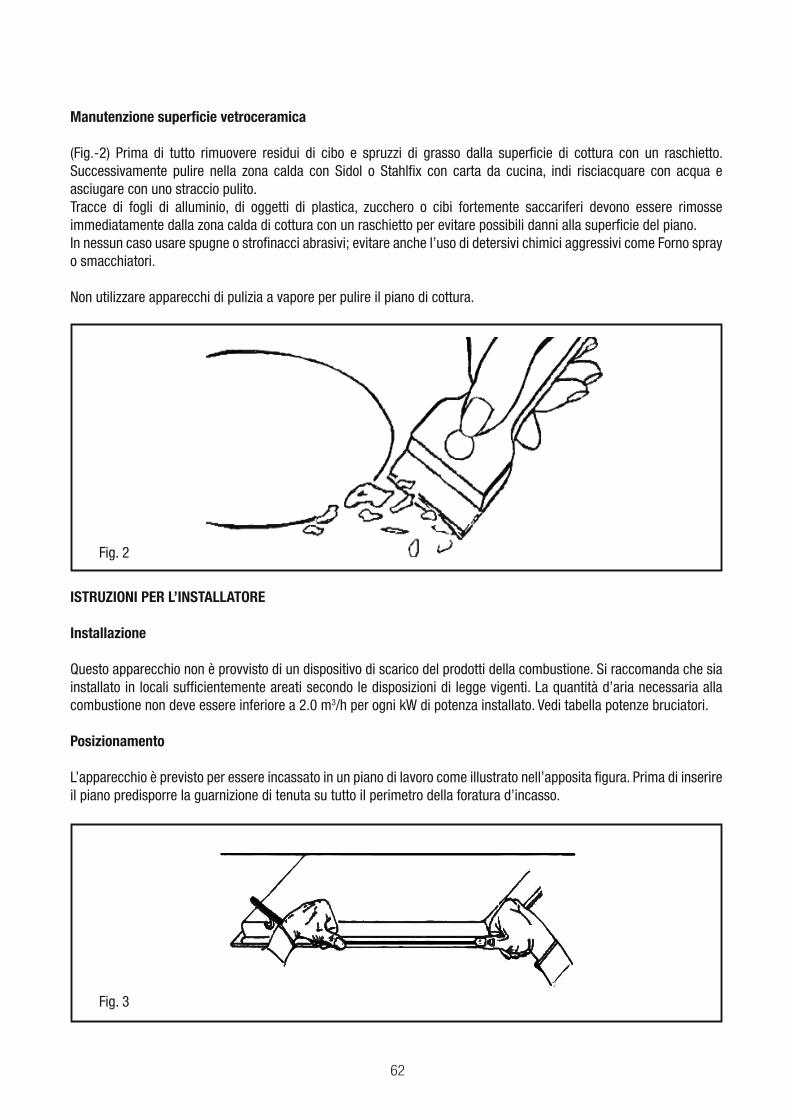
62
Manutenzione superficie vetroceramica
(Fig.-2) Prima di tutto rimuovere residui di cibo e spruzzi di grasso dalla superficie di cottura con un raschietto. Successivamente pulire nella zona calda con Sidol o Stahlfix con carta da cucina, indi risciacquare con acqua e asciugare con uno straccio pulito.Tracce di fogli di alluminio, di oggetti di plastica, zucchero o cibi fortemente saccariferi devono essere rimosse immediatamente dalla zona calda di cottura con un raschietto per evitare possibili danni alla superficie del piano.In nessun caso usare spugne o strofinacci abrasivi; evitare anche l’uso di detersivi chimici aggressivi come Forno spray o smacchiatori.
Non utilizzare apparecchi di pulizia a vapore per pulire il piano di cottura.
Fig. 2
ISTRUZIONI PER L’INSTALLATORE
Installazione
Questo apparecchio non è provvisto di un dispositivo di scarico del prodotti della combustione. Si raccomanda che sia installato in locali sufficientemente areati secondo le disposizioni di legge vigenti. La quantità d’aria necessaria alla combustione non deve essere inferiore a 2.0 m3/h per ogni kW di potenza installato. Vedi tabella potenze bruciatori.
Posizionamento
L’apparecchio è previsto per essere incassato in un piano di lavoro come illustrato nell’apposita figura. Prima di inserire il piano predisporre la guarnizione di tenuta su tutto il perimetro della foratura d’incasso.
Fig. 3
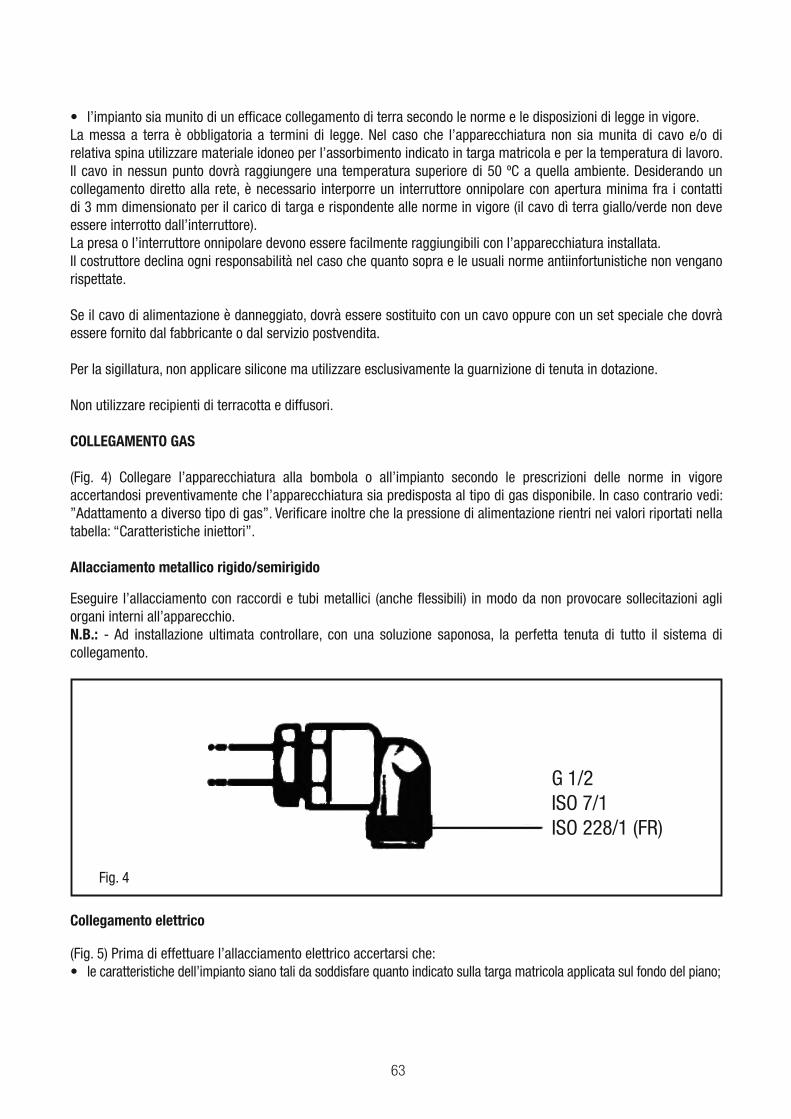
63
La messa a terra è obbligatoria a termini di legge. Nel caso che l’apparecchiatura non sia munita di cavo e/o di relativa spina utilizzare materiale idoneo per l’assorbimento indicato in targa matricola e per la temperatura di lavoro. Il cavo in nessun punto dovrà raggiungere una temperatura superiore di 50 ºC a quella ambiente. Desiderando un collegamento diretto alla rete, è necessario interporre un interruttore onnipolare con apertura minima fra i contatti di 3 mm dimensionato per il carico di targa e rispondente alle norme in vigore (il cavo dì terra giallo/verde non deve essere interrotto dall’interruttore). La presa o l’interruttore onnipolare devono essere facilmente raggiungibili con l’apparecchiatura installata.Il costruttore declina ogni responsabilità nel caso che quanto sopra e le usuali norme antiinfortunistiche non vengano rispettate.
Se il cavo di alimentazione è danneggiato, dovrà essere sostituito con un cavo oppure con un set speciale che dovrà essere fornito dal fabbricante o dal servizio postvendita.
Per la sigillatura, non applicare silicone ma utilizzare esclusivamente la guarnizione di tenuta in dotazione.
Non utilizzare recipienti di terracotta e diffusori.
COLLEGAMENTO GAS
(Fig. 4) Collegare l’apparecchiatura alla bombola o all’impianto secondo le prescrizioni delle norme in vigore accertandosi preventivamente che l’apparecchiatura sia predisposta al tipo di gas disponibile. In caso contrario vedi: ’’Adattamento a diverso tipo di gas”. Verificare inoltre che la pressione di alimentazione rientri nei valori riportati nella tabella: “Caratteristiche iniettori”.
Allacciamento metallico rigido/semirigido
Eseguire l’allacciamento con raccordi e tubi metallici (anche flessibili) in modo da non provocare sollecitazioni agli organi interni all’apparecchio. N.B.: - Ad installazione ultimata controllare, con una soluzione saponosa, la perfetta tenuta di tutto il sistema di collegamento.
G 1/2ISO 7/1ISO 228/1 (FR)
Fig. 4
Collegamento elettrico
(Fig. 5) Prima di effettuare l’allacciamento elettrico accertarsi che: le caratteristiche dell’impianto siano tali da soddisfare quanto indicato sulla targa matricola applicata sul fondo del piano;
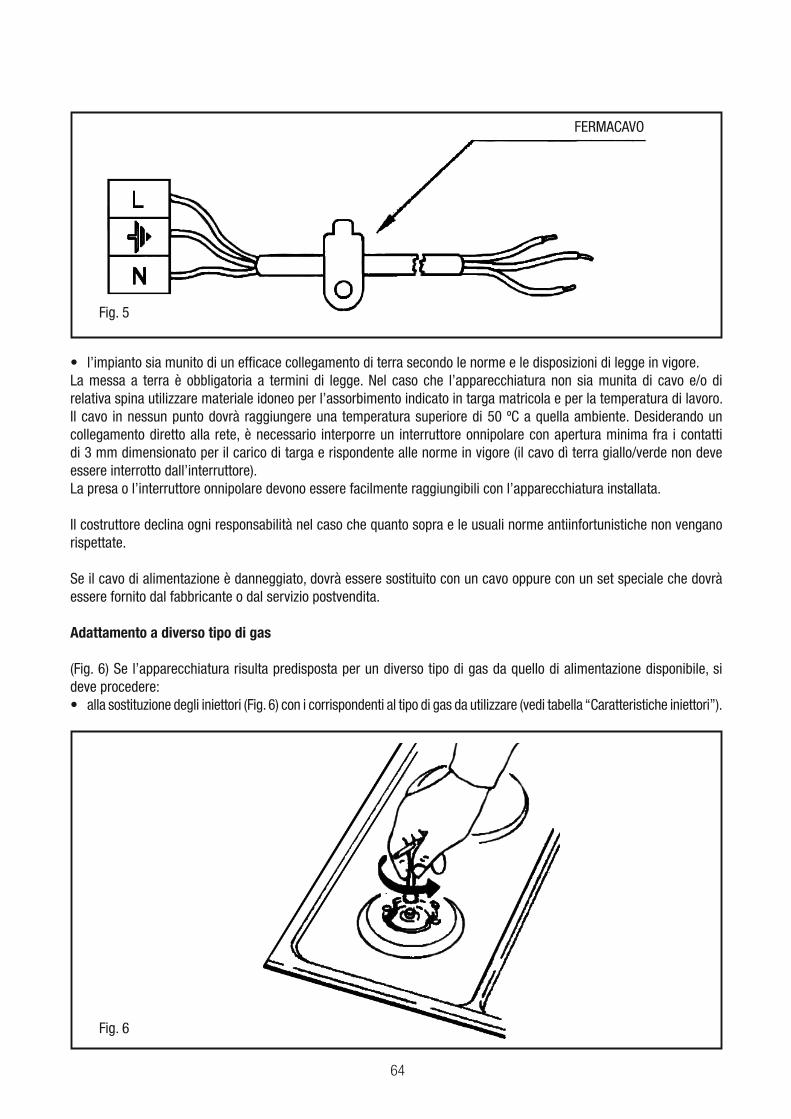
64
Fig. 5
FERMACAVO
La messa a terra è obbligatoria a termini di legge. Nel caso che l’apparecchiatura non sia munita di cavo e/o di relativa spina utilizzare materiale idoneo per l’assorbimento indicato in targa matricola e per la temperatura di lavoro. Il cavo in nessun punto dovrà raggiungere una temperatura superiore di 50 ºC a quella ambiente. Desiderando un collegamento diretto alla rete, è necessario interporre un interruttore onnipolare con apertura minima fra i contatti di 3 mm dimensionato per il carico di targa e rispondente alle norme in vigore (il cavo dì terra giallo/verde non deve essere interrotto dall’interruttore). La presa o l’interruttore onnipolare devono essere facilmente raggiungibili con l’apparecchiatura installata.
Il costruttore declina ogni responsabilità nel caso che quanto sopra e le usuali norme antiinfortunistiche non vengano rispettate.
Se il cavo di alimentazione è danneggiato, dovrà essere sostituito con un cavo oppure con un set speciale che dovrà essere fornito dal fabbricante o dal servizio postvendita.
Adattamento a diverso tipo di gas
(Fig. 6) Se l’apparecchiatura risulta predisposta per un diverso tipo di gas da quello di alimentazione disponibile, si deve procedere:
alla sostituzione degli iniettori (Fig. 6) con i corrispondenti al tipo di gas da utilizzare (vedi tabella “Caratteristiche iniettori”).
Fig. 6
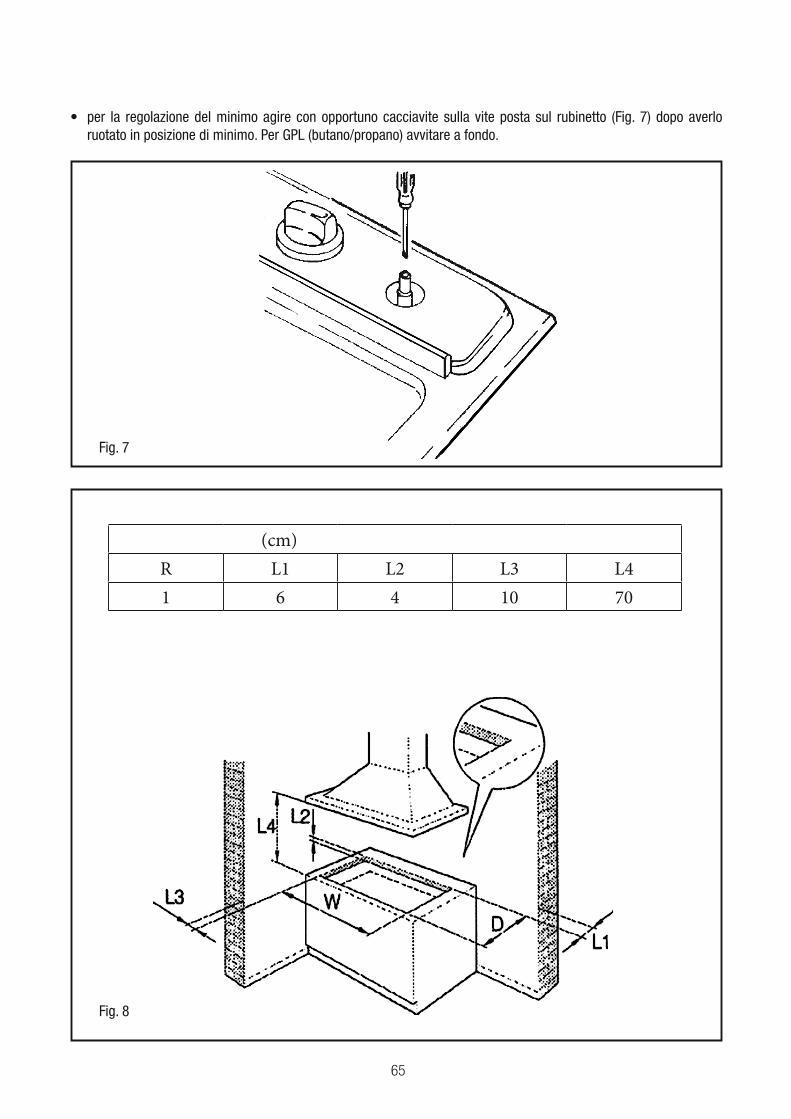
65
ruotato in posizione di minimo. Per GPL (butano/propano) avvitare a fondo.
Fig. 7
Fig. 8
(cm)
R L1 L2 L3 L4
1 6 4 10 70

66
G25 G27 G2.350 G30
Burner
(kW) kW kW (mm) (mm) (mm) kW (mm) (mm) (mm)
(A)0.90 69 0.90 69 0.90 69 0.90 75 0.90 96 0.90 50 44 43
97 97 97 64 60
2.40 2.40 2.40 2.40 2.40 2.40 72
(TR)3.40 3.40 3.40 3.40 3.40 3.40
20mbar 25mbar 25mbar 20mbar 13mbar 30mbar
37mbar
50mbar
At 15°C and 1013 mbar-dry gas
P.C.I.G20 37.78 MJ/m³ P.C.I.G25.1 32.51 MJ/m³
P.C.I.G25 32.49 MJ/m³ P.C.I.G27 30.98 MJ/m³
P.C.I.G2.350 27.20MJ/ m³ P.C.I.G30 49.47MJ/Kg
I2H3+
BurnerType of
Gas
PressureNozzle
diameterNominal Charge Reduced Charge
mbar 1/100mm g/h l/h kW kcal/h kW kcal/h
Auxiliary
Natural
G2020 69 — 85.7 0.90 774 0.40 344
Natural
G2525 69 — 99.7 0.90 774 0.40 344
Natural
G25.125 69 — 99.6 0.90 774 0.40 344
Natural
G2720 75 — 104.5 0.90 774 0.40 344
Natural
G2.35013 96 — 119 0.90 774 0.40 344
Butane
G30
30 50 65 — 0.90 774 0.40 344
37 44 65 — 0.90 774 0.40 344
50 43 65 — 0.90 774 0.40 344
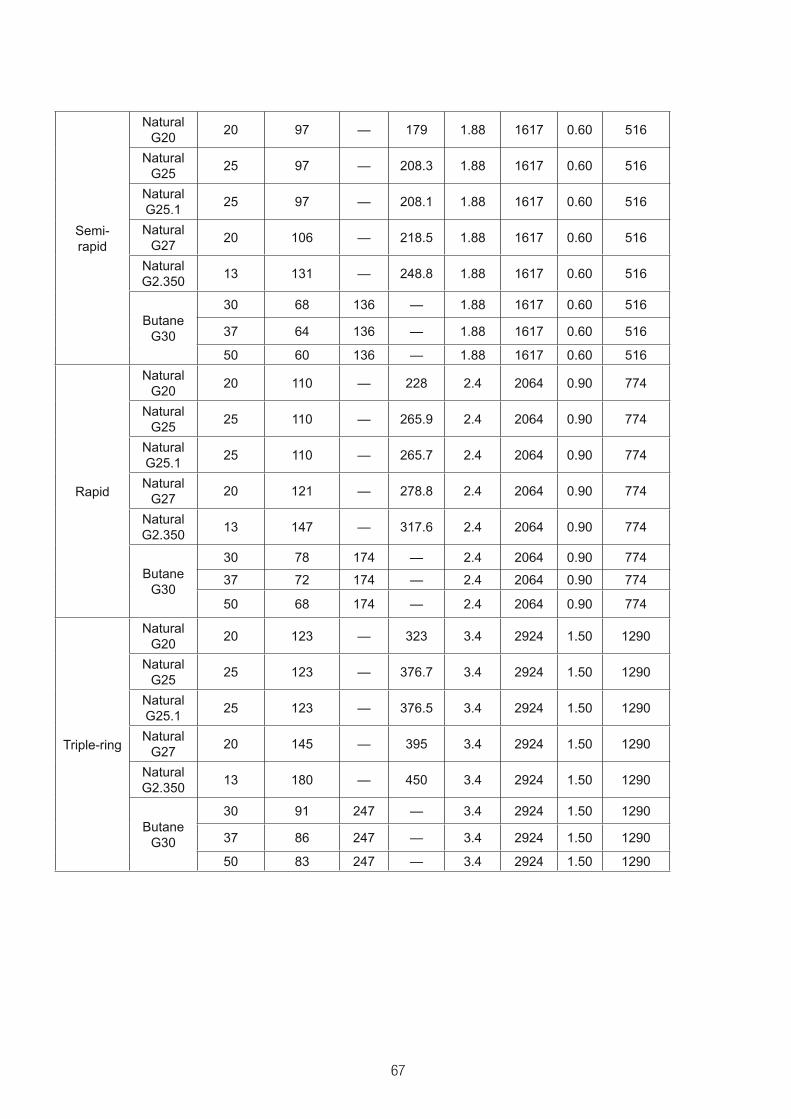
67
Semi-
rapid
Natural
G2020 97 — 179 1.88 1617 0.60 516
Natural
G2525 97 — 208.3 1.88 1617 0.60 516
Natural
G25.125 97 — 208.1 1.88 1617 0.60 516
Natural
G2720 106 — 218.5 1.88 1617 0.60 516
Natural
G2.35013 131 — 248.8 1.88 1617 0.60 516
Butane
G30
30 68 136 — 1.88 1617 0.60 516
37 64 136 — 1.88 1617 0.60 516
50 60 136 — 1.88 1617 0.60 516
Rapid
Natural
G2020 110 — 228 2.4 2064 0.90 774
Natural
G2525 110 — 265.9 2.4 2064 0.90 774
Natural
G25.125 110 — 265.7 2.4 2064 0.90 774
Natural
G2720 121 — 278.8 2.4 2064 0.90 774
Natural
G2.35013 147 — 317.6 2.4 2064 0.90 774
Butane
G30
30 78 174 — 2.4 2064 0.90 774
37 72 174 — 2.4 2064 0.90 774
50 68 174 — 2.4 2064 0.90 774
Triple-ring
Natural
G2020 123 — 323 3.4 2924 1.50 1290
Natural
G2525 123 — 376.7 3.4 2924 1.50 1290
Natural
G25.125 123 — 376.5 3.4 2924 1.50 1290
Natural
G2720 145 — 395 3.4 2924 1.50 1290
Natural
G2.35013 180 — 450 3.4 2924 1.50 1290
Butane
G30
30 91 247 — 3.4 2924 1.50 1290
37 86 247 — 3.4 2924 1.50 1290
50 83 247 — 3.4 2924 1.50 1290
68
Geachte klant,
wij danken u en feliciteren ons met de door u gedane keuze.Dit nieuwe produkt, zorgvuldig ontworpen en geconstrueera uit materialen van de allerbeste kwaliteit, is gedegen uitgetest am al uw eisen voor een perfect kookresultaat te kunnen bevredigen.Wij verzoeken u daarom de eenvoudige instructies te lezen en te respecteren, dewelke het u toe zullen staan om al vanaf het eerste gebruik uitstekende resultaten te bereiken.Met dit moderne apparaat doen wij u onze welgemeende gelukwensen toekomen.
DE FABRIKANT
INDEX
MODELLEN MET BATTERIJEN
Garantie
Pakket
Installatie en doeltreffendheid
INSTRUCTIES VOOR DE GEBRUIKER
Installatie
Gebruik
Onderhoud
INSTRUCTIES VOOR DE INSTALLATEUR
Installatie
Gasaansluiting
Elektrische aansluiting
Karakteristieken verstuivers
DIT PRODUKT IS ALS HUISHOUDELIJK APPARAAT GEDACHT. VOOR BESCHADIGINGEN AAN SPULLEN OF PERSONEN DIE AAN VERKEERDE INSTALLATIE, MISBRUIK OT VERKEERDE GEBRUIK ZIJN TE WIJTEN, NEEMT DE FABRIKANT GEEN VERANTWOORDELIJKHEID OP ZICH.
NL
69
: Veiligheidsaanwijzin-
gen
Lees deze instructies aan-
dachtig. Alleen dan kunt u
uw apparaat op een juiste
en veilige manier gebruiken.
Bewaar de gebruiks- en ins-
tallatie-instructies en over-
handig deze met het appa-
raat indien het van eigenaar
wisselt.
De fabrikant is vrij van elke
verantwoordelijkheid, in-
dien de beschikkingen van
deze handleiding niet na-
geleefd worden.
De afbeeldingen die bij deze
aanwijzingen staan afge-
drukt zijn slechts ter ori�nta-
tie.
Haal het apparaat niet uit de
beschermende verpakking,
tot het moment van de in-
bouw. Indien u schade waar-
neemt aan het apparaat, sluit
het dan niet aan. Neem con-
tact op met onze Technische
Dienst.
Dit apparaat behoort tot
klasse 3, volgens de norm
EN 30-1-1 voor gasappa-
raten: apparaat ingebouwd
in een meubel. Zorg, voor-
dat uw nieuwe kookplaat
ge�nstalleerd wordt, dat de
installatie uitgevoerd wordt
volgens het installatievoors-
chrift.
Dit apparaat mag niet wor-
den ge�nstalleerd in jachten
of caravans.
Dit apparaat mag alleen ge-
bruikt worden in voldoende
geventileerde ruimtes.
Dit apparaat is niet bestemd
voor gebruik met een ex-
terne tijdschakelklok of een
afstandbediening.
Alle werkzaamheden be-
treffende installatie, afs-
telling en aanpassing
aan een ander soort gas
moeten worden uitgevoerd
door een bekwaam insta-
70
llateur, waarbij alle toepas-
bare normen en wetge-
ving en de voorschriften
van de lokale gas- en ele-
ktriciteitsmaatschappijen
moeten worden nageleefd.
Er wordt met name gelet
op de voorschriften met
betrekking tot ventilatie.
Dit apparaat is vanuit de fa-
briek aangepast aan het soort
gas dat vermeld staat op het
gegevensplaatje. Raadpleeg
het installatievoorschrift in-
dien dat gewijzigd moet
worden.Het wordt aanbevo-
len onze Technische dienst
te bellen voor de aanpassing
aan een ander soort gas. Dit
apparaat is enkel ontworpen
voor huishoudelijk gebruik.
Commercieel of professio-
neel gebruik hiervan is niet
toegestaan. Gebruik het
apparaat enkel om te koken,
nooit als verwarming. De
garantie is alleen geldig als
het apparaat gebruikt wordt
voor het doel waarvoor het
ontworpen is.
Zorg ervoor dat er tijdens het
gebruik van het apparaat al-
tijd toezicht is. Gebruik geen
deksels of beschermingsba-
rri�res voor kinderen die niet
aanbevolen worden door de
fabrikant van de kookpla-
at. Ze kunnen ongevallen
veroorzaken, bv. wegens
oververhitting, ontsteking of
loskomen van materiaalde-
eltjes.
Dit apparaat kan worden ge-
bruikt door kinderen vanaf 8
jaar en door personen met
beperkte fysieke, sensoris-
che of geestelijke vermo-
gens of personen die gebrek
aan kennis of ervaring heb-
ben, wanneer zij onder toezi-
cht staan of met het oog op
een veilig gebruik volledig
over de bediening van het
apparaat zijn ge�nformeerd
en op de hoogte zijn van de
gevaren die hieruit kunnen
voorvloeien.
Kinderen mogen niet met het
apparaat spelen. Kinderen
71
mogen het toestel niet zon-
der toezicht schoonmaken
of onderhouden.
Ophoping van onverbrand
gas in een afgesloten ruimte
-
vaar. Stel het apparaat niet
bloot aan luchtstromen. De
branders zouden kunnen uit-
gaan. Lees de aanwijzingen
en waarschuwingen omtrent
de werking van gasbranders
aandachtig door.
Het
gebruik van een gaskooka-
pparaat veroorzaakt warmte,
vocht en verbrandingspro-
ducten in de ruimte waar het
ge�nstalleerd is. Zorg voor
een goede ventilatie in de
keuken, met name wanneer
kookplaat aan staat: laat de
natuurlijke ventilatieopenin-
gen open of installeer een
voorziening voor mechanis-
che ventilatie (afzuigkap).
Bij intensief en langdurig
gebruik van het apparaat
kan extra of doeltreffendere
ventilatie nodig zijn: zet een
raam open of verhoog het
vermogen van de mechanis-
che ventilatie.
Gevaar voor brandwon-
De kookzones en nabijgele-
gen zones worden zeer heet.
Raak de hete oppervlakken
nooit aan. Houd kinderen
jonger dan 8 jaar uit de buurt.
heet. Leg nooit ontvlambare
voorwerpen op de kookpla-
at. Bewaar geen voorwerpen
op de kookplaat.
-
mische producten, stoom,
ontvlambare materialen of
niet-voedingsmiddelen op
onder dit huishoudelijk appa-
raat of in de buurt daarvan.
gemakkelijk vlam. Ga nooit
72
weg terwijl u vet of olie ver-
hit. Indien dit vlam vat, doof
het vuur dan niet met water.
Doe een deksel op de pan
om het vuur te doven en zet
de kookzone uit.
zijn, een ongeschikte afme-
ting hebben, buiten de ran-
den van de kookplaat uitko-
men of niet goed geplaatst
zijn kunnen ernstig letsel
veroorzaken. Neem de tips
en waarschuwingen omtrent
pannen in acht.
en gastoevoer van het appa-
raat af. Bel voor de reparatie
onze Technische Dienst.
van het apparaat niet. Bel in-
dien nodig onze Technische
Dienst.
niet kan
worden gedraaid, forceer
deze niet. Bel onmiddellijk
met de Technische dienst
voor reparatie of vervanging
daarvan.
Gevaar voor elektrische
Gebruik geen stoomreinigers
om het apparaat te reinigen.
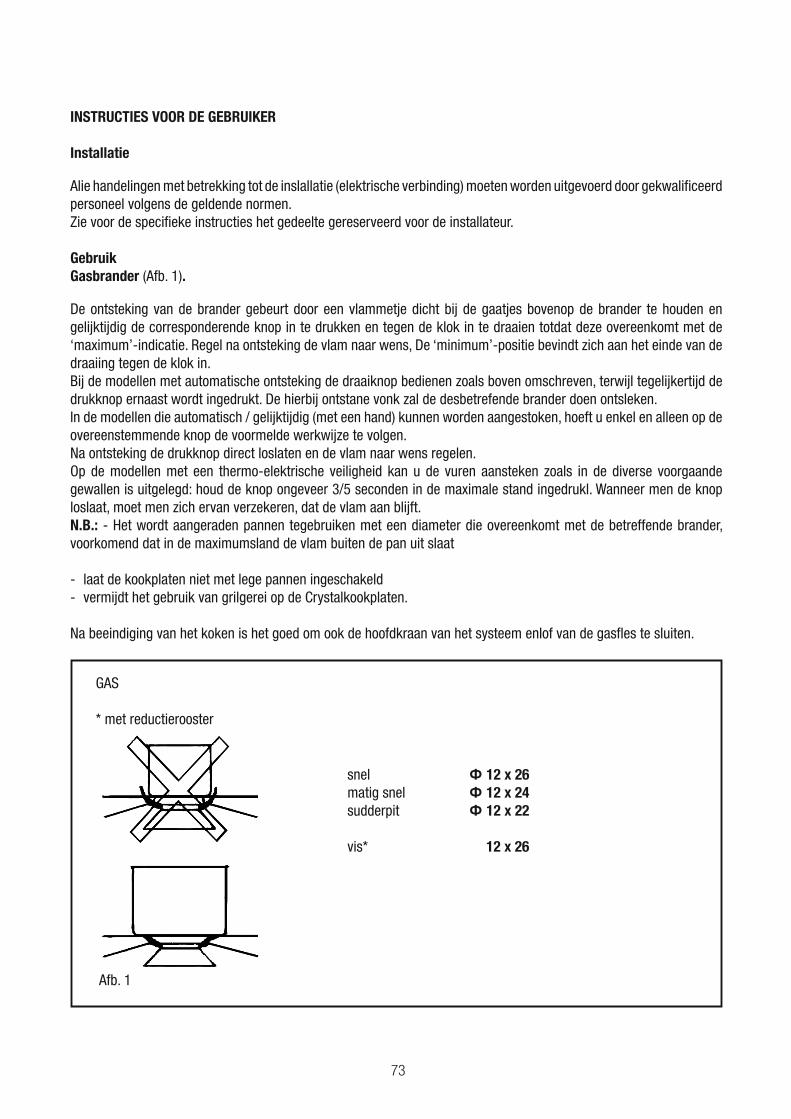
73
INSTRUCTIES VOOR DE GEBRUIKER
Installatie
Alie handelingen met betrekking tot de inslallatie (elektrische verbinding) moeten worden uitgevoerd door gekwalificeerd personeel volgens de geldende normen. Zie voor de specifieke instructies het gedeelte gereserveerd voor de installateur.
GebruikGasbrander (Afb. 1).
De ontsteking van de brander gebeurt door een vlammetje dicht bij de gaatjes bovenop de brander te houden en gelijktijdig de corresponderende knop in te drukken en tegen de klok in te draaien totdat deze overeenkomt met de ‘maximum’-indicatie. Regel na ontsteking de vlam naar wens, De ‘minimum’-positie bevindt zich aan het einde van de draaiing tegen de klok in.Bij de modellen met automatische ontsteking de draaiknop bedienen zoals boven omschreven, terwijl tegelijkertijd de drukknop ernaast wordt ingedrukt. De hierbij ontstane vonk zal de desbetrefende brander doen ontsleken. ln de modellen die automatisch / gelijktijdig (met een hand) kunnen worden aangestoken, hoeft u enkel en alleen op de overeenstemmende knop de voormelde werkwijze te volgen.Na ontsteking de drukknop direct loslaten en de vlam naar wens regelen.Op de modellen met een thermo-elektrische veiligheid kan u de vuren aansteken zoals in de diverse voorgaande gewallen is uitgelegd: houd de knop ongeveer 3/5 seconden in de maximale stand ingedrukl. Wanneer men de knop loslaat, moet men zich ervan verzekeren, dat de vlam aan blijft.N.B.: - Het wordt aangeraden pannen tegebruiken met een diameter die overeenkomt met de betreffende brander, voorkomend dat in de maximumsland de vlam buiten de pan uit slaat
- laat de kookplaten niet met lege pannen ingeschakeld- vermijdt het gebruik van grilgerei op de Crystalkookplaten.
Na beeindiging van het koken is het goed om ook de hoofdkraan van het systeem enIof van de gasfles te sluiten.
snel 12 x 26matig snel 12 x 24sudderpit 12 x 22
vis* 12 x 26
GAS
* met reductierooster
Afb. 1
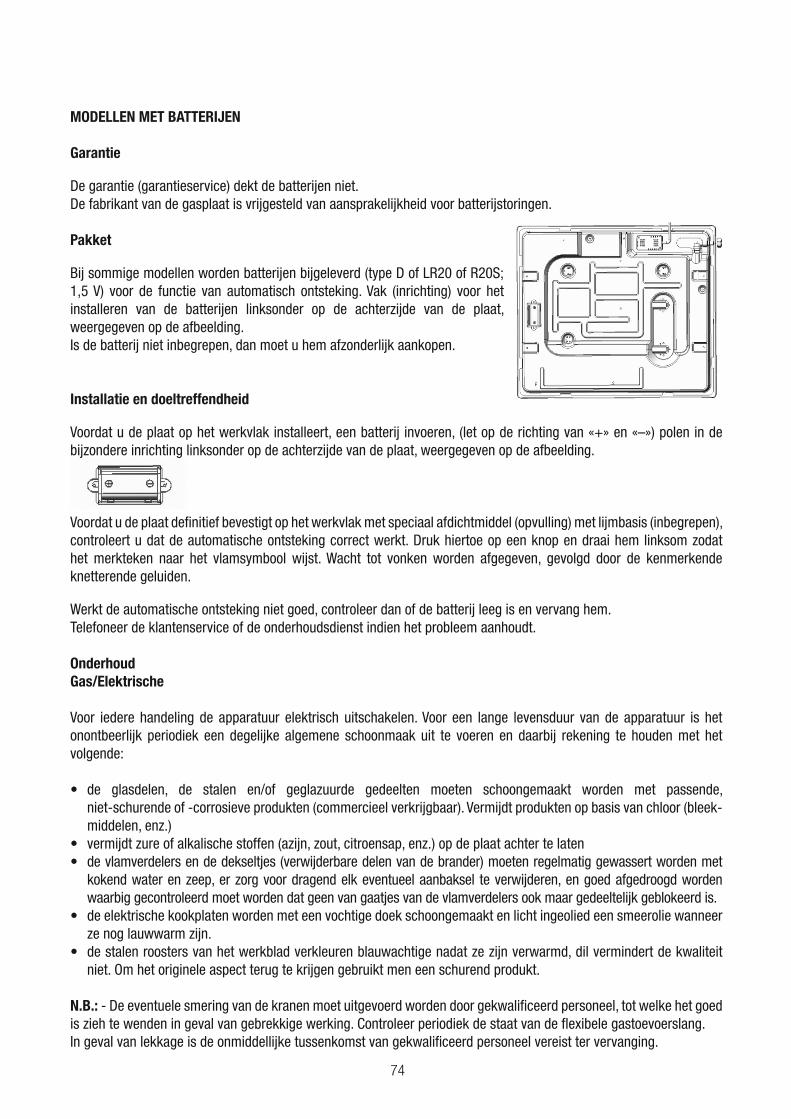
74
MODELLEN MET BATTERIJEN
Garantie
De garantie (garantieservice) dekt de batterijen niet.De fabrikant van de gasplaat is vrijgesteld van aansprakelijkheid voor batterijstoringen.
Pakket
Bij sommige modellen worden batterijen bijgeleverd (type D of LR20 of R20S; 1,5 V) voor de functie van automatisch ontsteking. Vak (inrichting) voor het installeren van de batterijen linksonder op de achterzijde van de plaat, weergegeven op de afbeelding.Is de batterij niet inbegrepen, dan moet u hem afzonderlijk aankopen.
Installatie en doeltreffendheid
Voordat u de plaat op het werkvlak installeert, een batterij invoeren, (let op de richting van «+» en «–») polen in de bijzondere inrichting linksonder op de achterzijde van de plaat, weergegeven op de afbeelding.
Voordat u de plaat definitief bevestigt op het werkvlak met speciaal afdichtmiddel (opvulling) met lijmbasis (inbegrepen), controleert u dat de automatische ontsteking correct werkt. Druk hiertoe op een knop en draai hem linksom zodat het merkteken naar het vlamsymbool wijst. Wacht tot vonken worden afgegeven, gevolgd door de kenmerkende knetterende geluiden.
Werkt de automatische ontsteking niet goed, controleer dan of de batterij leeg is en vervang hem.Telefoneer de klantenservice of de onderhoudsdienst indien het probleem aanhoudt.
OnderhoudGas/Elektrische
Voor iedere handeling de apparatuur elektrisch uitschakelen. Voor een lange levensduur van de apparatuur is het onontbeerlijk periodiek een degelijke algemene schoonmaak uit te voeren en daarbij rekening te houden met het volgende:
niet-schurende of -corrosieve produkten (commercieel verkrijgbaar). Vermijdt produkten op basis van chloor (bleek- middelen, enz.)
kokend water en zeep, er zorg voor dragend elk eventueel aanbaksel te verwijderen, en goed afgedroogd worden waarbig gecontroleerd moet worden dat geen van gaatjes van de vlamverdelers ook maar gedeeltelijk geblokeerd is.
ze nog lauwwarm zijn.
niet. Om het originele aspect terug te krijgen gebruikt men een schurend produkt. N.B.: - De eventuele smering van de kranen moet uitgevoerd worden door gekwalificeerd personeel, tot welke het goed is zieh te wenden in geval van gebrekkige werking. Controleer periodiek de staat van de flexibele gastoevoerslang.In geval van lekkage is de onmiddellijke tussenkomst van gekwalificeerd personeel vereist ter vervanging.
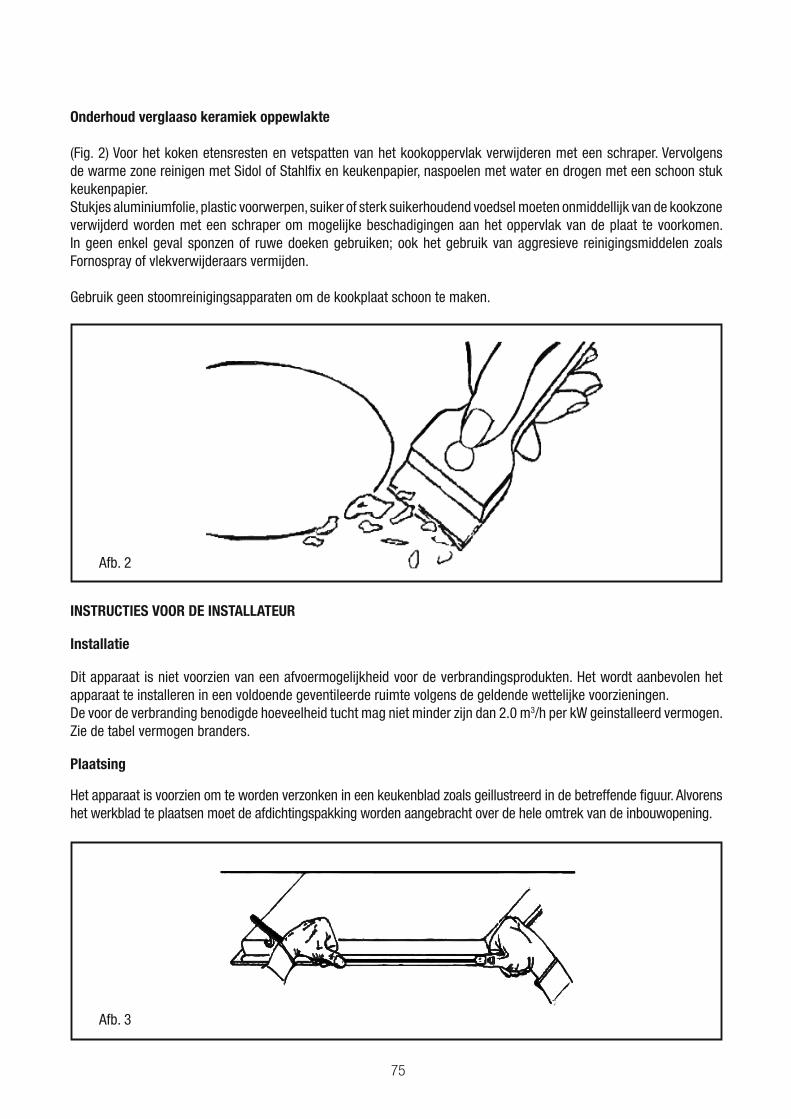
75
Onderhoud verglaaso keramiek oppewlakte
(Fig. 2) Voor het koken etensresten en vetspatten van het kookoppervlak verwijderen met een schraper. Vervolgens de warme zone reinigen met Sidol of Stahlfix en keukenpapier, naspoelen met water en drogen met een schoon stuk keukenpapier. Stukjes aluminiumfolie, plastic voorwerpen, suiker of sterk suikerhoudend voedsel moeten onmiddellijk van de kookzone verwijderd worden met een schraper om mogelijke beschadigingen aan het oppervlak van de plaat te voorkomen. In geen enkel geval sponzen of ruwe doeken gebruiken; ook het gebruik van aggresieve reinigingsmiddelen zoals Fornospray of vlekverwijderaars vermijden.
Gebruik geen stoomreinigingsapparaten om de kookplaat schoon te maken.
Afb. 2
INSTRUCTIES VOOR DE INSTALLATEUR
Installatie
Dit apparaat is niet voorzien van een afvoermogelijkheid voor de verbrandingsprodukten. Het wordt aanbevolen het apparaat te installeren in een voldoende geventileerde ruimte volgens de geldende wettelijke voorzieningen.De voor de verbranding benodigde hoeveelheid tucht mag niet minder zijn dan 2.0 m3/h per kW geinstalleerd vermogen. Zie de tabel vermogen branders.
Plaatsing
Het apparaat is voorzien om te worden verzonken in een keukenblad zoals geillustreerd in de betreffende figuur. Alvorens het werkblad te plaatsen moet de afdichtingspakking worden aangebracht over de hele omtrek van de inbouwopening.
Afb. 3
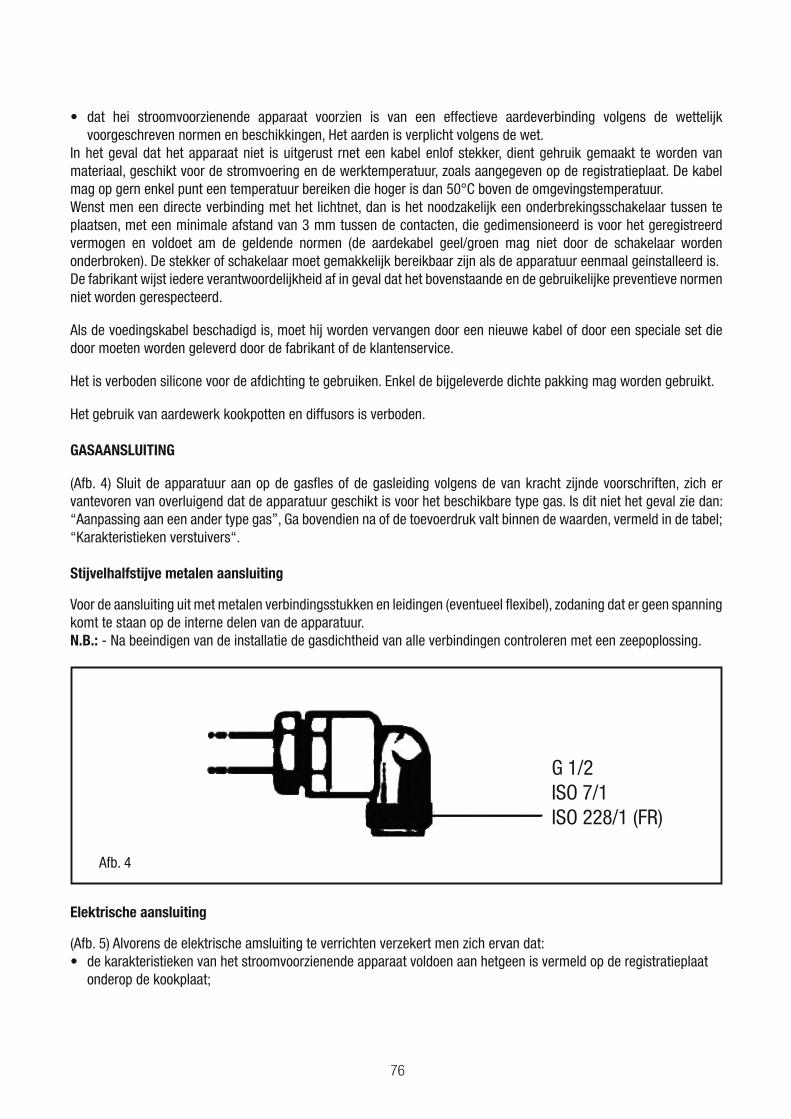
76
voorgeschreven normen en beschikkingen, Het aarden is verplicht volgens de wet.In het geval dat het apparaat niet is uitgerust rnet een kabel enlof stekker, dient gehruik gemaakt te worden van materiaal, geschikt voor de stromvoering en de werktemperatuur, zoals aangegeven op de registratieplaat. De kabel mag op gern enkel punt een temperatuur bereiken die hoger is dan 50°C boven de omgevingstemperatuur.Wenst men een directe verbinding met het lichtnet, dan is het noodzakelijk een onderbrekingsschakelaar tussen te plaatsen, met een minimale afstand van 3 mm tussen de contacten, die gedimensioneerd is voor het geregistreerd vermogen en voldoet am de geldende normen (de aardekabel geel/groen mag niet door de schakelaar worden onderbroken). De stekker of schakelaar moet gemakkelijk bereikbaar zijn als de apparatuur eenmaal geinstalleerd is.De fabrikant wijst iedere verantwoordelijkheid af in geval dat het bovenstaande en de gebruikelijke preventieve normen niet worden gerespecteerd.
Als de voedingskabel beschadigd is, moet hij worden vervangen door een nieuwe kabel of door een speciale set die door moeten worden geleverd door de fabrikant of de klantenservice.
Het is verboden silicone voor de afdichting te gebruiken. Enkel de bijgeleverde dichte pakking mag worden gebruikt.
Het gebruik van aardewerk kookpotten en diffusors is verboden.
GASAANSLUITING
(Afb. 4) Sluit de apparatuur aan op de gasfles of de gasleiding volgens de van kracht zijnde voorschriften, zich er vantevoren van overluigend dat de apparatuur geschikt is voor het beschikbare type gas. Is dit niet het geval zie dan: “Aanpassing aan een ander type gas”, Ga bovendien na of de toevoerdruk valt binnen de waarden, vermeld in de tabel; “Karakteristieken verstuivers“.
Stijvelhalfstijve metalen aansluiting
Voor de aansluiting uit met metalen verbindingsstukken en leidingen (eventueel flexibel), zodaning dat er geen spanning komt te staan op de interne delen van de apparatuur.N.B.: - Na beeindigen van de installatie de gasdichtheid van alle verbindingen controleren met een zeepoplossing.
G 1/2ISO 7/1ISO 228/1 (FR)
Afb. 4
Elektrische aansluiting
(Afb. 5) Alvorens de elektrische amsluiting te verrichten verzekert men zich ervan dat:de karakteristieken van het stroomvoorzienende apparaat voldoen aan hetgeen is vermeld op de registratieplaat onderop de kookplaat;
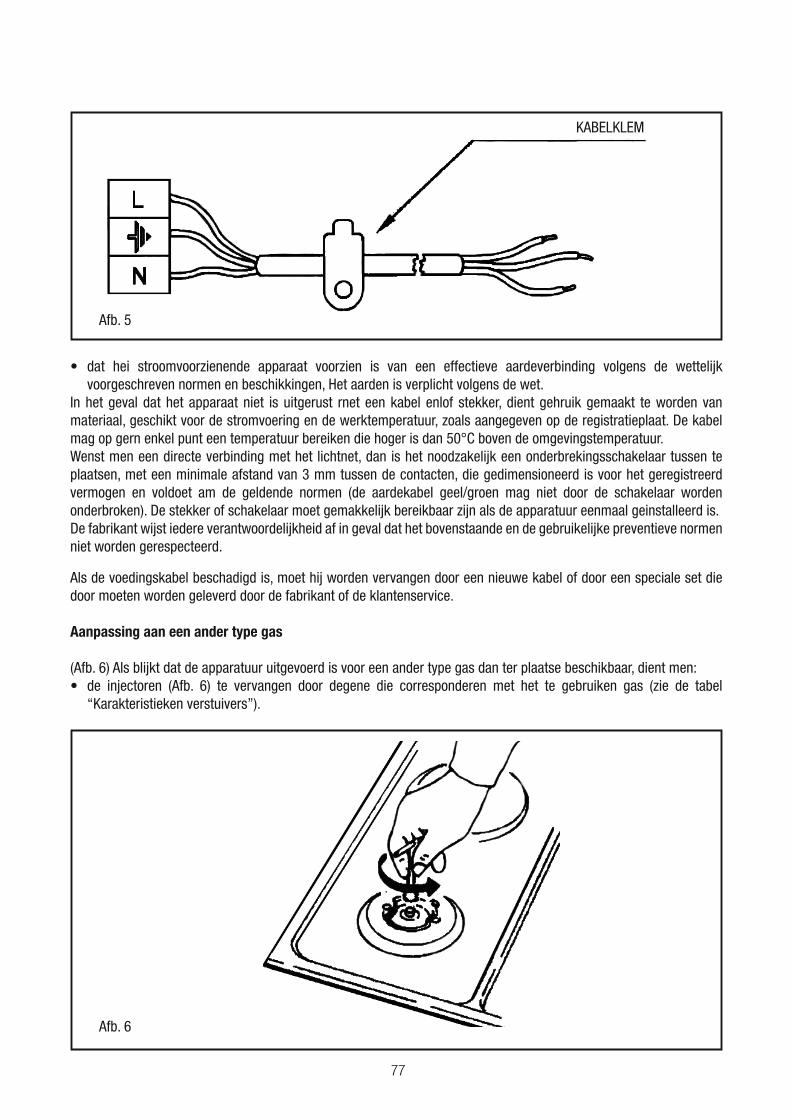
77
Afb. 5
KABELKLEM
voorgeschreven normen en beschikkingen, Het aarden is verplicht volgens de wet.In het geval dat het apparaat niet is uitgerust rnet een kabel enlof stekker, dient gehruik gemaakt te worden van materiaal, geschikt voor de stromvoering en de werktemperatuur, zoals aangegeven op de registratieplaat. De kabel mag op gern enkel punt een temperatuur bereiken die hoger is dan 50°C boven de omgevingstemperatuur.Wenst men een directe verbinding met het lichtnet, dan is het noodzakelijk een onderbrekingsschakelaar tussen te plaatsen, met een minimale afstand van 3 mm tussen de contacten, die gedimensioneerd is voor het geregistreerd vermogen en voldoet am de geldende normen (de aardekabel geel/groen mag niet door de schakelaar worden onderbroken). De stekker of schakelaar moet gemakkelijk bereikbaar zijn als de apparatuur eenmaal geinstalleerd is.De fabrikant wijst iedere verantwoordelijkheid af in geval dat het bovenstaande en de gebruikelijke preventieve normen niet worden gerespecteerd.
Als de voedingskabel beschadigd is, moet hij worden vervangen door een nieuwe kabel of door een speciale set die door moeten worden geleverd door de fabrikant of de klantenservice.
Aanpassing aan een ander type gas
(Afb. 6) Als blijkt dat de apparatuur uitgevoerd is voor een ander type gas dan ter plaatse beschikbaar, dient men:
“Karakteristieken verstuivers”).
Afb. 6
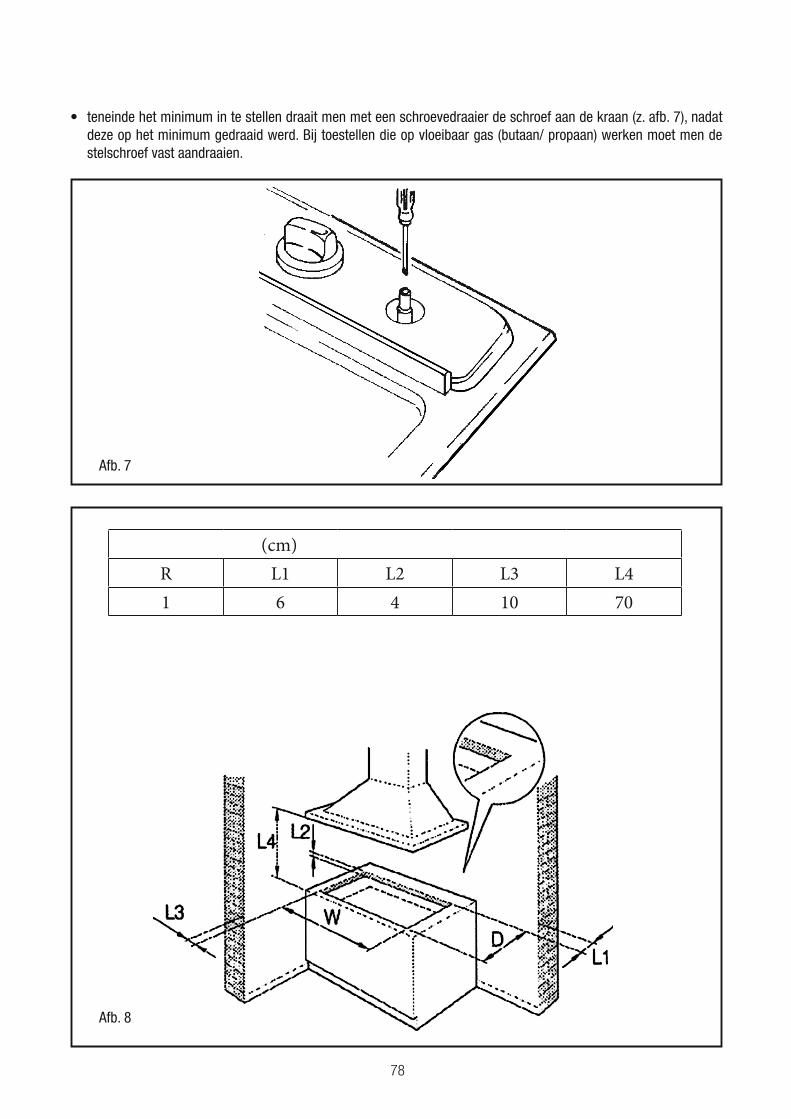
78
deze op het minimum gedraaid werd. Bij toestellen die op vloeibaar gas (butaan/ propaan) werken moet men de stelschroef vast aandraaien.
Afb. 7
Afb. 8
(cm)
R L1 L2 L3 L4
1 6 4 10 70

79
G25 G27 G2.350 G30
Burner
(kW) kW kW (mm) (mm) (mm) kW (mm) (mm) (mm)
(A)0.90 69 0.90 69 0.90 69 0.90 75 0.90 96 0.90 50 44 43
97 97 97 64 60
2.40 2.40 2.40 2.40 2.40 2.40 72
(TR)3.40 3.40 3.40 3.40 3.40 3.40
20mbar 25mbar 25mbar 20mbar 13mbar 30mbar
37mbar
50mbar
At 15°C and 1013 mbar-dry gas
P.C.I.G20 37.78 MJ/m³ P.C.I.G25.1 32.51 MJ/m³
P.C.I.G25 32.49 MJ/m³ P.C.I.G27 30.98 MJ/m³
P.C.I.G2.350 27.20MJ/ m³ P.C.I.G30 49.47MJ/Kg
I2H3+
BurnerType of
Gas
PressureNozzle
diameterNominal Charge Reduced Charge
mbar 1/100mm g/h l/h kW kcal/h kW kcal/h
Auxiliary
Natural
G2020 69 — 85.7 0.90 774 0.40 344
Natural
G2525 69 — 99.7 0.90 774 0.40 344
Natural
G25.125 69 — 99.6 0.90 774 0.40 344
Natural
G2720 75 — 104.5 0.90 774 0.40 344
Natural
G2.35013 96 — 119 0.90 774 0.40 344
Butane
G30
30 50 65 — 0.90 774 0.40 344
37 44 65 — 0.90 774 0.40 344
50 43 65 — 0.90 774 0.40 344

80
Semi-
rapid
Natural
G2020 97 — 179 1.88 1617 0.60 516
Natural
G2525 97 — 208.3 1.88 1617 0.60 516
Natural
G25.125 97 — 208.1 1.88 1617 0.60 516
Natural
G2720 106 — 218.5 1.88 1617 0.60 516
Natural
G2.35013 131 — 248.8 1.88 1617 0.60 516
Butane
G30
30 68 136 — 1.88 1617 0.60 516
37 64 136 — 1.88 1617 0.60 516
50 60 136 — 1.88 1617 0.60 516
Rapid
Natural
G2020 110 — 228 2.4 2064 0.90 774
Natural
G2525 110 — 265.9 2.4 2064 0.90 774
Natural
G25.125 110 — 265.7 2.4 2064 0.90 774
Natural
G2720 121 — 278.8 2.4 2064 0.90 774
Natural
G2.35013 147 — 317.6 2.4 2064 0.90 774
Butane
G30
30 78 174 — 2.4 2064 0.90 774
37 72 174 — 2.4 2064 0.90 774
50 68 174 — 2.4 2064 0.90 774
Triple-ring
Natural
G2020 123 — 323 3.4 2924 1.50 1290
Natural
G2525 123 — 376.7 3.4 2924 1.50 1290
Natural
G25.125 123 — 376.5 3.4 2924 1.50 1290
Natural
G2720 145 — 395 3.4 2924 1.50 1290
Natural
G2.35013 180 — 450 3.4 2924 1.50 1290
Butane
G30
30 91 247 — 3.4 2924 1.50 1290
37 86 247 — 3.4 2924 1.50 1290
50 83 247 — 3.4 2924 1.50 1290
81
Ex.mo. Sr. Cliente,
Agradecemos, muito sinceramente a sua escolha, e aproveitamos da ocasião para o felicitar. Este novo produto, que foi projectado com grande atenção e construído com os melhores materiais, foi verificado e aprovado, de maneira a dar-lhe imensa satisfação para um cozinhado perfeito.Por conseguinte, pedimos que leia e siga as fáceis instruções que lhe permitirão de alcançar excelentes resultados desde o início da sua utilização. Juntamente com este moderno aparelho, aproveitamos para lhe enviar os nossos melhores cumprimentos.
O FABRICANTE
ÍNDICE
MODELOS QUE INCLUEM PILHAS
Garantia
Embalagem
Instalação e eficiência
INSTRUÇÕES PARA O UTILIZADOR
Instalação
Utilização
Manutenção
INSTRUÇÕES PARA O INSTALADOR
Instalação
Conexão do gás
Conexão eléctrica
Características dos injectores
ESTE PRODUTO FOI CONCEBIDO PARA UMA UTILIZAÇÃO DE TIPO DOMÉSTICA. O FABRICANTE DECLINA TODAS AS RESPONSABILIDADES NO CASO DE EVENTUAIS DANOS A COISAS OU PESSOAS DERIVADOS DE UMA INSTALAÇÃO INCORRECTA OU DE USO IMPRÓPRIO, ERRÓNEO OU ABSURDO.
PT
82
: Indica��es de segu-
ran�a
Leia atentamente estas ins-
tru��es. S� assim poder�
manusear o aparelho de for-
-
ve as instru��es de uso e
de instala��o e entregue-as
juntamente com o aparelho
se este mudar de dono.
de qualquer tipo de res-
ponsabilidade caso n�o se
cumpram as disposi��es
deste manual. As imagens
apresentadas ao longo das
instru��es servem apenas
para orienta��o. N�o retire o
aparelho da embalagem de
protec��o at� ao momento
de ser encastrado. Se ob-
servar algum dano no apa-
relho, n�o o ligue. Entre em
contacto com o nosso Ser-
vi�o de Assist�ncia T�cnica.
Este aparelho corresponde �
classe 3, segundo a norma
EN 30-1-1 para aparelhos
a g�s: aparelho encastrado
num m�vel. Antes de insta-
lar a sua nova placa de co-
segue todas as instru��es
de montagem durante a ins-
tala��o.
Este aparelho n�o pode ser
instalado em iates ou cara-
vanas.
Este aparelho deve ser ape-
nas utilizado em locais com
uma ventila��o adequada.
Este aparelho n�o foi previs-
to para ser utilizado com um
temporizador externo ou um
telecomando externo.
Todos os trabalhos de ins-
tala��o, liga��o, regula��o
e adapta��o a outros tipos
de g�s devem ser efectua-
dos por um t�cnico auto-
rizado, respeitando todas
as regulamenta��es e le-
gisla��o aplic�veis, bem
como o estipulado pelas
empresas locais fornece-
doras de g�s e electricida-
de. Deve prestar particular
83
aten��o �s disposi��es
aplic�veis relativamente �
ventila��o.
Este aparelho vem adaptado
da f�brica para o tipo de g�s
indicado na placa de carac-
ter�sticas. Caso seja neces-
s�rio alterar o tipo de g�s,
consulte as instru��es de
montagem. Recomenda-se
chamar o nosso Servi�o de
Assist�ncia T�cnica para a
adapta��o a outros tipos de
g�s.
Este aparelho foi unicamen-
te concebido para utiliza��o
dom�stica, n�o podendo,
por isso, ser utilizado para
-
sionais. Utilize o aparelho
unicamente para cozinhar,
nunca como aparelho de
aquecimento. A garantia
apenas ser� v�lida caso o
aparelho seja utilizado co-
que se destina.
N�o deixe o aparelho a fun-
cionar sem vigil�ncia.
N�o utilize tampas ou ba-
rreiras de protec��o, para
crian�as, que n�o sejam re-
comendadas pelo fabricante
da placa de cozedura. Po-
dem provocar acidentes, por
ex. devido ao sobreaqueci-
mento, igni��o ou liberta��o
de fragmentos de materiais.
Este aparelho n�o pode ser
utilizado por crian�as com
mais de 8 anos e pessoas
com capacidades f�sicas,
sensoriais ou mentais re-
duzidas ou que n�o dispon-
-
te, excepto sob vigil�ncia ou
de utiliza��o segura do apa-
relho, e desde que enten-
dam os perigos resultantes
da mesma.
N�o deixe que as crian�as
brinquem com o aparelho.
N�o permita a limpeza e ma-
nuten��o do aparelho pelo
utilizador a crian�as sem vi-
gil�ncia.
84
A acumula��o do g�s que
n�o � queimado, num es-
pa�o fechado, pode causar
aparelho a correntes de ar.
Os queimadores poderiam
apagar-se. Leia atentamente
as instru��es e advert�ncias
relativas ao funcionamento
dos queimadores a g�s.
A utiliza��o de um aparelho
de cozedura a g�s produz
calor, humidade e produ-
tos de combust�o no local
onde est� instalado. Garan-
ta uma boa ventila��o na
cozinha, especialmente en-
quanto a placa de cozedura
estiver em funcionamento:
mantenha as aberturas de
ventila��o natural abertas
ou instale um dispositivo de
ventila��o mec�nica (cam-
p�nula com exaustor). A uti-
liza��o intensa e prolongada
do aparelho pode requerer
uma ventila��o complemen-
janela ou aumente a pot�n-
cia da ventila��o mec�nica.
As zonas de cozedura e zo-
nas adjacentes aquecem
muito. Nunca toque nas su-
as crian�as com menos de 8
anos afastadas do aparelho.
aquecem muito. N�o co-
sobre a placa de cozedura.
N�o deixe objectos sobre a
placa de cozedura.
produtos qu�micos corrosi-
vos, vapores, materiais in-
alimentares por baixo deste
electrodom�stico, nem perto
dele.
-
breaquecidos s�o facilmente
85
enquanto estiver a aque-
cer gorduras ou �leos. Se
o fogo com �gua. Cubra o
recipiente com uma tampa
para apagar o fogo e desli-
gue a zona de cozedura.
-
sentem danos, com um ta-
manho inadequado, que ul-
trapassem as margens da
placa de cozedura ou que
estejam mal posicionados,
podem provocar graves
les�es. Tenha em conside-
ra��o as recomenda��es e
advert�ncias relativas aos
recipientes para cozinhados.
a alimenta��o el�ctrica e o
fornecimento de g�s do apa-
relho. Para proceder � repa-
ra��o, recorra ao nosso Ser-
vi�o de Assist�ncia T�cnica.
aparelho. Se tal for necess�-
rio, recorra ao nosso Servi�o
de Assist�ncia T�cnica.
n�o rodar, n�o o force. Con-
tacte imediatamente o Ser-
vi�o de Assist�ncia T�cnica
para proceder � repara��o
ou substitui��o.
Perigo de descarga el�ctri-
N�o utilize m�quinas de lim-
peza a vapor para limpar o
aparelho.
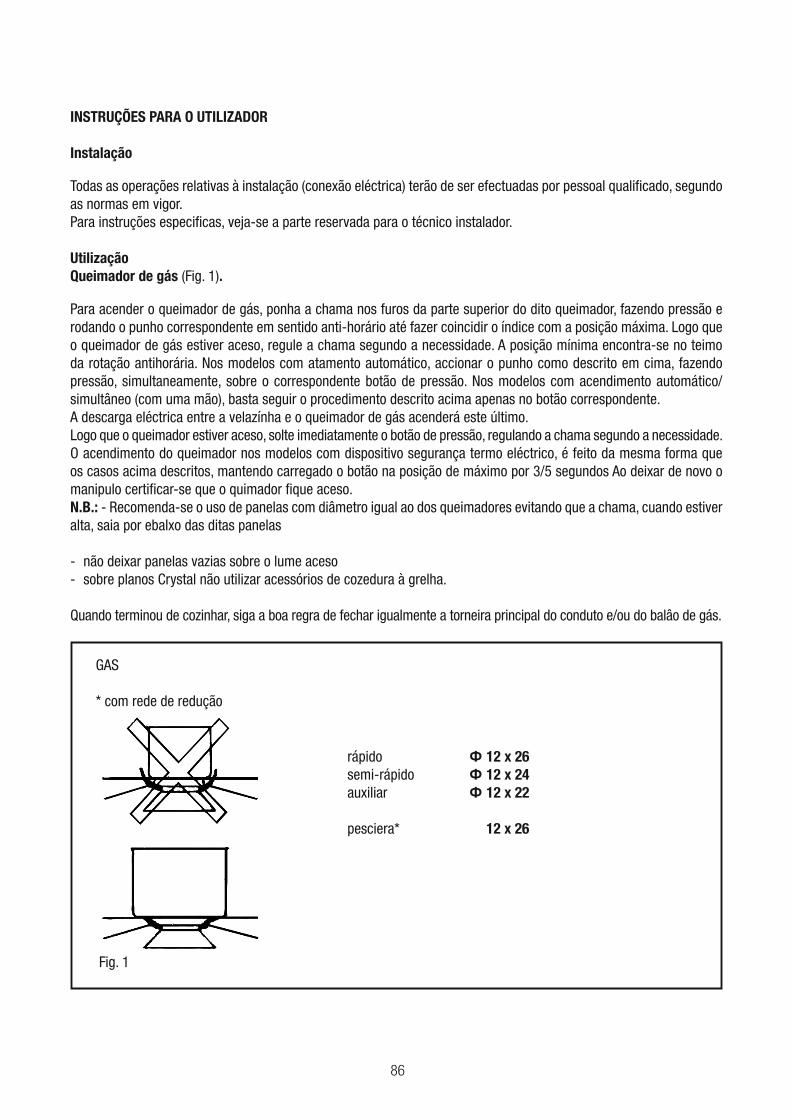
86
INSTRUÇÕES PARA O UTILIZADOR
Instalação
Todas as operações relativas à instalação (conexão eléctrica) terão de ser efectuadas por pessoal qualificado, segundo as normas em vigor.Para instruções especificas, veja-se a parte reservada para o técnico instalador.
UtilizaçãoQueimador de gás (Fig. 1).
Para acender o queimador de gás, ponha a chama nos furos da parte superior do dito queimador, fazendo pressão e rodando o punho correspondente em sentido anti-horário até fazer coincidir o índice com a posição máxima. Logo que o queimador de gás estiver aceso, regule a chama segundo a necessidade. A posição mínima encontra-se no teimo da rotação antihorária. Nos modelos com atamento automático, accionar o punho como descrito em cima, fazendo pressão, simultaneamente, sobre o correspondente botão de pressão. Nos modelos com acendimento automático/simultâneo (com uma mão), basta seguir o procedimento descrito acima apenas no botão correspondente.A descarga eléctrica entre a velazínha e o queimador de gás acenderá este último. Logo que o queimador estiver aceso, solte imediatamente o botão de pressão, regulando a chama segundo a necessidade.O acendimento do queimador nos modelos com dispositivo segurança termo eléctrico, é feito da mesma forma que os casos acima descritos, mantendo carregado o botão na posição de máximo por 3/5 segundos Ao deixar de novo o manipulo certificar-se que o quimador fique aceso.N.B.: - Recomenda-se o uso de panelas com diâmetro igual ao dos queimadores evitando que a chama, cuando estiver alta, saia por ebalxo das ditas panelas
- não deixar panelas vazias sobre o lume aceso- sobre planos Crystal não utilizar acessórios de cozedura à grelha.
Quando terminou de cozinhar, siga a boa regra de fechar igualmente a torneira principal do conduto e/ou do balâo de gás.
rápido 12 x 26semi-rápido 12 x 24auxiliar 12 x 22
pesciera* 12 x 26
GAS
* com rede de redução
Fig. 1
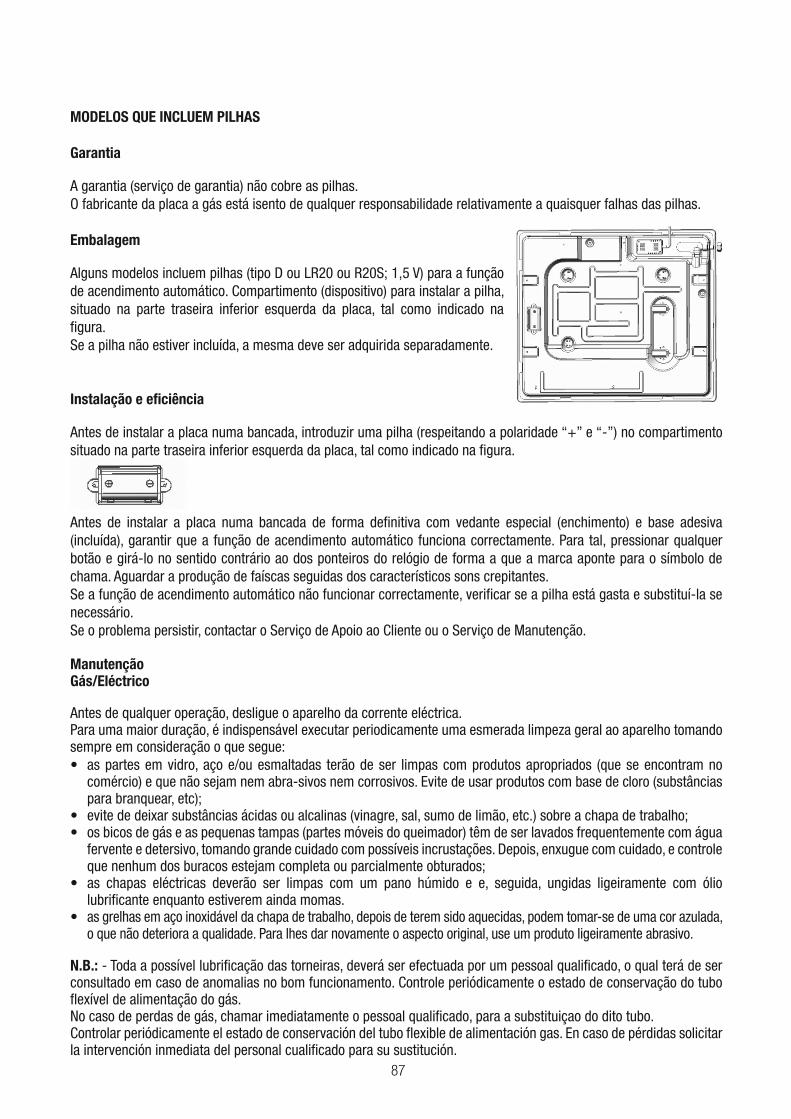
87
MODELOS QUE INCLUEM PILHAS
Garantia
A garantia (serviço de garantia) não cobre as pilhas.O fabricante da placa a gás está isento de qualquer responsabilidade relativamente a quaisquer falhas das pilhas.
Embalagem
Alguns modelos incluem pilhas (tipo D ou LR20 ou R20S; 1,5 V) para a função de acendimento automático. Compartimento (dispositivo) para instalar a pilha, situado na parte traseira inferior esquerda da placa, tal como indicado na figura.Se a pilha não estiver incluída, a mesma deve ser adquirida separadamente.
Instalação e eficiência
Antes de instalar a placa numa bancada, introduzir uma pilha (respeitando a polaridade “+” e “-”) no compartimento situado na parte traseira inferior esquerda da placa, tal como indicado na figura.
Antes de instalar a placa numa bancada de forma definitiva com vedante especial (enchimento) e base adesiva (incluída), garantir que a função de acendimento automático funciona correctamente. Para tal, pressionar qualquer botão e girá-lo no sentido contrário ao dos ponteiros do relógio de forma a que a marca aponte para o símbolo de chama. Aguardar a produção de faíscas seguidas dos característicos sons crepitantes.Se a função de acendimento automático não funcionar correctamente, verificar se a pilha está gasta e substituí-la se necessário.Se o problema persistir, contactar o Serviço de Apoio ao Cliente ou o Serviço de Manutenção.
ManutençãoGás/Eléctrico
Antes de qualquer operação, desligue o aparelho da corrente eléctrica.Para uma maior duração, é indispensável executar periodicamente uma esmerada limpeza geral ao aparelho tomando sempre em consideração o que segue:
as partes em vidro, aço e/ou esmaltadas terão de ser limpas com produtos apropriados (que se encontram no comércio) e que não sejam nem abra-sivos nem corrosivos. Evite de usar produtos com base de cloro (substâncias para branquear, etc);
fervente e detersivo, tomando grande cuidado com possíveis incrustações. Depois, enxugue com cuidado, e controle que nenhum dos buracos estejam completa ou parcialmente obturados;
lubrificante enquanto estiverem ainda momas.as grelhas em aço inoxidável da chapa de trabalho, depois de terem sido aquecidas, podem tomar-se de uma cor azulada, o que não deteriora a qualidade. Para lhes dar novamente o aspecto original, use um produto ligeiramente abrasivo.
N.B.: - Toda a possível lubrificação das torneiras, deverá ser efectuada por um pessoal qualificado, o qual terá de ser consultado em caso de anomalias no bom funcionamento. Controle periódicamente o estado de conservação do tubo flexível de alimentação do gás.No caso de perdas de gás, chamar imediatamente o pessoal qualificado, para a substituiçao do dito tubo.Controlar periódicamente el estado de conservación del tubo flexible de alimentación gas. En caso de pérdidas solicitar la intervención inmediata del personal cualificado para su sustitución.
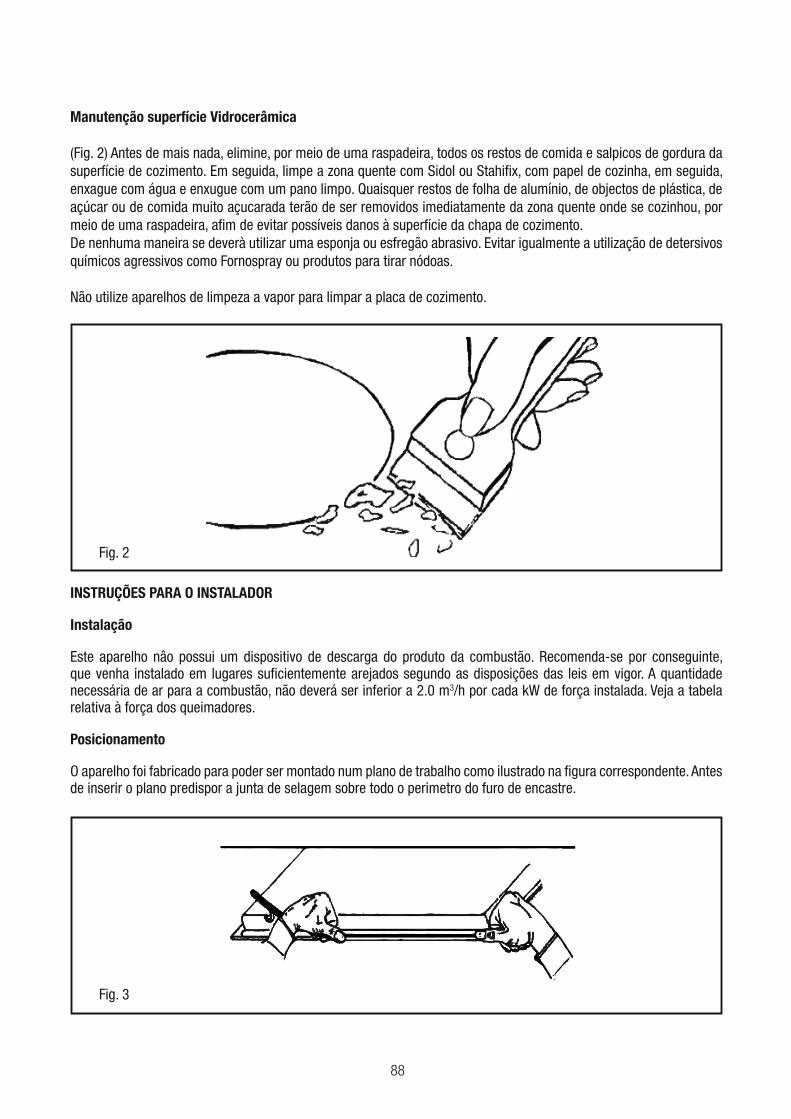
88
Manutenção superfície Vidrocerâmica
(Fig. 2) Antes de mais nada, elimine, por meio de uma raspadeira, todos os restos de comida e salpicos de gordura da superfície de cozimento. Em seguida, limpe a zona quente com Sidol ou Stahifix, com papel de cozinha, em seguida, enxague com água e enxugue com um pano limpo. Quaisquer restos de folha de alumínio, de objectos de plástica, de açúcar ou de comida muito açucarada terão de ser removidos imediatamente da zona quente onde se cozinhou, por meio de uma raspadeira, afim de evitar possíveis danos à superfície da chapa de cozimento.De nenhuma maneira se deverà utilizar uma esponja ou esfregão abrasivo. Evitar igualmente a utilização de detersivos químicos agressivos como Fornospray ou produtos para tirar nódoas.
Não utilize aparelhos de limpeza a vapor para limpar a placa de cozimento.
Fig. 2
INSTRUÇÕES PARA O INSTALADOR
Instalação
Este aparelho nâo possui um dispositivo de descarga do produto da combustão. Recomenda-se por conseguinte, que venha instalado em lugares suficientemente arejados segundo as disposições das leis em vigor. A quantidade necessária de ar para a combustão, não deverá ser inferior a 2.0 m3/h por cada kW de força instalada. Veja a tabela relativa à força dos queimadores.
Posicionamento
O aparelho foi fabricado para poder ser montado num plano de trabalho como ilustrado na figura correspondente. Antes de inserir o plano predispor a junta de selagem sobre todo o perimetro do furo de encastre.
Fig. 3
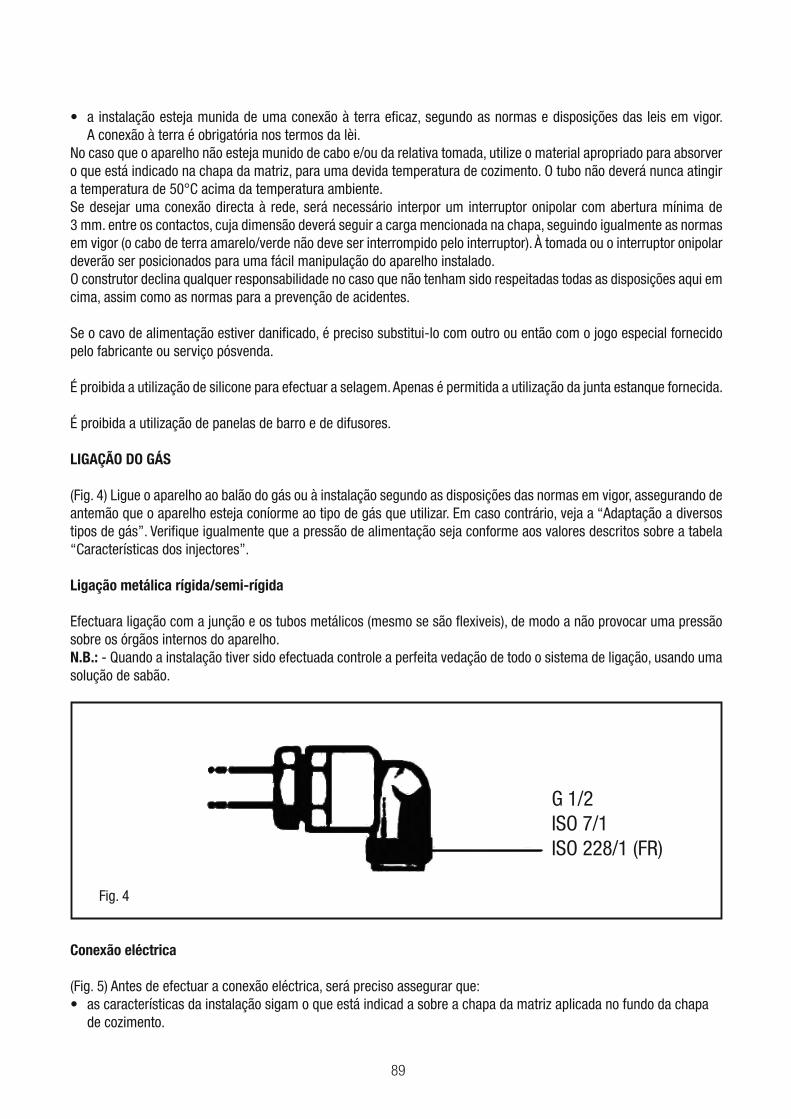
89
A conexão à terra é obrigatória nos termos da lèi.
No caso que o aparelho não esteja munido de cabo e/ou da relativa tomada, utilize o material apropriado para absorver o que está indicado na chapa da matriz, para uma devida temperatura de cozimento. O tubo não deverá nunca atingir a temperatura de 50°C acima da temperatura ambiente.Se desejar uma conexão directa à rede, será necessário interpor um interruptor onipolar com abertura mínima de 3 mm. entre os contactos, cuja dimensão deverá seguir a carga mencionada na chapa, seguindo igualmente as normas em vigor (o cabo de terra amarelo/verde não deve ser interrompido pelo interruptor). À tomada ou o interruptor onipolar deverão ser posicionados para uma fácil manipulação do aparelho instalado.O construtor declina qualquer responsabilidade no caso que não tenham sido respeitadas todas as disposições aqui em cima, assim como as normas para a prevenção de acidentes.
Se o cavo de alimentação estiver danificado, é preciso substitui-lo com outro ou então com o jogo especial fornecido pelo fabricante ou serviço pósvenda.
É proibida a utilização de silicone para efectuar a selagem. Apenas é permitida a utilização da junta estanque fornecida.
É proibida a utilização de panelas de barro e de difusores.
LIGAÇÃO DO GÁS
(Fig. 4) Ligue o aparelho ao balão do gás ou à instalação segundo as disposições das normas em vigor, assegurando de antemão que o aparelho esteja coníorme ao tipo de gás que utilizar. Em caso contrário, veja a “Adaptação a diversos tipos de gás”. Verifique igualmente que a pressão de alimentação seja conforme aos valores descritos sobre a tabela “Características dos injectores”.
Ligação metálica rígida/semi-rígida
Efectuara ligação com a junção e os tubos metálicos (mesmo se são flexiveis), de modo a não provocar uma pressão sobre os órgãos internos do aparelho. N.B.: - Quando a instalação tiver sido efectuada controle a perfeita vedação de todo o sistema de ligação, usando uma solução de sabão.
G 1/2ISO 7/1ISO 228/1 (FR)
Fig. 4
Conexão eléctrica
(Fig. 5) Antes de efectuar a conexão eléctrica, será preciso assegurar que:as características da instalação sigam o que está indicad a sobre a chapa da matriz aplicada no fundo da chapa de cozimento.
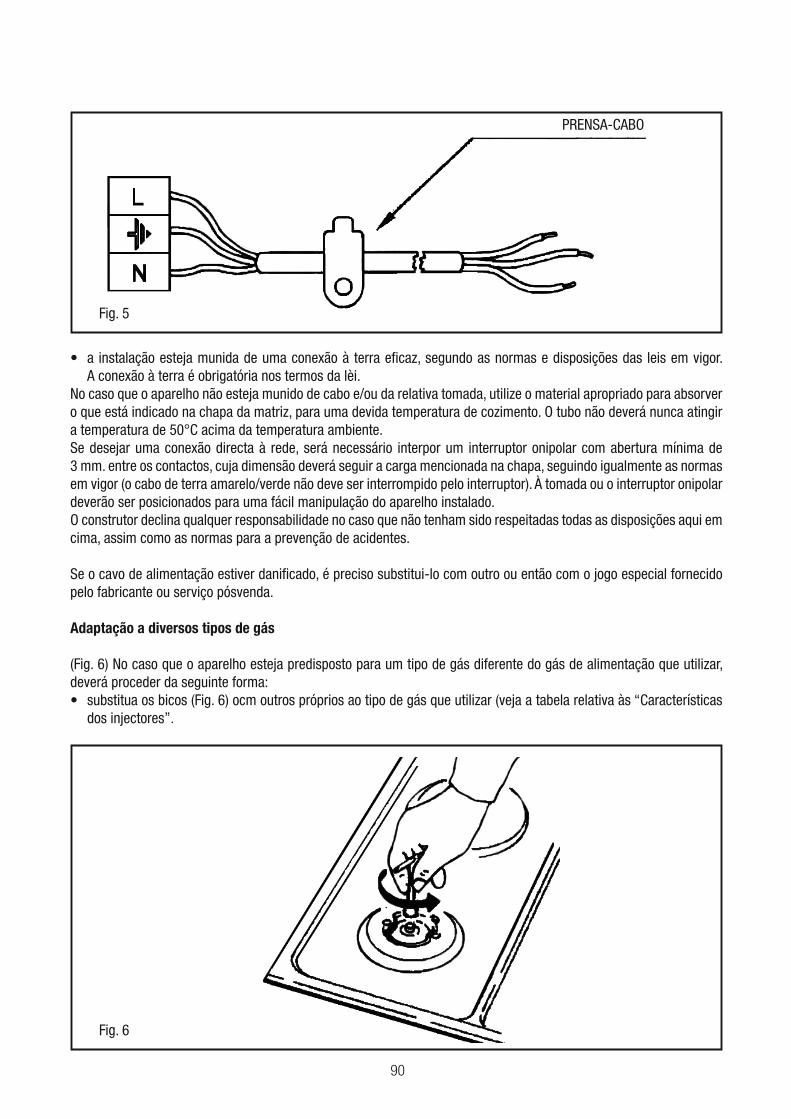
90
Fig. 5
PRENSA-CABO
A conexão à terra é obrigatória nos termos da lèi.
No caso que o aparelho não esteja munido de cabo e/ou da relativa tomada, utilize o material apropriado para absorver o que está indicado na chapa da matriz, para uma devida temperatura de cozimento. O tubo não deverá nunca atingir a temperatura de 50°C acima da temperatura ambiente.Se desejar uma conexão directa à rede, será necessário interpor um interruptor onipolar com abertura mínima de 3 mm. entre os contactos, cuja dimensão deverá seguir a carga mencionada na chapa, seguindo igualmente as normas em vigor (o cabo de terra amarelo/verde não deve ser interrompido pelo interruptor). À tomada ou o interruptor onipolar deverão ser posicionados para uma fácil manipulação do aparelho instalado.O construtor declina qualquer responsabilidade no caso que não tenham sido respeitadas todas as disposições aqui em cima, assim como as normas para a prevenção de acidentes.
Se o cavo de alimentação estiver danificado, é preciso substitui-lo com outro ou então com o jogo especial fornecido pelo fabricante ou serviço pósvenda.
Adaptação a diversos tipos de gás
(Fig. 6) No caso que o aparelho esteja predisposto para um tipo de gás diferente do gás de alimentação que utilizar, deverá proceder da seguinte forma:
dos injectores”.
Fig. 6
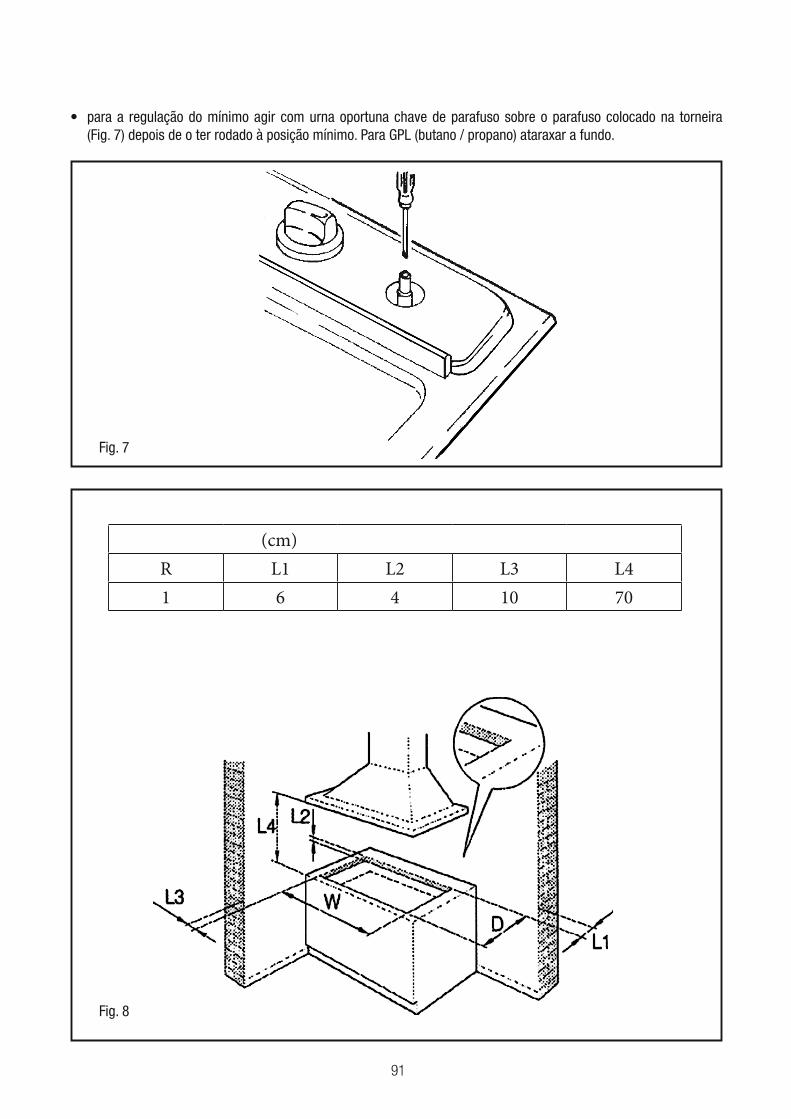
91
(Fig. 7) depois de o ter rodado à posição mínimo. Para GPL (butano / propano) ataraxar a fundo.
Fig. 7
Fig. 8
(cm)
R L1 L2 L3 L4
1 6 4 10 70
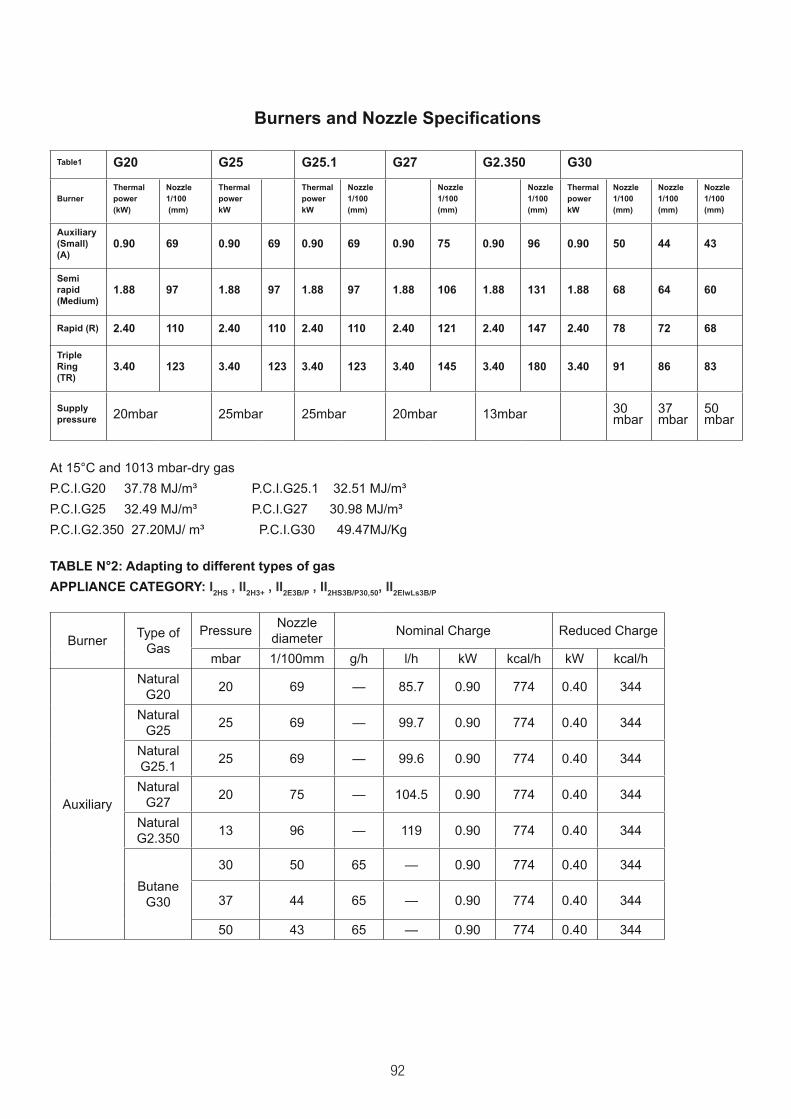
92
G25 G27 G2.350 G30
Burner
(kW) kW kW (mm) (mm) (mm) kW (mm) (mm) (mm)
(A)0.90 69 0.90 69 0.90 69 0.90 75 0.90 96 0.90 50 44 43
97 97 97 64 60
2.40 2.40 2.40 2.40 2.40 2.40 72
(TR)3.40 3.40 3.40 3.40 3.40 3.40
20mbar 25mbar 25mbar 20mbar 13mbar 30mbar
37mbar
50mbar
At 15°C and 1013 mbar-dry gas
P.C.I.G20 37.78 MJ/m³ P.C.I.G25.1 32.51 MJ/m³
P.C.I.G25 32.49 MJ/m³ P.C.I.G27 30.98 MJ/m³
P.C.I.G2.350 27.20MJ/ m³ P.C.I.G30 49.47MJ/Kg
I2H3+
BurnerType of
Gas
PressureNozzle
diameterNominal Charge Reduced Charge
mbar 1/100mm g/h l/h kW kcal/h kW kcal/h
Auxiliary
Natural
G2020 69 — 85.7 0.90 774 0.40 344
Natural
G2525 69 — 99.7 0.90 774 0.40 344
Natural
G25.125 69 — 99.6 0.90 774 0.40 344
Natural
G2720 75 — 104.5 0.90 774 0.40 344
Natural
G2.35013 96 — 119 0.90 774 0.40 344
Butane
G30
30 50 65 — 0.90 774 0.40 344
37 44 65 — 0.90 774 0.40 344
50 43 65 — 0.90 774 0.40 344

93
Semi-
rapid
Natural
G2020 97 — 179 1.88 1617 0.60 516
Natural
G2525 97 — 208.3 1.88 1617 0.60 516
Natural
G25.125 97 — 208.1 1.88 1617 0.60 516
Natural
G2720 106 — 218.5 1.88 1617 0.60 516
Natural
G2.35013 131 — 248.8 1.88 1617 0.60 516
Butane
G30
30 68 136 — 1.88 1617 0.60 516
37 64 136 — 1.88 1617 0.60 516
50 60 136 — 1.88 1617 0.60 516
Rapid
Natural
G2020 110 — 228 2.4 2064 0.90 774
Natural
G2525 110 — 265.9 2.4 2064 0.90 774
Natural
G25.125 110 — 265.7 2.4 2064 0.90 774
Natural
G2720 121 — 278.8 2.4 2064 0.90 774
Natural
G2.35013 147 — 317.6 2.4 2064 0.90 774
Butane
G30
30 78 174 — 2.4 2064 0.90 774
37 72 174 — 2.4 2064 0.90 774
50 68 174 — 2.4 2064 0.90 774
Triple-ring
Natural
G2020 123 — 323 3.4 2924 1.50 1290
Natural
G2525 123 — 376.7 3.4 2924 1.50 1290
Natural
G25.125 123 — 376.5 3.4 2924 1.50 1290
Natural
G2720 145 — 395 3.4 2924 1.50 1290
Natural
G2.35013 180 — 450 3.4 2924 1.50 1290
Butane
G30
30 91 247 — 3.4 2924 1.50 1290
37 86 247 — 3.4 2924 1.50 1290
50 83 247 — 3.4 2924 1.50 1290
94
Уважаемый покупатель,
мы искренне благодарим Вас и поздравляем со сделанными Вами выбором. Это новое, тщательно разработанное и изготовленное из высококачественных материалов изделие, прошло всеобъемлющую проверку и в состоянии удовлетворить все Ваши требования и обеспечить готовку с отличными результатами. Просим Вас ознакомиться с предлагаемыми простыми указаниями, соблюдение которых позволит Вам добиться отличных результатов с самого первого раза. Желаем Вам всяческих успехов в работе с этой современной варочной панелью.
ИЗГОТОВИТЕЛЬ
ОГЛАВПЕНИЕ
МОДЕЛИ С БАТАРЕЙКАМИ
Гарантия
Комплектация
Установка и работоспособность
УКАЗАНИЯ ДЛЯ ПОЛЬЗОВАТЕЛЯ
Установка
Эксплуатация
Техобслуживание
Указания для монтажника
Установка
Подключение к газовой магистрали
Подсоединение к электрической сети
Характеристики инжекторов
ДАННОЕ ИЗДЕЛИЕ РАЗРАБОТАНО ДЛЯ ПРИМЕНЕНИЯ В БЫТУ. ИЗГОТОВИТЕЛЬ НЕ НЕСЕТ ОТВЕТСТВЕННОСТИ В СЛУЧАЕ ТРАВИ ИЛИ МАТЕРИАЛЬНОГО УЩЕРБА, ВЫЗВАННЫХ НЕВЕРНЫМ МОНТАЖОМ, ИЛИ НЕПОДОБАЮЩЕЙ, ОШИБОЧНОЙ ИЛИ ЗАВЕДОМО АБСУРДНОЙ ЭКСПЛУАТАЦИЕЙ.
RU

95
: Safety precautions
Read these instructions ca-
refully. You will only be able
to use your appliance safely
and effectively when you
have read them. These ope-
rating and installation ins-
tructions should be retained,
and passed onto the buyer if
the appliance is sold.
The manufacturer is
exempt from all responsi-
bility if the requirements
of this manual are not
complied with. The images
shown in these instructions
are for guidance only.
Do not remove the applian-
ce from its protective packa-
ging until it is installed in the
unit. Do not switch on the
appliance if it is damaged in
any way. Contact our Techni-
cal Assistance Service. This
appliance is class 3 type,
according to the EN 30-1-1
regulation for gas applian-
ces: built-in appliance. Be-
fore installing your new hob,
ensure that it is being insta-
lled according to the assem-
bly instructions.
This appliance cannot be
installed on yachts or in ca-
ravans.
This appliance must only be
used in well ventilated pla-
ces.
This appliance is not inten-
ded for operation with an ex-
ternal clock timer or a remo-
te control.
All operations relating to
installation, connection,
regulation and conversion
to other gas types must be
performed by an authori-
sed technician, respecting
all applicable regulations,
standards and the speci-
and electricity suppliers.
Special attention shall be
paid to ventilation regula-
tions.
96
This appliance leaves the
factory set to the gas type
that is indicated on the
needs to be changed, plea-
se consult the assembly ins-
tructions. It is recommended
you contact the Technical
Assistance Service to chan-
ge to another gas type.
This appliance has been de-
signed for home use only,
not for commercial or pro-
fessional use. This appliance
is only intended for cooking
purposes, not as a heating
system. The warranty will
only be valid if the appliance
is used for the purpose for
which it was designed.
Never leave the appliance
unattended during opera-
tion.
Do not use lids or protective
barriers for children which
are not recommended by
the hob manufacturer. They
may cause accidents such
as those due to the overhea-
ting, ignition or detachment
of fragments of materials.
This appliance may be used
by children 8 years old and
older and by persons with
reduced physical, sensory
or mental capacity or a lack
of experience or knowledge
if they are supervised or they
have been instructed about
the safe use of the appliance
and have understood the as-
sociated dangers.
Never let children play with
the appliance. Cleaning and
user maintenance must not
be carried out by unsupervi-
sed children.
Accumulation of unburned
gas in an enclosed area ca-
Do not subject the applian-
ce to draughts. These might
blow out the burners. Ca-
refully read the instructions
and warnings on the opera-
tion of gas burners.

97
The kitchen will become hot
and humid and combustion
products produced when
this gas appliance is used.
ventilated, particularly when
the hob is in operation: either
keep the natural ventilation
apertures open, or install a
ventilation system (extractor
hood). Intense prolonged use
of the appliance may require
additional or more effective
ventilation: open a window
or increase the power of the
ventilation system.
The hotplates and their im-
mediate vicinity get very hot.
Never touch the hot surfa-
ces. Keep children under 8
years old well away from this
appliance.
-
jects on the hob. Do not sto-
re objects on the hob.
-
rrosive chemicals, products
-
mmable materials or non-
food products below or near
this domestic appliance.
-
-
ver leave fat or oil to heat up
unattended. If oil or fats do
out by covering the pan with
a lid and switch off the hot-
plate.
are not the right size, hang
over the edge of the hob or
are not positioned correctly
can cause serious injuries.
Follow the advice and war-
nings provided relating to
the cooking pans.

98
turn off the applianceÕs gas
and electricity supply. For
repairs, call our Technical
Assistance Service.
applianceÕs interior. If neces-
sary, call our Technical As-
sistance Service.
will not turn, do not force it.
Call the Technical Assistan-
ce Service immediately so
that they can repair or repla-
ce them.
Do not clean the appliance
using steam cleaners.
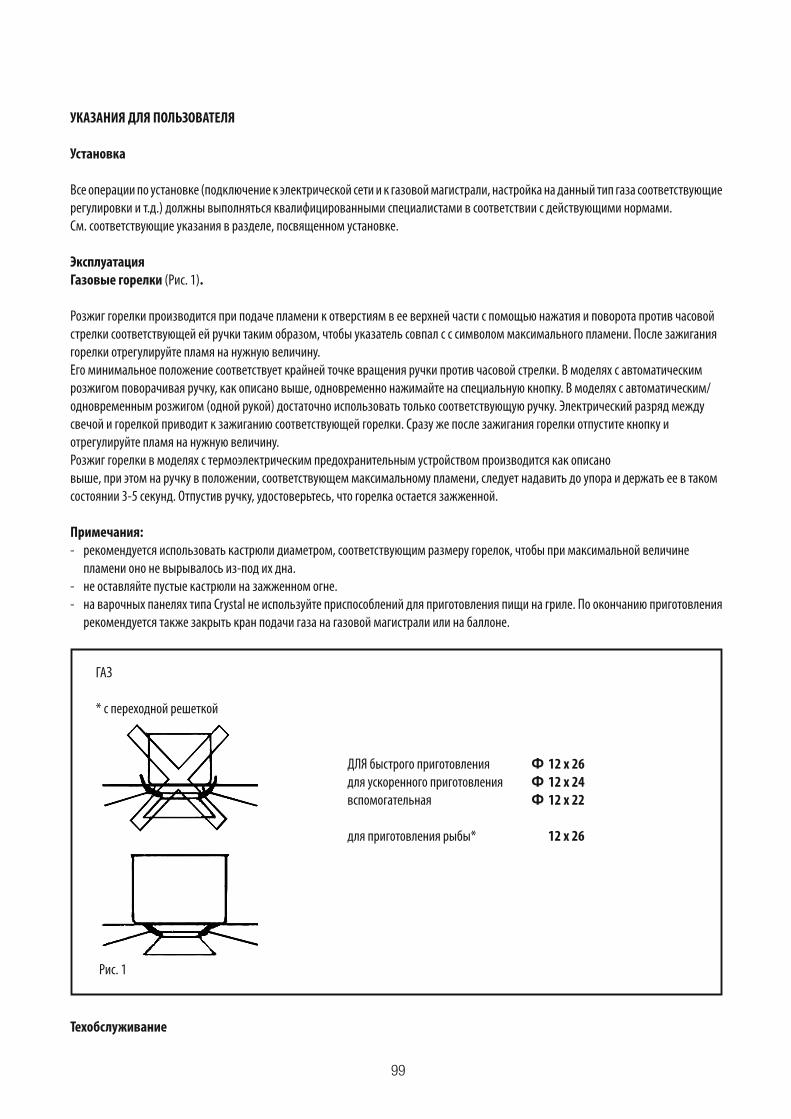
99
УКАЗАНИЯ ДЛЯ ПОЛЬЗОВАТЕЛЯ
Установка
Все операции по установке (подключение к электрической сети и к газовой магистрали, настройка на данный тип газа соответствующие регулировки и т.д.) должны выполняться квалифицированными специалистами в соответствии с действующими нормами.См. соответствующие указания в разделе, посвященном установке.
ЭксплуатацияГазовые горелки (Рис. 1).
Розжиг горелки производится при подаче пламени к отверстиям в ее верхней части с помощью нажатия и поворота против часовой стрелки соответствующей ей ручки таким образом, чтобы указатель совпал с с символом максимального пламени. После зажигания горелки отрегулируйте пламя на нужную величину.Его минимальное положение соответствует крайней точке вращения ручки против часовой стрелки. В моделях с автоматическим розжигом поворачивая ручку, как описано выше, одновременно нажимайте на специальную кнопку. В моделях с автоматическим/ одновременным розжигом (одной рукой) достаточно использовать только соответствующую ручку. Электрический разряд между свечой и горелкой приводит к зажиганию соответствующей горелки. Сразу же после зажигания горелки отпустите кнопку и отрегулируйте пламя на нужную величину.Розжиг горелки в моделях с термоэлектрическим предохранительным устройством производится как описановыше, при этом на ручку в положении, соответствующем максимальному пламени, следует надавить до упора и держать ее в таком состоянии 3-5 секунд. Отпустив ручку, удостоверьтесь, что горелка остается зажженной.
Примечания:- рекомендуется использовать кастрюли диаметром, соответствующим размеру горелок, чтобы при максимальной величине
пламени оно не вырывалось из-под их дна.- не оставляйте пустые кастрюли на зажженном огне.- на варочных панелях типа Crystal не используйте приспособлений для приготовления пищи на гриле. По окончанию приготовления
рекомендуется также закрыть кран подачи газа на газовой магистрали или на баллоне.
ДЛЯ быстрого приготовления 12 x 26для ускоренного приготовления 12 x 24вспомогательная 12 x 22
для приготовления рыбы* 12 x 26
ГАЗ
* с переходной решеткой
Рис. 1
Техобслуживание
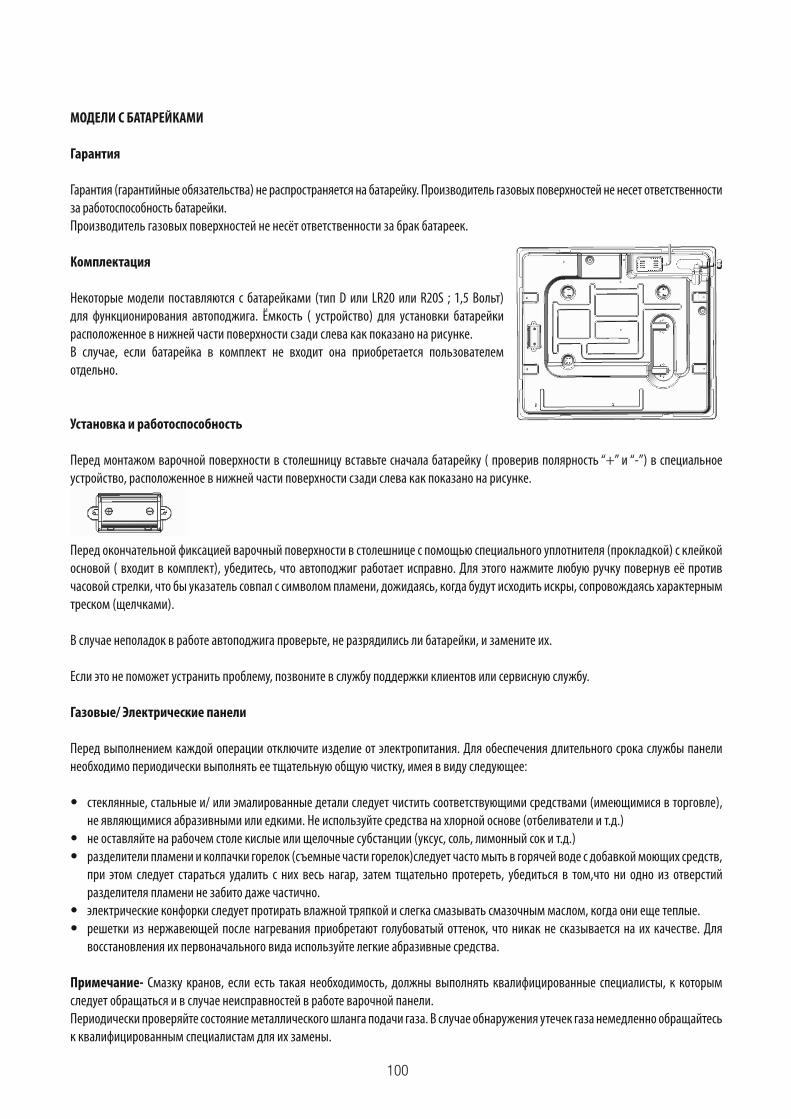
100
МОДЕЛИ С БАТАРЕЙКАМИ
Гарантия
Гарантия (гарантийные обязательства) не распространяется на батарейку. Производитель газовых поверхностей не несет ответственности за работоспособность батарейки. Производитель газовых поверхностей не несёт ответственности за брак батареек.
Комплектация
Некоторые модели поставляются с батарейками (тип D или LR20 или R20S ; 1,5 Вольт) для функционирования автоподжига. Ёмкость ( устройство) для установки батарейки расположенное в нижней части поверхности сзади слева как показано на рисунке. В случае, если батарейка в комплект не входит она приобретается пользователем отдельно.
Установка и работоспособность
Перед монтажом варочной поверхности в столешницу вставьте сначала батарейку ( проверив полярность “+” и “-”) в специальное устройство, расположенное в нижней части поверхности сзади слева как показано на рисунке.
Перед окончательной фиксацией варочный поверхности в столешнице с помощью специального уплотнителя (прокладкой) с клейкой основой ( входит в комплект), убедитесь, что автоподжиг работает исправно. Для этого нажмите любую ручку повернув её против часовой стрелки, что бы указатель совпал с символом пламени, дожидаясь, когда будут исходить искры, сопровождаясь характерным треском (щелчками).
В случае неполадок в работе автоподжига проверьте, не разрядились ли батарейки, и замените их.
Если это не поможет устранить проблему, позвоните в службу поддержки клиентов или сервисную службу.
Газовые/ Электрические панели
Перед выполнением каждой операции отключите изделие от электропитания. Для обеспечения длительного срока службы панели необходимо периодически выполнять ее тщательную общую чистку, имея в виду следующее:
стеклянные, стальные и/ или эмалированные детали следует чистить соответствующими средствами (имеющимися в торговле), не являющимися абразивными или едкими. Не используйте средства на хлорной основе (отбеливатели и т.д.)
не оставляйте на рабочем столе кислые или щелочные субстанции (уксус, соль, лимонный сок и т.д.) разделители пламени и колпачки горелок (съемные части горелок)следует часто мыть в горячей воде с добавкой моющих средств,
при этом следует стараться удалить с них весь нагар, затем тщательно протереть, убедиться в том,что ни одно из отверстий разделителя пламени не забито даже частично.
электрические конфорки следует протирать влажной тряпкой и слегка смазывать смазочным маслом, когда они еще теплые. решетки из нержавеющей после нагревания приобретают голубоватый оттенок, что никак не сказывается на их качестве. Для
восстановления их первоначального вида используйте легкие абразивные средства.
Примечание- Смазку кранов, если есть такая необходимость, должны выполнять квалифицированные специалисты, к которым следует обращаться и в случае неисправностей в работе варочной панели.Периодически проверяйте состояние металлического шланга подачи газа. В случае обнаружения утечек газа немедленно обращайтесь к квалифицированным специалистам для их замены.
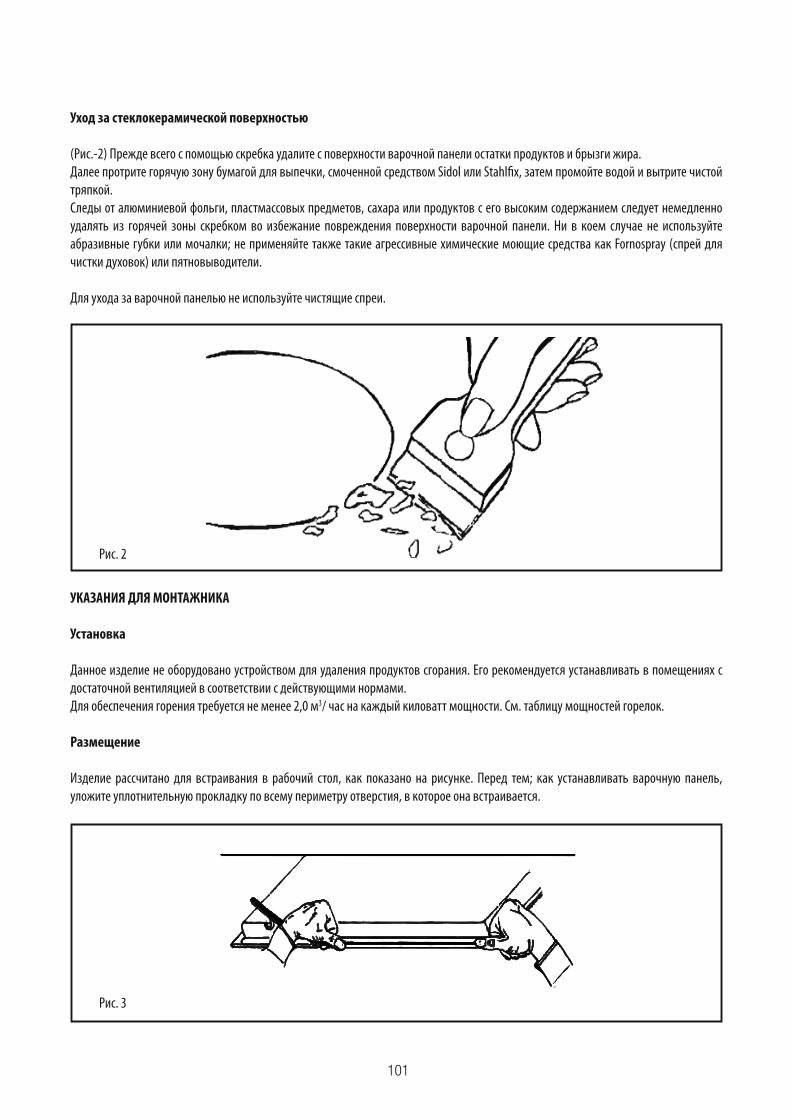
101
Уход за стеклокерамической поверхностью
(Рис.-2) Прежде всего с помощью скребка удалите с поверхности варочной панели остатки продуктов и брызги жира.Далее протрите горячую зону бумагой для выпечки, смоченной средством Sidol или Stаhlqx, затем промойте водой и вытрите чистой тряпкой.Следы от алюминиевой фольги, пластмассовых предметов, сахара или продуктов с его высоким содержанием следует немедленно удалять из горячей зоны скребком во избежание повреждения поверхности варочной панели. Ни в коем случае не используйте абразивные губки или мочалки; не применяйте также такие агрессивные химические моющие средства как Fornosprаy (спрей для чистки духовок) или пятновыводители.
Для ухода за варочной панелью не используйте чистящие спреи.
Рис. 2
УКАЗАНИЯ ДЛЯ МОНТАЖНИКА
Установка
Данное изделие не оборудовано устройством для удаления продуктов сгорания. Его рекомендуется устанавливать в помещениях с достаточной вентиляцией в соответствии с действующими нормами.Для обеспечения горения требуется не менее 2,0 м3/ час на каждый киловатт мощности. См. таблицу мощностей горелок.
Размещение
Изделие рассчитано для встраивания в рабочий стол, как показано на рисунке. Перед тем; как устанавливать варочную панель, уложите уплотнительную прокладку по всему периметру отверстия, в которое она встраивается.
Рис. 3
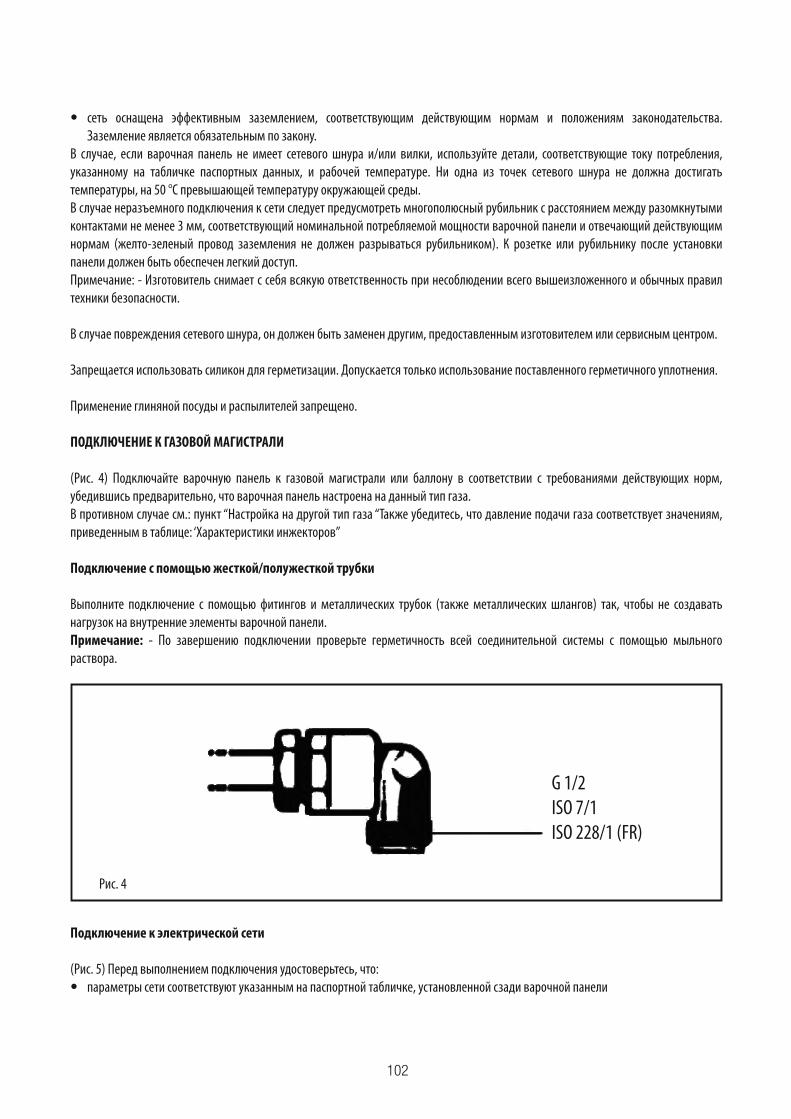
102
сеть оснащена эффективным заземлением, соответствующим действующим нормам и положениям законодательства. Заземление является обязательным по закону.
В случае, если варочная панель не имеет сетевого шнура и/или вилки, используйте детали, соответствующие току потребления, указанному на табличке паспортных данных, и рабочей температуре. Ни одна из точек сетевого шнура не должна достигать температуры, на 50 °С превышающей температуру окружающей среды.В случае неразъемного подключения к сети следует предусмотреть многополюсный рубильник с расстоянием между разомкнутыми контактами не менее 3 мм, соответствующий номинальной потребляемой мощности варочной панели и отвечающий действующим нормам (желто-зеленый провод заземления не должен разрываться рубильником). К розетке или рубильнику после установки панели должен быть обеспечен легкий доступ.Примечание: - Изготовитель снимает с себя всякую ответственность при несоблюдении всего вышеизложенного и обычных правил техники безопасности.
В случае повреждения сетевого шнура, он должен быть заменен другим, предоставленным изготовителем или сервисным центром.
Запрещается использовать силикон для герметизации. Допускается только использование поставленного герметичного уплотнения.
Применение глиняной посуды и распылителей запрещено.
ПОДКЛЮЧЕНИЕ К ГАЗОВОЙ МАГИСТРАЛИ
(Рис. 4) Подключайте варочную панель к газовой магистрали или баллону в соответствии с требованиями действующих норм, убедившись предварительно, что варочная панель настроена на данный тип газа. В противном случае см.: пункт ‘‘Настройка на другой тип газа “Также убедитесь, что давление подачи газа соответствует значениям, приведенным в таблице: ‘Характеристики инжекторов”
Подключение с помощью жесткой/полужесткой трубки
Выполните подключение с помощью фитингов и металлических трубок (также металлических шлангов) так, чтобы не создавать нагрузок на внутренние элементы варочной панели.Примечание: - По завершению подключении проверьте герметичность всей соединительной системы с помощью мыльного раствора.
G 1/2ISO 7/1ISO 228/1 (FR)
Рис. 4
Подключение к электрической сети
(Рис. 5) Перед выполнением подключения удостоверьтесь, что: параметры сети соответствуют указанным на паспортной табличке, установленной сзади варочной панели
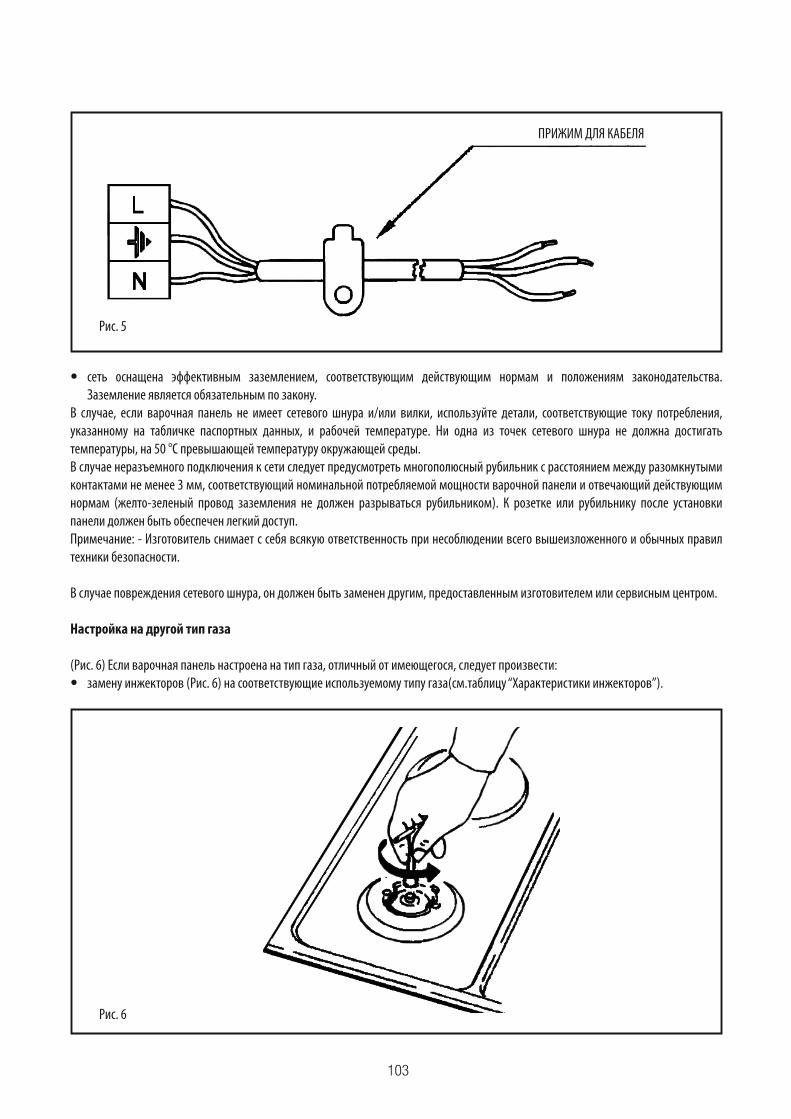
103
Рис. 5
ПРИЖИМ ДЛЯ КАБЕЛЯ
сеть оснащена эффективным заземлением, соответствующим действующим нормам и положениям законодательства. Заземление является обязательным по закону.
В случае, если варочная панель не имеет сетевого шнура и/или вилки, используйте детали, соответствующие току потребления, указанному на табличке паспортных данных, и рабочей температуре. Ни одна из точек сетевого шнура не должна достигать температуры, на 50 °С превышающей температуру окружающей среды.В случае неразъемного подключения к сети следует предусмотреть многополюсный рубильник с расстоянием между разомкнутыми контактами не менее 3 мм, соответствующий номинальной потребляемой мощности варочной панели и отвечающий действующим нормам (желто-зеленый провод заземления не должен разрываться рубильником). К розетке или рубильнику после установки панели должен быть обеспечен легкий доступ.Примечание: - Изготовитель снимает с себя всякую ответственность при несоблюдении всего вышеизложенного и обычных правил техники безопасности.
В случае повреждения сетевого шнура, он должен быть заменен другим, предоставленным изготовителем или сервисным центром.
Настройка на другой тип газа
(Рис. 6) Если варочная панель настроена на тип газа, отличный от имеющегося, следует произвести: замену инжекторов (Рис. 6) на соответствующие используемому типу газа(см.таблицу “Характеристики инжекторов”).
Рис. 6
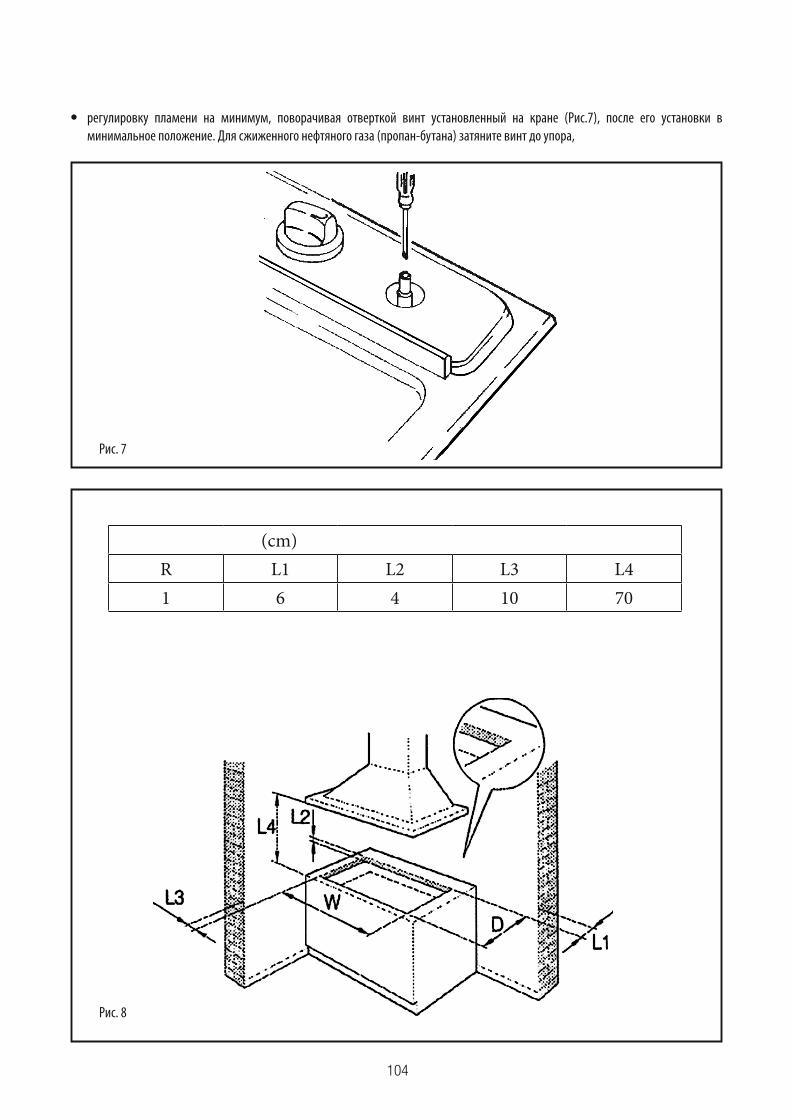
104
регулировку пламени на минимум, поворачивая отверткой винт установленный на кране (Рис.7), после его установки в минимальное положение. Для сжиженного нефтяного газа (пропан-бутана) затяните винт до упора,
Рис. 7
Рис. 8
(cm)
R L1 L2 L3 L4
1 6 4 10 70

105
G25 G27 G2.350 G30
Burner
(kW) kW kW (mm) (mm) (mm) kW (mm) (mm) (mm)
(A)0.90 69 0.90 69 0.90 69 0.90 75 0.90 96 0.90 50 44 43
97 97 97 64 60
2.40 2.40 2.40 2.40 2.40 2.40 72
(TR)3.40 3.40 3.40 3.40 3.40 3.40
20mbar 25mbar 25mbar 20mbar 13mbar 30mbar
37mbar
50mbar
At 15°C and 1013 mbar-dry gas
P.C.I.G20 37.78 MJ/m³ P.C.I.G25.1 32.51 MJ/m³
P.C.I.G25 32.49 MJ/m³ P.C.I.G27 30.98 MJ/m³
P.C.I.G2.350 27.20MJ/ m³ P.C.I.G30 49.47MJ/Kg
I2H3+
BurnerType of
Gas
PressureNozzle
diameterNominal Charge Reduced Charge
mbar 1/100mm g/h l/h kW kcal/h kW kcal/h
Auxiliary
Natural
G2020 69 — 85.7 0.90 774 0.40 344
Natural
G2525 69 — 99.7 0.90 774 0.40 344
Natural
G25.125 69 — 99.6 0.90 774 0.40 344
Natural
G2720 75 — 104.5 0.90 774 0.40 344
Natural
G2.35013 96 — 119 0.90 774 0.40 344
Butane
G30
30 50 65 — 0.90 774 0.40 344
37 44 65 — 0.90 774 0.40 344
50 43 65 — 0.90 774 0.40 344

106
Semi-
rapid
Natural
G2020 97 — 179 1.88 1617 0.60 516
Natural
G2525 97 — 208.3 1.88 1617 0.60 516
Natural
G25.125 97 — 208.1 1.88 1617 0.60 516
Natural
G2720 106 — 218.5 1.88 1617 0.60 516
Natural
G2.35013 131 — 248.8 1.88 1617 0.60 516
Butane
G30
30 68 136 — 1.88 1617 0.60 516
37 64 136 — 1.88 1617 0.60 516
50 60 136 — 1.88 1617 0.60 516
Rapid
Natural
G2020 110 — 228 2.4 2064 0.90 774
Natural
G2525 110 — 265.9 2.4 2064 0.90 774
Natural
G25.125 110 — 265.7 2.4 2064 0.90 774
Natural
G2720 121 — 278.8 2.4 2064 0.90 774
Natural
G2.35013 147 — 317.6 2.4 2064 0.90 774
Butane
G30
30 78 174 — 2.4 2064 0.90 774
37 72 174 — 2.4 2064 0.90 774
50 68 174 — 2.4 2064 0.90 774
Triple-ring
Natural
G2020 123 — 323 3.4 2924 1.50 1290
Natural
G2525 123 — 376.7 3.4 2924 1.50 1290
Natural
G25.125 123 — 376.5 3.4 2924 1.50 1290
Natural
G2720 145 — 395 3.4 2924 1.50 1290
Natural
G2.35013 180 — 450 3.4 2924 1.50 1290
Butane
G30
30 91 247 — 3.4 2924 1.50 1290
37 86 247 — 3.4 2924 1.50 1290
50 83 247 — 3.4 2924 1.50 1290
107
عزيزي العميل،نتقدم لك بخالص الشكر والتهنئة عىل اختيارك.
لقد خضع هذا املنتج الجديد املصمم بعناية، واملصّنع من خامات فائقة الجودة، لالختبار الدقيق لضJن مالءمته لجميع متطلبات الطهي الخاصة بك. لذا نود منك قراءة هذه اإلرشادات البسيطة وااللتزام بها، حيث أنها تتيح لك الحصول عىل نتائج ممتارة منذ البداية.
نتمنى لك كل التوفيق مع جهازك الحديث!
الجهة الصانعة
فهرس املحتوياتاملوديالت املشتملة عىل بطاريات
الضJنالتغليف
الرتكيب وكفاءة التشغيلإرشادات االستخدام
الرتكيباالستخدام
الصيانةإرشادات لفني الرتكيب
الرتكيبتوصيل الغاز
xالتوصيل الكهرباخصائص الحاقنات
هذا الجهاز مخصص لالستخدام املنزيل فقط. وال تتحمل الجهة الصانعة املسؤولية بأي حال من األحوال عن اإلصابات أو التلفيات الناجمة عن الرتكيب الخاطئ أيا كانت أو تلك الناتجة عن االستخدام غl املالئم أو الخاطئ أو العبثي.
AR

108
: Safety precautions
Read these instructions ca-
refully. You will only be able
to use your appliance safely
and effectively when you
have read them. These ope-
rating and installation ins-
tructions should be retained,
and passed onto the buyer if
the appliance is sold.
The manufacturer is
exempt from all responsi-
bility if the requirements
of this manual are not
complied with. The images
shown in these instructions
are for guidance only.
Do not remove the applian-
ce from its protective packa-
ging until it is installed in the
unit. Do not switch on the
appliance if it is damaged in
any way. Contact our Techni-
cal Assistance Service. This
appliance is class 3 type,
according to the EN 30-1-1
regulation for gas applian-
ces: built-in appliance. Be-
fore installing your new hob,
ensure that it is being insta-
lled according to the assem-
bly instructions.
This appliance cannot be
installed on yachts or in ca-
ravans.
This appliance must only be
used in well ventilated pla-
ces.
This appliance is not inten-
ded for operation with an ex-
ternal clock timer or a remo-
te control.
All operations relating to
installation, connection,
regulation and conversion
to other gas types must be
performed by an authori-
sed technician, respecting
all applicable regulations,
standards and the speci-
and electricity suppliers.
Special attention shall be
paid to ventilation regula-
tions.

109
This appliance leaves the
factory set to the gas type
that is indicated on the
needs to be changed, plea-
se consult the assembly ins-
tructions. It is recommended
you contact the Technical
Assistance Service to chan-
ge to another gas type.
This appliance has been de-
signed for home use only,
not for commercial or pro-
fessional use. This appliance
is only intended for cooking
purposes, not as a heating
system. The warranty will
only be valid if the appliance
is used for the purpose for
which it was designed.
Never leave the appliance
unattended during opera-
tion.
Do not use lids or protective
barriers for children which
are not recommended by
the hob manufacturer. They
may cause accidents such
as those due to the overhea-
ting, ignition or detachment
of fragments of materials.
This appliance may be used
by children 8 years old and
older and by persons with
reduced physical, sensory
or mental capacity or a lack
of experience or knowledge
if they are supervised or they
have been instructed about
the safe use of the appliance
and have understood the as-
sociated dangers.
Never let children play with
the appliance. Cleaning and
user maintenance must not
be carried out by unsupervi-
sed children.
Accumulation of unburned
gas in an enclosed area ca-
Do not subject the applian-
ce to draughts. These might
blow out the burners. Ca-
refully read the instructions
and warnings on the opera-
tion of gas burners.
110
The kitchen will become hot
and humid and combustion
products produced when
this gas appliance is used.
ventilated, particularly when
the hob is in operation: either
keep the natural ventilation
apertures open, or install a
ventilation system (extractor
hood). Intense prolonged use
of the appliance may require
additional or more effective
ventilation: open a window
or increase the power of the
ventilation system.
The hotplates and their im-
mediate vicinity get very hot.
Never touch the hot surfa-
ces. Keep children under 8
years old well away from this
appliance.
-
jects on the hob. Do not sto-
re objects on the hob.
-
rrosive chemicals, products
-
mmable materials or non-
food products below or near
this domestic appliance.
-
-
ver leave fat or oil to heat up
unattended. If oil or fats do
out by covering the pan with
a lid and switch off the hot-
plate.
are not the right size, hang
over the edge of the hob or
are not positioned correctly
can cause serious injuries.
Follow the advice and war-
nings provided relating to
the cooking pans.
111
turn off the applianceÕs gas
and electricity supply. For
repairs, call our Technical
Assistance Service.
applianceÕs interior. If neces-
sary, call our Technical As-
sistance Service.
will not turn, do not force it.
Call the Technical Assistan-
ce Service immediately so
that they can repair or repla-
ce them.
Do not clean the appliance
using steam cleaners.
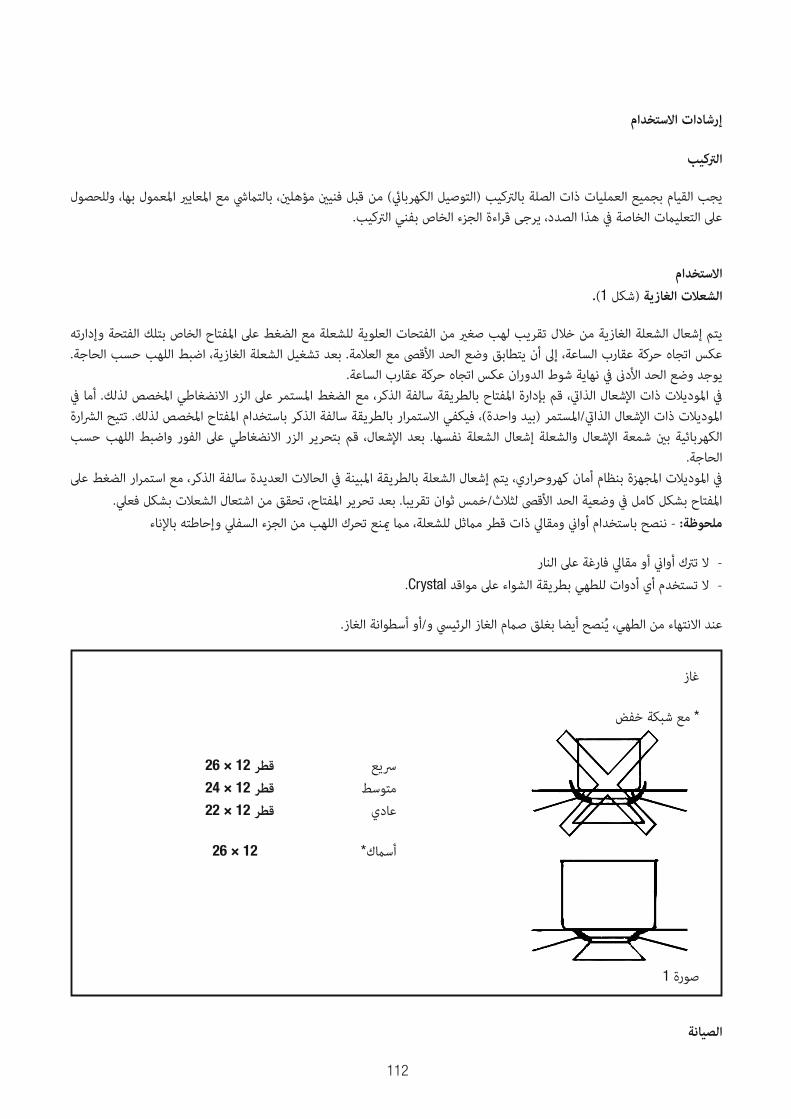
112
إرشادات االستخدامالرتكيب
يجب القيام بجميع العمليات ذات الصلة بالرتكيب (التوصيل الكهرباx) من قبل فني} مؤهل}، بالتJيش مع املعايy املعمول بها، وللحصول عىل التعليJت الخاصة يف هذا الصدد، يرجى قراءة الجزء الخاص بفني الرتكيب.
االستخدامالشعالت الغازية (شكل 1).
يتم إشعال الشعلة الغازية من خالل تقريب لهب صغy من الفتحات العلوية للشعلة مع الضغط عىل املفتاح الخاص بتلك الفتحة وإدارته عكس اتجاه حركة عقارب الساعة، إىل أن يتطابق وضع الحد األقىص مع العالمة. بعد تشغيل الشعلة الغازية، اضبط اللهب حسب الحاجة.
يوجد وضع الحد األد� يف نهاية شوط الدوران عكس اتجاه حركة عقارب الساعة.يف املوديالت ذات اإلشعال الذا�، قم بإدارة املفتاح بالطريقة سالفة الذكر، مع الضغط املستمر عىل الزر االنضغاطي املخصص لذلك. أما يف املوديالت ذات اإلشعال الذا�/املستمر (بيد واحدة)، فيكفي االستمرار بالطريقة سالفة الذكر باستخدام املفتاح املخصص لذلك. تتيح الرشارة اللهب حسب الفور واضبط الزر االنضغاطي عىل بتحرير الشعلة نفسها. بعد اإلشعال، قم الكهربائية ب} شمعة اإلشعال والشعلة إشعال
الحاجة.يف املوديالت املجهزة بنظام أمان كهروحراري، يتم إشعال الشعلة بالطريقة املبينة يف الحاالت العديدة سالفة الذكر، مع استمرار الضغط عىل
املفتاح بشكل كامل يف وضعية الحد األقىص لثالث/خمس ثوان تقريبا. بعد تحرير املفتاح، تحقق من اشتعال الشعالت بشكل فعيل.ملحوظة: - ننصح باستخدام أوا� ومقايل ذات قطر مJثل للشعلة، مJ �نع تحرك اللهب من الجزء السفيل وإحاطته باإلناء
ال ترتك أوا� أو مقايل فارغة عىل النار -.Crystal ال تستخدم أي أدوات للطهي بطريقة الشواء عىل مواقد -
عند االنتهاء من الطهي، يُنصح أيضا بغلق صJم الغاز الرئييس و/أو أسطوانة الغاز.
قطر 12 × 26 رسيع قطر 12 × 24 متوسط قطر 12 × 22 عادي
أسJك* 12 × 26
غاز* مع شبكة خفض
صورة 1
الصيانة
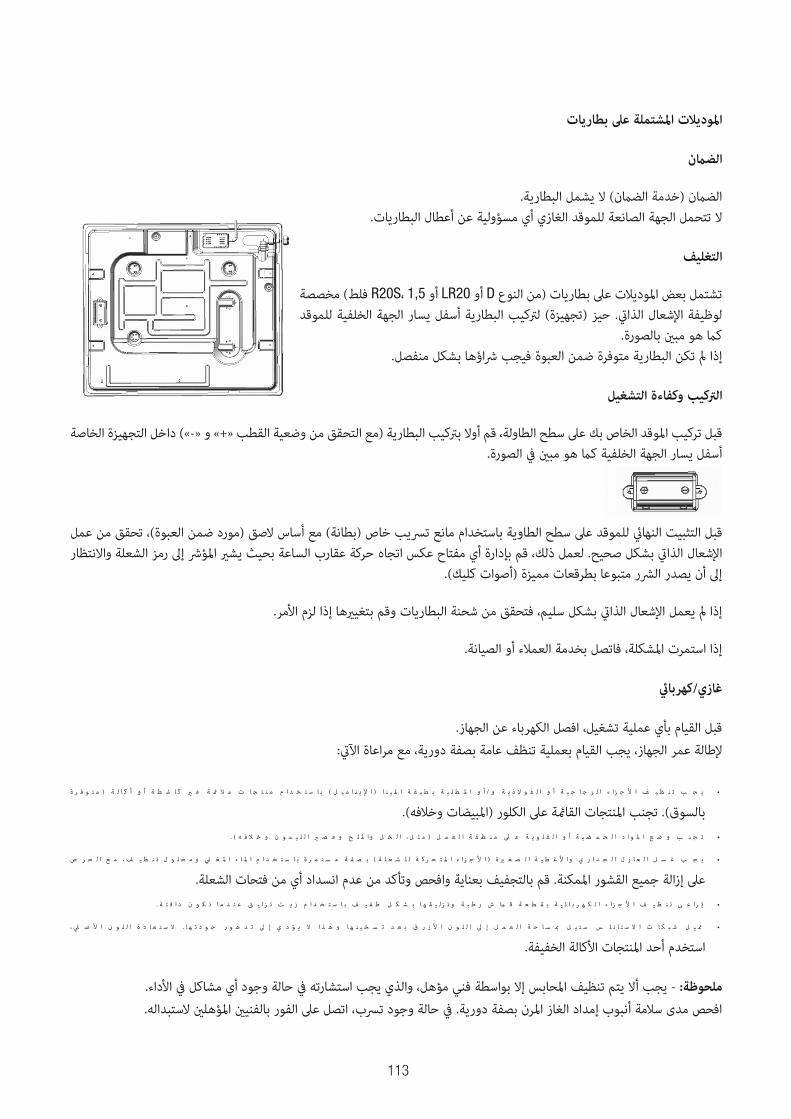
113
املوديالت املشتملة عىل بطارياتالضuن
الضJن (خدمة الضJن) ال يشمل البطارية. ال تتحمل الجهة الصانعة للموقد الغازي أي مسؤولية عن أعطال البطاريات.
التغليفتشتمل بعض املوديالت عىل بطاريات (من النوع D أو LR20 أو R20S، 1,5 فلط) مخصصة لوظيفة اإلشعال الذا�. حيز (تجهيزة) لرتكيب البطارية أسفل يسار الجهة الخلفية للموقد
كJ هو مب} بالصورة.إذا ¥ تكن البطارية متوفرة ضمن العبوة فيجب رشاؤها بشكل منفصل.
الرتكيب وكفاءة التشغيلقبل تركيب املوقد الخاص بك عىل سطح الطاولة، قم أوال برتكيب البطارية (مع التحقق من وضعية القطب «+» و «-») داخل التجهيزة الخاصة
أسفل يسار الجهة الخلفية كJ هو مب} يف الصورة.
قبل التثبيت النهاx للموقد عىل سطح الطاوية باستخدام مانع ترسيب خاص (بطانة) مع أساس الصق (مورد ضمن العبوة)، تحقق من عمل اإلشعال الذا� بشكل صحيح. لعمل ذلك، قم بإدارة أي مفتاح عكس اتجاه حركة عقارب الساعة بحيث يشy املؤرش إىل رمز الشعلة واالنتظار
إىل أن يصدر الرشر متبوعا بطرقعات مميزة (أصوات كليك).إذا ¥ يعمل اإلشعال الذا� بشكل سليم، فتحقق من شحنة البطاريات وقم بتغيyها إذا لزم األمر.
إذا استمرت املشكلة، فاتصل بخدمة العمالء أو الصيانة.zغازي/كهربا
قبل القيام بأي عملية تشغيل، افصل الكهرباء عن الجهاز.إلطالة عمر الجهاز، يجب القيام بعملية تنظف عامة بصفة دورية، مع مراعاة اآل�:
بالسوق). تجنب املنتجات القا¯ة عىل الكلور (املبيضات وخالفه).
عىل إزالة جميع القشور املمكنة. قم بالتجفيف بعناية وافحص وتأكد من عدم انسداد أي من فتحات الشعلة.
استخدم أحد املنتجات األكالة الخفيفة.ملحوظة: - يجب أال يتم تنظيف املحابس إال بواسطة فني مؤهل، والذي يجب استشارته يف حالة وجود أي مشاكل يف األداء. افحص مدى سالمة أنبوب إمداد الغاز املرن بصفة دورية. يف حالة وجود ترسب، اتصل عىل الفور بالفني} املؤهل} الستبداله.
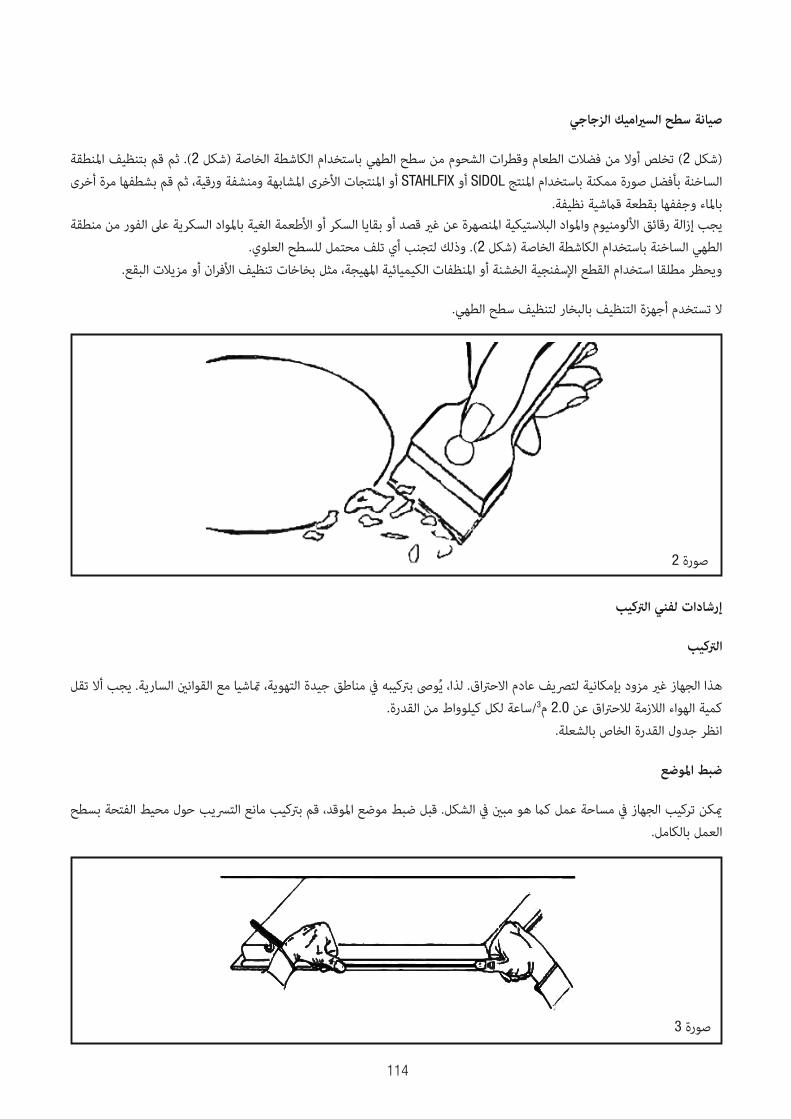
114
صيانة سطح السlاميك الزجاجي(شكل 2) تخلص أوال من فضالت الطعام وقطرات الشحوم من سطح الطهي باستخدام الكاشطة الخاصة (شكل 2). ثم قم بتنظيف املنطقة الساخنة بأفضل صورة ممكنة باستخدام املنتج SIDOL أو STAHLFIX أو املنتجات األخرى املشابهة ومنشفة ورقية، ثم قم بشطفها مرة أخرى
باملاء وجففها بقطعة قJشية نظيفة.يجب إزالة رقائق األلومنيوم واملواد البالستيكية املنصهرة عن غy قصد أو بقايا السكر أو األطعمة الغية باملواد السكرية عىل الفور من منطقة
الطهي الساخنة باستخدام الكاشطة الخاصة (شكل 2). وذلك لتجنب أي تلف محتمل للسطح العلوي.ويحظر مطلقا استخدام القطع اإلسفنجية الخشنة أو املنظفات الكيميائية املهيجة، مثل بخاخات تنظيف األفران أو مزيالت البقع.
ال تستخدم أجهزة التنظيف بالبخار لتنظيف سطح الطهي.
صورة 2إرشادات لفني الرتكيب
الرتكيبهذا الجهاز غy مزود بإمكانية لترصيف عادم االحرتاق. لذا، يُوىص برتكيبه يف مناطق جيدة التهوية، ²اشيا مع القوان} السارية. يجب أال تقل
كمية الهواء الالزمة لالحرتاق عن 2.0 م3/ساعة لكل كيلوواط من القدرة.انظر جدول القدرة الخاص بالشعلة.
ضبط املوضع�كن تركيب الجهاز يف مساحة عمل كJ هو مب} يف الشكل. قبل ضبط موضع املوقد، قم برتكيب مانع الترسيب حول محيط الفتحة بسطح
العمل بالكامل.
صورة 3
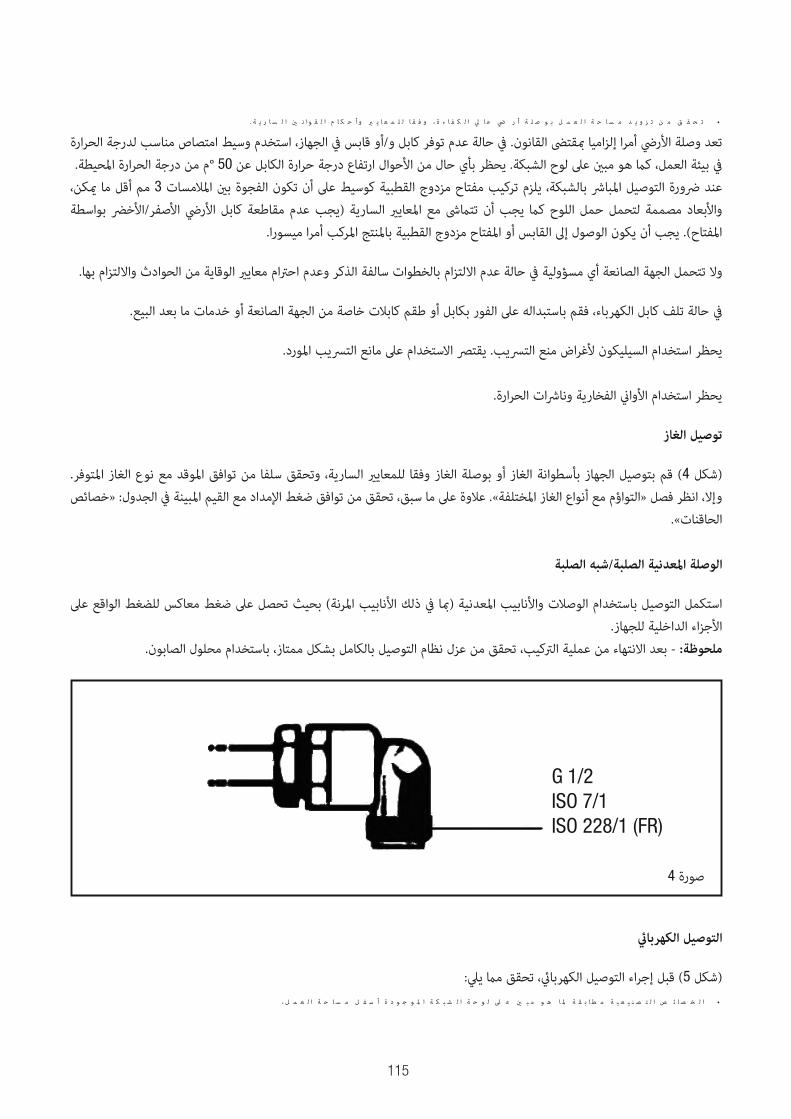
115
تعد وصلة األريض أمرا إلزاميا ¶قتىض القانون. يف حالة عدم توفر كابل و/أو قابس يف الجهاز، استخدم وسيط امتصاص مناسب لدرجة الحرارة يف بيئة العمل، كJ هو مب} عىل لوح الشبكة. يحظر بأي حال من األحوال ارتفاع درجة حرارة الكابل عن 50 °م من درجة الحرارة املحيطة.
عند رضورة التوصيل املبارش بالشبكة، يلزم تركيب مفتاح مزدوج القطبية كوسيط عىل أن تكون الفجوة ب} املالمسات 3 مم أقل ما �كن، بواسطة األصفر/األخرض األريض كابل (يجب عدم مقاطعة السارية yاملعاي تتJىش مع أن اللوح كJ يجب لتحمل حمل واألبعاد مصممة
املفتاح). يجب أن يكون الوصول إىل القابس أو املفتاح مزدوج القطبية باملنتج املركب أمرا ميسورا.وال تتحمل الجهة الصانعة أي مسؤولية يف حالة عدم االلتزام بالخطوات سالفة الذكر وعدم احرتام معايy الوقاية من الحوادث وااللتزام بها.
يف حالة تلف كابل الكهرباء، فقم باستبداله عىل الفور بكابل أو طقم كابالت خاصة من الجهة الصانعة أو خدمات ما بعد البيع.يحظر استخدام السيليكون ألغراض منع الترسيب. يقترص االستخدام عىل مانع الترسيب املورد.
يحظر استخدام األوا� الفخارية ونارشات الحرارة.توصيل الغاز
(شكل 4) قم بتوصيل الجهاز بأسطوانة الغاز أو بوصلة الغاز وفقا للمعايy السارية، وتحقق سلفا من توافق املوقد مع نوع الغاز املتوفر. وإال، انظر فصل «التواؤم مع أنواع الغاز املختلفة». عالوة عىل ما سبق، تحقق من توافق ضغط اإلمداد مع القيم املبينة يف الجدول: «خصائص
الحاقنات».الوصلة املعدنية الصلبة/شبه الصلبة
استكمل التوصيل باستخدام الوصالت واألنابيب املعدنية (¶ا يف ذلك األنابيب املرنة) بحيث تحصل عىل ضغط معاكس للضغط الواقع عىل األجزاء الداخلية للجهاز.
ملحوظة: - بعد االنتهاء من عملية الرتكيب، تحقق من عزل نظام التوصيل بالكامل بشكل ممتاز، باستخدام محلول الصابون.
G 1/2ISO 7/1ISO 228/1 (FR)
صورة 4
zالتوصيل الكهربا(شكل 5) قبل إجراء التوصيل الكهرباx، تحقق مJ ييل:
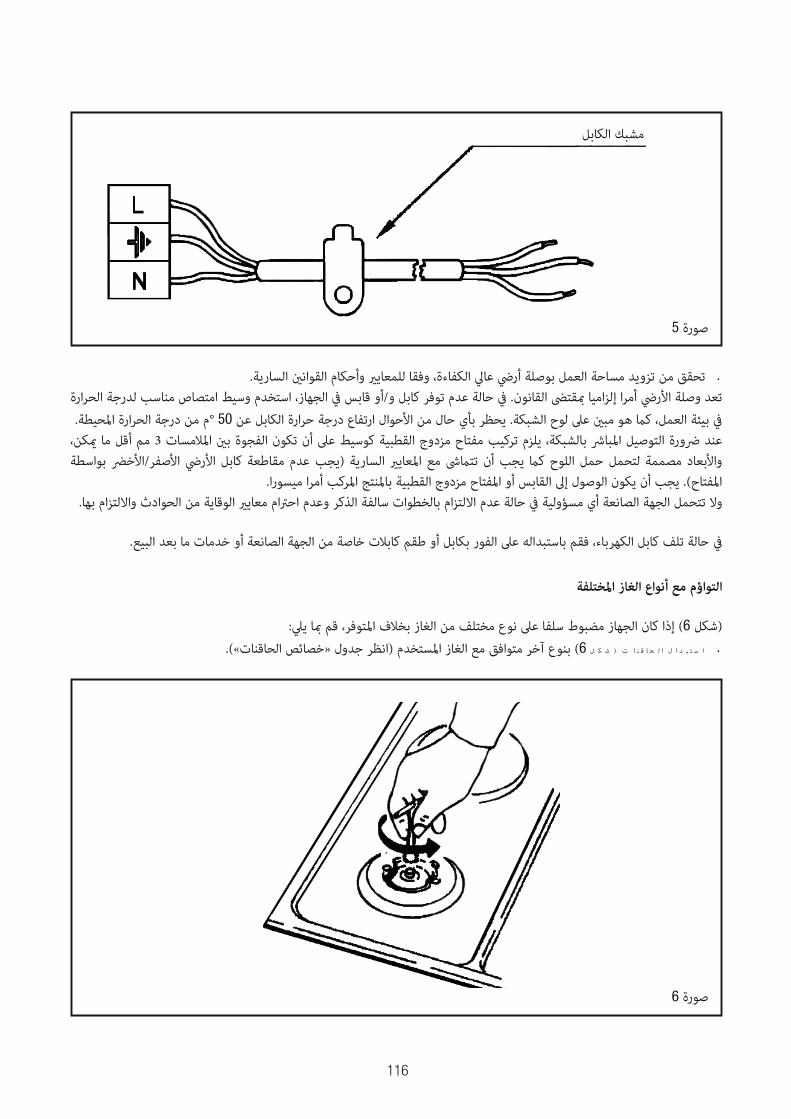
116
صورة 5
مشبك الكابل
تحقق من تزويد مساحة العمل بوصلة أريض عايل الكفاءة، وفقا للمعايy وأحكام القوان} السارية.تعد وصلة األريض أمرا إلزاميا ¶قتىض القانون. يف حالة عدم توفر كابل و/أو قابس يف الجهاز، استخدم وسيط امتصاص مناسب لدرجة الحرارة
يف بيئة العمل، كJ هو مب} عىل لوح الشبكة. يحظر بأي حال من األحوال ارتفاع درجة حرارة الكابل عن 50 °م من درجة الحرارة املحيطة.عند رضورة التوصيل املبارش بالشبكة، يلزم تركيب مفتاح مزدوج القطبية كوسيط عىل أن تكون الفجوة ب} املالمسات 3 مم أقل ما �كن، بواسطة األصفر/األخرض األريض كابل (يجب عدم مقاطعة السارية yاملعاي تتJىش مع أن اللوح كJ يجب لتحمل حمل واألبعاد مصممة
املفتاح). يجب أن يكون الوصول إىل القابس أو املفتاح مزدوج القطبية باملنتج املركب أمرا ميسورا.وال تتحمل الجهة الصانعة أي مسؤولية يف حالة عدم االلتزام بالخطوات سالفة الذكر وعدم احرتام معايy الوقاية من الحوادث وااللتزام بها.
يف حالة تلف كابل الكهرباء، فقم باستبداله عىل الفور بكابل أو طقم كابالت خاصة من الجهة الصانعة أو خدمات ما بعد البيع.التواؤم مع أنواع الغاز املختلفة
(شكل 6) إذا كان الجهاز مضبوط سلفا عىل نوع مختلف من الغاز بخالف املتوفر، قم ¶ا ييل:6) بنوع آخر متوافق مع الغاز املستخدم (انظر جدول «خصائص الحاقنات»).
صورة 6
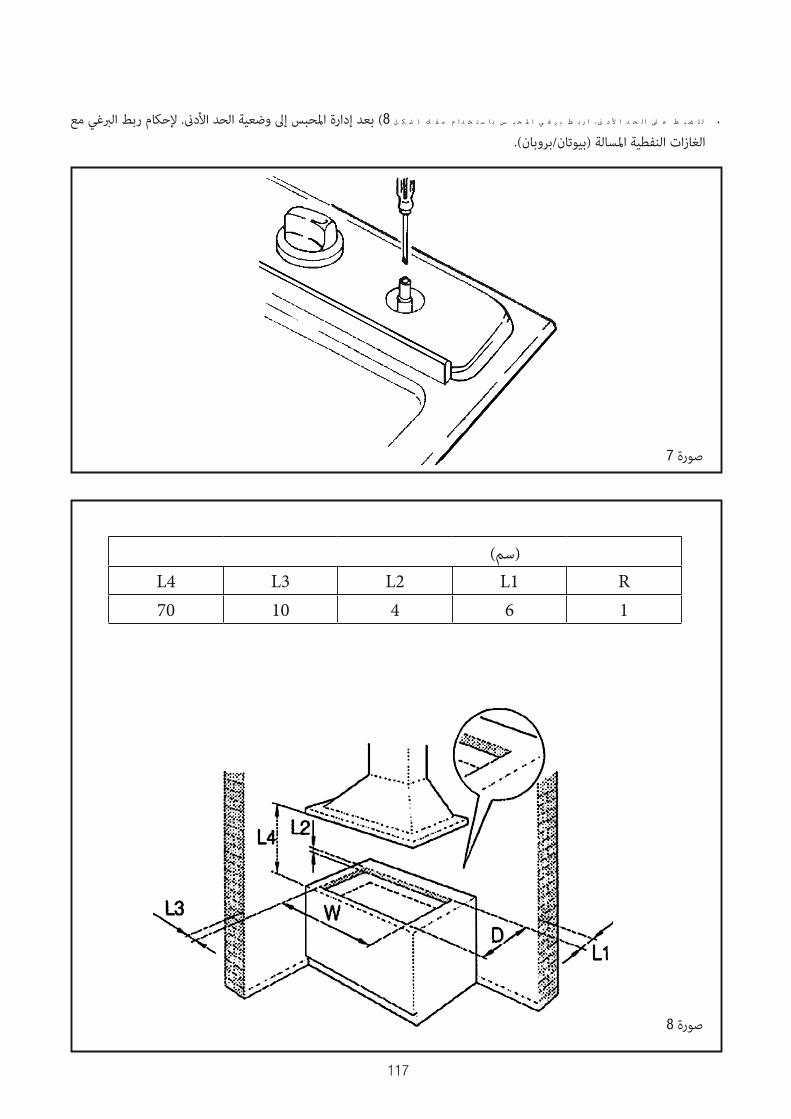
117
8) بعد إدارة املحبس إىل وضعية الحد األد�. إلحكام ربط الربغي مع الغازات النفطية املسالة (بيوتان/بروبان).
صورة 7
صورة 8
(سم)RL1L2L3L4
1641070
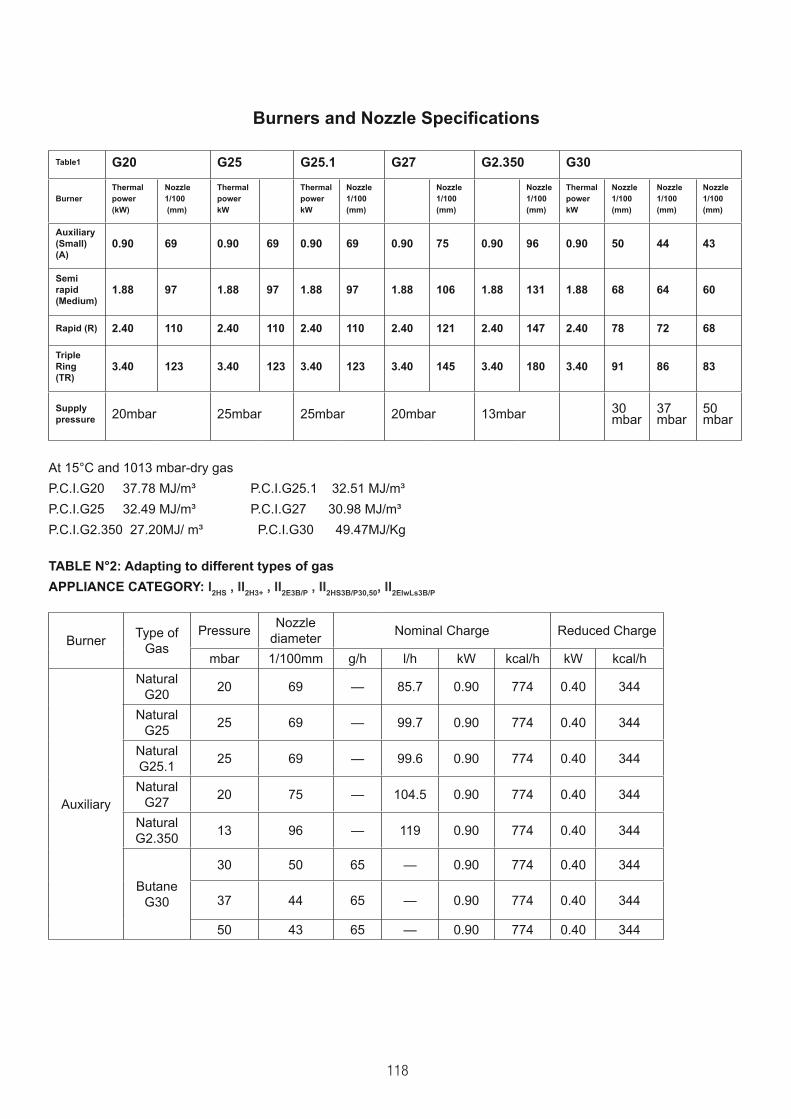
118
G25 G27 G2.350 G30
Burner
(kW) kW kW (mm) (mm) (mm) kW (mm) (mm) (mm)
(A)0.90 69 0.90 69 0.90 69 0.90 75 0.90 96 0.90 50 44 43
97 97 97 64 60
2.40 2.40 2.40 2.40 2.40 2.40 72
(TR)3.40 3.40 3.40 3.40 3.40 3.40
20mbar 25mbar 25mbar 20mbar 13mbar 30mbar
37mbar
50mbar
At 15°C and 1013 mbar-dry gas
P.C.I.G20 37.78 MJ/m³ P.C.I.G25.1 32.51 MJ/m³
P.C.I.G25 32.49 MJ/m³ P.C.I.G27 30.98 MJ/m³
P.C.I.G2.350 27.20MJ/ m³ P.C.I.G30 49.47MJ/Kg
I2H3+
BurnerType of
Gas
PressureNozzle
diameterNominal Charge Reduced Charge
mbar 1/100mm g/h l/h kW kcal/h kW kcal/h
Auxiliary
Natural
G2020 69 — 85.7 0.90 774 0.40 344
Natural
G2525 69 — 99.7 0.90 774 0.40 344
Natural
G25.125 69 — 99.6 0.90 774 0.40 344
Natural
G2720 75 — 104.5 0.90 774 0.40 344
Natural
G2.35013 96 — 119 0.90 774 0.40 344
Butane
G30
30 50 65 — 0.90 774 0.40 344
37 44 65 — 0.90 774 0.40 344
50 43 65 — 0.90 774 0.40 344

119
Semi-
rapid
Natural
G2020 97 — 179 1.88 1617 0.60 516
Natural
G2525 97 — 208.3 1.88 1617 0.60 516
Natural
G25.125 97 — 208.1 1.88 1617 0.60 516
Natural
G2720 106 — 218.5 1.88 1617 0.60 516
Natural
G2.35013 131 — 248.8 1.88 1617 0.60 516
Butane
G30
30 68 136 — 1.88 1617 0.60 516
37 64 136 — 1.88 1617 0.60 516
50 60 136 — 1.88 1617 0.60 516
Rapid
Natural
G2020 110 — 228 2.4 2064 0.90 774
Natural
G2525 110 — 265.9 2.4 2064 0.90 774
Natural
G25.125 110 — 265.7 2.4 2064 0.90 774
Natural
G2720 121 — 278.8 2.4 2064 0.90 774
Natural
G2.35013 147 — 317.6 2.4 2064 0.90 774
Butane
G30
30 78 174 — 2.4 2064 0.90 774
37 72 174 — 2.4 2064 0.90 774
50 68 174 — 2.4 2064 0.90 774
Triple-ring
Natural
G2020 123 — 323 3.4 2924 1.50 1290
Natural
G2525 123 — 376.7 3.4 2924 1.50 1290
Natural
G25.125 123 — 376.5 3.4 2924 1.50 1290
Natural
G2720 145 — 395 3.4 2924 1.50 1290
Natural
G2.35013 180 — 450 3.4 2924 1.50 1290
Butane
G30
30 91 247 — 3.4 2924 1.50 1290
37 86 247 — 3.4 2924 1.50 1290
50 83 247 — 3.4 2924 1.50 1290

120
EDESA INDUSTRIAL, S.L. Bº Garagarza, s/n 20.500 (Mondragón) Guipuzcoa