750-1-0085 sdr8100 operations manual rev 1
TRANSCRIPT

Tplljb SDR® 8100
Operations ManualPart Number 750-1-0085 Rev 1
Electronic Field Book®

Copyright Notice© 2001 POINT, Inc. All rights reserved. No part of this publication or the equipment described in it may be reproduced, trans-lated, stored in a retrieval system, or transmitted in any form or by any means, elec-tronic, mechanical photocopying, recording, or otherwise, without prior written permission of POINT, Inc. Your rights with regard to this publication and the equip-ment are subject to the restrictions and limitations imposed by the copyright laws of the United States of America (“U.S.A.”) and/or the jurisdiction in which you are located.
Trademark NoticeSokkia is a trademark of Sokkia Co. Ltd. Spectrum, SDR and Electronic Field Book are registered trademarks of POINT, Inc. All other product and brand names are trade-marks or registered trademarks of their respective holders.
FCC NoticeThe equipment described in this manual has been tested pursuant to Part 15 of the FCC Rules and found to comply with the limits for a Class A digital device for use in com-mercial business, and industrial environments. Operation is subject to the following two conditions: (1) this device may not cause harmful interference, and (2) this device must accept any interference received, including interference that may cause undesired operation. These limits are designed to provide reasonable protection against harmful interference when the equipment is operated in a commercial environment. The equip-ment generates, uses, and can radiate radio frequency energy and, if not installed and used in accordance with the instruction manual, may cause harmful interference to radio and television reception. Operation of this equipment in a residential area is likely to cause harmful interference in which case the user will be required to correct the interference at his own expense.
If this equipment does cause interference to radio or television reception, which can be determined by turning the equipment off and on, you can try to correct the interference by one or more of the following measures:• Reorient the receiving antenna.• Relocate the receiver relative to the equipment which it interferes.• Power the equipment from a different AC receptacle so that this equipment and
the interfered equipment are on different branch circuits. If necessary, contact our customer service department or an authorized representative for additional advice.
CE NoticeWarning: This is a Class B product. In domestic environments this product may cause radio interference in which case the user may be required to take adequate measures.
Part# 750-1-0085 Rev 101-00004-25

Contents
Chapter 1 Introduction 1
1.1 What is the SDR 8100?................................................... 11.2 Features ........................................................................... 11.3 Where to Find Information........................................... 2
1.4 Obtaining Technical Support ....................................... 31.5 Notes, Cautions, and Warnings ................................... 51.6 SDR 8100 Usage Caution .............................................. 6
1.7 Regulatory Information................................................. 6
Chapter 2 General Components 9
2.1 SDR 8100 Front View..................................................... 9
2.2 SDR 8100 Back View.................................................... 102.3 Keyboard ....................................................................... 112.4 Windows CE Interface................................................. 12
2.5 Synchronization Cable ................................................ 122.6 Serial Charging Cable.................................................. 132.7 SDR 8100 Cradle (Optional) ....................................... 14
Chapter 3 Setting-up the Controller 15
3.1 Install Sokkia Software................................................ 15
3.1.1 Confirming the installation ............................. 153.1.2 Starting the software program........................ 16
3.2 Batteries ......................................................................... 16
3.2.1 Install battery..................................................... 173.2.2 Charge battery ................................................... 17
3.3 CompactFlash Card ..................................................... 20
SDR® 8100 i
Contents
3.3.1 Install CompactFlash card ............................... 203.3.2 Remove CompactFlash card............................ 22
3.4 Power/Memory Settings ............................................ 22
3.4.1 Allocate memory............................................... 233.4.2 Conserve battery power................................... 23
Chapter 4 Operating the SDR 8100 25
4.1 Power On and Off ........................................................ 254.2 Use Backlight ................................................................ 254.3 Reset Controller............................................................ 25
4.3.1 Soft reset ............................................................. 254.3.2 Hard reset........................................................... 26
4.4 Shortcut Keys................................................................ 26
4.5 Access Keypad Symbols.............................................. 264.6 On-Screen Operations ................................................. 27
4.6.1 Toggle from field to field ................................. 27
4.6.2 Toggle from page to page ................................ 274.6.3 Enter a blank space in a field........................... 274.6.4 Insert a space between characters in a field .. 28
4.6.5 Capitalization .................................................... 284.6.6 Escape out of an application or screen........... 28
Appendix A SDR 8100 Specifications 29
Glossary 32
Index 33
SDR® 8100 ii

Figures
1 SDR 8100 Front View ............................................................... 9
2 SDR 8100 Back View .............................................................. 10
3 SDR 8100 Keypad ................................................................... 11
4 Synchronization Cable ........................................................... 12
5 Serial Charging Cable ............................................................ 13
6 SDR Cradle .............................................................................. 14
7 Inserting Battery into the SDR 8100 ..................................... 17
8 Charge Battery Using Synchronization Cable ................... 18
9 Opening CompactFlash Card Compartment ..................... 20
10 Flash Card Compartment ...................................................... 22
SDR® 8100 iii


Chapter 1 Introduction
1.1 What is the SDR® 8100?
Welcome to the SDR® 8100 manual. This text will provide you with in-depth SDR 8100 information.
The SDR 8100 is a sleek, ergonomically designed data collection platform that provides flexible one-handed data capture. This system is ideal for many GPS applications, including topographic stake-out, roading, mapping, and control surveys.
This handy system features an integrated keyboard, touch screen computer and Windows® CE operating system. It is specifically designed to work with a wide range of Sokkia hardware products, including GPS receivers, digital levels and total stations.
With the SDR 8100, the answer for powerful data collection is truly in the palm of your hand.
1.2 Features
• Easy-to-use. The controller fits comfortably in one hand and features an easy-to-use operating system and keyboard to make your surveying experience simple and quick.
• Lightweight Design. The SDR 8100’s lightweight design makes working in the field more convenient.
• CompactFlash™ Memory. The SDR 8100 provides a CompactFlash Memory card slot for extra storage within the battery compartment, and for extra protection against the weather.
SDR® 8100 1

Introduction Chapter 1
• No cables. The SDR 8100 features an integrated system that is capable of transferring wireless data.
The SDR 8100 features are summarized in Table 1. For a detailed list of features, see Appendix A, SDR 8100 Specifications.
Table 1: SDR 8100 Main Features
1.3 Where to Find Information
This manual provides information to enable you to effectively use the SDR 8100. In addition to this manual, several other forms of documentation serve as supporting documents.
• SDR 8100 Data Sheet. This lists the basic SDR 8100 specifications.
SDR 8100 Main Features
Rugged shock resistant, water proof, buoyant enclosure
Microsoft® Windows® CE operating system
Touch Screen monitor
40-key keypad, Sokkia specific
16MB ROM / 16MB RAM
1400 mAH Li-Lon rechargeable battery (up to 1 day of use)
Flash Memory
131 MHz Processor
Spread Spectrum integrated radio and antenna (optional)
Backlight for keypad
Infrared interface (IrDA)
*See Appendix A, SDR 8100 Specifications for more features.
SDR® 8100 2

Introduction Chapter 1
• Sokkia Software Manuals. Refer to your software manuals for detailed information about the software you are using with your SDR 8100.
1.4 Obtaining Technical Support
When contacting customer support, please ensure the following information is available:
• the SDR 8100 serial number• the SDR 8100 firmware version number• concise description of the problem
Technical Support is available from the distributor where you purchased it. You also may contact one of the Sokkia subsidiaries listed on the following page.
SDR® 8100 3

Introduction Chapter 1
CanadaSokkia Corp.1050 Stacey CourtMississauga, OntarioL4W 2X8Phone +1-905-238-5810Fax +1-905-238-9383Web www.sokkia.com
AustraliaSokkia Pty. Ltd.Rydalmere Metro CentreUnit 29,38-46 South StreetRydalmere NSW 2116AustraliaPhone +61-2-9638-0055Fax +61-2-9638-3933Web www.sokkia.com.au
U.K.Sokkia Ltd.Datum House, Electra WayCrewe Business ParkCrewe, Cheshire, CW1 6ZTUnited KingdomPhone +44-1270-25-05-11Fax +44-1270-25-05-33Web www.sokkia.co.uk
EuropeSokkia B.V.Businesspark De VaartDamsluisweg 1, 1332 EA AlmereP.O. Box 1292, 1300 BG AlmereThe NetherlandsPhone +31-36-53-22-880Fax +31-36-53-26-241Web www.sokkia.nl/home.nsf
AsiaSokkia Singapore Pte. Ltd.401 Commonwealth Drive#06-01 Haw Par TechnocentreSingapore 149598Phone +65-479-3966Fax +65-479-4966Web www.sokkia.com/Worldwide/sg.htm
New ZealandSokkia New Zealand20 Constellation DriveMairangi Bay, C.P.O. Box 4464,Auckland 10New ZealandPhone +64-9-479-3064Fax +64-9-479-3066Web www.sokkia.com.au
USASokkia Corporation16900 W 118th TerraceP.O Box 726Olatha, KS 66051-0726Phone +1-913-492-4900Phone +1-800-257-2552Fax +1-913-492-0188Web www.sokkia.com
AfricaSokkia RSA Pty. Ltd.P.O. Box 7998Centurion, 0046Republic of South AfricaPhone +27-12-663-7999Fax +27-12-663-7998Web www.sokkia.com/Worldwide/sg.htm
Central & South AmericaSokkia Central & South America1200 N.W. 78 AvenueSuite 109Miami, FLUSA 33126Phone +1-305-599-4701Fax +1-305-599-4703Web www.sokkia.com/Worldwide/ sa.htm
SDR® 8100 4
Introduction Chapter 1
1.5 Notes, Cautions, and Warnings
Notes, Cautions, and Warnings stress important information regarding the installation, configuration, and operation of the SDR 8100.
� Note: Notes outline important information of a general nature.
CAUTION
Cautions inform of possible sources of difficulty or situations that may causedamage to the product.
WARNING
Warnings inform of situations that may cause you harm.
SDR® 8100 5

Introduction Chapter 1
1.6 SDR 8100 Usage Caution
1.7 Regulatory Information
The product regulations that the SDR 8100 complies with are as follows:
• Radio Frequency Interference Requirements (RFIR)• Radio Frequency Interference Requirements (RFIR) -
Canada • CE Marketing and European Union Compliance (MEUC)
Radio Frequency Interference Requirements
This device has been tested and found to comply with the limits for a Class B digital device pursuant to Part 15 of the Federal Communications Commissions Rules and Regulation. These limits are designed to provide reasonable protection against harmful interference when the equipment is operated in a commercial environment. This equipment generates, uses, and
CAUTION
General• This device incorporates circuitry to absorb most static discharges.
However, severe static shock may cause inaccurate operation of the unit. Use anti-static precautions where possible.
• This device is a precision instrument. Although it is designed for rugged operating conditions, it performs best when handled with care.
• When the access cover for the SDR 8100 is closed and latched, the enclosure is sealed to provide protection against adverse environmental conditions. To minimize the possibility of damage, always keep the access door closed and latched except when exchanging batteries or replacing your CompactFlash memory card.
Ergonomic RecommendationsTo avoid or minimize the risk of ergonomic injury, read the recommendations below. • Reduce or eliminate repetitive motion• Reduce or eliminate excessive force• Perform tasks at correct heights• Reduce or eliminate direct pressure• Provide a suitable working environment
SDR® 8100 6

Introduction Chapter 1
can radiate radio frequency energy and, if not installed and used in accordance with the instruction manual, may cause harmful interference to radio communications. Operation of this equipment in a residential area is likely to cause harmful interference in which case the user will be required to correct the interference at his own expense.
However, there is no guarantee that interference will not occur in a particular installation. If the equipment does cause harmful interference to radio or television reception, which can be determined by turning the equipment off and on, the user is encouraged to try to correct the interference by one or more of the following measures:
• re-orient or relocate the receiving antenna• increase the separation between the equipment and
receiver• connect the equipment into an outlet on a circuit different
from that which the receiver is connected• consult the dealer or and experienced radio/TV technician
for help
Radio Frequency Interference Requirements - Canada
This Class B digital apparatus complies with Industry Canada Standard ICES-003.
CE Marketing and European Union Compliance
Products intended for sale within the European Union are marked with the CE Mark which indicates compliance to applicable Directives and European Normes (EN) as follows. Amendments to these Directives or ENs are included:
Applicable Directives:
• Electromagnetic Compatibility Directive 89/336/EEC• Low Voltage Directive 73/23/EEC
SDR® 8100 7

Introduction Chapter 1
Applicable Standards:
• EN 55022:1998, Limits and Methods of Measurement of Radio Disturbance Characteristics of Information Technology Equipment
• EN 55024:1998; Information Technology equipment - Immunity characteristics - Limits and methods of measurement
• IEC 1000-4-2:1995; Electromagnetic compatibility (EMC); Part 4:Testing and measurement techniques; Section 4.2:Electrostatic discharge immunity test
• IEC 1000-4-3:1997; Electromagnetic Compatibility (EMC); Part 4:Testing and measurement techniques; Section 3. Radiated, radio frequency, electromagnetic field immunity test
• IEC 1000-4-4:1995; Electromagnetic compatibility (EMC); Part 4: Testing and measurement techniques; Section 4:Testing electrical fast transient,/Burst immunity
• IEC1000-4-5:1995; Electromagnetic compatibility (EMC), Part 4: Testing and measurement techniques; Section 5: Surge Immunity
• IEC 1000-4-6:1996; Electromagnetic compatibility (EMC), Part 4:Testing and measurement techniques; Section 6: Immunity to conducted disturbances, induced by radio frequency fields
• IEC 1000-4-11:1994; Electromagnetic compatibility (EMC), Part 4: Testing and measurement techniques; Section 11: Voltage Dips, Short Interruptions, and Voltage Variations
• EN 60 950 + A1+A2+A3+A4+A11 - Safety of Information Technology Equipment Including Electrical Business Equipment
SDR® 8100 8

Chapter 2 General Components
The following sections introduce the general SDR 8100 physical components.
2.1 SDR 8100 Front View
The following is an illustration of the SDR 8100 showing some of the main features located on the front of the handheld.
Figure 1: SDR 8100 Front View
# Description # Description
1 Power Button 5 Read Key (2)
2 Keyboard 6 Backlight Button
3 Touch Screen 7 Microphone
4 Speaker
61
2
3
4
5
7
SDR® 8100 9

General Components Chapter 2
To use the Windows CE interface and SDR 8100 keyboard, see Chapter 4, Operating the SDR 8100.
2.2 SDR 8100 Back View
The following is an illustration of the SDR 8100 showing some of the main features located on the back of the handheld
Figure 2: SDR 8100 Back View
To learn more about battery usage, see Section 3.2, Batteries, on Page 16.
# Description # Description
1 Battery Door Latch 8 Infrared Port
2 Battery Compartment 9 Reset Button
3 Battery Latch 10 RS-232 Serial Port
4 Stylus Compartment 11 1400 Li-Ion Battery
5 Stylus 12 Battery Door
6 15-Pin Serial Port 13 Battery Door Latch
7 Headset Port 14 CompactFlash Slot
1
23
4
5 6
7
8
9
10
11
1213
14
SDR® 8100 10

General Components Chapter 2
2.3 Keyboard
The 40-key keypad uses an alphanumeric keypad that includes the 26-character alphabet (A-Z), numbers (0-9), and assorted characters. The keypad is color-coded to indicate which modifier key to press to produce a particular character or action.
Figure 3: SDR 8100 Keypad
# Description # Description
1 Power Key 7 Backspace/Delete Key
2 Alpha-Numeric Keys 8 Space/Insert Key
3 Shift/Caps Key 9 Alt Key
4 Escape Key 10 Enter Key
5 Read Keys (2) 11 Backlight Key
6 Cursor Keys
4
1
23
6
7
89
1011
5
SDR® 8100 11

2.4 Windows CE Interface
The SDR 8100 incorporates the latest version of the Windows CE operating system.
Windows CE is a real-time embedded operating system for the pocket PC. Windows CE features customary Windows compatibility and advanced application services to provide you with a variety of tools.
For more information about Windows CE features, see Appendix A, SDR 8100 Specifications.
2.5 Synchronization Cable
The following cable can be used to charge your primary battery.
Figure 4: Synchronization Cable
To understand how to use the cable listed above, see Section 3.2.2.1, Charge battery using the synchronization cable, on Page 18.
General Components Chapter 2
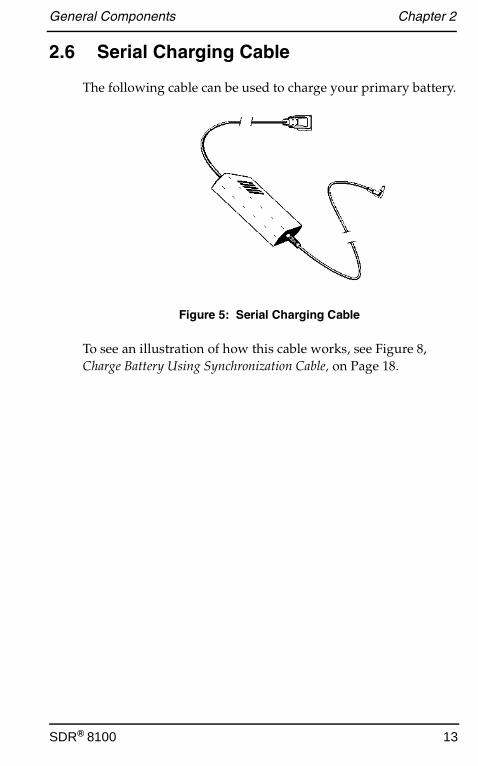
2.6 Serial Charging Cable
The following cable can be used to charge your primary battery.
Figure 5: Serial Charging Cable
To see an illustration of how this cable works, see Figure 8, Charge Battery Using Synchronization Cable, on Page 18.
SDR® 8100 13

General Components Chapter 2
2.7 SDR 8100 Cradle (Optional)
The SDR 8100 Cradle can be used to charge your batteries and, through the controller, can communicate with your PC and Receiver.
Figure 6: SDR Cradle
For more information about the SDR 8100 Cradle, see Section 3.2.2, Charge battery, on Page 17.
12
3
4
5
# Description # Description
1 Primary Battery LED 4 Secondary Battery Port
2 Secondary Battery LED 5 SDR 8100 Port
3 Secondary Battery
SDR® 8100 14

Chapter 3 Setting-up the Controller
3.1 Install Sokkia Software
To install Sokkia software on to your SDR 8100, follow these steps:
1. With the ActiveSync software installed and running, connect your data collector to the PC. For more information about ActiveSync, refer to your Windows CE materials.
2. Insert the Sokkia Complete Product CD into your computer’s CD-ROM drive.
� Note: If the Sokkia Complete Product CD menu does not automatically appear when you insert the CD, use Windows Explorer to access your computer's CD-ROM drive and locate the setup.exe file. Double-click the setup.exe file to open the menu. Click the <Install> button. You will be prompted for installation on the data collector’s default directory.
3. Click <Yes> to continue. The necessary files are then transferred to the File Explorer |Program Files folder on the data collector. After a few minutes, you will be prompted to check your data collector screen to confirm the program was installed successfully.
3.1.1 Confirming the installation
On the data collector, tap the <Start> button and select Programs. You should see the program you installed as one of the program options.
SDR® 8100 15

Setting-up the Controller Chapter 3
3.1.2 Starting the software program
You can start the program by selecting Start | File Explorer | Programs | (Name of Program).
To use the Sokkia software, refer to your Sokkia Software Manuals.
3.2 Batteries
The SDR 8100 comes with one 1400 Lithium Ion (Li-Ion) battery. This powerful battery can power the controller for one working day. To use the SDR 8100, you must have a charged 1400 rechargeable Lithium Ion battery installed.
You will have to recharge the battery from time to time. With the SDR 8100 it is possible to use your controller while the battery is charging. For a detailed list of battery specifications, see Appendix A, SDR 8100 Specifications.
The following sections discuss how to install and recharge your batteries.
CAUTION
If all power from the battery within the SDR 8100 has been used, your con-troller will stop working. If the power supply is not replaced within 80 hours, you may lose memory stored on the controller.
SDR® 8100 16

Setting-up the Controller Chapter 3
3.2.1 Install battery
The following illustration shows how to install a battery into the SDR 8100.
Figure 7: Inserting Battery into the SDR 8100
The following steps will guide you through the battery installation process.
1. Slide the latches on the battery door up and lift the battery door away from the SDR 8100.
2. Insert the Li-Ion battery in the battery compartment with the tether positioned below the battery. The battery should snap into place.
3. Replace the battery cover, pressing down firmly along the top edge while sliding the latches into the locked position.
3.2.2 Charge battery
Your batteries should be fully charged after 2.5 hours to get a minimum of 20 hours of power in the field. There are two ways to charge your batteries:
# Description # Description
1 Controller 3 Battery Cover
2 Battery 4 Tether
1
2
3
4
SDR® 8100 17

Setting-up the Controller Chapter 3
• Charge your battery using the Synchronization Cable (see Section 3.2.2.1, Charge battery using the synchronization cable, on Page 18)
• Charge your battery using the optional cradle (see Section 3.2.2.2, Charge battery using the optional cradle, on Page 19)
� Note: Newly purchased Li-Ion batteries must be charged before they can be used.
3.2.2.1 Charge battery using the synchronization cable
This illustration shows how to charge your primary battery using the SDR 8100 synchronization cable and power cable.
Figure 8: Charge Battery Using Synchronization Cable
# Description # Description
1 Power Cable 4 RS-232 Serial Port
2 Power Outlet 5 Synchronization Cable
3 SDR 8100
1
2
3
4
5
SDR® 8100 18

Setting-up the Controller Chapter 3
Follow these instructions to charge your primary battery using the SDR 8100 synchronization cable and power cable.
1. Insert the synchronization cable into the RS-232 serial port on the bottom of the data collector.
2. Plug one end of the power cable into a wall outlet and the other end into the port on the synchronization cable.
3.2.2.2 Charge battery using the optional cradle
If you purchase a cradle, you may use it to charge your battery. The cradle can charge your battery in two ways: while it is in the controller, or by itself.
Follow these instructions to charge your battery (while it is inside the SDR 8100) in the optional cradle:
1. Plug the cradle into a wall outlet.
2. Insert the SDR 8100 (with battery installed) into the cradle.
3. The Primary Battery LED glows red to indicate charging, then green when the battery is fully charged.
If you choose to purchase a backup battery, or to charge your battery while it is not installed in the SDR 8100, follow these instructions to charge your battery with the optional cradle:
1. Insert the battery into the secondary battery port with contacts facing down and toward the back of the cradle.
2. Press the battery into the slot until it is firmly seated.
3. The Secondary Battery LED will glow red to indicate charging, then green when the battery is fully charged.
SDR® 8100 19

Setting-up the Controller Chapter 3
� Note: It may take up to one minute for the Battery LEDs to glow red.
See Figure 6, SDR Cradle, on Page 14 for an illustration of the SDR 8100 Cradle.
3.3 CompactFlash Card
The SDR 8100 has a slot for a standard CompactFlash card, which includes a locking mechanism to prevent the card from coming loose if the SDR 8100 is dropped. Insert the CompactFlash card carefully to make sure it engages this locking mechanism.
3.3.1 Install CompactFlash card
The following illustration shows how to install a CompactFlash card into your SDR 8100.
Figure 9: Opening CompactFlash Card Compartment
# Description # Description
1 Compartment Closed 2 Compartment Opened
12
SDR® 8100 20

Setting-up the Controller Chapter 3
Follow these instructions to install a CompactFlash card in your SDR 8100:
1. Open the battery door and remove the battery.
2. Remove the flash card cover at the top of the battery compartment.
3. Insert the flash card into the compartment with the pins facing forward, and front face down. The two metal tabs on the locking mechanism will prevent you from pushing the card all of the way in.
4. To fit the card into place, push down and in at the same time so that the lip of the CompactFlash card slips under the tabs of the locking mechanism.
5. Replace the flash card cover by inserting the bottom first, then clicking the top into place.
� Note: After you insert or remove a CompactFlash card, you must replace the flash card cover for the card to function.
6. Reinsert the battery and battery door.
7. Perform a soft reset (see Section 4.3.1, Soft reset, on Page 25).
CAUTION
If the CompactFlash Card does not slide easily into slot, do not try to force it to fit. Remove the card, face the pins towards the entrance of the slot, and try again. If it still does not fit, check that nothing is blocking the entrance of the compartment. If there is a blockage, please contact Sokkia Technical Support (see Section 1.4, Obtaining Technical Support, on Page 3).
SDR® 8100 21

Setting-up the Controller Chapter 3
3.3.2 Remove CompactFlash card
The following illustration shows how to remove a CompactFlash card from your SDR 8100.
Figure 10: Flash Card Compartment
Follow these instructions to remove the CompactFlash card from the SDR 8100:
1. Open the battery door and remove the battery and flash card cover (see Figure 9, Opening CompactFlash Card Compartment, on Page 20).
2. Use the stylus to press the flash card release button inside the flash card compartment (see Figure 10, Flash Card Compartment, on Page 22).
3.4 Power/Memory Settings
Adjusting certain settings on your data collector can optimize the performance of your SDR 8100 in the field. From your Window CE operating system, you can adjust memory settings, power settings and other systems settings. To see your adjustable settings tap Settings | System from the Start menu.
1
3
4
2
# Description # Description
1 Flash Card Compartment 3 Flash Card Release Button
2 SDR 8100 (Back View) 4 Stylus
SDR® 8100 22

Setting-up the Controller Chapter 3
For more information about configuring your Windows CE settings, refer to your Windows CE documentation or visit Microsoft on the internet at www.microsoft.com.
The following sections give tips to prolong the life of your controller and speed up its performance.
3.4.1 Allocate memory
To provide more space on the controller for your survey information, allocate more memory for storage. Experiment with the memory allocation to find a setting that is suitable for your needs.
To access memory settings, tap Settings | System from the Start menu and choose the Memory tab. Adjust the slider bar as necessary to allocate memory.
3.4.2 Conserve battery power
The SDR 8100 has the ability to suspend operation after a fixed period of time to save the life of its battery. After the controller exhausts its battery, it can retain its memory for 80 hours.
Follow these steps to ensure the maximum amount of surveying time from your data collector in the field:
• Ensure your data collector is fullly charged before proceeding to the field (see Section 3.2.2, Charge battery, on Page 17).
• Turn off the backlight, unless it is absolutely necessary. If available, set the backlight to power down automatically when the data collector is idle (see Section 4.2, Use Backlight, on Page 25).
• Consider removing CompactFlash or other memory cards if you do not need their services (see Section 3.3.2, Remove CompactFlash card, on Page 22).
• If possible, set your data collector to automatically sleep when it is idle. You can also shorten the interval before the
SDR® 8100 23

Setting-up the Controller Chapter 3
data collector powers down. This will not interfere with SDR 8100 surveying processes. The software will pick up where it left off when you return to use your data collector. To modify your controller’s power settings, tap Settings | Power from the Start menu and choose the Power off tab. Select your settings from the list box.
SDR® 8100 24

Chapter 4 Operating the SDR 8100
The following sections cover a variety of operations you need to know to use the SDR 8100.
4.1 Power On and Off
Press the Power key to turn your SDR 8100 off and on.
� Note: The SDR 8100 will by default turn off after three minutes standing idle. You can change this idle time in the Settings window. See Section 3.4, Power/Memory Settings, on Page 22 for more information.
4.2 Use Backlight
To turn the backlight on or off, press the white light bulb key located at bottom of the controller.
To adjust the Backlight contrast, press <Alt> + <y> to increase (darken) the contrast. Press <Alt> + <t> to decrease (lighten) the contrast.
4.3 Reset Controller
There are two ways to reset the controller: a soft reset and a hard reset.
4.3.1 Soft reset
A soft reset will save all of your stored records and then restart the data collector.
SDR® 8100 25

Operating the SDR 8100 Chapter 4
There are two ways to perform a soft reset:
• Press <Page Up> + <Page Down> + <Backlight Key> on your keyboard simultaneously.
• From the Start menu on your touch screen, select Reboot.
4.3.2 Hard reset
A hard reset will erase all of your stored records and restart your SDR 8100.
To perform a hard reset, remove the battery cover and use the stylus to press the <Reset> button while you hold down the <Alt> key. When you next power on the SDR 8100, the controller will restore its factory default settings (see the Reset button location in Figure 2, SDR 8100 Back View, on Page 10).
4.4 Shortcut Keys
Shortcut keys can be used to quickly pull up menus. Your software operations manual will list the shortcut keys relevant to its program. To access a shortcut key on the SDR 8100 you must press the <Alt> + <desired letter> on your keyboard. Your software manual will have a list of shortcut keys to work with.
4.5 Access Keypad Symbols
You will notice on your keypad that symbols are in three different colors: yellow, white, and black. This section describes how to access the different colored symbols on your keypad.
WARNING
A soft reset will not save any data that has not been previously saved on the controller. DO NOT perform a Soft Reset if the data collector is suspended. Press the Power button to wake the data collector. If the data collector does not power on, perform a Soft Reset.
SDR® 8100 26

Operating the SDR 8100 Chapter 4
Yellow ........................... Numeric symbols. Press the <Alpha/Num> key to toggle between yellow and white symbols. By default, the yellow symbols are activated.
White ............................ Alphabetic and miscellaneous symbols. Press the <Alpha/Num> key to toggle between Alpha and Numeric keys.
Black.............................. Miscellaneous symbols. Press <Alt> to access the black symbols.
4.6 On-Screen Operations
You may use your stylus on the touch screen to move between programs, windows, and fields. You can also maneuver through operations using the keypad. The following sections show the operations you can use on your keypad to move through programs, windows, and fields.
4.6.1 Toggle from field to field
Press the cursor keys to toggle left, right, up and down between fields on your touch screen. You may also press the <Enter> button to drop to the next field on the screen.
4.6.2 Toggle from page to page
Press <Alt> + <CAPS> to access the page up, page down, home, and end commands located on your cursor keys.
4.6.3 Enter a blank space in a field
Press the <Ins/Spc> key. The white symbols must be activated to access this key.
SDR® 8100 27
Operating the SDR 8100 Chapter 4
4.6.4 Insert a space between characters in a field
Use your cursor keys to toggle over to the characters which need a space between them. Press the <Spc/Ins> key to insert a blank space between characters.
4.6.5 Capitalization
You have the ability to capitalize a single letter or a string of letters as shown below:
<Shift> ......................... Capitalize a letter
<Alt> + <CAPS> ........ Capitalize a string of letters (CAPS LOCK).
4.6.6 Escape out of an application or screen
To escape out of an application or screen press the <Esc> key on your keyboard.
SDR® 8100 28

Appendix A SDR 8100 Specifications
SDR 8100 SPECIFICATIONS
Physical
Size (HxWxL) 21.8 cm x 9.4 cm x 4.6 cm (8.6 in x 3.72 in x 1.84 in)
Weight 13.7 oz (0.8 lbs)
Description of Controller Comfortable hand-fit hold, rubber molding to protectfrom blowing dust and rain, rugged, cable-free,lightweight
Environmental
Operating Temperature (w/obatteries)
-20°C to +50°C (-4°F to +122°F)
Storage Temperature -25°C to +50°C (-13°F to +122°F)
Resistance Characteristics(with access door closed)
Wind-Blown Rain, Dust Immunity, Sealing: IP54
Humidity 5% to 95% RH non-condensing
Shock Thermal: -25°C to 65°C (-13°F to 149°F) 2.5 hours, 3cyclesPhysical: 1.2 m drop (4 ft drop)
Vibration Sine: 5 Hz to 2,000 Hz, 4g (peak)Random: 20 Hz to 2,000 Hz, 6 Grms
Electro-Static Discharge 8 kVdc (air), 4 kVdc (contact)
Altitude Sea level to 2,930 m (8,000 ft)
Batteries
Model Sokkia
Capacity 1400 mAH
Chemistry Li-Ion
Voltage 3.7 V
Operating Time (20°C) 8 hours
Charge Time >2.5 hours (using Sokkia charger)
SDR® 8100 29
SDR 8100 Specifications Appendix A
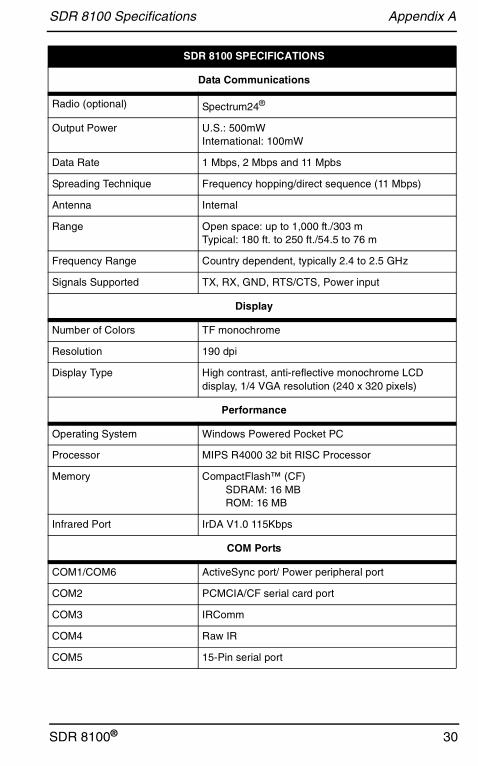
Data Communications
Radio (optional) Spectrum24®
Output Power U.S.: 500mWInternational: 100mW
Data Rate 1 Mbps, 2 Mbps and 11 Mpbs
Spreading Technique Frequency hopping/direct sequence (11 Mbps)
Antenna Internal
Range Open space: up to 1,000 ft./303 mTypical: 180 ft. to 250 ft./54.5 to 76 m
Frequency Range Country dependent, typically 2.4 to 2.5 GHz
Signals Supported TX, RX, GND, RTS/CTS, Power input
Display
Number of Colors TF monochrome
Resolution 190 dpi
Display Type High contrast, anti-reflective monochrome LCDdisplay, 1/4 VGA resolution (240 x 320 pixels)
Performance
Operating System Windows Powered Pocket PC
Processor MIPS R4000 32 bit RISC Processor
Memory CompactFlash™ (CF)SDRAM: 16 MBROM: 16 MB
Infrared Port IrDA V1.0 115Kbps
COM Ports
COM1/COM6 ActiveSync port/ Power peripheral port
COM2 PCMCIA/CF serial card port
COM3 IRComm
COM4 Raw IR
COM5 15-Pin serial port
SDR 8100 SPECIFICATIONS
SDR 8100® 30

SDR 8100 Specifications Appendix A
Regulatory Requirements
Product Safety UL1950/CSA C22.2 No. 950 (min); EN60950; IEC950
EMC Testing FFC Part 15, Class A; EN55022, Class B; EN50082-1,3 V/m; EN61000-4-2 ESD +/-8KV Air +/-4KV Contact;EN61000-4-3, Radiated Immunity 3 V/M; EN6000-4-4EFT Burst Immunity +/-
SDR 8100 SPECIFICATIONS
SDR 8100® 31

SDR® 8100 32
Glossary
Bi-directional - In two directions (backwards and forwards).
Byte - A sequential series of bits comprised of one character and handled. A byte is typically comprised of eight bits, and represents either one alphabetic or other character, two decimal digits, or eight binary bits.
Contrast - The difference in reflectance between the black and white areas of a symbol.
Data Collection System - A system that consists of input devices located at points where data are created. Once captured, the data may be immediately transmitted to a central location, usually in or near a computer room for auto-matic recording. Or the data may be transmitted to a storage medium, such as a tape, disk, or semiconductor memory for later transfer to a host computer appli-cation program.
Diffuse Reflection - The component of reflected light which emanates in all directions from the reflecting surface.
LED - Light emitting diode. A semiconductor that produces light at a fre-quency determined by its chemical composition. The light source commonly used in wand readers.
PCMCIA - Personal Computer Memory Card International Association.
Radio Frequency - Non-optical automatic identification devices that use radio waves to transmit data.
RF - Radio Frequency.
Resolution - The narrowest element dimension which can be distinguished by a particular reading device or printed with a particular device or method.

Index
A
adjustcontrast 25memory settings 22
allocate memory 23alphabetic symbols 27alpha-numeric keys 11alt key 11automatic sleep settings 23
B
back view 10backlight 25backspace/delete key 11battery
charge 17compartment 10conserve power 23door 10general 16install 16latch 10new 18secondary 14
buttonbacklight 9flash card release 22power 9reset 10
C
cableserial charging 13synchronization 12, 18
capatalization 28card
compactflash 20compartment 22
cautions 5CE marketing compliance 7charge battery 17charging cable, serial 13compactflash
card 1general 20install card 20slot 10
compartmentbattery 10flash card 22stylus 10
compatibility 1components, general 9conserve battery power 23contrast, adjust 25controller
back view 10cradle 14front view 9general 1port 14
cradlegeneral 18–19SDR 8100 14
SDR® 8100 33

Index
cursor keys 12, 27
D
damage, minimize 6default settings 26documentation 2door, battery 10
E
enter key 12escape 12, 28european union compliance 7
F
factory default settings 26features 2flash card 22
G
general SDR 8100 components 9
H
hard reset 26headset port 10
I
inaccurate operation 6infrared port 10install
battery 16compactflash card 20sokkia software 15
instrument, precision 6interface, windows CE 12
K
keyboard 11keypad
general 27symbols 26
keysalpha-numeric 11alt 11backspace/delete 11black 27cursor 12, 27enter 12Esc 28escape 12Ins/Spc 27shift/caps 11space/insert 11Spc/Ins 28white 27yellow 27
L
latch, battery 10led 14loss, memory 16
M
maximum surveying time 23memory
allocate 23loss 16save 23settings 22
microphone 9minimize damage 6miscellaneous symbols 27modify power settings 24
SDR® 8100 34

Index
N
new battery 18notes 5numeric symbols 27
O
off, power 25on, power 25operation
inaccurate 6suspend 23
optimize performance 22
P
performance, optimize 22port
15-pin serial 10headset 10infrared 10RS-232 serial 10secondary battery 14
powerbattery 23button 9off 25on 25settings 22
precision instrument 6primary battery led 14
R
radio frequency requirements 6–7regulatory information 6release button, flash card 22
resetbutton 10general 25hard 26soft 25
rs-232 serial port 10
S
save memory 23SDR 8100 Specifications 29secondary
battery led 14battery port 14
serialcharging cable 13port, 15-pin 10port, RS-232 10
settingsautomatic sleep 23factory default 26memory 22power 22, 24system 22
shift/caps key 11shock, static 6shortcut keys 26sleep settings, automatic 23slot, compactflash 10soft reset 25software, install 15space/insert key 11speaker 9static shock 6storage 23stylus 10, 27stylus compartment 10support, technical 3surveying time, maximum 23suspend operation 23
SDR® 8100 35

Index
symbolsalphabetic 27keypad 26miscellaneous 27numeric 27
synchronization cable 12, 18system settings 22
T
tether 17technical support 3time, maximum surveying 23touch screen 9, 27troubleshooting 21
V
viewSDR 8100 back 10, 23SDR 8100 front 9
W
warnings 5windows CEinterface 12
SDR® 8100 36


SOKKIA CO. LTD. INTERNATIONAL DEPT. 20-28, Asahicho 3-Chome, Machida, Tokyo, 194-0023 Japan PHONE +81-42-729-1848 FAX +81-42-729-1930SOKKIA CORPORATION 16900 W 118th Terrace, P.O Box 726, Olathe, KS 66061-0726 U.S.A., Phone +1-913-492-4900 Fax +1-913-492-0188SOKKIA CENTRAL & SOUTH AMERICA CORPORATION 1200 N.W. 78th Avenue, Suite 109, Miami, Florida, 33066 U.S.A., Phone +1-305-599-4701 Fax +1-305-599-4703SOKKIA PTY. LTD. Rydalmere Metro Centre, Unit 29, 38-46 South St., Rydalmere, NSW 2116 Australia, Phone +61-2-9638-0055 Fax +61-2-9638-3933SOKKIA NEW ZEALAND 20 Constellation Drive, C.P.O. Box 4464, Mairangi Bay, Auckland 10 New Zealand, Phone +64-9-479-3064 Fax +64-9-479-3066SOKKIA B.V. Businesspark De Vaart, Damsluisweg 1, 1332 EA Almere, P.O. Box 1292, 1300 BG Almere, The Netherlands, Phone +31-36-53.22.880 Fax +31-36-53.26.241SOKKIA LTD. Datum House, Electra Way, Crewe Business Park, Crewe, Cheshire, CW1 6ZT United Kingdom, Phone +44-1270-25.05.25 Fax +44-1270-25.05.33SOKKIA B.V. Niederlassung Deutschland An der Wachsfabrik 25, 50996 Köln (Rodenkirchen), Germany, Phone +49-2236-39.27.60 Fax +49-2236-6.26.75SOKKIA S.R.O. Skroupovo námestí 1255/9, 130 00 Praha 3, Czech Republic, Phone +420-2-6273715 Fax +420-2-6273895SOKKIA S.A. Rue Copernic, 38760 Chasse-sur-Rhóne, France, Phone +33-4-72.492.640 Fax +33-4-72.492.646SOKKIA S.R.L. Via Alserio 22, 20159 Milano, Italy, Phone +39-02-66.803.803 Fax +39-02-66.803.804SOKKIA N.V./S.A. Doornveld, Asse 3, Nr.11-B1, 1731 Zellik (Brussels) Belgium, Phone +32-2-466.82.30 Fax +32-2-466.83.00SOKKIA KFT., Légszeszgyár u.17., 7622 Pécs, Hungary, Phone +36-72-226.636 Fax +36-72-324.636SOKKIA KOREA CO., LTD. 2Fl. Chungam Bldg, 129-11, Chungdam-dong, Kangnam-ku, Seoul, Republic of Korea, Phone +82-2-514-0491 Fax +82-2-514-0495SOKKIA SINGAPORE PTE. LTD. 401 Commonwealth Drive, #06-01 Haw Par Technocentre, Singapore 149598, Phone +65-479-3966 Fax +65-479-4966SOKKIA (M) SDN. BHD. Dataran Prima, No.31-3, Jalan PJU 1/42A, 47301 Petaling Jaya, Selangor Darul Ehsan, Malaysia, Phone +60-3-7052197 / 7044240 Fax +60-3-7054069SOKKIA HONG KONG CO., LTD. Rm.1416 Shatin Galleria,18-24 Shan Mei Street, Fo Tan, New Territories, Hong Kong, Phone +852-2-691-0280 Fax +852-2-693-0543SOKKIA PAKISTAN (PVT.) LTD. Suite #A-2, 4th Floor, Westland Trade Centre, C-5, Central Commercial Area Blook 7 & 8, K.C.H.S.U. Ltd. Shaheed-e-Millat Road, karachi, Pakistan, Phone +92-21-4313151 / 3 Fax +92-21-4313154SOKKIA INDIA PVT. LTD. C-25, 2nd Floor, Sector-8, Noida-201301, India Phone +91-011-8-527850 / 525781 Fax +91-011-8-525769SOKKIA GULF P.O.Box 4801, Dubai, U.A.E., Phone +971-4-368539 Fax +971-4-368549SOKKIA RSA PTY. LTD. Centuria Park, 265 Von Willich St., Centurion, 0046 Republic of South Africa, Phone +27-12-663-7999 Fax +27-12-663-7998SOKKIA CO., LTD. SHANGHAI REP. OFFICE 11F No.8, Tower 1 Kerry Everbright City, 218 Tian Mu Road West, Shanghai, #200070 Peoples Republic of China, Phone +86-21-63541844 Fax +86-21-63172083