6640 6650 user-manual
TRANSCRIPT

Projector
6640W/6645/6645W/6650 User’s Manual
6640W_6645_6645W_6650_ User Manual v00

Ver. 1/02/13
• Apple,Mac,MacOS,iMac,andMacBookaretrademarksofAppleInc.registeredintheU.S.andothercountries.
• Microsoft,Windows,WindowsVista,InternetExplorer,.NETFramework,Excel,andPowerPointareeitheraregis-teredtrademarkortrademarkofMicrosoftCorporationintheUnitedStatesand/orothercountries.
• IntelandIntelCorearetrademarksofIntelCorporationintheU.S.and/orothercountries.
• PowerPCisaregisteredtrademarkoftheInternationalBusinessMachinesCorporation.
• MicroSaverisaregisteredtrademarkofKensingtonComputerProductsGroup,adivisionofACCOBrands.
• VirtualRemoteToolusesWinI2C/DDClibrary,©NicomsoftLtd.
• HDMI,theHDMILogoandHigh-DefinitionMultimediaInterfacearetrademarksorregisteredtrademarksofHDMILicensingLLC.
• TrademarkPJLinkisatrademarkappliedfortrademarkrightsinJapan,theUnitedStatesofAmericaandothercountries and areas.
• Wi-Fi®,Wi-FiAlliance®,andWi-FiProtectedAccess(WPA,WPA2)®are registered trademarksof theWi-FiAlli-ance.
• Blu-rayisatrademarkofBlu-rayDiscAssociation
• CRESTRONandROOMVIEWareregisteredtrademarksofCrestronElectronics,Inc.intheUnitedStatesandothercountries.
• Otherproductandcompanynamesmentionedinthisuser’smanualmaybethetrademarksorregisteredtrademarksoftheirrespectiveholders.
• GPL/LGPLSoftwareLicenses
TheproductincludessoftwarelicensedunderGNUGeneralPublicLicense(GPL),GNULesserGeneralPublicLicense(LGPL),andothers.
Formoreinformationoneachsoftware,see“readme.pdf”insidethe“aboutGPL&LGPL”folderonthesuppliedCD-ROM.
NOTES(1)Thecontentsofthisuser’smanualmaynotbereprintedinpartorwholewithoutpermission.
(2)Thecontentsofthisuser’smanualaresubjecttochangewithoutnotice.
(3)Greatcarehasbeentakeninthepreparationofthisuser’smanual;however,shouldyounoticeanyquestionablepoints,errorsoromissions,pleasecontactus.
(4)Notwithstandingarticle(3),DukanewillnotberesponsibleforanyclaimsonlossofprofitorothermattersdeemedtoresultfromusingtheProjector.
Note: The Dukane models described in this document are manufactured by NEC and use the same firmware, software programs, control code, and accessory parts. The equivalent Dukane to NEC models are 6640W (NP-P401W), 6645 (NP-P451X), 6645W (NP-P451W), and 6650 (NP-P501X).

i
Important InformationSafety CautionsPrecautionsPleasereadthismanualcarefullybeforeusingyourprojectorandkeepthemanualhandyforfuturereference.
CAUTIONToturnoffmainpower,besuretoremovetheplugfrompoweroutlet.Thepoweroutletsocketshouldbeinstalledasneartotheequipmentaspossible,andshouldbeeasilyaccessible.
CAUTIONTOPREVENTSHOCK,DONOTOPENTHECABINET.THEREAREHIGH-VOLTAGECOMPONENTSINSIDE.REFERSERVICINGTOQUALIFIEDSERVICEPERSONNEL.
Thissymbolwarnstheuserthatuninsulatedvoltagewithintheunitmaybesufficienttocauseelectricalshock.Therefore,itisdangeroustomakeanykindofcontactwithanypartinsideoftheunit.
Thissymbolalertstheuserthatimportantinformationconcerningtheoperationandmaintenanceofthisunithasbeenprovided.Theinformationshouldbereadcarefullytoavoidproblems.
WARNING:TOPREVENTFIREORSHOCK,DONOTEXPOSETHISUNITTORAINORMOISTURE.DONOTUSETHISUNIT’SPLUGWITHANEXTENSIONCORDORINANOUTLETUNLESSALLTHEPRONGSCANBEFULLYINSERTED.
DOC Compliance Notice (for Canada only)ThisClassBdigitalapparatuscomplieswithCanadianICES-003.
Machine Noise Information Regulation - 3. GPSGV,Thehighestsoundpressurelevelislessthan70dB(A)inaccordancewithENISO7779.
CAUTIONAvoiddisplayingstationaryimagesforaprolongedperiodoftime.DoingsocanresultintheseimagesbeingtemporarilysustainedonthesurfaceoftheLCDpanel.Ifthisshouldhappen,continuetouseyourprojector.Thestaticbackgroundfrompreviousimageswilldisappear.
Disposing of your used product
EU-widelegislationasimplementedineachMemberStaterequiresthatusedelectricalandelectronicprod-uctscarryingthemark(left)mustbedisposedofseparatelyfromnormalhouseholdwaste.Thisincludesprojectorsandtheirelectricalaccessoriesorlamps.Whenyoudisposeofsuchproducts,pleasefollowtheguidanceofyourlocalauthorityand/orasktheshopwhereyoupurchasedtheproduct.Aftercollectingtheusedproducts,theyarereusedandrecycledinaproperway.Thiseffortwillhelpusreducethewastesaswellasthenegativeimpactsuchasmercurycontainedinalamptothehumanhealthandtheenvironmentattheminimumlevel.ThemarkontheelectricalandelectronicproductsonlyappliestothecurrentEuropeanUnionMemberStates.

ii
Important Information
WARNING TO CALIFORNIA RESIDENTS:Handlingthecablessuppliedwiththisproductwillexposeyoutolead,achemicalknowntotheStateofCaliforniatocausebirthdefectsorotherreproductiveharm.WASHHANDSAFTERHANDLING.
RF Interference (for USA only)
WARNINGTheFederalCommunicationsCommissiondoesnotallowanymodificationsorchangestotheunitEXCEPTthosespecifiedbyNECDisplaySolutionsofAmerica,Inc.inthismanual.Failuretocomplywiththisgovernmentregu-lationcouldvoidyourrighttooperatethisequipment.ThisequipmenthasbeentestedandfoundtocomplywiththelimitsforaClassBdigitaldevice,pursuanttoPart15oftheFCCRules.Theselimitsaredesignedtoprovidereasonableprotectionagainstharmfulinterferenceinaresidentialinstallation.Thisequipmentgenerates,uses,andcanradiateradiofrequencyenergyand,ifnotinstalledandusedinaccordancewiththeinstructions,maycauseharmfulinterferencetoradiocommunications.However,thereisnoguaranteethatinterferencewillnotoccurinaparticularinstallation.Ifthisequipmentdoescauseharmfulinterferencetoradioortelevisionreception,whichcanbedeterminedbyturningtheequipmentoffandon,theuserisencouragedtotrytocorrecttheinterferencebyoneormoreofthefollowingmeasures:
• Reorientorrelocatethereceivingantenna.• Increasetheseparationbetweentheequipmentandreceiver.• Connecttheequipmentintoanoutletonacircuitdifferentfromthattowhichthereceiverisconnected.• Consultthedealeroranexperiencedradio/TVtechnicianforhelp.
ForUKonly:InUK,aBSapprovedpowercordwithmouldedplughasaBlack(fiveAmps)fuseinstalledforusewiththisequipment.Ifapowercordisnotsuppliedwiththisequipmentpleasecontactyoursupplier.
Important SafeguardsThesesafetyinstructionsaretoensurethelonglifeofyourprojectorandtopreventfireandshock.Pleasereadthemcarefullyandheedallwarnings.
Installation•Donotplacetheprojectorinthefollowingconditions:
- on an unstable cart, stand, or table.- nearwater,baths,ordamprooms.- indirectsunlight,nearheaters,orheatradiatingappliances.- inadusty,smokyorsteamyenvironment.- onasheetofpaperorcloth,rugsorcarpets.
•Ifyouwishtohavetheprojectorinstalledontheceiling:- Donotattempttoinstalltheprojectoryourself.- Theprojectormustbeinstalledbyqualifiedtechniciansinordertoensureproperoperationandreducetherisk
ofbodilyinjury.- Inaddition,theceilingmustbestrongenoughtosupporttheprojectorandtheinstallationmustbeinaccordance
withanylocalbuildingcodes.- Pleaseconsultyourdealerformoreinformation.
iii
Important Information
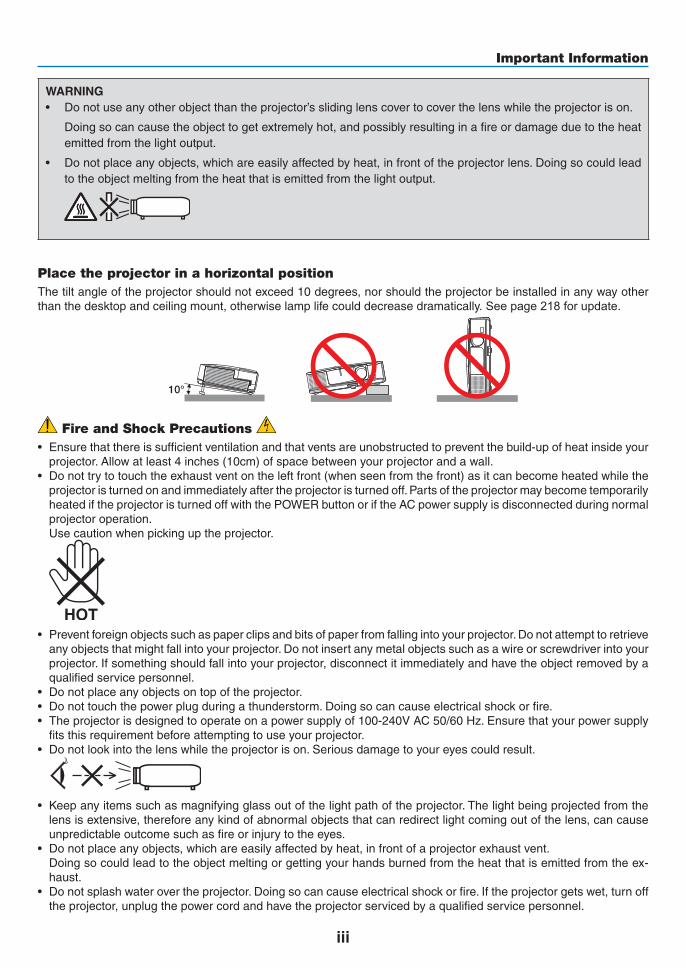
WARNING• Donotuseanyotherobjectthantheprojector’sslidinglenscovertocoverthelenswhiletheprojectorison.
Doingsocancausetheobjecttogetextremelyhot,andpossiblyresultinginafireordamageduetotheheatemittedfromthelightoutput.
• Donotplaceanyobjects,whichareeasilyaffectedbyheat,infrontoftheprojectorlens.Doingsocouldleadtotheobjectmeltingfromtheheatthatisemittedfromthelightoutput.
Place the projector in a horizontal positionThetiltangleoftheprojectorshouldnotexceed10degrees,norshouldtheprojectorbeinstalledinanywayotherthanthedesktopandceilingmount,otherwiselamplifecoulddecreasedramatically. See page 218 for update.
10°
Fire and Shock Precautions • Ensurethatthereissufficientventilationandthatventsareunobstructedtopreventthebuild-upofheatinsideyour
projector.Allowatleast4inches(10cm)ofspacebetweenyourprojectorandawall.• Donottrytotouchtheexhaustventontheleftfront(whenseenfromthefront)asitcanbecomeheatedwhilethe
projectoristurnedonandimmediatelyaftertheprojectoristurnedoff.PartsoftheprojectormaybecometemporarilyheatediftheprojectoristurnedoffwiththePOWERbuttonoriftheACpowersupplyisdisconnectedduringnormalprojectoroperation.
Usecautionwhenpickinguptheprojector.
• Preventforeignobjectssuchaspaperclipsandbitsofpaperfromfallingintoyourprojector.Donotattempttoretrieveanyobjectsthatmightfallintoyourprojector.Donotinsertanymetalobjectssuchasawireorscrewdriverintoyourprojector.Ifsomethingshouldfallintoyourprojector,disconnectitimmediatelyandhavetheobjectremovedbyaqualifiedservicepersonnel.
• Donotplaceanyobjectsontopoftheprojector.• Donottouchthepowerplugduringathunderstorm.Doingsocancauseelectricalshockorfire.• Theprojectorisdesignedtooperateonapowersupplyof100-240VAC50/60Hz.Ensurethatyourpowersupply
fitsthisrequirementbeforeattemptingtouseyourprojector.• Donotlookintothelenswhiletheprojectorison.Seriousdamagetoyoureyescouldresult.
• Keepanyitemssuchasmagnifyingglassoutofthelightpathoftheprojector.Thelightbeingprojectedfromthelensisextensive,thereforeanykindofabnormalobjectsthatcanredirectlightcomingoutofthelens,cancauseunpredictableoutcomesuchasfireorinjurytotheeyes.
• Donotplaceanyobjects,whichareeasilyaffectedbyheat,infrontofaprojectorexhaustvent. Doingsocouldleadtotheobjectmeltingorgettingyourhandsburnedfromtheheatthatisemittedfromtheex-
haust.• Donotsplashwaterovertheprojector.Doingsocancauseelectricalshockorfire.Iftheprojectorgetswet,turnoff
theprojector,unplugthepowercordandhavetheprojectorservicedbyaqualifiedservicepersonnel.

iv
Important Information
• Handlethepowercordcarefully.Adamagedorfrayedpowercordcancauseelectricshockorfire.- Donotuseanypowercordotherthantheonesuppliedwiththeprojector.- Donotbendortugthepowercordexcessively.- Donotplacethepowercordundertheprojector,oranyheavyobject.- Donotcoverthepowercordwithothersoftmaterialssuchasrugs.- Donotheatthepowercord.- Donothandlethepowerplugwithwethands.
• Turnofftheprojector,unplugthepowercordandhavetheprojectorservicedbyaqualifiedservicepersonnelunderthefollowingconditions:- Whenthepowercordorplugisdamagedorfrayed.- Ifliquidhasbeenspilledintotheprojector,orifithasbeenexposedtorainorwater.- Iftheprojectordoesnotoperatenormallywhenyoufollowtheinstructionsdescribedinthisuser’smanual.- Iftheprojectorhasbeendroppedorthecabinethasbeendamaged.- Iftheprojectorexhibitsadistinctchangeinperformance,indicatinganeedforservice.
• Disconnectthepowercordandanyothercablesbeforecarryingtheprojector.• Turnofftheprojectorandunplugthepowercordbeforecleaningthecabinetorreplacingthelamp.• Turnofftheprojectorandunplugthepowercordiftheprojectorisnottobeusedforanextendedperiodoftime.• WhenusingaLANcable(onlymodelswiththeRJ-45LANport): Forsafety,donotconnecttotheconnectorforperipheraldevicewiringthatmighthaveexcessivevoltage.
CAUTION• Donotusethetilt-footforpurposesotherthanoriginallyintended.Misusessuchasgrippingthetilt-footorhang-
ingonthewallcancausedamagetotheprojector.• Donotsendtheprojectorinthesoftcasebyparceldeliveryserviceorcargoshipment.Theprojectorinsidethe
softcasecouldbedamaged.• Select[HIGH]inFanmodeifyoucontinuetousetheprojectorforconsecutivedays.(Fromthemenu,select
[SETUP]→[OPTIONS(1)]→[FANMODE]→[HIGH].)• DonotturnofftheACpowerfor60secondsafterthelampisturnedonandwhilethePOWERindicatorisblink-
ingblue.Doingsocouldcauseprematurelampfailure.
Remote Control Precautions
• Handletheremotecontrolcarefully.
• Iftheremotecontrolgetswet,wipeitdryimmediately.
• Avoidexcessiveheatandhumidity.
• Donotshort,heat,ortakeapartbatteries.
• Donotthrowbatteriesintofire.
• Ifyouwillnotbeusingtheremotecontrolforalongtime,removethebatteries.
• Ensurethatyouhavethebatteries’polarity(+/−)alignedcorrectly.
• Donotusenewandoldbatteriestogether,orusedifferenttypesofbatteriestogether.
• Disposeofusedbatteriesaccordingtoyourlocalregulations.

v
Important Information
Note for US ResidentsThelampinthisproductcontainsmercury.PleasedisposeaccordingtoLocal,StateorFederalLaws.
Lamp Replacement• Usethespecifiedlampforsafetyandperformance.• Toreplacethelamp,followallinstructionsprovidedonpage160.• Besuretoreplacethelampandfilterwhenthemessage[THE LAMP HAS REACHED THE END OF ITS USABLE
LIFE. PLEASE REPLACE THE LAMP AND FILTER.]appears.Ifyoucontinuetousethelampafterthelamphasreachedtheendofitsusablelife,thelampbulbmayshatter,andpiecesofglassmaybescatteredinthelampcase.Donottouchthemasthepiecesofglassmaycauseinjury.
Ifthishappens,contactyourdealerforlampreplacement.
A Lamp CharacteristicTheprojectorhasahigh-pressuremercurylampasalightsource.Alamphasacharacteristicthatitsbrightnessgraduallydecreaseswithage.Alsorepeatedlyturningthelamponandoffwillincreasethepossibilityofitslowerbrightness.Theactuallamplifemayvarydependingupontheindividuallamp,theenvironmentalconditionsandusage.
CAUTION:• DONOTTOUCHTHELAMPimmediatelyafterithasbeenused.Itwillbeextremelyhot.Turntheprojectoroff
andthendisconnectthepowercord.Allowatleastonehourforthelamptocoolbeforehandling.• Whenremovingthelampfromaceiling-mountedprojector,makesurethatnooneisundertheprojector.Glass
fragmentscouldfallifthelamphasbeenburnedout.
About High Altitude mode
• Set[FANMODE]to[HIGHALTITUDE]whenusingtheprojectorataltitudesapproximately5500feet/1700metersorhigher.
Usingtheprojectorataltitudesapproximately5500feet/1700metersorhigherwithoutsettingto[HIGHALTITUDE]cancausetheprojectortooverheatandtheprojectorcouldshutdown.Ifthishappens,waitacoupleminutesandturnontheprojector.
• Usingtheprojectorataltitudeslessthanapproximately5500feet/1700metersandsettingto[HIGHALTITUDE]cancausethelamptoovercool,causingtheimagetoflicker.Switch[FANMODE]to[AUTO].
• Usingtheprojectorataltitudesapproximately5500feet/1700metersorhighercanshortenthelifeofopticalcom-ponentssuchasthelamp.
About Copyright of original projected pictures:Pleasenotethatusingthisprojectorforthepurposeofcommercialgainortheattractionofpublicattentioninavenuesuchasacoffeeshoporhotelandemployingcompressionorexpansionofthescreenimagewiththefollowingfunc-tionsmayraiseconcernabouttheinfringementofcopyrightswhichareprotectedbycopyrightlaw.[ASPECTRATIO],[KEYSTONE],Magnifyingfeatureandothersimilarfeatures.
Turkish RoHS information relevant for Turkish marketEEE Yonetmeliğine Uygundur.
Thisdeviceisnotintendedforuseinthedirectfieldofviewatvisualdisplayworkplaces.Toavoidincommodingreflec-tionsatvisualdisplayworkplacesthisdevicemustnotbeplacedinthedirectfieldofview.

vi
Important Information
Power management functionTheprojectorhaspowermanagementfunctions.Toreducepowerconsumption,thepowermanagementfunctions(1and2)arefactorypresetasshownbelow.TocontroltheprojectorfromanexternaldeviceviaaLANorserialcableconnection,usetheon-screenmenutochangethesettingsfor1and2.
1. STANDBY MODE (Factory preset: POWER-SAVING)
To control the projector from an external device, select [NORMAL] for [STANDBY MODE].
NOTE:• When[POWER-SAVING]isselectedfor[STANDBYMODE],thefollowingconnectorsandfunctionswillnotwork: PCCONTROLport,MONITOROUTconnector,AUDIOOUTconnector,USB(PC)port,LANfunctions*,MailAlertfunction*,DDC/
CI(VirtualRemoteTool)* PE501Xdoesnothavethisfunction.
2. AUTO POWER OFF (Factory preset: 30 minutes)
To control the projector from an external device, select [OFF] for [AUTO POWER OFF].
NOTE:• When[0:30]isselectedfor[AUTOPOWEROFF],youcanenabletheprojectortoautomaticallyturnoffin30minutesifthereis
nosignalreceivedbyanyinputorifnooperationisperformed.

vii
Table of ContentsImportant Information ............................................................................................ i
1. Introduction ...........................................................................................................1❶What’sintheBox? ..........................................................................................................1❷IntroductiontotheProjector ...........................................................................................2
CongratulationsonYourPurchaseoftheProjector ..................................................2Featuresyou’llenjoy: ................................................................................................2Aboutthisuser’s manual ...........................................................................................3
❸ Part NamesoftheProjector ...........................................................................................4Front/Top ...................................................................................................................4Rear ..........................................................................................................................5TopFeatures .............................................................................................................6TerminalPanelFeatures ...........................................................................................7
❹PartNamesoftheRemoteControl ................................................................................8BatteryInstallation ....................................................................................................9RemoteControlPrecautions .....................................................................................9OperatingRangeforWirelessRemoteControl .........................................................9
❺OperatingEnvironmentforSoftwareIncludedonCD-ROM .........................................10OperatingEnvironment ...........................................................................................11
2. Projecting an Image (Basic Operation) ...............................................13❶FlowofProjectinganImage .........................................................................................13❷ConnectingYourComputer/ConnectingthePowerCord ..............................................14❸TurningontheProjector ...............................................................................................15
NoteonStartupscreen(MenuLanguageSelectscreen) .......................................16❹SelectingaSource .......................................................................................................17
Selectingthecomputerorvideosource..................................................................17❺AdjustingthePictureSizeandPosition ........................................................................19
Adjustingtheverticalpositionofaprojectedimage(Lensshift) .............................20Focus ......................................................................................................................21Zoom .......................................................................................................................22AdjusttheTiltFoot ..................................................................................................23
❻CorrectingKeystoneDistortion[KEYSTONE] ..............................................................24❼OptimizingComputerSignalAutomatically ..................................................................26
AdjustingtheImageUsingAutoAdjust ...................................................................26❽ TurningUporDownVolume .........................................................................................26❾TurningofftheProjector ...............................................................................................27❿AfterUse.......................................................................................................................28
3. Convenient Features ......................................................................................29❶ TurningofftheImageandSound .................................................................................29❷Freezing a Picture ........................................................................................................29❸ EnlargingaPicture .......................................................................................................29❹ChangingEcoMode/CheckingEnergy-SavingEffect .................................................30
UsingEcoMode[ECOMODE] ...............................................................................30CheckingEnergy-SavingEffect[CARBONMETER] ..............................................31
❺ PreventingtheUnauthorizedUseoftheProjector[SECURITY] ..................................33

viii
Table of Contents
❻Using4-PointCornertoCorrectKeystoneDistortion[CORNERSTONE] ....................36Cornerstone ............................................................................................................36
❼OperatingYourComputer’sMouseFunctionsfromtheProjector’sRemoteControl viatheUSBCable(RemoteMouseFunction) ........................................................39
❽ProjectingYourComputer’sScreenImagefromtheProjectorviatheUSBCable(USBDisplay) .........................................................................................................40
❾ControllingtheProjectorbyUsinganHTTPBrowser........................................... ......42❿ProjectingYourComputer’sScreenImagefromtheProjectorviaaNetwork
[NETWORKPROJECTOR]........................................... ........................................49⓫UsingtheProjectortoOperateYourComputerviaaNetwork[REMOTE
DESKTOP].............................................................................................................53⓬ConnectingYourMicrophone ........................................................................................58
4. Using the Viewer...............................................................................................59❶WhatyoucandowiththeViewer ..................................................................................59❷Preparingpresentation materials .................................................................................62❸ProjectingimagesstoredinaUSBmemorydevice .....................................................63
StartingtheViewer ..................................................................................................63ExitingtheViewer ...................................................................................................68NamesandfunctionsofViewerscreen ...................................................................69Vieweroptionsettings .............................................................................................74
❹Projectingdatafromsharedfolder ...............................................................................77Connectingtheprojectortothesharedfolder ........................................................77Disconnectingthesharedfolderfromtheprojector ................................................80
❺Projectingdatafrommediaserver................................................................................81Settingup“MediaSharing”inWindowsMediaPlayer11 .......................................81Settingup“MediaSharing”inWindowsMediaPlayer12 .......................................83Connectingtheprojectortothemediaserver .........................................................84Disconnectingtheprojectorfromthemediaserver ................................................85
❻Restrictionsondisplayingfiles .....................................................................................86SomerestrictionsonPowerPointfiles .....................................................................86SomerestrictionsonExcelfiles ..............................................................................86SomerestrictionsonPDFfiles ...............................................................................86
5. Using On-Screen Menu .................................................................................87❶UsingtheMenus ...........................................................................................................87❷ Menu Elements .............................................................................................................88❸ListofMenuItems ........................................................................................................89❹MenuDescriptions&Functions[SOURCE] .................................................................92
COMPUTER ...........................................................................................................92HDMI1and2 ...........................................................................................................92VIDEO .....................................................................................................................92S-VIDEO .................................................................................................................92VIEWER.................................................................................................................92NETWORK.............................................................................................................92USBDISPLAY .........................................................................................................92
❺MenuDescriptions&Functions[ADJUST] ...................................................................93[PICTURE] ..............................................................................................................93

ix
Table of Contents
[IMAGEOPTIONS] .................................................................................................96[AUDIO] .................................................................................................................100
❻MenuDescriptions&Functions[SETUP] ...................................................................101[GENERAL] ...........................................................................................................101[MENU] .................................................................................................................103[INSTALLATION] ...................................................................................................105[OPTIONS(1)] .......................................................................................................107[OPTIONS(2)] .......................................................................................................110
❼MenuDescriptions&Functions[INFO.] .....................................................................113[USAGETIME] ......................................................................................................113[SOURCE(1)] ........................................................................................................114[SOURCE(2)] ........................................................................................................114[WIREDLAN].......................................................................................................114[WIRELESSLAN]................................................................................................115[VERSION(1)] .......................................................................................................115[VERSION(2)].......................................................................................................115[OTHERS] .............................................................................................................116
❽MenuDescriptions&Functions[RESET] ...................................................................117ReturningtoFactoryDefault[RESET] ..................................................................117
❾ApplicationMenu.......................................................................................................118IMAGEEXPRESSUTILITY ..................................................................................118DESKTOPCONTROLUTILITY ............................................................................118NETWORKPROJECTOR .....................................................................................119REMOTEDESKTOPCONNECTION ...................................................................119NETWORKSETTINGS .........................................................................................120TOOLS ..................................................................................................................136
6. Installation and Connections ..................................................................141❶SettingUptheScreenandtheProjector ....................................................................141
SelectingaLocation..............................................................................................141ThrowDistanceandScreenSize ..........................................................................143
❷MakingConnections ...................................................................................................145ConnectingYourComputer ...................................................................................145ConnectinganExternal Monitor ...........................................................................147ConnectingYourDVDPlayerorOtherAVEquipment ...........................................148ConnectingComponentInput ...............................................................................149ConnectingHDMIInput.........................................................................................150ConnectingtoaWiredLAN...................................................................................151ConnectingtoaWirelessLAN(Optional:NP02LMseries).................................. 152AttachingtheOptionalCableCover(NP03CV) ....................................................155
7. Maintenance .....................................................................................................156❶CleaningtheFilters.....................................................................................................156❷CleaningtheLens.......................................................................................................159❸CleaningtheCabinet ..................................................................................................159❹ReplacingtheLampandtheFilters ............................................................................160
x
Table of Contents
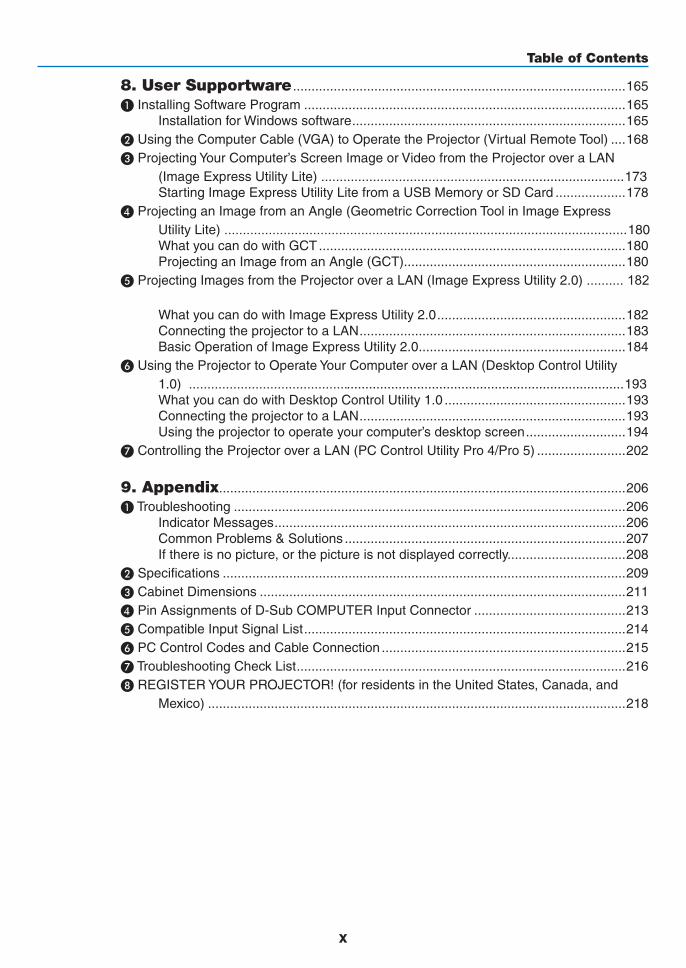
8. User Supportware ..........................................................................................165❶InstallingSoftwareProgram .......................................................................................165
InstallationforWindowssoftware ..........................................................................165❷UsingtheComputerCable(VGA)toOperatetheProjector(VirtualRemoteTool) ....168❸ProjectingYourComputer’sScreenImageorVideofromtheProjectoroveraLAN
(ImageExpressUtilityLite)..................................................................................173StartingImageExpressUtilityLitefromaUSBMemoryorSDCard ...................178
❹ProjectinganImagefromanAngle(GeometricCorrectionToolinImageExpress UtilityLite).............................................................................................................180WhatyoucandowithGCT ...................................................................................180ProjectinganImagefromanAngle(GCT) ............................................................180
❺ ProjectingImagesfromtheProjectoroveraLAN(ImageExpressUtility2.0).......... 182
WhatyoucandowithImageExpressUtility2.0 ...................................................182ConnectingtheprojectortoaLAN ........................................................................183BasicOperationofImageExpressUtility2.0 ........................................................184
❻UsingtheProjectortoOperateYourComputeroveraLAN(DesktopControlUtility1.0) ......................................................................................................................193WhatyoucandowithDesktopControlUtility1.0 .................................................193ConnectingtheprojectortoaLAN ........................................................................193Usingtheprojectortooperateyourcomputer’sdesktopscreen ...........................194
❼ControllingtheProjectoroveraLAN(PCControlUtilityPro4/Pro5) ........................202
9. Appendix ..............................................................................................................206❶Troubleshooting ..........................................................................................................206
IndicatorMessages ...............................................................................................206CommonProblems&Solutions ............................................................................207Ifthereisnopicture,orthepictureisnotdisplayedcorrectly. ...............................208
❷Specifications .............................................................................................................209❸CabinetDimensions ...................................................................................................211❹PinAssignmentsofD-SubCOMPUTERInputConnector .........................................213❺CompatibleInputSignalList .......................................................................................214❻PCControlCodesandCableConnection ..................................................................215❼ TroubleshootingCheckList .........................................................................................216❽REGISTERYOURPROJECTOR!(for residents in the UnitedStates,Canada, and
Mexico) .................................................................................................................218

1
Projector
1. Introduction❶ What’s in the Box?Makesureyourboxcontainseverythinglisted.Ifanypiecesaremissing,contactyourdealer.Pleasesavetheoriginalboxandpackingmaterialsifyoueverneedtoshipyourprojector.
Power cord(US: 7N080236)(EU: 7N080022)
Computer cable (VGA)(7N520087)
Projector CD-ROMUser’s manual (PDF) and the utility software(7N951901)
• ImportantInfomation(ForNorthAmerica: 7N8N3471) (For Other countries than North America: 7N8N3471 and 7N8N3481)
• QuickSetupGuide(ForNorthAmer-ica: 7N8N3491) (For Other countries than North America: 7N8N3491 and 7N8N3501)
Remote control(7N900926)
Batteries (AAA × 2)
Unlessotherwisedescribedintheuser’smanual,thedrawingsfortheprojectorcabinetshowexamplesofthe6650.

2
1. Introduction
❷ Introduction to the ProjectorThissectionintroducesyoutoyournewprojectoranddescribesthefeaturesandcontrols.
Congratulations on Your Purchase of the ProjectorThisprojectorisoneoftheverybestprojectorsavailabletoday.Theprojectorenablesyoutoprojectpreciseimagesupto300inchesacross(measureddiagonally)fromyourPCorMaccomputer(desktopornotebook),VCR,DVDplayer,ordocumentcamera.Youcanusetheprojectoronatabletoporcart,youcanusetheprojectortoprojectimagesfrombehindthescreen,andtheprojectorcanbepermanentlymountedonaceiling*1.Theremotecontrolcanbeusedwirelessly.
*1 Donotattempttomounttheprojectoronaceilingyourself.
Theprojectormustbeinstalledbyqualifiedtechniciansinordertoensureproperoperationandreducetheriskofbodilyinjury.
Inaddition,theceilingmustbestrongenoughtosupporttheprojectorandtheinstallationmustbeinaccordancewithanylocalbuildingcodes.Pleaseconsultyourdealerformoreinformation.
Features you’ll enjoy:
• Quickstart(3seconds*2),QuickPowerOff,DirectPowerOff
3seconds*2afterturningonthepower,theprojectorisreadytodisplayPCorvideoimages.
Theprojectorcanbeputawayimmediatelyaftertheprojectorispowereddown.Nocooldownperiodisrequiredaftertheprojectoristurnedofffromtheremotecontrolorcabinetcontrolpanel.
Theprojectorhasafeaturecalled“DirectPowerOff”.Thisfeatureallowstheprojectortobeturnedoff(evenwhenprojectinganimage)byusingtheMainPowerSwitchordisconnectingtheACpowersupply.
ToturnofftheACpowersupplywhentheprojectorispoweredon,useapowerstripequippedwithaswitchandabreaker.
*2 Thequickstarttimeisonlywhen[STANDBYMODE]issetto[NORMAL]intheon-screenmessage.
• 0.21W(100-130VAC)/0.43W(200-240VAC)instandbyconditionwithenergysavingtechnology
Selecting[POWER-SAVING]for[STANDBYMODE]fromthemenucanputtheprojectorinpower-savingmodethatconsumesonly0.21W(100-130VAC)/0.43W(200-240VAC).Thewattageisatypicalvalue.
• CarbonMeter
Thisfeaturewillshowenergy-savingeffectintermsofCO2emissionreduction(kg)andelectricitycostwhentheprojector’s[ECOMODE]issetto[AUTOECO],[NORMAL],or[ECO].
TheamountofCO2emissionreductionwillbedisplayedintheconfirmationmessageatthetimeofpower-offandintheINFOoftheon-screenmenu.
• Lamplifeupto6000hours*3
UsinginEcoMode(ECO)allowsyoutoprolongtheprojector’slamplifeupto6000hours(upto4000hoursinECOMODEOFF).
*36650/6645:6000hours(upto3500hoursinECOMODEOFF).
• TwoHDMIinputssupportsdigitalsignals
ThetwoHDMIinputsprovideHDCPcompatibledigitalsignals.TheHDMIinputalsosupportsaudiosignal.
• 16Wbuilt-inspeakerforanintegratedaudiosolution
Powerful16wattmonauralspeakerprovidesvolumeneedforlargerooms.
• MICInputprovided
AMICinputjackforacommerciallyavailabledynamicmicrophoneisusefulforyourpresentationinaconferenceroom or lecture in a classroom.
• ThesuppliedremotecontrolallowsyoutoassignaCONTROLIDtotheprojector
MultipleprojectorscanbeoperatedseparatelyandindependentlywiththesamesingleremotecontrolbyassigninganIDnumbertoeachprojector.

3
1. Introduction
• Keystonecorrection
Keystonevertical/horizontal/pincushionandcornerstonefeaturesallowsyoutocorrectalmostalldistortionsintheimage.
• IntegratedRJ-45connectorforwirednetworkingcapabilityalongwithwirelessnetworkingcapabilities
AnRJ-45connectorisstandard.AnoptionalUSBWirelessLANUnit(NP02LMseries)isrequiredforwirelessLANconnection.
• Softwareprograms(UserSupportware)containedinthesuppliedCD-ROM
ThesuppliedProjectorincludesprograms:VirtualRemoteTool,ImageExpressUtilityLite(forWindows/MacOS),ImageExpressUtility2.0(forWindowsonly),DesktopControlUtility1.0(forWindowsonly),andPCControlUtilityPro4(forWindows)/5(forMacOS).
• LAN-compatibleViewer
Theprojector’sbuilt-inViewerallowsyoutoviewimagesormoviefilesinthesharedfolderofyourPCconnectedtoawiredorwirelessLAN.
* TheViewersupportstheMediaSharingfunctionofWindowsMediaPlayer11.
• Audiotransfercapability(forWindowsonly)
ImageExpressUtilityLiteallowsyoutosendthecomputer’sscreenimageandaudiototheprojector.
* Audiotransfercapabilityisavailableonlywhenthecomputerconnectswiththeprojectorinpeer-to-peernet-work.
* AudiotransfercapabilityisavailablewithUSBDisplayconnection.
• Streamingvideotransfercapability(forWindowsonly)
ImageExpressUtilityLiteallowsyoutosendstreamingvideofromthecomputertoasingleprojectoroverwiredorwirelessLANwithouttheneedofconnectingacomputercable.
• USBDisplay
UsingacommerciallyavailableUSBcable(compatiblewithUSB2.0specifications)toconnectthecomputerwiththeprojectorallowsyoutosendyourcomputerscreenimageandaudiototheprojectorwithouttheneedofatraditionalcomputercable(VGA).
• AUTOPOWERONandAUTOPOWEROFFfeatures
TheDIRECTPOWERON,AUTOPOWERON(COMP.),AUTOPOWEROFF,andOFFTIMERfeatureseliminatetheneedtoalwaysusethePOWERbuttonontheremotecontrolorprojectorcabinet.
• Preventingunauthorizeduseoftheprojector
Enhancedsmartsecuritysettingsforkeywordprotection,cabinetcontrolpanellock,securityslot,andsecuritychainopeningtohelppreventunauthorizedaccess,adjustmentsandtheftdeterrence.
• HighresolutionuptoWUXGA
Highresolutiondisplay-uptoWUXGAcompatible,XGA(6645/6650)/WXGA(6640W/6645W)nativeresolution.
• CRESTRONROOMVIEWcompatibility. TheprojectorsupportsCRESTRONROOMVIEW,allowingmultipledevicesconnectedinthenetworktobeman-
agedandcontrolledfromacomputerorcontroller.
About this user’s manualThefastestwaytogetstartedistotakeyourtimeanddoeverythingrightthefirsttime.Takeafewminutesnowtoreviewtheuser’smanual.Thismaysaveyoutimelateron.Atthebeginningofeachsectionofthemanualyou’llfindanoverview.Ifthesectiondoesn’tapply,youcanskipit.

4
1. Introduction
❸ Part Names of the ProjectorFront/Top
Controls(→ page 6)
Lens
Remote Sensor(→ page 9)
IntakeVent/FilterCover(→ page 158, 163)
Zoom Lever (→ page 22)
Lens Cover
Focus Lever(→ page 21)
Adjustable Tilt Foot (→ page 23)
Adjustable Tilt Foot Lever (→ page 23)
Exhaust VentHeated air is exhausted from here.
Lens Shift Dial (Vertical)(→ page 20)

5
1. Introduction
Opening and closing the lens coverSlidethelenscovertothelefttouncoverthelens.
Tocoverthelens,slidethelenscovertotheright.
NOTE:• ThelenscoverworksinconjunctionwiththeAV-MUTEfunction.Closingthelenscoverwillturnofftheimageandsoundduring
normalprojectoroperation;openingitwillrestoretheimageandsound. Withthelenscoverclosedtheimageandsoundisturnedoff,howeverthelampisstilllit.Iftheprojectorstaysthiswayforabout
2hours,itwillturnoffautomatically.• Donotpullthelenscoverwithexcessiveforceorapplystrongpressureineithertheupordowndirection.Doingsocancause
damagetothelenscoverslidingmechanism!
ACInputConnect the supplied power cord’s
three-pin plug here, and plug the other end into an active wall outlet.
(→ page 14)
Port Cover for Optional USB Wireless LAN Unit*1
When using the optional USB Wireless LAN Unit, first remove
the cover. (→ page 152)
Terminal Panel (→ page 7)
MonauralSpeaker(16W)
Lamp Cover (→ page 161)
Rear Foot (→ page 23)
Rear
Built-in Security Slot ( )*2
Security chain opening Attach an anti-theft device.The security chain opening accepts security wires or chains up to 0.18 inch/4.6mmindiameter.
*2 ThissecurityslotsupportstheMicroSaver®SecuritySystem.

6
1. Introduction
Top Features
1/2
5
6
4
7
8 11
9
3
10
1. (POWER)Button (→page15, 27)
2. POWER Indicator (→page14, 15, 27, 206)
3. STATUSIndicator (→page206)
4. LAMPIndicator (→page160, 206)
5. ECOButton (→page30)
6. SOURCEButton (→page17)
7. AUTOADJ.Button (→page26)
8. MENUButton (→page87)
9. ▲▼◀▶/VolumeButtons◀▶/KeystoneButton▼ (→page24, 26)
10.ENTERButton (→page87)
11.EXITButton (→page87)

7
1. Introduction
Terminal Panel Features
1 237 465
119 810 14
12
13*
1. COMPUTERIN/ComponentInputConnector(MiniD-Sub15Pin) (→page145, 149)
2. AUDIOINMiniJack(StereoMini) (→page145, 149)
3. HDMI1INConnector(TypeA) (→page145, 150)
4. HDMI2INConnector(TypeA) (→page145, 150)
5. USB(PC)Port(TypeB) (→page39, 40, 145)
6. MONITOROUT(COMP.)Connector(MiniD-Sub15Pin) (→page147)
7. AUDIOOUTMiniJack(StereoMini) (→page147)
8. S-VIDEOINConnector(MiniDIN4Pin) (→page148)
9. VIDEOINConnector(RCA) (→page148)
10.VIDEO/S-VIDEOAUDIOINL/MONO,R(RCA) (→page148)
11.MICInputJack(MonauralMini) (→page58)
12.USBPort(TypeA)* (→page63)
13.LANPort(RJ-45)* (→page151)
14.PCCONTROL[PCCONTROL]Port(D-Sub9Pin) (→page215) UsethisporttoconnectaPCorcontrolsystem.Thisenablesyoutocontroltheprojectorusingserialcommunica-
tionprotocol.Ifyouarewritingyourownprogram,typicalPCcontrolcodesareonpage215.

8
1. Introduction
❹ Part Names of the Remote Control
3756
1
2
1015
161417
9
48
13
29
3031
19202527
2824
18
23
2221
26
32
1211
1. Infrared Transmitter (→page9)
2. POWERONButton (→page15)
3. POWEROFFButton (→page27)
4,5,6.COMPUTER1/2/3Button (→page17) (COMPUTER2/3buttonisnotavailable.)
7. AUTOADJ.Button (→page26)
8. VIDEOButton (→page17)
9. S-VIDEOButton (→page17)
10.HDMIButton(→page17)
11.VIEWERButton(→page17, 63)
12.NETWORKButton(→page17)
13.USBDISPLAYButton(→page17)
14.IDSETButton (→page106)
15.NumericKeypadButton/CLEARButton (→page106)
16.FREEZEButton (→page29)
17.AV-MUTEButton (→page29)
18.MENUButton (→page87)
19.EXITButton(→page87)
20.▲▼◀▶Button(→page87)
21.ENTERButton(→page87)
22.D-ZOOM(+)(–)Button (→page29)
23.MOUSEL-CLICKButton* (→page39)
24.MOUSER-CLICKButton* (→page39)
25.PAGE▽/△Button (→page39)
26.ECOButton(→page30)
27.KEYSTONEButton (→page24)
28.PICTUREButton (→page93, 95)
29.VOL.(+)(–)Button (→page26)
30.ASPECTButton (→page98)
31.FOCUS/ZOOMButton (notavailableonthisseriesofprojectors)
32.HELPButton (→page113)
* TheMOUSEL-CLICKandMOUSER-CLICKbuttonsworkonlywhenaUSBcableisconnectedwithyourcom-puter.

9
1. Introduction
Remote Control Precautions• Handletheremotecontrolcarefully.• Iftheremotecontrolgetswet,wipeitdryimmediately.• Avoidexcessiveheatandhumidity.• Donotshort,heat,ortakeapartbatteries.• Donotthrowbatteriesintofire.• Ifyouwillnotbeusingtheremotecontrolforalongtime,removethebatteries.• Ensurethatyouhavethebatteries’polarity(+/−)alignedcorrectly.• Donotusenewandoldbatteriestogether,orusedifferenttypesofbatteriestogether.• Disposeofusedbatteriesaccordingtoyourlocalregulations.
Operating Range for Wireless Remote Control
30°
30°
30°
30°30°
30°
30°
30°
22feet/7m
22feet/7m
Remote sensor on projector cabinetRemote control
22feet/7m
22feet/7m
• Theinfraredsignaloperatesbyline-of-sightuptoadistanceofabout22feet/7mandwithina60-degreeangleoftheremotesensorontheprojectorcabinet.
• Theprojectorwillnotrespondifthereareobjectsbetweentheremotecontrolandthesensor,orifstronglightfallsonthesensor.Weakbatterieswillalsopreventtheremotecontrolfromproperlyoperatingtheprojector.
1 Pressfirmlyandslidethebatterycoveroff.
2 Installnewbatteries(AAA).Ensurethatyouhavethebatteries’polarity(+/−)alignedcorrectly.
Battery Installation
3 Slip thecoverbackover thebat-teriesuntilitsnapsintoplace.Donotmixdifferenttypesofbatteriesornewandoldbatteries.
OPEN
OPEN

10
1. Introduction
❺ Operating Environment for Software Included on CD-ROMNamesandFeaturesofBundledSoftwarePrograms
Nameofsoftwareprogram Features
VirtualRemoteTool(Windowsonly)
ThisisasoftwareprogramusedtocontrolthepowerON/OFFandsourceselec-tionoftheprojectorfromyourcomputerbyusingthesuppliedcomputercable(VGA)andothers.(→page168)
ImageExpressUtilityLite • Thisisasoftwareprogramusedtoprojectyourcomputer’sscreen,streamingmovie,orsoundfromthecomputerovertheUSBcable*orthewired/wirelessnetwork.Thecomputercable(VGA)isnotrequired.(→page40, 173)* StreamingmoviescannotbeplayedwithUSBDisplayconnection.
• ThissoftwareprogramcanbeusedtocontrolthepowerON/OFFandsourceselectionoftheprojectorfromyourcomputer.
• TheGeometricCorrectionTool(GCT)andaudiofunctionallowsyoutocor-rectdistortionofimagesprojectedonacurvedwall.(→page180)TheGCTfunctionisnotavailableforstreamingvideo.
ImageExpressUtilityLiteforMacOS
• Thisisasoftwareprogramusedtoprojectyourcomputer'sscreenoverthewired/wirelessnetwork.Thecomputercable(VGA)isnotrequired.(→page40, 179)
• ThissoftwareprogramcanbeusedtocontrolthepowerON/OFFandsourceselectionoftheprojectorfromyourcomputer.* “Audiotransmission”,“USBDisplay”,and“GCT”functionsarenotsupported
byMac.
ImageExpressUtility2.0(Windowsonly)
• Thisisasoftwareprogramusedtosendthescreensofyourpersonalcomput-erstotheprojectorviawired/wirelessLAN(Meetingmode).
Projectedimagescanbetransferredandsavedtopersonalcomputers. When“MeetingMode”isused,projectedimagescanbesentandsavedto
thepersonalcomputers.Imagescanbesentfromapersonalcomputertonotonlyoneprojectorbutalsototwoormoreprojectorsatthesametime.(→page182)
DesktopControlUtility1.0(Windowsonly)
• Thisisasoftwareprogramusedtooperatethedesktopscreenofapersonalcomputerataremotelocationbyusingaprojectorviawired/wirelessLAN.(→page193)
PCControlUtilityPro4PCControlUtilityPro5(forMacOS)
This isasoftwareprogramusedtooperatetheprojector fromthecomputerwhenthecomputerandtheprojectorareconnectedwithLAN(wiredorwire-less).(→page202)• PCControlUtilityPro4canbeusedwithaserialconnection.
NOTE:• ImageExpressUtilityLitedoesnotsupport"MeetingMode"inImageExpressUtility2.0includedwithourothermodels.
DownloadserviceFortheupdateinformationaboutthesesoftwareprograms,visitourwebsite:URL:http://www.nec-display.com/dl/en/index.html
11
1. Introduction
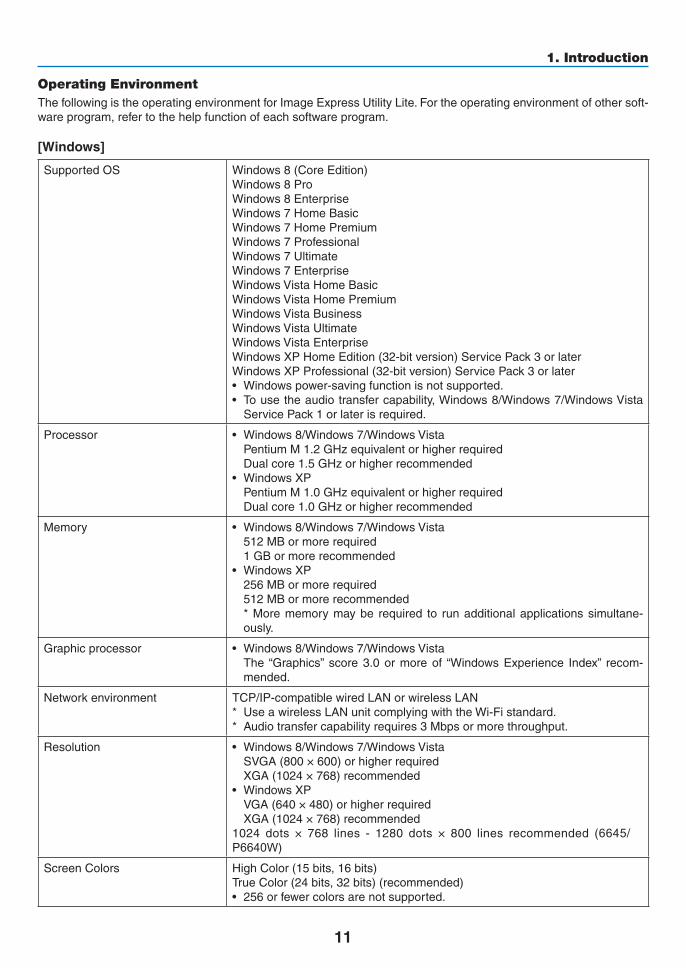
Operating EnvironmentThefollowingistheoperatingenvironmentforImageExpressUtilityLite.Fortheoperatingenvironmentofothersoft-wareprogram,refertothehelpfunctionofeachsoftwareprogram.
[Windows]
SupportedOS Windows8(CoreEdition)Windows8ProWindows8EnterpriseWindows7HomeBasicWindows7HomePremiumWindows7ProfessionalWindows7UltimateWindows7EnterpriseWindowsVistaHomeBasicWindowsVistaHomePremiumWindowsVistaBusinessWindowsVistaUltimateWindowsVistaEnterpriseWindowsXPHomeEdition(32-bitversion)ServicePack3orlaterWindowsXPProfessional(32-bitversion)ServicePack3orlater• Windowspower-savingfunctionisnotsupported.• Tousetheaudiotransfercapability,Windows8/Windows7/WindowsVista
ServicePack1orlaterisrequired.
Processor • Windows8/Windows7/WindowsVistaPentiumM1.2GHzequivalentorhigherrequiredDualcore1.5GHzorhigherrecommended
• WindowsXPPentiumM1.0GHzequivalentorhigherrequiredDualcore1.0GHzorhigherrecommended
Memory • Windows8/Windows7/WindowsVista512MBormorerequired1GBormorerecommended
• WindowsXP256MBormorerequired512MBormorerecommended*Morememorymaybe required to runadditionalapplicationssimultane-ously.
Graphicprocessor • Windows8/Windows7/WindowsVistaThe“Graphics” score3.0ormoreof“WindowsExperience Index” recom-mended.
Networkenvironment TCP/IP-compatiblewiredLANorwirelessLAN* UseawirelessLANunitcomplyingwiththeWi-Fistandard.* Audiotransfercapabilityrequires3Mbpsormorethroughput.
Resolution • Windows8/Windows7/WindowsVistaSVGA(800×600)orhigherrequiredXGA(1024×768)recommended
• WindowsXPVGA(640×480)orhigherrequiredXGA(1024×768)recommended
1024 dots × 768 lines - 1280 dots × 800 lines recommended (6645/P6640W)
ScreenColors HighColor(15bits,16bits)TrueColor(24bits,32bits)(recommended)• 256orfewercolorsarenotsupported.

12
1. Introduction
[Mac]
SupportedOS MacOSXv10.6,v10.7,v10.8
Processor(CPU) Intel®Core™Duoprocessor1.5GHzorhigherrequiredIntel®Core™2Duoprocessor1.6GHzorhigherrecommended* PowerPC®isnotsupported
Memory 512MBorhigherrequired
Networkenvironment WiredorwirelessLANrequiredthatsupportsTCP/IP* ThefollowingLANadaptersareverifiedtoworkwithImageExpressUtility
Lite:• WiredLANadapterbuiltintoMac• WirelessLANadapterbuiltintoMac• AppleUSBEthernetadapter
“EasyConnection”supportsonlywirelessLAN.
SupportedResolution SVGA(800×600)orhigherrequiredXGA(1024×768)recommended(1024×768–1280×800recommendedfor6645W/6640W)
SupportedScreenColors 16.70millioncolorsrequired

13
Thissectiondescribeshowtoturnontheprojectorandtoprojectapictureontothescreen.
❶ Flow of Projecting an Image
Step 1• Connectingyourcomputer/Connectingthepowercord(→page14)
Step 2 • Turningontheprojector(→page15)
Step 3 • Selectingasource(→page17)
Step 4• Adjustingthepicturesizeandposition(→page19)
• Correctingkeystonedistortion[KEYSTONE](→page24)
Step 5• Adjustingapictureandsound
- Optimizing a computer signal automatically (→ page 26)
- Turning up or down volume (→ page 26)
Step 6• Makingapresentation
Step 7• Turningofftheprojector(→page27)
Step 8• Afteruse(→page28)
2. Projecting an Image (Basic Operation)

14
2. Projecting an Image (Basic Operation)
❷ Connecting Your Computer/Connecting the Power Cord
1. Connectyourcomputertotheprojector.
This section will show you a basic connection to a computer. For information about other connections, see “6. InstallationandConnections”onpage145.
Connectthecomputercable(VGA)betweentheprojector’sCOMPUTERINconnectorandthecomputer’sport(mini D-Sub 15 Pin). Turn two thumb screws of both connectors to fix the computer cable (VGA).
2. Connectthesuppliedpowercordtotheprojector.
Firstconnectthesuppliedpowercord’sthree-pinplugtotheACINoftheprojector,andthenconnecttheotherplug of the supplied power cord in the wall outlet.
The projector’s power indicator will flash for a few seconds and then will light orange* (standby mode).
The STATUS indicator will also light green*.
*Thiswillapplyforbothindicatorswhen[NORMAL]isselectedfor[STANDBYMODE].SeethePowerIndicatorsection.(→ page 206)
COMPUTER IN
MakesurethattheprongsarefullyinsertedintoboththeACINandthewalloutlet.
→ To wall outlet
CAUTION:PartsoftheprojectormaybecometemporarilyheatediftheprojectoristurnedoffwiththePOWERbuttonoriftheACpowersupplyisdisconnectedduringnormalprojectoroperation.Usecautionwhenpickinguptheprojector.

15
2. Projecting an Image (Basic Operation)
Standby Blinking PowerOn
Steady orange light Blinking blue light Steady blue light
❸ Turning on the Projector
1. Slidethelenscovertothelefttouncoverthelens.
2. Press the (POWER) button on the projector cabinet or the POWER ON button on the remote control.
The POWER indicator will turn to blue and the projector will become ready to use.
TIP:• Whenthemessage“Projectorislocked!Enteryourpassword.”
isdisplayed,itmeansthatthe[SECURITY]featureisturnedon.(→page33)
• When the ECO message is displayed, it means that [ON] isselectedfor[ECOMESSAGE].(→page104)
• PressingbuttonssuchaspowerbuttonandMENUbuttonwillmakesound.Toturnoffthebeepsound,select[OFF]for[BEEP]fromthemenu.(→page109)
After you turn on your projector, ensure that the computer or video source is turned on and that the lens cover is open.
NOTE:Whenno inputsignal ispresent, theno-signalguidance isdisplayed(factorymenusetting).
(→page206)

16
2. Projecting an Image (Basic Operation)
Note on Startup screen (Menu Language Select screen)Whenyoufirstturnontheprojector,youwillgettheStartupmenu.Thismenugivesyoutheopportunitytoselectoneofthe29menulanguages.
Toselectamenulanguage,followthesesteps:
1. Use the ▲, ▼, ◀ or ▶buttontoselectoneofthe29languagesfromthemenu.
2. Press the ENTER button to execute the selection.
After this has been done, you can proceed to the menuoperation.Ifyouwant,youcanselectthemenulanguagelater.(→[LANGUAGE]onpage89 and 103)
NOTE:• Whenturningoffthepowersupplyandthenbackonbyusingapowerstriporbreaker. Allowaminimumof1secondbetweenturningoffthemainpowersupplyandturningitbackonagain. Failingtodosocouldresultinnopowertotheprojector.(Therewillbenostand-byLED) Shouldthishappen,unplugthepowercordandplugitinagain.Turnonthemainpower.• Ifoneofthefollowingthingshappens,theprojectorwillnotturnon.
- Iftheinternaltemperatureoftheprojectoristoohigh,theprojectordetectsabnormalhightemperature.Inthisconditiontheprojectorwillnotturnontoprotecttheinternalsystem.Ifthishappens,waitfortheprojector’sinternalcomponentstocooldown.
- Whenthelampreachesitsendofusablelife,theprojectorwillnotturnon.Ifthishappens,replacethelamp.- IftheSTATUSindicatorlightsorangewiththepowerbuttonpressed,itmeansthatthe[CONTROLPANELLOCK]isturnedon.
Cancelthelockbyturningitoff.(→page105)- Ifthelampfailstolight,andiftheSTATUSindicatorflashesonandoffinacycleofsixtimes,waitafullminuteandthenturn
onthepower.• WhilethePOWERindicatorisblinkingblueinshortcycles,thepowercannotbeturnedoffbyusingthepowerbutton.• Immediatelyafterturningontheprojector,screenflickermayoccur.Thisisnormal.Wait3to5minutesuntilthelamplightingis
stabilized.• Whentheprojectoristurnedon,itmaytakesometimebeforethelamplightbecomesbright.• Ifyouturnontheprojectorimmediatelyafterthelampisturnedofforwhenthetemperatureishigh,thefansrunwithoutdisplay-
inganimageforsometimeandthentheprojectorwilldisplaytheimage.

17
2. Projecting an Image (Basic Operation)
❹ Selecting a SourceSelecting the computer or video sourceNOTE:Turnonthecomputerorvideosourceequipmentconnectedtotheprojector.
DetectingtheSignalAutomaticallyPresstheSOURCEbuttononce.Theprojectorwillsearchfortheavailableinputsourceanddisplayit.Theinputsourcewillchangeasfollows:
COMPUTER→HDMI1→HDMI2→VIDEO→S-VIDEO→VIEWER→ USBDISPLAY→COMPUTER→ ...
• With theSOURCEscreendisplayed,youcanpress theSOURCEbuttonafewtimestoselecttheinputsource.
• TheViewerandNetworksourcesarenotsupportedbyPE501X.
TIP:Ifnoinputsignalispresent,theinputwillbeskipped.
UsingtheRemoteControlPressanyoneoftheCOMPUTER1,HDMI,VIDEO,S-VIDEO,VIEWER,NETWORK,orUSBDISPLAYbuttons.
NOTE: The HDMI button on the remote control will toggle between “HDMI1” and“HDMI2”.
[6650/6645/6645W/6640W]

18
2. Projecting an Image (Basic Operation)
SelectingDefaultSourceYoucansetasourceasthedefaultsourcesothatitwillbedisplayedeachtimetheprojectoristurnedon.1. Press the MENU button.
The menu will be displayed.
2. Press the ▶buttontwicetoselect[SETUP]andpressthe▼ but-tonortheENTERbuttontoselect[GENERAL].
3. Press the ▶buttonfourtimestoselect[OPTIONS(2)].
4. Press the ▼buttonfivetimestoselect[DEFAULTSOURCESE-LECT]andpresstheENTERbutton.
The [DEFAULT SOURCE SELECT] screen will be displayed.
(→ page 111)
5. Selectasourceasthedefaultsource,andpresstheENTERbutton.
6. PresstheEXITbuttonafewtimestoclosethemenu.
7. Restart the projector.
The source you selected in step 5 will be projected.
NOTE:Evenwhen[AUTO]isturnedon,the[NETWORK]willnotbeautomaticallyselected.Tosetyournetworkasthedefaultsource,select[NETWORK].
TIP:• When theprojector is inStandbymode,applyingacomputersignal froma
computerconnectedtotheCOMPUTERINinputwillpowerontheprojectorandsimultaneouslyprojectthecomputer’simage.
([AUTOPOWERON(COMP.)]→page111)• OnWindows7,acombinationoftheWindowsandPkeysallowsyoutosetup
externaldisplayeasilyandquickly.
[6650/6645/6645W/6640W]
19
2. Projecting an Image (Basic Operation)
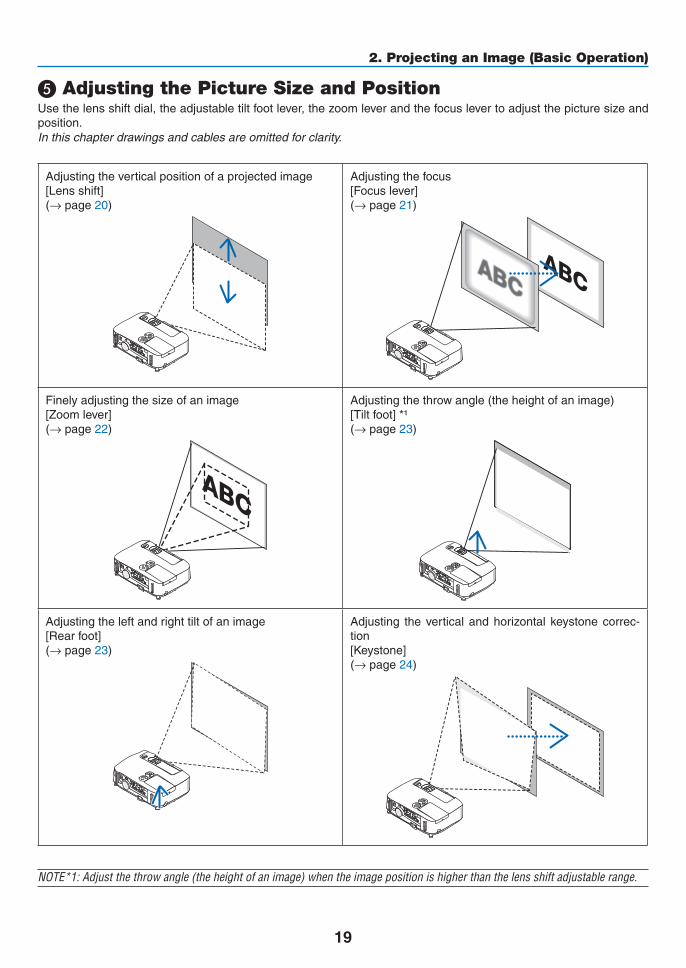
❺ Adjusting the Picture Size and PositionUsethelensshiftdial,theadjustabletiltfootlever,thezoomleverandthefocuslevertoadjustthepicturesizeandposition.Inthischapterdrawingsandcablesareomittedforclarity.
Adjustingtheverticalpositionofaprojectedimage[Lensshift](→page20)
Adjustingthefocus[Focuslever](→page21)
Finelyadjustingthesizeofanimage[Zoomlever](→page22)
Adjustingthethrowangle(theheightofanimage)[Tiltfoot]*¹(→page23)
Adjustingtheleftandrighttiltofanimage[Rearfoot](→page23)
Adjusting theverticalandhorizontal keystonecorrec-tion[Keystone](→page24)
NOTE*1:Adjustthethrowangle(theheightofanimage)whentheimagepositionishigherthanthelensshiftadjustablerange.

20
2. Projecting an Image (Basic Operation)
Adjusting the vertical position of a projected image (Lens shift)Rotatethelensshiftdial.
Downward
Upward
Lens shift dial
NOTE:Thelensshiftdialcannotberotatedbeyondthemaximumupwardordownwardshift.Forciblyrotatingmaycausedamagetotheprojector.
TIP:Lensshiftcanbeadjustedwiththerangebelow.Ifyouwishtomoveuptheimagehigherthanthislimit,usethetiltfootoftheprojector.
Desktopfrontprojection[6650/6645]
[6645W/6640W]
Height of projected image
Height of projected image
Vertical shift range (0 to 0.5V)
Vertical shift range (0 to 0.6V)

21
2. Projecting an Image (Basic Operation)
Ceilingfrontprojection[6650/6645]
[6645W/6640W]
FocusUsetheFOCUSlevertoobtainthebestfocus.
Focus Lever
Height of projected image
Height of projected image
Vertical shift range (0 to 0.5V)
Vertical shift range (0 to 0.6V)

22
2. Projecting an Image (Basic Operation)
ZoomUsetheZOOMlevertoadjusttheimagesizeonthescreen.
Zoom Lever

23
2. Projecting an Image (Basic Operation)
2
1
3
Adjustable Tilt FootAdjustable Tilt Foot Lever
Adjust the Tilt Foot1.Liftthefrontedgeoftheprojector.
CAUTION:DonottrytotouchtheventilationoutletduringTiltFootadjustmentasitcanbecomeheatedwhiletheprojectoristurnedonandafteritisturnedoff.
2.PushupandholdtheAdjustableTiltFootLeveronthefrontoftheprojectortoextendtheadjustabletiltfoot.
3.Lowerthefrontoftheprojectortothedesiredheight.
4.ReleasetheAdjustableTiltFootLevertolocktheAdjustabletiltfoot.
Thetiltfootcanbeextendedupto1.6inch/40mm.
There is approximately 10 degrees (up) of adjustment for the front of the projector.
Rotate the rear foot to the desired height in order to square the image on the projection surface.
CAUTION:• Donotusethetilt-footforpurposesotherthanoriginallyintended. Misusessuchasusingthetiltfoottocarryorhang(fromthewallor
ceiling)theprojectorcancausedamagetotheprojector.
Adjustingtheleftandrighttiltofanimage[Rearfoot]• Rotatetherearfoot.
Therearfootcanbeextendedupto0.5inch/12mm.Rotatingtherearfoot allows the projector to be placed horizontally.
NOTE:• Donotextendtherearfootbeyonditsheightlimit(0.5inch/12mm).Doingso
maycausetherearfoottocomeoutoftheprojector.
Rear foot
Up Down

24
2. Projecting an Image (Basic Operation)
❻ Correcting Keystone Distortion [KEYSTONE]Whentheprojectorisnotexactlyperpendiculartothescreen,keystonedistortionoccurs.Toovercomeit,youcanusethe“Keystone”function,adigitaltechnologythatcanadjustforkeystone-typedistortion,resultinginacrisp,squareimage.Thefollowingprocedureexplainshowtousethe[KEYSTONE]screenfromthemenutocorrecttrapezoidaldistor-tions.Whentheprojectorisplaceddiagonallytothescreen,Whentheprojectorissetupatanangleinrelationtothescreen,adjusttheHorizontaloptionoftheKeystonemenusothatthetopandbottomofsidesoftheprojectedimageareparallel.
NOTE:• Beforeperformingthehorizontalkeystonecorrection,setthelensshifttothepositionof0.5V(P501X/P451X/PE501X)/0.6V
(P451W/P401W).
1. Press the ▼ button on the projector cabinet.
The Keystone screen will be displayed on the screen.
• PresstheKEYSTONEbuttonwhenusingtheremotecontrol.
• SeepageforPINCUSHION.
• SeepageforCORNERSTONE.
• SeepageforRESET.
2. Press the ▼buttontoselect[VERTICAL]andthenusethe◀ or ▶ sothattheleftandrightsidesoftheprojectedimageareparal-lel.
* Adjusttheverticalkeystonedistortion.
Projected areaScreen frame
3. Aligntheleft(orright)sideofthescreenwiththeleft(orright)sideoftheprojectedimage.
• Usetheshortersideoftheprojectedimageasthebase.
• Intherightexample,usetheleftsideasthebase.
Align left side
0.5 V (6650/6645) / 0.6 V (6645W/6640W).

25
2. Projecting an Image (Basic Operation)
4. Press the ▲buttontoselect[HORIZONTAL]andthenusethe◀ or ▶sothatthetopandbottomsidesoftheprojectedimageareparallel.
• Adjustthehorizontalkeystonedistortion.
5. Repeatsteps2and4tocorrectkeystonedistortion.
6. AftercompletingKeystonecorrection,presstheEXITbutton.
The Keystone screen will disappear.
• ToperformKeystonecorrectionagain,pressthe▼ button to display the Keystone screen and repeat above steps 1 to 6.
Toreturnthekeystoneadjustmentstodefault:1. Press the ▼buttontoselect[RESET]andpresstheENTERbutton.
2. Press the ◀ or ▶buttontoselect[YES]andpresstheENTERbutton.
The adjustments will be reset.
All the adjustments for all the five items will be reset at the same time.
• TheKEYSTONEfeaturecancauseanimagetobeslightlyblurredbecausethecorrectionismadeelectroni-cally.

26
2. Projecting an Image (Basic Operation)
❼ Optimizing Computer Signal AutomaticallyAdjusting the Image Using Auto AdjustOptimizingacomputerimageautomatically.(COMPUTER)PresstheAUTOADJ.buttontooptimizeacomputerimageautomatically.Thisadjustmentmaybenecessarywhenyouconnectyourcomputerforthefirsttime.
[Poor picture]
[Normal picture]
NOTE:Somesignalsmaytaketimetodisplayormaynotbedisplayedcorrectly.• IftheAutoAdjustoperationcannotoptimizethecomputersignal,trytoadjust[HORIZONTAL],[VERTICAL],[CLOCK],and[PHASE]
manually.(→page96,97)
❽ Turning Up or Down VolumeSoundlevelfromthespeakercanbeadjusted.
TIP:Whennomenusappear,the◀and▶buttonsontheprojectorcabinetworkasavolumecontrol.
NOTE:• Volumecontrolisnotavailablewiththe◀or▶buttonwhenanimageisenlarged
byusingtheD-ZOOM(+)buttonorwhenthemenuisdisplayed.• Volume control is not available with the◀ or▶ button when VIEWER is
used.
TIP:• The[BEEP]soundvolumecannotbeadjusted.Toturnoffthe[BEEP]sound,
fromthemenu,select[SETUP]→[OPTIONS(1)]→[BEEP]→[OFF].• Volumecanbecontrolledfromthemenu([ADJUST]→[AUDIO])
Increasevolume
Decrease volume

27
2. Projecting an Image (Basic Operation)
❾ Turning off the ProjectorToturnofftheprojector:
1. First, press the (POWER) button on the projector cabinet or the POWER OFF button on the remote con-trol.
The confirmation message will be displayed.
2. Secondly, press the ENTER button or press the (POWER)orthePOWEROFFbuttonagain.
The lamp will turn off and the projector will go into standby mode. When in standby mode, the POWER indicator will light orange and the STATUS indicator will light green when [NORMAL] is selected for [STANDBY MODE].
PowerOn
Steady blue light
Standby
Steady orange light
CAUTION:PartsoftheprojectormaybecometemporarilyheatediftheprojectoristurnedoffwiththePOWERbuttonoriftheACpowersupplyisdisconnectedduringnormalprojectoroperation.Usecautionwhenpickinguptheprojector.
NOTE:• Whilethepowerindicatorisblinkingblueinshortcycles,thepowercannotbeturnedoff.• Youcannotturnoffthepowerfor60secondsimmediatelyafterturningitonanddisplayinganimage.• DonotdisconnecttheACpowersupplytotheprojectorwithin10secondsofmakingadjustmentorsettingchangesandclosing
themenu.Doingsocancauselossofadjustmentsandsettings.

28
2. Projecting an Image (Basic Operation)
❿ After UsePreparation:Makesurethattheprojectoristurnedoff.
1. Unplugthepowercord.
2. Disconnect any other cables.• RemovetheUSBmemoryifitisinsertedintotheprojector.
3. Retractadjustabletiltfootifextended.
4. Slidethelenscovertotherighttocoverthelens.

29
❶ Turning off the Image and SoundPresstheAV-MUTEbuttontoturnofftheimageandsoundforashortperiodoftime.Pressagaintorestoretheimageandsound.Theprojector’spower-savingfunctionwillwork10secondsaftertheimageisturnedoff.Asaresult,thelamppowerwillbereduced.
NOTE:• Eventhoughtheimageisturnedoff,themenustillremainsonthescreen.• SoundfromtheAUDIOOUTjack(Stereomini)canbeturnedoff.• Evenwhenthepower-savingfunctionworks,thelamppowermayberestoredtoitsoriginal
leveltemporarily.• Torestoretheimage,evenifyoupresstheAV-MUTEbuttonimmediatelyafterthestartofthe
power-savingfunction,thelampbrightnessmaynotberestoredtoitsoriginallevel.
❷ Freezing a PicturePresstheFREEZEbuttontofreezeapicture.Pressagaintoresumemotion.
NOTE:• Theimageisfrozenbuttheoriginalvideoisstillplayingback.• WithImageExpressUtilityincludingUSBDisplay,pressingtheFREEZEbuttonwilleliminate
soundtemporarilyduringdisplayoffreezedimage.
❸ Enlarging a PictureYoucanenlargethepictureuptofourtimes.
NOTE:• Dependingontheinputsignal,themaximummagnificationmaybelessthanfourtimes,orthis
featureisnotavailable.• ThisfeatureisnotavailablewithUSBDisplay.
Todoso:
1. PresstheD-ZOOM(+)buttontomagnifythepicture.
To move the magnified image, use the ▲,▼,◀ or ▶ button.
3. Convenient Features
30
3. Convenient Features
❹ Changing Eco Mode/Checking Energy-Saving Effect Using Eco Mode [ECO MODE]TheECOMODE(NORMALandECO)increaseslamplife,whileloweringpowerconsumptionandcuttingdownonCO2 emissions. Fourbrightnessmodesofthelampcanbeselected:[OFF],[AUTOECO],[NORMAL]and[ECO]modes.
[ECOMODE] Description StatusofLAMPindicator
[OFF] Thelampbrightnessis100%. Off
[AUTOECO] Lamppowerconsumptionwillbechangedbetween[OFF] and [NORMAL] automatically according topicturelevelNOTE:Abrightgradationmaybe lessvisibledependingontheimage.
[NORMAL] Lamppowerconsumption.(approx.80%brightnesson6650/6645W and approx. 83% on6650/6640W)Thelamplifewillextendbyloweringthelamppower.
SteadyGreenlight
[ECO] Lamppowerconsumption.(approx.60%brightnesson6650/6645W and approx. 67% on6645/6640W)ThelamplifewillextendlongerthantheoneonNORMALmodebycontrollingpowerap-propriateforthelamp.ThemaximumpowerbecomesequivalenttothepowerinNORMAL.
Toturnonthe[ECOMODE],dothefollowing:1. PresstheECOButtonontheremotecontroltodisplay[ECOMODE]screen.
2. PresstheECObuttonagaintoselectamodeyouwish.
• EachtimetheECObuttonispressed,thechoiceswillbechanged:
OFF → AUTO ECO → NORMAL → ECO → OFF
TIP:• TheleafsymbolatthebottomofthemenushowsthecurrentselectionofECOmode.
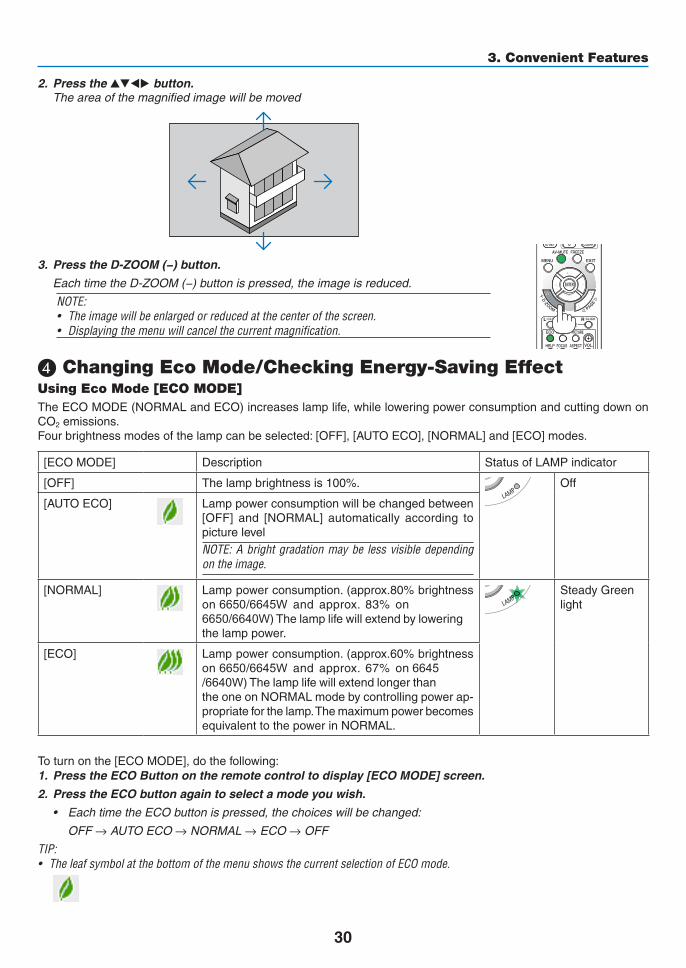
2. Press the ▲▼◀▶ button. The area of the magnified image will be moved
3. PresstheD-ZOOM(−)button.
Each time the D-ZOOM (−) button is pressed, the image is reduced.
NOTE:• Theimagewillbeenlargedorreducedatthecenterofthescreen.• Displayingthemenuwillcancelthecurrentmagnification.

31
3. Convenient Features
NOTE:• The[ECOMODE]canbechangedbyusingthemenu. Select[SETUP]→[GENERAL]→[ECOMODE].• Thelampliferemainingandlamphoursusedcanbecheckedin[USAGETIME].Select[INFO.]→[USAGETIME].• Theprojectorisalwaysin[NORMAL]for90secondsafterthelampisturnedonandwhilethePOWERindicatorisblinkinggreen.
Thelampconditionwillnotbeaffectedevenwhen[ECOMODE]ischanged.• Afteralapseof1minutefromwhentheprojectordisplaysno-signalguidance,ablue,blackorlogoscreen,[ECOMODE]will
automaticallyswitchto[ECO].• Iftheprojectorisoverheatedin[OFF]mode,theremaybeacasewherethe[ECOMODE]automaticallychangesto[NORMAL]
modetoprotecttheprojector.Whentheprojectorisin[NORMAL]mode,thepicturebrightnessdecreases.Whentheprojectorcomesbacktonormaltemperature,the[ECOMODE]returnsto[OFF]mode.
Thermometersymbol[ ]indicatesthe[ECOMODE]isautomaticallysetto[NORMAL]modebecausetheinternaltemperatureistoohigh.
• Immediatelyafter[ECOMODE]ischangedfrom[ECO]tooneof[OFF],[AUTOECO],or[NORMAL],thelampbrightnessmaydecreasetemporarily.Thisisnotamalfunction.
Checking Energy-Saving Effect [CARBON METER]Thisfeaturewillshowenergy-savingeffectintermsofCO2emissionreduction(kg)whentheprojector’s[ECOMODE]issetto[AUTOECO],[NORMAL],or[ECO].Thisfeatureiscalledas[CARBONMETER].
Therearetwomessages:[TOTALCARBONSAVINGS]and[CARBONSAVINGS-SESSION].The[TOTALCARBONSAVINGS]messageshowsthetotalamountofCO2emissionreductionfromthetimeofshipmentuptonow.Youcanchecktheinformationon[USAGETIME]from[INFO.]ofthemenu.(→page113)
The[CARBONSAVINGS-SESSION]messageshowstheamountofCO2emissionreductionbetweenthetimeofchangingtoECOMODEimmediatelyafterthetimeofpower-onandthetimeofpower-off.The[CARBONSAVINGS-SESSION]messagewillbedisplayedinthe[POWEROFF/AREYOUSURE?]messageatthetimeofpower-off.

32
3. Convenient Features
TIP:• TheformulaasshownbelowisusedtocalculatetheamountofCO2emissionreduction. AmountofCO2emissionreduction=(PowerconsumptioninOFFforECOMODE−PowerconsumptioninAUTOECO/NORMAL/
ECOforECOMODE)×CO2conversionfactor.*WhentheimageisturnedoffwiththeAV-MUTEbuttonorwiththelenscoverclosed,theamountofCO2emmissionreductionwillalsoincrease.
*CalculationforamountofCO2emissionreductionisbasedonanOECDpublication“CO2EmissionsfromFuelCombustion,2008Edition”.
• The[TOTALCARBONSAVINGS]iscalculatedbasedonsavingsrecordedin15minutesintervals.• Thisformulawillnotapplytothepowerconsumptionwhichisnotaffectedbywhether[ECOMODE]isturnedonoroff.• Thefactorsfor[TOTALCOSTSAVINGS]canbechangedfromthemenu([CARBONCONVERT]and[CURRENCYCONVERT]).(→
page112)• Thecurrencyunitfor[TOTALCOSTSAVINGS]canbechangedfromthemenu([CURRENCY]).(→page112)

33
3. Convenient Features
❺ Preventing the Unauthorized Use of the Projector [SECURITY]AkeywordcanbesetforyourprojectorusingtheMenutoavoidoperationbyanunauthorizeduser.Whenakeywordisset,turningontheprojectorwilldisplaytheKeywordinputscreen.Unlessthecorrectkeywordisentered,thepro-jectorcannotprojectanimage.•The[SECURITY]settingcannotbecancelledbyusingthe[RESET]ofthemenu.
ToenabletheSecurityfunction:
1. Press the MENU button.
The menu will be displayed.
2. Press the ▶buttontwicetoselect[SETUP]andpressthe▼buttonortheENTERbuttontoselect[GEN-ERAL].
3. Press the ▶buttontoselect[INSTALLATION].
4. Press the ▼buttonthreetimestoselect[SECURITY]andpresstheENTERbutton.
TheOFF/ONmenuwillbedisplayed.
5. Press the ▼buttontoselect[ON]andpresstheENTERbutton.
The[SECURITYKEYWORD]screenwillbedisplayed.
6. Typeinacombinationofthefour▲▼◀▶buttonsandpresstheENTERbutton.
NOTE:Akeywordmustbe4to10digitsinlength.
The[CONFIRMKEYWORD]screenwillbedisplayed.

34
3. Convenient Features
7. Typeinthesamecombinationof▲▼◀▶buttonsandpresstheENTERbutton.
The confirmation screen will be displayed.
8. Select[YES]andpresstheENTERbutton.
TheSECURITYfunctionhasbeenenabled.
Toturnontheprojectorwhen[SECURITY]isenabled:
1. Press the POWER button.
Theprojectorwillbeturnedonanddisplayamessagetotheeffectthattheprojectorislocked.
2. Press the MENU button.
3. TypeinthecorrectkeywordandpresstheENTERbutton.Theprojectorwilldisplayanimage.
NOTE:Thesecuritydisablemodeismaintaineduntilthemainpoweristurnedofforunpluggingthepowercord.
35
3. Convenient Features
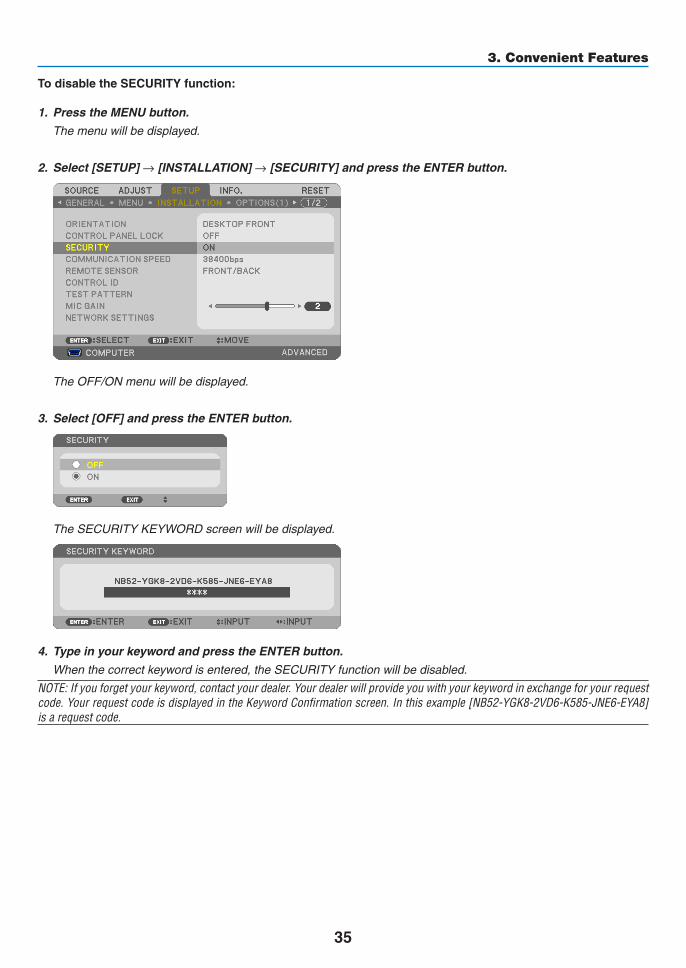
TodisabletheSECURITYfunction:
1. Press the MENU button.
The menu will be displayed.
2.Select[SETUP]→[INSTALLATION]→[SECURITY]andpresstheENTERbutton.
TheOFF/ONmenuwillbedisplayed.
3. Select[OFF]andpresstheENTERbutton.
TheSECURITYKEYWORDscreenwillbedisplayed.
4. TypeinyourkeywordandpresstheENTERbutton.
Whenthecorrectkeywordisentered,theSECURITYfunctionwillbedisabled.
NOTE:Ifyouforgetyourkeyword,contactyourdealer.Yourdealerwillprovideyouwithyourkeywordinexchangeforyourrequestcode.YourrequestcodeisdisplayedintheKeywordConfirmationscreen.Inthisexample[NB52-YGK8-2VD6-K585-JNE6-EYA8]isarequestcode.

36
3. Convenient Features
❻ Using 4-Point Corner to Correct Keystone Distortion [CORNERSTONE]
Usethe[CORNERSTONE]featuretocorrectkeystone(trapezoidal)distortiontomakethetoporbottomandtheleftorrightsideofthescreenlongerorshortersothattheprojectedimageisrectangular.
Cornerstone1. PresstheKEYSTONEbuttonwithnomenudisplayed.
The KEYSTONE screen will be displayed.
• PresstheKESTONEbuttonwhenusingtheremotecontrol.
• SeepageforPINCUSHION.
2. Press the ▼buttontoselect[CORNERSTONE]andpresstheENTERbutton.
The drawing shows the upper left icon ( ) is selected.
The CORNERSTONE screen will be displayed.
3. Projectanimagesothatthescreenissmallerthantheareaoftheraster.
4. Pickupanyoneofthecornersandalignthecorneroftheimagewithacornerofthescreen.
Projected image
The drawing shows the upper right corner.
TIP:Ifyouareadjusting[KEYSTONEHORIZONTAL],[KEYSTONEVERTICAL],[PINCUSHIONLEFT/RIGHT],or[PINCUSHIONTOP/BOTTOM],the[CORNERSTONE]itemwillnotbeavailable.Ifthishappens,resetthe[KEYSTONE]adjustments.
5. Use the ▲▼◀▶ button to select one icon (▲)whichpointsinthedirectionyouwishtomovetheprojectedimageframe.
6. Press the ENTER button.

37
3. Convenient Features
7. Use the ▲▼◀▶buttontomovetheprojectedimageframeasshownontheexample.
8. Press the ENTER button.
9. Use the ▲▼◀▶buttontoselectanothericonwhichpointsinthedirection.
OntheCornerstoneadjustmentscreen,select[EXIT]orpresstheEXITbuttonontheremotecontrol.
The confirmation screen is displayed.
10. Press the ◀ or ▶buttontohighlightthe[OK]andpresstheENTERbutton.
ThiscompletestheCornerstonecorrection.Selecting[CANCEL]willreturntotheadjustmentscreenwithoutsavingchanges(Step3).Selecting[RESET]willreturntothefactorydefault.Selecting[UNDO]willexitwithoutsavingchanges.

38
3. Convenient Features
Theadjustablerangesfor3DReformareasfollows:
HORIZONTAL VERTICALCORNERSTONE Max.+/−30°approx. Max.+/−30°approx.KEYSTONE
* Thefollowingareconditionsunderwhichthemaximumangleisachieved:
• Whenthelensshiftissettothecenter
Whenthelensshiftisusedandyettheimageisnotdisplayedinthecenterofthescreen,theadjustablerangewillbeincreasedordecreased.
• Imageisprojectedinmaximumwidewiththezoom
NOTE:• Evenwhentheprojectoristurnedon,thelastusedcorrectionvaluesareapplied.• IftheCornerstonescreenisunavailable(grayed),resetthecurrentcorrectiondata.TheCornerstonefunctionbecomesavail-
able.• Therangeofkeystonecorrectionisnotthemaximumtiltangleofprojector.
NOTE:Using[KEYSTONE]correctioncancausetheimagetobeslightlyblurredbecausethecorrectionismadeelectronically.

39
3. Convenient Features
❼ Operating Your Computer’s Mouse Functions from the Projector’s Remote Control via the USB Cable (Remote Mouse Function)Thebuilt-inremotemousefunctionenablesyoutooperateyourcomputer’smousefunctionsfromthesuppliedremotecontrolwhentheprojectorisconnectedtoacomputerviaacommerciallyavailableUSBcable(compatiblewithUSB2.0specifications).TheRemoteMousefunctionworksfortheCOMPUTERinputwhilethecomputerscreenisdisplayed.TheRemoteMousefunctionwillnotworkwhileyoufreezeormagnifyanimage.- UsingtheUSBcabletoconnecttheprojectorandthecomputerwillalsostartUSBDisplayfunction.
USB cable (not supplied)
NOTE:• AUSBcablemustsupporttheUSB2.0Specifications.• Themousefunctioncanbeusedwiththefollowingoperatingsystems: Windows8,Windows7,WindowsXP,orWindowsVista• InSP2orolderversionofWindowsXP,ifthemousecursorwillnotmovecorrectly,dothefollowing: CleartheEnhancepointerprecisioncheckboxunderneaththemousespeedsliderintheMousePropertiesdialogbox[Pointer
Optionstab].• Waitatleast5secondsafterdisconnectingtheUSBcablebeforereconnectingitandviceversa.Thecomputermaynotidentify
theUSBcableifitisrepeatedlyconnectedanddisconnectedinrapidintervals.• ConnecttheprojectortothecomputerwithaUSBcableafterstartingthecomputer.Failuretodosomayfailtostartthecom-
puter.
Operatingyourcomputer’smousefromtheremotecontrolYoucanoperateyourcomputer’smousefromtheremotecontrol.
PAGE ▽/△ Button ���������������������������scrolls the viewing area of the window or to move to the previous or next slide in PowerPoint on your computer�
▲▼◀▶ Buttons ������������������������������moves the mouse cursor on your computer�MOUSE L-CLICK/ENTER Button ������works as the mouse left button�MOUSE R-CLICK Button ������������������works as the mouse right button�
NOTE:• Whenyouoperatethecomputerusingthe▲▼◀or▶buttonwiththemenudisplayed,boththemenuandthemousepointer
willbeaffected.Closethemenuandperformthemouseoperation.
TIP:YoucanchangethePointerspeedontheMousePropertiesdialogboxontheWindows.Formoreinformation,seetheuserdocumentationoronlinehelpsuppliedwithyourcomputer.
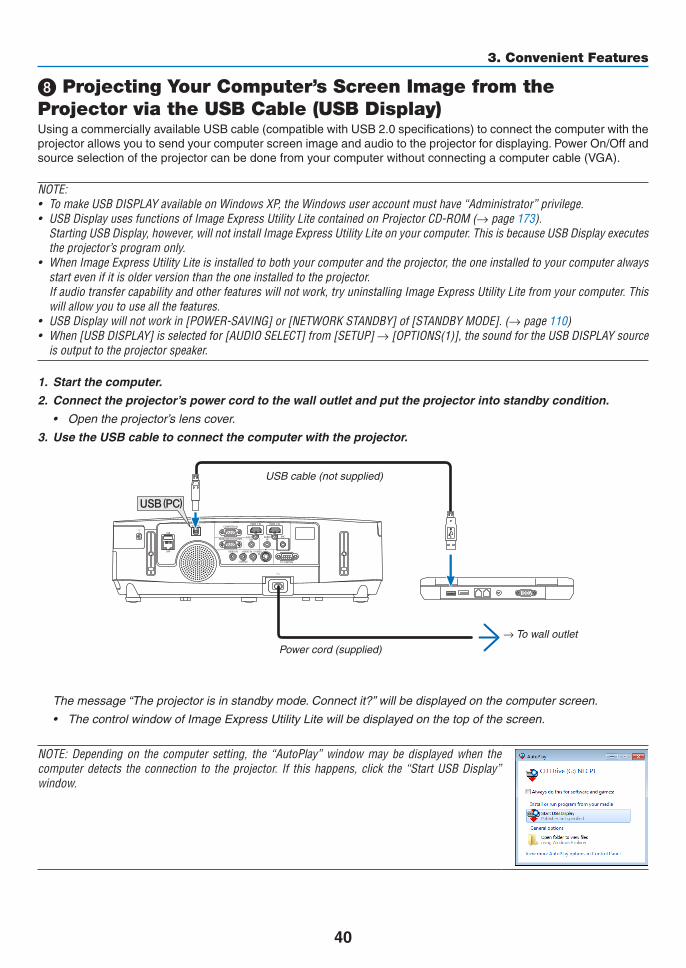
40
3. Convenient Features
❽ Projecting Your Computer’s Screen Image from the Projector via the USB Cable (USB Display)UsingacommerciallyavailableUSBcable(compatiblewithUSB2.0specifications)toconnectthecomputerwiththeprojectorallowsyoutosendyourcomputerscreenimageandaudiototheprojectorfordisplaying.PowerOn/Offandsourceselectionoftheprojectorcanbedonefromyourcomputerwithoutconnectingacomputercable(VGA).
NOTE:• TomakeUSBDISPLAYavailableonWindowsXP,theWindowsuseraccountmusthave“Administrator”privilege.• USBDisplayusesfunctionsofImageExpressUtilityLitecontainedonNECProjectorCD-ROM(→page173). StartingUSBDisplay,however,willnotinstallImageExpressUtilityLiteonyourcomputer.ThisisbecauseUSBDisplayexecutes
theprojector’sprogramonly.• WhenImageExpressUtilityLiteisinstalledtobothyourcomputerandtheprojector,theoneinstalledtoyourcomputeralways
startevenifitisolderversionthantheoneinstalledtotheprojector. Ifaudiotransfercapabilityandotherfeatureswillnotwork,tryuninstallingImageExpressUtilityLitefromyourcomputer.This
willallowyoutouseallthefeatures.• USBDisplaywillnotworkin[POWER-SAVING]or[NETWORKSTANDBY]of[STANDBYMODE].(→page110)• When[USBDISPLAY]isselectedfor[AUDIOSELECT]from[SETUP]→[OPTIONS(1)],thesoundfortheUSBDISPLAYsource
isoutputtotheprojectorspeaker.
1. Start the computer.
2. Connecttheprojector’spowercordtothewalloutletandputtheprojectorintostandbycondition.
• Opentheprojector’slenscover.
3. UsetheUSBcabletoconnectthecomputerwiththeprojector.
USB cable (not supplied)
→ To wall outlet
Power cord (supplied)
Themessage“Theprojectorisinstandbymode.Connectit?”willbedisplayedonthecomputerscreen.
• ThecontrolwindowofImageExpressUtilityLitewillbedisplayedonthetopofthescreen.
NOTE:Dependingon the computer setting, the “AutoPlay”windowmaybedisplayedwhen thecomputerdetects theconnection to theprojector. If thishappens,click the“StartUSBDisplay”window.

41
3. Convenient Features
4. Click“Yes”.
Theprojectorwillturnonandthemessage“Theprojectorisgettingready.Pleasewait.”willbedisplayedonthecomputer screen. This message will disappear in a few seconds.
5. Operatethecontrolwindow.
(1) (2) (3) (4) (5)(6)
(1) (Source) ����� Selects an input source of the projector� (2) (Picture) ���� Turns on or off AV-MUTE (Picture mute), and turns on or off FREEZE (Freeze a picture)�(3) (Sound) ����� Turns on or off AV-MUTE (Sound mute), play the sound and turns up or down the volume�(4) (Others) ����� Uses “Update”, “HTTP Server”*, “Settings” and “Information”�
* The HTTP Server cannot be selected when a USB cable is connected�
(5) (Exit) ���������� Exit Image Express Utility Lite� You can also turn off the projector at the same time�(6) (Help) ����������� Displays the help of Image Express Utility Lite�
42
3. Convenient Features
❾ Controlling the Projector by Using an HTTP Browser
OverviewTheHTTPServerfunctionprovidessettingsandoperationsfor:1. Settingforwired/wirelessnetwork(NETWORKSETTINGS)
To use wireless LAN connection, the optional USB Wireless LAN Unit is required. (→ page 152)
Tousewired/wirelessLANconnection,connecttheprojectortothecomputerwithacommerciallyavailableLANcable. (→ page 151)
2. SettingAlertMail(ALERTMAIL)
Whentheprojectorisconnectedtoawired/wirelessnetwork,lampreplacetimeorerrormessageswillbesentviae-mail.
3. Operatingtheprojector
Poweron/off,selectinginput,volumecontrolandpictureadjustmentsarepossible.
4. SettingPJLinkPASSWORDandAMXBEACON
Thisdeviceuses“JavaScript”and“Cookies”andthebrowsershouldbesettoacceptthesefunctions.Thesettingmethodwillvarydependingontheversionofbrowser.Pleaserefertothehelpfilesandtheotherinformationprovidedinyoursoftware.
TwowaysofaccesstotheHTTPserverfunctionareavailable:• StarttheWebbrowseronthecomputerviathenetworkconnectedtotheprojectorandenterthefollowing
URL:
http://<theprojector’sIPaddress>/index.html
• UseImageExpressUtilityLitecontainedonthesuppliedProjectorCD-ROM.
TIP:ThefactorysettingIPaddressis[DHCPON].
NOTE:• Tousetheprojectorinanetwork,consultwithyournetworkadministratoraboutnetworksettings.• Thedisplay’sorbutton’sresponsecanbesloweddownoroperationmaynotbeaccepteddependingthesettingsofyournet-
work. Shouldthishappen,consultyournetworkadministrator.Theprojectormaynotrespondifitsbuttonsarerepeatedlypressedin
rapidintervals.Shouldthishappen,waitamomentandrepeat.Ifyoustillcan’tgetanyresponse,turnoffandbackontheprojec-tor.
• IfthePROJECTORNETWORKSETTINGSscreendoesnotappearinthewebbrowser,presstheCtrl+F5keystorefreshyourwebbrowser(orclearthecache).
• Thisdeviceuses“JavaScript”and“Cookies”andthebrowsershouldbesettoacceptthesefunctions.Thesettingmethodwillvarydependingontheversionofbrowser.Pleaserefertothehelpfilesandtheotherinformationprovidedinyoursoftware.
Preparation before UseConnecttheprojectortoacommerciallyavailableLANcablebeforeengaginginbrowseroperations.(→page151)Operationwithabrowserthatusesaproxyservermaynotbepossibledependingonthetypeofproxyserverandthesettingmethod.Althoughthetypeofproxyserverwillbeafactor,itispossiblethatitemsthathaveactuallybeensetwillnotbedisplayeddependingontheeffectivenessofthecache,andthecontentssetfromthebrowsermaynotbereflectedinoperation.Itisrecommendedthataproxyservernotbeusedunlessitisunavoidable.

43
3. Convenient Features
Handling of the Address for Operation via a BrowserRegardingtheactualaddressthatisenteredfortheaddressorenteredtotheURLcolumnwhenoperationofthepro-jectorisviaabrowser,thehostnamecanbeusedasitiswhenthehostnamecorrespondingtotheIPaddressoftheprojectorhasbeenregisteredtothedomainnameserverbyanetworkadministrator,orthehostnamecorrespondingtotheIPaddressoftheprojectorhasbeensetinthe“HOSTS”fileofthecomputerbeingused.
Example1:Whenthehostnameoftheprojectorhasbeensetto“pj.nec.co.jp”,accessisgainedtothenetworksettingbyspecifying http://pj.nec.co.jp/index.html fortheaddressortheentrycolumnoftheURL.
Example2:WhentheIPaddressoftheprojectoris“192.168.73.1”,accessisgainedtothenetworksettingbyspecifying http://192.168.73.1/index.html fortheaddressortheentrycolumnoftheURL.
PROJECTOR ADJUSTMENT
POWER:Thiscontrolsthepoweroftheprojector.ON ������������������������� Power is switched on�OFF ������������������������ Power is switched off�
VOLUME:Thiscontrolsthevolumeoftheprojector.▲ ��������������������������� Increases the volume adjustment value�▼ ��������������������������� Decreases the volume adjustment value�
AV-MUTE:Thiscontrolsthemutefunctionoftheprojector.PICTURE ON ���������� Mutes the video�PICTURE OFF ��������� Cancels the video muting�SOUND ON ������������ Mutes the audio�SOUND OFF ����������� Cancels the audio muting�ALL ON ������������������ Mutes each of the video, and audio functions�ALL OFF ����������������� Cancels the muting of each of the video, and audio functions�

44
3. Convenient Features
PICTURE:Controlsthevideoadjustmentoftheprojector.BRIGHTNESS ▲ ���� Increases the brightness adjustment value�BRIGHTNESS ▼ ���� Decreases the brightness adjustment value�CONTRAST ▲ �������� Increases the contrast adjustment value�CONTRAST ▼ �������� Decreases the contrast adjustment value�COLOR ▲ �������������� Increases the color adjustment value�COLOR ▼ �������������� Decreases the color adjustment value�HUE ▲ ������������������� Increases the hue adjustment value�HUE ▼ ������������������� Decreases the hue adjustment value�SHARPNESS ▲ ����� Increases the sharpness adjustment value�SHARPNESS ▼ ����� Decreases the sharpness adjustment value�
• Thefunctionsthatcanbecontrolledwillvarydependingonthesignalbeinginputtotheprojector.(→page95)
SOURCESELECT:Thisswitchestheinputconnectoroftheprojector.COMPUTER ����������� Switches to the COMPUTER IN connector�HDMI1 ������������������� Switches to the HDMI 1 IN connector�HDMI2 ������������������� Switches to the HDMI 2 IN connector�VIDEO �������������������� Switches to the VIDEO IN connector�S-VIDEO ���������������� Switches to the S-VIDEO IN connector�VIEWER ����������������� Switches to the data on the USB memory device�NETWORK ������������� Switches to a LAN signal�USB DISPLAY �������� Switches to the USB Port (PC)�
PROJECTORSTATUS:Thisdisplaystheconditionoftheprojector.LAMP LIFE REMAINING �����Displays the remaining life of the lamp as a percentage�LAMP HOURS USED �����������Displays how many hours the lamp has been used�FILTER HOURS USED ���������Displays how many hours the filter has been used�ERROR STATUS ������������������Displays the status of errors occurring within the projector�
LOGOFF:Loggingoffyourprojectorandreturningtotheauthenticationscreen(LOGONscreen).

45
3. Convenient Features
NETWORK SETTINGS
•SETTINGS
WIRED or WIRELESS
SETTING SetforwiredLANorforwirelessLAN.
APPLY ApplyyoursettingstowiredLANorwirelessLAN.
DHCPON AutomaticallyassignIPaddress,subnetmask,andgatewaytotheprojectorfromyourDHCPserver.
DHCPOFF SetIPaddress,subnetmask,andgatewaytotheprojectorassignedbyyournetworkadministrator.
IPADDRESS SetyourIPaddressofthenetworkconnectedtotheprojector.
SUBNETMASK Setyoursubnetmasknumberofthenetworkconnectedtotheprojector.
GATEWAY Setthedefaultgatewayofthenetworkconnectedtotheprojector.
WINS SettheIPaddressofyourWINSserverofthenetworkconnectedtotheprojectorwhen[DHCP]isturnedon,thisoptionisnotavailable.
AUTODNSON DHCPserverwillautomaticallyassign IPaddressofDNSserverconnected to theprojector.
AUTODNSOFF SetyourIPaddressofDNSserverconnectedtotheprojector.
SettingforWIREDLAN
PROFILE1/PROFILE2 TwosettingscanbesetforwiredLANconnection.SelectPROFILE1orPROFILE2.
DISABLE TurnoffwiredLANconnection
SettingforWIRELESSLAN(theoptionalWirelessLANUnitrequired)
EASYCONNECTION ExecuteawirelessLANusingEASYCONNECTION.
SIMPLEACCESPOINT Settheprojectorforsimpleaccesspoint.
WPS UseWPS(Wi-FiProtectedSetup™)tosetupthewirelessLANfortheprojector.NOTE:Usetheprojector’smenustomakeWPSconnectionsandchangetheWPSprofilesettings.
CHANNEL Selectachannel.Availablechannelsvarydependingonthecountryandregion.Whenyouselect[INFRASTRUCTURE],makesurethattheprojectorandyouraccesspointareonthesamechannel;whenyouselect[ADHOC],makesurethattheprojectorandyourcomputerareonthesamechannel.

46
3. Convenient Features
PROFILE1/PROFILE2 TwosettingscanbesetforwirelessLANconnection.SelectPROFILE1orPROFILE2.
SSID Enteran identifier (SSID) forwirelessLAN.CommunicationcanbedoneonlywithequipmentwhoseSSIDmatchesSSIDforyourwirelessLAN.
SITESURVEY DisplaysalistofavailableSSIDsforwirelessLANonsite.SelectanSSIDwhichyoucan access.
NETWORKTYPE SelectcommunicationmethodwhenusingwirelessLAN.INFRASTRUCTURE:Selectthisoptionwhencommunicatingwithoneormoreequip-mentconnectedtothewirelessLANnetworkviaawirelessaccesspoint.ADHOC:SelectthisoptionwhenusingthewirelessLANtodirectlycommunicatewithacomputerinpeer-to-peermode.
SECURITYTYPE Turnonorofftheencryptionmodeforsecuretransmission.Whenturnontheencryp-tionmode,setWEPkeyorencryptedkey.
DISABLE Willnotturnontheencryptionfeature.Yourcommunicationsmaybemonitoredbysomeone.
WEP64bit Uses64-bitdatalengthforsecuretransmission.
WEP 128 bit Uses128-bitdatalengthforsecuretransmission.Thisoptionwillincrease privacy and security when compared to use of 64-bitdatalengthencryption.
WPA-PSKTKIP/WPA-PSKAES/WPA2-PSKTKIP/WPA2-PSKAES/WPA-EAPTKIPEAP-TLS/WPA-EAPAESEAP-TLS/WPA-EAPTKIPPEAP-MSCHAPv2/WPA-EAPAESPEAP-MSCHAPv2/WPA2-EAPTKIPEAP-TLS/WPA2-EAPAESEAP-TLS/WPA2-EAPTKIPPEAP-MSCHAPv2/WPA2-EAPAESPEAP-MSCHAPv2
Theseoptionsparovidestrongersecuritythan WEP.
NOTE:• TheWEPsettingsmustbethesameascommunicationdevicessuchasPCoraccesspointin
yourwirelessnetwork.• WhenyouuseWEP,yourimagetransmissionspeedwillslowdown.• OtherencryptionkeysthanWEP64bitandWEP128bitarenotavailablewhen[ADHOC]is
selectedfrom[NETWORKTYPE].• Toinstalladigitalcertificate,usetheprojector’smenu.(→page125)
INDEX Selectencryptionkeywhenselecting[WEP64bit]or[WEP128bit] in[SECURITYTYPE].
KEY Whenselecting[WEP64bit]or[WEP128bit]in[SECURITYTYPE]:EnterWEPkey.
Select Characters(ASCII) Hexadecimaldigit(HEX)
WEP64bit Upto5characters Upto10characters
WEP 128 bit Upto13characters Upto26characters
When selecting [WPA PSK-TKIP], [WPA PSK-AES], [WPA2 PSK-TKIP] or [WPA2PSK-AES]:Enterencryptionkey.Keylengthmustbe8orgreaterand63orless.
USERNAME SetausernameforWPA-EAP/WPA2-EAP.
PASSWORD SetapasswordforWPA-EAPTKIPPEAP-MSCHAPv2/WPA-EAPAESPEAP-MSCHAPv2/WPA2-EAPTKIPPEAP-MSCHAPv2/WPA2-EAPAESPEAP-MSCHAPv2.

47
3. Convenient Features
USEDIGITALCERTIFI-CATE
SelectthisifyouuseadigitalcertificateforWPA-EAPTKIPPEAP-MSCHAPv2/WPA-EAPAESPEAP-MSCHAPv2/WPA2-EAPTKIPPEAP-MSCHAPv2/WPA2-EAPAESPEAP-MSCHAPv2.
•NAME
PROJECTORNAME Enteranameforyourprojectorso thatyourcomputercan identify theprojector.Aprojectornamemustbe16charactersorless.TIP:Projectornamewillnotbeaffectedevenwhen[RESET]isdonefromthemenu.
HOSTNAME Enterthehostnameofthenetworkconnectedtotheprojector.Ahostnamemustbe15 or less.
DOMAINNAME Enter thedomainnameof thenetworkconnectedtotheprojector.Adomainnamemustbe60charactersorless.
•ALERTMAIL
ALERTMAIL(Englishonly)
Thisoptionwillnotifyyourcomputeroflampreplacetimeorerrormessagesviae-mailwhenusingwirelessorwiredLAN.PlacingacheckmarkwillturnontheAlertMailfeature.ClearingacheckmarkwillturnofftheAlertMailfeature.Sampleofamessagetobesentfromtheprojector:
Thelampandfiltersareattheendofitsusablelife.Pleasereplacethelampandfilters.ProjectorName:NEC/DukneProjectorLampHoursUsed:100[H]
SENDER’SADDRESS Entersender’saddress.
SMTPSERVERNAME EntertheSMTPservernametobeconnectedtotheprojector.
RECIPIENT’SADDRESS1,2,3
Enteryourrecipient’saddress.Uptothreeaddressescanbeentered.
TESTMAIL SendatestmailtocheckwhetheryoursettingsarecorrectornotNOTE:• Ifyouexecuteatest,youmaynotreceiveanAlertmail.Shouldthishappen,checkifnetwork
settingsarecorrect.• Ifyouenteredanincorrectaddressinatest,youmaynotreceiveanAlertmail.Shouldthis
happen,checkiftheRecipient’sAddressiscorrect.
SAVE Clickthisbuttontoreflecttheabovesettings.

48
3. Convenient Features
•NETWORKSERVICE
PJLinkPASSWORD SetapasswordforPJLink*.Apasswordmustbe32charactersorless.Donotforgetyourpassword.However,ifyouforgetyourpassword,consultwithyourdealer.
HTTPPASSWORD SetapasswordforHTTPserver.Apasswordmustbe10charactersorless.
AMXBEACON TurnonorofffordetectionfromAMXDeviceDiscoverywhenconnectingtothenetworksupportedbyAMX’sNetLinxcontrolsystem.TIP:WhenusingadevicethatsupportsAMXDeviceDiscovery,allAMXNetLinxcontrolsystemwillrec-ognizethedeviceanddownloadtheappropriateDeviceDiscoveryModulefromanAMXserver.PlacingacheckmarkwillenabledetectingtheprojectorfromAMXDeviceDiscovery.ClearingacheckmarkwilldisabledetectingtheprojectorfromAMXDeviceDiscovery.
*WhatisPJLink?PJLinkisastandardizationofprotocolusedforcontrollingprojectorsofdifferentmanufacturers.Thisstandardproto-colisestablishedbyJapanBusinessMachineandInformationSystemIndustriesAssociation(JBMIA)in2005.TheprojectorsupportsallthecommandsofPJLinkClass1.SettingofPJLinkwillnotbeaffectedevenwhen[RESET]isdonefromthemenu.
CRESTRONROOMVIEWcompatibilityTheprojectorsupportsCRESTRONROOMVIEW,allowingmultipledevicesconnectedinthenetworktobemanagedandcontrolledfromacomputeroracontroller.Formoreinformation,visithttp://www.crestron.com
<SettingProcedure>AccesstotheHTTPserverfunction,andmakenecessarysettingsfor[CRESTRON]in[NETWORKSETTINGS].
•ROOMVIEWformanagingfromthecomputer.
DISABLE DisablesROOMVIEW.
ENABLE EnablesROOMVIEW.
•CRESTRONCONTROLformanagingfromthecontroller.
DISABLE DisablesCRESTRONCONTROL.
ENABLE EnablesCRESTRONCONTROL.
IPADDRESS SetyourIPaddressofCRESTRONSERVER.
IPID SetyourIPIDofCRESTRONSERVER.
TIP:TheCRESTRONsettingsarerequiredonlyforusewithCRESTRONROOMVIEW.Formoreinformation,visithttp://www.crestron.com
•INFORMATION
WIREDLAN DisplayalistofsettingsofwiredLANconnection.
WIRELESSLAN DisplayalistofsettingsofwirelessLANconnection.
UPDATE Reflectsettingswhentheyarechanged.

49
3. Convenient Features
❿ Projecting Your Computer’s Screen Image from the Projector via a Network [NETWORK PROJECTOR]
ByselectingtheprojectorconnectedtothesamenetworkasthatofyourPC,thePCscreenimagecanbeprojectedtothescreenvianetwork.Thereisnoneedofconnectionusingthecomputercable(VGA).
Operation Environment
ApplicableOS Windows8ProWindows8EnterpriseWindows7ProfessionalWindows7UltimateWindows7EnterpriseWindowsVistaHomePremiumWindowsVistaBusinessWindowsVistaUltimateWindowsVistaEnterprise
Hardwarespecifications ThespecificationsrecommendedbyMicrosoftastheoperationenvironmentforWindows8/Windows7/WindowsVistashouldbesatisfied.
NetworkEnvironment WiredLANorwirelessLANenvironmentthatsupportsTCP/IPisrequired.
Screencolor HighColor(16bits)TrueColor(24bitsand32bits)*Settingwith256colorsorlessisnotavailable.
SettingtheProjectortoNetworkProjectorInputMode1. Withtheprojectorturnedon,presstheSOURCEbutton.
The input selection window appears.
Another way to display the input selection window is to press the NETWORK button on the remote control. The APPLICATIONMENUscreenwillbedisplayed.Gotostep3.

50
3. Convenient Features
2. PresstheSELECT▼ or ▲buttontoselect[NETWORK]andpresstheENTERbutton.
Inthescreen,the[APPLICATIONMENU]menuisdisplayed.
3. Fromthe[APPLICATIONMENU]menu,select[NETWORKPROJECTOR].
The[PROJECTORNAME/DISPLAYRESOLUTION/PASSWORD/URL]willbedisplayed.

51
3. Convenient Features
ProjectingtheImagewithNetworkProjector1. Click[Start]fromthedesktopofWindows7.
2. Click[AllPrograms].
3. Click[Accessories].
4. Click[ConnecttoaNetworkProjector].
Whenthe[PermissionConnecttoaNetworkProjector]windowappears,click[Yes.].
The“ConnecttoaNetworkProjector”windowappears.
5. Click[→Searchforaprojector(recommended)].
Inthe“Availableprojectors”box,“P501Series”isdisplayed.
6. Click[P501Series].
Themessage“Enterthepasswordfortheprojectorthatyouselected.”isdisplayedatthebottomofthewindow.

52
3. Convenient Features
7. Inputthepasswordtothepasswordinputboxdisplayedbytheoperationatstep3onpage50.
8. Click[Connect].
ThenetworkprojectorfunctionworksandthescreenofWindows7isprojectedfromtheprojector.
• Iftheresolutionofyourcomputer’sscreenisdifferentfromtheprojector’sscreenresolution,theNETWORKPROJECTORfunctionmaynotwork.Ifthishappens,changetheresolutionofthecomputer’sscreentolowerresolution than the one displayed at Step 3 on page 50.
NOTE:Whenthenetworkprojectorfunctionworks,thebackgroundcolorofthedesktopchangestosolidcolor.Whenthenetworkprojectorfunctionisstopped,theoriginalbackgroundcolorisrestored.
Reference:IftheprojectorcannotbefoundatStep5,click[→Entertheprojectoraddress].Then,inputthe“Networkaddress”(Inputexample:http://10.32.97.61/lan)and“Projectorpassword”(Inputexample:82291627)displayedinthescreenprojectedfromtheprojector.
ExitingtheNetworkProjectorOperation
1. Click[Projecting:P501Series]intheWindowsVistataskbar.
2. Click[Disconnect].
TheNetworkProjectorfunctionisstopped.
3. PresstheSOURCEbuttonoftheprojectortoselectaninputterminalotherthan[NETWORK].
When using the remote control, press a button other than the NETWORK button.

53
3. Convenient Features
⓫ Using the Projector to Operate Your Computer via a Network [REMOTE DESKTOP] • ByselectingthePCconnectedtothesamenetworkasthatoftheprojector,thePCscreenimagecanbeprojected
tothescreenvianetwork.
Then,byoperatingthekeyboard,youcanoperateWindows8,Windows7,WindowsVistaorWindowsXPonthePCconnectedwiththenetwork.
• WiththeRemoteDesktopfunction,youcanremotelyoperatethePCplacedatadistancefromtheprojector.
Meetingroom
Office
NOTE:• The[REMOTEDESKTOP]functionwillworkonthefollowingWindowseditions. Windows8Pro,Windows8Enterprise, Windows7Professional,Windows7Ultimate,Windows7Enterprise, WindowsVistaHomePremium,WindowsVistaBusiness,WindowsVistaUltimate,WindowsVistaEnterprise, WindowsXPProfessionalwithServicePack3 (Note)• Inthisuser’smanualthisfeatureisdescribedusingWindows7asanexample.• AkeyboardisrequiredtousetheRemoteDesktopfunction.• TheRemoteDesktopfunctioncanbeoperatedwithakeyboard.Usingawirelessmousewithawirelesskeyboardismoreuseful
foroperating.Useacommerciallyavailablewirelesskeyboard,awirelessmouse,andaUSBwirelessreceiver.UseacommerciallyavailableUSBkeyboardandUSBmouse.
• AUSBkeyboardwithabuilt-inUSBhubcannotbeusedwiththeprojector.• AwirelesskeyboardormousethatsupportsBluetoothcannotbeusedwiththeprojector.• WedonotwarrantthattheUSBportoftheprojectorwillsupportallUSBdevicesinthemarket.
Prepareacommerciallyavailablewirelesskeyboard(USlayoutversion).
ConnecttheUSBwirelessreceivertotheUSBport(TypeA)oftheprojector.Makeallnecessarysettingsforyourwirelesskeyboardandmouse.
USB

54
3. Convenient Features
SettingthepasswordtotheuseraccountofWindows7TIP:Ifapasswordhasbeensetforanaccount,thesteps1to9canbeskipped.1. Click[Start]fromthedesktopofWindows7.
2. Click[ControlPanel].
3. Click[Addorremoveuseraccounts]displayedunder[UserAccounts].
4. Whenthe[UserAccountControl]confirmationwindowappears,click[Continue].
5. Click[Administrator].
6. Click[Createapassword].
7. Inputthepasswordtothe[Newpassword]box.
8. InputthesamepasswordasthatatStep7tothe[Confirmnewpassword]box.
9. Click[Createapassword].
The Administrator is changed to [Password Protection].
SettingtheRemoteAccess1. Click[Start]fromthedesktopofWindows7.
2. Click[ControlPanel].
3. Click[SystemandSecurity].
4. Click[Allowremoteaccess]displayedunder[System].
5. Whenthe[UserAccountControl]confirmationwindowappears,click[Continue].
The [System Properties] window appears.
6. Click[AllowconnectionsfromcomputersrunninganyversionofRemoteDesktop(lesssecure)]intheRemoteDesktopboxandclick[OK].
CheckingtheIPaddressonWindows71. Click[Start]fromthedesktopofWindows7.
2. Click[ControlPanel].
3. Click[Viewnetworkstatusandtasks]displayedunder[NetworkandInternet].

55
3. Convenient Features
4. Click[Viewstatus]displayedinblueontherightof[LocalAreaConnection]inthewindow.
The [Local Area Connection Status] window appears.
5. Click[Details...].
Writedownthevaluefor“IPv4IPAddress”(xxx.xxx.xxx.xxx)displayed.
6. Click[Close].
7. Click[X]attheupperrightofthewindow.
Thesystemgoesbacktothedesktop.
StartingtheRemoteDesktop1. Withtheprojectorturnedon,presstheSOURCEbutton.
The input selection window appears.
Another way to display the input selection window is to press the NETWORK button on the remote control. The APPLICATIONMENUscreenwillbedisplayed.Gotostep3.

56
3. Convenient Features
2. PresstheSELECT▼ or ▲buttontoselect[NETWORK]andpresstheENTERbutton.
The[APPLICATIONMENU]menuwillbedisplayed.
3. Fromthe[APPLICATIONMENU]menu,usethewirelesskeyboardtoselect[REMOTEDESKTOPCONNEC-TION].
The[REMOTEDESKTOPCONNECTION]windowappears.
4. OperatethewirelesskeyboardtoinputtheIPaddressofWindows7andclick[CONNECTION].
The log-on screen of Windows 7 is displayed in the screen projected by the projector.
5. Operatethewirelesskeyboardtoinputtheuser’spasswordandpress“Enter”.
Theremotedesktopfunctionisstarted.
Windows7desktopisdisplayedinthescreenprojectedbytheprojector.
Log out the computer.
UsethewirelesskeyboardconnectedtotheprojectortooperateWindows7.
NOTE:Whentheprojectionismadewiththeremotedesktopfunction,thebackgroundcolorofthedesktopischangedtosolidcolor.

57
3. Convenient Features
ExitingtheRemoteDesktop1. Operatethewirelesskeyboardtoclick[Start]fromthedesktopscreenprojectedbytheprojector.
2. Click[X]ontherightofthestartmenu.
Theremotedesktopfunctionisstopped.
3. PresstheSOURCEbuttonoftheprojectortoselectaninputterminalotherthan[NETWORK].
When using the remote control, press a button other than the NETWORK button.
TIP:Setting[OPTIONS]inREMOTEDESKTOPClicking[OPTIONS]displaysthe[PERFORMANCE]screen.Makingsettingsto[OPTIONS]willallowyoutodisplaythedesktopbackground,ortoenablethewindowanimationfunctionduringtheRemoteDesktopoperation.However,doingthiswillcausethedisplay’sormouse’sresponsetoslowdown.Ifthedisplay’sormouse’sresponseissloweddown,tryoneormoreofthefollowing:
DESKTOPBACKGROUND:Clearthecheckmarktodisplaythedesktopbackgroundinsolidcolor.MENUANDWINDOWANIMATION:Clearthecheckmarktodisablemenuandwindowanimation.THEMES:ClearthecheckmarknottouseThemes.SHOWCONTENTSOFWINDOWWHILEDRAGGING:Clearthecheckmarktoshowonlythewindowpanewhiledragging.

58
3. Convenient Features
⓬ Connecting Your Microphone ConnectingacommerciallyavailabledynamicmicrophonetotheMICinputjackallowsyoutooutputyourmicsoundfromthebuilt-inspeaker.
SoundfromCOMPUTER,VIDEO,S-VIDEO,andHDMIaudioinputsorsoundofVIEWER/NETWORKinputwillbeheardfromthespeakerwithyourmicrophonevoice.Microphonesensitivitycanbeadjusted.Fromthemenu,select[SETUP]→[INSTALLATION]→[MICGAIN].(→page107)
NOTE:• TheMICinputjackdoesnotsupportpluginpowermicrophones.• IfthereisnosignalwheneitherHDMIinputisselected,soundoutputmaynotwork.
MIC
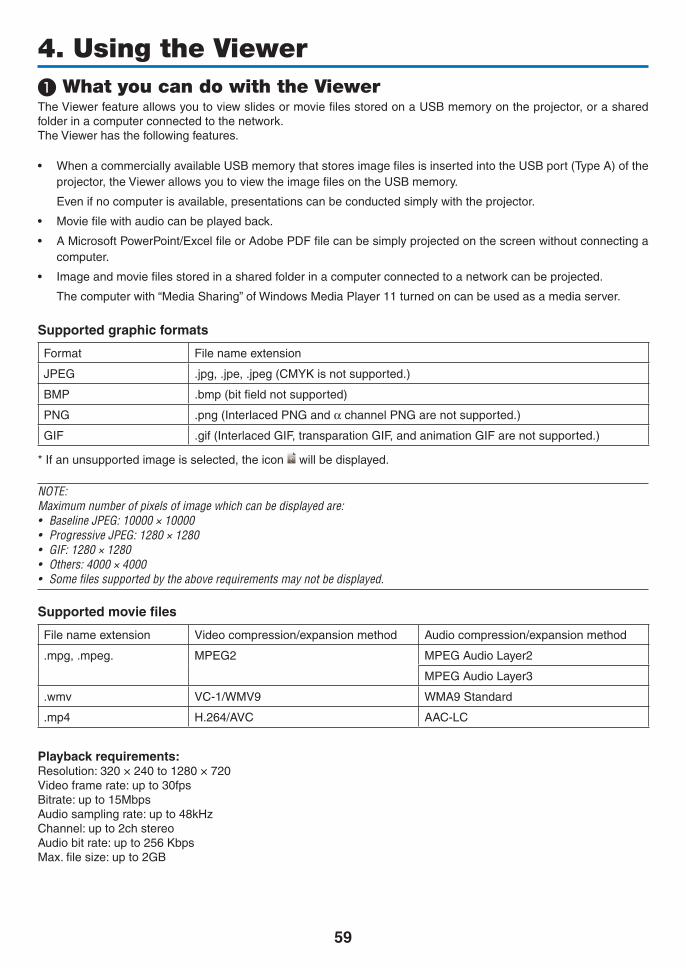
59
4. Using the Viewer ❶ What you can do with the ViewerTheViewerfeatureallowsyoutoviewslidesormoviefilesstoredonaUSBmemoryontheprojector,orasharedfolderinacomputerconnectedtothenetwork.TheViewerhasthefollowingfeatures.
• WhenacommerciallyavailableUSBmemorythatstoresimagefilesisinsertedintotheUSBport(TypeA)oftheprojector,theViewerallowsyoutoviewtheimagefilesontheUSBmemory.
Evenifnocomputerisavailable,presentationscanbeconductedsimplywiththeprojector.
• Moviefilewithaudiocanbeplayedback.
• AMicrosoftPowerPoint/ExcelfileorAdobePDFfilecanbesimplyprojectedonthescreenwithoutconnectingacomputer.
• Imageandmoviefilesstoredinasharedfolderinacomputerconnectedtoanetworkcanbeprojected.
Thecomputerwith“MediaSharing”ofWindowsMediaPlayer11turnedoncanbeusedasamediaserver.
Supportedgraphicformats
Format Filenameextension
JPEG .jpg,.jpe,.jpeg(CMYKisnotsupported.)
BMP .bmp(bitfieldnotsupported)
PNG .png(InterlacedPNGandαchannelPNGarenotsupported.)
GIF .gif(InterlacedGIF,transparationGIF,andanimationGIFarenotsupported.)
*Ifanunsupportedimageisselected,theicon willbedisplayed.
NOTE:Maximumnumberofpixelsofimagewhichcanbedisplayedare:• BaselineJPEG:10000×10000• ProgressiveJPEG:1280×1280• GIF:1280×1280• Others:4000×4000• Somefilessupportedbytheaboverequirementsmaynotbedisplayed.
Supportedmoviefiles
Filenameextension Videocompression/expansionmethod Audiocompression/expansionmethod
.mpg,.mpeg. MPEG2 MPEGAudioLayer2
MPEGAudioLayer3
.wmv VC-1/WMV9 WMA9Standard
.mp4 H.264/AVC AAC-LC
Playbackrequirements:Resolution:320×240to1280×720Videoframerate:upto30fpsBitrate:upto15MbpsAudiosamplingrate:upto48kHzChannel:upto2chstereoAudiobitrate:upto256KbpsMax.filesize:upto2GB

60
4. Using the Viewer
NOTE:• Moviefilesconvertedbyusingthevideo/audioformatwhichisnotsupportedbythisprojectorcannotbeplayedback. Inthiscase,therewillbenoicontoshowthatplaybackisnotpossible.• FileswithDigitalRightsManagement(DRM)protectioncannotbeplayedback.• Someofthemoviefilesthatmeettheaboverequirementsmaynotbeplayedback.Moviefilesmaynotbeplayedbackcorrectly
dependingonyournetworkenvironmentorthebitrateofyourfile.• WMVformatvideofilewillbedisplayedinanaspectratioof1to1independentlyofitsoriginalaspectratio.• Filesthatcanbeplayedbackonthemediaserveraregraphicsandmoviefiles. InWindowsMediaPlayer11(WindowsXP/
WindowsVista)mp4filescannotbeplayedback.
SupportedPDFfiles
Filenameextension Supportedfileformat
.pdf AdobeAcrobatPDF
NOTE:• FontsnotembeddedinPDFmaynotbedisplayed• FunctionsaddedtoPDFfileaftercreatedwillnotworkordisplay.Functionsaddedarebookmarks,boxesinformtool,andnotes
willnotbedisplayed. AutofliporAutotransitionwillnotwork.• SomePDFfilesmaynotbedisplayed.
SupportedPowerPointfiles
Filenameextension Supportedfileformat
.ppt,.pptx MicrosoftPowerPoint97–2007
NOTE:• Playablefonts,colors,fontornament,placement,objectinsertionoranimationarerestricted.• SomeMicrosoftPowerPoint97–2007filesmaynotbedisplayed.
SupportedExcelfiles
Filenameextension Supportedfileformat
.xls,.xlsx MicrosoftExcel97-2007
NOTE:• Playablefonts,colors,fontornament,graphs,orgraphicsarerestricted.• SomeMicrosoftExcel97-2007filesmaynotbedisplayed.
SupportedUSBmemorydevices- BesuretouseaUSBmemorydeviceformattedwiththeFAT,exFAT,FAT32orFAT16filesystem.
TheprojectordoesnotsupportNTFSformattedUSBmemory.
IftheprojectordoesnotrecognizeyourUSBmemory,checkiftheformatissupported.
ToformatyourUSBmemoryinyourcomputer,refertothedocumentorhelpfilethatcomeswithyourWin-dows.
- WedonotwarrantthattheUSBportoftheprojectorwillsupportallUSBmemoriesinthemarket.

61
4. Using the Viewer
Noticesonsharedfolderandmediaserver• Filesfromasharedfolderormediaservermaynotbeprojectedifsecurityorantivirussoftwareisinstalledonyour
computer.
• Openthefollowingfirewallports:
- Mediaserver
Port number Protocol1900 UDP2869 TCP10243 TCP10280-10284 UDP
- Sharedfolder
Port number Protocol137 UDP/TCP138 UDP/TCP139 UDP/TCP445 UDP/TCP
• Setyourcomputerforsharingandsecuritytograntaccesstofilesinthesharedfolderandsetyoursecurityorantivirussoftwaretograntaccesstofilesinthesharedfolder.Consultyournetworkadministratorformoreinforma-tion.
• Moviefilesinthesharedfolderorthemediaservermaynotbeplayedbackcorrectlydependingonyournetworkenvironmentorthebitrateofyourfile.
NOTE:DonotdisconnectbetweentheprojectorandyourcomputerbyremovingtheLANcableorturningofftheprojectorwhenaPow-erPointfileorPDFfileisdisplayedfromasharedfolder.DoingsowillmakeViewerinoperable.
NOTE• ThefollowingoperationsbyusingthebuttonsontheprojectorarenotpossiblewhentheVIEWERscreensuchastheslidescreen
andthethumbnailscreenisdisplayed.- Keystonecorrectionbyusingthe▲or▼button- AutoAdjustmentbyusingtheAUTOADJ.button- Volumecontrolwiththe◀or▶button
• FreezingpicturebyusingtheFREEZE,ASPECT,orAUTOADJ.buttonontheremotecontrolisnotpossiblewhentheVIEWERscreensuchastheslidescreenandthethumbnailscreenisdisplayed.
• Executing[RESET]→[ALLDATA]fromthemenuwillreturnthesettingsfortheViewertoolbartothefactorydefault.

62
4. Using the Viewer
❷ Preparing presentation materials
1. Createyourpresentationmaterialsandsavetheminasupportedfileformattoyourcomputer.
• Seepage86 for supported file formats.
• MakesurethatPowerPointfileisdisplayedontheViewerbeforegivingyourrealpresentation.
• WhencreatingaPDFfile,embedyourfontsinyourPDFfile.EmbeddingfontsrequiresAdobeAcrobat.Thiscannot be done in Adobe Reader.
TIP:•UsingPrintCommandExampleforfontembeddingusingPrintCommand.SeethehelpofAdobeAcrobatformoreinformation.1. Select“Print”fromthe“File”menu.
2. Select“AdobePDF”from“Printername”andclickthe“Properties”but-ton.
3. Clickthe“Edit”buttoninthe“AdobePDFSettings”tab.
4. ClickthefonttabintheEditwindowtoselectthefontembedwindow.
5. Placeacheckmarkfor“Embedallfonts”.
Click“OK”toreturntothePrintwindow,andclick“OK”tostartcreatingaPDF file.
2. Saveafiletoyourdrive.
To save a file to your USB memory:
Use the Windows Explore to copy the file to your USB memory.
To place a file in a shared folder you create in your computer, see page 77.
Touse“MediaSharing”inWindowsMediaPlayer11,seepage81.

63
4. Using the Viewer
❸ Projecting images stored in a USB memory device
ThissectionexplainsthebasicoperationoftheViewer.TheexplanationprovidestheoperationalprocedurewhentheViewertoolbarissettothefactorydefault.
Preparation:BeforestartingtheViewer,storeimagestotheUSBmemoryusingyourcomputer.
Starting the Viewer
1. Turn on the projector. (→page15)
2. InserttheUSBmemoryintotheUSBportoftheprojec-tor.
NOTE:• DonotremovetheUSBmemoryfromtheprojectorwhileit’sLED
flashes.Doingsomaycorruptthedata.
TIP:YoucanaUSBmemoryinserttheprojectorwhenthedrivelistscreenisdisplayed.
3. PresstheSOURCEbuttontoselect[VIEWER].
A press of the SOURCE button will display the source select screen.
A few more presses of the SOURCE button will display the drive list screen.
Anotherwaytoselect[VIEWER]istopresstheVIEWERbutton on the remote control.
TIP:• Formoreinformationaboutthedrivelistscreen,seepage69.• Todisplaygraphicsinasharedfolder,seepage77;todisplaystill
imagesormoviefilesinamediaserver,seepage81.
USB

64
4. Using the Viewer
4. Press the ▶ button to select“USB1” and press theENTER button.
The“USB1”thumbnailscreenwillbedisplayed.
TIP:• Formoreinformationaboutthumbnailscreen,seepage71.
5. Use the ▲▼◀ or ▶ button to select an icon.
• The→ (arrow) symbol on the right indicates there are more pages. pressing the PAGE ▽ (page down) button will show the next page: pressing the PAGE △ (page up) will show the previous page.
6. Press the ENTER button.
Operation varies depending on the selected file.
•Stillimage
The selected slide will be displayed.
The ◀ or ▶ button can be used to select the next (right) slide or the previous (left) slide in the thumbnail screen.
• PressingtheENTERbuttonwilldisplaythecontrolbarwith which is used to select or rotate an slide.(→ page 72)

65
4. Using the Viewer
•Moviefile
The movie file will start playing.
Afterfinishingtheplayback,thescreenwill turntoblack.PresstheEXITbuttontoreturntothethumbnailscreen.
• Pressing the ENTER button will display the movie’scontrol bar with which you can pause or fastforward and some other operations.
•MicrosoftPowerPoint/Excelfile
[PowerPoint]
The slide on the first page will be displayed.
Press ▶ to select the next slide; press ◀ to select the previ-ous slide.
• Youcanalsousethe▼ or ▲ button to select a page. To returntothethumbnailscreen,presstheEXITbutton.
[Excel]
The first sheet will be displayed.
Pressing the ▲, ▼, ◀, or ▶ button to scroll the sheet up, down, left and right.
The PAGE ▼ or PAGE ▲ button will move to the next sheet or the previous sheet.
Pressing the ENTER button will change the display ratio in the sheet.
Toreturntothethumbnailscreen,presstheEXITbutton.
NOTE:• Files with slideshow or animation effects may not be correctly
displayedontheViewer. See“SupportedPowerPointfiles”/“SupportedExcelfiles”onpage
60,86.

66
4. Using the Viewer
•AdobePDFfile
The first page will be displayed.
• ThePDFfilewillfillthewidthofthescreen.
Pressing the ▼ or ▲ button will scroll the screen down or up.
The PAGE ▼ or PAGE ▲ button will move the screen one page down or up.
Toreturntothethumbnailscreen,presstheEXITbutton.
Pressing the ENTER button will change the display mode between whole screen and part screen.
• Whenapassowordinputwindowisdisplayed,itmeansthat the PDF file is password-protected.
Pressing the ENTER button will show the software keyboard. Use the software keyboard to enter yourpassword.
Select [OK] and press the ENTER button. The PDF file will be displayed.
• Formoreinformationonthesoftwarekeyboard,seepage131.
NOTE:BookmarksandnotesthatwereaddedafterPDFconversionwillnotbedisplayed.IffontswerenotembeddedatthetimeofPDFconversion,thosefontswillnotbedisplayed.
TIP:Ittakessometime(about30secondstotwominutes)todisplayalargesizefileortoturnpagesofaPDFfilethathasmanypages.

67
4. Using the Viewer
•Indexfile(extension:.idx)
• Index files, which is converted by usingViewer PPTConverter 3.0, will appear in the Thumbnail screen.
Only folders and JPEG files converted by using Viewer PPT Converter 3.0 will appear in the Thumbnail screen.
TIP:• Viewer PPT Converter 3.0 can be downloaded from our
website.URL:http://www.nec-display.com/dl/en/index.html
• Toselectslideshowofindexfiles,openthe[PRESENTA-TION]folderintheDRIVELISTscreen.
However, index files will not appear. Only folders and JPEG files will appear.
• UptofourindexfoldersinyourUSBandsharedfolderare displayed. The four folders will be displayed in reverse chronological order
• WhenyouinserttheUSBmemorydevicestoringindexwith the Viewer in operation, the content of the index files will be displayed.
NOTE:• Theplaymode(MANUAL/AUTO)forslidesofindexfileworksin
thefollowingway: Incaseof[MANUAL]for[PLAYMODE] Whenyouselect[OPTIONS]→[SLIDESETTING]→[PLAYMODE]→[MANUAL],indexfileswillbesetformanualplaybackinregard-lessofwhether[INTERVAL]isset.
Incaseof[AUTO]selectedfor[PLAYMODE] Whenyouselect[OPTIONS]→[SLIDESETTING]→[PLAYMODE]→ [AUTO], index files will be set for auto playback at intervalsspecifiedbyusing[INTERVAL].
When,however,[-1]isselectedfor[INTERVAL],theplaymodewillbesetforautoplaybackaccordingtothesettingfor[OPTIONS]→[SLIDESETTING]→[INTERVAL].
7. RemovetheUSBmemoryfromtheprojector.
Returntothedrivelistscreen.MakesurethattheLEDonthe USB memory is not flashing before removing the USB memory.
NOTE:IfyouremovetheUSBmemoryfromtheprojectorwithaslidedisplayed,theprojectormaynotoperatecorrectly.Ifthishappens,turnofftheprojectorandunplugthepowercord.Wait3minutes,thenconnectthepowercord,andturnontheprojector.
USB
XXXX Motors

68
4. Using the Viewer
Exiting the Viewer1. PresstheSOURCEbuttontoselectasourceotherthan
[VIEWER].
A press of the SOURCE button will display the source select screen.
A few more presses of the SOURCE button will display another source.
• To exit theViewer using the remote control, select asourceotherthan[VIEWER].

69
4. Using the Viewer
Names and functions of Viewer screen
TheViewerhasthreescreens:Drivelistscreen,Thumbnailscreen,andSlidescreen.
•DrivelistscreenDisplaysalistofdrivesconnectedtotheprojector.
Menuoperation• Usethe▼ or ▲buttontomovethecursorupordown.SelectthemenuitemandpresstheENTERbutton
todisplaythesubmenu.
OperationforDrivelistscreen1. Press the ▶buttontomovethecursortothedrivelist.
(Use the ◀ or ▶ button to switch between the menu and the drive list.)
Press the ▼ or ▲ button to select a type of drive; press the ◀ or ▶ button to select the drive connected to the projector.
2. SelectthedriveandpresstheENTERbuttontoswitchtothethumbnailscreenoftheselecteddrive.
Cursor (yellow) Cursor (yellow)
Menu Menu Scroll bar
[Drive list screen] [Thumbnail screen]
Folder icon
Path information
Driveinformation/Fileinformation
Menu guide Operation button guide
Control bar* The operation for still image differs from that for movie.
[Slide screen]

70
4. Using the Viewer
Functions
Name Description
REFRESH Displaysadditionalmediaserversinthedrivelistscreen.
OPTIONS OpenstheOPTIONSmenu.
SLIDESETTING Setsupslides.(→page74)
MOVIESETTING Setsupmoviefiles.(→page75)
AUTOPLAYSETTING Setsupautoplay.(→page75)
SHAREEDFOLDER Setsupasharedfolder.(→page77)
MEDIASERVER Setsupamediaserver.(→page81)
RETURN ClosestheOPTIONSmenu.
SYSTEMSETTING Switchestothesystemsettingmenu.SeewiredLAN,wirelessLAN,WPS,network information, mouse, and keyboard in “9. Application Menu”. (→ page118)
USB Displays the icon for a USB memory inserted into the USB port of theprojector.
SHAREDFOLDER DisplaysuptofourdrivesofacomputerconnectedtoaLAN(setforcon-nectingasharedfolder).*Seepage77forsettingupforconnectingasharedfoleroftheprojector.
MEDIASERVER DisplaysuptofourdrivesofacomputerconnectedtoaLAN(setforcon-nectingamediaserver).*Seepage81forsettingupforconnectingamediaserveroftheprojector
PRESENTATION DisplaystheiconwhenaUSBmemoryorsharedfolerstoresindexfiles.
Pathinformation Displaysthelocationofafolderorfile.
Driveinformation [Example]
USB1 314MBFREE/492MB
Displaysthedrive. Displaysfreespaceandcapcityofadrive.(USBonly)
Menuguide Displaysthedescriptionofaselectedmenu.
Operationbuttonguide Displaysinformationaboutoperationbuttons.
*Itisdisplayedinthree-digitnumber(roundingup)
NOTE:WhentheOPTIONSmenuisdisplayed,thedrivelistscreenorthumbnailscreenisnotdisplayed.Todisplayit,selectthe[RETURN]iconandpresstheENTERbutton.
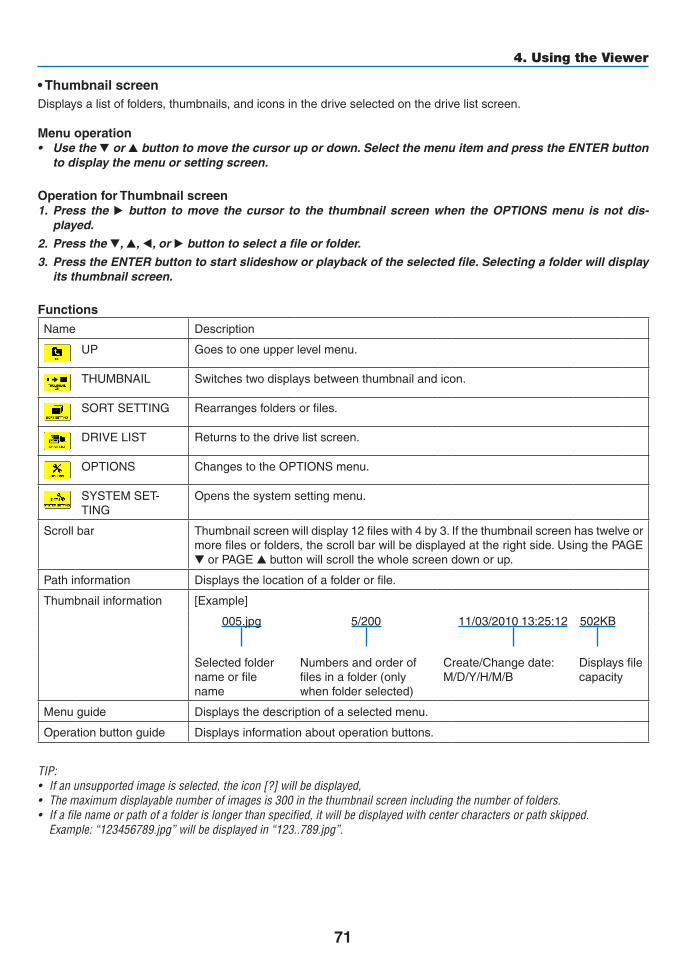
71
4. Using the Viewer
•ThumbnailscreenDisplaysalistoffolders,thumbnails,andiconsinthedriveselectedonthedrivelistscreen.
Menuoperation• Usethe▼ or ▲buttontomovethecursorupordown.SelectthemenuitemandpresstheENTERbutton
todisplaythemenuorsettingscreen.
OperationforThumbnailscreen1. Press the ▶ button to move thecursor to the thumbnail screenwhen theOPTIONS menu is not dis-
played.
2. Press the ▼, ▲, ◀, or ▶buttontoselectafileorfolder.
3. PresstheENTERbuttontostartslideshoworplaybackoftheselectedfile.Selectingafolderwilldisplayits thumbnail screen.
Functions
Name Description
UP Goestooneupperlevelmenu.
THUMBNAIL Switchestwodisplaysbetweenthumbnailandicon.
SORTSETTING Rearrangesfoldersorfiles.
DRIVELIST Returnstothedrivelistscreen.
OPTIONS ChangestotheOPTIONSmenu.
SYSTEMSET-TING
Opensthesystemsettingmenu.
Scrollbar Thumbnailscreenwilldisplay12fileswith4by3.Ifthethumbnailscreenhastwelveormorefilesorfolders,thescrollbarwillbedisplayedattherightside.UsingthePAGE▼orPAGE▲buttonwillscrollthewholescreendownorup.
Pathinformation Displaysthelocationofafolderorfile.
Thumbnailinformation [Example]
005.jpg 5/200 11/03/201013:25:12 502KB
Selectedfoldernameorfilename
Numbersandorderoffilesinafolder(onlywhenfolderselected)
Create/Changedate:M/D/Y/H/M/B
Displaysfilecapacity
Menuguide Displaysthedescriptionofaselectedmenu.
Operationbuttonguide Displaysinformationaboutoperationbuttons.
TIP:• Ifanunsupportedimageisselected,theicon[?]willbedisplayed,• Themaximumdisplayablenumberofimagesis300inthethumbnailscreenincludingthenumberoffolders.• Ifafilenameorpathofafolderislongerthanspecified,itwillbedisplayedwithcentercharactersorpathskipped. Example:“123456789.jpg”willbedisplayedin“123..789.jpg”.

72
4. Using the Viewer
•Slidescreen(stillimage/movie)Playsafileselectedfromalistofthumbnailsoricons.• ForoperatingaMicrosoftPowerPointfileandAdobePDFfile,seepage65, 66.
Controlbaroperation• Thecontrolbarwillbedisplayedonlywhenastillimage(orindexfile)andamoviefileisselected.
• Thecontrolbarforstillimagesdiffersfromthatformoviefiles.
1. PressingtheENTERbuttoninSlidescreenwilldisplaythecontrolbaratthebottomofthescreen.
2. Use the ◀ or ▶buttontoselectafileandpresstheENTERbutton.
• Theselectedfunctionwillbeexecuted.
Functionsofstillimagecontrolbar
Name Description
PREV Goesbacktothepreviousimage
PLAY Playstheimage.Thisbuttonalsoisusedtostoporstartplayinganimage.
NEXT Goestothenextimage.
RIGHT Rotatestheimage90°clockwise.• Tocancel,selectanotherfolder.
LEFT Rotatestheimage90°counterclockwise.• Tocancel,selectanotherfolder.
SIZE BESTFIT Displays the imagewith itsaspect ratio in theprojector’sdisplayablemaximumresolution.
ACTUALSIZE
Displaystheimageinitsactualsize.
CLOSE Closesthecontrolbar.• YoucanalsopresstheEXITbuttontoclosethecontrolbar.
END Stops playing slides or slideshow, and closes the control bar to return to the thumbnailscreen.
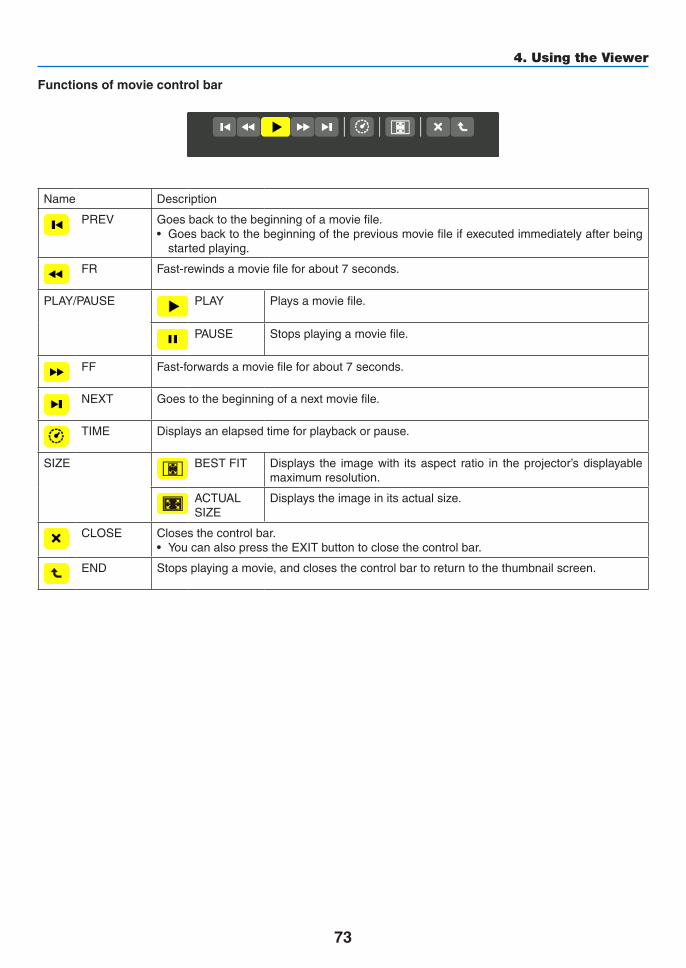
73
4. Using the Viewer
Functionsofmoviecontrolbar
Name Description
PREV Goesbacktothebeginningofamoviefile.• Goesbacktothebeginningofthepreviousmoviefileifexecutedimmediatelyafterbeing
startedplaying.
FR Fast-rewindsamoviefileforabout7seconds.
PLAY/PAUSE PLAY Playsamoviefile.
PAUSE Stopsplayingamoviefile.
FF Fast-forwardsamoviefileforabout7seconds.
NEXT Goestothebeginningofanextmoviefile.
TIME Displaysanelapsedtimeforplaybackorpause.
SIZE BESTFIT Displays the imagewith itsaspect ratio in theprojector’sdisplayablemaximumresolution.
ACTUALSIZE
Displaystheimageinitsactualsize.
CLOSE Closesthecontrolbar.• YoucanalsopresstheEXITbuttontoclosethecontrolbar.
END Stopsplayingamovie,andclosesthecontrolbartoreturntothethumbnailscreen.

74
4. Using the Viewer
Viewer option settings
•SLIDESETTINGSetsstillimagesorslides.
Name Options Description
SCREENSIZE BESTFIT Displaystheimagewithitsaspectratiointheprojector’sdisplay-ablemaximumresolution.
ACTUALSIZE Displaystheimageinitsactualsize.
PLAYMODE MANUAL Selectsmanualplay.
AUTO Selectsautoplay.
INTERVAL 5 - 300 seconds Specifies interval time when [AUTO] is selected for PLAYMODE.
REPEAT Checkmark Turnsonorofftherepeatfunction.
TIP• Toplayoneormoreslides,placethosefilesintoafolder.

75
4. Using the Viewer
•MOVIESETTINGSetsthefunctionsforamoviefile.
Name Options Description
SCREENSIZE BESTFIT Displaystheimagewithitsaspectratiointheprojector’sdisplay-ablemaximumresolution.
ACTUALSIZE Displaystheimageinitsactualsize.
REPEAT OFF Turnsonorofftherepeatfunction.
ONEREPEAT Repeatsonefileonly.
ALLREPEAT Repeatsallfilesinthecurrentfolder.
TIP• Turningon[REPEAT]willdisplayblackscreenduringintermissionbetweenmovies.
•AUTOPLAYSETTINGSetsautoplayforslideshowwhenaUSBmemorydevice is inserted into theUSBportof theprojector,orwhen[VIEWER]isselectedfor[SOURCE].
Name Options Description
AUTOPLAY OFF —
PICTURE Playsafirstfoundstillimageinadrive.
MOVIE Playsafirstfoundmoviefileinadrive.
PowerPoint PlaysafirstfoundPowerPointfileinadrive.
TIP• Autoplaybehavior isdifferentbetweenwhenaUSBmemorydeviceis insertedintotheUSBportoftheprojectorandwhen
[VIEWER]isselectedfor[SOURCE].• AutoplaystartsforthefirstfoundfilesupportingthefiletypesetupforAutoPlay.Thefilewillbesearchedinthedriverootor
lowerlevel.• When[VIEWER]isselectedfor[SOURCE],thelastselectedfilewillbeautomaticallyplayedifitisfound,orthelastselectedfolder
willbesearchedandthefirstfoundfilewillbeautomaticallyplayed. ToautomaticallyplayamoviefileinaUSBmemory,storeonemoviefileorchangeitsfilenamesothatitcanbesearchedfirst.

76
4. Using the Viewer
•SORTSETTINGSetstheorderofdisplayingthumbnailsorslides.
Name Options Description
SORT NAME(ABC..) Displaysthefilesalphabeticallybynameinascendingorder.
NAME(ZYX..) Displaysthefilesalphabeticallybynameindescendingorder.
EXT.(ABC..) Displays thefilesalphabeticallybyextension inascendingor-der.
EXT.(ZYX..) Displays the files alphabetically by extension in descendingorder.
DATE(NEW) Displaysthefilesinreversechronologicalorder.
DATE(OLD) Displaysthefilesinchronologicalorder.
SIZE(BIG) Displaysthefilesindescendingorderofitsfilesize.
SIZE(SMALL) Displaysthefilesinascendingorderofitsfilesize.
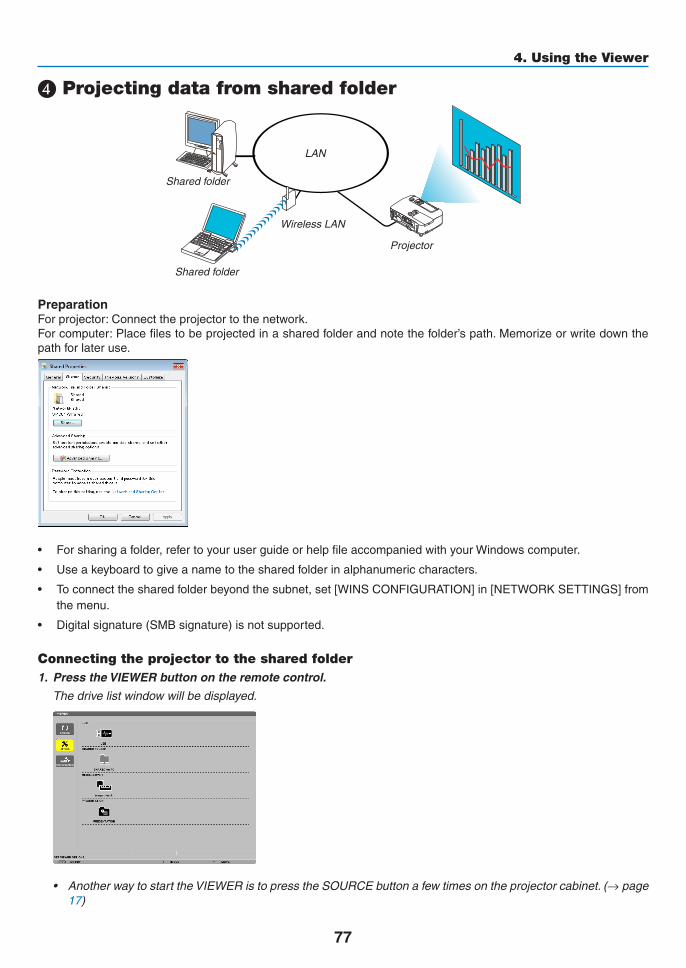
77
4. Using the Viewer
❹ Projecting data from shared folder
LAN
Shared folder
Wireless LAN
Projector
Shared folder
PreparationForprojector:Connecttheprojectortothenetwork.Forcomputer:Placefilestobeprojectedinasharedfolderandnotethefolder’spath.Memorizeorwritedownthepathforlateruse.
• Forsharingafolder,refertoyouruserguideorhelpfileaccompaniedwithyourWindowscomputer.
• Useakeyboardtogiveanametothesharedfolderinalphanumericcharacters.
• Toconnectthesharedfolderbeyondthesubnet,set[WINSCONFIGURATION]in[NETWORKSETTINGS]fromthe menu.
• Digitalsignature(SMBsignature)isnotsupported.
Connecting the projector to the shared folder 1. Press the VIEWER button on the remote control.
The drive list window will be displayed.
• AnotherwaytostarttheVIEWERistopresstheSOURCEbuttonafewtimesontheprojectorcabinet.(→ page 17)

78
4. Using the Viewer
2. Displaysthe[OPTIONS]menu.
Press the ▼ button to select the (OPTIONS)iconandpresstheENTERbutton.
• WhentheOPTIONSmenuisdisplayed,thedrivelistwillnotbedisplayed.
3. Displaythe[SHAREDFOLDER]screen.
Press the ▼ button to select the (SHARED FOLDER) icon and press the ENETR button.
4. Selectafoldernumberandplacetoenableit.
Press the ◀ or ▶ button to a shared folder number and press the ▼ button to select [ENABLE] , and then press the ENTER button.
5. Enterthepath,username,andpasswordforthesharedfolder.
Press the ▼buttontoselectthe[SHAREDFOLDER]field.Thesoftwarekeyboardwillbedisplayed.
Forusingthesoftwarekeyboard,seepage131.
• Ifyourcomputerisnotpasswordprotected,enteringapasswordisnotrequired.
• Uptofoursharedfolderscanbeadded.
• Themaximumlengthofapathofthesharedfoldermustbe15alphanumericcharactersforcomputernameand23 alphanumeric characters for folder name.

79
4. Using the Viewer
6. Exitthesetting.
Press the ▼ button to select [OK] and press the ENTER button.
This will close the [SHARED FOLDER] screen.
• Ifanerrormessageappear,yoursettingsarenotcorrect.Tryagain.

80
4. Using the Viewer
Disconnecting the shared folder from the projector
• Disablethenumberofasharedfolderyouwishtodisconnect
Press the ▼ button to select [ENABLE] and press the ENTER button to clear it.
NOTE:• WhenaPowerPointfileorPDFfileisdisplayed,donotdisconnectyourLANcable.Ifdoingso,theViewerwillnotwork.
TIP:• ConnectingsettingsforSharedfolder Settingsofuptofourfolderscanbesaved. Restartingtheprojectorwilldisplaysetting-savedsharedfoldersingreyfoldericononthedrivelistscreen. Selectingthegreyiconfolderwillskipentryforafolderpath.• Failingtoconnectwithasharedfolderwilldisplaythefoldericonwith“x”mark.Ifthishappen,checkyourfoldersetting.
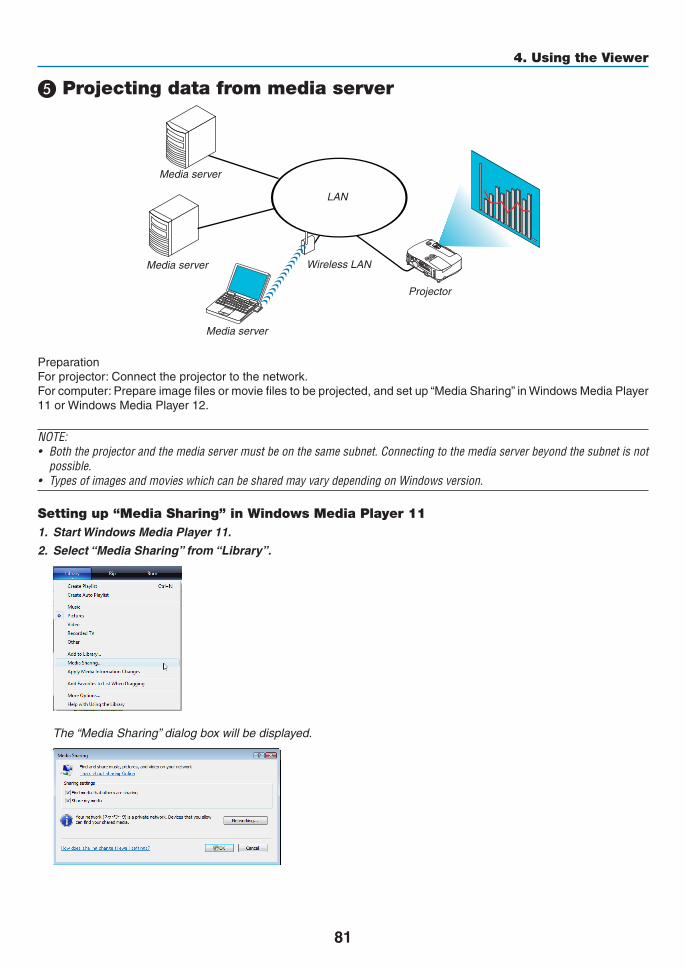
81
4. Using the Viewer
❺ Projecting data from media server
LAN
Media server
Media server
Wireless LAN
Media server
Projector
PreparationForprojector:Connecttheprojectortothenetwork.Forcomputer:Prepareimagefilesormoviefilestobeprojected,andsetup“MediaSharing”inWindowsMediaPlayer11orWindowsMediaPlayer12.
NOTE:• Boththeprojectorandthemediaservermustbeonthesamesubnet.Connectingtothemediaserverbeyondthesubnetisnot
possible.• TypesofimagesandmovieswhichcanbesharedmayvarydependingonWindowsversion.
Setting up “Media Sharing” in Windows Media Player 111. StartWindowsMediaPlayer11.
2. Select“MediaSharing”from“Library”.
The“MediaSharing”dialogboxwillbedisplayed.

82
4. Using the Viewer
3. Select“Sharemymedia”checkbox,andthenselectOK.
A list of accessible devices will be displayed.
4. Select“P501Series”andthen“Allow”.
Acheckmarkwillbeaddedtothe“P501Series”icon.
• The“P501Series”isaprojectornamespecifiedin[NETWORKSETTINGS].
5. Select“OK”.
Thiswillmakepicturesandvideoin“Library”availablefromtheprojector.

83
4. Using the Viewer
Setting up “Media Sharing” in Windows Media Player 121. StartWindowsMediaPlayer12.
2. Select“Stream”,andthenselect“Automaticallyallowdevicestoplaymymedia”.
The“AllowAllMediaDevices”windowswillbedisplayed.
3. Select“Automaticallyallowallcomputersandmediadevices”.
Graphicsandmoviefilesin“Library”canbeusedfromtheprojector.

84
4. Using the Viewer
Connecting the projector to the media serverPresstheVIEWERbuttonontheremotecontrol.TheVIEWERwillstart.
• AnotherwaytostarttheVIEWERistopresstheSOURCEbuttonafewtimesontheprojectorcabinet.(→page17)
• Thiswillstartsearchingforacomputerwith“mediasharing”enabledinthenetworkandaddittothe“Mediaserver”ofthethumbnailscreen.
Anotherwaytodothisistopointthecursorto“Mediaserver”andselect[REFRESH]fromthethumbnailmenuandpresstheENTERbutton.
NOTE:• Uptofouraccessiblemediaserverscanbeautomaticallysearchedanddisplayed.Thefifthdeviceorlatercannotbedisplayed.
(→page63)

85
4. Using the Viewer
Disconnecting the projector from the media server1. Display the OPTIONS menu.
Press the ▼buttontoselectthe[OPTIONS]iconandselecttheENTERbutton.
2. DisplaytheMEDIASERVERsettingscreen.
Press the ▼buttontoselecttheMEDIASERVERiconandpresstheENTERbutton.
3. Disable the connection.
PresstheENTERbuttontoclearthecheckmarktodisabletheconnection.
Press the ▼buttontoselect[OK]andpresstheENTERbuttontoclosetheMEDIASERVERsettingscreen.

86
4. Using the Viewer
❻ Restrictions on displaying files
TheViewerallowsyoutogiveasimplifieddisplayofaPowerPointfileorPDFfile.Duetosimplifieddisplay,however,actualdisplaymaybedifferentfromtheoneonyourcomputerapplicationpro-gram.
Some restrictions on PowerPoint files
• Fontswillbeautomaticallyconvertedtothefontsinstalledintheprojector.Fontscanvaryinsizeorwidth,causinglayoutcorruption
Somecharactersorfontsmaynotbedisplayed.
• Somefunctionsincludedinfontarenotsupported.
Example:Therearesomerestrictionsonanimation,selection,orhyperlink.
• Itmaytakelongertimetofeedpagescomparedwithacomputer
• InsomecasesMicrosoftPowerPoint97-2007formatfilesmaynotbedisplayed.
Some restrictions on Excel files
• Fontswillbeautomaticallyconvertedtothefontsinstalledintheprojector.Fontscanvaryinsizeorwidth,causinglayoutcorruption
Somecharactersorfontsmaynotbedisplayed.
• Somefunctionsincludedinfontarenotsupported.
• Therearesomerestrictionsongraphs,graphics,orimages.
• AfocuscursorincellA1cannotbemoved.
• Itmaytakelongertimetofeedpagescomparedwithacomputer
• InsomecasesMicrosoftExcel97-2007formatfilesmaynotbedisplayed.
Some restrictions on PDF files
• FontsnotembeddedatthetimeofPDFcreationmaynotbedisplayed.
• Somefunctionsincludedinfontarenotsupported.
Example:Therearesomerestrictionsonannotations,selection,form,orcolorspace.
• Itmaytakelongertimetofeedpagescomparedwithacomputer
• InsomecasesAdobeAcrobatformatfilesmaynotbedisplayed.

87
5. Using On-Screen Menu❶ Using the Menus
NOTE:Theon-screenmenumaynotbedisplayedcorrectlywhileinterlacedmotionvideoimageisprojected.
1. PresstheMENUbuttonontheremotecontrolortheprojectorcabinettodisplaythemenu.
NOTE:ThecommandssuchasENTER,EXIT,▲▼,◀▶inthebottomshowavailablebuttonsforyouroperation.
2. Press the ◀▶buttonsontheremotecontrolortheprojectorcabinettodisplaythesubmenu.
3. PresstheENTERbuttonontheremotecontrolortheprojectorcabinettohighlightthetopitemorthefirsttab.
4. Use the ▲▼buttonsontheremotecontrolortheprojectorcabinettoselecttheitemyouwanttoadjustorset.
You can use the ◀▶buttonsontheremotecontrolortheprojectorcabinettoselectthetabyouwant.
5. PresstheENTERbuttonontheremotecontrolortheprojectorcabinettodisplaythesubmenuwindow.
6. Adjustthelevelorturntheselecteditemonoroffbyusingthe▲▼◀▶ buttons on the remote control or the projector cabinet.
Changesarestoreduntiladjustedagain.
7. Repeatsteps2-6toadjustanadditionalitem,orpresstheEXITbuttonontheremotecontrolortheprojec-torcabinettoquitthemenudisplay.
NOTE:Whenamenuormessageisdisplayed,severallinesofinformationmaybelost,dependingonthesignalorsettings.
8. Press the MENU button to close the menu.
Toreturntothepreviousmenu,presstheEXITbutton.

88
5. Using On-Screen Menu
❷ Menu ElementsSlide bar
Solid triangle
Tab
Radio button
High Altitude symbol
ECO mode symbol
Wireless symbol
Menuwindowsordialogboxestypicallyhavethefollowingelements:
Highlight ����������������������������� Indicates the selected menu or item� Solid triangle ���������������������� Indicates further choices are available� A highlighted triangle indicates the item is active� Tab �������������������������������������� Indicates a group of features in a dialog box� Selecting on any tab brings its page to the front�Radio button �����������������������Use this round button to select an option in a dialog box�Source �������������������������������� Indicates the currently selected source�Off Timer remaining time ���� Indicates the remaining countdown time when the [OFF TIMER] is preset�Slide bar ����������������������������� Indicates settings or the direction of adjustment�ECO mode symbol �������������� Indicates ECO MODE is set�Key Lock symbol ���������������� Indicates the [CONTROL PANEL LOCK] is enabled�Thermometer symbol ��������� Indicates the [ECO MODE] is forcibly set to [NORMAL] mode because the internal temperature is
too high�High Altitude symbol ���������� Indicates the [FAN MODE] is set to [HIGH ALTITUDE] mode�Wireless symbol ����������������� Indicate the wireless LAN connection is enabled� (not supported by PE501X)
Source
Available buttons
Thermometer symbol
KeyLocksymbol
Off Timer remaining time
Highlight
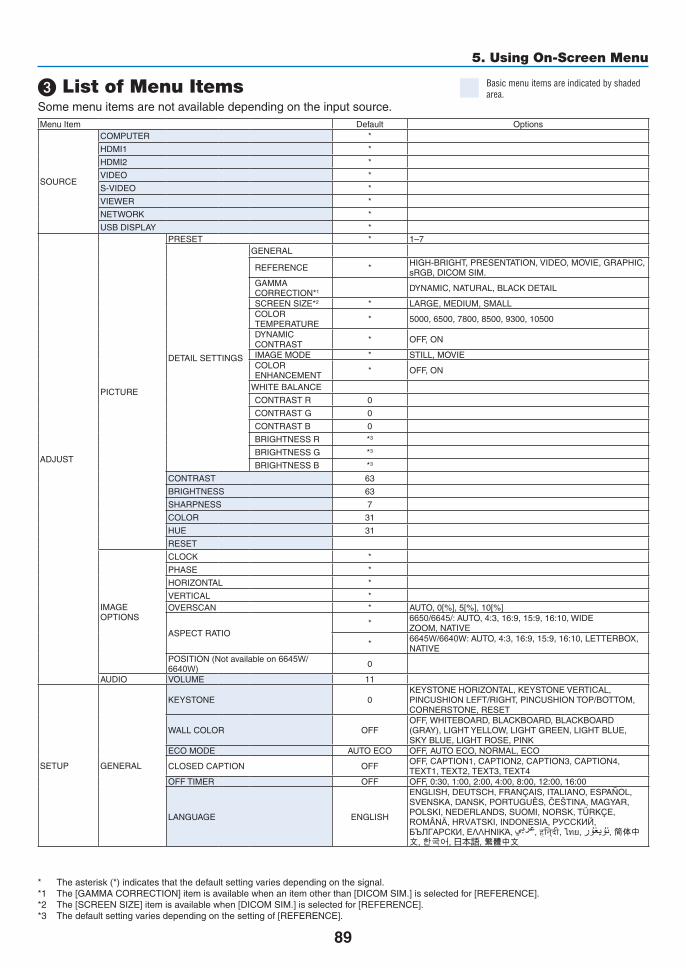
89
5. Using On-Screen Menu
❸ List of Menu ItemsSomemenuitemsarenotavailabledependingontheinputsource.MenuItem Default Options
SOURCE
COMPUTER *
HDMI1 *
HDMI2 *
VIDEO *
S-VIDEO *
VIEWER *
NETWORK *
USBDISPLAY *
ADJUST
PICTURE
PRESET * 1–7
DETAILSETTINGS
GENERAL
REFERENCE * HIGH-BRIGHT,PRESENTATION,VIDEO,MOVIE,GRAPHIC,sRGB,DICOMSIM.
GAMMACORRECTION*1 DYNAMIC,NATURAL,BLACKDETAIL
SCREENSIZE*2 * LARGE,MEDIUM,SMALLCOLORTEMPERATURE * 5000,6500,7800,8500,9300,10500
DYNAMICCONTRAST * OFF,ON
IMAGEMODE * STILL,MOVIECOLORENHANCEMENT * OFF,ON
WHITEBALANCE
CONTRASTR 0
CONTRASTG 0
CONTRASTB 0
BRIGHTNESSR *3
BRIGHTNESSG *3
BRIGHTNESSB *3
CONTRAST 63
BRIGHTNESS 63
SHARPNESS 7
COLOR 31
HUE 31
RESET
IMAGEOPTIONS
CLOCK *
PHASE *
HORIZONTAL *
VERTICAL *OVERSCAN * AUTO,0[%],5[%],10[%]
ASPECTRATIO* 6650/6645/:AUTO,4:3,16:9,15:9,16:10,WIDE
ZOOM,NATIVE
* 6645W/6640W:AUTO,4:3,16:9,15:9,16:10,LETTERBOX,NATIVE
POSITION(Notavailableon6645W/6640W) 0
AUDIO VOLUME 11
SETUP GENERAL
KEYSTONE 0KEYSTONEHORIZONTAL,KEYSTONEVERTICAL,PINCUSHIONLEFT/RIGHT,PINCUSHIONTOP/BOTTOM,CORNERSTONE,RESET
WALLCOLOR OFFOFF,WHITEBOARD,BLACKBOARD,BLACKBOARD(GRAY),LIGHTYELLOW,LIGHTGREEN,LIGHTBLUE,SKYBLUE,LIGHTROSE,PINK
ECOMODE AUTOECO OFF,AUTOECO,NORMAL,ECO
CLOSEDCAPTION OFF OFF,CAPTION1,CAPTION2,CAPTION3,CAPTION4,TEXT1, TEXT2, TEXT3, TEXT4
OFFTIMER OFF OFF,0:30,1:00,2:00,4:00,8:00,12:00,16:00
LANGUAGE ENGLISH
ENGLISH,DEUTSCH,FRANÇAIS,ITALIANO,ESPAÑOL,SVENSKA,DANSK,PORTUGUÊS,ČEŠTINA,MAGYAR,POLSKI,NEDERLANDS,SUOMI,NORSK,TÜRKÇE,ROMÂNĂ, HRVATSKI, INDONESIA, РУССКИЙ, БЪЛГАРСКИ, ΕΛΛΗΝΙΚΆ, , हिन्दी, ไทย, , 简体中文, 한국어, 日本語, 繁體中文
* Theasterisk(*)indicatesthatthedefaultsettingvariesdependingonthesignal.*1 The[GAMMACORRECTION]itemisavailablewhenanitemotherthan[DICOMSIM.]isselectedfor[REFERENCE].*2 The[SCREENSIZE]itemisavailablewhen[DICOMSIM.]isselectedfor[REFERENCE].*3 Thedefaultsettingvariesdependingonthesettingof[REFERENCE].
Basic menu items are indicated by shaded area�

90
5. Using On-Screen Menu
MenuItem Default Options
SETUP
MENU
COLORSELECT COLOR COLOR,MONOCHROMESOURCEDISPLAY ON OFF,ONIDDISPLAY ON OFF,ONECOMESSAGE OFF OFF,ONDISPLAYTIME AUTO45SEC MANUAL,AUTO5SEC,AUTO15SEC,AUTO45SECBACKGROUND BLUE BLUE,BLACK,LOGOFILTERMESSAGE OFF OFF,100[H],500[H],1000[H],2000[H]
INSTALLATION
ORIENTATION DESKTOPFRONT
DESKTOPFRONT,CEILINGREAR,DESKTOPREAR,CEILINGFRONT
CONTROLPANELLOCK OFF OFF,ONSECURITY OFF OFF,ONCOMMUNICATIONSPEED 38400bps 4800bps,9600bps,19200bps,38400bpsREMOTESENSOR FRONT/BACK FRONT/BACK,FRONT,BACK
CONTROLIDCONTROLIDNUMBER 1 1–254
CONTROLID OFF OFF,ONTESTPATTERNMICGAIN 2 0, 1, 2, 3NETWORKSETTINGS
OPTIONS(1)
AUTOADJUST NORMAL OFF,NORMAL,FINEFANMODE AUTO AUTO,HIGH,HIGHALTITUDE
SIGNALSELECT
COMPUTER RGB/COMPONENT RGB/COMPONENT,RGB,COMPONENT
VIDEO AUTO AUTO,NTSC3.58,NTSC4.43,PAL,PAL-M,PAL-N,PAL60,SECAM
S-VIDEO AUTO AUTO,NTSC3.58,NTSC4.43,PAL,PAL-M,PAL-N,PAL60,SECAM
WXGAMODE
6650/6645/:OFF
P6645W6640W:ON
OFF,ON
DEINTERLACE ON OFF,ONHDMISETTINGS
HDMI1 VIDEOLEVEL AUTO AUTO,NORMAL,ENHANCEDHDMI2 VIDEOLEVEL AUTO AUTO,NORMAL,ENHANCED
AUDIOSELECT
HDMI1 HDMI1 HDMI1,COMPUTERHDMI2 HDMI2 HDMI2,COMPUTERNETWORK NETWORK NETWORK,COMPUTER
USBDISPLAY USBDISPLAY USBDISPLAY,COMPUTERBEEP ON OFF,ONTOOLS
OPTIONS(2)
STANDBYMODE POWER-SAVING NORMAL,POWER-SAVING,NETWORKSTANDBY
DIRECTPOWERON OFF OFF,ONAUTOPOWERON(COMP.) OFF OFF,ONAUTOPOWEROFF 0:30 OFF,0:05,0:10,0:20,0:30,1:00
DEFAULTSOURCESELECT LASTLAST,AUTO,COMPUTER,HDMI1,HDMI2,VIDEO,S-VIDEO,VIEWER,NETWORK,USBDISPLAY
CARBONCONVERTCURRENCY $, €,JP¥,RMB¥CURRENCYCONVERT
* Theasterisk(*)indicatesthatthedefaultsettingvariesdependingonthesignal.

91
5. Using On-Screen Menu
MenuItem Default Options
INFO.
USAGETIME
LAMPLIFEREMAINING
LAMPHOURSUSED
FILTERHOURSUSED
TOTALCARBONSAVINGS
TOTALCOSTSAVINGS
SOURCE(1)
SOURCENAME
SOURCEINDEX
HORIZONTALFREQUENCY
VERTICALFREQUENCY
SYNCTYPE
SYNCPOLARITY
SCANTYPE
SOURCE(2)
SIGNALTYPE
VIDEOTYPE
BITDEPTH
VIDEOLEVEL
WIREDLANIPADDRESS
SUBNETMASK
GATEWAY
MACADDRESS
WIRELESSLAN
IPADDRESS
SUBNETMASK
GATEWAY
MACADDRESS
SSID
NETWORKTYPE
WEP/WPA
CHANNEL
SIGNALLEVEL
VERSION(1)FIRMWARE
DATA
VERSION(2) FIRMWARE2
OTHERS
PROJECTORNAME
MODELNO.
SERIALNUMBERLANUNITTYPE
CONTROLID(when[CONTROLID]isset)
RESET
CURRENTSIGNAL
ALLDATA
CLEARLAMPHOURS
CLEARFILTERHOURS
* Theasterisk(*)indicatesthatthedefaultsettingvariesdependingonthesignal.

92
5. Using On-Screen Menu
❹ Menu Descriptions & Functions [SOURCE]
COMPUTERSelectsthecomputerconnectedtoyourCOMPUTERinputconnectorsignal.NOTE:WhenthecomponentinputsignalisconnectedtotheCOMPUTERINconnector,select[COMPUTER].
HDMI1 and 2SelectstheHDMIcompatibleequipmentconnectedtoyourHDMI1or2INconnector.
VIDEOSelectswhatisconnectedtoyourVIDEOinput-VCR,DVDplayerordocumentcamera.
S-VIDEOSelectswhatisconnectedtoyourS-VIDEOinput-VCRorDVDplayer.NOTE:Aframemayfreezeforabriefperiodoftimewhenavideoisplayedbackinfast-forwardorfast-rewindwithaVideoorS-Videosource.
VIEWER ThisfeatureenablesyoutomakepresentationsusingaUSBmemorythatcontainsslides.(→page59“4.UsingtheViewer”)
NETWORK SelectsasignalfromtheLANport(RJ-45)ortheinstalledUSBwirelessLANunit(optional).
USB DISPLAYSelectsthecomputerconnectedtotheUSB(PC)port(typeB)byusingacommerciallyavailableUSBcable.(→page40)

93
5. Using On-Screen Menu
❺ Menu Descriptions & Functions [ADJUST][PICTURE]
[PRESET]Thisfunctionallowsyoutoselectoptimizedsettingsforyourprojectedimage.Youcanadjustneutraltintforyellow,cyanormagenta.Therearesevenfactorypresetsoptimizedforvarioustypesofimages.Youcanalsouse[DETAILSETTINGS]tosetuseradjustablesettingstocustomizeeachgammaorcolor.Yoursettingscanbestoredin[PRESET1]to[PRESET7].
HIGH-BRIGHT �������� Recommended for use in a brightly lit room�PRESENTATION ����� Recommended for making a presentation using a PowerPoint file�VIDEO �������������������� Recommended for typical TV program viewing�MOVIE ������������������� Recommended for movies�GRAPHIC ��������������� Recommended for graphics�sRGB ��������������������� Standard color valuesDICOM SIM� ���������� Recommended for DICOM simulation format�
NOTE:• The[DICOMSIM.]optionisfortraining/referenceonlyandshouldnotbeusedforactualdiagnosis.• DICOMstandsforDigitalImagingandCommunicationsinMedicine.ItisastandarddevelopedbytheAmericanCollegeofRadiol-
ogy(ACR)andtheNationalElectricalManufacturersAssociation(NEMA). Thestandardspecifieshowdigitalimagedatacanbemovedfromsystemtosystem.
[DETAIL SETTINGS]

94
5. Using On-Screen Menu
[GENERAL]StoringYourCustomizedSettings[REFERENCE]Thisfunctionallowsyoutostoreyourcustomizedsettingsin[PRESET1]to[PRESET7].First,selectabasepresetmodefrom[REFERENCE],thenset[GAMMACORRECTION]and[COLORTEMPERA-TURE].
HIGH-BRIGHT �������� Recommended for use in a brightly lit room�PRESENTATION ����� Recommended for making a presentation using a PowerPoint file�VIDEO �������������������� Recommended for typical TV program viewing�MOVIE ������������������� Recommended for movies�GRAPHIC ��������������� Recommended for graphics�sRGB ��������������������� Standard color values�DICOM SIM� ���������� Recommended for DICOM simulation format�
SelectingGammaCorrectionMode[GAMMACORRECTION]Eachmodeisrecommendedfor:
DYNAMIC �������������� Creates a high-contrast picture�NATURAL ��������������� Natural reproduction of the picture�BLACK DETAIL ������� Emphasizes detail in dark areas of the picture�
NOTE:Thisfunctionisnotavailablewhen[DICOMSIM.]isselectedfor[DETAILSETTINGS].
SelectingScreenSizeforDICOMSIM[SCREENSIZE]Thisfunctionwillperformgammacorrectionappropriateforthescreensize.
LARGE ������������������� For screen size of 110"MEDIUM ���������������� For screen size of 90"SMALL ������������������� For screen size of 70"
NOTE:Thisfunctionisavailableonlywhen[DICOMSIM.]isselectedfor[DETAILSETTINGS].
AdjustingColorTemperature[COLORTEMPERATURE]Thisoptionallowsyoutoselectthecolortemperatureofyourchoice.
NOTE:When[PRESENTATION]or[HIGH-BRIGHT]isselectedin[REFERENCE],thisfunctionisnotavailable.
AdjustingBrightnessandContrast[DYNAMICCONTRAST]Thisfunctionallowsyoutoadjustthecontrastratioopticallyusingthebuilt-iniris.Toincreasethecontrastratio,select[ON].
SelectingStillImageModeorMovieMode[IMAGEMODE]Thisfunctionallowsyoutoselectthestillimagemodeorthemoviemode.
STILL ��������������������� This mode is for a still image�MOVIE ������������������� This mode is for a movie�
NOTE:Thisfunctionisavailableonlywhen[HIGH-BRIGHT]isselectedfor[REFERENCE].

95
5. Using On-Screen Menu
EnhancingtheColor[COLORENHANCEMENT]Thisfunctionallowsyoutoenhancethecolorofimage.
OFF ������������������������ Does not enhance the colorON ������������������������� Enhances the color�
NOTE:Thisfunctionisavailableonlywhen[PRESENTATION]isselected[REFERENCE].
AdjustingWhiteBalance[WHITEBALANCE]Thisallowsyoutoadjustthewhitebalance.Contrastforeachcolor(RGB)toadjustthewhitelevelofthescreen;Brightnessforeachcolor(RGB)isusedtoadjusttheblacklevelofthescreen.
[CONTRAST]Adjuststheintensityoftheimageaccordingtotheincomingsignal.
[BRIGHTNESS]Adjuststhebrightnesslevelorthebackrasterintensity.
[SHARPNESS]Controlsthedetailoftheimage.
[COLOR]Increasesordecreasesthecolorsaturationlevel.
[HUE]Variesthecolorlevelfrom+/−greento+/−blue.Theredlevelisusedasreference.
Inputsignal CONTRAST BRIGHTNESS SHARPNESS COLOR HUE
COMPUTER/HDMI(RGB) Yes Yes Yes No No
COMPUTER/HDMI(COMPONENT) Yes Yes Yes Yes Yes
VIDEO/S-VIDEO Yes Yes Yes Yes Yes
VIEWER/NETWORK/USBDISPLAY Yes Yes Yes No No
Yes=Adjustable,No=Notadjustable
[RESET]Thesettingsandadjustmentsfor[PICTURE]willbereturnedtothefactorysettingswiththeexceptionofthefollowing;Presetnumbersand[REFERENCE]withinthe[PRESET]screen.Thesettingsandadjustmentsunder[DETAILSETTINGS]withinthe[PRESET]screenthatarenotcurrentlyselectedwillnotbereset.

96
5. Using On-Screen Menu
[IMAGE OPTIONS]
AdjustingClockandPhase[CLOCK/PHASE]ThisallowsyoutomanuallyadjustCLOCKandPHASE.
CLOCK ������������������� Use this item to fine tune the computer image or to remove any vertical banding that might appear� This function adjusts the clock frequencies that eliminate the horizontal banding in the image�This adjustment may be necessary when you connect your computer for the first time�
PHASE ������������������� Use this item to adjust the clock phase or to reduce video noise, dot interference or cross talk� (This is evident when part of your image appears to be shimmering�)Use [PHASE] only after the [CLOCK] is complete�
NOTE:The[CLOCK]and[PHASE]itemsareavailableforRGBsignalsonly.

97
5. Using On-Screen Menu
AdjustingHorizontal/VerticalPosition[HORIZONTAL/VERTICAL]Adjuststheimagelocationhorizontallyandvertically.
NOTE:• The[HORIZONTAL]and[VERTICAL]itemsarenotavailableforVIDEO,S-VIDEO,HDMI,VIEWER,NETWORK,andUSBDIS-
PLAY.• TheHORIZONTALandVERTICALcannotbeadjusteddependingonthesignal.
- Animagecanbedistortedduringtheadjustmentof[CLOCK]and[PHASE].Thisisnotmalfunction.
- Theadjustments for [CLOCK], [PHASE], [HORIZONTAL],and[VERTICAL]willbestored inmemoryfor thecurrentsignal.Thenexttimeyouprojectthesignalwiththesameresolution,horizontalandverticalfrequency,itsadjustmentswillbecalledupandapplied.
Todeleteadjustmentsstoredinmemory,fromthemenu,youselect[RESET]→[CURRENTSIGNAL]or[ALLDATA]andresettheadjustments.
SelectingOverscanPercentage[OVERSCAN]Selectoverscanpercentage(AUTO,0%,5%and10%)forsignal.
Projected image
Overscaned by 10%
NOTE:• The[0[%]]cannotbeselectedwhenVIDEOandS-VIDEOsignalsareused.• The[OVERSCAN]itemisnotavailable: •when[NATIVE]isselectedfor[ASPECTRATIO]. •when[VIEWER],[NETWORK],or[USBDISPLAY]isselectedfor[SOURCE] •dependingonthesignal• IftheprojectordoesnotreflectthesettingsforyourHDMIequipmentsuchasaDVDplayerconnectedtotheHDMI1INorHDMI
2INconnector,selecttheHDMI1orHDMI2inputsourceagainontheprojector.

98
5. Using On-Screen Menu
SelectingAspectRatio[ASPECTRATIO]Theterm“aspectratio”referstotheratioofwidthtoheightofaprojectedimage.Theprojectorautomaticallydeterminestheincomingsignalanddisplaysitinitsappropriateaspectratio.• Thistableshowstypicalresolutionsandaspectratiosthatmostcomputerssupport.
Resolution AspectRatioVGA 640×480 4:3SVGA 800×600 4:3XGA 1024×768 4:3WXGA 1280×768 15:9WXGA 1280×800 16:10WXGA+ 1440×900 16:10SXGA 1280×1024 5:4SXGA+ 1400×1050 4:3UXGA 1600×1200 4:3WUXGA 1920×1200 16:10
Options Function
AUTO Theprojectorwillautomaticallydeterminetheincomingsignalanddisplayitinitsaspectratio.(→ nextpage)Theprojectormayerroneouslydeterminetheaspectratiodependingonitssignal.Ifthisoccurs,selecttheappropriateaspectratiofromthefollowing.
4:3 Theimageisdisplayedin4:3aspectratio.
16:9 Theimageisdisplayedin16:9aspectratio.
15:9 Theimageisdisplayedin15:9aspectratio.
16:10 Theimageisdisplayedin16:10aspectratio.
WIDEZOOM(6650/6645)
Theimageisstretchedleftandright.Partsofthedisplayedimagearecroppedattheleftandrightedgesandthereforenotvisible.
LETTERBOX(6645W/6640W)
Theimageofaletterboxsignalisstretchedequallyinthehorizontalandverticaldirec-tionstofitthescreen.Partsofthedisplayedimagearecroppedatthetopandbottomedgesandthereforenotvisible.
NATIVE Theprojectordisplaysthecurrentimageinitstrueresolutionwhentheincomingcomputersignalhasalowerresolutionthantheprojector’snativeresolution.
[Example 1]When the incomingsignal with the resolution of 800×600 is displayed on the6650/6645:
[Example 2]When the incomingsignalwiththeresolutionof800×600 is displayed on the6645W/6640W:
NOTE:• Whenanon-computersignalisdisplayed,the[NATIVE]isnotavailable.• Whenasignalwithahigherresolutionthantheprojector’snativeresolutionisdisplayed,[NA-
TIVE]isnotavailable.
NOTE:• TheASPECTfeaturemaynotbeavailabledependingonthesignal.

99
5. Using On-Screen Menu
Sampleimagewhentheappropriateaspectratioisautomaticallydetermined6650/6645[Computersignal]Aspectratioofincomingsignal 4:3 5:4 16:9 15:9 16:10
Sampleimagewhentheappro-priate aspect ratio is automati-callydetermined
[Videosignal]Aspectratioofincomingsignal 4:3 Letterbox Squeeze
Sample image when the as-pect ratio is automatically de-termined
NOTE:Todisplayasqueezedsignalprop-erly,select[16:9]or[WIDEZOOM].
6645W/6640W[Computersignal]Aspectratioofincomingsignal 4:3 5:4 16:9 15:9 16:10
Sampleimagewhentheappro-priate aspect ratio is automati-callydetermined
[Videosignal]Aspectratioofincomingsignal 4:3 Letterbox Squeeze
Sample image when the as-pect ratio is automatically de-termined
NOTE:Todisplayaletterboxsignalprop-erly,select[LETTERBOX].
NOTE:Todisplayasqueezedsignalprop-erly,select[16:9].
TIP:• Imagepositioncanbeadjustedverticallyusing[POSITION]whenthe[16:9],[15:9],or[16:10]aspectratiosareselected.• Theterm“letterbox”referstoamorelandscape-orientedimagewhencomparedtoa4:3image,whichisthestandardaspect
ratioforavideosource. Theletterboxsignalhasaspectratioswiththevistasize“1.85:1”orcinemascopesize“2.35:1”formoviefilm.• Theterm“squeeze”referstothecompressedimageofwhichaspectratioisconvertedfrom16:9to4:3.
AdjustingtheVerticalPositionofImage[POSITION](notsupportedby6645W/6640W)(onlywhen[16:9],[15:9],or[16:10]isselectedfor[ASPECTRATIO])
When[16:9],[15:9],or[16:10]isselectedin[ASPECTRATIO],theimageisdisplayedwithblackbordersonthetopand bottom.Youcanadjusttheverticalpositionfromthetoptothebottomoftheblackarea.

100
5. Using On-Screen Menu
[AUDIO]
TurningUporDownSoundAdjuststhevolumeoftheprojectorspeakerandAUDIOOUT(StereoMiniJack).
TIP:• Whennomenusappear,the◀and▶buttonsontheprojectorcabinetandtheVOL.+/−buttonsontheremotecontrolworkas
avolumecontrol.(→page26)

101
5. Using On-Screen Menu
❻ Menu Descriptions & Functions [SETUP]
[GENERAL]
CorrectingKeystoneDistortionManually[KEYSTONE]Youcancorrecthorizontalorverticalkeystone,pincushion,orcornerstonedistortionmanually.
NOTE:• Someitemsarenotavailablewhenoneitemisactivated.Unavailableitemsareshowningrey.• Tochangefromoneitemtoanotheritem,resetthefirstitem.• Adjustmentvalueswillbeoverwritten.Theywillnotbedeletedevenwhentheprojectoristurnedoff.• Using[KEYSTONE]correctioncancausetheimagetobeslightlyblurredbecausethecorrectionismadeelectronically.
KEYSTONE HORIZONTAL ��������� Corrects horizontal keystone distortion� (→ page 24)KEYSTONE VERTICAL��������������� Corrects vertical keystone distortion� (→ page 24)PINCUSHION LEFT/RIGHT �������� Corrects pincushion distortion at the left or right side�PINCUSHION TOP/BOTTOM ����� Corrects pincushion distortion at the top or bottom side�CORNERSTONE ������������������������ Fits a projected image within the border of the screen easily by align the four corner of an image
to the ones of the screen� (→ page 36)RESET ��������������������������������������� Returns all the above items to the factory preset values�
Correctingpincushiondistortion
NOTE:• The[PINCUSHIONLEFT/RIGHT]or[PINCUSHIONTOP/BOTTOM]itemisnotavailablewhen[KEYSTONEHORIZONTAL],[KEY-
STONEVERTICAL]or[CORNERSTONE]isactivated.• Beforeperformingcorrection,setthelensshifttothecenterposition.
1. Press the ▼ or ▲buttontoselect[PINCUSHIONLEFT/RIGHT]or[PINCUSHIONTOP/BOTTOM].
2. Press the ◀ or ▶buttontocorrectdistortion.
3. Press ENTER button.

102
5. Using On-Screen Menu
UsingtheWallColorCorrection[WALLCOLOR]
Thisfunctionallowsforquickadaptivecolorcorrectioninapplicationswherethescreenmaterialisnotwhite.
NOTE:Selecting[WHITEBOARD]reduceslampbrightness.
SettingEcoMode[ECOMODE]TheECOMODEincreaseslamplife,whileloweringpowerconsumptionandcuttingdownonCO2 emissions. Fourbrightnessmodesofthelampcanbeselected:[OFF],[AUTOECO],[NORMAL]and[ECO]modes.(→page30)

103
5. Using On-Screen Menu
SettingClosedCaption[CLOSEDCAPTION]ThisoptionsetsseveralclosedcaptionmodesthatallowtexttobesuperimposedontheprojectedimageofVideoorS-Video.
OFF ������������������������ This exits the closed caption mode�CAPTION 1-4 ��������� Text is superimposed�TEXT 1-4 ���������������� Text is displayed�NOTE:• Theclosedcaptionisnotavailableunderthefollowingconditions:
- whenmessagesormenusaredisplayed.- whenanimageismagnified,frozen,ormuted.
• Portionsofsuperimposedtextorclosedcaptionmaybetruncated.Ifthathappens,trytoplacethesuperimposedtextorclosedcaptionwithinthescreen.
UsingOffTimer[OFFTIMER]1. Selectyourdesiredtimebetween30minutesand16hours:OFF,0:30,1:00,2:00,4:00,8:00,12:00,16:00.
2. Press the ENTER button on the remote control.
3. Theremainingtimestartscountingdown.
4. Theprojectorwillturnoffafterthecountdowniscomplete.
NOTE:• Tocancelthepresettime,set[OFF]forthepresettimeorturnoffthepower.• Whentheremainingtimereaches3minutesbeforetheprojectoristurnedoff,the[THEPROJECTORWILLTURNOFFWITHIN3
MINUTES]messagewillbedisplayedonthebottomofthescreen.
SelectingMenuLanguage[LANGUAGE]Youcanchooseoneof29languagesforon-screeninstructions.
NOTE:Yoursettingwillnotbeaffectedevenwhen[RESET]isdonefromthemenu.
[MENU]
SelectingMenuColor[COLORSELECT]Youcanchoosebetweentwooptionsformenucolor:COLORandMONOCHROME.
TurningOn/OffSourceDisplay[SOURCEDISPLAY]ThisoptionturnsonoroffinputnamedisplaysuchasCOMPUTER,HDMI1,HDMI2,VIDEO,S-VIDEO,VIEWER,NETWORK,USBDISPLAY,tobedisplayedonthetoprightofthescreen.Whennoinputsignalispresent,theno-signalguidancepromptingyoutocheckforanavailableinputwillbedisplayedatthecenterofthescreen.Whenthe[VIEWER]or[NETWORK]itemisselectedfor[SOURCE],theno-signalguid-ancewillnotbedisplayed.

104
5. Using On-Screen Menu
TurningON/OFFControlID[IDDISPLAY]ID DISPLAY ����������� This option turns on or off the ID number which is displayed when the ID SET button on the remote control
is pressed�
TurningOn/OffEcoMessage[ECOMESSAGE]Thisoptionturnsonoroffthefollowingmessageswhentheprojectoristurnedon.
TheEcoMessagepromptstheusertosaveenergy.When[OFF]isselectedfor[ECOMODE],youwillgetamessagetopromptyoutoselect[AUTOECO],[NORMAL],or[ECO]for[ECOMODE].
When[AUTOECO],[NORMAL],or[ECO]isselectedfor[ECOMODE]
Toclosethemessage,pressanyoneofthebuttons.Themessagewilldisappearifnobuttonoperationisdonefor30 seconds.
When[OFF]isselectedfor[ECOMODE]
PressingtheENTERbuttonwilldisplaythe[ECOMODE]screen.(→page30)Toclosethemessage,presstheEXITbutton.
SelectingMenuDisplayTime[DISPLAYTIME]Thisoptionallowsyoutoselecthowlongtheprojectorwaitsafterthelasttouchofabuttontoturnoffthemenu.Thepresetchoicesare[MANUAL],[AUTO5SEC],[AUTO15SEC],and[AUTO45SEC].The[AUTO45SEC]isthefac-torypreset.
SelectingaColororLogoforBackground[BACKGROUND]Use this feature to display a blue/black screen or logo when no signal is available.The default background is[BLUE].NOTE:• Ifthe[LOGO]itemisselectedfor[BACKGROUND]withthe[NETWORK]or[USBDISPLAY]sourceselected,the[BLUE]itemwill
beselectedregardlessofitsselection.• When[SOURCEDISPLAY]isturnedon,theno-signalguidancepromptingyoutocheckforanavailableinputwillbedisplayed
atthecenterofthescreenregardlessofitsselection.• Yoursettingwillnotbeaffectedevenwhen[RESET]isdonefromthemenu.
SelectingIntervalTimeforFilterMessage[FILTERMESSAGE]Thisoptionallowsyoutoselectthetimepreferencebetweendisplayingthemessageforcleaningthefilters.Cleanthefilterwhenyougetthemessage“PLEASECLEANTHEFILTER.”(→page156)Optionsareavailable:
OFF,100[H],500[H],1000[H],2000[H]
NOTE:Yoursettingwillnotbeaffectedevenwhen[RESET]isdonefromthemenu.

105
5. Using On-Screen Menu
[INSTALLATION]
SelectingProjectorOrientation[ORIENTATION]Thisreorientsyourimageforyourtypeofprojection.Theoptionsare:desktopfrontprojection,ceilingrearprojection,desktoprearprojection,andceilingfrontprojection.
DESKTOPFRONT CEILINGREAR
DESKTOPREAR CEILINGFRONT
DisablingtheCabinetButtons[CONTROLPANELLOCK]ThisoptionturnsonorofftheCONTROLPANELLOCKfunction.
NOTE:• ThisCONTROLPANELLOCKdoesnotaffecttheremotecontrolfunctions.• Whenthecontrolpanelislocked,pressingandholdingtheEXITbuttonontheprojectorcabinetforabout10secondswillchange
thesettingto[OFF].
TIP:Whenthe[CONTROLPANELLOCK]isturnedon,akeylockicon[ ]willbedisplayedatthebottomrightofthemenu.
EnablingSecurity[SECURITY]ThisfeatureturnsonorofftheSECURITYfunction.Unlessthecorrectkeywordisentered,theprojectorcannotprojectanimage.(→page33)
NOTE:Yoursettingwillnotbeaffectedevenwhen[RESET]isdonefromthemenu.

106
5. Using On-Screen Menu
SelectingCommunicationSpeed[COMMUNICATIONSPEED]ThisfeaturesetsthebaudrateofthePCControlport(D-Sub9P).Itsupportsdataratesfrom4800to38400bps.Thedefaultis38400bps.Selecttheappropriatebaudrateforyourequipmenttobeconnected(dependingontheequip-ment,alowerbaudratemayberecommendedforlongcableruns).
NOTE:Yourselectedcommunicationspeedwillnotbeaffectedevenwhen[RESET]isdonefromthemenu.
TurningOnorOffRemoteSensor[REMOTESENSOR]Thisoptiondetermineswhichremotesensorontheprojectorisenabledinwirelessmode.Theoptionsare:FRONT/BACK,FRONT,andBACK.Iftheremotecontrolsystemdoesnotfunctionwhendirectsunlightorstrongilluminationstrikestheremotecontrolsensoroftheprojector,changeanotheroption.
SettingIDtotheProjector[CONTROLID]YoucanoperatemultipleprojectorsseparatelyandindependentlywiththesingleremotecontrolthathastheCONTROLIDfunction.IfyouassignthesameIDtoalltheprojectors,youcanconvenientlyoperatealltheprojectorstogetherusingthesingleremotecontrol.Todoso,youhavetoassignanIDnumbertoeachprojector.
CONTROL ID NUMBER �������Select a number from 1 to 254 you wish to assign to your projector�CONTROL ID �����������������������Select [OFF] to turn off the CONTROL ID setting and select [ON] to turn on the CONTROL ID set-
ting�
NOTE:• When[ON]isselectedfor[CONTROLID],theprojectorcannotbeoperatedbyusingtheremotecontrolthatdoesnotsupport
theCONTROLIDfunction.(Inthiscasethebuttonsontheprojectorcabinetcanbeused.)• Yoursettingwillnotbeaffectedevenwhen[RESET]isdonefromthemenu.• PressingandholdingtheENTERbuttonontheprojectorcabinetfor10secondswilldisplaythemenuforcancelingtheControl
ID.
AssigningorChangingtheControlID
1. Turn on the projector.
2. Press the ID SET button on the remote control.
TheCONTROLIDscreenwillbedisplayed.
IftheprojectorcanbeoperatedwiththecurrentremotecontrolID,the[ACTIVE]willbedisplayed.IftheprojectorcannotbeoperatedwiththecurrentremotecontrolID,the[INACTIVE]willbedisplayed.Tooperatetheinactiveprojector,assignthecontrolIDusedfortheprojectorbyusingthefollowingprocedure(Step3).
3. PressoneofnumerickeypadbuttonswhilepressingandholdingtheIDSETbutton on the remote control.
Example:
Toassign“3”,pressthe“3”buttonontheremotecontrol.
NoIDmeansthatalltheprojectorscanbeoperatedtogetherwithasingleremotecontrol.Toset“NoID”,enter“000”orpresstheCLEARbutton.
TIP:TherangeofIDsisfrom1to254.

107
5. Using On-Screen Menu
4. Release the ID SET button.
TheupdatedCONTROLIDscreenwillbedisplayed.
NOTE:• TheIDscanbeclearedinafewdaysafterthebatteriesarerundownorremoved.• Accidentallypressinganyoneofthebuttonsoftheremotecontrolwillclearcurrentlyspecified
IDwithbatteriesremoved.
UsingTestPattern[TESTPATTERN]Displaysthetestpatterntocheckforimagedistortionatthetimeoftheprojectorsetup.PresstheENTERbuttontodisplaythetestpattern;presstheEXITbuttontoclosethetestpatternandreturntothemenu.Menuoperationandkeystonecorrectionarenotpossiblewhenthetestpatternisdisplayed.
SettingMICGain[MICGAIN]ThisfeatureallowsyoutoadjustyourmicrophonesensitivitywhenitisconnectedtotheMICinputjackoftheprojec-tor.MicrophonevolumecanbeadjustedwiththeVOL.(+)or(−)buttonontheremotecontrolorthe◀ or ▶ on the projectorcabinet.
[NETWORKINGSETTINGS]See“APPLICATIONMENU”onpage120.
[OPTIONS(1)]
SettingAutoAdjust[AUTOADJUST]ThisfeaturesetstheAutoAdjustmodesothatthecomputersignalcanbeautomaticallyormanuallyadjustedfornoiseandstability.Youcanautomaticallymakeadjustmentintwoways:[NORMAL]and[FINE].
OFF ������������������������ The computer signal will not be automatically adjusted� You can manually optimize the computer signal�NORMAL ���������������� Default setting� The computer signal will be automatically adjusted� Normally select this option�FINE ����������������������� Select this option if fine adjustment is needed� It takes more time to switch to the source than when [NOR-
MAL]is selected�
SelectingFanMode[FANMODE]Thisoptionallowsyoutoselectthreemodesforfanspeed:Automode,Highspeedmode,andHighAltitudemode.
AUTO ��������������������� The built-in fans automatically run at a variable speed according to the internal temperature�HIGH ���������������������� The built-in fans run at high speed�HIGH ALTITUDE ����� The built-in fans run at a proper speed for low air pressure areas� Select this option when using the projector
in low air pressure areas or at an altitude of approximately 5500 feet/1700 meters or higher�
Whenyouwishtocooldownthetemperatureinsidetheprojectorquickly,select[HIGH].
108
5. Using On-Screen Menu
NOTE:• ItisrecommendedthatyouselectHighspeedmodeifyouusetheprojectornon-stopforconsecutivedays.• Set[FANMODE]to[HIGHALTITUDE]whenusingtheprojectorataltitudesapproximately5500feet/1700metersorhigher.• Usingtheprojectorataltitudesapproximately5500feet/1700metersorhigherwithoutsettingto[HIGHALTITUDE]cancause
theprojectortooverheatandtheprotectorcouldshutdown.Ifthishappens,waitacoupleminutesandturnontheprojector.• Usingtheprojectorataltitudeslessthanapproximately5500feet/1700metersandsettingto[HIGHALTITUDE]cancausethe
lamptoovercool,causingtheimagetoflicker.Switch[FANMODE]to[AUTO].• Usingtheprojectorataltitudesapproximately5500feet/1700metersorhighercanshortenthelifeofopticalcomponentssuch
asthelamp.• Yoursettingwillnotbeaffectedevenwhen[RESET]isdonefromthemenu.
TIP:• When[HIGHALTITUDE]isselected,anicon[ ]isdisplayedatthebottomoftheon-screenmenu.
SelectingSignalFormat[SIGNALSELECT][COMPUTER]Allowsyoutochoose[COMPUTER]foranRGBsourcesuchasacomputer,or[COMPONENT]foracomponentvideosourcesuchasaDVDplayer.Normallyselect[RGB/COMPONENT]andtheprojectorautomaticallydetectsacomponentsignal.Howevertheremaybesomecomponentsignalsthattheprojectorisunabletodetect.Ifthisisthecase,select[COMPONENT].
[VIDEO&S-VIDEOSystemSelect]Thisfeatureenablesyoutoselectcompositevideostandardsautomaticallyormanually.Normallyselect[AUTO]andtheprojectorwillautomaticallydetectthevideostandard.Inthecasewheretheprojectorhasdifficultydetectingthevideostandard,selecttheappropriatevideostandardfromthe menu.ThismustbedoneforVIDEOandS-VIDEOrespectively.Notethatifyouhavemanuallyselectedavideostandardotherthanthevideoformatofthecurrentinput,theimagewillnotappear.
EnablingorDisablingWXGAMode[WXGAMODE]Selecting[ON]willgiveprioritytoWXGA(1280×768)/WUXGA(1920×1200)signalsinrecognizinganinputsig-nal.When[WXGAMODE] isset to[ON],XGA(1024×768)/UXGA(1600×1200)signalsmaynotberecognizedon6650/6645.Inthiscase,select[OFF].
NOTE:• The[OFF]isselectedatthetimeofshipmentofP501X/P451X/PE501X.• The[ON]isselectedatthetimeofshipmentofP451W/P401W.
EnablingtheDeinterlace[DEINTERLACE]Turnsonoroffthedeinterlacefunctionforatelecinesignal.
OFF ������������������������ Select this option if there is any jitter or artifacts in video�ON ������������������������� Default standard setting�
NOTE:ThisfeatureisnotavailableforHDTV(progressive)andcomputersignals.
6650/6645.6645W/6640W.

109
5. Using On-Screen Menu
SettingHDMI1/2[HDMISETTINGS]MakethesettingsforeachvideolevelwhenconnectingHDMIequipmentsuchasaDVDplayer.
VIDEO LEVEL ��������� Select [AUTO] to automatically detect video level� If automatic detection may not work well, select [NOR-MAL] to disable the [ENHANCED] feature of your HDMI equipment or select [ENHANCED] to improve image contrast and increase detail in the dark areas�
NOTE:• IftheprojectordoesnotreflectthesettingsforyourHDMIequipmentsuchasaDVDplayerconnectedtotheHDMI1INorHDMI
2INconnector,selecttheHDMI1orHDMI2inputsourceagainontheprojector.
SettingAudio[AUDIOSELECT]MakethesettingsforeachaudiolevelwhenconnectingHDMIequipment,yournetwork,andUSB(PC)port.Selectbetweeneachequipmentandcomputer.
HDMI ��������������������� Select [HDMI1] or [HDMI2] to switch the HDMI 1 or HDMI 2 IN digital audio signal and select [COMPUTER] to switch the COMPUTER input audio signal�
NETWORK ������������� Select [NETWORK] or [COMPUTER] to switch the source connected to the network� (not supported by PE501X)
USB DISPLAY �������� Select [USB DISPLAY] or [COMPUTER] to switch the source connected over the USB cable (USB DIS-PLAY)�
EnablingKeySoundandErrorSound[BEEP]This feature turnsonoroff thebuttonsoundoralarmwhenanerroroccursor the followingoperationsareper-formed.
-Displayingthemainmenu
-Switchingsources
-Resettingdatabyusing[RESET]
-PressingPOWERONorPOWEROFFbutton
[TOOLS]See“APPLICATIONMENU”onpage136.

110
5. Using On-Screen Menu
[OPTIONS(2)]
SelectingPower-savingin[STANDBYMODE]Theprojectorhasthreestandbymodes:[NORMAL],[POWER-SAVING],and[NETWORKSTANDBY].ThePOWER-SAVINGmodeisthemodethatallowsyoutoputtheprojector inthepower-savingconditionwhichconsumeslesspowerthantheNORMALmode.
NORMAL ���������������� Power indicator: Orange light/STATUS indicator: Green light- MIC sound will not be output from speaker during this mode�
POWER-SAVING ���� Power indicator: Red light/STATUS indicator: OffThe following connectors, buttons or functions will not work during this mode�- MONITOR OUT (COMP�) connector, AUDIO OUT connector, and MIC input jack - LAN and Mail Alert functions- Buttons other than POWER button on the cabinet- Buttons other than POWER ON button on the remote control- Virtual Remote Tool, USB Display fucntion
NETWORK STANDBY (not supported by PE501X) ������������������������������ When in the standby mode, the POWER indicator will light orange and the STATUS indicator will not light�
This shows that the projector’s power can be turned on by wired LAN�When in the standby mode, the following connectors, buttons or functions will not work:- MONITOR OUT (COMP�) connector, AUDIO OUT connector, and MIC input jack- Wireless LAN Unit- [AUTO POWER ON(COMP�)]- Buttons other than POWER button on the cabinet- Buttons other than POWER ON button on the remote control- PC control commands for other than power-on, USB Display function
NOTE:• When[CONTROLPANELLOCK],[CONTROLID],or[AUTOPOWERON(COMP.)]isturnedon,the[STANDBYMODE]settingis
notavailable.• Evenwhen[POWER-SAVING]isselectedfor[STANDBYMODE],poweronoroffcanbedonebyusingthePCCONTROLport.• ThepowerconsumptioninthestandbymodewillnotbeincludedincalculatingCO2emissionreduction.• Yoursettingwillnotbeaffectedevenwhen[RESET]isdonefromthemenu.
EnablingDirectPowerOn[DIRECTPOWERON]Turnstheprojectoronautomaticallywhenthepowercordisinsertedintoanactivepoweroutlet.ThiseliminatestheneedtoalwaysusethePOWERbuttonontheremotecontrolorprojectorcabinet.

111
5. Using On-Screen Menu
TurningOntheProjectorByApplyingComputerSignal[AUTOPOWERON(COMP.)]WhentheprojectorisinStandbymode,applyingacomputersignalfromacomputerconnectedtotheCOMPUTERINinputwillpowerontheprojectorandsimultaneouslyprojectthecomputer’simage.ThisfunctionalityeliminatestheneedtoalwaysusethePOWERbuttonontheremotecontrolortheprojectorcabinettopowerontheprojector.Tousethisfunction,firstconnectacomputertotheprojectorandtheprojectortoanactiveACinput.
NOTE:• Disconnectingacomputersignalfromthecomputerwillnotpowerofftheprojector.Werecommendusingthisfunctionincom-
binationoftheAUTOPOWEROFFfunction.• Thisfunctionwillnotbeavailableunderthefollowingconditions:
- whenacomponentsignalisappliedtotheCOMPUTERINconnector- whenaSynconGreenRGBsignalorcompositesyncsignalisapplied
• ToenabletheAUTOPOWERON(COMP.)afterturningofftheprojector,wait3secondsandinputacomputersignal. Ifacomputersignalisstillpresentwhentheprojectoristurnedoff,theAUTOPOWERON(COMP.)willnotworkandtheprojector
remainsinstandbymode.
EnablingPowerManagement[AUTOPOWEROFF]Whenthisoptionisselectedyoucanenabletheprojectortoautomaticallyturnoff(attheselectedtime:5min.,10min.,20min.,30min.,60min.)ifthereisnosignalreceivedbyanyinputorifnooperationisperformed.
SelectingDefaultSource[DEFAULTSOURCESELECT]Youcansettheprojectortodefaulttoanyoneofitsinputseachtimetheprojectoristurnedon.
LAST ���������������������� Sets the projector to default to the previous or last active input each time the projector is turned on�AUTO ��������������������� Searches for an active source in order of COMPUTER → HDMI1 → HDMI2 → VIDEO → S-VIDEO → VIEWER
→ NETWORK → USB DISPLAY → COMPUTER and displays the first found source�COMPUTER ����������� Displays the computer signal from the COMPUTER IN connector every time the projector is turned on�HDMI1 ������������������� Displays the digital source from the HDMI 1 IN connector every time the projector is turned on� HDMI2 ������������������� Displays the digital source from the HDMI 2 IN connector every time the projector is turned on�VIDEO �������������������� Displays the Video source from the VIDEO IN connector every time the projector is turned on�S-VIDEO ���������������� Displays the Video source from the S-VIDEO IN connector every time the projector is turned on�VIEWER ����������������� Displays slides or plays back movie files from the USB memory device every time the projector is turned
on� (not supported by PE501X)NETWORK ������������� Displays a signal from LAN port (RJ-45) or the USB Wireless LAN Unit� (not supported by PE501X)USB DISPLAY �������� Displays the computer signal from the USB (PC) port every time the projector is turned on�

112
5. Using On-Screen Menu
Settingcarbonfootprintfactor[CARBONCONVERT]Adjuststhecarbonfootprintfactorinthecarbonsavingcalculation.Theinitialsettingis0.505[kg-CO2/kWh]basedontheCO2EmissionsfromFuelCombustion(2008Edition)publishedbyOECD.
Selectingyourcurrency[CURRENCY]Displayselectricitypricing(availablein4currencyunits).
$ ���������������������������� US Dollar€ ��������������������������� EU EuroJP¥ ������������������������ Japanese YenRMB¥ �������������������� Chinese Yuan
Changingcurrencysettingandcurrencyconvertsetting[CURRENCYCONVERT]ChangescurrencysettingandcurrencyconvertsettingforCARBONMETER.Theinitialsettingareasfollows:
US Dollar ��������������� 0�11 [$/kWh]EU Euro ����������������� 0�19 [€/kWh]Japanese Yen ��������� 20 [¥/kWh]Chinese Yuan ��������� 0�48 [¥/kWh]
TheinitialsettingsforUSdollar,EUEuro,andJapaneseYenarebasedon“EnergyPricesandTaxes(secondquarter2010”publishedbyOECD.TheinitialsettingforChineseYuanisbasedon“ChineseDataFile(2010)”publishedbyJETRO.

113
5. Using On-Screen Menu
❼ Menu Descriptions & Functions [INFO.]Displaysthestatusofthecurrentsignalandlampusage.Thisitemhaseightpages.Theinformationincludedisasfollows:
TIP:PressingtheHELPbuttonontheremotecontrolwillshowthe[INFO.]menuitems.
[USAGE TIME]
[LAMPLIFEREMAINING](%)*[LAMPHOURSUSED](H)[FILTERHOURSUSED](H)[TOTALCARBONSAVINGS](kg-CO2)[TOTALCOSTSAVINGS]($)
* Theprogressindicatorshowsthepercentageofremainingbulblife.
Thevalueinformsyouoftheamountoflampusage.Whentheremaininglamptimereaches0,theLAMPLIFEREMAININGbarindicatorchangesfrom0%to100Hoursandstartscountingdown.
Iftheremaininglamptimereaches0hours,theprojectorwillnotturnon.
• ThemessagetotheeffectthatthelamporthefiltersshouldbereplacedwillbedisplayedforoneminutewhentheprojectoristurnedonandwhenthePOWERbuttonontheprojectorortheremotecontrolispressed.
Todismissthismessage,pressanybuttonontheprojectorortheremotecontrol.
Lamplife(H)Replacementlamp ModelECO MODE
OFF/AUTOECO NORMAL ECO3500 4000 6000 456-6640W 6650/66454000 5000 6000 6645W/6640W
• [TOTALCARBONSAVINGS]
Thisdisplaystheestimatedcarbonsavinginformationinkg.Thecarbonfootprintfactorinthecarbonsavingcal-culationisbasedontheOECD(2008Edition).(→page31)

114
5. Using On-Screen Menu
[SOURCE(1)]
[SOURCENAME] [SOURCE INDEX][HORIZONTALFREQUENCY] [VERTICALFREQUENCY][SYNCTYPE] [SYNCPOLARITY][SCANTYPE]
[SOURCE(2)]
[SIGNALTYPE] [VIDEOTYPE][BITDEPTH] [VIDEOLEVEL]
[WIRED LAN]
[IPADDRESS] [SUBNETMASK][GATEWAY] [MACADDRESS]

115
5. Using On-Screen Menu
[WIRELESS LAN]
[IPADDRESS] [SUBNETMASK][GATEWAY] [MACADDRESS][SSID] [NETWORKTYPE][WEP/WPA] [CHANNEL][SIGNALLEVEL]
[VERSION(1)]
[FIRMWARE]Version[DATA]Version
[VERSION(2)]
[FIRMWARE2]Version

116
5. Using On-Screen Menu
[OTHERS]
[PROJECTORNAME][MODELNO.][SERIALNUMBER][LANUNITTYPE][CONTROLID](when[CONTROLID]isset)

117
5. Using On-Screen Menu
❽ Menu Descriptions & Functions [RESET]
Returning to Factory Default [RESET]TheRESETfeatureallowsyoutochangeadjustmentsandsettingstothefactorypresetfora(all)source(s)exceptthefollowing:
[CURRENTSIGNAL]Resetstheadjustmentsforthecurrentsignaltothefactorypresetlevels.Theitemsthatcanberesetare:[PRESET],[CONTRAST],[BRIGHTNESS],[COLOR],[HUE],[SHARPNESS],[ASPECTRATIO],[HORIZONTAL],[VERTICAL],[CLOCK],[PHASE],and[OVERSCAN].
[ALLDATA]Resetalltheadjustmentsandsettingsforallthesignalstothefactorypreset.All items can be reset EXCEPT[LANGUAGE],[BACKGROUND],[FILTERMESSAGE],[SECURITY],[COMMU-NICATIONSPEED],[CONTROLID],[STANDBYMODE],[FANMODE],[CARBONCONVERT],[CURRENCY],[CURRENCYCONVERT],[LAMPLIFEREMAINING],[LAMPHOURSUSED],[FILTERHOURSUSED],[TOTALCARBONSAVINGS],[WIREDLAN],and[WIRELESSLAN].Toresetthelampusagetime,see“ClearingLampHourMeter[CLEARLAMPHOURS]”below.
ClearingLampHourMeter[CLEARLAMPHOURS]Resetsthelampclockbacktozero.Selectingthisoptiondisplayssubmenuforaconfirmation.Select[YES]andpresstheENTERbutton.
NOTE:Elapsedtimeofthelampusewillnotbeaffectedevenwhen[RESET]isdonefromthemenu.
NOTE:Theprojectorwillturnoffandgointostandbymodewhenyoucontinuetousetheprojectorforanother100hoursafterthelamphasreachedtheendofitslife.Inthisconditionyoucannotclearthelamphourmeteronthemenu.Ifthishappens,presstheHELPbuttonontheremotecontrolfor10secondstoresetthelampclockbacktozero.Dothisonlyafterreplacingthelamp.
ClearingtheFilterUsageHours[CLEARFILTERHOURS]Resetsthefilterusagebacktozero.Selectingthisoptiondisplayssubmenuforaconfirmation.Select[YES]andpresstheENTERbutton.
NOTE:Elapsedtimeofthefilterusewillnotbeaffectedevenwhen[RESET]isdonefromthemenu.

118
5. Using On-Screen Menu
❾ Application Menu When[NETWORK]isselectedfromthe[SOURCE]menu,theapplicationmenu[APPLICATIONMENU]willbedis-played.TheapplicationmenuallowsyoutosetuptheUserSupportware,NetworkSettings(NETWORKSETTINGS)andTools(TOOLS).TheUserSupportwareiscontainedonthesuppliedProjectorCD-ROM.In[ADMINISTRATORMODE],either[ADVANCED]menuor[BASIC]menucanbeselected.(→page136)The[BASIC]menucontainsminimumessentialsofmenusandcommands.
IMAGE EXPRESS UTILITYThisshowsinformationforprojectorname,resolution,andnetwork(wired/wireless)whicharerequiredtouseImageExpressUtility.Usethisinformationtosetupforyourcomputer.
DESKTOP CONTROL UTILITYThisallowsyoutosetupforpasswordentry/deletion,computersearchingandIPaddressonnetwork(wired/wireless)whicharerequiredtouseDesktopControlUtility.

119
5. Using On-Screen Menu
NETWORK PROJECTORThisshowsinformationforprojectorname,resolution,andnetwork(wired/wireless)whicharerequiredtouseNetworkProjector.Usethisinformationtosetupforyourcomputer.
REMOTE DESKTOP CONNECTIONThisallowsyoutosetupforcomputernameentryandeffectsforRemoteDesktop.
NOTE:• AUSBkeyboardisrequiredtosetuptheRemoteDesktopConnection.

120
5. Using On-Screen Menu
NETWORK SETTINGS
Important:• Consultwithyournetworkadministratoraboutthesesettings.• WhenusingawiredLANconnection,connectaLANcable(Ethernetcable)totheLANport(RJ-45)oftheprojector.(→page
151)
TIP:Thenetworksettingsyoumakewillnotbeaffectedevenwhen[RESET]isdonefromthemenu.
HintsonHowtoSetUpLANConnection
TosetuptheprojectorforaLANconnection:Select[WIREDLAN]or[WIRELESSLAN]→[PROFILES]→[PROFILE1]or[PROFILE2].TwosettingscanbesetforwiredorwirelessLAN.Nextturnonorofffor[DHCP],[IPADDRESS],[SUBNETMASK],and[GATEWAY]andselect[OK]andpresstheENTERbutton.(→page121)TorecallLANsettingsstoredintheprofilenumber:Select[PROFILE1]or[PROFILE2]forwiredorwirelessLAN,andthenselect[OK]andpresstheENTERbutton.(→page121)To connect a DHCP server:Turnon[DHCP]forwiredorwirelessLAN.Select[ON]andpresstheENTERbutton.TospecifyIPaddresswithoutusingtheDHCPserver,turnoff[DHCP].(→page122)
TosetonlyforwirelessLAN(NETWORKTYPEandWEP/WPA):Select[PROFILE1]or[PROFILE2]forwirelessLAN,andthenselect[ADVANCED]and[OK]andpresstheENTERbutton.TheAdvancedmenuwillbedisplayed.(→page123)ToselectanSSID:Select[ADVANCED]→[SITESURVEY]andpresstheENTERbutton.SelectanSSIDandpressthe>buttontoselect[OK]andpresstheENTERbutton.Ifyoudonotuse[SITESURVEY],typetheSSIDandselect[INFRASTRUCTURE]or[ADHOC].(→page123)Toreceivelampreplacementtimeorerrormessagesviae-mail:Select[ALERTMAIL],andset[SENDER'SADDRESS],[SMTPSERVERNAME],and[RECIPIENT'SADDRESS].Last,select[OK]andpresstheENTERbutton.(→page134)Toexecute[EASYCONNECTION]usingImageExpressUtility2.0:The[EASYCONNECTION]isamodethatcanabbreviatethetroublesomeLANsettingswhenusingtheImageExpressUtilityandconnectingthePCandprojectorviaawirelessLAN.TheImageExpressUtilityLiteandImageExpressUtility2.0arecontainedonthesuppliedProjectorCD-ROM.Touse[EASYCONNECTION],select[WIRELESSLAN]→[PROFILES]→[EASYCONNECTION].NOTE:The[EASYCONNECTION]functionisavailableonWindows7,WindowsVistaorWindowsXPSP3.

121
5. Using On-Screen Menu
WIREDLANorWIRELESSLAN(ADVANCEDmenuonly)
PROFILES • UptotwosettingsfortheLANportorUSBwirelessLANunitcanbestoredinmemoryoftheprojector.Totaloffoursettingscan be stored.
Fivesettingscanbestored:twoforthebuilt-inLANport,twoforwirelessLANandoneforWPS.
• Select[PROFILE1]or[PROFILE2]andthendosettingsfor[DHCP]andtheotheroptions.
Afterdoingthis,select[OK]andpresstheENTERbutton.Thiswillstoreyoursettingsinmemory.
• Torecallthesettingsfrommemory: Afterselecting[PROFILE1]or[PROFILE2]fromthe[PRO-
FILES]list. Select[OK]andpresstheENTERbutton.• Toexecute[EASYCONNECTION]usingImageExpressUtility
LiteorImageExpressUtility2.0,select[WIRELESSLAN]→ [PROFILES]→[EASYCONNECTION].
• TostopemittingradiowavesfromtheUSBWirelessLANUnit,select[DISABLE]fromthe[PROFILES]list.
• Selecting[SIMPLEACCESSPOINT]willallowtheprojectortocreateaninfrastructurenetwork.
TheIPaddressoftheprojectorwillbesetautomatically. Select“ObtainanIPAddressAutomatically”tosettheIPad-
dressofaconnectedcomputer. Ittakesafewsecondsforachangeofyourcomputer’sIPad-
dresstocomeintoeffectinWindows7/WindowsVistawhileittakesoneortwominutesinWindowXP.
When you connect with your computer to save your profileandselect“Automaticallyconnectwhenwithinrange”fromthePropertiestabofWirelessNetworkinWindowsforyourselectedprofile,yourwirelessLANwillbeaccessedunderthefollowingconditions:• atthetimeofturningonthecomputerortheprojector• whenthenotebooktypeiswithintherangeoftheprojector’s
wirelessLANcanbeachieved. DatatransmissionbetweenwirelessLANandwiredLANisnot
possible. Whenthe[SIMPLEACCESSPOINT]modeisusedtosend
images,itisrecommendedtoconnecttoonlyonecomputer.
—

122
5. Using On-Screen Menu
• Whenselecting[WPS],thenetworkwillbeconnectedbyusingsettingsstoredautomaticallywiththeWPSfunction.
Selecting[WPS]willallowtheprojectortoaccessthenetworkbyusingthesettingstheWPSfunctionautomaticallystored.
DHCP PlaceacheckmarktoautomaticallyassignanIPaddresstotheprojectorfromyourDHCPserver.ClearthischeckboxtoregistertheIPaddressorsubnetmasknumberobtainedfromyournetworkadministrator.
—
IPADDRESS SetyourIPaddressofthenetworkconnectedtotheprojectorwhen[DHCP]isturnedoff.
Upto12numericcharacters
SUBNETMASK Setyoursubnetmasknumberofthenetworkconnectedtotheprojectorwhen[DHCP]isturnedoff.
Upto12numericcharacters
GATEWAY Setthedefaultgatewayofthenetworkconnectedtotheprojectorwhen[DHCP]isturnedoff.
Upto12numericcharacters
WNSCONFIGURA-TION
SettheIPaddressofyourWINSserverofthenetworkconnectedtotheprojectorwhen[DHCP]isturnedoff.
Upto12numericcharacters
AUTODNS PlaceacheckmarktoautomaticallyassigntheIPaddressofyourDNSserverconnectedtotheprojectorfromyourDHCPserver.ClearthischeckboxtosettheIPaddressofyourDNSserverconnectedtotheprojector.
—
DNSCONFIGURA-TION
SettheIPaddressofyourDNSserveronthenetworkconnectedtotheprojectorwhen[AUTODNS]iscleared.
Upto12numericcharacters
ADVANCED* ThismenuallowsyoutosetvariousitemsforyourwirelessLANconnection(networktype,security).
—
RECONNECT Retrytoconnecttheprojectortoanetwork.Trythisifyouhavechanged[PROFILES].
—
*The[ADVANCED]settingscreenisavailablefor[WIRELESSLAN]only.
NOTE:• Ifyouselect[EASYCONNECTION]from[PROFILES],youcannotmakesettingstoDHCPanditsfollowingitemsexcept[CHAN-
NEL]in[ADVANCED]. ADVANCEDSetting(requiredforwirelessLANonly)(ADVANCEDmenuonly)

123
5. Using On-Screen Menu
SITESURVEY DisplaysalistofavailableSSIDsforwirelessLANonsite.SelectanSSIDwhichyoucanaccess.ToselectanSSID,highlight[SSID]andusetheSELECT→ to select[OK]andpresstheENTERbutton.
����������������������� Wireless access point
����������������������� Ad Hoc PC
����������������������� WEP or WPA enabled
—
SECURITY Thiswillturnonorofftheencryptionmodeforsecuretransmis-sion.Touseencryption,specifyaWEPkeyorencryptionkey.Selectyoursecuritytypeappropriateforyourcomputerandthewire-lessLANunit.
DISABLE ���������������� Will not turn on the encryption feature� Your com-munications may be monitored by someone�
WEP(64bit) ������������ Uses 64-bit datalength for secure transmis-sion�
WEP(128bit) ���������� Uses 128-bit datalength for secure transmission� This option will increase privacy and security when compared to use of 64-bit datalength en-cryption�
WPA-PSK/WPA2-PSK/WPA-EAP/WPA2-EAP ������������������������������ These options provide stronger security than
WEP�
NOTE:• Thesecuritytype,WEPkey,andencryptionkeysettingsmustbethe
sameascommunicationdevicessuchasPCoraccesspointinyourwirelessnetwork.
• Whenyouuse[SECURITY],yourimagetransmissionspeedwillslowdown.
• [WPA-PSK],[WPA-EAP],[WPA2-PSK]and[WPA2-EAP]arenotavail-ablewhen[ADHOC]isselectedfrom[NETWORKTYPE].
—
SSID Enteranidentifier(SSID)forwirelessLAN.CommunicationcanbedoneonlywithequipmentwhoseSSIDmatchesSSIDforyourwirelessLAN.
Upto32alphanumericcharacters(casesensitive).
NETWORKTYPE SelectcommunicationmethodwhenusingwirelessLAN.
INFRASTRUCTURE ���Select this option when communicating with one or more equipment connected to the wire-less or wired LAN network via a wireless access point�
AD HOC ��������������������Select this option when using the wireless LAN to directly communicate with a computer in peer-to-peer mode�
—
CHANNEL Select a channel. Available channels vary depending on thecountryandregion.Whenyouselect[INFRASTRUCTURE],makesurethattheprojectorandyouraccesspointareonthesamechannel;whenyouselect[ADHOC],makesurethattheprojectorandyourcomputerareonthesamechannel.
—

124
5. Using On-Screen Menu
When[WEP(64bit)]or[WEP(128bit)]isselectedfor[SECURITYTYPE]
KEYSELECT SelectsoneWEPkeyfromthefourkeysbelow.
KEY1,KEY2,KEY3,KEY4
EnteraWEPkey.•Maximumnumberofcharacters
Option Alphanumeric(ASCII) Hexadecimal(HEX)
WEP64bit 5 10
WEP 128bit 13 26
When[WPA-PSK],[WPA-EAP],[WPA2-PSK],or[WPA2-EAP]isselectedfor[SECURITYTYPE]
ENCRYPTIONTYPE Select[TKIP]or[AES].
KEY Enterencryptionkey.Keylengthmustbe8orgreaterand63orless.

125
5. Using On-Screen Menu
[AUTHENTICATION](requiredforwirelessonly)SettingisrequiredforusingWPA-EAPorWPA2-EAP.
PreparationbeforesettingSelectawirelessLANcompliantWPA-EAPorWPA2-EAPauthenticationandinstalladigitalcertificateontheprojec-tor.
1. Set[DATEANDTIME]ontheprojector.(→page140)
2. Useacomputertosavedigitalcertificates(files)forWPA-EAPorWPA2-EAPsettingtoyourUSBmemorydevice.
After completing saving the file, remove the USB memory device from the computer.
Important:• Saveadigitalcertificate(file)totherootfolderoftheUSBmemory.• ThefileformatsofdigitalcertificatethataresupportedbytheprojectorareDERandPKCS#12only.• Theprojectorcannothandleanydigitalcertificatewhosefilesizeexceeds8KB.• CRL(CertificateRelocationList)isnotsupported.• Clientcertificatechainisnotsupported. 3. PlugtheUSBmemorydeviceintotheUSBportoftheprojector.
USB
SettingProcedures1. Select[NETWORKSETTINGS]→[WIRELESSSLAN].
2. SetitemssuchasPROFILES,DHCP,IPADDRESS,SUBNETMASKandothersasrequired.
• Select[PROFILE1]or[PROFILE2]for[PROFILES].If[EASYCONNECTION]isselected,WPA-PSK,WPA2-PSK, WPA-EAP, or WPA2-EAP is not available.
3. Select[ADVANCED]andpresstheENTERbutton.
The [ADVANCED] setting screen will be displayed.

126
5. Using On-Screen Menu
4. Select[SITESURVEY]andpresstheENTERbutton.
The“SSID”listwillbedisplayed.
5. SelectaconnectingSSID,andthenselect[OK].
Finally press the ENTER button.
• SelecttheSSIDforwhichWPA-PSKorWPA2-PSKisset.
• Select[INFRASTRUCTURE( )] for [NETWORK TYPE]. WPA-PSK, WPA2-PSK, WPA-EAP, or WPA2-EAP is not available when [AD HOC ( )] is selected.
6. Selectthe[SECURITY]tab.
The[SECURITY]pagewillbedisplayed.
7. Selectthe[SECURITYTYPE]fieldandpresstheENTERbutton.
The pull-down list will be displayed.
8. Select[WPA-EAP]or[WPA2-EAP]andpresstheENTERbutton.
9. Selectthe[TKIP/AES]fieldandpresstheENTERbutton.
The pull-down list will be displayed.
10.Select[TKIP]or[AES]andpresstheENTERbutton.
Select[TKIP]or[AES]accordingtothesettingforyouraccesspoint.

127
5. Using On-Screen Menu
11.Selectthe[AUTHENTICATION]tab.
The[AUTHENTICATION]pagewillbedisplayed.
Select either [EAP-TLS] or [PEAP-MSCHAPv2] for [EAP TYPE]. The setting items vary depending on the EAP type.
See the table below.
EAPType SettingItem Note
EAP-TLS UserName 1 character or more and 32 characters or less
ClientCertificate PKCS#12formatfile
CACertificate(Certificateauthority’scertificate)
DERformatfile
PEAP-MSCHAPv2 UserName 1 character or more and 32 characters or less
Password 1 character or more and 32 characters or less
CACertificate(Certificateauthority’scertificate)
DERformatfile
①Selecting[EAP-TLS]for[EAPTYPE]: The following section explains the operation for selecting [EAP-TLS].
For selecting [PEAP-MSCHAPv2], go on to Step 12 on page 129.
12.Selectthe[USERNAME]fieldandpresstheENTERbutton.
Thecharacterentryscreen(softwarekeyboard)willbedisplayed.Setausername.
• Ausernamemustbe1characterormoreand32charactersorless.
• Seepage131forusingthesoftwarekeyboardtoentercharacters.

128
5. Using On-Screen Menu
13.Select[CLIENTCERTIFICATE]andpresstheENTERbutton.
Alistoffiles([FILES]screen)willbedisplayed.
• Foroperatingthe[FILES]screen,see“4.UsingtheViewer”inthe“User’sManual”(PDF).
• Toreturntothe[AUTHENTICATION]page,presstheEXITbutton.
NOTE:InstallingadigitalcertificateYoucaninstalleachdigitalcertificate(clientcertificateandCAcertificate)for[PROFILE1(or2)]onafile-by-filebasis.• InstallarootCAcertificateforaCAcertificate.• Ifyouinstalladigitalcertificateoveryourexistingdigitalcertificate,theexistingdigitalcertificatewillbeoverwrittenwiththenew
digitalcertificate.• Onceadigitalcertificatehasbeeninstalled,itsinformationcannotbedeletedevenifyoustopsettingWPA-EAPorWPA2-EAP.
14.Onthe[FILES]screen,selectadigitalcertificate(PKCS#12formatfile)savedinyourUSBmemorydeviceandpresstheENTERbutton.
The password screen will be displayed.
15.Select[PASSWORD]fieldandpresstheENTERbutton.
Thecharacterentryscreen(softwarekeyboard)willbedisplayed.Setthepasswordoftheprivatekey.Apasswordmust be 1 character or more and 32 characters or less.
The selected digital certificate file will be installed on the projector.
• WhentherootCAcertificateisnotincludedinthefilethatwasselectedinStep14,proceedtoStep16.Whenthe root certification authority certificate is included, proceed to Step 18.
16.Select[CACERTIFICATE]andpresstheENTERbutton.
The drive list screen will be displayed.

129
5. Using On-Screen Menu
17.Onthe[FILES]screen,selectadigitalcertificate(DERformatfile)savedinyourUSBmemorydeviceandpress the ENTER button.
• SelectyourrootCAcertificatehere.
The selected digital certificate will be installed on the projector.
18.Aftercompletingrequiredsettings,select[OK]andpresstheENTERbutton.
The[WIRELESS]pagewillbereturned.
19.Select[RECONNECT]andpresstheENTERbutton.
20.Select[OK]andpresstheENTERbutton.
Thiswillcompletesetting[EAP-TLS]for[EAPTYPE]in[WPA-EAP]or[WPA2-EAP].
TIP:ClearingthedigitalcertificatethatisinstalledontheprojectorToclearthedigitalcertificateinstalledontheprojector,followthestepsbelow.Bydoingthefollowingprocedure,allthedigitalcertificatesforthecurrentlydisplayedprofilewillbecleared.1. Select [CLEAR CERTIFICATES] in the bottom left of the [AD-
VANCED]settingscreenandpresstheENTERbutton.
A message for confirmation will be displayed.
2. Select[YES]andpresstheENTERbutton.
The digital certificates will be cleared.
TIP:• ThePKCS#12formatdigitalcertificateincludingaCAcertificatewillbeinstalledasarootCAcertificate.
②Selecting[PEAP-MSCHAPv2]for[EAPTYPE]:
12.Fromthe[AUTHENTICATION]page,select[EAPTYPE]fieldandpresstheENTERbutton.
The pull-down list will be displayed.
13.Select[PEAP-MSCHAPv2]andpresstheENTERbutton.
14.Select[USERNAME]fieldandpresstheENTERbutton.
Thecharacterentryscreen(softwarekeyboard)willbedisplayed.Setausername.
• Ausernamemustbe32charactersorless.
(→ page 131)

130
5. Using On-Screen Menu
15.Aftercompletingsettingausername,selectthe[PASSWORD]fieldandpresstheENTERbutton.
Thecharacterentryscreen(softwarekeyboard)willbedisplayed.Setapassword.
• Apasswordmustbe32charactersorless.
16.Aftercompletingsettingthepassword,select[CACERTIFICATE]fieldandpresstheENTERbutton.
The drive list screen will be displayed.
• Foroperatingthe[FILES]screen,see“4.UsingtheViewer”inthe“User’sManual”(PDF).
• Toreturntothe[AUTHENTICATION]page,presstheEXITbutton.
NOTE:InstallingadigitalcertificateYoucan installeachdigitalcertificate(clientcertificateandCAcertificate) for [PROFILE1(or2)]onafile-by-filebasis.• InstallarootCAcertificateforaCAcertificate.• Ifyouinstalladigitalcertificateoveryourexistingdigitalcertificate,theexistingdigitalcertificatewillbeoverwrittenwiththenew
digitalcertificate.• Onceadigitalcertificatehasbeeninstalled,itsinformationcannotbedeletedevenifyoustopsettingWPA-EAPorWPA2-EAP.
17.Onthe[FILES]screen,selectadigitalcertificate(DERformatfile)savedinyourUSBmemorydeviceandpress the ENTER button.
• SelectyourrootCAcertificatehere.
The selected digital certificate will be installed on the projector.

131
5. Using On-Screen Menu
18.Aftercompletingrequiredsettings,select[OK]andpresstheENTERbutton.
The[WIRELESS]pagewillbereturned.
19.Select[RECONNECT]andpresstheENTERbutton.
20.Select[OK]andpresstheENTERbutton.
Thiswillcompletesetting[PEAP-MSCHAPv2]for[EAPTYPE]in[WPA-EAP]or[WPA2-EAP].
TIP:ClearingthedigitalcertificatethatisinstalledontheprojectorToclearthedigitalcertificateinstalledontheprojector,followthestepsbelow.Bydoingthefollowingprocedure,allthedigitalcertificatesforthecurrentlydisplayedprofilewillbecleared.1. Select [CLEAR CERTIFICATES] in the bottom left of the [AD-
VANCED]settingscreenandpresstheENTERbutton.
A message for confirmation will be displayed.
2. Select[YES]andpresstheENTERbutton.
The digital certificates will be cleared.
TIP:EnteringWEPkeys(SwitchingbetweenAlphanumericcharactersandhexadecimal)Toenterfrom[KEY1]to[KEY4],dothefollowing:1. Selectoneof[KEY1],[KEY2],[KEY3]and[KEY4]andpresstheENTERbutton.
Thecharacterentryscreen(softwarekeyboard)willbedisplayed.
2. Use the ▼, ▲, ◀, or ▶buttontoselectacharacterandpresstheENTERbutton.
• ToenteraWEPkeyorpassphrase,usealphanumericcharacters(ASCII)orhexadecimal(HEX).ToenteraPSKkey,usealphanumericcharacters(ASCII).
• Pressthe[HEX]buttontochangeto[ASCII]tosetthekeyinASCIIdigit.Youcantogglethisbuttonbetween[ASCII]and[HEX].
• Enter0x(numeralandalphabetrespectively)rightinfrontofyourkeycode.
• Hexadecimaluses0to9andAtoF.
3. AfterenteringyourWEPkeyorpassphrase,usethe▼, ▲, ◀, or ▶buttontoselect[OK]andpresstheENTERbutton.
Thecharacterentryscreen(softwarekeyboard)willbeclosed.

132
5. Using On-Screen Menu
WPSWhenthewirelessLANaccesspointconnectedtotheprojectorsupportsWPS(Wi-FiProtectedSetup™),youcanusePINmethodorpushbuttonmethodtosetupthewirelessLANfortheprojector.
PINTYPE Seta4-digitor8digit-PINcodeofWPSforyouraccesspointtocompletesettingfortheSSIDsecurity.
PUSHBUTTONTYPE Pressthededicatedbuttonoftheaccesspointandtheprojector’swirelessLANunittocompletesettingfortheSSIDsecurity.
NETWORKINFORMATIONThe following informationwillbedisplayedwhen theprojector isconnected toanetwork (wiredLANorwirelessLAN).
PROJECTORNAME
HOSTNAME
DOMAIN
NETWORKINFOR-MATION(WIREDLAN/WIRELESSLAN)
CONNECTIONSTATUS,IPADDRESS,SUBNETMASK,GATEWAY,WINS,DNS,MACADDRESS,SSID,NETWORKTYPE,WEP/WPA,CHANNEL,SIGNALLEVEL,AU-THENTICATION,AUTHENTICATIONPERIOD
DISPLAYTHEINFOR-MATIONINAPPLICA-TIONMENU
Turnonoroffthedisplayofthenetworkinformation.
Themeaningsofthesestatusstatementsaredescribedbelow.
Statement Authentication status
Authenticated Authenticationisdonecorrectly.
Failure Authenticationfailed.
Authenticating… Authenticationisinprocess.
Expired Thedigitalcertificateisexpired.Or[DATE,TIMEPRESET]isnotsetcorrectly.
Time Error The[DATE,TIMEPRESET]hasbeencleared.Setthecorrectdateandtime.

133
5. Using On-Screen Menu
PROJECTORNAME(ADVANCEDmenuonly)
PROJECTORNAME Setauniqueprojectorname. Upto16alphanu-meric characters and symbols
DOMAIN(ADVANCEDmenuonly)Setahostnameanddomainnameoftheprojector.
HOSTNAME Setahostnameoftheprojector. Upto15alphanumericcharacters
DOMAINNAME Setadomainnameoftheprojector. Upto60alphanumericcharacters

134
5. Using On-Screen Menu
ALERTMAIL(ADVANCEDmenuonly)
ALERTMAIL Thisoptionwillnotifyyourcomputeroflampreplacetimeorerrormessagesviae-mailwhenusingwirelessorwiredLAN.
Placing a checkmark will turn on the Alert Mail feature�Clearing a checkmark will turn off the Alert Mail feature�
Sampleofamessagetobesentfromtheprojector:
Thelampandfiltersareat theendof itsusable life.Pleasereplacethelampandfilters.ProjectorName:NECProjectorLampHoursUsed:100[H]
—
HOSTNAME Typeinahostname. Upto15alphanumericcharacters
DOMAINNAME Typeinadomainnameofthenetworkconnectedtotheprojec-tor.
Upto60alphanumericcharacters
SENDER'SAD-DRESS
Specifythesender’saddress. Upto60alphanu-meric characters and symbols
SMTPSERVERNAME
TypeintheSMTPservernametobeconnectedtotheprojec-tor.
Upto60alphanumericcharacters
RECIPIENT'SAD-DRESS1,2,3
Typeinyourrecipient’saddress. Upto60alphanu-meric characters and symbols
TESTMAIL Sendatestmailtocheckifyoursettingsarecorrect.NOTE:• Ifyouenteredanincorrectaddressinatest,youmaynotreceivean
Alert mail. Should this happen, check if the Recipient’s Address iscorrectlyset.
• Unless any one of the [SENDER'S ADDRESS], [SMTP SERVER'SNAME]or[RECIPIENT'SADDRESS1-3]isselected,[TESTMAIL]isnotavailable.
• Besuretohighlight[OK]andpresstheENTERbuttonbeforeexecuting[TESTMAIL].
—

135
5. Using On-Screen Menu
NETWORKSERVICE(ADVANCEDmenuonly)
HTTPSERVER SetapasswordforyourHTTPserver. Upto10alphanumericcharacters
PJLink This option allows you to set a password when you use thePJLinkfeature.NOTE:• Donotforgetyourpassword.However,ifyouforgetyourpassword,
consultwithyourdealer.• WhatisPJLink? PJLinkisastandardizationofprotocolusedforcontrollingprojectors
ofdifferentmanufacturers.Thisstandardprotocol isestablishedbyJapanBusinessMachineandInformationSystemIndustriesAssocia-tion(JBMIA)in2005.
TheprojectorsupportsallthecommandsofPJLinkClass1.• SettingofPJLinkwillnotbeaffectedevenwhen[RESET]isdonefrom
themenu.
Upto32alphanumericcharacters
AMX Turnonoroff fordetection fromAMXDeviceDiscoverywhenconnectingtothenetworksupportedbyAMX’sNetLinxcontrolsystem.
TIP:WhenusingadevicethatsupportsAMXDeviceDiscovery,allAMXNetLinxcontrolsystemwillrecognizethedeviceanddownloadtheappropriateDeviceDiscoveryModulefromanAMXserver.
Placing a checkmark will enable detecting the projector from AMX Device Discovery�Clearing a checkmark will disable detecting the projector from AMX Device Discovery�
—

136
5. Using On-Screen Menu
TOOLS
ADMINISTRATOR MODEThisallowsyoutoselectMENUMODE,savesettings,andsetapasswordfortheadministratormode.
MENUMODE Selecteither[BASIC]or[ADVANCED]menu.(→page89)
—
NOTSAVESETTINGVALUES
Placing a check mark will not save your projector settings�Clear this check box to save your projector settings�
—
NEWPASSWORD/CONFIRMPASS-WORD
Assignapasswordfortheadministratormode. Upto10alphanumericcharacters
TIP:ToreturntotheADVANCEDmenufromtheBASICmenu,dothefollowing:1. UsetheSOURCEbuttononthecabinetorpresstheNETWORKbuttonontheremotecontroltoselect
[NETWORK]todisplaytheAPPLICATIONMENU.
2. Select[TOOLS]→[ADMINISTRATORMODE]→[MENUMODE]→[ADVANCEDMODE].

137
5. Using On-Screen Menu
PROGRAM TIMER
Thisoptionturnson/offtheprojectorandchangesvideosignals,andselectsECOmodeautomaticallyataspecifiedtime.
NOTE:• Beforeusing[PROGRAMTIMER],makesurethatthe[DATEANDTIME]featureisset.(→page140)• MakesurethattheprojectorisinthestandbyconditionwiththePOWERcordconnected.• Theprojectorhasabuilt-inclock.Theclockwillkeepworkingforabouttwoweeksafterthemainpoweristurnedoff.Ifthemain
powerisnotsuppliedtotheprojectorfortwoweeksormore,thebuilt-inclockstopsworking.• The [POWER-SAVING] or [NETWORK STANDBY] of [STANDBY MODE] will be invalidated when [PROGRAM TIMER] is en-
abled.
Settinganewprogramtimer1. OnthePROGRAMTIMERscreen,usetheSELECT▲ or ▼buttontoselect[SETTINGS]andpresstheENTER
button.
The[PROGRAMLIST]screenwillbedisplayed.
2. SelectablankprogramnumberandpresstheENTERbutton.
The[EDIT]screenwillbedisplayed.
3. Makesettingsforeachitemasrequired.
ACTIVE ������������������ Place a check mark to enable the program�DAY ������������������������ Select days of the week for the program timer� To execute the program from Monday to Friday, select [MON-

138
5. Using On-Screen Menu
FRI]�To execute the program in everyday basis, select [EVERYDAY]�TIME ���������������������� Set the time to execute the program� Enter time in 24-hour format�FUNCTION ������������� Select a function to be executed� Selecting [POWER] will allow you to turn on or off the projector by setting
[ADVANCED SETTINGS]� Selecting [SOURCE] will allow you to select a video source by setting [ADVANCED SETTINGS]� Selecting [ECO MODE] will allow you to select [ECO MODE] by setting [ADVANCED SET-TINGS]�
ADVANCED SETTINGS ������������������������������ Select power on/off, a type of video source, or ECO MODE for the selected item in [FUNCTION]�REPEAT ������������������ Place a check mark to repeat the program continuing basis� To use the program this week only, clear the
check mark�4. Select[OK]andpresstheENTERbutton.
This will complete the settings.
Youwillbereturnedtothe[PROGRAMLIST]screen.
5. Select[BACK]andpresstheENTERbutton.
Youwillbereturnedtothe[PROGRAMTIMER]screen.
6. Select[OK]andpresstheENTERbutton.
You will be returned to the [TOOLS] screen.
NOTE:• Upto30differenttimersettingscanbeprogrammed.• Oncetheprogramnotmarkedwithacheckin[REPEAT]hasbeenexecuted,thecheckmarkinthe[ACTIVE]checkboxwillbe
clearedautomaticallyandtheprogramwillbedisabled.• Whentheon-timeandtheoff-timesetforthesametime,theoff-timesettingwilltakepreference.• Twodifferentsourcesaresetforthesametime,thelargerprogramnumberwilltakepreference.• Theon-timesettingwillnotbeexecutedwhilethecoolingfansarerunningoranerrorisoccurring.• Iftheoff-timesettingisexpiredundertheconditioninwhichthepoweroffisnotpossible,theoff-timersettingwillnotbeexecuted
untilthepoweroffbecomespossible.• Programsnotmarkedwithacheckmarkin[ACTIVE]ofthe[EDIT]screenwillnotbeexecutedeveniftheProgramTimeris
enabled.• Whentheprojectoristurnedonbyusingtheprogramtimerandifyouwanttoturnofftheprojector,settheoff-timeordoit
manuallysoasnottoleavetheprojectoronforalongperiodoftime.

139
5. Using On-Screen Menu
Activatingtheprogramtimer
1. Select[ENABLE]onthe[PROGRAMTIMER]screenandpresstheENTERbutton.
The [ENABLE] will be activated.
2. Select[OK]andpresstheENTERbutton.
The[PROGRAMTIMER]screenwillbechangedtothe[TOOL]screen.
NOTE:• Clearing[ENABLE]willdisabletheProgramTimerevenwhenaprogramismarkedwithacheckmarkon[PROGRAMLIST]
screen.• When[ENABLE]isselected,the[PROGRAMLIST]cannotbeedited.Toedittheprograms,select[ENABLE]toturnofftheProgram
Timer.
Changingtheprogrammedsettings
1. Onthe[PROGRAMLIST]screen,selectaprogramyouwanttoeditandpresstheENTERbutton.
2. Changethesettingsonthe[EDIT]screen.
3. Select[OK]andpresstheENTERbutton.
The programmed settings will be changed.
Youwillbereturnedtothe[PROGRAMLIST]screen.
Changingtheorderofprograms
1. Onthe[PROGRAMLIST]screen,selectaprogramwhoseorderyouwanttochangeandpresstheSELECT▶ button.
2. PresstheSELECT▼ button to select ▲ or ▼.
3. PresstheENTERbuttonafewtimestoselectarowtowhichyouwishtomovetheprogram.
The order of the programs will be changed.
Deletingtheprograms
1. Onthe[PROGRAMLIST]screen,selectaprogramnumberyouwanttodeleteandpresstheSELECT▶ button.
2. PresstheSELECT▼buttontoselect[DELETE].
3. Press the ENTER button.
The confirmation screen will be displayed.
4. Select[YES]andpresstheENTERbutton.
The program will be deleted.
This will complete deleting the program.

140
5. Using On-Screen Menu
DATE AND TIME
Youcansetthecurrenttime,month,date,andyear.NOTE:Theprojectorhasabuilt-inclock.Theclockwillkeepworkingforabout2weeksafterthemainpoweristurnedoff.Ifthemainpowerisofffor2weeksormore,thebuilt-inclockwillcease.Ifthebuilt-inclockceases,setthedateandtimeagain.Thebuilt-inclockwillnotceasewhileinthestandbymode.
TIME ZONE SETTINGS �������������� Select your time zone�DATE AND TIME SETTINGS ������ Set your current date (MM/DD/YYYY) and time (HH:MM)� INTERNET TIME SERVER ��������� If you place a check mark, the projector’s built-in clock will be synchronized with an Internet
time server in every 24 hours and at the time of projector’s startup�UPDATE ������������������������������������ Synchronizes the projector’s built-in clock immediately� The UPDATE button is not available
unless the INTERNET TIME SERVER check box is turned on�SUMMER TIME SETTINGS ������� If you place a check mark, the clock for daylight saving will be enabled�
MOUSEThisoptionletsyoutochangeyourUSBmousesettings.ThemousesettingsfeatureisavailableforUSBmouseonly.Choosethesettingsyouwant:
MOUSE BUTTON ���������������������� [RIGHT HAND] or [LEFT HAND]MOUSE SENSITIVITY ��������������� [FAST], [MEDIUM] or [SLOW]

141
6. Installation and Connections
32
1
Thissectiondescribeshowtosetupyourprojectorandhowtoconnectvideoandaudiosources.Yourprojectorissimpletosetupanduse.Butbeforeyougetstarted,youmustfirst:
① Setupascreenandtheprojector.
② Connectyourcomputerorvideoequip-menttotheprojector.
(→page145, 147, 148, 149, 150, 151, 152)
③ Connect the supplied power cord. (→page14)
NOTE:Ensurethatthepowercordandanyothercablesaredisconnectedbeforemovingthepro-jector.Whenmovingtheprojectororwhenitisnot inuse,cover the lenswith thesliding lenscover.
❶ Setting Up the Screen and the ProjectorSelecting a Location
[6650/6645]Thefurtheryourprojectorisfromthescreenorwall,thelargertheimage.Theminimumsizetheimagecanbeisapproximately25"(0.64m)measureddiagonallywhentheprojectorisroughly35inches(0.9m)fromthewallorscreen.Thelargesttheimagecanbeis300"(7.6m)whentheprojectorisabout435inches(11.0m)fromthewallor screen.
300"240"
Distance (Unit: m/inch)
Lens center
Screen Size
Screen Size (Unit: cm/inch)
200"180"150"120"
100"80"
11.0/435"8.8/348"
6.6/260"
5.5/216"
4.4/173"
3.6/144"2.9/115"
2.2/86"1.4/57"
40"
7.3/289"
60"
30"25"
1.1/42"
0.9/35"
609.6(W)�457.2(H) / 240(W)�180(H)
487.7(W)�365.8(H) / 192(W)�144(H)
406.4(W)�304.8(H) / 160(W)�120(H)
304.8(W)�228.6(H) / 120(W)�90(H)
365.8(W)�274.3(H) / 144(W)�108(H)
243.8(W)�182.9(H) / 96(W)�72(H)
203.2(W)�152.4(H) / 80(W)�60(H)
162.6(W)�121.9(H) / 64(W)�48(H)
121.9(W)�91.4(H) / 48(W)�36(H)
81.3(W)�61.0(H) / 32(W)�24(H)
61.0(W)�45.7(H) / 24(W)�18(H)
50.8(W)�38.1(H) / 20(W)�15(H)
TIP:• Thedistancesareindicatedbyintermediatevaluesbetweenteleandwide.Useasaruleofthumb.• Formoredetailsonthrowdistance,seepage143.
To the wall outlet.

142
6. Installation and Connections
[6645W/6640W]Thefurtheryourprojectorisfromthescreenorwall,thelargertheimage.Theminimumsizetheimagecanbeisapproximately25"(0.64m)measureddiagonallywhentheprojectorisroughly37inches(0.9m)fromthewallorscreen.Thelargesttheimagecanbeis300"(7.6m)whentheprojectorisabout459inches(11.7m)fromthewallor screen.
300"240"
Distance (Unit: m/inch)
Lens center
Screen Size
Screen Size (Unit: cm/inch)
200"180"150"120"
100"80"
11.7/459"9.3/367"
7.0/275"
5.8/229"
4.6/183"
3.9/152"3.1/121"
2.3/90"1.5/60"
40"
7.8/306"
60"
30"25"
1.1/45"
0.9/37"
646.2(W)�403.9(H) / 254(W)�159(H)
516.9(W)�323.1(H) / 204(W)�127(H)
430.8(W)�269.2(H) / 170(W)�106(H)
323.1(W)�201.9(H) / 127(W)�79(H)
387.7(W)�242.3(H) / 153(W)�95(H)
258.5(W)�161.5(H) / 102(W)�64(H)
215.4(W)�134.6(H) / 85(W)�53(H)
172.3(W)�107.7(H) / 68(W)�42(H)
129.2(W)�80.8(H) / 51(W)�32(H)
86.2(W)�53.8(H) / 34(W)�21(H)
64.6(W)�40.4(H) / 25(W)�16(H)
53.8(W)�33.7(H) / 21(W)�13(H)
TIP:• Thedistancesareindicatedbyintermediatevaluesbetweenteleandwide.Useasaruleofthumb.• Formoredetailsonthrowdistance,seepage143.

143
6. Installation and Connections
C
α
B
D
Throw Distance and Screen SizeThefollowingshowstheproperrelativepositionsof theprojectorandscreen.Refer to thetabletodeterminethepositionofinstallation.
Distance Chart
B= Vertical distance between lens center andscreen center
C= ThrowdistanceD= Vertical distance between lens center and
screenbottom(topofscreenforceilingap-plication)
α= Throwangle
NOTE:Thevalues in the tablesaredesignvaluesandmayvary.
[6650/6645]Screen Size B C D
αDiagonal Width Height wide tele wide tele
inch mm inch mm inch mm inch mm inch mm - inch mm inch mm degree - degree25 635 20 508 15 381 0–8 0–191 25 643 - 43 1102 -8–0 -191–0 0�0–16�5 - 0�0–9�830 762 24 610 18 457 0–9 0–229 31 782 - 52 1333 -9–0 -229–0 0�0–16�3 - 0�0–9�740 1016 32 813 24 610 0–12 0–305 42 1060 - 71 1794 -12–0 -305–0 0�0–16�0 - 0�0–9�660 1524 48 1219 36 914 0–18 0–457 64 1616 - 107 2717 -18–0 -457–0 0�0–15�8 - 0�0–9�672 1829 58 1463 43 1097 0–22 0–549 77 1950 - 129 3271 -22–0 -549–0 0�0–15�7 - 0�0–9�580 2032 64 1626 48 1219 0–24 0–610 86 2172 - 143 3641 -24–0 -610–0 0�0–15�7 - 0�0–9�584 2134 67 1707 50 1280 0–25 0–640 90 2284 - 151 3825 -25–0 -640–0 0�0–15�7 - 0�0–9�590 2286 72 1829 54 1372 0–27 0–686 96 2450 - 161 4102 -27–0 -686–0 0�0–15�6 - 0�0–9�5
100 2540 80 2032 60 1524 0–30 0–762 107 2728 - 180 4564 -30–0 -762–0 0�0–15�6 - 0�0–9�5120 3048 96 2438 72 1829 0–36 0–914 129 3285 - 216 5487 -36–0 -914–0 0�0–15�6 - 0�0–9�5150 3810 120 3048 90 2286 0–45 0–1143 162 4119 - 271 6872 -45–0 -1143–0 0�0–15�5 - 0�0–9�4180 4572 144 3658 108 2743 0–54 0–1372 195 4953 - 325 8256 -54–0 -1372–0 0�0–15�5 - 0�0–9�4200 5080 160 4064 120 3048 0–60 0–1524 217 5509 - 361 9180 -60–0 -1524–0 0�0–15�5 - 0�0–9�4210 5334 168 4267 126 3200 0–63 0–1600 228 5787 - 380 9641 -63–0 -1600–0 0�0–15�5 - 0�0–9�4240 6096 192 4877 144 3658 0–72 0–1829 261 6621 - 434 11026 -72–0 -1829–0 0�0–15�4 - 0�0–9�4270 6858 216 5486 162 4115 0–81 0–2057 294 7456 - 489 12411 -81–0 -2057–0 0�0–15�4 - 0�0–9�4300 7620 240 6096 180 4572 0–90 0–2286 326 8290 - 543 13795 -90–0 -2286–0 0�0–15�4 - 0�0–9�4
[6645W/6640W]Screen Size B C D
αDiagonal Width Height wide tele wide tele
inch mm inch mm inch mm inch mm inch mm - inch mm inch mm degree - degree25 635 21 538 13 337 0–8 0–202 27 682 - 46 1167 -7–1 -168–34 0�0–16�5 - 0�0–9�830 762 25 646 16 404 0–10 0–242 33 829 - 56 1411 -8–2 -202–40 0�0–16�3 - 0�0–9�740 1016 34 862 21 538 0–13 0–323 44 1123 - 75 1898 -11–2 -269–54 0�0–16�1 - 0�0–9�760 1524 51 1292 32 808 0–19 0–485 67 1710 - 113 2873 -16–3 -404–81 0�0–15�8 - 0�0–9�672 1829 61 1551 38 969 0–23 0–582 81 2063 - 136 3458 -19–4 -485–97 0�0–15�7 - 0�0–9�580 2032 68 1723 42 1077 0–25 0–646 90 2298 - 151 3848 -21–4 -538–108 0�0–15�7 - 0�0–9�584 2134 71 1809 45 1131 0–27 0–678 95 2415 - 159 4043 -22–4 -565–113 0�0–15�7 - 0�0–9�590 2286 76 1939 48 1212 0–29 0–727 102 2591 - 171 4336 -24–5 -606–121 0�0–15�7 - 0�0–9�5
100 2540 85 2154 53 1346 0–32 0–808 114 2885 - 190 4823 -26–5 -673–135 0�0–15�6 - 0�0–9�5120 3048 102 2585 64 1615 0–38 0–969 137 3472 - 228 5799 -32–6 -808–162 0�0–15�6 - 0�0–9�5150 3810 127 3231 79 2019 0–48 0–1212 171 4354 - 286 7261 -40–8 -1010–202 0�0–15�6 - 0�0–9�5180 4572 153 3877 95 2423 0–57 0–1454 206 5235 - 343 8724 -48–10 -1212–242 0�0–15�5 - 0�0–9�5200 5080 170 4308 106 2692 0–64 0–1615 229 5822 - 382 9699 -53–11 -1346–269 0�0–15�5 - 0�0–9�5210 5334 178 4523 111 2827 0–67 0–1696 241 6116 - 401 10187 -56–11 -1414–283 0�0–15�5 - 0�0–9�5240 6096 204 5169 127 3231 0–76 0–1939 275 6997 - 459 11649 -64–13 -1615–323 0�0–15�5 - 0�0–9�4270 6858 229 5816 143 3635 0–86 0–2181 310 7878 - 516 13112 -72–14 -1817–363 0�0–15�5 - 0�0–9�4300 7620 254 6462 159 4039 0–95 0–2423 345 8759 - 574 14575 -79–16 -2019–404 0�0–15�5 - 0�0–9�4
Screencenter
Lenscenter
Screenbottom

144
6. Installation and Connections
WARNING* Installingyourprojectorontheceilingmustbedone
byaqualifiedtechnician.Contactyourdealerformoreinformation.
* Donotattempttoinstalltheprojectoryourself.• Onlyuseyourprojectoronasolid,levelsurface.Ifthe
projectorfallstotheground,youcanbeinjuredandtheprojectorseverelydamaged.
• Do not use the projector where temperatures varygreatly.Theprojectormustbeusedattemperaturesbetween 41°F (5°C) and 104°F (40°C) (Eco modeselected automatically at 95°F to 104°F/35°C to40°C).
• Do not expose the projector to moisture, dust, orsmoke.Thiswillharmthescreenimage.
• Ensure that you have adequate ventilation aroundyourprojectorsoheatcandissipate.Donotcovertheventsonthesideorthefrontoftheprojector.
ReflectingtheImageUsingamirrortoreflectyourprojector’simageenablesyoutoenjoyamuchlargerimagewhenasmallerspaceisrequired.Contactyourdealerifyouneedamirrorsystem.Ifyou’reusingamirrorsystemandyourimageisinverted,usetheMENUand▲▼◀▶buttonsonyourprojectorcabinetoryourremotecontroltocorrecttheorientation.(→page105)

145
6. Installation and Connections
Computer cable (VGA) (supplied)To mini D-Sub 15-pin connector on the projector.Itisrecommendedthatyouuse a commercially available distribu-tion amplifier if connecting a signal cable longer than the cable supplied.
NOTE:ForMac,useacommerciallyavail-ablepinadapter(notsupplied)toconnecttoyourMac’svideoport.
A commercially available USB cable (compatible with USB 2.0 specifications)
Stereo mini-plug audio cable (not supplied)
❷ Making ConnectionsNOTE:WhenusingwithanotebookPC,besuretoconnecttheprojectorandnotebookPCwhiletheprojectorisinstandbymodeandbeforeturningonthepowertothenotebookPC.InmostcasestheoutputsignalfromthenotebookPCisnotturnedonunlessconnectedtotheprojectorbeforebeingpoweredup.* Ifthescreengoesblankwhileusingyourremotecontrol,itmaybetheresultofthecomputer’sscreen-saverorpowermanage-
mentsoftware.
Enabling the computer’s external displayDisplayinganimageonthenotebookPC’sscreendoesnotnecessarilymeanitoutputsasignaltotheprojector.WhenusingaPCcompatiblelaptop,acombinationoffunctionkeyswillenable/disabletheexternaldisplay.Usually,thecombinationofthe“Fn”keyalongwithoneofthe12functionkeysgetstheexternaldisplaytocomeonoroff.Forexample,NEClaptopsuseFn+F3,whileDelllaptopsuseFn+F8keycombinationstotogglethroughexternaldisplayselections.
Connecting Your Computer
NOTE:SignalssupportedbyPlug&Play(DDC2B)
INPUTCOMPUTER IN HDMI 1 IN HDMI 2 IN
analog digital digitalYes Yes Yes
HDMIcable(notsupplied)UseHighSpeedHDMI® Cable.
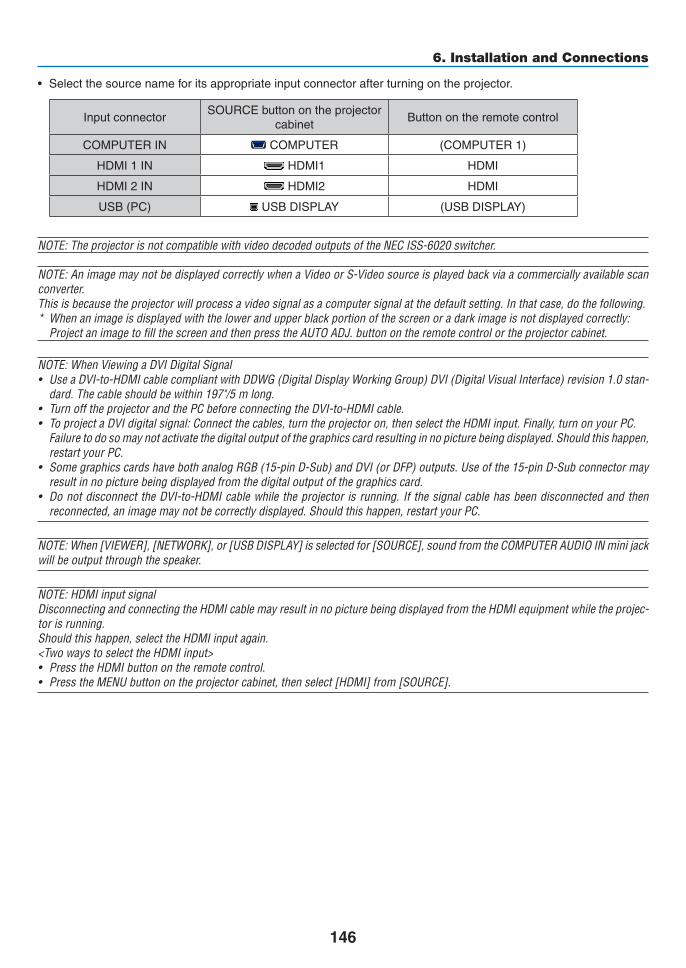
146
6. Installation and Connections
• Selectthesourcenameforitsappropriateinputconnectorafterturningontheprojector.
InputconnectorSOURCEbuttonontheprojector
cabinetButtonontheremotecontrol
COMPUTERIN COMPUTER (COMPUTER1)
HDMI1IN HDMI1 HDMI
HDMI2IN HDMI2 HDMI
USB(PC) USBDISPLAY (USBDISPLAY)
NOTE:TheprojectorisnotcompatiblewithvideodecodedoutputsoftheNECISS-6020switcher.
NOTE:AnimagemaynotbedisplayedcorrectlywhenaVideoorS-Videosourceisplayedbackviaacommerciallyavailablescanconverter.Thisisbecausetheprojectorwillprocessavideosignalasacomputersignalatthedefaultsetting.Inthatcase,dothefollowing.* Whenanimageisdisplayedwiththelowerandupperblackportionofthescreenoradarkimageisnotdisplayedcorrectly: ProjectanimagetofillthescreenandthenpresstheAUTOADJ.buttonontheremotecontrolortheprojectorcabinet.
NOTE:WhenViewingaDVIDigitalSignal• UseaDVI-to-HDMIcablecompliantwithDDWG(DigitalDisplayWorkingGroup)DVI(DigitalVisualInterface)revision1.0stan-
dard.Thecableshouldbewithin197"/5mlong.• TurnofftheprojectorandthePCbeforeconnectingtheDVI-to-HDMIcable.• ToprojectaDVIdigitalsignal:Connectthecables,turntheprojectoron,thenselecttheHDMIinput.Finally,turnonyourPC. Failuretodosomaynotactivatethedigitaloutputofthegraphicscardresultinginnopicturebeingdisplayed.Shouldthishappen,
restartyourPC.• SomegraphicscardshavebothanalogRGB(15-pinD-Sub)andDVI(orDFP)outputs.Useofthe15-pinD-Subconnectormay
resultinnopicturebeingdisplayedfromthedigitaloutputofthegraphicscard.• DonotdisconnecttheDVI-to-HDMIcablewhiletheprojector isrunning.If thesignalcablehasbeendisconnectedandthen
reconnected,animagemaynotbecorrectlydisplayed.Shouldthishappen,restartyourPC.
NOTE:When[VIEWER],[NETWORK],or[USBDISPLAY]isselectedfor[SOURCE],soundfromtheCOMPUTERAUDIOINminijackwillbeoutputthroughthespeaker.The[VIEWER]and[NETWORK]arenotsupportedbyPE501X.
NOTE:HDMIinputsignalDisconnectingandconnectingtheHDMIcablemayresultinnopicturebeingdisplayedfromtheHDMIequipmentwhiletheprojec-torisrunning.Shouldthishappen,selecttheHDMIinputagain.<TwowaystoselecttheHDMIinput>• PresstheHDMIbuttonontheremotecontrol.• PresstheMENUbuttonontheprojectorcabinet,thenselect[HDMI]from[SOURCE].

147
6. Installation and Connections
Connecting an External Monitor
Youcanconnectaseparate,externalmonitortoyourprojectortosimultaneouslyviewonamonitorthecomputeranalogimageyou’reprojecting.
NOTE:• Daisychainconnectionisnotpossible.• Whenaudioequipmentisconnected,theprojectorspeakerisdisabled.
Computer cable (VGA) (supplied)
Stereo mini-plug audio cable (not supplied)
Computer cable (VGA) (not supplied)
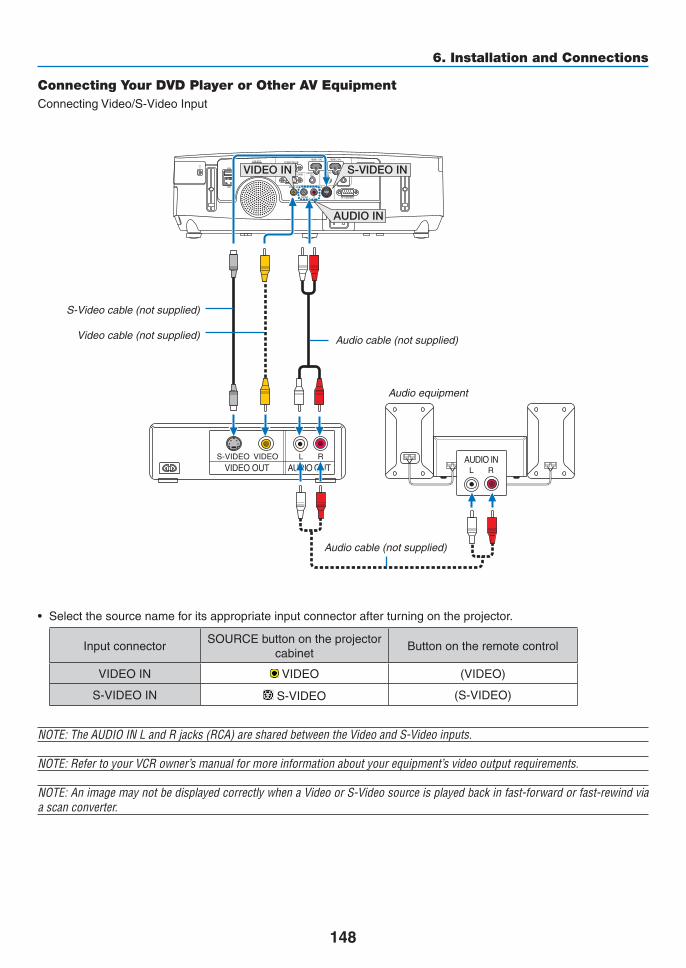
148
6. Installation and Connections
Connecting Your DVD Player or Other AV EquipmentConnectingVideo/S-VideoInput
• Selectthesourcenameforitsappropriateinputconnectorafterturningontheprojector.
InputconnectorSOURCEbuttonontheprojector
cabinetButtonontheremotecontrol
VIDEOIN VIDEO (VIDEO)
S-VIDEOIN S-VIDEO (S-VIDEO)
NOTE:TheAUDIOINLandRjacks(RCA)aresharedbetweentheVideoandS-Videoinputs.
NOTE:RefertoyourVCRowner’smanualformoreinformationaboutyourequipment’svideooutputrequirements.
NOTE:AnimagemaynotbedisplayedcorrectlywhenaVideoorS-Videosourceisplayedbackinfast-forwardorfast-rewindviaascanconverter.
Audio cable (not supplied)
S-Video cable (not supplied)
Video cable (not supplied)
Audio equipment
Audio cable (not supplied)

149
6. Installation and Connections
Connecting Component Input
Acomponentsignalwillbeautomaticallydisplayed.Ifnot,fromthemenu,select[SETUP]→[OPTIONS(1)]→ [SIGNALSELECT]→[COMPUTER],andthenplaceacheckmarkintheComponentradiobutton.
• Selectthesourcenameforitsappropriateinputconnectorafterturningontheprojector.
InputconnectorSOURCEbuttonontheprojector
cabinetButtonontheremotecontrol
COMPUTERIN COMPUTER (COMPUTER1)
NOTE:RefertoyourDVDplayer’sowner’smanualformoreinformationaboutyourDVDplayer’svideooutputrequirements.
Audio cable (not supplied)
15-pin - to - RCA (female) × 3 cable adapter (ADP-CV1E)
Stereo mini plug - to - RCA audio cable (not supplied)
Component video RCA × 3 cable (not supplied)
DVD player
Audio Equipment

150
6. Installation and Connections
Connecting HDMI InputYoucanconnecttheHDMIoutputofyourDVDplayer,harddiskplayer,Blu-rayplayer,ornotebooktypePCtotheHDMIINconnectorofyourprojector.NOTE:TheHDMI1IN/HDMI2INconnectorsupportsPlug&Play(DDC2B).
Audio cable (not supplied)
HDMIcable(notsupplied)UseHighSpeedHDMI® Cable.
InputconnectorSOURCEbuttonontheprojector
cabinetButtonontheremotecontrol
HDMI1IN HDMI1 HDMI
HDMI2IN HDMI2 HDMI
TIP:ForusersofaudiovideoequipmentwithanHDMIconnector:Select“Enhanced”ratherthan“Normal”ifHDMIoutputisswitchablebetween“Enhanced”and“Normal”.Thiswillprovideimprovedimagecontrastandmoredetaileddarkareas.Formoreinformationonsettings,refertotheinstructionmanualoftheaudiovideoequipmenttobeconnected.
• WhenconnectingtheHDMI1IN(orHDMI2IN)connectoroftheprojectortotheDVDplayer,theprojector’svideolevelcanbemadesettingsinaccordancewiththeDVDplayer’svideolevel.Inthemenuselect[HDMISETTINGS]→[HDMI1](or[HDMI2])→[VIDEOLEVEL]andmakenecessarysettings.
• IftheHDMIinputsoundcannotbeheard,inthemenuselect[AUDIOSELECT]→[HDMI1](or[HDMI2]).

151
6. Installation and Connections
Connecting to a Wired LAN TheprojectorcomesstandardwithaLANport(RJ-45)whichprovidesaLANconnectionusingaLANcable.TouseaLANconnection,youarerequiredtosettheLANontheprojectormenu.Select[SETUP]→[WIREDLAN].(→page120).
ExampleofLANconnectionExampleofwiredLANconnection
LAN
Server
Hub
LAN cable (not supplied)
NOTE:UseaCategory5orhigherLANcable.

152
6. Installation and Connections
Connecting to a Wireless LAN (Optional: NP02LM series) TheUSBWirelessLANUnitalsoprovidesawirelessLANconnection.TouseawirelessLANconnection,youarerequiredtoassignanIPaddresstotheprojector.
Important:• IfyouusetheprojectorwiththeUSBWirelessLANUnitintheareawheretheuseofwirelessLANequipmentis
prohibited,removetheUSBWirelessLANUnitfromtheprojector.
• BuytheappropriateUSBWirelessLANUnitforyourcountryorarea.
NOTE:• ThegreenLEDontheUSBWirelessLANUnitflashestoshowthattheUSBWirelessLANUnitisworking.• Yourcomputer’swirelessLANadapter(orunit)mustbecompliedwithWi-Fi(IEEE802.11b/g/n)standard.
FlowofSettingWirelessLANStep 1: AttachtheUSBWirelessLANUnittotheprojector.
Step 2: ConnectthecomputertotheprojectorviawiredLAN.(→page151)
Usethecomputer’sbrowsertodisplaytheprojector’sHTTPserver.(→page42)
Step 3: UseanHTTPservertosetthewirelessLAN.(→page45)
AccesstheHTTPserverfunctiontoset[NETWORKSETTINGS]→[SETTINGS]→[WIRELESS]→ [EASYCONNECTION],[SIMPLEACCESSPOINT],[PROFILE1]or[PROFILE2].
NOTE:• TousetheHTTPserverfunction,theprojectormustbeconnectedtoanetwork. FirstusethewiredLANtoconnecttheprojectortoanetworkandthenusetheHTTPservertosetthewirelessLAN.• AftersettingthewirelessLANbyusingtheHTTPserver,set[NETWORKSETTINGS]→[SETTINGS]→[WIRED]→[DISABLE]
WhenswitchingtosetontheprojectorafterconnectingtothewirelessLAN:UsethemenutosetthewirelessLANconnectionfortheprojector.(→page120)Select[DISABLE],[EASYCONNECTION],[SIMPLEACCESSPOINT],[PROFILE1]or[PROFILE2]yousetfromtheHTTPserver.
AttachingtheUSBWirelessLANUnit
NOTE:• TheUSBWirelessLANUnitmustbeinsertedintotheUSBWirelessLANUnitportinthecorrectdirection.Itcannotbeinserted
inthereversedirection.IftheUSBWirelessLANUnitisinsertedinthereversedirectionwithexcessiveforceapplied,theUSBportmaybreak.
• BeforetouchingtheUSBWirelessLANUnit,touchametallicobject(suchasadoorknoboraluminumwindowframe)todischargethestaticelectricityfromyourbody.
• AlwaysinsertorremovetheUSBWirelessLANunitwhenthemainpoweristurnedoff.FailuretodosomaycauseprojectormalfunctionordamagetotheUSBwirelessLANunit.Iftheprojectorwillnotworkcorrectly,turnofftheprojector,disconnectthepowercord,andthenconnectitagain.
• DonotinsertotherUSBdevicesintotheUSBWirelessLANunitport.DonotinserttheUSBWirelessLANunitintotheUSB(PC)port(TypeB).
• AlthoughthePE501XdoesnotsupportwirelessLAN,awirelessmark( shownonthecabinet.
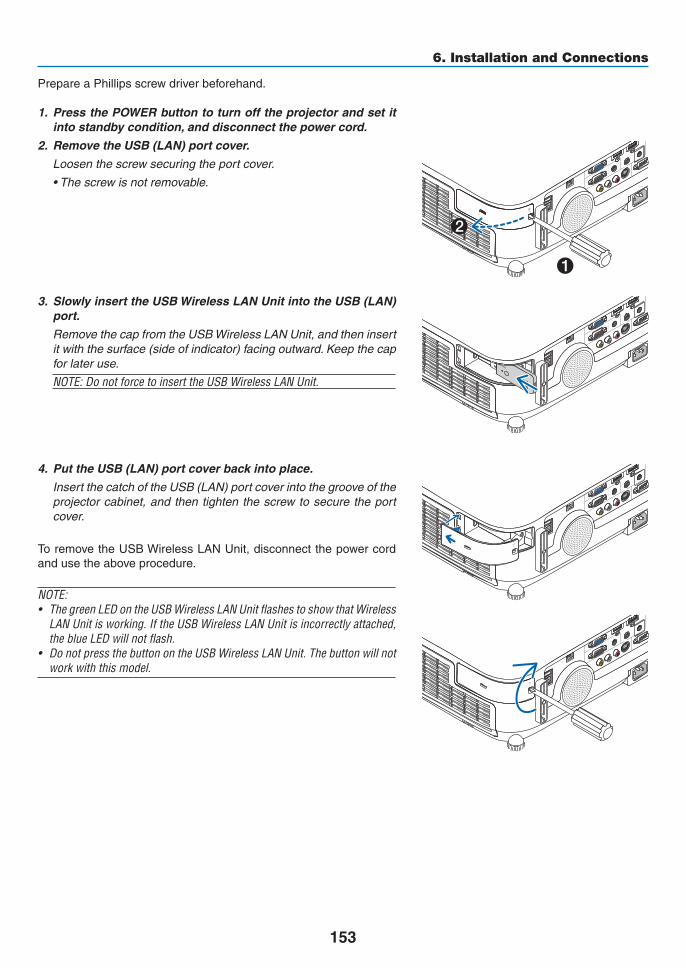
153
6. Installation and Connections
PrepareaPhillipsscrewdriverbeforehand.
1. PressthePOWERbuttontoturnofftheprojectorandsetitintostandbycondition,anddisconnectthepowercord.
2. RemovetheUSB(LAN)portcover.
Loosen the screw securing the port cover.
•Thescrewisnotremovable.
3. SlowlyinserttheUSBWirelessLANUnitintotheUSB(LAN)port.
Remove the cap from the USB Wireless LAN Unit, and then insert it with the surface (side of indicator) facing outward. Keep the cap for later use.
NOTE:DonotforcetoinserttheUSBWirelessLANUnit.
4. PuttheUSB(LAN)portcoverbackintoplace.
InsertthecatchoftheUSB(LAN)portcoverintothegrooveoftheprojector cabinet, and then tighten the screw to secure the port cover.
ToremovetheUSBWirelessLANUnit,disconnectthepowercordandusetheaboveprocedure.
NOTE:• ThegreenLEDontheUSBWirelessLANUnitflashestoshowthatWireless
LANUnitisworking.IftheUSBWirelessLANUnitisincorrectlyattached,theblueLEDwillnotflash.
• DonotpressthebuttonontheUSBWirelessLANUnit.Thebuttonwillnotworkwiththismodel.
1
2

154
6. Installation and Connections
ExampleofwirelessLANconnection(NetworkType→Infrastructure)
PC with wireless LAN card inserted
PC with built-in wireless LAN function
Wired LAN
Wireless access point
USB Wireless LAN Unit
Toenabledirect communication (i.e.,peer-to-peer)betweenpersonal computersandprojectors, youneed toselecttheAdHocmode.
UsetheHTTPserverfunctiontomakethesettings.(→page42)
PC with wireless LAN card inserted
PC with built-in wireless LAN function
UsetheHTTPserverfunctiontomakethesettings.(→page42)
ExampleofwirelessLANconnection(NetworkType→AdHoc)
USB Wireless LAN Unit

155
6. Installation and Connections
Attaching the Optional Cable Cover (NP03CV)Anoptionalcablecover(NP03CV)isavailableforhidingcables.TheNP03CVcablecoverisdesignedforusewiththePseriesprojectors.
CAUTION:• Besuretotightenthescrewsafterattachingthecablecover.Failuretodosomaycausethecablecovertocome
offandfall,resultingininjuryordamagetothecablecover.• Donotputbundledcablesinthecablecover.Failuretodosomaydamagethepowercord,resultingafire.
AttachingthecablecoverAttachthecablecoverafterinstallingtheprojectorontheceilingandconnectingcables.Toolneededforattaching:• Phillipsscrewdriver(plus-head)
1. Aligntwotabsontheoutsideofthecablecoverwithgroovesoftheprojectorandpushthetopend.
• Atthesametimetwotabsontheinsideofthecablecoverwillbeengagedintherespondinggroovesoftheprojector.
NOTE:• Becarefulnottogetcablescaughtinbetweenthecablecoverandtheprojector.
2. Tightenthecablecoverscrews.
• Besuretotightenthescrews.
12
2
1Tabs
Removingthecablecover1. LoosenthecablecoverscrewsuntilthePhillipsscrewdrivergoesintoafreewheelingcondition.
2. Removethecablecover.
Push up the cable cover slightly and rotate it to release.
1
1
2

156
1. Pushupthebuttonsontheleftandrighttoreleasethefilterunitandpullitout.
2. Removethefilterunitbypullingoutthetab.
3. Removethefourfilters.
(1) Turn the filter unit over and pull out the two soft accordion filters (large and small).
Filter cover
Filter unit
7. MaintenanceThissectiondescribesthesimplemaintenanceproceduresyoushouldfollowtocleanthefilters,thelens,thecabinet,andtoreplacethelampandthefilters.
❶ Cleaning the FiltersTheair-filterspongekeepsdustanddirtfromgettinginsidetheprojectorandshouldbefrequentlycleaned.Ifthefilterisdirtyorclogged,yourprojectormayoverheat.
NOTE:Themessageforfiltercleaningwillbedisplayedforoneminuteaftertheprojectoristurnedonoroff.Whenthemessageisdisplayed,cleanthefilters.Thetimetocleanthefiltersissetto[OFF]attimeofshipment.Tocancelthemessage,pressanybuttonontheprojectorcabinetortheremotecontrol.
The two-layerfilteron theprojector improvescoolinganddust-proofcapabilitiescomparedwith theconventionalmodels.Theoutsides(intakeside)ofthefirstandsecondlayerfiltersremovedust.Tocleanthefilter,detachthefilterunitandthefiltercover.
CAUTION• Beforecleaningthefilters,turnofftheprojector,disconnectthepowercordandthenallowthecabinettocool.
Failuretodosocanresultinelectricshockorburninjuries.

157
7. Maintenance
(2) Push the left end of each filter and remove the hard two honeycomb filters (large and small).
•Thelargefiltercannotberemovedbypushingonitsrightend.
4. Useavacuumcleanertovacuumallthedustinside.
Get rid of dust in the accordion filter
NOTE:• Wheneveryouvacuumthefilter,usethesoftbrushattachmentto
vacuum.Thisistoavoiddamagetothefilter.• Donotwashthefilterwithwater.Doingsocanresultinfilterclog-
ging.
5. Removedustfromthefilterunitandthefiltercover.
Clean both outside and inside.
6. Attachthefourfilterstothefilterunit.
(1)Inserttheleftendofeachhardhoneycombfilter(largeandsmall) first and then the right end of each hard honeycomb filter to the filter unit.
•Thelargefiltercannotbefittedifitsrightendisinserted.
(2) Turn the filter unit over.
•Attachthetwosoftaccordionfilters(largeandsmall).Eachaccordion filter has a slit on it. Align the slit with each pro-trusion of the filter unit.
Slit

158
7. Maintenance
7. Putthefilterunitbacktotheprojectorcabinet.
Makesurethatthefilterunitisplacedinthecorrectorienta-tion.
8. Putthefiltercoverbacktotheprojectorcabinet.
Insert twocatchesof the topsideof thefiltercover into thegroove of the cabinet, and push the buttons on the left and right to close the filter cover.
• Pushthefiltercoveruntilitclicksintoplace.
9. Clearthefilterusagehours.
Plug the power cord into the wall outlet, and then turn on the projector.
From the menu, select [RESET] →[CLEARFILTERHOURS].(→ page 117)
The interval time to clean the filters is set to [OFF] at time of shipment. When using the projector as it is, you do not clear the filter usage

159
7. Maintenance
❷ Cleaning the Lens• Turnofftheprojectorbeforecleaning.
• Theprojectorhasaplasticlens.Useacommerciallyavailableplasticlenscleaner.
• Donotscratchormarthelenssurfaceasaplasticlensiseasilyscratched.
• Neverusealcoholorglasslenscleanerasdoingsowillcausedamagetotheplasticlenssurface.
❸ Cleaning the CabinetTurnofftheprojector,andunplugtheprojectorbeforecleaning.• Useadrysoftclothtowipedustoffthecabinet.
Ifheavilysoiled,useamilddetergent.
• Neverusestrongdetergentsorsolventssuchasalcoholorthinner.
• Whencleaningtheventilationslitsorthespeakerusingavacuumcleaner,donotforcethebrushofthevacuumcleanerintotheslitsofthecabinet.
Vacuum the dust off the ventilation slits.
• Cloggedventilationslitsmaycauseariseintheinternaltemperatureoftheprojector,resultinginmalfunction.
• Donotscratchorhitthecabinetwithyourfingersoranyhardobjects
• Contactyourdealerforcleaningtheinsideoftheprojector.
NOTE:Donotapplyvolatileagentsuchasinsecticideonthecabinet,thelens,orthescreen.Donotleavearubberorvinylproductinprolongedcontactwithit.Otherwisethesurfacefinishwillbedeterioratedorthecoatingmaybestrippedoff.

160
7. Maintenance
❹ Replacing the Lamp and the FiltersWhenthelampreachestheendofitslife,theLAMPindicatorinthecabinetwillblinkredandthemessage“THELAMPHASREACHEDTHEENDOFITSUSABLELIFE.PLEASEREPLACETHELAMPANDFILTER.”willappear(*).Eventhoughthelampmaystillbeworking,replacethelamptomaintaintheoptimalprojectorperformance.Afterreplacingthelamp,besuretoclearthelamphourmeter.(→page117)
CAUTION• DONOTTOUCHTHELAMPimmediatelyafterithasbeenused.Itwillbeextremelyhot.Turntheprojector
offandthendisconnectthepowercord.Allowatleastonehourforthelamptocoolbeforehandling.
• Usethespecifiedlampforsafetyandperformance.
Toorderthereplacementlamp,specifyyourlamptype.
Replacementlamp:
456-6640W Thereplacementlampcomeswithfilters.
• DONOTREMOVEANYSCREWSexceptonelampcoverscrewandtwolamphousingscrews.Youcouldreceiveanelectricshock.
• Donotbreaktheglassonthelamphousing.
Keepfingerprintsofftheglasssurfaceonthelamphousing.Leavingfingerprintsontheglasssurfacemightcauseanunwantedshadowandpoorpicturequality.
• Theprojectorwillturnoffandgointostandbymodewhenyoucontinuetousetheprojectorforanother100hoursafterthelamphasreachedtheendofitslife.Ifthishappens,besuretoreplacethelamp.Ifyoucontinuetousethelampafterthelampreachestheendofitslife,thelampbulbmayshatter,andpiecesofglassmaybescatteredinthelampcase.Donottouchthemasthepiecesofglassmaycauseinjury.Ifthishappens,contactyourdealerforlampreplacement.
*NOTE:Thismessagewillbedisplayedunderthefollowingconditions:• foroneminuteaftertheprojectorhasbeenpoweredon• whenthe (POWER)buttonontheprojectorcabinetorthePOWEROFFbuttonontheremotecontrolispressed
Toturnoffthemessage,pressanybuttonontheprojectorcabinetortheremotecontrol.
Optionallampandtoolsneededforreplacement:
• Phillipsscrewdriver(plus-head)
• Replacementlamp
Flow of Replacing the Lamp and the Filters
Step 1. Replace the lamp
Step 2. Replace the filters (→page163)
Step 3. Clearthelampusagehoursandthefilterusagehours(→page117)

161
7. Maintenance
2. Removethelamphousing.
(1)Loosenthetwoscrewssecuringthelamphousinguntilthephillipsscrewdrivergoesintoafreewheelingcondi-tion.
•Thetwoscrewsarenotremovable.
•There isan interlockonthiscasetoprevent theriskofelectricalshock.Donotattempt tocircumvent thisinterlock.
(2)Removethelamphousingbyholdingit.
CAUTION:Makesurethatthelamphousingiscoolenoughtobeforeremovingit.
Interlock
Toreplacethelamp:1. Removethelampcover.
(1)Loosenthelampcoverscrew
•Thelampcoverscrewisnotremovable.
(2)Pushandslidethelampcoveroff.

162
7. Maintenance
Thiscompletesthelampreplacement.Goontothefilterreplacement.
NOTE:Whenyoucontinuetousetheprojectorforanother100hoursafterthelamphasreachedtheendofitslife,theprojectorcannotturnonandthemenuisnotdisplayed.Ifthishappens,presstheHELPbuttonontheremotecontrolfor10secondstoresetthelampclockbacktozero.Whenthelamptimeclockisresettozero,theLAMPindicatorgoesout.
4. Reattachthelampcover.
(1)Slidethelampcoverbackuntilitsnapsintoplace.
(2)Tightenthescrewtosecurethelampcover.
•Besuretotightenthescrew.
3. Installanewlamphousing.
(1)Insertanewlamphousinguntilthelamphousingispluggedintothesocket.
(2)Pushthetopcenterofthelamphousingtosecureit.
(3)Secureitinplacewiththetwoscrews.
•Besuretotightenthescrews.
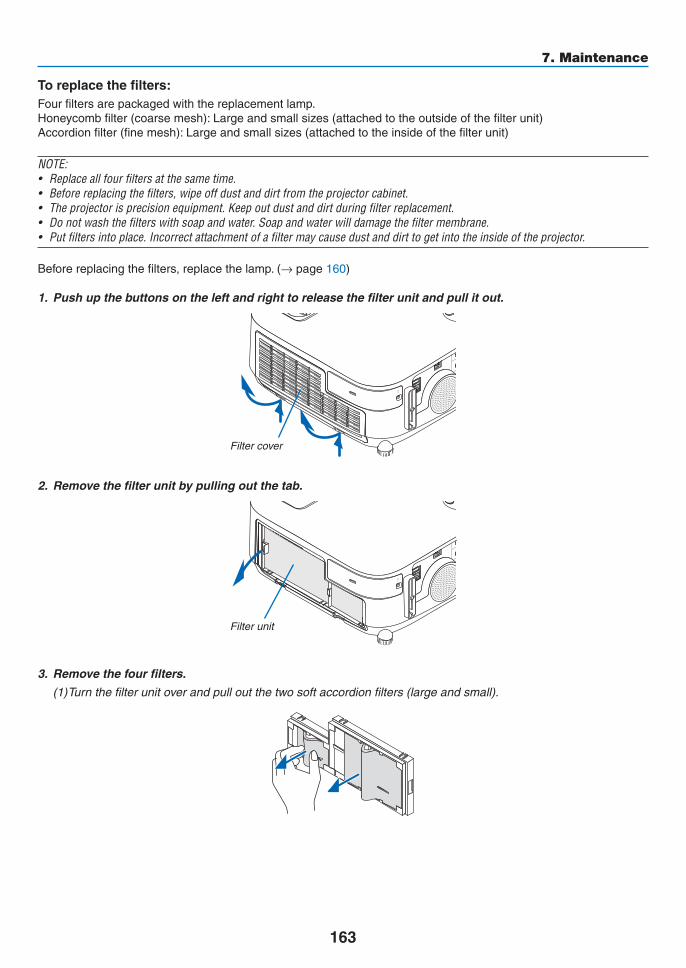
163
7. Maintenance
Toreplacethefilters:Fourfiltersarepackagedwiththereplacementlamp.Honeycombfilter(coarsemesh):Largeandsmallsizes(attachedtotheoutsideofthefilterunit)Accordionfilter(finemesh):Largeandsmallsizes(attachedtotheinsideofthefilterunit)
NOTE:• Replaceallfourfiltersatthesametime.• Beforereplacingthefilters,wipeoffdustanddirtfromtheprojectorcabinet.• Theprojectorisprecisionequipment.Keepoutdustanddirtduringfilterreplacement.• Donotwashthefilterswithsoapandwater.Soapandwaterwilldamagethefiltermembrane.• Putfiltersintoplace.Incorrectattachmentofafiltermaycausedustanddirttogetintotheinsideoftheprojector.
Beforereplacingthefilters,replacethelamp.(→page160)
1. Pushupthebuttonsontheleftandrighttoreleasethefilterunitandpullitout.
Filter cover
2. Removethefilterunitbypullingoutthetab.
Filter unit
3. Removethefourfilters.
(1) Turn the filter unit over and pull out the two soft accordion filters (large and small).

164
7. Maintenance
(2) Push the left end of each filter and remove the hard two honeycomb filters (large and small).
•Thelargefiltercannotberemovedbypushingonitsrightend.
4. Removedustfromthefilterunitandthefiltercover.
Clean both outside and inside.
5. Attachfournewfilterstothefilterunit.
(1)Insert the leftendofeachhardhoneycombfilter(largeandsmall)firstandthentherightendofeachhardhoneycomb filter to the filter unit.
•Thelargefiltercannotbefittedifitsrightendisinserted.
(2) Turn the filter unit over.
•Attachthetwosoftaccordionfilters(largeandsmall).Eachaccordionfilterhasaslitonit.Aligntheslitwitheach protrusion of the filter unit.
6. Putthefilterunitbacktotheprojectorcabinet.
Makesurethatthefilterunitisplacedinthecorrectorientation.
7. Putthefiltercoverbacktotheprojectorcabinet.
Inserttwocatchesofthetopsideofthefiltercoverintothegrooveofthecabinet,andpushthebuttonsontheleftand right to close the filter cover.
Pushthefiltercoveruntilitclicksintoplace.
Thiscompletesthefilterreplacement.Goontotheclearinglampandfilterhourmeters.
Toclearthelampusagehoursandthefilterusagehours:1. Placetheprojectorwhereyouuseit.
2. Plugthepowercordintothewalloutlet,andthenturnontheprojector.
3. Clearthelampusagehoursandthefilterusagehours.
1. From the menu, select [RESET] → [CLEAR LAMP HOURS] and reset the lamp usage hours.
2. Select[CLEARFILTERHOURS].andresetthefilterusagehours.(→ page 117)

165
8. User Supportware❶ Installing Software Program
Installation for Windows software
ThesoftwareprogramsexceptImageExpressUtilityLiteforMacOSandPCControlUtilityPro5supportWindows8,Windows7,WindowsVista,andWindowsXP.
NOTE:• Toinstalloruninstalleachsoftwareprogram,theWindowsuseraccountmusthave“Administrator”privilege(Windows8,Win-
dows7,WindowsVista)or“ComputerAdministrator”privilege(WindowsXP).• Exitallrunningprogramsbeforeinstallation.Ifanotherprogramisrunning,theinstallationmaynotbecompleted.• TorunVirtualRemoteToolorPCControlUtilityPro4onWindows8,WindowsXPHomeEdition,andWindowsXPProfessional,
“Microsoft.NETFrameworkVersion2.0”isrequired.TheMicrosoft.NETFrameworkVersion2.0,3.0or3.5isavailablefromMicrosoft’swebpage.Downloadandinstallitonyourcomputer.
• ImageExpressUtilityLitewillbeinstalledtothesystemdriveofyourcomputer. Ifthemessage“Thereisnotenoughfreespaceondestination”isdisplayed,freeupenoughspace(about100MB)toinstallthe
program. 1 InserttheaccompanyingNECProjectorCD-ROMintoyourCD-ROMdrive.
The menu window will be displayed.
TIP:Ifthemenuwindowwillnotbedisplayed,trythefollowingprocedure.ForWindows71. Click“start”onWindows.
2. Click“AllPrograms”→“Accessories”→“Run”.
3. Type your CD-ROM drive name (example:“Q:\”) and“LAUNCHER.EXE” in“Name”. (example: Q:\LAUNCHER.EXE)
4. Click“OK”.
the menu window will be displayed.

166
8. User Supportware
2 Clickasoftwareprogramyouwishtoinstallonthemenuwindow.
The installation will start.
• Followtheinstructionsontheinstallerscreenstocompletetheinstallation.
TIP:
UninstallingaSoftwareProgramPreparation:Exit thesoftwareprogrambeforeuninstalling.Touninstall thesoftwareprogram, theWindowsuseraccountmusthave“Administrator”privilege(Windows8,Windows7,andWindowsVista)or“ComputerAdministrator”privilege(WindowsXP).
•ForWindows7/WindowsVista1 Click“Start”andthen“ControlPanel”.
The Control Panel window will be displayed.
2 Click“Uninstallaprogram”under“Programs”
The“ProgramsandFeatures”windowwillbedisplayed.
3 Selectthesoftwareprogramandclickit.
4 Click“Uninstall/Change”or“Uninstall”.
•Whenthe“UserAccountControl”windowsisdisplayed,click“Continue”.
Follow the instructions on the screens to complete the uninstallation.
•ForWindowsXP1 Click“Start”andthen“ControlPanel”.
The Control Panel window will be displayed.
2 Double-click“Add/RemovePrograms”.
TheAdd/RemoveProgramswindowwillbedisplayed.
3 Clickthesoftwareprogramfromthelistandthenclick“Remove”.
Follow the instructions on the screens to complete the uninstallation.

167
8. User Supportware
Using on Mac OS
Step 1: Install Image Express Utility Lite for Mac OS or PC Control Utility Pro 5 on the computer.
1. InserttheaccompanyingProjectorCD-ROMinyourMacCD-ROMdrive.
TheCD-ROMiconwillbedisplayedonthedesktop.
2. Double-clicktheCD-ROMicon.
The CD-ROM window will be displayed.
3. Double-clickthe“MacOSX”folder.
4. Double-click“ImageExpressUtilityLite.dmg”or“PCControlUtility.mpkg”.
The installer will start.
5. Click“Next”.
“ENDUSERLICENSEAGREEMENT”screenwillbedisplayed.
6. Read“ENDUSERLICENSEAGREEMENT”andclick“Next”.
The confirmation window will be displayed
7. Click“Iacceptthetermsinthelicenseagreement”.
Follow the instructions on the installer screens to complete the installation.
TIP:
•Uninstallingasoftwareprogram1. Putthe“ImageExpressUtilityLite”or“PCControlUtilityPro5”foldertotheTrashicon.
2. PuttheconfigurationfileofImageExpressUtilityLiteorPCControlUtilityPro5totheTrashicon.
• TheconfigurationfileofImageExpressUtilityLiteislocatedin“/Users/<yourusername>/Library/Preferences/jp.necds.Image-Express-Utility-Lite.plist”.
• TheconfigurationfileofPCControlUtilityPro5islocatedin“/Users/<yourusername>/ApplicationData/NECProjectorUserSupportware/PCControlUtilityPro5”.

168
8. User Supportware
❷ Using the Computer Cable (VGA) to Operate the Projector (Virtual Remote Tool)Usingtheutilitysoftware“VirtualRemoteTool”,VirtualRemotescreen(ortoolbar)canbedisplayedonyourcomputerscreen.Thiswillhelpyouperformoperationssuchasprojector’spoweronoroffandsignalselectionviathecomputercable(VGA),serialcable,orLANconnection.OnlyviaserialorLANconnectionitisalsousedtosendanimagetotheprojectorandregisteritasthelogodataoftheprojector.Afterregisteringit,youcanlockthelogotopreventitfromchanging.
ControlFunctionsPowerOn/Off,signalselection,picturefreeze,picturemute,audiomute,Logotransfertotheprojector,andremotecontroloperationonyourPC.
VirtualRemotescreen
RemoteControlWindow Toolbar
ThissectionprovidesanoutlineofpreparationforuseofVirtualRemoteTool.ForinformationonhowtouseVirtualRemoteTool,seeHelpofVirtualRemoteTool.(→page172)
TIP:• VirtualRemoteToolcanbeusedwithaLANandaserialconnection.• ForupdateinformationonVirtualRemoteTool,visitourwebsite: http://www.nec-display.com/dl/en/index.html
NOTE:• When[COMPUTER]isselectedfromyoursourceselection,theVirtualRemotescreenorthetoolbarwillbedisplayedaswellas
yourcomputerscreen.• Usethesuppliedcomputercable(VGA)toconnecttheCOMPUTERINconnectordirectlywiththemonitoroutputconnectorof
thecomputertouseVirtualRemoteTool. Usingaswitcherorothercablesthanthesuppliedcomputercable(VGA)maycausefailureinsignalcommunication. VGAcableconnector: PinNos.12and15arerequiredforDDC/CI.• VirtualRemoteToolmaynotworkdependingonyourcomputer’sspecificationsandversionofgraphicadaptersordrivers.• Logodata(graphics)thatcanbesenttotheprojectorwithVirtualRemoteToolhasthefollowingrestrictions: (OnlyviaserialorLANconnection)
- Filesize:Lessthan1MB- Imagesize(resolution): P501X/P451X/PE501X:Horizontal1024dots×vertical768dotsorless P451W/P401W:Horizontal1280dots×vertical800dotsorless- Numberofcolors:256colorsorless
TIP:• Theprojector’sCOMPUTERINconnectorsupportsDDC/CI(DisplayDataChannelCommandInterface).DDC/CIisastandard
interfaceforbidirectionalcommunicationbetweendisplay/projectorandcomputer.
6650/6645:6645W/6640W:

169
8. User Supportware
Step 1: Install Virtual Remote Tool on the computer
NOTE:• ToinstallVirtualRemoteTool,theWindowsuseraccountmusthave“Administrator”privilege(Windows8,Windows7,Windows
VistaandWindowsXP).• ExitallrunningprogramsbeforeinstallingVirtualRemoteTool.Ifanotherprogramisrunning,theinstallationmaynotbecom-
pleted.
1 InserttheaccompanyingNECProjectorCD-ROMintoyourCD-ROMdrive.
The menu window will be displayed.
TIP:Ifthemenuwindowwillnotbedisplayed,trythefollowingprocedure.ForWindows71. Click“start”onWindows.
2. Click“AllPrograms”→“Accessories”→“Run”.
3. Type your CD-ROM drive name (example:“Q:\”) and“LAUNCHER.EXE” in“Name”. (example: Q:\LAUNCHER.EXE)
4. Click“OK”.
the menu window will be displayed.
2 Clickasoftwareprogramyouwishtoinstallonthemenuwindow.
The installation will start.
• Followtheinstructionsontheinstallerscreenstocompletetheinstallation.
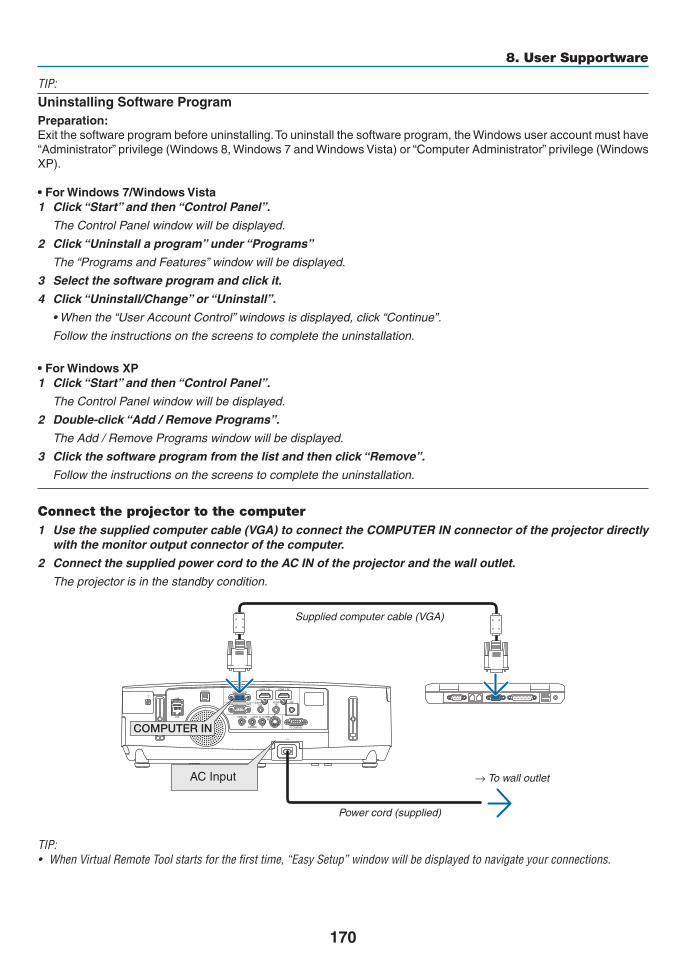
170
8. User Supportware
TIP:
UninstallingSoftwareProgramPreparation:Exitthesoftwareprogrambeforeuninstalling.Touninstallthesoftwareprogram,theWindowsuseraccountmusthave“Administrator”privilege(Windows8,Windows7andWindowsVista)or“ComputerAdministrator”privilege(WindowsXP).
•ForWindows7/WindowsVista1 Click“Start”andthen“ControlPanel”.
The Control Panel window will be displayed.
2 Click“Uninstallaprogram”under“Programs”
The“ProgramsandFeatures”windowwillbedisplayed.
3 Selectthesoftwareprogramandclickit.
4 Click“Uninstall/Change”or“Uninstall”.
•Whenthe“UserAccountControl”windowsisdisplayed,click“Continue”.
Follow the instructions on the screens to complete the uninstallation.
•ForWindowsXP1 Click“Start”andthen“ControlPanel”.
The Control Panel window will be displayed.
2 Double-click“Add/RemovePrograms”.
TheAdd/RemoveProgramswindowwillbedisplayed.
3 Clickthesoftwareprogramfromthelistandthenclick“Remove”.
Follow the instructions on the screens to complete the uninstallation.
Connect the projector to the computer1 Usethesuppliedcomputercable(VGA)toconnecttheCOMPUTERINconnectoroftheprojectordirectly
withthemonitoroutputconnectorofthecomputer.
2 ConnectthesuppliedpowercordtotheACINoftheprojectorandthewalloutlet.
The projector is in the standby condition.
ACInput
Supplied computer cable (VGA)
→ To wall outlet
Power cord (supplied)
TIP:• WhenVirtualRemoteToolstartsforthefirsttime,“EasySetup”windowwillbedisplayedtonavigateyourconnections.

171
8. User Supportware
Start Virtual Remote Tool
Startusingtheshortcuticon• Double-clicktheshortcuticon ontheWindowsDesktop.
StartfromtheStartmenu• Click[Start]→[AllPrograms]or[Programs]→[NECProjectorUserSupportware]→[VirtualRemoteTool]
→[VirtualRemoteTool].
WhenVirtualRemoteToolstartsforthefirsttime,“EasySetup”windowwillbedisplayed.
Follow the instructions on the screens
When“EasySetup”iscompleted,theVirtualRemoteToolscreenwillbedisplayed.
NOTE:• When[POWER-SAVING]isselectedfor[STANDBYMODE]fromthemenu,theprojectorcannotbeturnedonviathecomputer
cable(VGA)ornetwork(wiredLAN/wirelessLAN)connection.• When[NETWORKSTANDBY]isselectedfor[STANDBYMODE]fromthemenu,theprojectorcannotbeturnedonviawireless
LANconnection.
TIP:• TheVirtualRemoteToolscreen(orToolbar)canbedisplayedwithoutdisplaying“EasySetup”window. Todoso,clicktoplaceacheckmarkfor“ DonotuseEasySetupnexttime”onthescreenatStep6in“EasySetup”.
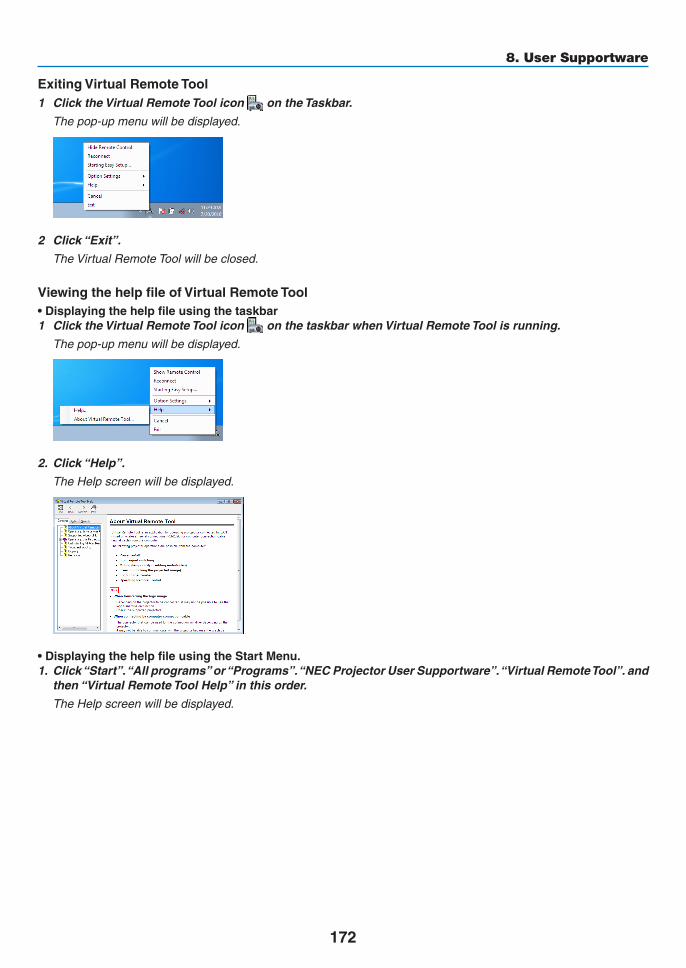
172
8. User Supportware
ExitingVirtualRemoteTool1 ClicktheVirtualRemoteToolicon ontheTaskbar.
The pop-up menu will be displayed.
2 Click“Exit”.
The Virtual Remote Tool will be closed.
ViewingthehelpfileofVirtualRemoteTool•Displayingthehelpfileusingthetaskbar1 ClicktheVirtualRemoteToolicon onthetaskbarwhenVirtualRemoteToolisrunning.
The pop-up menu will be displayed.
2. Click“Help”.
The Help screen will be displayed.
•DisplayingthehelpfileusingtheStartMenu.1. Click“Start”.“Allprograms”or“Programs”.“NECProjectorUserSupportware”.“VirtualRemoteTool”.and
then“VirtualRemoteToolHelp”inthisorder.
The Help screen will be displayed.

173
8. User Supportware
❸ Projecting Your Computer’s Screen Image or Video from the Projector over a LAN (Image Express Utility Lite) (not supported by PE501X) UsingImageExpressUtilityLitecontainedonthesuppliedNECProjectorCD-ROMallowsyoutosendthecomputer’sscreenimagetotheprojectoroveraUSBcableorawiredorwirelessLAN.ImageExpressUtilityLiteisaprogramcompatiblewithWindows.ImageExpressUtilityLiteforMacOSisaprogramcompatiblewithMacOS.(→page179)ThissectionwillshowyouanoutlineabouthowtoconnecttheprojectortoaLANandtouseImageExpressUtilityLite.FortheoperationofImageExpressUtilityLite,seethehelpofImageExpressUtilityLite.
Step1:installImageExpressUtilityLiteonthecomputer.Step2:ConnecttheprojectortoaLAN.Step3:StartImageExpressUtilityLite.
TIP:• ImageExpressUtilityLite(forWindows)canbestartedfrommostcommerciallyavailableremovablemediasuchasUSBmemory
devicesorSDcardswithouttheneedtoinstallonyourcomputer.(→page178)
What You can Do with Image Express Utility Lite
•Imagetransmission(forWindowsandMacOS)• Thescreenofyourcomputercanbesenttotheprojectorviaawiredorwirelessnetworkwithoutacomputercable
(VGA).
• Byusing“EASYCONNECTION”function,thecomplicatednetworksettingscanbesimplifiedandthecomputerwillautomaticallyconnecttotheprojector.
• Thescreenofyourcomputercanbesenttouptofourprojectorsatthesametime.
•Audiotransfercapability(forWindowsonly)• ImageExpressUtilityLiteallowsyoutosendthecomputer’sscreenimageandaudiototheprojectoroverwired/
wirelessLANorUSBconnection.
• Audio transfercapability isavailableonlywhen thecomputerconnectswith theprojector inpeer-to-peernet-work.
•Playingstreamingvideo(forWindowsonly)• ImageExpressUtilityLiteallowsyoutosendstreamingvideofromthecomputertoasingleprojectoroverwired
orwirelessLANwithouttheneedofconnectingacomputercable.Forlistofsupportedmoviefilesandplaybackrequirements,seepage59of“4.UsingtheViewer”.
•USBDisplay(forWindowsonly)• Computer’sscreen imageandaudiocanbeprojectedviaaUSBcable,withoutconnectingacomputercable
(VGA).
• JustconnectingthecomputerandtheprojectoroveraUSBcablewillmaketheUSBDisplayfunctionavailable(Plug&Play)evenwithoutinstallingImageExpressUtilityLiteonthecomputer.(→page40)
•GeometricCorrectionTool[GCT](forWindowsonly)See“❹Projectingan Image fromanAngle (GeometricCorrectionTool in ImageExpressUtilityLite)”. (→ page180)
NOTE:• WhenImageExpressUtilityLiteisused,theaudiofromtheCOMPUTERAUDIOINMiniJack(StereoMini)maynotbesynchro-
nizedwiththevideo.

174
8. User Supportware
Using on Windows
Step 1: install Image Express Utility Lite on the computer.
NOTE:• Toinstalloruninstalltheprogram,theWindowsuseraccountmusthave“Administrator”privilege(Windows7,WindowsVista
andWindowsXP).• Exitallrunningprogramsbeforeinstallation.Ifanotherprogramisrunning,theinstallationmaynotbecompleted.• ImageExpressUtilityLitewillbeinstalledtothesystemdriveofyourcomputer. Ifthemessage“Thereisnotenoughfreespaceondestination”isdisplayed,freeupenoughspace(about100MB)toinstallthe
program.
1. InserttheaccompanyingNECProjectorCD-ROMintoyourCD-ROMdrive.
The menu window will be displayed.
TIP:Ifthemenuwindowwillnotbedisplayed,trythefollowingprocedure.ForWindows7:1.Click“start”onWindows.
2.Click“AllPrograms”→“Accessories”→“Run”.
3. TypeyourCD-ROMdrivename(example:“Q:\”)and“LAUNCHER.EXE”in“Name”.(example:Q:\LAUNCH-ER.EXE)
4. Click“OK”.
The menu window will be displayed.
2. Click“InstallingImageExpressUtilityLite”onthemenuwindow.
The installation will start.
“ENDUSERLICENSEAGREEMENT”screenwillbedisplayed.
Read“ENDUSERLICENSEAGREEMENT”carefully
3. Ifyouagree,click“Iagree.”andthenclick“Next”.
• Followtheinstructionsontheinstallerscreenstocompletetheinstallation.
• Whentheinstallationiscomplete,youwillreturntothemenuwindow.
When the installation is complete, a completion message will be displayed.
4. Click“OK”.
This completes the installation.
TIP:•UninstallingImageExpressUtilityLiteTouninstallImageExpressUtilityLite,dothesameproceduresstatedasin“UninstallingVirtualRemoteTool”.Read“VirtualRemoteTool”as“ImageExpressUtilityLite”(→page170)

175
8. User Supportware
Step 2: Connect the projector to a LAN.ConnecttheprojectortotheLANbyfollowingtheinstructionsin“ConnectingtoaWiredLAN”(→page151),“Con-nectingtoaWirelessLAN(Optional:NP02LMseries)”(→page152)and“9.ControllingtheProjectorbyUsinganHTTPBrowser”(→page42)
Step 3: Start Image Express Utility Lite.1. OnWindows,click“Start”→“Allprograms”→“NECProjectorUserSupportware”→“ImageExpressUtility
Lite”→“ImageExpressUtilityLite”.
ImageExpressUtilityLitewillstart.
Theselectwindowfornetworkconnectionwillbedisplayed
2. SelectNetworkandclick“OK”.
The select window for destination will show a list of connectable projectors.
• Whenconnectingthecomputerdirectlytotheprojectorbyone-to-one,“EasyConnection”isrecommended.
• Whenoneormorenetworksfor“EASYCONNECTION”arefound,the“EasyConnectionSelectionScreen”windowwillbedisplayed.
• Tocheckforthenetworkavailableforconnectedprojectors,fromthemenu,select[INFO.]→[WIRELESSLAN]→[SSID].
3. Selectthenetworkyouwishtoconnect,andclick“Select”.
The target selection window will be displayed.
4. Placeacheckmarkforprojectorstobeconnected,andthenclick“Connect”.
• Whenoneormoreprojectorsaredisplayed,fromthemenuontheprojector,select[INFO.]→[WIRELESSLAN]→[IPADDRESS].
When connecting with the projector is established, you can operate the control window to control the projector. (→ page 41, 176)
NOTE:• When[POWER-SAVING]or[NETWORKSTANDBY]isselectedfor[STANDBYMODE]fromthemenu,theprojectorthatisturned
offwillnotbedisplayedintheselectwindowfordestination.

176
8. User Supportware
5. Operatethecontrolwindow.
(1) (Streaming) Displays the streaming window� Movie files on the PC can be transferred to the projector via the network and played on the projector� Refer to “Movie streaming function” in the help file of Image Express Utility Lite�
(2) (Source) ����� Selects an input source of the projector� (3) (Picture) ���� Turns on or off AV-MUTE (Picture mute), and turns on or off FREEZE (Freeze a picture)�(4) (Sound) ����� Turns on or off AV-MUTE (Sound mute), play the sound and turns up or down the volume�(5) (Others) ����� Uses “Update”, “HTTP Server”*, “Settings” and “Information”�
* The HTTP Server cannot be selected when a USB cable is connected�
(6) (Exit) ���������� Exit Image Express Utility Lite� You can also turn off the projector at the same time�(7) (Help) ����������� Displays the help of Image Express Utility Lite�
(1) (2) (3) (4) (5)(7) (6)

177
8. User Supportware
TIP:
Viewingthe“Help”fileofImageExpressUtilityLite• DisplayingtheHelpfileofImageExpressUtilityLitewhileitisrunning.
Clickthe[?](help)icononthecontrolwindow.
The Help screen will be displayed.
• DisplayingtheHelpfileofGCTwhileitisrunning.
Click“Help”→“Help”ontheeditwindow.
The Help screen will be displayed.
• DisplayingthehelpfileusingtheStartMenu.
Click“Start”→“Allprograms”or“Programs”→“NECProjectorUserSupportware”→“ImageExpressUtilityLite”→“ImageExpressUtilityLiteHelp”.
The Help screen will be displayed.

178
8. User Supportware
Starting Image Express Utility Lite from a USB Memory or SD CardImageExpressUtilityLitecanbestartedfromcommerciallyavailableremovablemediasuchUSBmemoryorSDcardsifitiscopiedbeforehand.ThiswilleliminatethetroubleofinstallingImageExpressUtilityLitetoyourcomputer.1. CopyImageExpressUtilityLitetoremovablemedia.
Copyallthefoldersandfiles(totalsizeapprox.6MB)fromthe“IEU_Lite(removable-media)”folderinthesuppliedProjector CD-ROM to the root directory of your removable media.
2. Insertyourremovablemediaintoyourcomputer.
The“AutoPlay”screenwillbedisplayedonyourcomputer.
TIP:• Ifthe“AutoPlay”screenisnotdisplayed,openthefolderfrom“Computer”(“MyComputer”forWindowsXP).
3. Click“Openfoldertoviewfiles”
TheIEU_Lite.exe,otherfolder,andfileswillbedisplayed.
4. Double-clickthe“IEU_Lite.exe”( ) icon.
ImageExpressUtilityLitewillstart.
NOTE:• The“EASYCONNECTION”functionisnotsupportedwhenImageExpressUtilityLiteisstartedfromremovablemedia.

179
8. User Supportware
Using on Mac OS
Step 1: Install Image Express Utility Lite for Mac OS on the computer1. InserttheaccompanyingProjectorCD-ROMinyourMacCD-ROMdrive.
TheCD-ROMiconwillbedisplayedonthedesktop.
2. Double-clicktheCD-ROMicon.
The CD-ROM window will be displayed.
3. Double-clickthe“MacOSX”folder.
4. Double-click“ImageExpressUtilityLite.dmg”.
The“ImageExpressUtilityLite”windowwillbedisplayed.
5. Draganddropthe“ImageExpressUtilityLite”foldertoyourApplicationsfolderinMacOS.
Step 2: Connect the projector to a LANConnecttheprojectortotheLANbyfollowingtheinstructionsin“ConnectingtoaWiredLAN”(→page151),“Con-nectingtoaWirelessLAN(Optional:NP02LMseries)”(→page152)and“❾ControllingtheProjectorbyUsinganHTTPBrowser”(→page42)
Step 3: Start Image Express Utility Lite for Mac OS1. OpenyourApplicationsfolderinMacOS.
2. Double-clickthe“ImageExpressUtilityLite”folder.
3. Double-clickthe“ImageExpressUtilityLite”icon.
WhenImageExpressUtilityLiteforMacOSstarts,theselectwindowfordestinationwillbedisplayed.
• At thefirst timeofstartup,“ENDUSERLICENSEAGREEMENT”screenwillbedisplayedbeforetheselectwindow for destination is displayed.
Read“ENDUSERLICENSEAGREEMENT”andselect“Iacceptthetermsinthelicenseagreement”,andclick“OK”.
4. Selectaprojectortobeconnected,andthenclick“Connect”.
Yourdesktopscreenwillbedisplayedontheprojector.
TIP:ViewingtheHelpofImageExpressUtilityLiteforMacOS• Fromthemenubar,click“Help”→“ImageExpressUtilityLiteHelp”whileImageExpressUtilityisrun-
ning.
The Help screen will be displayed

180
8. User Supportware
❹ Projecting an Image from an Angle (Geometric Correction Tool in Image Express Utility Lite) TheGeometricCorrectionTool (GCT) functionallowsyou tocorrectdistortionof imagesprojectedeven fromanangle.
What you can do with GCT
• TheGCTfeatureincludesthefollowingthreefunctions
• 4-pointCorrection:Youcanfitaprojectedimagewithintheborderofthescreeneasilybyalignthefourcornersofanimagetotheonesofthescreen.
• Multi-pointCorrection:Youcancorrectadistortedimageonthecornerofawallorirregularshapedscreenbyusingmanyseparatedscreenstocorrecttheimageaswellas4-pointCorrection.
• Parameters Correction:Youcancorrectadistortedimagebyusingacombinationoftransformationalrulespreparedinadvance.
Thissectionwillshowanexampleforusewith4-pointCorrection.Forinformationabout“Multi-pointCorrection”and“ParametersCorrection”,seethehelpfileofImageExpressUtilityLite.(→page177, 179)
• Yourcorrectiondatacanbestoredintheprojectororyourcomputerwhichcanberestoredwhennecessary.
• TheGCTfunctionisavailablewithaUSBcable,wiredorwirelessLANconnection,andvideocable.
Projecting an Image from an Angle (GCT)ThissectionwillshowanexampleforusewithUSBDisplay(usingaUSBcabletoconnectacomputerandthepro-jector).• TheUSBDisplayfunctionwillautomaticallydisplaythecontrolwindow
• ForavideocableorLANconnection,installandstartImageExpressUtilityLiteinyourcomputerbeforehand.(→ page173)
Preparation:Adjusttheprojectorpositionorthezoomsothattheprojectedimagecancoverthewholescreenarea.
1. Clickthe“ ”(Picture)iconandthenthe“ ”button.
The“4-pointCorrection”windowwillbedisplayed.
2. Clickthe“StartCorrection”buttonandthen“Start4-pointCorrection”button.
A green frame and a mouse pointer ( ) will be displayed.
• Four[•]markswillbeappearedatfourcornersofthegreenframe

181
8. User Supportware
3. Usethemousetoclickthe[•]markofwhichcorneryouwishtomove.
The currently selected [ •]markwillturnred.
(Intheaboveexample,Windowsscreensareomittedforclarification.)
4. Dragtheselected[•]marktothepointyouwishtocorrectanddropit.
• Whenyouclicksomewherewithintheprojectimagearea,thenearest[•]markwillgotothepositionwherethe mouse cursor is.
5. RepeatStep3and4tocorrectthedistortionoftheprojectedimage.
6. Aftercompleting,right-clickthemouse.
The green frame and the mouse pointer will disappear from the projected image area. This will complete the cor-rection.
7. Clickthe“X”(close)buttononthe“4-pointCorrection”window.
The“4-pointCorrection”windowwilldisappearandthe4-pointcorrectionwilltakeeffect.
8. Clickthe“ ”buttononthecontrolwindowtoexittheGCT.
TIP:• Afterperformingthe4-pointcorrection,youcansavethe4-pointcorrectiondatatotheprojectorbyclicking“File”→“Exportto
theprojector…”onthe“4-pointCorrection”window.• SeetheHelpofImageExpressUtilityLiteforoperating“4-pointCorrection”windowandotherfunctionsthanGCT.(→page177,
179)

182
8. User Supportware
❺ Projecting Images from the Projector over a LAN (Image Express Utility 2.0)
What you can do with Image Express Utility 2.0
• UsingImageExpressUtility2.0allowsyoutosendthescreensofyourcomputerstotheprojectorviawired/wire-lessLAN.
ThedifferencefromImageExpressUtilityLiteisthatprojectedimagescanbesentfromacomputertonotonlyoneprojectorbutalsototwoormoreprojectorsatthesametime.
When“MeetingMode”isused,projectedimagescanbesentandreceivedbetweentwoormorecomputers.
• High-speed,high-qualityimagetransmissionsbasedonNEC’soriginalcompressionalgorithm
NEC’soriginalcompressionalgorithmallowshigh-qualityimagestobesentoverthenetworkathighspeed,fromyourcomputertotheprojector.
• Simultaneousprojectionbymultipleprojectors
Imagescanbesentfromacomputertonotonlyoneprojectorbutalsototwoormoreprojectorsatthesametime.
• “EasyConnection”functionforconnectingwirelessLAN
Byusing“EasyConnection”function*1,thecomplicatedsettingofwirelessLANcanbesimplified.
*1 ThisfunctioncanbeusedwhenWindowsXPisusedastheOSandwhenyouhavea“ComputerAdminis-trator”privilege.IftheOSisWindows7/WindowsVista,inputoflogonpasswordas“Administrator”maybeprompted.

183
8. User Supportware
• Projectedimagescanbetransferredandsavedtocomputers.
When“MeetingMode”isused,projectedimagescanbesenttothecomputersofalltheparticipants(attendants)ofa“Meeting”.Thereceivedimagescanbesavedtoyourcomputerwithamemo(textdata)attached.
Presenter
Attendant
Attendant
Attendant
• 1-clickswitchingofpresenter
Whenswitchingtoanotherpresenterduringtheconference,theparticipants(attendants)cansimplyclickabuttontoswitchovertothenewpresenter.
• Centralmanagementoftheprojectingcomputer
UsingtheTrainingModeallowsyoutouseasinglecomputer(Manager)tomanagewhichcomputer(Attendant)projects.Possibleoperationincludesswitchingprojectingcomputerstoprojectfrom,aswellastemporarilytermi-natingcommunicationwiththeprojector.
Attendant D (presenter)
Manager
Attendant B Attendant C
Mr� D, please start your presentation�
Attendant A
NOTE::TheTrainingModeisnotinstalledviathe“Typical”installationoptionwhenImageExpressUtility2.0isinstalled.TouseTrainingMode,select“Extension”installationoptionontheinstallselectionscreenthatisdisplayedwhileImageExpressUtility2.0installationisinprogress,andselect“TrainingMode(Attendant)”or“TrainingMode(Manager)”.
Connecting the projector to a LANConnecttheprojectortotheLANbyfollowingtheinstructionsin“ConnectingtoaWiredLAN”(→page151),“Con-nectingtoaWirelessLAN”(→page152)and“9ApplicationMenus”(→page118)

184
8. User Supportware
Basic Operation of Image Express Utility 2.0ThissectionexplainsthefollowingthreecasesasexamplesofoperatingImageExpressUtility2.0.
(1)Transferringimagestotheprojector
(2)Holdingaconference
(3)Participatinginaconference
SendingImagestoProjector•Connectingprojector1 TurnonthepowertotheprojectorforwhichLANhasbeenset.
2 ClickWindows[Start]→[AllPrograms]→[NECProjectorUserSupportware]→[ImageExpressUtility2.0]→[ImageExpressUtility2.0],inthatorder.
The“SelectionOfNetworkConnections”windowwillbedisplayed.
Alistofthenetworkequipmentconnectedtoyourcomputerwillbedisplayed.
IMPORTANT:AscreenliketheonebelowisdisplayedwhenthesoftwareisstartedonaPCinstalledwithWindowsXPServicePack2(SP2)(orlater).Click“Unblock”ifthisisdisplayed.
3 Selectthenetworkequipmentthatistobeusedandclick[OK].
Selectthenetworkdevicedisplaying“EasyConnection”iftheproductLANsettingisfor“EasyConnection.”Thiswillcallupthe“ProjectorList”window.
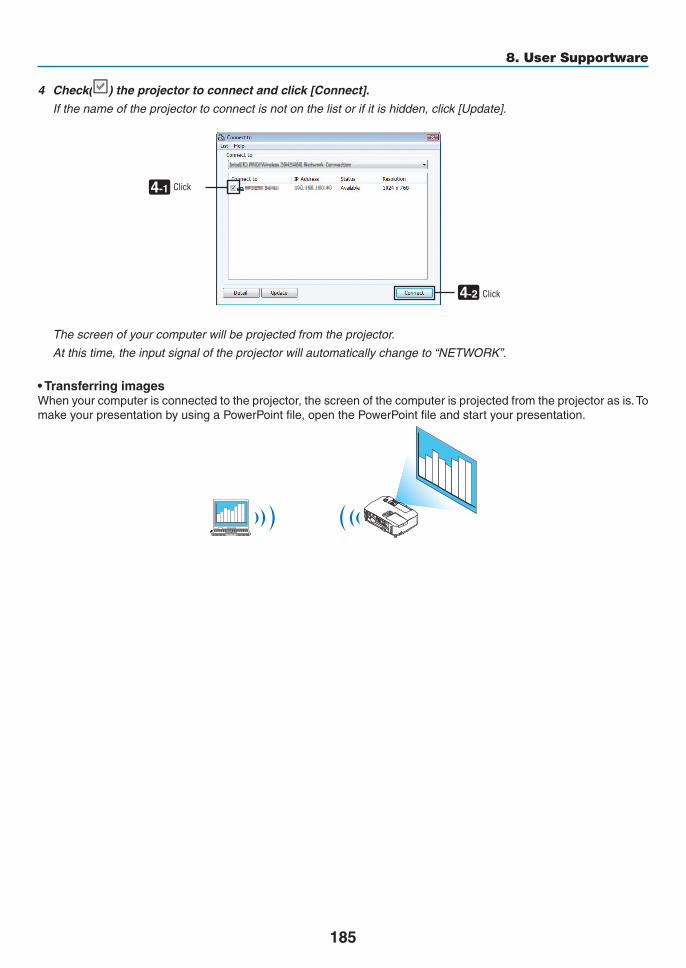
185
8. User Supportware
4 Check( )theprojectortoconnectandclick[Connect].
Ifthenameoftheprojectortoconnectisnotonthelistorifitishidden,click[Update].
4-1
4-2
Click
Click
The screen of your computer will be projected from the projector.
Atthistime,theinputsignaloftheprojectorwillautomaticallychangeto“NETWORK”.
•TransferringimagesWhenyourcomputerisconnectedtotheprojector,thescreenofthecomputerisprojectedfromtheprojectorasis.TomakeyourpresentationbyusingaPowerPointfile,openthePowerPointfileandstartyourpresentation.

186
8. User Supportware
•StoppingorresumingthetransmissionofimagesThetransmissionofthescreenofthecomputertotheprojectorcanbetemporarilystoppedandthenresumed.
1 Clicktheprojectoricon( )ontheWindowstaskbar.
A pop-up menu will be displayed.
2 Click[StopSending].
Theprojectoricononthetaskbarwillchange( → ).
NOTE:Evenifthescreenofthecomputerischangedinthisstatus,theimageprojectedfromtheprojectordoesnotchange.Tomanipulatethescreenthatshouldnotbedisclosed(projectedfromtheprojector),stoptransmission.
3 Clicktheprojectoricon( )ontheWindowstaskbar.
A pop-up menu will be displayed.
4 Click[StartSending].
Theprojectoricononthetaskbarwillchange( → ).
The transmission of the screen for the computer will be resumed, and the current screen of the computer will be projected from the projector.
•EndthetransmissionofimagesExitImageExpressUtility2.0.
1 Clicktheprojectoricon( )ontheWindowstaskbar.
A pop-up menu will be displayed.
2 Click[Exit].

187
8. User Supportware
HoldingConferences•Holdingconferences1 Followsteps1through4in“Connectingprojector”of“SendingImagestoProjector”(→page184).
The screen of your computer will be projected from the projector.
•Discloseafiletotheparticipantsoftheconference.
NOTE:Todiscloseafiletotheparticipants,selectioncanbemadeonlyinfolderunits.Therefore,afolderonlyhavingfilesthatcanbedisclosedtotheparticipantsmustbecreatedinadvance.
1 Clicktheprojectoricon( )ontheWindowstaskbar.
A pop-up menu will be displayed.
2 Beforeclicking[SendtoPCandProjector],checkthatthereisa“•”markapplied.
3 Clickthe[ImageExpressUtility2.0]buttononthetaskbar.
The presenter window will be opened.
4 Click[SelectFolder].
4 Click

188
8. User Supportware
5 Selectafoldersavingthefiletobedisclosedtotheparticipants,andclick[OK].
The file in the selected folder will be displayed in the list of files to transfer.
6 Click[Download].
The file will be shown to the participants.
NOTE:Whenthecomputerisconnectedtotheprojector,thecomputerscreenthatisinofbeingprogressisalsoprojectedfromtheprojec-tor.Tomanipulateascreenthatshouldnotbeshown(notprojected),temporarilystopthetransmission(→page186).
•Endingconference1 Click[File]inthepresenterwindow,andclick[Exit].
Youcanalsoendtheconferencebyclicking[×]attheupperrightofthepresenterwindow.
ParticipatinginConference•Participatinginconferences1 ClickWindows[Start]→[AllPrograms]→[NECProjectorUserSupportware]→[ImageExpressUtility2.0]
→[ImageExpressUtility2.0],inthatorder.
The“SelectionOfNetworkConnections”windowwillbedisplayed.
Alistofthenetworkequipmentconnectedtoyourcomputerwillbedisplayed.
IMPORTANT:AscreenliketheonebelowisdisplayedwhenthesoftwareisstartedonaPCinstalledwithWindowsXPServicePack2(SP2)(orlater).Click“Unblock”ifthisisdisplayed.
2 Selectthenetworkequipmentthatistobeusedandclick[OK].
Selectthenetworkdevicedisplaying“EasyConnection”iftheproductLANsettingisfor“EasyConnection.”Thiswillcallupthe“MeetingList”window.

189
8. User Supportware
3 ClicktheMeetingNametoparticipate,andclick[Connect].
3 Click
The computer will be connected to the selected conference and the attendant window will be displayed.
Ifthepresenterselects“SendtoPCAndProjector”,theimageprojectedfromtheprojectorisdisplayedintheat-tendant window.
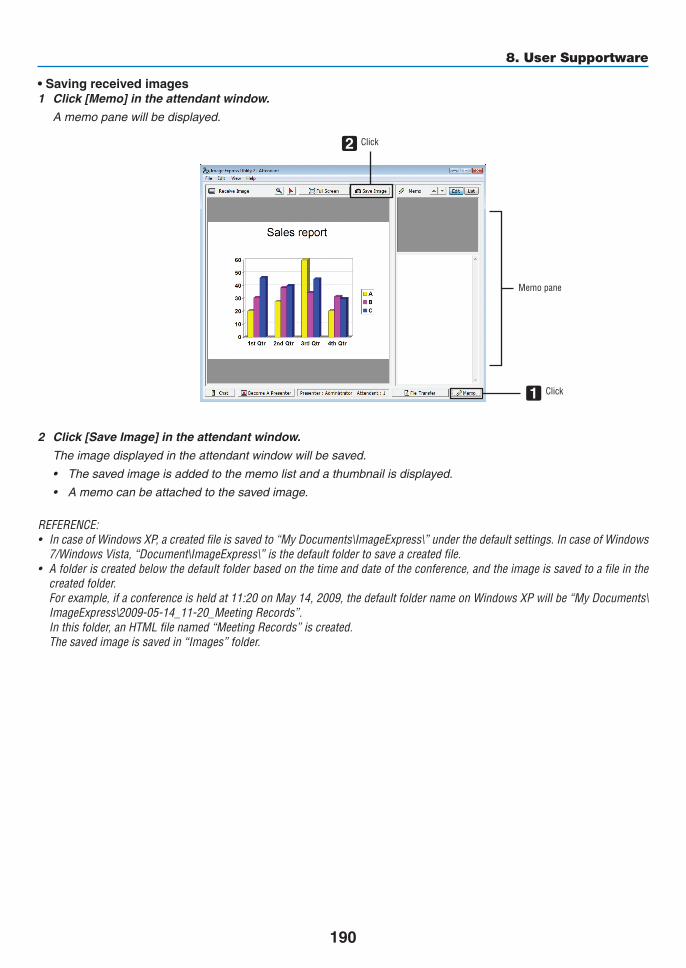
190
8. User Supportware
•Savingreceivedimages1 Click[Memo]intheattendantwindow.
A memo pane will be displayed.
2
1
Click
Memo pane
Click
2 Click[SaveImage]intheattendantwindow.
The image displayed in the attendant window will be saved.
• Thesavedimageisaddedtothememolistandathumbnailisdisplayed.
• Amemocanbeattachedtothesavedimage.
REFERENCE:• IncaseofWindowsXP,acreatedfileissavedto“MyDocuments\ImageExpress\”underthedefaultsettings.IncaseofWindows
7/WindowsVista,“Document\ImageExpress\”isthedefaultfoldertosaveacreatedfile.• Afolderiscreatedbelowthedefaultfolderbasedonthetimeanddateoftheconference,andtheimageissavedtoafileinthe
createdfolder. Forexample,ifaconferenceisheldat11:20onMay14,2009,thedefaultfoldernameonWindowsXPwillbe“MyDocuments\
ImageExpress\2009-05-14_11-20_MeetingRecords”. Inthisfolder,anHTMLfilenamed“MeetingRecords”iscreated. Thesavedimageissavedin“Images”folder.

191
8. User Supportware
•Downloadingdisclosedfile1 Click[FileTransfer]intheattendantwindow.
The“FileTransfer”windowwillbeopened.
1 Click
2 Selectafiletodownload,andclick[Download].
Downloading will begin.
The progress of the downloading is displayed at the lower left of the window.
3 Whendownloadingiscomplete,click[File]inthe“FileTransfer”window,andclick[Exit].
The“FileTransfer”windowwillbeclosed.
REFERENCE:• If“OpenAfterDownloading”ischecked,thefileisopenedbyspecifiedWindowsapplicationsoftwareafterdownloadingiscom-
plete.• IncaseofWindowsXP,acreatedfileissavedto“MyDocuments\ImageExpress\”underthedefaultsettings.IncaseofWindows
7/WindowsVista,“Document\ImageExpress\”isthedefaultfoldertosaveacreatedfile.• Afolderiscreatedbelowthedefaultfolderbasedonthetimeanddateoftheconference,andtheimageissavedtoafileinthe
createdfolder. Forexample,ifaconferenceisheldat11:20onMay14,2009,thedefaultfoldernameonWindowsXPwillbe“MyDocuments\
ImageExpress\2009-05-14_11-20_MeetingRecords”.

192
8. User Supportware
•ChangingpresenterThreetypesofsettingsmaybemadetochangethepresenter:“NotApproved”,“Approved”,and“ChangingProhibited”(thesecanbeselectedonlybythepresenter).Inthefollowingexample,“NotApproved”isselected.• Click[BecomeAPresenter]intheattendantwindow.
You will change from a participant to a presenter.
1 Click
•LeavingconferenceLeavetheconferenceandexitImageExpressUtility2.0.• Click[File]intheattendantwindow,andclick[Exit].
Youcanalsoleavetheconferencebyclicking[×]attheupperrightoftheattendantwindow.
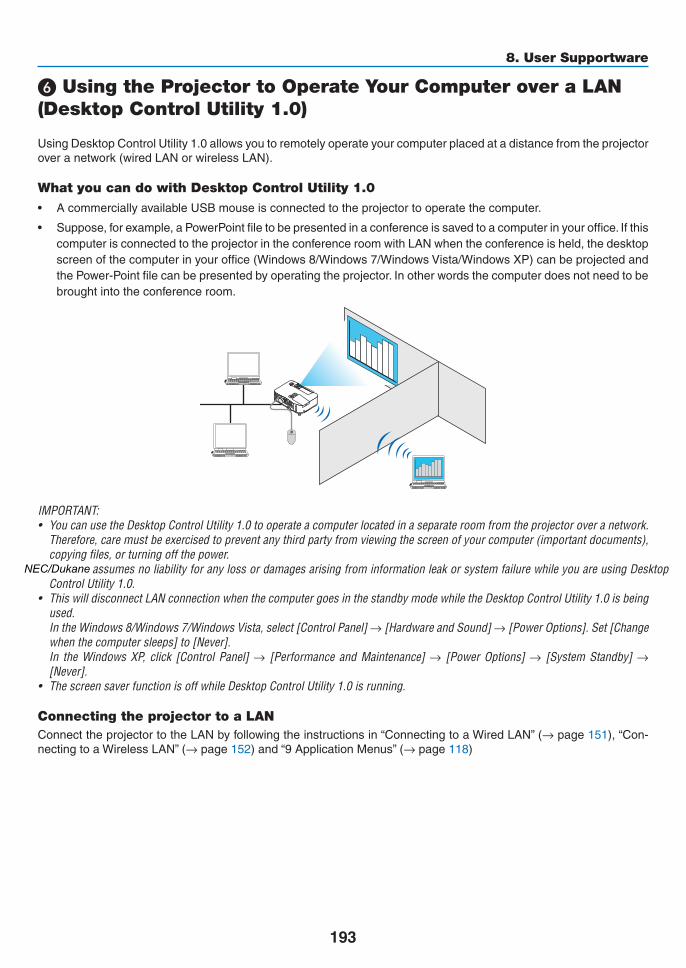
193
8. User Supportware
❻ Using the Projector to Operate Your Computer over a LAN (Desktop Control Utility 1.0)
UsingDesktopControlUtility1.0allowsyoutoremotelyoperateyourcomputerplacedatadistancefromtheprojectoroveranetwork(wiredLANorwirelessLAN).
What you can do with Desktop Control Utility 1.0
• AcommerciallyavailableUSBmouseisconnectedtotheprojectortooperatethecomputer.
• Suppose,forexample,aPowerPointfiletobepresentedinaconferenceissavedtoacomputerinyouroffice.IfthiscomputerisconnectedtotheprojectorintheconferenceroomwithLANwhentheconferenceisheld,thedesktopscreenofthecomputerinyouroffice(Windows8/Windows7/WindowsVista/WindowsXP)canbeprojectedandthePower-Pointfilecanbepresentedbyoperatingtheprojector.Inotherwordsthecomputerdoesnotneedtobebroughtintotheconferenceroom.
IMPORTANT:• YoucanusetheDesktopControlUtility1.0tooperateacomputerlocatedinaseparateroomfromtheprojectoroveranetwork.
Therefore,caremustbeexercisedtopreventanythirdpartyfromviewingthescreenofyourcomputer(importantdocuments),copyingfiles,orturningoffthepower.
NECassumesnoliabilityforanylossordamagesarisingfrominformationleakorsystemfailurewhileyouareusingDesktopControlUtility1.0.
• ThiswilldisconnectLANconnectionwhenthecomputergoesinthestandbymodewhiletheDesktopControlUtility1.0isbeingused.
IntheWindows8/Windows7/WindowsVista,select[ControlPanel]→[HardwareandSound]→[PowerOptions].Set[Changewhenthecomputersleeps]to[Never].
In the Windows XP, click [Control Panel]→ [Performance and Maintenance]→ [Power Options]→ [System Standby]→[Never].
• ThescreensaverfunctionisoffwhileDesktopControlUtility1.0isrunning.
Connecting the projector to a LANConnecttheprojectortotheLANbyfollowingtheinstructionsin“ConnectingtoaWiredLAN”(→page151),“Con-nectingtoaWirelessLAN”(→page152)and“9ApplicationMenus”(→page118)
NEC/Dukane

194
8. User Supportware
Using the projector to operate your computer’s desktop screen
IMPORTANT:• IncaseofWindows8/Windows7/WindowsVista,disabletheuseraccountcontrolbeforeusingDesktopControlUtility1.0. WindowsVistahas“UserAccountControl”functiontoprotectthecomputer.Theuseraccountconfirmationwindowmaybe
displayed. SinceDesktopControlUtility1.0cannottransfertheuseraccountconfirmationwindow,thiswindowmakestheoperationun-
available.BeforeusingDesktopControlUtility1.0,itisnecessarytodisabletheuseraccountcontrolofWindows8/Windows7/WindowsVista.Afterloggingonwiththeadministratoraccount,followtheprocedurebelowtochangethesetting:
[ChangeProcedure]<ForWindows8/Windows7>1 Click[ControlPanel].
2 Click[UserAccountsandFamilySafety](Windows8only).
3 Click[UserAccounts].
4 Click[ChangeUserAccountControlsettings].
5 Change[Choosewhentobenotifiedaboutchangestoyourcomputer]to[Nevernotify]andclick[OK].
• Ifrestartingisrequested,click[Restartnow].
<ForWindowsVista>1 Click[ControlPanel]fromtheStartMenu.
2 Click[UserAccountsandFamilySafety].
3 Click[UserAccount].
4 Click[Enable/DisableUserAccountControl].
5 Remove the checkmark for [Use User Account Control (UAC) to Help Computer Protection] and click[OK].
• Ifrebootingisrequested,click[RebootNow].
UponcompletionofDesktopControlUtility,itisrecommendedtoenabletheuseraccountcontrol.

195
8. User Supportware
•Operationoncomputer1 ClickWindows[Start]→[AllPrograms]→[NECProjectorUserSupportware]→[DesktopControlUtility
1.0]→[DesktopControl],inthatorder.
The“SelectionOfNetworkConnections”windowisdisplayed.
Thisdisplaysalistofthenetworkdevicesconnectedtothecomputeryouareusing.
2 Selectthenetworkdevicetouseandclick[OK].
The“Startuppasswordsettings”windowwillbedisplayed.
• IncaseofWindows7/WindowsVista,theUserAccountControlWindowisdisplayed.Click[OK]orinputtheadministrator password.
ScreenwhenDesktopControlUtility1.0isstartedfirsttimealready
Screen if starting password has been set
IMPORTANT:• Besuretowritedownthestartingpasswordincaseyouforgetit.• ThestartingpasswordmustbeinputeachtimeDesktopControlUtility1.0isstarted.• Shouldyouforgetthestartingpassword,reinstalltheDesktopControlUtility1.0.AscreenliketheonebelowisdisplayedwhenthesoftwareisstartedonaPCinstalledwithWindowsXPServicePack2(SP2)(orlater).Click“Unblock”ifthisisdisplayed.

196
8. User Supportware
3 InputthestartingpasswordofDesktopControlUtility1.0,andclick[OK].
The“Currentpassword”windowwillbedisplayed.
NOTE:ThecharacterstringdisplayedinthepasswordfieldvarieseachtimeDesktopControlUtility1.0isstarted.
4 Writedownthecharacterstringdisplayedinthepasswordfield.
Writedown“PMHN”inthescreenexampleofstep3.
5 Click[OK].
DesktopControlUtility1.0willbestarted.
Move to the room where the projector is installed, with the paper on which you have written down the password in step 4.

197
8. User Supportware
•Operatingtheprojector(connectingcomputer)1 ConnectaUSBmousethatiscommerciallyavailabletotheprojector.
USB
2 Turnonthepowertotheprojector.
Set the LAN setting of the projector in advance.
3 PresstheSOURCEbuttonontheprojectorunit.
The Source list will be displayed.
Incaseoftheremotecontrol,presstheNETWORKbutton.
The“networkmenu”screenwillbedisplayed,proceedtostep5.
4 PresstheSELECT▼/▲buttonstoselect[NETWORK],andthenpresstheENTERbutton.
The“networkmenu”screenwillbedisplayed.
• TheremainingoperationscanbeperformedusingaUSBmouseconnectedtotheprojector.

198
8. User Supportware
5 Click[DESKTOPCONTROLUTILITY].
The“DESKTOPCONTROLUTILITYmenu”screenwillbedisplayed.
6 Click“ENTRY”.
A password input screen will be displayed.
7 Inputthepasswordyouhavewrittendowninstep4of“Operationoncomputer”.
• Clickthe[BS]buttonontherightsideofthe[PASSWORD]fieldtodeletethecharactertotheleftofthecharacterinsertion point.
8 Afterinputtingthepassword,clickthe buttonontherightsideofthe[PASSWORD]field.
Youarereturnedtothe“DESKTOPCONTROLUTILITY”menuscreen.
9 Click[COMPUTERSEARCH].
The“COMPUTERLIST”screenwillbedisplayed.
IftheconnectiondestinationhasnotbeenfoundasaresultofaCOMPUTERSEARCH,searchfortheconnectiondestinationbyinputtingtheIPaddressofthecomputerattheconnectiondestination,click“InputIPAddress”.

199
8. User Supportware
10Clickthecomputerattheconnectiondestinationandthen[OK].
Thedesktopscreenofthecomputerattheconnectiondestinationwillbedisplayed.
•Operatingtheprojector(manipulatingdesktopscreen)ThedisplayeddesktopscreencanbemanipulatedbyusingtheUSBmouseconnectedtotheprojector.IftheEXITbuttonoftheprojectororremotecontrolispressedwhilethedesktopscreenisdisplayed,anauxiliaryoperationbarisdisplayedatthelowerleftofthescreen.Manipulatetheauxiliaryoperationbarbyusingthebuttonsoftheprojectororremotecontrol.

200
8. User Supportware
<1> <2> <3> <4>
<1> (cut-off icon) �������Disconnects communication with the computer�
<2> (Shift icon) ����������When the highlight is moved to this icon and the ENTER button is pressed, shift lock status is set� The shift lock is canceled if the highlight is moved to this icon and the ENTER button is pressed again�
<3> (Ctrl icon) ������������When the highlight is moved to this icon and the ENTER button is pressed, control lock status is set� The control lock is canceled if the highlight is moved to this icon and the ENTER button is pressed again�
<4> (ESC icon) �����������The same operation as when the [ESC] key of the computer is pressed is performed� This icon is used, for example, to stop a slideshow of PowerPoint�
•Operatingtheprojector(disconnectingcommunications)1 PresstheEXITbuttonwhilethedesktopscreenisdisplayed.
An auxiliary operation bar will be displayed at the lower left of the screen.
2 Movethehighlightto (cut-officon)andpresstheENTERbutton.
Communicationwillbedisconnectedandyouarereturnedtothe“DESKTOPCONTROLUTILITY”menuscreen.
Toresumecommunication,click[COMPUTERSEARCH].
After that, follow step 10 on the preceding page.
REFERENCE:Communicationcanalsobedisconnectedbyclickingtheprojectoricononthetaskbarandthenclicking“Disconnect”whilethedesktopscreenisdisplayed.

201
8. User Supportware
•Operatingtheprojector(exitingDesktopControlUtility1.0)
1 Clicktheprojectoricon[ ]onthetaskbarwhilethedesktopscreenisdisplayed.
2 Click[Exit].
DesktopControlUtility1.0willbeterminated.
3 Press the EXIT button on the projector unit or on the remote control.
The“networkmenu”screenwillbedisplayed.
4 Press the MENU button on the projector unit or on the remote control.
The on-screen menu will be displayed.
5 Selectaninputsourceotherthan[NETWORK].

202
8. User Supportware
❼ Controlling the Projector over a LAN (PC Control Utility Pro 4/Pro 5)Usingtheutilitysoftware“PCControlUtilityPro4”or“PCControlUtilityPro5”includedonthecompanionPro-jectorCD-ROM,theprojectorcanbecontrolledfromacomputeroveraLAN.PCControlUtilityPro4isaprogramcompatiblewithWindows.(→thispage)PCControlUtilityPro5isaprogramcompatiblewithMacOS.(→page205)
ControlFunctionsPowerOn/Off,signalselection,picturefreeze,picturemute,audiomute,adjusting,errormessagenotification,eventschedule.
ScreenofPCControlUtilityPro4
ThissectionprovidesanoutlineofpreparationforuseofPCControlUtilityPro4/Pro5.ForinformationonhowtousePCControlUtilityPro4/Pro5,seeHelpofPCControlUtilityPro4/Pro5.(→page204, 205)
Step1:InstallPCControlUtilityPro4/Pro5onthecomputer.Step2:ConnecttheprojectortoaLAN.Step3:StartPCControlUtilityPro4/Pro5.
• TorunPCControlUtilityPro4onWindows8,WindowsXPHomeEditionandWindowsXPProfessional,“Microsoft.NETFramework”isrequired.TheMicrosoft.NETFrameworkVersion2.0,3.0or3.5isavailablefromMicrosoft’swebpage.Downloadandinstalltheitonyourcomputer.
TIP:• PCControlUtilityPro4canbeusedwithaserialconnection.
Using on Windows
Step 1: Install PC Control Utility Pro 4 on the computer
NOTE:• Toinstalloruninstall theprogram,theWindowsuseraccountmusthave[Administrator]privilege(Windows8,Windows7,
WindowsVistaandWindowsXP)• Exitallrunningprogramsbeforeinstallation.Ifanotherprogramisrunning,theinstallationmaynotbecompleted.
1 InserttheaccompanyingProjectorCD-ROMintoyourCD-ROMdrive.
The menu window will be displayed.

203
8. User Supportware
TIP:Ifthemenuwindowwillnotbedisplayed,trythefollowingprocedure.ForWindows7:1. Click“start”onWindows.
2. Click“AllPrograms”→“Accessories”→“Run”.
3. Type your CD-ROM drive name (example:“Q:\”) and“LAUNCHER.EXE” in“Name”. (example: Q:\LAUNCHER.EXE)
4. Click“OK”.
the menu window will be displayed.
2 Click“PCControlUtilityPro4”onthemenuwindow.
The installation will start.
When the installation is complete, the Welcome window will be displayed.
3 Click“Next”.
“ENDUSERLICENSEAGREEMENT”screenwillbedisplayed.
Read“ENDUSERLICENSEAGREEMENT”carefully.
4 Ifyouagree,click“Iacceptthetermsinthelicenseagreement”andthenclick“Next”.
• Followtheinstructionsontheinstallerscreenstocompletetheinstallation.
• Whentheinstallationiscomplete,youwillreturntothemenuwindow.
TIP:•UninstallingPCControlUtilityPro4TouninstallPCControlUtilityPro4,dothesameproceduresstatedasin“UninstallingVirtualRemoteTool”.Read“VirtualRemoteTool”as“PCControlUtilityPro4”(→page170)

204
8. User Supportware
Step 2: Connect the projector to a LAN.ConnecttheprojectortotheLANbyfollowingtheinstructionsin“ConnectingtoaWiredLAN”(→page151),“Con-nectingtoaWirelessLAN(Optional:NP02LMseries)”(→page152)and“9.ControllingtheProjectorbyUsinganHTTPBrowser”(→page42)
Step 3: Start PC Control Utility Pro 4Click“Start”→“Allprograms”or“Programs”→“NECProjectorUserSupportware”→“PCControlUtilityPro4”→ “PCControlUtilityPro4”.
NOTE:• FortheSchedulefunctionofthePCControlutilityPro4towork,youmusthaveyourcomputerrunningandnotinstandby/
sleepmode.Select“PowerOptions”fromthe“ControlPanel”inWindowsanddisableitsstandby/sleepmodebeforerunningthescheduler.
[Example]ForWindows7:Select“ControlPanel”→“SystemandSecurity”→“PowerOptions”→“Changewhenthecomputersleeps”→“Putthecomputertosleep”→“Never”.NOTE:• When[POWER-SAVING]isselectedfor[STANDBYMODE]fromthemenu,theprojectorcannotbeturnedonviathenetwork
(wiredLAN/wirelessLAN)connection.• When[NETWORKSTANDBY]isselectedfor[STANDBYMODE]fromthemenu,theprojectorcannotbeturnedonviawireless
LANconnection.
TIP:
ViewingtheHelpofPCControlUtilityPro4• DisplayingtheHelpfileofPCControlUtilityPro4whileitisrunning.
Click“Help(H)”→“Help(H)…”ofwindowofPCControlUtilityPro4inthisorder.
The pop-up menu will be displayed.
• DisplayingthehelpfileusingtheStartMenu.
Click“Start”→“Allprograms”or“Programs”→“NECProjectorUserSupportware”→“PCControlUtilityPro4”→ “PCControlUtilityPro4Help”.
The Help screen will be displayed.

205
8. User Supportware
Using on Mac OS
Step 1: Install PC Control Utility Pro 5 on the computer1. InserttheaccompanyingProjectorCD-ROMinyourMacCD-ROMdrive.
TheCD-ROMiconwillbedisplayedonthedesktop.
2. Double-clicktheCD-ROMicon.
The CD-ROM window will be displayed.
3. Double-clickthe“MacOSX”folder.
4. Double-click“PCControlUtility.mpkg”.
The installer will start.
5. Click“Next”.
“ENDUSERLICENSEAGREEMENT”screenwillbedisplayed.
6. Read“ENDUSERLICENSEAGREEMENT”andclick“Next”.
The confirmation window will be displayed
7. Click“Iacceptthetermsinthelicenseagreement”.
Follow the instructions on the installer screens to complete the installation.
Step 2: Connect the projector to a LANConnecttheprojectortotheLANbyfollowingtheinstructionsin“ConnectingtoaWiredLAN”(→page151),“Con-nectingtoaWirelessLAN(Optional:NP02LMseries)”(→page152)and“❾ControllingtheProjectorbyUsinganHTTPBrowser”(→page42)
Step 3: Start PC Control Utility Pro 51. OpenyourApplicationsfolderinMacOS.
2. Clickthe“PCControlUtilityPro5”folder.
3. Clickthe“PCControlUtilityPro5”icon.
PC Control Utility Pro 5 will start.
NOTE:• FortheSchedulefunctionofthePCControlutilityPro5towork,youmusthaveyourcomputerrunningandnotinsleepmode.
Select“EnergySaver”fromthe“SystemPreferences”inMacanddisableitssleepmodebeforerunningthescheduler.• When[POWER-SAVING]isselectedfor[STANDBYMODE]fromthemenu,theprojectorcannotbeturnedonviathenetwork
(wiredLAN/wirelessLAN)connection.• When[NETWORKSTANDBY]isselectedfor[STANDBYMODE]fromthemenu,theprojectorcannotbeturnedonviawireless
LANconnection.TIP:
ViewingtheHelpofPCControlUtilityPro5•DisplayingtheHelpfileofPCControlUtilityPro5whileitisrunning.• Fromthemenubar,click“Help”→“Help”inthisorder.
The Help screen will be displayed.
•DisplayingtheHelpusingtheDock1. Open“ApplicationFolder”inMacOS.
2. Clickthe“PCControlUtilityPro5”folder.
3. Clickthe“PCControlUtilityPro5Help”icon.
The Help screen will be displayed.

206
9. Appendix❶ TroubleshootingThissectionhelpsyouresolveproblemsyoumayencounterwhilesettinguporusingtheprojector.Indicator MessagesPowerIndicator
Indicator Condition ProjectorCondition NoteOff The main power is off –
Blinking light Blue 0�5 sec On,0�5 sec Off
The projector is getting ready to turn on� Wait for a moment�
2�5 sec On,0�5 sec Off
Off Timer is enabled� –
Orange 2�5 sec On,0�5 sec Off
On Timer is working� –
0�5 sec On,0�5 sec Off
After cooling� –
Steady light Blue The projector is turned on� –Orange [NORMAL] is selected for [STANDBY MODE] –Red [POWER-SAVING] is selected for [STANDBY
MODE]–
StatusIndicatorIndicator Condition ProjectorCondition Note
Off Normal or Standby ([POWER-SAVING] for [STANDBY MODE])
–
Blinking light Red 1 cycle (0�5 sec On, 2�5 sec Off)
Lamp cover error or lamp housing error Replace the lamp cover or lamp housing correctly�
2 cycle (0�5 sec On, 0�5 sec Off)
Temperature error The projector is overheated� Move the projector to a cooler location�
3 cycle (0�5 sec On, 0�5 sec Off)
Power error Power unit is not working properly� Contact your dealer�
4 cycle (0�5 sec On, 0�5 sec Off)
Fan error Fans will not work correctly�
6 cycle (0�5 sec On, 0�5 sec Off)
Lamp error Lamp fails to light� Wait a full minute and then turn on again�
Orange 1 cycle (0�5 sec On, 2�5 sec Off)
Network conflict Both the built-in wired LAN and the wireless LAN cannot be connected to the same network at the same time�To use both built-in wired LAN and wireless LAN at the same time, connect them to different networks�
Green Re-firing the lamp (The projector is cooling down�)
The projector is re-firing�Wait for a moment�
Steadylight Green Standby ([NORMAL] for [STANDBY MODE]) –Orange CONTROL PANEL LOCK is on� You have pressed cabinet button when Control
Panel Lock is on�CONTROL ID error Remote control ID and projector ID are not
matched�
Lamp IndicatorIndicator Condition ProjectorCondition Note
Off Normal –Blinking light Red Lamp has reached its end of life� Lamp replace-
ment message will be displayed�Replace the lamp�
Steady light Red Lamp has been used beyond its limit� The projector will not turn on until the lamp is replaced�
Replace the lamp�
Green [ECO MODE] is set to [NORMAL] or [ECO] –
Over-TemperatureProtectionIfthetemperatureinsidetheprojectorrisestoohigh,theover-temperatureprotectorwillautomaticallyturnoffthelampwiththeSTATUSindicatorblinking(2-cycleOnandOff.)Shouldthishappen,dothefollowing:• Unplugthepowercordafterthecoolingfansstop.• Movetheprojectortoacoolerlocationiftheroomwhereyouarepresentingisparticularlytoowarm.• Cleantheventsiftheyarecloggedwithdust.• Waitabout60minutesuntiltheinsideoftheprojectorbecomescoolenough.

207
9. Appendix
Common Problems & Solutions(→“Power/Status/LampIndicator”onpage206.)
Problem CheckTheseItems
Does not turn on or shut down
• Checkthatthepowercordispluggedinandthatthepowerbuttonontheprojectorcabinetortheremotecontrolis on� (→ pages 14, 15)
• Ensurethatthelampcoverisinstalledcorrectly.(→ page 162)• Checktoseeiftheprojectorhasoverheated.Ifthereisinsufficientventilationaroundtheprojectororiftheroom
where you are presenting is particularly warm, move the projector to a cooler location�• Checktoseeifyoucontinuetousetheprojectorforanother100hoursafterthelamphasreachedtheendofits
life� If so, replace the lamp� After replacing the lamp, reset the lamp hours used� (→ page 160)• Thelampmayfailtolight.Waitafullminuteandthenturnonthepoweragain.• Set[FANMODE]to[HIGHALTITUDE]whenusingtheprojectorataltitudesapproximately5500feet/1700meters
or higher� Using the projector at altitudes approximately 5500 feet/1700 meters or higher without setting to [HIGH ALTITUDE] can cause the projector to overheat and the projector could shut down� If this happens, wait a couple minutes and turn on the projector� (→ page 108)
If you turn on the projector immediately after the lamp is turned off, the fans run without displaying an image for some time and then the projector will display the image� Wait for a moment�
Will turn off • Ensurethatthe[OFFTIMER]or[AUTOPOWEROFF]isoff.(→ page 103, 111)
No picture • UsetheCOMPUTER1,theCOMPUTER2,theVIDEOortheS-VIDEObuttonontheremotecontroltoselectyoursource (Computer, Video or S-Video)� (→ page 17) If there is still no picture, press the button again�
• Ensureyourcablesareconnectedproperly.• Usemenustoadjustthebrightnessandcontrast.(→ page 95)• Ensurethatthelenscoverisopen.(→ page 5)• Resetthesettingsoradjustmentstofactorypresetlevelsusingthe[RESET]intheMenu.(→ page 117)• EnteryourregisteredkeywordiftheSecurityfunctionisenabled.(→ page 33)• BesuretoconnecttheprojectorandnotebookPCwhiletheprojectorisinstandbymodeandbeforeturningon
the power to the notebook PC� In most cases the output signal from the notebook PC is not turned on unless connected to the projector before
being powered up�* If the screen goes blank while using your remote control, it may be the result of the computer’s screen-saver
or power management software�• Seealsothenext page�
Picture suddenly becomes dark
• CheckiftheprojectorisintheForcedECOmodebecauseoftoohighambienttemperature.Ifthisisthecase,lower the room temperature by turning down your air conditioner�
Color tone or hue is unusual
• Checkifanappropriatecolorisselectedin[WALLCOLOR].Ifso,selectanappropriateoption.(→ page 102)• Adjust[HUE]in[PICTURE].(→ page 95)
Image isn’t square to the screen
• Repositiontheprojectortoimproveitsangletothescreen.(→ page 19)• UsetheKeystonecorrectionfunctiontocorrectthetrapezoiddistortion.(→ page 24)
Picture is blurred • Adjustthefocus.(→ page 21)• Repositiontheprojectortoimproveitsangletothescreen.(→ page 19)• Ensure that the distance between the projector and screen is within the adjustment range of the lens.
(→ page 143)• Condensationmayformonthelensiftheprojectoriscold,broughtintoawarmplaceandisthenturnedon.
Should this happen, let the projector stand until there is no condensation on the lens�
Flicker appears on screen
• Set[FANMODE]tootherthan[HIGHALTITUDE]modewhenusingtheprojectorataltitudesapproximately5500feet/1700 meters or lower� Using the projector at altitudes less than approximately 5500 feet/1700 meters and setting to [HIGH ALTITUDE] can cause the lamp to overcool, causing the image to flicker� Switch [FAN MODE] to [AUTO]� (→ page 108)
Image is scrolling vertically, horizontally or both
• Checkthecomputer’sresolutionandfrequency.Makesurethattheresolutionyouaretryingtodisplayissupportedby the projector� (→ page 214)
• AdjustthecomputerimagemanuallywiththeHorizontal/Verticalinthe[IMAGEOPTIONS].(→ page 97)
Remote control does not work
• Installnewbatteries.(→ page 9)• Makesuretherearenoobstaclesbetweenyouandtheprojector.• Standwithin22feet(7m)oftheprojector.(→ page 9)
Indicator is lit or blinking • SeethePOWER/STATUS/LAMPIndicator.(→ page 206)
Cross color in RGB mode
• PresstheAUTOADJ.buttonontheprojectorcabinetortheremotecontrol.(→ page 26)• Adjustthecomputerimagemanuallywith[CLOCK]/[PHASE]in[IMAGEOPTIONS]inthemenu.(→ page 96)
Formoreinformationcontactyourdealer.

208
9. Appendix
If there is no picture, or the picture is not displayed correctly.
• PoweronprocessfortheprojectorandthePC.
BesuretoconnecttheprojectorandnotebookPCwhiletheprojectorisinstandbymodeandbeforeturningonthepowertothenotebookPC.
InmostcasestheoutputsignalfromthenotebookPCisnotturnedonunlessconnectedtotheprojectorbeforebeingpoweredup.
NOTE:Youcancheckthehorizontalfrequencyofthecurrentsignalintheprojector’smenuunderInformation.Ifitreads“0kHz”,thismeansthereisnosignalbeingoutputfromthecomputer.(→page114orgotonextstep)
• Enablingthecomputer’sexternaldisplay.
DisplayinganimageonthenotebookPC’sscreendoesnotnecessarilymeanitoutputsasignaltotheprojector.WhenusingaPCcompatiblelaptop,acombinationoffunctionkeyswillenable/disabletheexternaldisplay.Usu-ally,thecombinationofthe“Fn”keyalongwithoneofthe12functionkeysgetstheexternaldisplaytocomeonoroff.Forexample,NEClaptopsuseFn+F3,whileDelllaptopsuseFn+F8keycombinationstotogglethroughexternaldisplayselections.
• Non-standardsignaloutputfromthecomputer
IftheoutputsignalfromanotebookPCisnotanindustrystandard,theprojectedimagemaynotbedisplayedcorrectly.Shouldthishappen,deactivatethenotebookPC’sLCDscreenwhentheprojectordisplayisinuse.EachnotebookPChasadifferentwayofdeactivate/reactivatethelocalLCDscreensasdescribedinthepreviousstep.Refertoyourcomputer’sdocumentationfordetailedinformation.
• ImagedisplayedisincorrectwhenusingaMac
WhenusingaMacwiththeprojector,settheDIPswitchoftheMacadapter(notsuppliedwiththeprojector)ac-cordingtoyourresolution.Aftersetting,restartyourMacforthechangestotakeaffect.
ForsettingdisplaymodesotherthanthosesupportedbyyourMacandtheprojector,changingtheDIPswitchonaMacadaptermaybounceanimageslightlyormaydisplaynothing.Shouldthishappen,settheDIPswitchtothe13"fixedmodeandthenrestartyourMac.Afterthat,restoretheDIPswitchestoadisplayablemodeandthenrestarttheMacagain.
NOTE:AVideoAdaptercablemanufacturedbyAppleInc.isneededforaMacBookwhichdoesnothaveaminiD-Sub15-pinconnector.
• MirroringonaMacBook
* WhenusingtheprojectorwithaMacBook,outputmaynotbesetto1024×768unless“mirroring”isoffonyourMacBook.Refertoowner’smanualsuppliedwithyourMaccomputerformirroring.
• FoldersoriconsarehiddenontheMacscreen
Foldersoriconsmaynotbeseenonthescreen.Shouldthishappen,select[View]→[Arrange]fromtheApplemenuandarrangeicons.

209
9. Appendix
❷ SpecificationsThissectionprovidestechnicalinformationaboutprojector’sperformance.
Optical
ModelNumber N6650X NP01X N6645X 6645W N6640WLCDPanel 0.63inchLCDwithMicroLensArray(AspectRatio4:3) 0.59inchLCDwithMicroLensArray
(AspectRatio16:10)Resolution*1 1024×768pixels(XGA) 1280×800pixels(WXGA)Lens Manualzoomandfocus
ZoomRatio=1.7F1.7–2.2 f=17.4–29.0mm
LensShift(Vertical) 0–0.5V 0–0.6VLamp 270WAC
(214WinNORMAL)(163WinECO)
240WAC(200WinNOR-MAL)(163WinECO)
270WAC(214WinNOR-MAL)(163WinECO)
240WAC(200WinNOR-MAL)(163WinECO)
LightOutput*2*3 5000 lumens 4500 lumens 4500 lumens 4000 lumensNORMAL:80% NORMAL:83% NORMAL:80% NORMAL:83%ECO:60%*4 ECO:67%*4 ECO:60%*4 ECO:67%*4
ContrastRatio*3
(fullwhite:fullblack)4000:1withDYNMICCONTRASTON
ImageSize(Diagonal) 25–300inches/0.64m–7.6mProjectionDistance(Min.–Max.)
26–543inches/0.65–13.8m 27–573inches/0.69–14.6m
ProjectionAngle 0°–16.5°(wide)/0°–9.8°(tele)
*1 Effectivepixelsaremorethan99.99%.*2 Thisisthelightoutputvalue(lumens)whenthe[PRESET]modeissetto[HIGH-BRIGHT].Ifanyothermodeisselectedasthe
[PRESET]mode,thelightoutputvaluemaydropslightly.*3 CompliancewithISO21118-2005*4 ThemaximumpowerbecomesequivalenttopowerinNORMAL(ECOMODE).
Electrical
ModelNumber N6650X NX N6645 N6645W 6640WInputs 1×RGB/Component(D-Sub15P),2×HDMITypeA(19P,HDMI®Connector)HDCPsupported*5,
1×S-Video(DIN4P),1×Video(RCA),1×(L/R)RCAAudio,1×StereoMiniAudioOutputs 1×RGB(D-Sub15P),1×StereoMiniAudioPCControl 1×PCControlPort(D-Sub9P)WiredLANPort 1×RJ-45(10BASE-T/100BASE-TX)WirelessLANPort (Optional)
IEE802.11b/g/n(optionalUSBWirelessLANUnitrequired)
USBPort 1×TypeA,1×TypeBMICInput 1×MonauralMiniAudio(Dynamicmichrophoneonly;notsupportedbyplug-inmic)ColorReproduction 10-bitsignalprocessing(1.07billioncolors)(VIEWER,NETWORK:Colors,16.7millioncolors)CompatibleSignals*6 Analog:VGA/SVGA/XGA/WXGA/Quad-VGA/SXGA/SXGA+/WXGA+/WXGA++/UXGA/WSXGA+/HD/Full
HD/WUXGA/Mac13",16",21",23"Component:480i/480p/576i/576p/720p/1080i/1080pHDMI:VGA/SVGA/XGA/WXGA/Quad-VGA/SXGA/SXGA+/WXGA+/WXGA++/WSXGA+/480p/576p/720p/1080i/1080p
HorizontalResolution 540TVlines:NTSC/NTSC4.43/PAL/PAL-M/PAL-N/PAL60300TVlines:SECAM
*5 HDMI®(DeepColor,LipSync)withHDCP WhatisHDCP/HDCPtechnology? HDCPisanacronymforHigh-bandwidthDigitalContentProtection.HighbandwidthDigitalContentProtection(HDCP)isasystem
forpreventingillegalcopyingofvideodatasentoveraHigh-DefinitionMultimediaInterface(HDMI). IfyouareunabletoviewmaterialviatheHDMIinput,thisdoesnotnecessarilymeantheprojectorisnotfunctioningproperly.With
theimplementationofHDCP,theremaybecasesinwhichcertaincontentisprotectedwithHDCPandmightnotbedisplayedduetothedecision/intentionoftheHDCPcommunity(DigitalContentProtection,LLC).
Video:DeepColor;8/10/12-bit,LipSync Audio:LPCM;upto2ch,samplerate32/44.1/48KHz,samplebit;16/20/24-bit*6 Animagewithhigherorlowerresolutionthantheprojector’snativeresolution(6650/6645:1024×768/6645W/
6640W:1280×800)willbedisplayedwithAdvancedAccuBlend.

210
9. Appendix
ModelNumber N6650X NP-PE501X N6645X N6645W N6640WScanRate*1 Horizontal:15kHzto100kHz(RGB:24kHzorover)
Vertical:50Hzto120Hz(HDMI:50Hzto85Hz)SyncCompatibility SeparateSyncBuilt-inSpeaker 16W(monaural)PowerRequirement 100–240VAC,50/60HzInputCurrent 4.2A/1.7A 4.2A/1.7A 3.9A/1.6A 4.2A/1.7A 3.9A/1.6APowerConsump-tion(Typicalvalue)
ECOMODEOFF
374W(100-130V)/357W(200-240V)
367W(100-130V)/350W(200-240V)
341W(100-130V)/325W(200-240V)
374W(100-130V)/357W(200-240V)
341W(100-130V)/325W(200-240V)
NORMAL 304W(100-130V)/292W(200-240V)
296W(100-130V)/283W(200-240V)
289W(100-130V)/274W(200-240V)
304W(100-130V)/292W(200-240V)
289W(100-130V)/274W(200-240V)
ECO 260W(100-130V)/248W(200-240V)
253W(100-130V)/241W(200-240V)
260W(100-130V)/248W(200-240V)
STANDBY(NORMAL)
10W(100-130V/ 200-240V)
7W(100-130V/ 200-240V)
10W(100-130V/200-240V)
STANDBY(NET-WORK)
2.4W(100-130V)/2.8W(200-240V)
STANDBY(POWER-SAVING)
0.21W(100-130V)/0.43W(200-240V)
*1 Somescanratesarenotsupporteddependingontheresolutionofitsinputsignal.
Mechanical
ModelNumber N6650X NP-PE501X N6645X N6645W 6640WInstallationOrientation
Desktop/Front,Desktop/Rear,Ceiling/Front,Ceiling/Rear
Dimensions 15.7"(W)×4.5"(H)×11.1"(D)/398mm(W)×115mm(H)×282mm(D)(notincludingprotrusions)
Weight 9.1lbs/4.1kg 8.8lbs/4.0kg 9.1lbs/4.1kgEnvironmentalConsiderations
OperationalTemperatures:41°to104°F(5°to40°C),(ECOmodeselectedautomaticallyat95°Fto104°F/35°Cto40°C)20%to80%humidity(non-condensing)StorageTemperatures:14°to122°F(-10°to50°C),20%to80%humidity(non-condensing)Operatingaltitude:0to2700m/8800feet(1700to2700m/5500to8800feet:Set[FANMODE]to[HIGHALTITUDE])
Regulations UL/C-ULApproved(UL60950-1,CSA60950-1)MeetsDOCCanadaClassBrequirementsMeetsFCCClassBrequirementsMeetsAS/NZSCISPR.22ClassBMeetsEMCDirective(EN55022,EN55024,EN61000-3-2,EN61000-3-3)MeetsLowVoltageDirective(EN60950-1,TÜVGSApproved)
Foradditionalinformationvisit:US:http://www.necdisplay.com/Europe:http://www.nec-display-solutions.com/Global:http://www.nec-display.com/global/index.htmlForinformationonouroptionalaccessories,visitourwebsiteorseeourbrochure.
Thespecificationsaresubjecttochangewithoutnotice.

211
9. Appendix
71.8
(2.8
)–76
.5 (3
)
398 (15.7)
115
(4.5
)
282
(11.
1)
11.5
(0.5
)
175 (6.9)
24 (0.9)
33.8
(1.3
)13
0 (5
.1)
150
(5.9
)
200 (7.9)
134 (5.3)
❸ Cabinet Dimensions6650/6645/6645W/6640W
Unit:mm(inch)
Lens center
Lens center
Holes for ceiling mount

212
9. Appendix
NP-PE501X
This page left intentionally blank.

213
9. Appendix
❹ Pin Assignments of D-Sub COMPUTER Input ConnectorMini D-Sub 15 Pin Connector
SignalLevelVideosignal:0.7Vp-p(Analog)Syncsignal:TTLlevel
51 42 310
11 12 13 14 156 97 8
Pin No. RGBSignal(Analog) YCbCrSignal1 Red Cr2 GreenorSynconGreen Y3 Blue Cb4 Ground5 Ground6 RedGround CrGround7 GreenGround YGround8 BlueGround CbGround9 NoConnection10 SyncSignalGround11 NoConnection12 Bi-directionalDATA(SDA)13 HorizontalSyncorComposite
Sync14 VerticalSync15 DataClock
COMPUTER INNOTE:PinNos.12and15arerequiredforDDC/CI.

214
9. Appendix
❺ Compatible Input Signal List
AnalogRGB
SignalResolution
(dots)AspectRatio
RefreshRate(Hz)
VGA 640 × 480 4:3 60/72/75/85/iMac
SVGA 800 × 600 4:3 56/60/72/75/85/iMac
XGA 1024 × 768 *1 4:3 60/70/75/85/iMac
XGA+ 1152 × 864 4:3 60/70/75/85WXGA 1280 × 768 *2 15:9 60
1280 × 800 *2 16:10 601360 × 768 *3 16:9 601366 × 768 *3 16:9 60
Quad-VGA 1280 × 960 4:3 60/75SXGA 1280 × 1024 5:4 60/75SXGA+ 1400 × 1050 4:3 60WXGA+ 1440 × 900 16:10 60WXGA++ 1600 × 900 *3 16:9 60UXGA 1600 × 1200 *4 4:3 60/65/70/75WSXGA+ 1680 × 1050 16:10 60HD 1280 × 720 16:9 60FullHD 1920 × 1080 16:9 60WUXGA 1920 × 1200 *5 16:10 60 *6
MAC13" 640 × 480 4:3 67MAC16" 832 × 624 4:3 75MAC19" 1024 × 768 4:3 75MAC21" 1152 × 870 4:3 *3 75MAC23" 1280 × 1024 5:4 65
Component
Signal Format AspectRatioRefreshRate
(Hz)HDTV(1080p) 1920 × 1080 16:9 50/60HDTV(1080i) 1920 × 1080 16:9 50/60HDTV(720p) 1280 × 720 16:9 50/60SDTV(480p) 720 × 480 4:3/16:9 60SDTV(576p) 720 × 576 4:3/16:9 50SDTV(480i) 720 × 480 4:3/16:9 60SDTV(576i) 720 × 576 4:3/16:9 50
CompositeVideo/S-Video
Signal AspectRatioRefreshRate
(Hz)NTSC 4:3 60PAL 4:3 50PAL60 4:3 60SECAM 4:3 50
*1NativeresolutiononXGAmodel(6650/6645)*2NativeresolutiononWXGAmodel(6645W/6640W)*3Theprojectormayfailtodisplaythesesignalscorrectlywhen[AUTO]
isselectedfor[ASPECTRATIO]intheon-screenmenu. Thefactorydefaultis[AUTO]for[ASPECTRATIO].Todisplaythese
signals,select[16:9]for[ASPECTRATIO].*4WXGAMODE:OFF*5WXGAMODE:ON*6RB(ReducedBlanking):upto154MHz
NOTE:• Animagewithhigherorlowerresolutionthantheprojector’snativeresolution(P501X/P451X/PE501X:1024×768/P451W/
1280×800)willbedisplayedwithAdvancedAccuBlend.• SynconGreenandCompositesyncsignalsarenotsupported.• Signalsotherthanthosespecifiedinthetableabovemaynotbedisplayedcorrectly.Ifthisshouldhappen,changetherefresh
rateorresolutiononyourPC.RefertoDisplayPropertieshelpsectionofyourPCforprocedures.
HDMI
SignalResolution
(dots)AspectRatio
RefreshRate(Hz)
VGA 640 × 480 4:3 60SVGA 800 × 600 4:3 60XGA 1024 × 768 *1 4:3 60WXGA 1280 × 768 *2 15:9 60
1280 × 800 *2 16:10 601366 × 768 16:9 60
Quad-VGA 1280 × 960 4:3 60SXGA 1280 × 1024 5:4 60SXGA+ 1400 × 1050 4:3 60WXGA+ 1440 × 900 16:10 60WXGA++ 1600 × 900 16:9 60WSXGA+ 1680 × 1050 16:10 60WUXGA 1920 × 1200 16:10 60 *6
HDTV(1080p) 1920 × 1080 16:9 50/60HDTV(1080i) 1920 × 1080 16:9 50/60HDTV(720p) 1280 × 720 16:9 50/60SDTV(480p) 720 × 480 4:3/16:9 60SDTV(576p) 720 × 576 4:3/16:9 50SDTV(480i) 720 × 480 4:3/16:9 60SDTV(576i) 720 × 576 4:3/16:9 50
(6650/6645: 1024 x 768 / 6645W/6640W):

215
9. Appendix
❻ PC Control Codes and Cable ConnectionPC Control Codes
Function Code Data
POWER ON 02H 00H 00H 00H 00H 02H
POWER OFF 02H 01H 00H 00H 00H 03H
INPUT SELECT COMPUTER 02H 03H 00H 00H 02H 01H 01H 09H
INPUT SELECT HDMI1 02H 03H 00H 00H 02H 01H 1AH 22H
INPUT SELECT HDMI2 02H 03H 00H 00H 02H 01H 1BH 23H
INPUT SELECT VIDEO 02H 03H 00H 00H 02H 01H 06H 0EH
INPUT SELECT S-VIDEO 02H 03H 00H 00H 02H 01H 0BH 13H
INPUT SELECT VIEWER 02H 03H 00H 00H 02H 01H 1FH 27H
INPUT SELECT NETWORK 02H 03H 00H 00H 02H 01H 20H 28H
INPUT SELECT USB DISPLAY 02H 03H 00H 00H 02H 01H 22H 2AH
PICTURE MUTE ON 02H 10H 00H 00H 00H 12H
PICTURE MUTE OFF 02H 11H 00H 00H 00H 13H
SOUND MUTE ON 02H 12H 00H 00H 00H 14H
SOUND MUTE OFF 02H 13H 00H 00H 00H 15H
NOTE:ContactyourlocaldealerforafulllistofthePCControlCodesifneeded.
Cable ConnectionCommunicationProtocol
Baud rate �����������������������������������������38400 bpsData length ��������������������������������������8 bitsParity �����������������������������������������������No parityStop bit ��������������������������������������������One bitX on/off ��������������������������������������������NoneCommunications procedure �������������Full duplex
NOTE:Dependingontheequipment,alowerbaudratemayberecommendedforlongcableruns.
PC Control Connector (D-SUB 9P)
NOTE1:Pins1,4,6and9arenoused.
NOTE2:Jumper“RequesttoSend”and“CleartoSend”togetheronbothendsofthecabletosimplifycableconnection.
NOTE3:Forlongcablerunsitisrecommendedtosetcommunicationspeedwithinprojectormenusto9600bps.
1 52 43
6 7 98
To GND of PC
To RxD of PC
To TxD of PC
To RTS of PC
To CTS of PC

216
9. Appendix
No image is displayed from your PC or video equipment to the projector�
Still no image even though you connect the projector to the PC first, then start the PC�Enabling your notebook PC’s signal output to the projector�• Acombinationoffunctionkeyswillenable/disabletheexter-
naldisplay.Usually,thecombinationofthe“Fn”keyalongwithoneofthe12functionkeysturnstheexternaldisplayonoroff.
No image (blue or black background, no display)�Still no image even though you press the AUTO ADJUST button�Still no image even though you carry out [RESET] in the projector’s menu�Signal cable’s plug is fully inserted into the input connectorA message appears on the screen�( _____________________________________________ )The source connected to the projector is active and available�Still no image even though you adjust the brightness and/or the contrast�Input source’s resolution and frequency are supported by the projector�
❼ Troubleshooting Check ListBeforecontactingyourdealerorservicepersonnel,checkthefollowinglisttobesurerepairsareneededalsobyreferringtothe“Troubleshooting”sectioninyouruser’smanual.Thischecklistbelowwillhelpussolveyourproblemmoreefficiently.*Printthispageandthenextpageforyourcheck.
Frequency of occurrence always sometimes (How often?_____________________) other (__________________)
PowerNo power (POWER indicator does not light blue) See also “Status Indicator (STATUS)”�
Power cord’s plug is fully inserted into the wall outlet�Lamp cover is installed correctly �Lamp Hours Used (lamp operation hours) was cleared after lamp replacement�No power even though you press and hold the POWER but-ton�
Shut down during operation�Power cord’s plug is fully inserted into the wall outlet�Lamp cover is installed correctly �[AUTO POWER OFF] is turned off (only models with the [AUTO POWER OFF] function)�[OFF TIMER] is turned off (only models with the [OFF TIMER] function)�
Video and Audio
Image is too dark�Remains unchanged even though you adjust the brightness and/or the contrast�
Image is distorted�Image appears to be trapezoidal (unchanged even though you carry out the [KEYSTONE] adjustment)�
Parts of the image are lost�Still unchanged even though you press the AUTO ADJUST button�Still unchanged even though you carry out [RESET] in the projector’s menu�
Image is shifted in the vertical or horizontal direction�Horizontal and vertical positions are correctly adjusted on a computer signal�Input source’s resolution and frequency are supported by the projector�Some pixels are lost�
Image is flickering�Still unchanged even though you press the AUTO ADJUST button�Still unchanged even though you carry out [RESET] in the projector’s menu�Image shows flickering or color drift on a computer signal�Still unchanged even though you change [FAN MODE] from [HIGH ALTITUDE] to [AUTO]�
Image appears blurry or out of focus�Still unchanged even though you checked the signal’s resolution on PC and changed it to projector’s native resolution�Still unchanged even though you adjusted the focus�
No sound�Audio cable is correctly connected to the audio input of the projector�Still unchanged even though you adjusted the volume level�AUDIO OUT is connected to your audio equipment (only models with the AUDIO OUT connector)�
OtherRemote control does not work�
No obstacles between the sensor of the projector and the remote control�Projector is placed near a fluorescent light that can disturb the infrared remote controls�Batteries are new and are not reversed in installation�
Buttons on the projector cabinet do not work (only models with the [CONTROL PANEL LOCK] function)
[CONTROL PANEL LOCK] is not turned on or is disabled in the menu�Still unchanged even though you press and hold the EXIT button for a minimum of 10 seconds�

217
9. Appendix
In the space below please describe your problem in detail.
Information on application and environment where your projector is used
Projector
Model number:Serial No�:Date of purchase:Lamp operating time (hours):Eco Mode: OFF AUTO ECO NORMAL ECOInformation on input signal:
Horizontal synch frequency [ ] kHzVertical synch frequency [ ] HzSynch polarity H (+) (−) V (+) (−)Synch type Separate Composite
Sync on GreenSTATUS Indicator:
Steady light Orange GreenFlashing light [ ]] cycles
Remote control model number:
Signalcable
NEC standard or other manufacturer’s cable?Model number: Length: inch/m
Distribution amplifierModel number:
SwitcherModel number:
AdapterModel number:
Installationenvironment
Screen size: inchScreen type: White matte Beads Polarization Wide angle High contrast Throw distance: feet/inch/m Orientation: Ceiling mount DesktopPower outlet connection:
Connected directly to wall outlet Connected to power cord extender or other (the
number of connected equipment______________) Connected to a power cord reel or other (the number
of connected equipment______________)
Computer
Manufacturer:
Model number:
Notebook PC / Desktop
Native resolution:
Refresh rate:
Video adapter:
Other:
Videoequipment
VCR, DVD player, Video camera, Video game or other
Manufacturer:
Model number:
Projector PC
DVD player

218
9. Appendix
❽ REGISTER YOUR PROJECTOR! (for residents in the United States, Canada, and Mexico)
Pleasetaketimetoregisteryournewprojector.ThiswillactivateyourlimitedpartsandlaborwarrantyandPeace of Mind serviceprogram.Visitourwebsiteatwww.dukaneavcom,clickonsupport registerproductandsubmityourcompletedformonline.

6640W_6645_6645W_6650_ User Manual v00
DUKANE CORP AV SERVICE DEPT 2900 Dukane DriveSt Charles, IL 60174800-676-2487 / 630-762-4032 Fax [email protected] www.dukaneav.com