6436a enu companion
TRANSCRIPT
O F F I C I A L M I C R O S O F T L E A R N I N G P R O D U C T
6436A Designing Active Directory Infrastructure and Services in Windows Server® 2008
Companion Content
Information in this document, including URL and other Internet Web site references, is subject to change without notice. Unless otherwise noted, the example companies, organizations, products, domain names, e-mail addresses, logos, people, places, and events depicted herein are fictitious, and no association with any real company, organization, product, domain name, e-mail address, logo, person, place or event is intended or should be inferred. Complying with all applicable copyright laws is the responsibility of the user. Without limiting the rights under copyright, no part of this document may be reproduced, stored in or introduced into a retrieval system, or transmitted in any form or by any means (electronic, mechanical, photocopying, recording, or otherwise), or for any purpose, without the express written permission of Microsoft Corporation.
Microsoft may have patents, patent applications, trademarks, copyrights, or other intellectual property rights covering subject matter in this document. Except as expressly provided in any written license agreement from Microsoft, the furnishing of this document does not give you any license to these patents, trademarks, copyrights, or other intellectual property.
The names of manufacturers, products, or URLs are provided for informational purposes only and Microsoft makes no representations and warranties, either expressed, implied, or statutory, regarding these manufacturers or the use of the products with any Microsoft technologies. The inclusion of a manufacturer or product does not imply endorsement of Microsoft of the manufacturer or product. Links may be provided to third party sites. Such sites are not under the control of Microsoft and Microsoft is not responsible for the contents of any linked site or any link contained in a linked site, or any changes or updates to such sites. Microsoft is not responsible for webcasting or any other form of transmission received from any linked site. Microsoft is providing these links to you only as a convenience, and the inclusion of any link does not imply endorsement of Microsoft of the site or the products contained therein.
© 2008 Microsoft Corporation. All rights reserved.
Microsoft and the trademarks listed at http://www.microsoft.com/about/legal/en/us/IntellectualProperty/Trademarks/EN-US.aspx are trademarks of the Microsoft group of companies. All other marks are property oftheir respective owners.
Product Number: 6436A
Released: 08/2008


Designing an Active Directory Forest Infrastructure in Windows Server® 2008 1-1
Module 1 Designing an Active Directory Forest Infrastructure in Windows Server® 2008
Contents: Lab Answer Keys 2
1-2 Designing Active Directory Infrastructure and Services in Windows Server® 2008
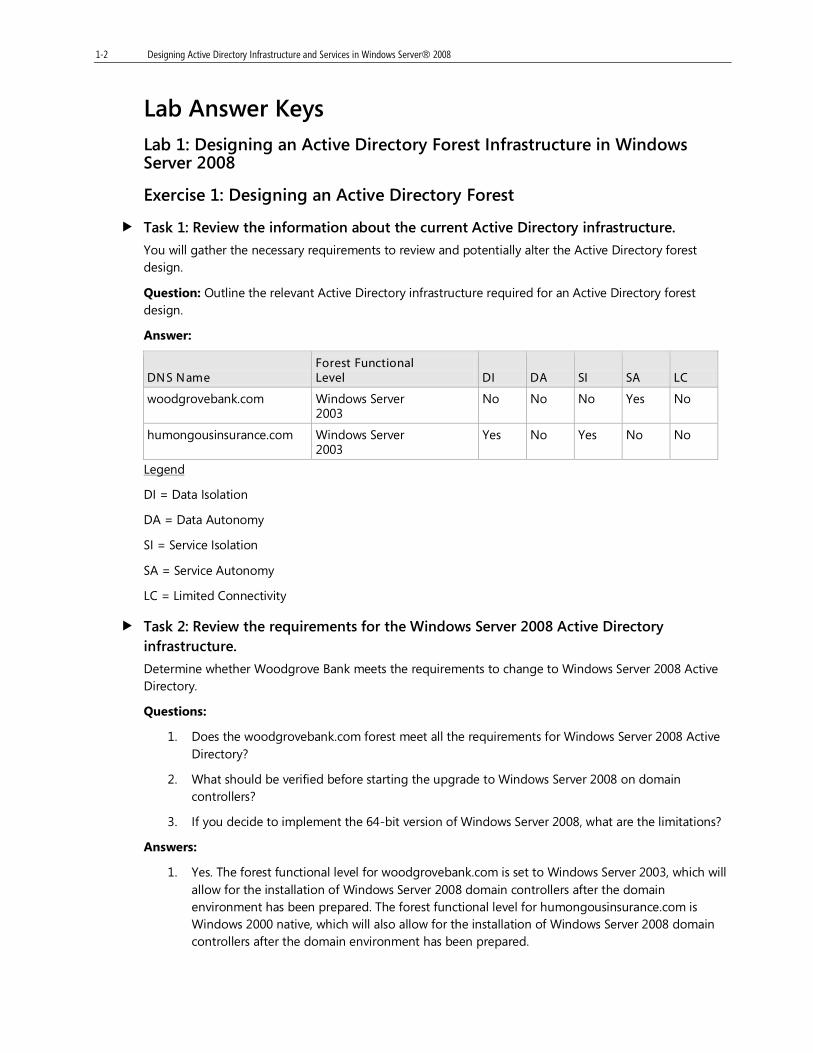
Lab Answer Keys Lab 1: Designing an Active Directory Forest Infrastructure in Windows Server 2008
Exercise 1: Designing an Active Directory Forest
Task 1: Review the information about the current Active Directory infrastructure.
You will gather the necessary requirements to review and potentially alter the Active Directory forest design.
Question: Outline the relevant Active Directory infrastructure required for an Active Directory forest design.
Answer:
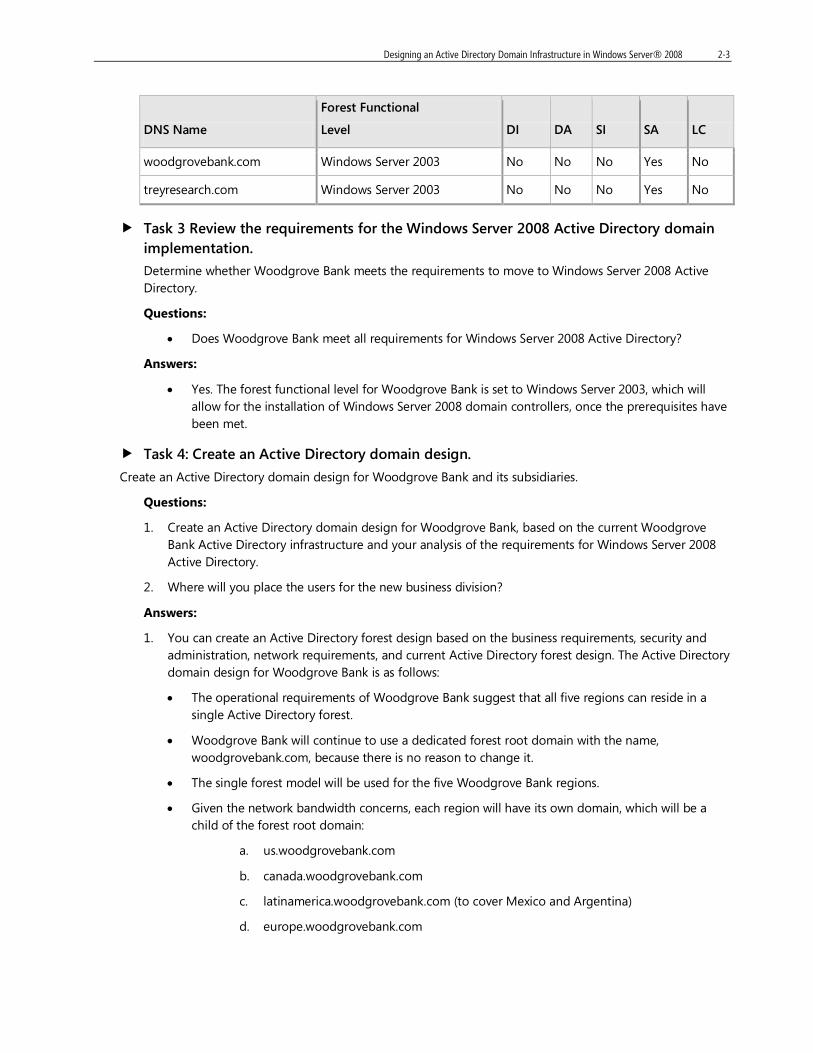
DN S N ame Forest Functional Level DI DA SI SA LC
woodgrovebank.com Windows Server 2003
No No No Yes No
humongousinsurance.com Windows Server 2003
Yes No Yes No No
DI = Data Isolation
Legend
DA = Data Autonomy
SI = Service Isolation
SA = Service Autonomy
LC = Limited Connectivity
Task 2: Review the requirements for the Windows Server 2008 Active Directory infrastructure.
Determine whether Woodgrove Bank meets the requirements to change to Windows Server 2008 Active Directory.
Questions:
1. Does the woodgrovebank.com forest meet all the requirements for Windows Server 2008 Active Directory?
2. What should be verified before starting the upgrade to Windows Server 2008 on domain controllers?
3. If you decide to implement the 64-bit version of Windows Server 2008, what are the limitations?
Answers:
1. Yes. The forest functional level for woodgrovebank.com is set to Windows Server 2003, which will allow for the installation of Windows Server 2008 domain controllers after the domain environment has been prepared. The forest functional level for humongousinsurance.com is Windows 2000 native, which will also allow for the installation of Windows Server 2008 domain controllers after the domain environment has been prepared.

Designing an Active Directory Forest Infrastructure in Windows Server® 2008 1-3
2. You must verify the hardware requirements for Windows Server 2008 and determine if the current domain controllers satisfy those requirements. You should also verify that there are no compatibility issues with currently installed applications and services.
3. Where current domain controllers are the 32-bit versions of Windows Server 2003, you cannot make direct upgrades to Windows Server 2008.
Task 3: Create an Active Directory forest design.
Based on the current Active Directory infrastructure of Woodgrove Bank and your analysis of the requirements for Windows Server 2008 Active Directory, create an Active Directory design for Woodgrove Bank.
Answers:
The Active Directory forest design will be based on the business requirements, security and administration, network requirements, and the current Active Directory forest design. The Active Directory forest design for Woodgrove Bank is as follows:
• The Woodgrove Bank operational requirements suggest that all five regions can reside in a single Active Directory forest, in separate domain trees. The helpdesk at each country will administer its domain. The forest root domain will be administered by the IT department at the head office.
• The single-forest, multiple-domains model will be used for the five Woodgrove Bank regions. For humongousinsurance.com forests, you will use the single-forest, single-domain model.
• The business and legal considerations require that the Active Directory data and users for the Humongous Insurance subsidiary should be isolated. Because it is already a separate forest, there is no action needed.
• Business requirements suggest that users from the Humongous Insurance subsidiary must access some data in woodgrovebank.com forest, a forest trust will be used to achieve this.
• The restricted access forest model will be used for the Humongous Insurance subsidiary.
Exercise 2: Designing and Implementing Active Directory Forest Trusts
Task 1: Create an Active Directory forest trust design.
Questions:
1. What trust types will be included in your Active Directory forest trust design?
2. In which direction will you create the trust?
3. How can you limit the users in the humongousinsurance.com forest to accessing data only on selected servers?
Answers:
1. A single forest trust will be used. This stems from the requirement whereby users in the humongousinsurance.com forest frequently access a number of applications and resources hosted on servers in all domains of the woodgrovebank.com forest.
2. The requirements dictate that the forest trust must be a one-way trust. The woodgrovebank.com forest will be the trusting forest. The humongousinsurance.com forest will be the trusted forest.
3. This can be achieved through the use of selective authentication on a forest trust. You should configure the Allowed to Authenticate permissions on destination servers.
1-4 Designing Active Directory Infrastructure and Services in Windows Server® 2008
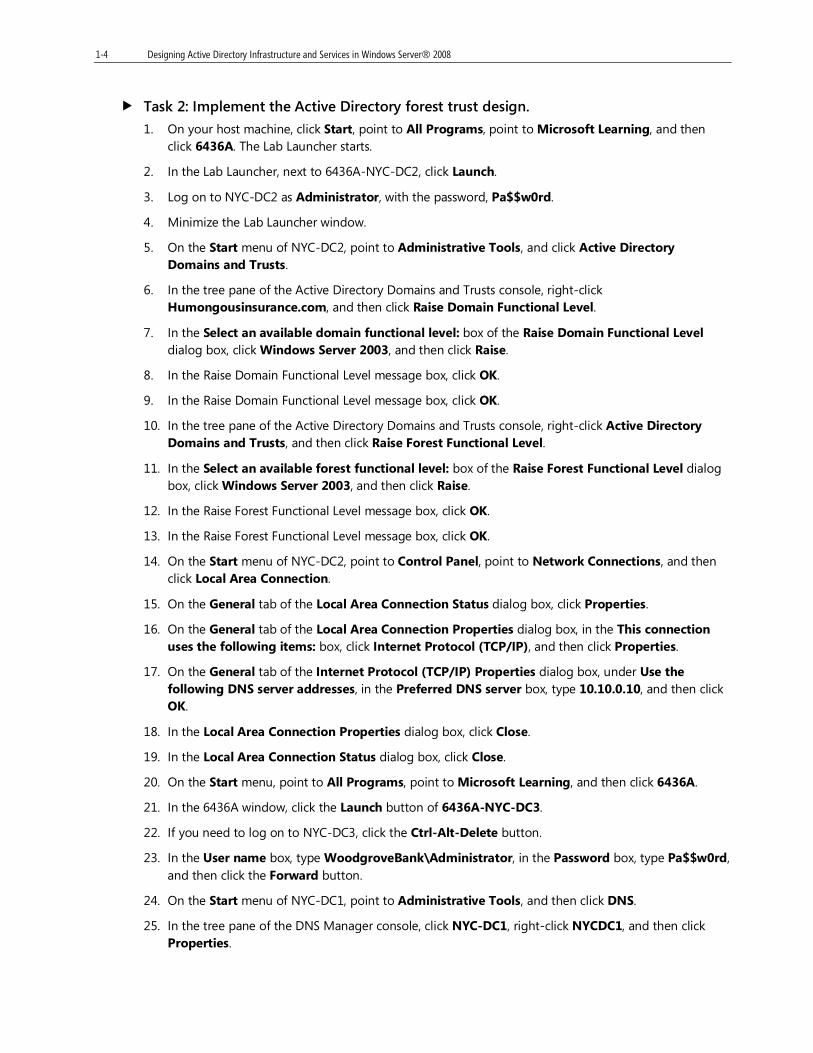
Task 2: Implement the Active Directory forest trust design.
1. On your host machine, click Start, point to All Programs, point to Microsoft Learning, and then click 6436A. The Lab Launcher starts.
2. In the Lab Launcher, next to 6436A-NYC-DC2, click Launch.
3. Log on to NYC-DC2 as Administrator, with the password, Pa$$w0rd.
4. Minimize the Lab Launcher window.
5. On the Start menu of NYC-DC2, point to Administrative Tools, and click Active Directory Domains and Trusts.
6. In the tree pane of the Active Directory Domains and Trusts console, right-click Humongousinsurance.com, and then click Raise Domain Functional Level.
7. In the Select an available domain functional level: box of the Raise Domain Functional Level dialog box, click Windows Server 2003, and then click Raise.
8. In the Raise Domain Functional Level message box, click OK.
9. In the Raise Domain Functional Level message box, click OK.
10. In the tree pane of the Active Directory Domains and Trusts console, right-click Active Directory Domains and Trusts, and then click Raise Forest Functional Level.
11. In the Select an available forest functional level: box of the Raise Forest Functional Level dialog box, click Windows Server 2003, and then click Raise.
12. In the Raise Forest Functional Level message box, click OK.
13. In the Raise Forest Functional Level message box, click OK.
14. On the Start menu of NYC-DC2, point to Control Panel, point to Network Connections, and then click Local Area Connection.
15. On the General tab of the Local Area Connection Status dialog box, click Properties.
16. On the General tab of the Local Area Connection Properties dialog box, in the This connection uses the following items: box, click Internet Protocol (TCP/IP), and then click Properties.
17. On the General tab of the Internet Protocol (TCP/IP) Properties dialog box, under Use the following DNS server addresses, in the Preferred DNS server box, type 10.10.0.10, and then click OK.
18. In the Local Area Connection Properties dialog box, click Close.
19. In the Local Area Connection Status dialog box, click Close.
20. On the Start menu, point to All Programs, point to Microsoft Learning, and then click 6436A.
21. In the 6436A window, click the Launch button of 6436A-NYC-DC3.
22. If you need to log on to NYC-DC3, click the Ctrl-Alt-Delete button.
23. In the User name box, type WoodgroveBank\Administrator, in the Password box, type Pa$$w0rd, and then click the Forward button.
24. On the Start menu of NYC-DC1, point to Administrative Tools, and then click DNS.
25. In the tree pane of the DNS Manager console, click NYC-DC1, right-click NYCDC1, and then click Properties.
Designing an Active Directory Forest Infrastructure in Windows Server® 2008 1-5
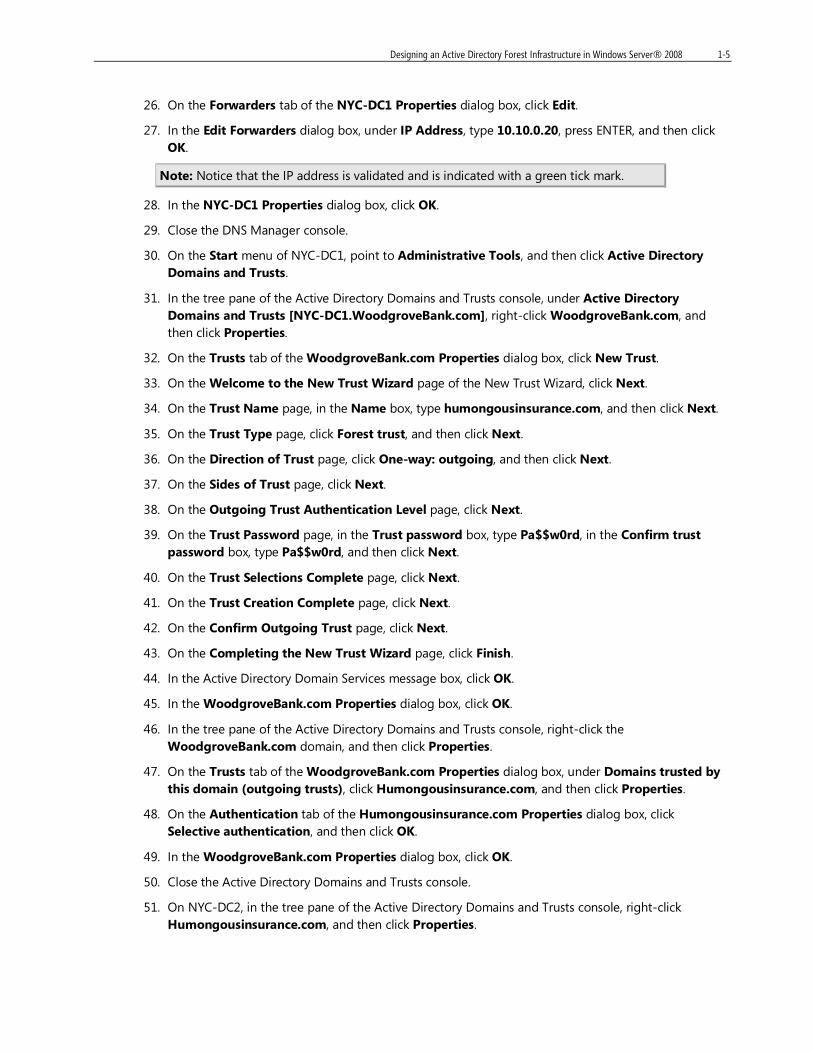
26. On the Forwarders tab of the NYC-DC1 Properties dialog box, click Edit.
27. In the Edit Forwarders dialog box, under IP Address, type 10.10.0.20, press ENTER, and then click OK.
Note: Notice that the IP address is validated and is indicated with a green tick mark.
28. In the NYC-DC1 Properties dialog box, click OK.
29. Close the DNS Manager console.
30. On the Start menu of NYC-DC1, point to Administrative Tools, and then click Active Directory Domains and Trusts.
31. In the tree pane of the Active Directory Domains and Trusts console, under Active Directory Domains and Trusts [NYC-DC1.WoodgroveBank.com], right-click WoodgroveBank.com, and then click Properties.
32. On the Trusts tab of the WoodgroveBank.com Properties dialog box, click New Trust.
33. On the Welcome to the New Trust Wizard page of the New Trust Wizard, click Next.
34. On the Trust Name page, in the Name box, type humongousinsurance.com, and then click Next.
35. On the Trust Type page, click Forest trust, and then click Next.
36. On the Direction of Trust page, click One-way: outgoing, and then click Next.
37. On the Sides of Trust page, click Next.
38. On the Outgoing Trust Authentication Level page, click Next.
39. On the Trust Password page, in the Trust password box, type Pa$$w0rd, in the Confirm trust password box, type Pa$$w0rd, and then click Next.
40. On the Trust Selections Complete page, click Next.
41. On the Trust Creation Complete page, click Next.
42. On the Confirm Outgoing Trust page, click Next.
43. On the Completing the New Trust Wizard page, click Finish.
44. In the Active Directory Domain Services message box, click OK.
45. In the WoodgroveBank.com Properties dialog box, click OK.
46. In the tree pane of the Active Directory Domains and Trusts console, right-click the WoodgroveBank.com domain, and then click Properties.
47. On the Trusts tab of the WoodgroveBank.com Properties dialog box, under Domains trusted by this domain (outgoing trusts), click Humongousinsurance.com, and then click Properties.
48. On the Authentication tab of the Humongousinsurance.com Properties dialog box, click Selective authentication, and then click OK.
49. In the WoodgroveBank.com Properties dialog box, click OK.
50. Close the Active Directory Domains and Trusts console.
51. On NYC-DC2, in the tree pane of the Active Directory Domains and Trusts console, right-click Humongousinsurance.com, and then click Properties.
1-6 Designing Active Directory Infrastructure and Services in Windows Server® 2008
52. On the Trusts tab of the Humongousinsurance.com Properties dialog box, click New Trust.
53. On the Welcome to the New Trust Wizard page of the New Trust Wizard, click Next.
54. On the Trust Name page, in the Name box, type WoodgroveBank.com, and then click Next.
55. On the Trust Type page, click Forest trust, and then click Next.
56. On the Direction of Trust page, click One-way: incoming, and then click Next.
57. On the Sides of Trust page, click Next.
58. On the Trust Password page, in the Trust password box, type Pa$$w0rd, in the Confirm trust password box, type Pa$$w0rd, and then click Next.
59. On the Trust Selections Complete page, click Next.
60. On the Trust Creation Complete page, click Next.
61. On the Confirm Incoming Trust page, click Next.
62. On the Completing the New Trust Wizard page, click Finish.
63. On the Trusts tab of the In the Humongousinsurance.com Properties dialog box, click OK.
64. Close the Active Directory Domains and Trusts console.
Exercise 3: Designing and Implementing Active Directory Schema Changes
Task 1: Review the requirements for schema changes at Woodgrove Bank.
Questions:
1. What schema changes are required to allow Woodgrove Bank to change to Windows Server 2008 Active Directory?
2. Where do these schema changes need to be implemented?
3. What permissions are required for these schema changes?
Answers:
1. The adprep.exe tool will need to be run to extend the Active Directory schema. First, the adprep.exe command will be run to prepare the forest. Next, the adprep.exe command will be used to prepare each domain where Windows Server 2008 domain controllers will be installed.
2. Because Woodgrove Bank has two Active Directory forests, each forest will need to be prepared individually.
• To prepare the Active Directory schema for the woodgrovebank.com forest perform the following tasks:
o Run the adprep.exe /forestprep command in the domain controller in the woodgrovebank.com forest root domain that holds the schema operations master role.
o Run the adprep /domainprep /gpprep command once on the domain controller that holds the infrastructure operations master role in each domain in the woodgrovebank.com forest.
• To prepare the Active Directory schema for the humongousinsurance.com forest, perform the following tasks:
Designing an Active Directory Forest Infrastructure in Windows Server® 2008 1-7
o Run the adprep.exe /forestprep command in the domain controller in the humongousinsurance.com forest root domain that holds the schema operations master role.
o Run the adprep /domainprep /gpprep command once on the domain controller that holds the infrastructure operations master role in each domain in the humongousinsurance.com forest.
3. Membership in the Schema Admins Active Directory group will be required to prepare the Active Directory schema for Windows Server 2008.
Task 2: Implement the schema changes.
1. On the Start menu of NYC-DC1, click Command Prompt.
2. At the command prompt of the Administrator: Command Prompt window, type D:, and then press ENTER.
3. At the command prompt of the Administrator: Command Prompt window, type cd d:\Labfiles\mod12\adprep, type adprep /forestprep, and then press ENTER.
4. At the command prompt, type adprep.exe /forestprep, and then press ENTER.
5. At the command prompt, type adprep /domainprep /gpprep, and then press ENTER.
Note: Notice that a message appears stating that Domain-wide information has already been updated.
6. On the Start menu of NYC-DC2, point to All Programs, point to Accessories, and then click Command Prompt.
7. In the Command Prompt window, at the command prompt, type D:, and then press ENTER.
8. At the command prompt, type cd d:\Labfiles\mod12\adprep, and then press ENTER.
9. At the command prompt, type adprep /forestprep, and then press ENTER.
10. At the command prompt, type C, and then press ENTER.
Note: Notice that a message appears stating that Adprep successfully updated the forest-wide information.
11. At the command prompt, type adprep /domainprep /gpprep, and then press ENTER.
Note: Notice that a message appears stating that Adprep successfully updated the Group Policy Object (GPO) information
12. On NYC-DC1, close the Command Prompt window.
13. On NYC-DC2, close the Command Prompt window.
Task 3: Close all virtual machines and discard the undo disks.
1. For each virtual machine that is running, close the Virtual Machine Remote Control window.
2. In the Close box, select Turn off machine and discard changes, and then click OK.
3. Close the 6436A Lab Launcher.
Exercise 4: Discussion In this exercise, the instructor will lead a discussion about the design decisions made in Exercises 1–3.

Designing an Active Directory Domain Infrastructure in Windows Server® 2008 2-1
Module 2 Designing an Active Directory Domain Infrastructure in Windows Server® 2008
Contents: Lab Answer Keys 2
2-2 Designing Active Directory Infrastructure and Services in Windows Server® 2008
Lab Answer Keys Lab 2: Designing an Active Directory Domain Infrastructure in Windows Server 2008
Exercise 1: Designing Active Directory Domains
Task 1: Start the virtual machines, and then log on.
1. On your host machine, click Start, point to All Programs, point to Microsoft Learning, and then click 6436A. The Lab Launcher starts.
2. In the Lab Launcher, next to 6436A-NYC-DC3, click Launch.
3. In the Lab Launcher, next to 6436A-CHI-DC4, click Launch.
4. In the Lab Launcher, next to 6436A-TOR-DC8, click Launch.
5. In the Lab Launcher, next to 6436A-LON-DC5, click Launch.
6. Log on to NYC-DC3 as Administrator with the password Pa$$w0rd.
7. Log on to CHI-DC4 as NorthwindTraders\Administrator with the password Pa$$w0rd.
8. Log on to TOR-DC8 as NorthwindTraders\Administrator with the password Pa$$w0rd.
9. Log on to LON-DC5 as Administrator with the password Pa$$w0rd.
10. Minimize the Lab Launcher window.
Task 2: Review the information about the current Active Directory domain.
You will gather the necessary requirements to review and potentially alter the Active Directory domain design.
Question: Outline the relevant Active Directory infrastructure required for an Active Directory domain design.
DNS Name
Forest Functional
Level DI DA SI SA LC
DI = Data Isolation
Legend
DA = Data Autonomy
SI = Service Isolation
SA = Service Autonomy
LC = Limited Connectivity
Answer:
Designing an Active Directory Domain Infrastructure in Windows Server® 2008 2-3
DNS Name
Forest Functional
Level DI DA SI SA LC
woodgrovebank.com Windows Server 2003 No No No Yes No
treyresearch.com Windows Server 2003 No No No Yes No
Task 3 Review the requirements for the Windows Server 2008 Active Directory domain implementation.
Determine whether Woodgrove Bank meets the requirements to move to Windows Server 2008 Active Directory.
Questions:
• Does Woodgrove Bank meet all requirements for Windows Server 2008 Active Directory?
Answers:
• Yes. The forest functional level for Woodgrove Bank is set to Windows Server 2003, which will allow for the installation of Windows Server 2008 domain controllers, once the prerequisites have been met.
Task 4: Create an Active Directory domain design.
Create an Active Directory domain design for Woodgrove Bank and its subsidiaries.
Questions:
1. Create an Active Directory domain design for Woodgrove Bank, based on the current Woodgrove Bank Active Directory infrastructure and your analysis of the requirements for Windows Server 2008 Active Directory.
2. Where will you place the users for the new business division?
Answers:
1. You can create an Active Directory forest design based on the business requirements, security and administration, network requirements, and current Active Directory forest design. The Active Directory domain design for Woodgrove Bank is as follows:
• The operational requirements of Woodgrove Bank suggest that all five regions can reside in a single Active Directory forest.
• Woodgrove Bank will continue to use a dedicated forest root domain with the name, woodgrovebank.com, because there is no reason to change it.
• The single forest model will be used for the five Woodgrove Bank regions.
• Given the network bandwidth concerns, each region will have its own domain, which will be a child of the forest root domain:
a. us.woodgrovebank.com
b. canada.woodgrovebank.com
c. latinamerica.woodgrovebank.com (to cover Mexico and Argentina)
d. europe.woodgrovebank.com

2-4 Designing Active Directory Infrastructure and Services in Windows Server® 2008
2. Given the requirement to identify Trey Research Active Directory through a different domain name, the user accounts for the new business division will be placed in a new domain tree in the Woodgrove Bank forest. The new domain tree will be called treyresearch.com. This domain tree will have only a single domain.
Exercise 2: Designing and Implementing DNS Namespace Integration
Task 1: Review the requirements for the DNS design.
Questions:
1. Is there a need to implement another name-resolution solution, such as WINS?
2. What will be used for Internet name resolution?
3. What should be achieved between woodgrovebank.com and treyresearch.com domains?
Answers:
1. No, all workstations and servers can use DNS, so there is no need for WINS.
2. A Unix-based DNS server will handle Internet name resolution.
3. Name resolution for application access must be implemented between these two domains.
Task 2: Design the DNS namespace integration based on the forest and domain designs.
Design and implement DNS namespace integration.
Questions:
1. What types of DNS zones will you use?
2. How will you secure the data in the DNS zones?
3. What will be the replication scope of the DNS zones?
4. How will you achieve Internet name resolution for clients?
5. How will you achieve name resolution between the woodgrovebank.com and treyresearch.com domains?
Answers:
1. All DNS zones will be configured as Active Directory-integrated zones. This will allow Woodgrove Bank and its subsidiaries to minimize the amount of DNS record management because dynamic DNS can be used.
2. The DNS data will be secured by allowing secure dynamic updates only.
3. The zone replication scope on each zone will be set to “All DNS servers in the forest that are domain controllers running Windows Server 2003 or Windows Server 2008.”
4. A forwarder will be configured on the local DNS, with the IP address of the Unix based server that handles Internet name resolution. The client will be configured with the IP address of the Active Directory DNS server.
5. Conditional forwarders will be implemented in both the woodgrovebank.com and treyresearch.com domain and will point to the DNS of another domain.
Designing an Active Directory Domain Infrastructure in Windows Server® 2008 2-5
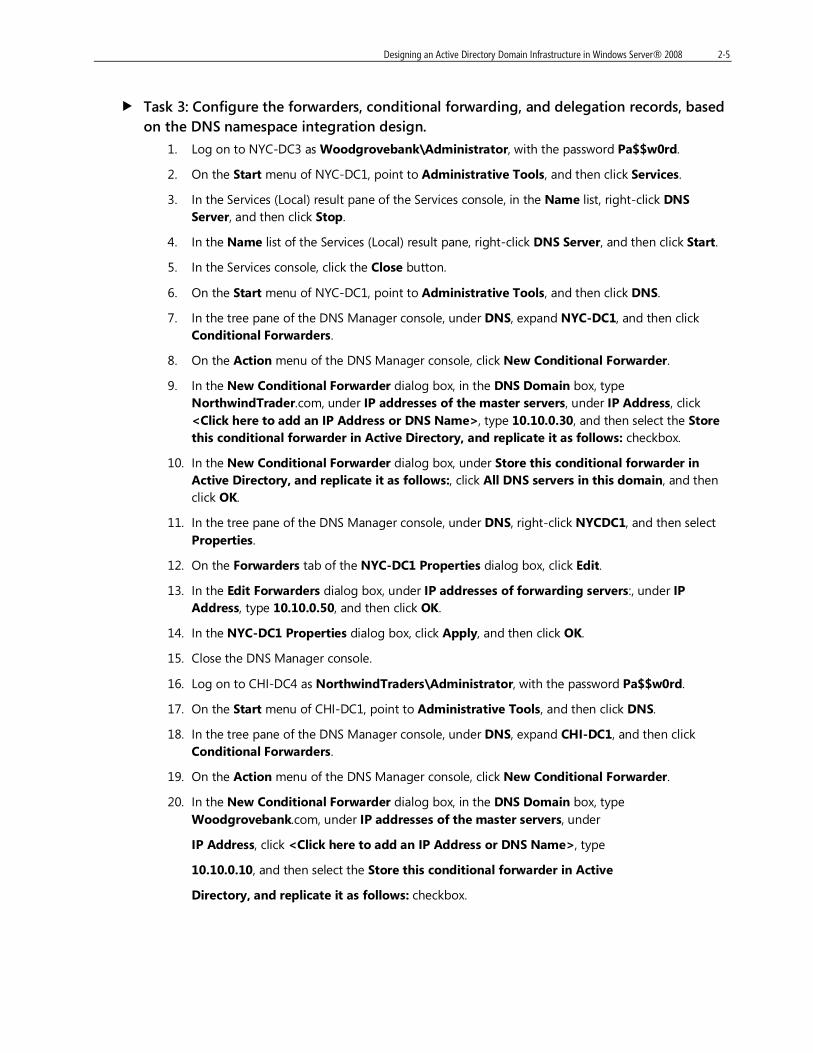
Task 3: Configure the forwarders, conditional forwarding, and delegation records, based on the DNS namespace integration design.
1. Log on to NYC-DC3 as Woodgrovebank\Administrator, with the password Pa$$w0rd.
2. On the Start menu of NYC-DC1, point to Administrative Tools, and then click Services.
3. In the Services (Local) result pane of the Services console, in the Name list, right-click DNS Server, and then click Stop.
4. In the Name list of the Services (Local) result pane, right-click DNS Server, and then click Start.
5. In the Services console, click the Close button.
6. On the Start menu of NYC-DC1, point to Administrative Tools, and then click DNS.
7. In the tree pane of the DNS Manager console, under DNS, expand NYC-DC1, and then click Conditional Forwarders.
8. On the Action menu of the DNS Manager console, click New Conditional Forwarder.
9. In the New Conditional Forwarder dialog box, in the DNS Domain box, type NorthwindTrader.com, under IP addresses of the master servers, under IP Address, click <Click here to add an IP Address or DNS Name>, type 10.10.0.30, and then select the Store this conditional forwarder in Active Directory, and replicate it as follows: checkbox.
10. In the New Conditional Forwarder dialog box, under Store this conditional forwarder in Active Directory, and replicate it as follows:, click All DNS servers in this domain, and then click OK.
11. In the tree pane of the DNS Manager console, under DNS, right-click NYCDC1, and then select Properties.
12. On the Forwarders tab of the NYC-DC1 Properties dialog box, click Edit.
13. In the Edit Forwarders dialog box, under IP addresses of forwarding servers:, under IP Address, type 10.10.0.50, and then click OK.
14. In the NYC-DC1 Properties dialog box, click Apply, and then click OK.
15. Close the DNS Manager console.
16. Log on to CHI-DC4 as NorthwindTraders\Administrator, with the password Pa$$w0rd.
17. On the Start menu of CHI-DC1, point to Administrative Tools, and then click DNS.
18. In the tree pane of the DNS Manager console, under DNS, expand CHI-DC1, and then click Conditional Forwarders.
19. On the Action menu of the DNS Manager console, click New Conditional Forwarder.
20. In the New Conditional Forwarder dialog box, in the DNS Domain box, type Woodgrovebank.com, under IP addresses of the master servers, under
IP Address, click <Click here to add an IP Address or DNS Name>, type
10.10.0.10, and then select the Store this conditional forwarder in Active
Directory, and replicate it as follows: checkbox.
2-6 Designing Active Directory Infrastructure and Services in Windows Server® 2008
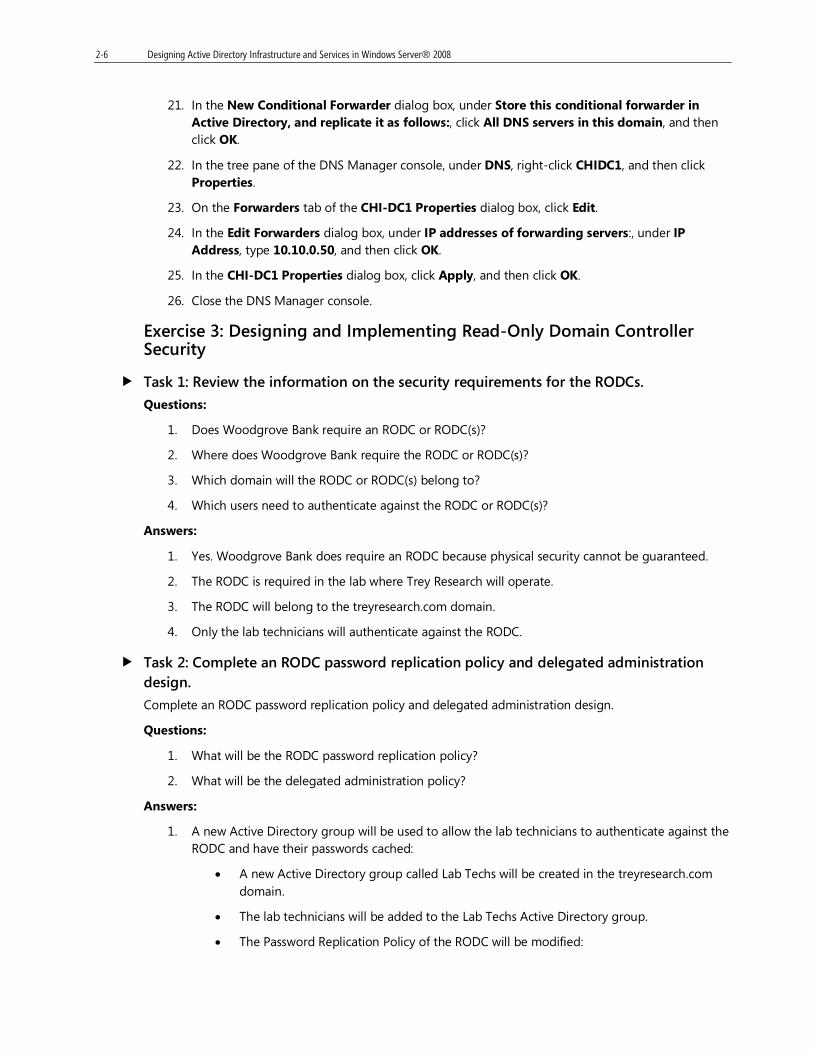
21. In the New Conditional Forwarder dialog box, under Store this conditional forwarder in Active Directory, and replicate it as follows:, click All DNS servers in this domain, and then click OK.
22. In the tree pane of the DNS Manager console, under DNS, right-click CHIDC1, and then click Properties.
23. On the Forwarders tab of the CHI-DC1 Properties dialog box, click Edit.
24. In the Edit Forwarders dialog box, under IP addresses of forwarding servers:, under IP Address, type 10.10.0.50, and then click OK.
25. In the CHI-DC1 Properties dialog box, click Apply, and then click OK.
26. Close the DNS Manager console.
Exercise 3: Designing and Implementing Read-Only Domain Controller Security
Task 1: Review the information on the security requirements for the RODCs.
Questions:
1. Does Woodgrove Bank require an RODC or RODC(s)?
2. Where does Woodgrove Bank require the RODC or RODC(s)?
3. Which domain will the RODC or RODC(s) belong to?
4. Which users need to authenticate against the RODC or RODC(s)?
Answers:
1. Yes. Woodgrove Bank does require an RODC because physical security cannot be guaranteed.
2. The RODC is required in the lab where Trey Research will operate.
3. The RODC will belong to the treyresearch.com domain.
4. Only the lab technicians will authenticate against the RODC.
Task 2: Complete an RODC password replication policy and delegated administration design.
Complete an RODC password replication policy and delegated administration design.
Questions:
1. What will be the RODC password replication policy?
2. What will be the delegated administration policy?
Answers:
1. A new Active Directory group will be used to allow the lab technicians to authenticate against the RODC and have their passwords cached:
• A new Active Directory group called Lab Techs will be created in the treyresearch.com domain.
• The lab technicians will be added to the Lab Techs Active Directory group.
• The Password Replication Policy of the RODC will be modified:
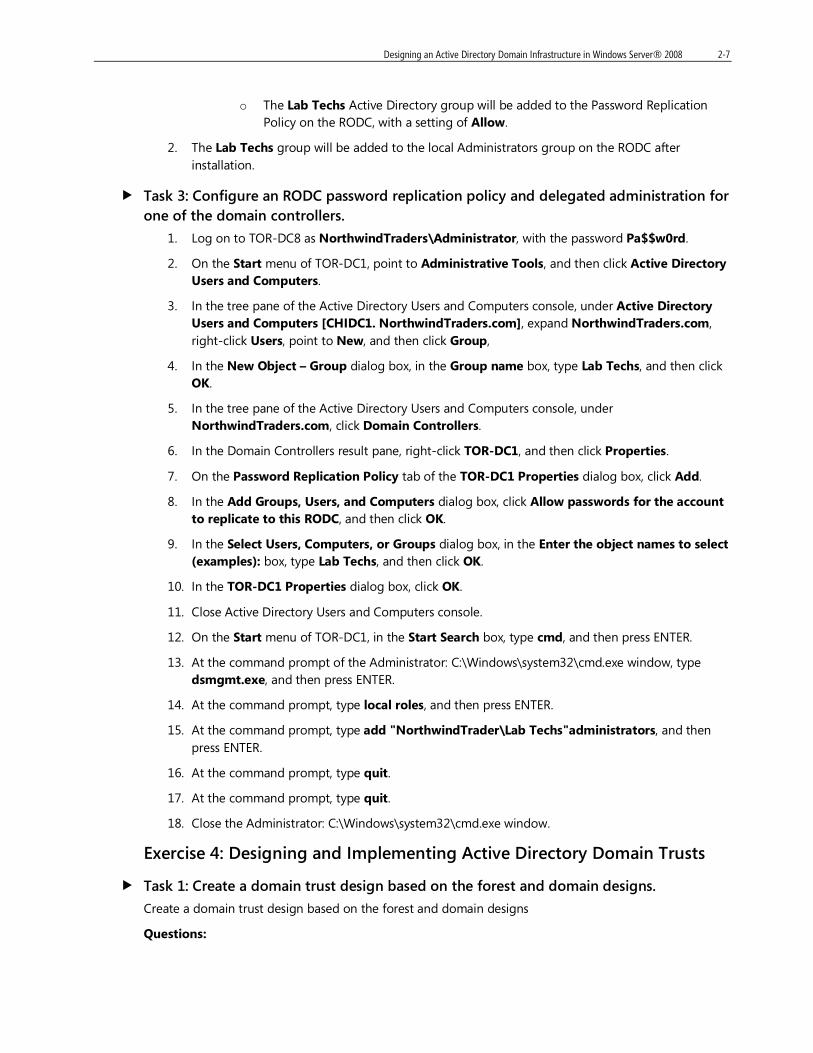
Designing an Active Directory Domain Infrastructure in Windows Server® 2008 2-7
o The Lab Techs Active Directory group will be added to the Password Replication Policy on the RODC, with a setting of Allow.
2. The Lab Techs group will be added to the local Administrators group on the RODC after installation.
Task 3: Configure an RODC password replication policy and delegated administration for one of the domain controllers.
1. Log on to TOR-DC8 as NorthwindTraders\Administrator, with the password Pa$$w0rd.
2. On the Start menu of TOR-DC1, point to Administrative Tools, and then click Active Directory Users and Computers.
3. In the tree pane of the Active Directory Users and Computers console, under Active Directory Users and Computers [CHIDC1. NorthwindTraders.com], expand NorthwindTraders.com, right-click Users, point to New, and then click Group,
4. In the New Object – Group dialog box, in the Group name box, type Lab Techs, and then click OK.
5. In the tree pane of the Active Directory Users and Computers console, under NorthwindTraders.com, click Domain Controllers.
6. In the Domain Controllers result pane, right-click TOR-DC1, and then click Properties.
7. On the Password Replication Policy tab of the TOR-DC1 Properties dialog box, click Add.
8. In the Add Groups, Users, and Computers dialog box, click Allow passwords for the account to replicate to this RODC, and then click OK.
9. In the Select Users, Computers, or Groups dialog box, in the Enter the object names to select (examples): box, type Lab Techs, and then click OK.
10. In the TOR-DC1 Properties dialog box, click OK.
11. Close Active Directory Users and Computers console.
12. On the Start menu of TOR-DC1, in the Start Search box, type cmd, and then press ENTER.
13. At the command prompt of the Administrator: C:\Windows\system32\cmd.exe window, type dsmgmt.exe, and then press ENTER.
14. At the command prompt, type local roles, and then press ENTER.
15. At the command prompt, type add "NorthwindTrader\Lab Techs"administrators, and then press ENTER.
16. At the command prompt, type quit.
17. At the command prompt, type quit.
18. Close the Administrator: C:\Windows\system32\cmd.exe window.
Exercise 4: Designing and Implementing Active Directory Domain Trusts
Task 1: Create a domain trust design based on the forest and domain designs.
Create a domain trust design based on the forest and domain designs
Questions:
2-8 Designing Active Directory Infrastructure and Services in Windows Server® 2008
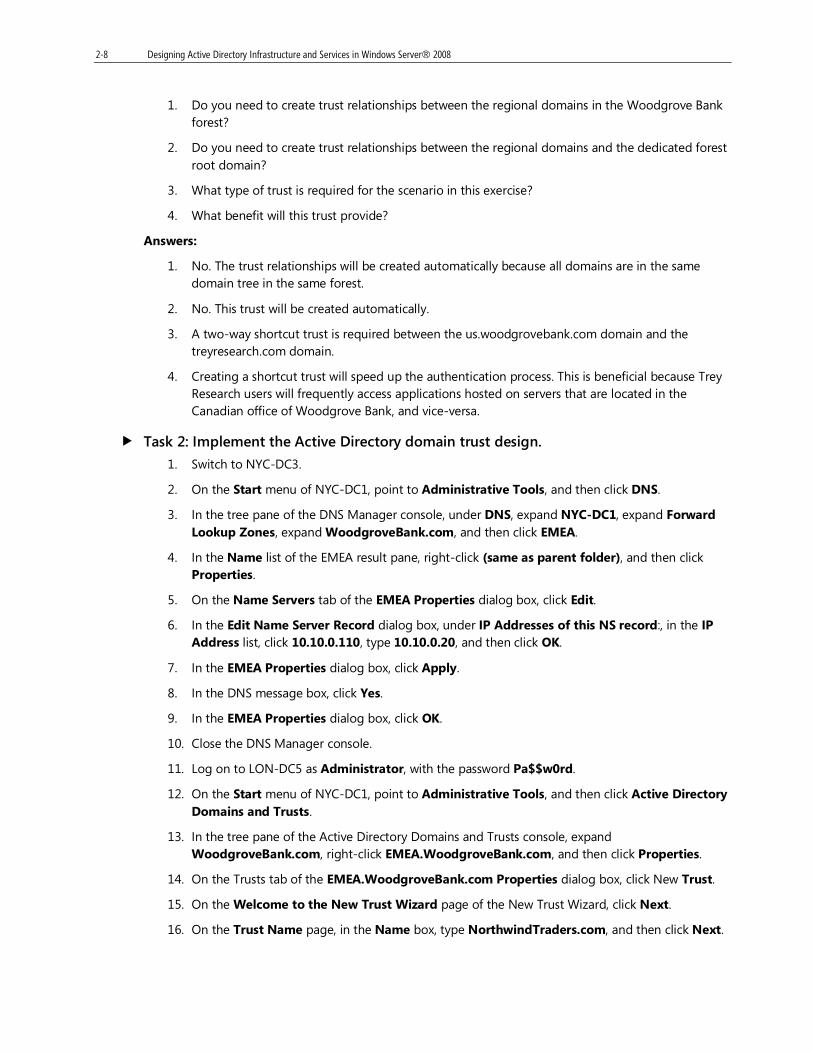
1. Do you need to create trust relationships between the regional domains in the Woodgrove Bank forest?
2. Do you need to create trust relationships between the regional domains and the dedicated forest root domain?
3. What type of trust is required for the scenario in this exercise?
4. What benefit will this trust provide?
Answers:
1. No. The trust relationships will be created automatically because all domains are in the same domain tree in the same forest.
2. No. This trust will be created automatically.
3. A two-way shortcut trust is required between the us.woodgrovebank.com domain and the treyresearch.com domain.
4. Creating a shortcut trust will speed up the authentication process. This is beneficial because Trey Research users will frequently access applications hosted on servers that are located in the Canadian office of Woodgrove Bank, and vice-versa.
Task 2: Implement the Active Directory domain trust design.
1. Switch to NYC-DC3.
2. On the Start menu of NYC-DC1, point to Administrative Tools, and then click DNS.
3. In the tree pane of the DNS Manager console, under DNS, expand NYC-DC1, expand Forward Lookup Zones, expand WoodgroveBank.com, and then click EMEA.
4. In the Name list of the EMEA result pane, right-click (same as parent folder), and then click Properties.
5. On the Name Servers tab of the EMEA Properties dialog box, click Edit.
6. In the Edit Name Server Record dialog box, under IP Addresses of this NS record:, in the IP Address list, click 10.10.0.110, type 10.10.0.20, and then click OK.
7. In the EMEA Properties dialog box, click Apply.
8. In the DNS message box, click Yes.
9. In the EMEA Properties dialog box, click OK.
10. Close the DNS Manager console.
11. Log on to LON-DC5 as Administrator, with the password Pa$$w0rd.
12. On the Start menu of NYC-DC1, point to Administrative Tools, and then click Active Directory Domains and Trusts.
13. In the tree pane of the Active Directory Domains and Trusts console, expand WoodgroveBank.com, right-click EMEA.WoodgroveBank.com, and then click Properties.
14. On the Trusts tab of the EMEA.WoodgroveBank.com Properties dialog box, click New Trust.
15. On the Welcome to the New Trust Wizard page of the New Trust Wizard, click Next.
16. On the Trust Name page, in the Name box, type NorthwindTraders.com, and then click Next.

Designing an Active Directory Domain Infrastructure in Windows Server® 2008 2-9
17. On the Trust Type page, under Select the appropriate trust type:, click Realm trust, and then click Next.
18. On the Transitivity of Trust page, click Next.
19. On the Direction of Trust page, click Next.
20. On the Trust Password page, in the Trust password box, type Pa$$w0rd, in the Confirm password box, type Pa$$w0rd, and then click Next.
21. On the Trust Selections Complete page, click Next.
22. On the Completing the New Trust Wizard page, click Finish.
23. In the EMEA.WoodgroveBank.com Properties dialog box, click OK.
24. Close the Active Directory Domains and Trusts console.
25. Switch to CHI-DC1.
26. On the Start menu of CHI-DC1, point to Administrative Tools, and then click Active Directory Domains and Trusts.
27. In the tree pane of the Active Directory Domains and Trusts console, under Active Directory Domains and Trusts [CHIDC1. NorthwindTraders.com], right-click NorthwindTraders.com, and then click Properties.
28. On the Trusts tab of the NorthwindTraders.com Properties dialog box, click New Trust.
29. On the Welcome to the New Trust Wizard page of the New Trust Wizard, click Next.
30. On the Trust Name page, in the Name box, type emea.woodgrovebank.com, and then click Next.
31. On the Direction of Trust page, click Next.
32. On the Sides of Trust page, click Next.
33. On the Outgoing Trust Authentication Level page, click Next.
34. On the Trust Password page, in the Trust password box, type Pa$$w0rd, in the Confirm trust password box, type Pa$$w0rd, and then click Next.
35. On the Trust Selections Complete page, click Next.
36. On the Trust Creation Complete page, click Next.
37. On the Confirm Outgoing Trust page, click Next.
38. On the Confirm Incoming Trust page, click Next.
39. On the Completing the New Trust Wizard page, click Finish.
40. In the Active Directory Domain Services message box, click OK.
41. In the NorthwindTraders.com Properties dialog box, click OK.
42. Close the Active Directory Domains and Trusts console.
Task 3: Close all virtual machines and discard undo disks.
1. For each virtual machine that is running, close the Virtual Machine Remote Control window.
2. In the Close box, select Turn off machine and discard changes. Click OK.

2-10 Designing Active Directory Infrastructure and Services in Windows Server® 2008
3. Close the 6436A Lab Launcher.
Exercise 5: Lab Discussion In this exercise, the instructor will lead a discussion about the design decisions made in Exercises 1 through 4.

Designing Active Directory Sites and Replication in Windows Server® 2008 3-1
Module 3 Designing Active Directory Sites and Replication in Windows Server® 2008
Contents: Lab Answer Keys 2
3-2 Designing Active Directory Infrastructure and Services in Windows Server® 2008
Lab Answer Keys Lab 3: Designing AD DS Sites and Replication in Windows Server 2008
Exercise 1: Designing and Implementing AD DS Sites
Task 1: Start the virtual machine, and then log on.
1. On your host machine, click Start, point to All Programs, point to Microsoft Learning, and then click 6436A. The Lab Launcher starts.
2. In the Lab Launcher, next to 6436A-NYC-DC3, click Launch.
3. Log on to NYC-DC3 as WOODGROVEBANK\Administrator, with the password, Pa$$w0rd.
4. Minimize the Lab Launcher window.
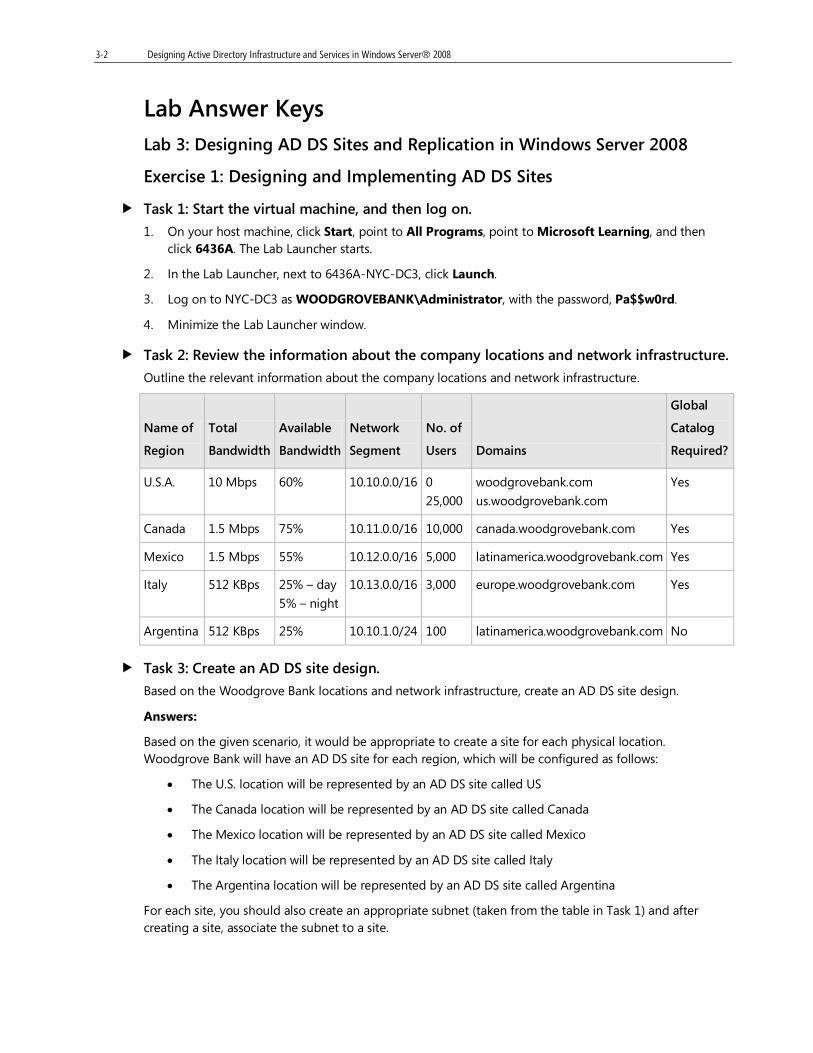
Task 2: Review the information about the company locations and network infrastructure.
Outline the relevant information about the company locations and network infrastructure.
Name of
Region
Total
Bandwidth
Available
Bandwidth
Network
Segment
No. of
Users Domains
Global
Catalog
Required?
U.S.A. 10 Mbps 60% 10.10.0.0/16 0
25,000
woodgrovebank.com
us.woodgrovebank.com
Yes
Canada 1.5 Mbps 75% 10.11.0.0/16 10,000 canada.woodgrovebank.com Yes
Mexico 1.5 Mbps 55% 10.12.0.0/16 5,000 latinamerica.woodgrovebank.com Yes
Italy 512 KBps 25% – day
5% – night
10.13.0.0/16 3,000 europe.woodgrovebank.com Yes
Argentina 512 KBps 25% 10.10.1.0/24 100 latinamerica.woodgrovebank.com No
Task 3: Create an AD DS site design.
Based on the Woodgrove Bank locations and network infrastructure, create an AD DS site design.
Answers:
Based on the given scenario, it would be appropriate to create a site for each physical location. Woodgrove Bank will have an AD DS site for each region, which will be configured as follows:
• The U.S. location will be represented by an AD DS site called US
• The Canada location will be represented by an AD DS site called Canada
• The Mexico location will be represented by an AD DS site called Mexico
• The Italy location will be represented by an AD DS site called Italy
• The Argentina location will be represented by an AD DS site called Argentina
For each site, you should also create an appropriate subnet (taken from the table in Task 1) and after creating a site, associate the subnet to a site.
Designing Active Directory Sites and Replication in Windows Server® 2008 3-3
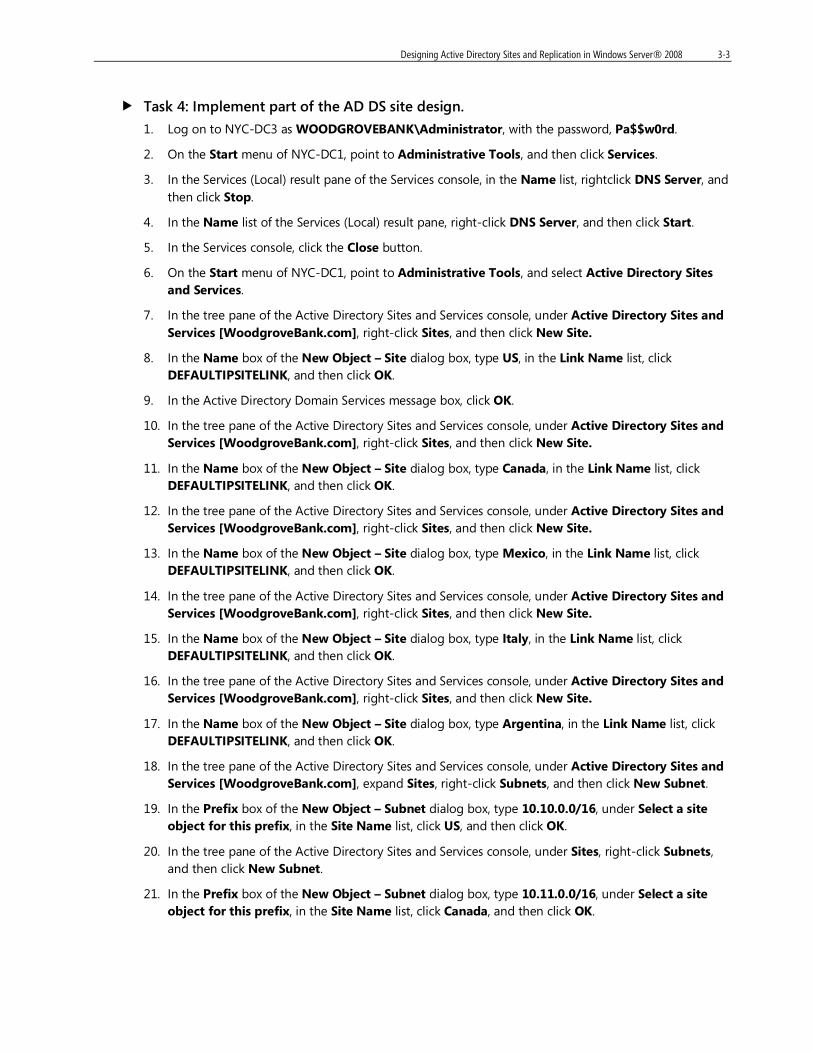
Task 4: Implement part of the AD DS site design.
1. Log on to NYC-DC3 as WOODGROVEBANK\Administrator, with the password, Pa$$w0rd.
2. On the Start menu of NYC-DC1, point to Administrative Tools, and then click Services.
3. In the Services (Local) result pane of the Services console, in the Name list, rightclick DNS Server, and then click Stop.
4. In the Name list of the Services (Local) result pane, right-click DNS Server, and then click Start.
5. In the Services console, click the Close button.
6. On the Start menu of NYC-DC1, point to Administrative Tools, and select Active Directory Sites and Services.
7. In the tree pane of the Active Directory Sites and Services console, under Active Directory Sites and Services [WoodgroveBank.com], right-click Sites, and then click New Site.
8. In the Name box of the New Object – Site dialog box, type US, in the Link Name list, click DEFAULTIPSITELINK, and then click OK.
9. In the Active Directory Domain Services message box, click OK.
10. In the tree pane of the Active Directory Sites and Services console, under Active Directory Sites and Services [WoodgroveBank.com], right-click Sites, and then click New Site.
11. In the Name box of the New Object – Site dialog box, type Canada, in the Link Name list, click DEFAULTIPSITELINK, and then click OK.
12. In the tree pane of the Active Directory Sites and Services console, under Active Directory Sites and Services [WoodgroveBank.com], right-click Sites, and then click New Site.
13. In the Name box of the New Object – Site dialog box, type Mexico, in the Link Name list, click DEFAULTIPSITELINK, and then click OK.
14. In the tree pane of the Active Directory Sites and Services console, under Active Directory Sites and Services [WoodgroveBank.com], right-click Sites, and then click New Site.
15. In the Name box of the New Object – Site dialog box, type Italy, in the Link Name list, click DEFAULTIPSITELINK, and then click OK.
16. In the tree pane of the Active Directory Sites and Services console, under Active Directory Sites and Services [WoodgroveBank.com], right-click Sites, and then click New Site.
17. In the Name box of the New Object – Site dialog box, type Argentina, in the Link Name list, click DEFAULTIPSITELINK, and then click OK.
18. In the tree pane of the Active Directory Sites and Services console, under Active Directory Sites and Services [WoodgroveBank.com], expand Sites, right-click Subnets, and then click New Subnet.
19. In the Prefix box of the New Object – Subnet dialog box, type 10.10.0.0/16, under Select a site object for this prefix, in the Site Name list, click US, and then click OK.
20. In the tree pane of the Active Directory Sites and Services console, under Sites, right-click Subnets, and then click New Subnet.
21. In the Prefix box of the New Object – Subnet dialog box, type 10.11.0.0/16, under Select a site object for this prefix, in the Site Name list, click Canada, and then click OK.
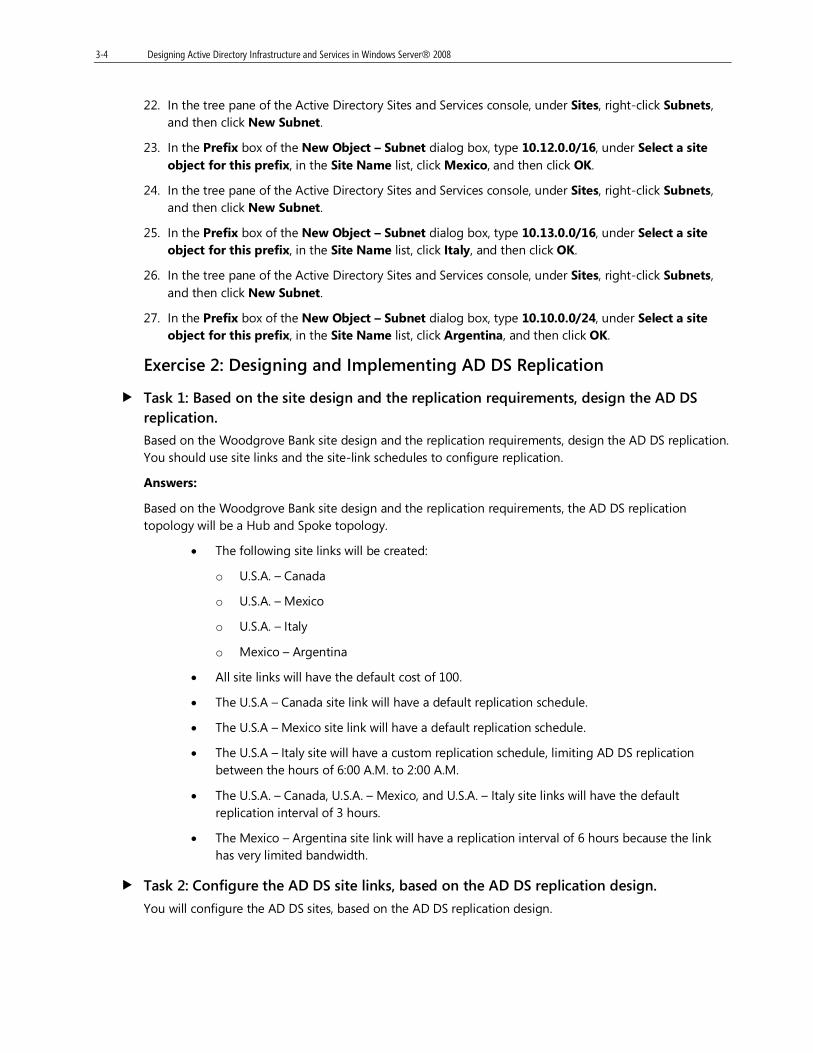
3-4 Designing Active Directory Infrastructure and Services in Windows Server® 2008
22. In the tree pane of the Active Directory Sites and Services console, under Sites, right-click Subnets, and then click New Subnet.
23. In the Prefix box of the New Object – Subnet dialog box, type 10.12.0.0/16, under Select a site object for this prefix, in the Site Name list, click Mexico, and then click OK.
24. In the tree pane of the Active Directory Sites and Services console, under Sites, right-click Subnets, and then click New Subnet.
25. In the Prefix box of the New Object – Subnet dialog box, type 10.13.0.0/16, under Select a site object for this prefix, in the Site Name list, click Italy, and then click OK.
26. In the tree pane of the Active Directory Sites and Services console, under Sites, right-click Subnets, and then click New Subnet.
27. In the Prefix box of the New Object – Subnet dialog box, type 10.10.0.0/24, under Select a site object for this prefix, in the Site Name list, click Argentina, and then click OK.
Exercise 2: Designing and Implementing AD DS Replication
Task 1: Based on the site design and the replication requirements, design the AD DS replication.
Based on the Woodgrove Bank site design and the replication requirements, design the AD DS replication. You should use site links and the site-link schedules to configure replication.
Answers:
Based on the Woodgrove Bank site design and the replication requirements, the AD DS replication topology will be a Hub and Spoke topology.
• The following site links will be created:
o U.S.A. – Canada
o U.S.A. – Mexico
o U.S.A. – Italy
o Mexico – Argentina
• All site links will have the default cost of 100.
• The U.S.A – Canada site link will have a default replication schedule.
• The U.S.A – Mexico site link will have a default replication schedule.
• The U.S.A – Italy site will have a custom replication schedule, limiting AD DS replication between the hours of 6:00 A.M. to 2:00 A.M.
• The U.S.A. – Canada, U.S.A. – Mexico, and U.S.A. – Italy site links will have the default replication interval of 3 hours.
• The Mexico – Argentina site link will have a replication interval of 6 hours because the link has very limited bandwidth.
Task 2: Configure the AD DS site links, based on the AD DS replication design.
You will configure the AD DS sites, based on the AD DS replication design.

Designing Active Directory Sites and Replication in Windows Server® 2008 3-5
1. In the tree pane of the Active Directory Sites and Services console, under Active Directory Sites and Services (WoodgroveBank.com), expand Sites, expand Inter-Site Transports, right-click IP, and then click New Site Link.
2. In the Name box of the New Object – Site Link dialog box, type USCanada, in the Sites not in this site link box, click US, and then click Add.
3. In the Sites not in this site link box of the New Object – Site Link dialog box, click Canada, click Add, and then click OK.
4. In the tree pane of the Active Directory Sites and Services console, under Inter-Site Transports, right-click IP, and then click New Site Link.
5. In the Name box of the New Object – Site Link dialog box, type US-Mexico, in the Sites not in this site link box, click Mexico, and then click Add.
6. In the Sites not in this site link box of the New Object – Site Link dialog box, click US, click Add, and then click OK.
7. In the tree pane of the Active Directory Sites and Services console, under Inter-Site Transports, right-click IP, and then click New Site Link.
8. In the Name box of the New Object – Site Link dialog box, type US-Italy, in the Sites not in this site link box, click Italy, and then click Add.
9. In the Sites not in this site link box of the New Object – Site Link dialog box, click US, click Add, and then click OK.
10. In the tree pane of the Active Directory Sites and Services console, under Inter-Site Transports, right-click IP, and then click New Site Link.
11. In the Name box of the New Object – Site Link dialog box, type Mexico- Argentina, in the Sites not in this site link box, click Argentina, and then click Add.
12. In the Sites not in this site link box of the New Object – Site Link dialog box, click Mexico, click Add, and then click OK.
13. In the tree pane of the Active Directory Sites and Services console, under Inter-Site Transports, click IP.
14. In the IP result pane, right-click Mexico-Argentina, and then click Properties.
15. On the General tab of the Mexico-Argentina Properties dialog box, in the Replicate every box, type 360, and then click OK.
16. In the IP result pane of the Active Directory Sites and Services console, rightclick US-Italy, and then click Properties.
17. On the General tab of the US-Italy Properties dialog box, click Change Schedule.
18. In the Schedule for US-Italy dialog box, select Sunday through Saturday from 2:00 AM to 6:00 AM, click Replication Not Available, and then click OK.
19. In the US-Italy Properties dialog box, click OK.
20. Close the Active Directory Sites and Services console.
Task 3: Close all virtual machines and discard the undo disks..
1. For each virtual machine that is running, close the Virtual Machine Remote Control window.

3-6 Designing Active Directory Infrastructure and Services in Windows Server® 2008
2. In the Close box, select Turn off machine and discard changes. Click OK.
3. Close the 6436A Lab Launcher.
Exercise 3: Designing the Placement of Domain Controllers
Task 1: Based on the site and replication design, and the company requirements for authentication and failover, create a domain controller placement design.
Questions:
1. Where should the domain controllers be placed?
2. How many domain controllers should be used?
Answers:
Based on the site and replication design, and the company requirements for authentication and failover, the AD DS domain controller placement design will be as follows:
• Two domain controllers for the forest root domain of woodgrovebank.com will be placed in the U.S.A. location.
• Five domain controllers for the us.woodgrovebank.com domain will be placed in the U.S.A. location.
• Two domain controllers for the latinamerica.woodgrovebank.com domain will be placed in the Mexico location.
• One domain controller for the europe.woodgrovebank.com domain will be placed in the Italy location.
• No writable domain controllers will be placed in the Argentina location.
Task 2: Create a Global Catalog, RODC, and operations master placement design.
You will create a Global Catalog, RODC, and operations master placement design.
Questions:
1. Where will the Global Catalogs be placed?
2. Where will the RODC be placed?
Answers:
1. Every writable domain controller will be made a Global Catalog server. The Global Catalog servers will be placed in U.S.A., Canada, Mexico, and Italy AD DS sites.
2. An RODC will be placed in the Argentina site because of the lack of physical security.
3. The following is the Operations Master Role Placement design for Woodgrove Bank:
• Schema Master placement: the schema master will reside on a server in the U.S.A. site in a forest root domain.
• Domain Naming Master placement: the domain naming master will reside on a server in the U.S.A. site.
• Infrastructure Master placement:
o The infrastructure master for the woodgovebank.com domain will reside on a server in the U.S.A. site.
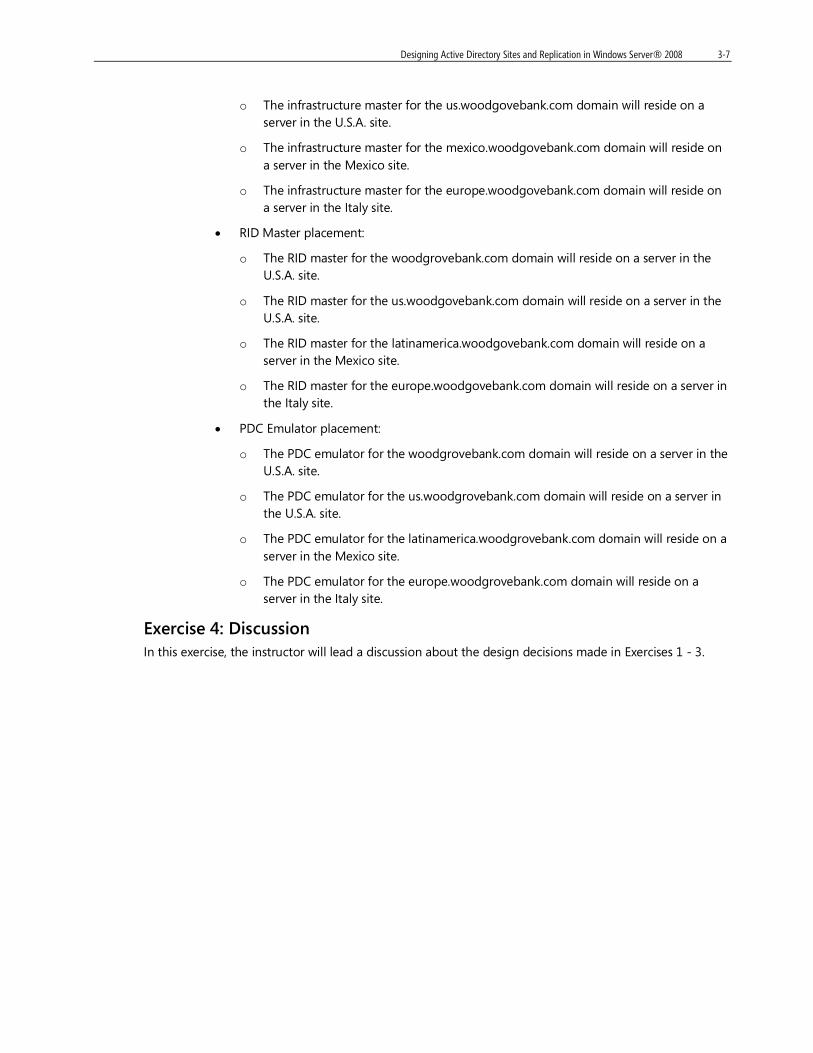
Designing Active Directory Sites and Replication in Windows Server® 2008 3-7
o The infrastructure master for the us.woodgovebank.com domain will reside on a server in the U.S.A. site.
o The infrastructure master for the mexico.woodgovebank.com domain will reside on a server in the Mexico site.
o The infrastructure master for the europe.woodgovebank.com domain will reside on a server in the Italy site.
• RID Master placement:
o The RID master for the woodgrovebank.com domain will reside on a server in the U.S.A. site.
o The RID master for the us.woodgovebank.com domain will reside on a server in the U.S.A. site.
o The RID master for the latinamerica.woodgovebank.com domain will reside on a server in the Mexico site.
o The RID master for the europe.woodgovebank.com domain will reside on a server in the Italy site.
• PDC Emulator placement:
o The PDC emulator for the woodgrovebank.com domain will reside on a server in the U.S.A. site.
o The PDC emulator for the us.woodgrovebank.com domain will reside on a server in the U.S.A. site.
o The PDC emulator for the latinamerica.woodgrovebank.com domain will reside on a server in the Mexico site.
o The PDC emulator for the europe.woodgrovebank.com domain will reside on a server in the Italy site.
Exercise 4: Discussion In this exercise, the instructor will lead a discussion about the design decisions made in Exercises 1 - 3.

Designing Active Directory Domain Administrative Structures in Windows Server® 2008 4-1
Module 4 Designing Active Directory Domain Administrative Structures in Windows Server® 2008
Contents: Lab Answer Keys 2

4-2 Designing Active Directory Infrastructure and Services in Windows Server® 2008
Lab Answer Keys Lab 4: Designing AD DS Administrative Structures in Windows Server 2008
Exercise 1: Designing and Implementing Organizational Units
Task 1: Start the virtual machines, and then log on.
1. On your host machine, click Start, point to All Programs, point to Microsoft Learning, and then click 6436A. The Lab Launcher starts.
2. In the Lab Launcher, next to 6436A-NYC-DC3, click Launch.
3. Log on to NYC-DC3 as Administrator with the password Pa$$w0rd.
4. Minimize the Lab Launcher window.
Task 2 : Review the information about the company locations, administrative structures, and Group Policy requirements.
Question:
1. Based on Woodgrove Bank’s company locations, administrative structure and group policy requirements, which IT administrative model would suit their needs?
2. Can all of Woodgrove Bank’s Active Directory objects reside in a single OU?
3. What are Woodgrove Bank’s administrative structure requirements?
4. What are Woodgrove Bank’s group policy requirements?
Answer:
1. Based on Woodgrove Bank’s requirements, and because Active Directory administrators are located only in headquarters, the Centralized IT with Delegation administration model would best suit their needs.
2. No. Woodgrove Bank has business requirements and group policy requirements to separate the Active Directory data. Each office has a unique set of workstation and server security requirements as well as user lockdown requirements. The only way to separate that and satisfy all requirements is to create separate OUs.
3. Woodgrove Bank’s administrative requirements consist of:
• Each remote office having its own helpdesk and computer support teams, which are responsible for the management of the users, computers and servers in their respective region.
• Woodgrove Bank has a separate team that is responsible for the management of the Active Directory data for its Humongous Insurance subsidiary.
4. Woodgrove Bank’s group policy requirements consist of:
• Each region has a dedicated computer support team that is responsible for securing servers and standardizing desktops in their region.
• Each region has a unique set of workstation and server security requirements.
• Each region has unique user lockdown requirements.
• Each region leverages the Restricted Groups feature in Group Policy to define and enforce the membership of the built-in Administrators group on the computers in their region.
Designing Active Directory Domain Administrative Structures in Windows Server® 2008 4-3
• The Humongous Insurance Active Directory data is managed by a separate team in New York, and they are responsible for securing and standardizing the desktops for Humongous Insurance.
• Woodgrove Bank has unique group policy requirements for the servers that host enterprise-wide applications.
Task 3: Create an Active Directory OU design.
Question:
What will the Active Directory OU design be for Woodgrove Bank and its subsidiary?
Answer:
The Active Directory OU design for Woodgrove Bank and its subsidiary will be as follows:
• Each office will be represented by an Organizational Unit in the root of the domain: New York, Boston, Seattle, New Jersey, and Houston
• Child-OUs will be created below each office’s OU to separate the user, workstation, server, and group objects.
• The Humongous Insurance subsidiary will have its own dedicated OU structure. An OU called Humongous Insurance will be created in the root of the domain. Child-OUs will be created below the Humongous Insurance OU to separate the user, workstation, and group objects.
• An additional OU called Servers will be created in the root of the domain to house the servers that host the enterprise-wide applications.
• Child-OUs will be created below the Servers OU to separate servers based on role. The role OUs will be named SQL, WEB, and SPPS.
• A child-OU called groups will also be stored below the Servers OU to house the groups used to provide access to the applications and resources stored on these servers.
Task 4: Implement part of the Active Directory OU design.
1. Logon to NYC-DC3 as WOODGROVEBANK\Administrator with the password Pa$$w0rd.
2. On the Start menu of NYC-DC1, point to Administrative Tools, and then click Services.
3. In the Services (Local) result pane of the Services console, in the Name list, rightclick DNS Server, and then click Stop.
4. In the Name list of the Services (Local) result pane, right-click DNS Server, and then click Start.
5. In the Services console, click the Close button.
6. On the Start menu of NYC-DC1, point to Administrative Tools, and the click Active Directory Users and Computers.
7. In the tree pane of the Active Directory Users and Computers console, expand WoodgroveBank.com, right-click WoodgroveBank.com, point to New, and then click Organizational Unit.
8. In the New Object – Organizational Unit dialog box, in the Name box, type New York, and then click OK.
9. In the tree pane of the Active Directory Users and Computers console, under WoodgroveBank.com, right-click the New York, point to New, and then click Organizational Unit.
4-4 Designing Active Directory Infrastructure and Services in Windows Server® 2008
10. In the New Object – Organizational Unit dialog box, in the Name box, type Users, and then click OK.
11. In the tree pane of the Active Directory Users and Computers console, under WoodgroveBank.com, right-click the New York, point to New, and then click Organizational Unit.
12. In the New Object – Organizational Unit dialog box, in the Name box, type Groups, and then click OK.
13. In the tree pane of the Active Directory Users and Computers console, under WoodgroveBank.com, right-click the New York, point to New, and then click Organizational Unit.
14. In the New Object – Organizational Unit dialog box, in the Name box, type Workstations, and then click OK.
15. In the tree pane of the Active Directory Users and Computers console, under WoodgroveBank.com, right-click the New York, point to New, and then click Organizational Unit.
16. In the New Object – Organizational Unit dialog box, in the Name box, type Servers, and then click OK.
17. In the tree pane of the Active Directory Users and Computers console, right-click WoodgroveBank.com, point to New, and then click Organizational Unit.
18. In the New Object – Organizational Unit dialog box, in the Name box, type Boston, and then click OK.
19. In the tree pane of the Active Directory Users and Computers console, right-click WoodgroveBank.com, point to New, and then click Organizational Unit.
20. In the New Object – Organizational Unit dialog box, in the Name box, type Seattle, and then click OK.
21. In the tree pane of the Active Directory Users and Computers console, right-click WoodgroveBank.com, point to New, and then click Organizational Unit.
22. In the New Object – Organizational Unit dialog box, in the Name box, type Humongous Insurance, and then click OK.
23. In the tree pane of the Active Directory Users and Computers console, under WoodgroveBank.com, right-click Humongous Insurance, point to New, and then click Organizational Unit.
24. In the New Object – Organizational Unit dialog box, in the Name box, type Users, and then click OK.
25. In the tree pane of the Active Directory Users and Computers console, under WoodgroveBank.com, right-click Humongous Insurance, point to New, and then click Organizational Unit.
26. In the New Object – Organizational Unit dialog box, in the Name box, type Groups, and then click OK.
27. In the tree pane of the Active Directory Users and Computers console, under WoodgroveBank.com, right-click Humongous Insurance, point to New, and then click Organizational Unit.
28. In the New Object – Organizational Unit dialog box, in the Name box, type Workstation, and then click OK.
29. In the tree pane of the Active Directory Users and Computers console, right-click WoodgroveBank.com, point to New, and then click Organizational Unit.
Designing Active Directory Domain Administrative Structures in Windows Server® 2008 4-5
30. In the New Object – Organizational Unit dialog box, in the Name box, type Servers, and then click OK.
31. In the tree pane of the Active Directory Users and Computers console, right-click Servers, point to New, and then click Organizational Unit.
32. In the New Object – Organizational Unit dialog box, In the Name box, type SQL, and then click OK.
33. In the tree pane of the Active Directory Users and Computers console, under WoodgroveBank.com, right-click Servers, point to New, and then click Organizational Unit.
34. In the New Object – Organizational Unit dialog box, in the Name box, type WEB, and then click OK.
35. In the tree pane of the Active Directory Users and Computers console, under WoodgroveBank.com, right-click Servers, point to New, and then click Organizational Unit.
36. In the New Object – Organizational Unit dialog box, in the Name box, type APP, and then click OK.
37. In the tree pane of the Active Directory Users and Computers console, under WoodgroveBank.com, right-click Servers, point to New, and then click Organizational Unit.
38. In the New Object – Organizational Unit dialog box, in the Name box, type Groups, and then click OK.
39. In the tree pane of the Active Directory Users and Computers console, right-click WoodgroveBank.com, point to New, and then click Organizational Unit.
40. In the New Object – Organizational Unit dialog box, in the Name box, type Houston, and then click OK.
41. In the tree pane of the Active Directory Users and Computers console, under WoodgroveBank.com, right-click Houston, point to New, and then click Organizational Unit.
42. In the New Object – Organizational Unit dialog box, in the Name box, type Groups, and then click OK.
Exercise 2: Designing and Implementing Active Directory Group Strategies
Task 1: Review the information on the company’s requirements for designing a shared folder implementation.
Question:
1. Should the user accounts for finance employees be added directly to the ACL on the file server?
2. What is the best solution for storing and securing financial data for each office?
3. Can all finance employees be placed in a single group and the group is granted access via the ACL on the file server in each office?
Answer:
1. The user accounts for finance employees should not be added directly to the ACL as the company has a high turnover rate for finance employees. Best practices are to always use groups on ACLs. Adding the user accounts directly to the ACLs will require a significant amount of change and maintenance when employees leave and when new employees need to be provided access to the financial data.
4-6 Designing Active Directory Infrastructure and Services in Windows Server® 2008
2. Each region needs a dedicated share on a file server, for the day-to-day financial data. By using groups and ACLs it will be ensured that only financial employees from that office can see the day-to-day financial data.
3. Yes. You should create a group that will have only financial employees from a specific office and name it by that office (for example Finance Seattle Users). On the ACL on the file server that hosts the financial data, assign access to this group.
Task 2: Design a group strategy that meets the company requirements.
Question:
Based on the company’s requirements, what would the group structure be?
Answer:
• Each region will have an account group created and stored in the region’s Groups OU. The following account global groups will be created:
• A Finance New York Users group
• A Finance Boston Users group
• A Finance Seattle Users group
• A Finance New Jersey Users group
• A Finance Houston Users group
The finance users from each region will be added to the account group for their region. Besides this, you should also create the following groups:
A domain local account group called Finance All Users for all finance users (from all offices), which will be used to grant access to the monthly financial data share at the enterprise level. Account global groups from each office should be added to this group. On the enterprise financial file server, the group Finance All Users will be granted rights to access the data.
Task 3: Implement part of the group strategy.
1. In the tree pane of the Active Directory Users and Computers console, under Houston, click Groups.
2. On the Action menu of the Active Directory Users and Computers console, point to New, and then click Group.
3. In the New Object – Group dialog box, in the Group name box, type Finance Houston Users, and ensure that the Group scope is Global and the Group type is Security, and then click OK.
4. In the tree pane of the Active Directory Users and Computers console, under Servers, click Groups.
5. On the Action menu of the Active Directory Users and Computers console, point to New, and then click Group.
6. In the New Object – Group dialog box, in the Group name box, type Finance All Users, in the Group scope area, click Domain local, ensure that the Group type is Security, and then click OK.
7. In the Groups result pane, right-click Finance All Users, and then click Properties.
8. On the Members tab of the Finance All Users Properties dialog box, click Add.
9. In the Select Users, Contacts, Computers, or Groups dialog box, in the Enter the object names to select (examples) box, enter Finance Houston Users, click Check Names, and then click OK.
Designing Active Directory Domain Administrative Structures in Windows Server® 2008 4-7
10. In the Finance All Users Properties dialog box, click OK.
Exercise 3: Automating User Account Management by using Windows PowerShell
Task 1: Based on the administrative requirements and design, create a plan for providing administrative scripts to junior administrators.
Question:
What will the plan be for providing administrative scripts to junior administrators?
Answer:
Windows PowerShell will be used to provide junior administrators scripts to create Active Directory user accounts. Junior administrators will first need to modify an input file. The input file will be in the CSV format and contain the relevant user information. The junior administrators will then need to run a PowerShell script, which will create the Active Directory user accounts based on the CSV input file.
Task 2: Create and test the administrative scripts by using Windows PowerShell.
1. On the Start menu, click Run.
2. In the Run dialog box, in the Open box, type D:\Labfiles\Mod03\Democode, and click OK.
3. In the Democode window, in the Name list, right-click CreateMultipleUsers.ps1, and then click Edit.
4. On the Edit menu of the CreateMultipleUsers.ps1 – Notepad window, click Replace.
5. In the Replace dialog box, in the Find what box, type Denver, in the Replace with box, type Boston, and then click Replace All.
6. In the Replace dialog box, in the Find what box, type C:\Mod03\democode\CreateUsers.csv, in the Replace with box, type D:\Labfiles\Mod03\democode\CreateUsers.csv, and then click Replace All.
7. Close the Replace dialog box.
8. On the File menu of the CreateMultipleUsers.ps1 – Notepad window, click Exit.
9. In the Notepad message box, click Save.
10. In the Democode window, in the Name list, right-click CreateUsers.csv, and then click Edit.
11. On the Edit menu of the CreateUsers.csv – Notepad window, click Replace.
12. In the Replace dialog box, in the Find what box, type WoodgroveBank, in the Replace with box, type HumongousInsurance, and then click Replace All.
13. In the Replace dialog box, in the Find what box, type Denver, in the Replace with box, type Boston, and then click Replace All.
14. Close the Replace dialog box.
15. On the File menu of the CreateUsers.csv – Notepad window, click Save.
16. Close the CreateUsers.csv – Notepad window.
17. On the Start menu, point to All Programs, click Windows PowerShell 1.0, and then click Windows PowerShell.
18. In the Windows PowerShell window, type Set-ExecutionPolicy unrestricted, and then press ENTER.

4-8 Designing Active Directory Infrastructure and Services in Windows Server® 2008
19. In the Windows PowerShell window, type cd D:\Labfiles\Mod03\Democode, and then press ENTER.
20. In the Windows PowerShell window, type .\CreateMultipleUsers.ps1, and then press ENTER.
21. In the Please enter default Password, type Pa$$w0rd, and press ENTER.
Note: Ensure that the accounts were created for the following users:
• Karen Berg
• Zainal Arifin
• Jesper Aaberg
• Mary North
• Claus Hansen
• Adam Barr
• Mark Bebbington
• Dick Beekman
• Ido Ben-Sachar
• Scott Bishop
• Paula Bento
22. In the Windows PowerShell window, click the Minimize button.
23. In the View menu, of the Active Directory Users and Computers console, click Advanced Features.
24. In the tree pane of the Active Directory Users and Computers console, under WoodgroveBank.com, click Boston.
25. In the Boston result pane, in the Name list, ensure that the user accounts are created.
26. Close all open windows.
Task 3: Close all virtual machines and discard undo disks.
1. For each virtual machine that is running, close the Virtual Machine Remote Control window.
2. In the Close box, select Turn off machine and discard changes. Click OK.
3. Close the 6436A Lab Launcher.
Exercise 4: Discussion In this exercise, the instructor will lead a discussion about the results of Exercises 1-3.

Designing Active Directory Group Policy in Windows Server® 2008 5-1
Module 5 Designing Active Directory Group Policy in Windows Server® 2008
Contents: Lab Answer Keys 2
5-2 Designing Active Directory Infrastructure and Services in Windows Server® 2008
Lab Answer Keys Lab 5: Designing Active Directory Administrative Structures in Windows Server 2008
Exercise 1: Designing and Implementing Group Policy Settings The main tasks for this exercise are to:
1. Gather and review the information about the organization’s desktop and user management requirements, including the current number of users, desktops, and administrators.
2. Create a Group Policy setting design.
3. Implement part of the Group Policy setting design by creating GPOs based on the design.
Task 1: Gather and review the information about the organization’s desktop and user management requirements, including the current number of users, desktops, and administrators.
You will gather the necessary information about the company desktops and users.
Question:
Outline the relevant information about the company’s desktops and users management.
Name of
Region
Regional User
Administrators
Number
of Users
Number of
Desktops
Organizational
Unit
US
Canada
Poland
Germany
Japan
Answer:
Name of
Region
Regional User
Administrators
# of
Users
# of
Desktops
Organizational
Unit
United
States
United States User
Admins
15,000 14,700 United States
Canada Canada User Admins 9,000 8,200 Canada
Poland Poland User Admins 6,500 6,000 Poland
Germany Germany User
Admins
5,200 4,800 Germany
Japan Japan User Admins 2,400 2,000 Japan
Designing Active Directory Group Policy in Windows Server® 2008 5-3
Task 2 : Create a Group Policy setting design.
You will gather information for and create the Group Policy setting design.
Question:
Based on Woodgrove Bank’s current company locations, and security and administration requirements, create the OU structure and the Group Policy setting design.
Answer:
You should create the Group Policy setting design based on the current company locations, and security and administration requirements. Location specific OUs named after each region will be created in the root of woodgrovebank.com domain. Under each location OU, the following child OUs will be created:
• Computers
• Groups
• Servers
• Service Accounts
• Users
Within the Users OU, the following child OUs will be created in order to satisfy business requirements :
o Administrators
o Business Banking
o Corporate Banking
o Personal Banking
The following Group Policy objects will be created:
• United States Policy
• Canada Policy
• Poland Policy
• Germany Policy
• Japan Policy
• United States User Admin Policy
• Canada User Admin Policy
• Poland User Admin Policy
• Germany User Admin Policy
• Japan User Admin Policy
• User Logon Policy
Task 3: Implement part of the Group Policy setting design by creating GPOs based on the design.
Implement part of the Group Policy setting design.

5-4 Designing Active Directory Infrastructure and Services in Windows Server® 2008
1. On your host machine, click Start, point to All Programs, point to Microsoft Learning, and then click 6436A. The Lab Launcher starts.
2. In the Lab Launcher, next to 6436A-NYC-DC3, click Launch.
3. Log on to NYC-DC3 as WoodgroveBank\Administrator, with the password, Pa$$w0rd.
4. Minimize the Lab Launcher window.
5. On the Start menu of NYC-DC1, point to Administrative Tools, and then click Services.
6. In the Services (Local) result pane of the Services console, in the Name list, right-click DNS Server, and then click Stop.
7. In the Name list of the Services (Local) result pane, right-click DNS Server, and then click Start.
8. In the Services console, click the Close button.
9. On the Start menu of NYC-DC1, point to Administrative Tools, and then click Active Directory Users and Computers.
10. In the tree pane of the Active Directory Users and Computers console, rightclick WoodgroveBank.com, point to New, and then click Organizational Unit.
11. In the Name box of the New Object – Organizational Unit dialog box, type United States, and then click OK.
12. In the tree pane of the Active Directory Users and Computers console, expand WoodgroveBank.com, right-click United States, point to New, and then click Organizational Unit.
13. In the Name box of the New Object – Organizational Unit dialog box, type Computers, and then click OK.
14. In the tree pane of the Active Directory Users and Computers console, under WoodgroveBank.com, right-click United States, point to New, and then click Organizational Unit.
15. In the Name box of the New Object – Organizational Unit dialog box, type Groups, and then click OK.
16. In the tree pane of the Active Directory Users and Computers console, under WoodgroveBank.com, right-click United States, point to New, and then click Organizational Unit.
17. In the Name box of the New Object – Organizational Unit dialog box, type Servers, and then click OK.
18. In the tree pane of the Active Directory Users and Computers console, under WoodgroveBank.com, right-click United States, point to New, and then click Organizational Unit.
19. In the Name box of the New Object – Organizational Unit dialog box, type Service Accounts, and then click OK.
20. In the tree pane of the Active Directory Users and Computers console, under WoodgroveBank.com, right-click United States, point to New, and then click Organizational Unit.
Designing Active Directory Group Policy in Windows Server® 2008 5-5
21. In the Name box of the New Object – Organizational Unit dialog box, type Users, and then click OK.
22. In the tree pane of the Active Directory Users and Computers console, expand United States, right-click Users, point to New, and then click Organizational Unit.
23. In the Name box of the New Object – Organizational Unit dialog box, type Administrators, and then click OK.
24. In the tree pane of the Active Directory Users and Computers console, under United States, right-click Users, point to New, and then click Organizational Unit.
25. In the Name box of the New Object – Organizational Unit dialog box, type Business Banking, and then click OK.
26. In the tree pane of the Active Directory Users and Computers console, under United States, right-click Users, point to New, and then click Organizational Unit.
27. In the Name box of the New Object – Organizational Unit dialog box, type Corporate Banking, and then click OK.
28. In the tree pane of the Active Directory Users and Computers console, under United States, right-click Users, point to New, and then click Organizational Unit.
29. In the Name box of the New Object – Organizational Unit dialog box, type Personal Banking, and then click OK.
30. On the Start menu, point to Administrative Tools, and then click Group Policy Management.
31. In the tree pane of the Group Policy Management console, expand the Forest: WoodgroveBank.com, expand Domains, and then expand WoodgroveBank.com.
32. In the tree pane, under WoodgroveBank.com, right-click Group Policy Objects, and then click New.
33. In the Name box of the New GPO dialog box, type United States Policy, and then click OK.
34. In the tree pane of the Group Policy Management console, under WoodgroveBank.com, right-click Group Policy Objects, and then click New.
35. In the Name box of the New GPO dialog box, type United States User Admin Policy, and then click OK.
36. In the tree pane of the Group Policy Management console, under WoodgroveBank.com, right-click Group Policy Objects, and then click New.
37. In the Name box of the New GPO dialog box, type User Logon Policy, and then click OK.
38. In the Group Policy Management console, click the Close button.
39. In the Active Directory Users and Computers console, click the Close button.
Exercise 2: Designing and Implementing Group Policy Application The main tasks for this exercise are to:
1. Review the information on the company’s requirements for applying GPOs based on the OU design.
2. Design Group Policy inheritance and filtering.
5-6 Designing Active Directory Infrastructure and Services in Windows Server® 2008
3. Implement part of the Group Policy application strategy by configuring GPO links, inheritance, and filtering.
Task 1: Review the information on the company’s requirements for applying GPOs based on the OU design.
You will review company’s requirements for applying GPOs based on the OU design.
Question:
Does the proposed OU structure support the Group Policy-based management strategy?
Answer:
Yes, each location has its own OU structure with objects managed by local groups of administrators. GPOs can be linked to OUs appropriate to each location. The OU model is structured around users, desktops, and servers to identify and configure corporate standard settings.
Task 2: Design Group Policy inheritance and filtering.
Based on requirements in the scenario, create a design for policy inheritance and filtering.
Question:
1. Are there any groups of users that need to be excluded from being managed by Group Policy linked to each location OU?
2. How should the policies be applied and should they be enforced or blocked on any OUs?
Answer:
1. You need to prevent Group Policy setting from being applied to administrators at each location. The policy will only be applied to the United States Users security group, containing regular branch users.
2. The User Logon Policy affects all domain user accounts except the service accounts. You can link it at the domain level and block inheritance at each Service Accounts OU.
The United States Policy needs to apply to all objects within the Unites States OU, except the administrators’ accounts. You should then link it to the Unites States OU. Because the Service Accounts OU blocks inheritance, you will need to enforce the United States Policy so that it is also applied to objects within the Service Accounts OU. The United States User Admin Policy should be linked to the Administrators OU and have security filtering set so that only the United States User Admins group is affected by this policy.
Task 3: Implement part of the Group Policy application strategy by configuring GPO links, inheritance, and filtering.
You will implement GPO links, inheritance, and filtering.
1. On the Start menu of NYC-DC1, point to Administrative Tools, and then click Active Directory Users and Computers.
2. In the tree pane of the Active Directory Users and Computers console, under WoodgroveBank.com, right-click Users, point to New, and then click Group.
3. In the Group name box of the New Object – Group dialog box, type United States User Admins, and then click OK.
4. In the Active Directory Users and Computers console, click the Close button.
Designing Active Directory Group Policy in Windows Server® 2008 5-7
5. On the Start menu of NYC-DC1, point to Administrative Tools, and then click Group Policy Management.
6. In the tree pane of the Group Policy Management console, expand Forest: WoodgroveBank.com, expand Domains, and then expand WoodgroveBank.com.
7. In the tree pane, under WoodgroveBank.com, right-click United States, and then click Link an Existing GPO.
8. In the Group Policy objects area of the Select GPO dialog box, in the Name list, click United States Policy, and then click OK.
9. In the tree pane of the Group Policy Management console, under WoodgroveBank.com, click United States.
10. In the GPO list of the United States result pane, right-click United States Policy, and then click Enforced.
11. In the Group Policy Management message box, click OK.
12. In the tree pane of the Group Policy Management console, under WoodgroveBank.com, expand United States.
13. In the tree pane, under United States, right-click Service Accounts, and then click Block Inheritance.
14. In the tree pane, under United States, expand Users.
15. In the tree pane, under Users, right-click Administrators, and then click Link an Existing GPO.
16. In the Group Policy objects area of the Select GPO dialog box, in the Name list, click United States User Admin Policy, and then click OK.
17. In the tree pane of the Group Policy Management console, under WoodgroveBank.com, expand Group Policy Objects.
18. In the tree pane, under Group Policy Objects, click United States User Admin Policy.
19. In the Security Filtering area of the United States User Admin Policy result pane, in the Name list, click Authenticated Users, and then click Remove.
20. In the Group Policy Management message box, click OK.
21. In the Security Filtering area of the United States User Admin Policy result pane, click Add.
22. In the Enter the object name to select (examples) box of the Select User, Computer, or Group dialog box, type United States User Admins, and then click OK.
23. In the Group Policy Management Console, click the Close button.
Exercise 3: Designing and Implementing Group Policy Management In this exercise, you will use the designs that you created in Exercises 1 and 2.
The main tasks for this exercise are to:
1. Create a plan for delegating GPO management based on the administrative requirements and design.
2. Implement the GPO management design.

5-8 Designing Active Directory Infrastructure and Services in Windows Server® 2008
Task 1: Create a plan for delegating GPO management based on the administrative requirements and design.
You will create a plan for delegating GPO management.
Question:
1. What is the best way to delegate GPO management for the Woodgrove Bank Group Policies and GPO links?
2. How would you grant the location Server Admins group the permissions to evaluate which policy settings would be applied to the administrators accounts?
Answer:
1. The location User Admins group should be able to manage GPO settings and GPO links specific to each location OU and the child OUs. The location Server Admins group should be able to manage the GPO links related to the Servers and Service Accounts OUs.
2. The location Server Admins group should be granted Perform Group Policy Modeling analyses permissions on the Administrators OU.
Task 2: Implement the GPO management design.
You will implement the GPO management design.
1. On the Start menu of NYC-DC1, point to Administrative Tools, and then click Group Policy Management.
2. In the tree pane of the Group Policy Management console, under Forest: WoodgroveBank.com, click United States.
3. On the Delegation tab of the United States result pane, click Add.
Note: Ensure Link GPOs is selected in the Permission box.
4. In the Enter the object name to select (examples) box of the Select User, Computer, or Group dialog box, type United States User Admins, and then click OK.
5. In the Permissions box of the Add Group or User dialog box, click This container only, and then click OK.
6. In the tree pane of the Group Policy Management console, under WoodgroveBank.com, expand Group Policy Objects.
7. In the tree pane, under Group Policy Objects, click United States Policy.
8. On the Delegation tab of the United States Policy result pane, click Add.
9. In the Enter the object name to select (examples) box of the Select User, Computer, or Group dialog box, type United States User Admins, and then click OK.
10. In the Permissions box of the Add Group or User dialog box, click Edit settings, delete, modify security, and then click OK.
11. In the tree pane of the Group Policy Management console, under Group Policy Objects, click United States User Admin Policy.
12. On the Delegation tab of the United States User Admin Policy result pane, click Add.

Designing Active Directory Group Policy in Windows Server® 2008 5-9
13. In the Enter the object name to select (examples) box of the Select User, Computer, or Group dialog box, type United States User Admins, and then click OK.
14. In the United States User Admins message box, click OK.
15. In the Permissions box of the Add Group or User dialog box, click Edit settings, delete, modify security, and then click OK.
16. In the tree pane of the Group Policy Management console, under WoodgroveBank.com, expand United States.
17. In the tree pane, under United States, click Service Accounts.
18. On the Delegation tab of the Service Accounts result pane, click Add.
Note: Ensure Link GPOs is selected in the Permission box.
19. On the Start menu, point to Administrative Tools, and then click Active Directory Users and Computers.
20. In the tree pane of the Active Directory Users and Computers console, under WoodgroveBank.com, right-click Users, point to New, and then click Group.
21. In the Group name box of the New Object – Group dialog box, type United States Server Admins, and then click OK.
22. In the Active Directory Users and Computers console, click the Close button.
23. In the Enter the object name to select (examples) box of the Select User, Computer, or Group dialog box, type United States Server Admins, and then click OK.
24. In the Permissions box of the Add Group or User dialog box, click This container only, and then click OK.
25. In the tree pane, under United States, click Servers.
26. On the Delegation tab of the Servers result pane, click Add.
Note: Ensure Link GPOs is selected in the Permission box.
27. In the Enter the object name to select (examples) box of the Select User, Computer, or Group dialog box, type United States Server Admins, and then click OK.
28. In the Permissions box of the Add Group or User dialog box, click This container only, and then click OK.
29. In the tree pane, under United States, expand the Users.
30. In the tree pane, under Users, click Administrators.
31. On the Delegation tab of the Administrators result pane, in the Permission box, click Perform Group Policy Modeling analyses, and then click Add.
32. In the Enter the object name to select (examples) box of the Select User, Computer, or Group dialog box, type United States Server Admins, and then click OK.
33. In the Permissions box of the Add Group or User dialog box, click This container only, and then click OK.
34. In the Group Policy Management console, click the Close button.

5-10 Designing Active Directory Infrastructure and Services in Windows Server® 2008
Task 3: Close all virtual machines and discard the undo disks.
1. For each virtual machine that is running, close the Virtual Machine Remote Control window.
2. In the Close box, select Turn off machine and discard changes. Click OK.
3. Close the 6436A Lab Launcher.
Exercise 4: Discussion
Task 1: Participate in a group discussion about your design decisions.
In this exercise, the instructor will lead a discussion about the design decisions made in Exercise 1 through 3.

Designing AD DS Security in Windows Server® 2008 6-1
Module 6 Designing AD DS Security in Windows Server® 2008
Contents: Lab Answer Keys 2
6-2 Designing Active Directory Infrastructure and Services in Windows Server® 2008
Lab Answer Keys Lab 6: Designing AD DS Security in Windows Server 2008
Exercise 1: Designing and Implementing Domain Security Policies The main tasks for this exercise are to:
1. Review information about the organization’s security requirements and constraints.
2. Create a domain account security policy design
3. Create a fine-grained password policy design.
4. Implement the domain account and fine-grained password policy design.
Task 1: Start the virtual machines, and then log on.
1. On your host machine, click Start, point to All Programs, point to Microsoft Learning, and then click 6436A. The Lab Launcher starts.
2. In the Lab Launcher, next to 6436A-NYC-DC3, click Launch.
3. Log on to NYC-DC3 as Administrator with the password Pa$$w0rd. Minimize the Lab Launcher window.
Task 2: Review information about the organization’s security requirements and constraints.
Question:
To summarize Woodgrove Bank’s requirements for security, answer the following questions:
1. What is the primary account security concern?
2. What technologies can be used to address this concern?
Answer:
1. The primary concern for account security is user account spoofing. Woodgrove Bank wants to minimize the possibility of someone illegally using user and administrator accounts.
2. Group Policy Management Console, Group Policy Management Editor, ADSIEdit and Active Directory Users and Computers can be used.
Task 3: Create a domain account security policy design.
Create a design for account security policy that will satisfy company requirements for ordinary users and managers.
Question:
1. How will you configure and implement Domain Account Policy?
2. How will managers be forced to use smart cards for logon?
Answer:
1. Edit the Default Domain Policy object. Define password and account requirements for the domain as follows:
• length : 10 chars
Designing AD DS Security in Windows Server® 2008 6-3
• history enabled
• maximum age : 90 days
• account lockout threshold : 5
• complex password
2. Every user account that belongs to a manager must be configured to require interactive logon using a smart card.
Task 4: Create a fine-grained password policy design.
In order to fulfill requirements for administrator user accounts, create a fine-grained password policy design.
Question:
1. How will fine-grained password policy be implemented on Administrator accounts?
2. What are the prerequisites for implementing fine-grained password policy?
Answer:
1. Create a global security group for all users that have administrative privileges, if necessary. Add these users as members of the group. Using ADSI editor, an administrator should create a Password Setting Object with the following settings required for the Administrators group:
• Maximum password age : 30 days
• Account lockout threshold : 3
• Password length : 14
2. The created PSO must be linked to the Administrators group by editing the msDS-PSOAppliesTo attribute. In order to use this, you must have a Windows 2008 domain functional level.
Task 5: Implement the domain account and fine-grained password policy design.
To create a Group Policy object (GPO) for domain account security policy:
1. On the Start menu of NYC-DC1, point to Administrative Tools, and then click Group Policy Management.
2. In the tree pane of the Group Policy Management console, expand Forest: WoodgroveBank.com, expand Domains, and then expand WoodgroveBank.com.
3. Under WoodgroveBank.com, click Group Policy Objects.
4. In the Group Policy Objects in WoodgroveBank.com result pane, right-click Default Domain Policy, and then click Edit.
5. In the tree pane of the Group Policy Management Editor console, under Computer Configuration, expand Policies, expand Windows Settings, and then expand Security Settings.
6. In the tree pane, under Security Settings, expand Account Policies, and then click Password Policy.
7. In the Password Policy result pane, double-click Enforce password history.
8. In the Keep password history for box of the Enforce password history Properties dialog box, type 10, and then click OK.
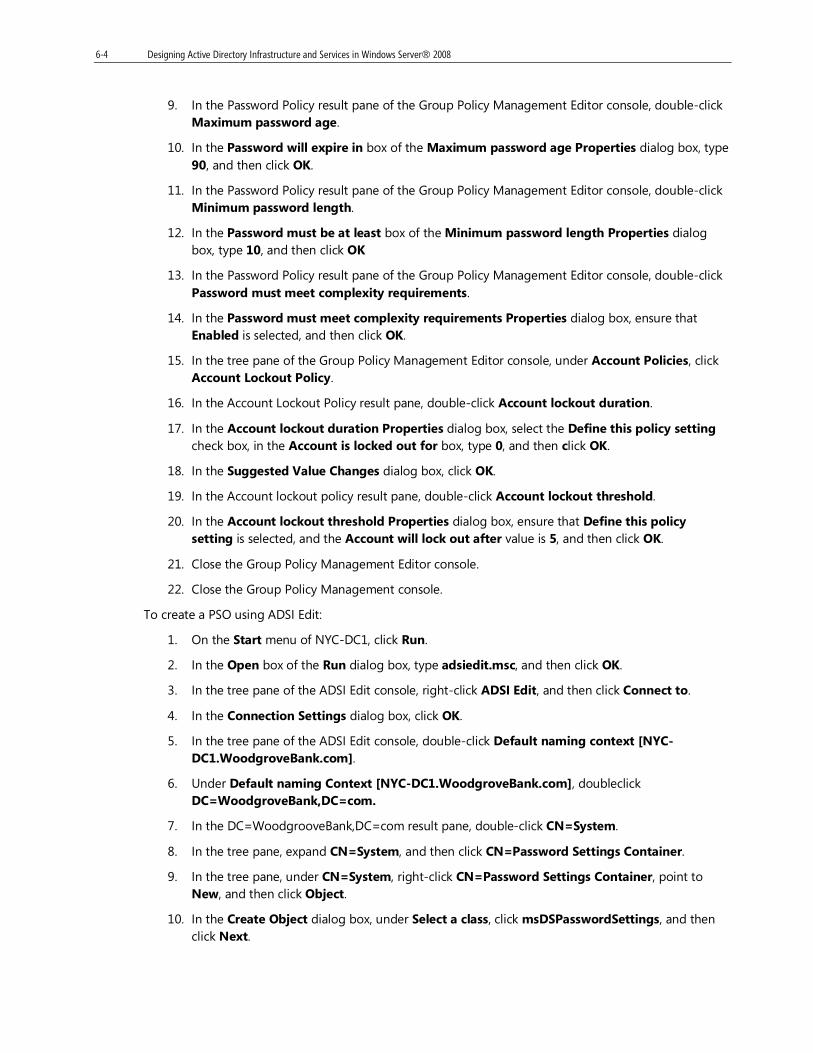
6-4 Designing Active Directory Infrastructure and Services in Windows Server® 2008
9. In the Password Policy result pane of the Group Policy Management Editor console, double-click Maximum password age.
10. In the Password will expire in box of the Maximum password age Properties dialog box, type 90, and then click OK.
11. In the Password Policy result pane of the Group Policy Management Editor console, double-click Minimum password length.
12. In the Password must be at least box of the Minimum password length Properties dialog box, type 10, and then click OK
13. In the Password Policy result pane of the Group Policy Management Editor console, double-click Password must meet complexity requirements.
14. In the Password must meet complexity requirements Properties dialog box, ensure that Enabled is selected, and then click OK.
15. In the tree pane of the Group Policy Management Editor console, under Account Policies, click Account Lockout Policy.
16. In the Account Lockout Policy result pane, double-click Account lockout duration.
17. In the Account lockout duration Properties dialog box, select the Define this policy setting check box, in the Account is locked out for box, type 0, and then click OK.
18. In the Suggested Value Changes dialog box, click OK.
19. In the Account lockout policy result pane, double-click Account lockout threshold.
20. In the Account lockout threshold Properties dialog box, ensure that Define this policy setting is selected, and the Account will lock out after value is 5, and then click OK.
21. Close the Group Policy Management Editor console.
22. Close the Group Policy Management console.
To create a PSO using ADSI Edit:
1. On the Start menu of NYC-DC1, click Run.
2. In the Open box of the Run dialog box, type adsiedit.msc, and then click OK.
3. In the tree pane of the ADSI Edit console, right-click ADSI Edit, and then click Connect to.
4. In the Connection Settings dialog box, click OK.
5. In the tree pane of the ADSI Edit console, double-click Default naming context [NYC-DC1.WoodgroveBank.com].
6. Under Default naming Context [NYC-DC1.WoodgroveBank.com], doubleclick DC=WoodgroveBank,DC=com.
7. In the DC=WoodgrooveBank,DC=com result pane, double-click CN=System.
8. In the tree pane, expand CN=System, and then click CN=Password Settings Container.
9. In the tree pane, under CN=System, right-click CN=Password Settings Container, point to New, and then click Object.
10. In the Create Object dialog box, under Select a class, click msDSPasswordSettings, and then click Next.
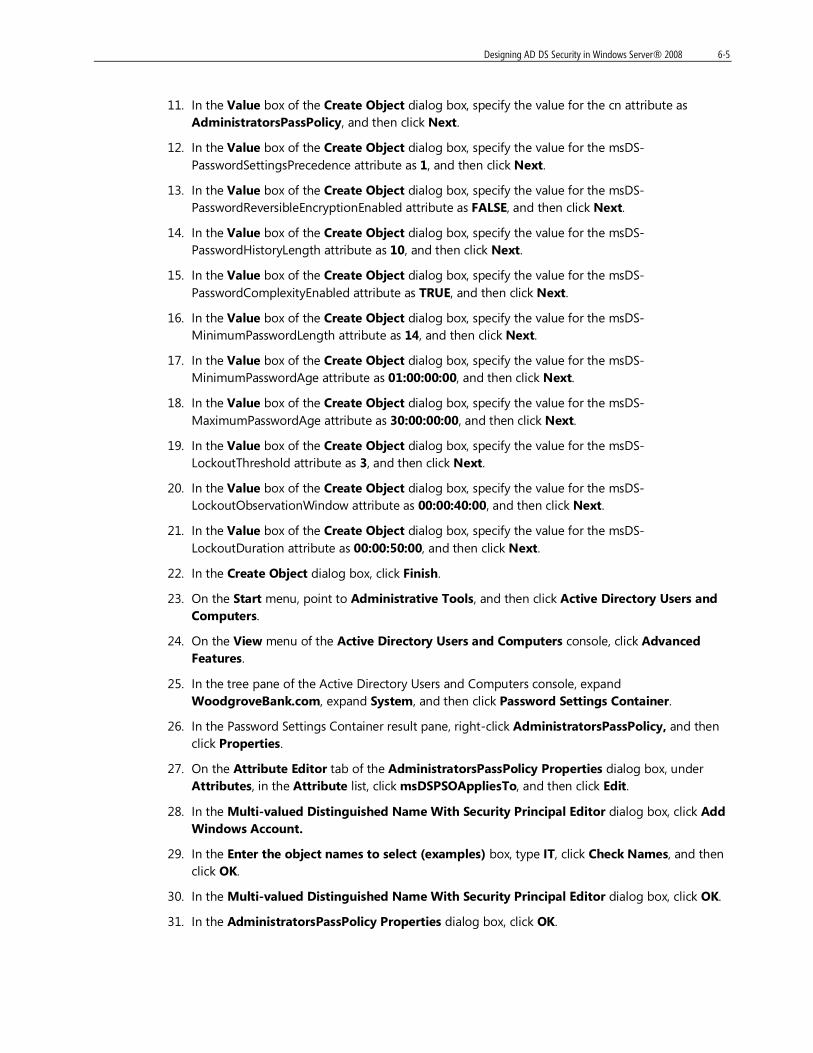
Designing AD DS Security in Windows Server® 2008 6-5
11. In the Value box of the Create Object dialog box, specify the value for the cn attribute as AdministratorsPassPolicy, and then click Next.
12. In the Value box of the Create Object dialog box, specify the value for the msDS-PasswordSettingsPrecedence attribute as 1, and then click Next.
13. In the Value box of the Create Object dialog box, specify the value for the msDS-PasswordReversibleEncryptionEnabled attribute as FALSE, and then click Next.
14. In the Value box of the Create Object dialog box, specify the value for the msDS-PasswordHistoryLength attribute as 10, and then click Next.
15. In the Value box of the Create Object dialog box, specify the value for the msDS-PasswordComplexityEnabled attribute as TRUE, and then click Next.
16. In the Value box of the Create Object dialog box, specify the value for the msDS-MinimumPasswordLength attribute as 14, and then click Next.
17. In the Value box of the Create Object dialog box, specify the value for the msDS-MinimumPasswordAge attribute as 01:00:00:00, and then click Next.
18. In the Value box of the Create Object dialog box, specify the value for the msDS-MaximumPasswordAge attribute as 30:00:00:00, and then click Next.
19. In the Value box of the Create Object dialog box, specify the value for the msDS-LockoutThreshold attribute as 3, and then click Next.
20. In the Value box of the Create Object dialog box, specify the value for the msDS-LockoutObservationWindow attribute as 00:00:40:00, and then click Next.
21. In the Value box of the Create Object dialog box, specify the value for the msDS-LockoutDuration attribute as 00:00:50:00, and then click Next.
22. In the Create Object dialog box, click Finish.
23. On the Start menu, point to Administrative Tools, and then click Active Directory Users and Computers.
24. On the View menu of the Active Directory Users and Computers console, click Advanced Features.
25. In the tree pane of the Active Directory Users and Computers console, expand WoodgroveBank.com, expand System, and then click Password Settings Container.
26. In the Password Settings Container result pane, right-click AdministratorsPassPolicy, and then click Properties.
27. On the Attribute Editor tab of the AdministratorsPassPolicy Properties dialog box, under Attributes, in the Attribute list, click msDSPSOAppliesTo, and then click Edit.
28. In the Multi-valued Distinguished Name With Security Principal Editor dialog box, click Add Windows Account.
29. In the Enter the object names to select (examples) box, type IT, click Check Names, and then click OK.
30. In the Multi-valued Distinguished Name With Security Principal Editor dialog box, click OK.
31. In the AdministratorsPassPolicy Properties dialog box, click OK.
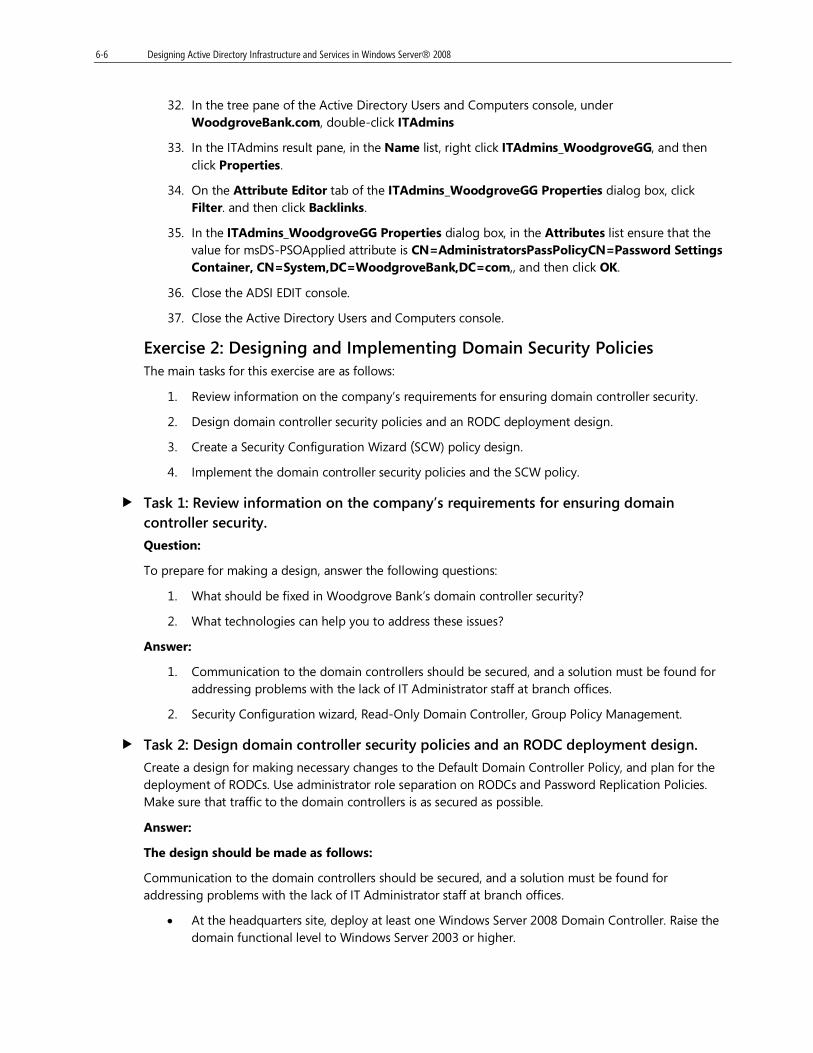
6-6 Designing Active Directory Infrastructure and Services in Windows Server® 2008
32. In the tree pane of the Active Directory Users and Computers console, under WoodgroveBank.com, double-click ITAdmins
33. In the ITAdmins result pane, in the Name list, right click ITAdmins_WoodgroveGG, and then click Properties.
34. On the Attribute Editor tab of the ITAdmins_WoodgroveGG Properties dialog box, click Filter. and then click Backlinks.
35. In the ITAdmins_WoodgroveGG Properties dialog box, in the Attributes list ensure that the value for msDS-PSOApplied attribute is CN=AdministratorsPassPolicyCN=Password Settings Container, CN=System,DC=WoodgroveBank,DC=com,, and then click OK.
36. Close the ADSI EDIT console.
37. Close the Active Directory Users and Computers console.
Exercise 2: Designing and Implementing Domain Security Policies The main tasks for this exercise are as follows:
1. Review information on the company’s requirements for ensuring domain controller security.
2. Design domain controller security policies and an RODC deployment design.
3. Create a Security Configuration Wizard (SCW) policy design.
4. Implement the domain controller security policies and the SCW policy.
Task 1: Review information on the company’s requirements for ensuring domain controller security.
Question:
To prepare for making a design, answer the following questions:
1. What should be fixed in Woodgrove Bank’s domain controller security?
2. What technologies can help you to address these issues?
Answer:
1. Communication to the domain controllers should be secured, and a solution must be found for addressing problems with the lack of IT Administrator staff at branch offices.
2. Security Configuration wizard, Read-Only Domain Controller, Group Policy Management.
Task 2: Design domain controller security policies and an RODC deployment design.
Create a design for making necessary changes to the Default Domain Controller Policy, and plan for the deployment of RODCs. Use administrator role separation on RODCs and Password Replication Policies. Make sure that traffic to the domain controllers is as secured as possible.
Answer:
The design should be made as follows:
Communication to the domain controllers should be secured, and a solution must be found for addressing problems with the lack of IT Administrator staff at branch offices.
• At the headquarters site, deploy at least one Windows Server 2008 Domain Controller. Raise the domain functional level to Windows Server 2003 or higher.
Designing AD DS Security in Windows Server® 2008 6-7
• At the Miami and Kentucky sites, deploy RODCs.
• Configure the Miami and Kentucky RODCs as read-only DNS and global catalog servers.
• Designate IT technicians in Miami and Kentucky as local administrators of the corresponding RODCs, for managing updates and drivers.
• Configure Password Replication Policy on RODCs accounts in the domain, to allow only passwords for ordinary users in Miami and Kentucky to be cached on RODC. Prohibit caching for all other users.
• On the default Domain Controller Security Policy GPO, under Security Settings, ensure that the following options are enabled:
• MS Network server – Digitally sign communications (always)
• MS Network Server - Digitally sign communications (if client agrees)
• LAN Manager Authentication Level – Send NTLMv2 only
• Do not store LAN Manager authentication level
• For all computers in the domain, deploy a GPO that enables the following setting: Microsoft Network client: Digitally sign communications (always).
Task 3: Create a SCW policy design
Question:
1. What will SCW do to help you secure domain controllers?
2. What options should be selected in SCW?
Answer:
1. SCW will strengthen the security of a domain controller and minimize the number of services running on it.
2. You should do following:
a. Run the Security Configuration Wizard on the domain controller.
b. Select Domain Controller in Role Based Service Configuration.
c. Set all other options as required by the scenario.
d. Choose to disable all unspecified services.
e. Export the settings to an XML file and apply it when convenient.
Task 4: Implement the domain controller security policies and the SCW policy.
Use Group Policy Management to edit the Default Domain Controllers Security Policy. Run the SCW and set the necessary options for securing the domain controller.
To implement the Default Domain Controller Security Policy:
1. On the Start menu of NYC-DC1, point to Administrative Tools, and then click Group Policy Management.
2. In the tree pane of the Group Policy Management console, under WoodgroveBank.com, and then click Group Policy Objects.
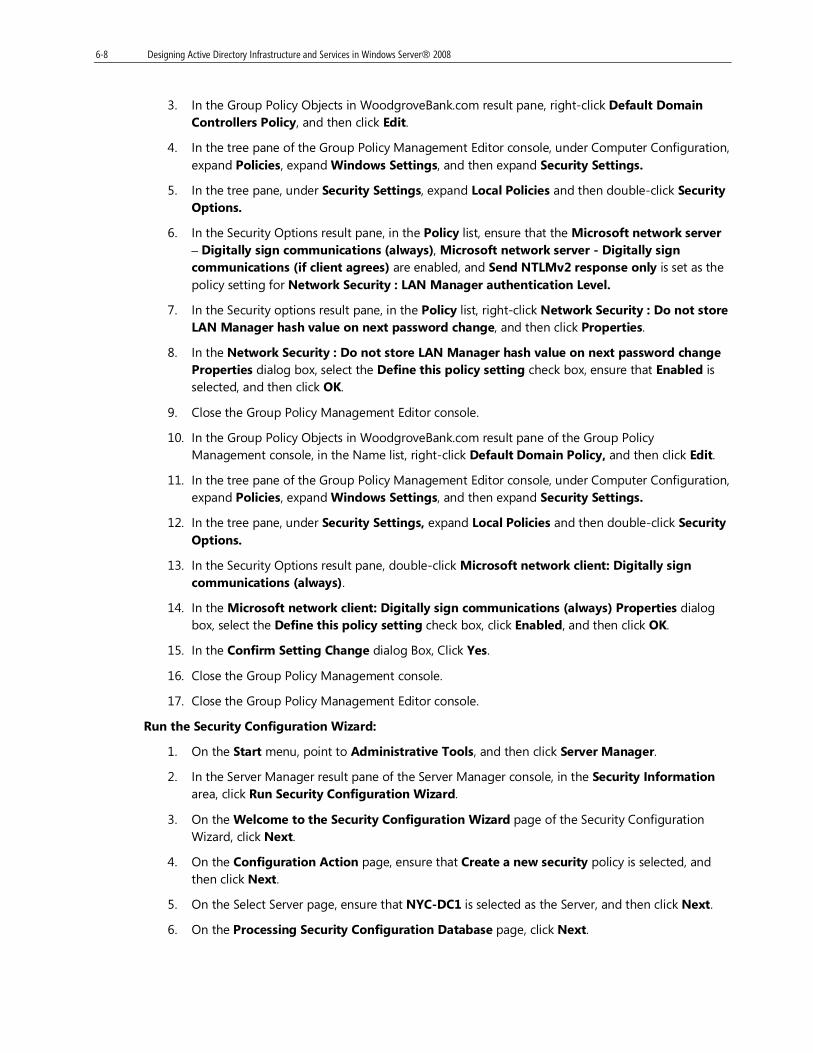
6-8 Designing Active Directory Infrastructure and Services in Windows Server® 2008
3. In the Group Policy Objects in WoodgroveBank.com result pane, right-click Default Domain Controllers Policy, and then click Edit.
4. In the tree pane of the Group Policy Management Editor console, under Computer Configuration, expand Policies, expand Windows Settings, and then expand Security Settings.
5. In the tree pane, under Security Settings, expand Local Policies and then double-click Security Options.
6. In the Security Options result pane, in the Policy list, ensure that the Microsoft network server – Digitally sign communications (always), Microsoft network server - Digitally sign communications (if client agrees) are enabled, and Send NTLMv2 response only is set as the policy setting for Network Security : LAN Manager authentication Level.
7. In the Security options result pane, in the Policy list, right-click Network Security : Do not store LAN Manager hash value on next password change, and then click Properties.
8. In the Network Security : Do not store LAN Manager hash value on next password change Properties dialog box, select the Define this policy setting check box, ensure that Enabled is selected, and then click OK.
9. Close the Group Policy Management Editor console.
10. In the Group Policy Objects in WoodgroveBank.com result pane of the Group Policy Management console, in the Name list, right-click Default Domain Policy, and then click Edit.
11. In the tree pane of the Group Policy Management Editor console, under Computer Configuration, expand Policies, expand Windows Settings, and then expand Security Settings.
12. In the tree pane, under Security Settings, expand Local Policies and then double-click Security Options.
13. In the Security Options result pane, double-click Microsoft network client: Digitally sign communications (always).
14. In the Microsoft network client: Digitally sign communications (always) Properties dialog box, select the Define this policy setting check box, click Enabled, and then click OK.
15. In the Confirm Setting Change dialog Box, Click Yes.
16. Close the Group Policy Management console.
17. Close the Group Policy Management Editor console.
Run the Security Configuration Wizard:
1. On the Start menu, point to Administrative Tools, and then click Server Manager.
2. In the Server Manager result pane of the Server Manager console, in the Security Information area, click Run Security Configuration Wizard.
3. On the Welcome to the Security Configuration Wizard page of the Security Configuration Wizard, click Next.
4. On the Configuration Action page, ensure that Create a new security policy is selected, and then click Next.
5. On the Select Server page, ensure that NYC-DC1 is selected as the Server, and then click Next.
6. On the Processing Security Configuration Database page, click Next.
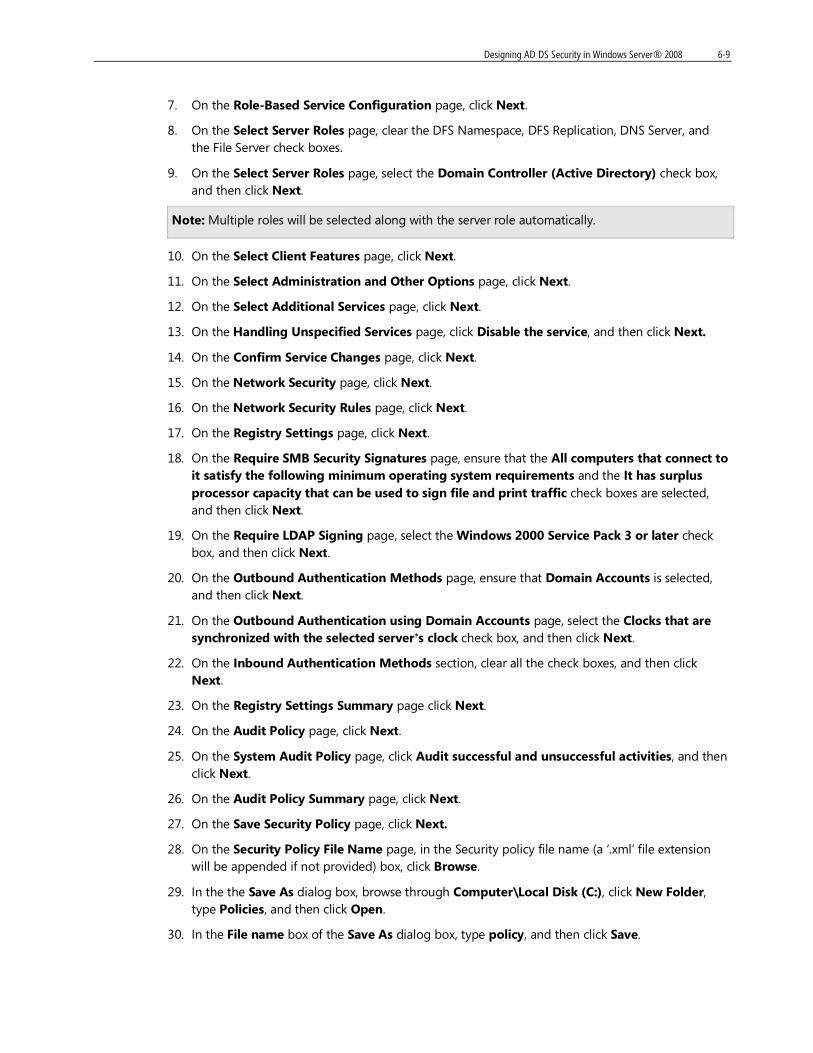
Designing AD DS Security in Windows Server® 2008 6-9
7. On the Role-Based Service Configuration page, click Next.
8. On the Select Server Roles page, clear the DFS Namespace, DFS Replication, DNS Server, and the File Server check boxes.
9. On the Select Server Roles page, select the Domain Controller (Active Directory) check box, and then click Next.
Note: Multiple roles will be selected along with the server role automatically.
10. On the Select Client Features page, click Next.
11. On the Select Administration and Other Options page, click Next.
12. On the Select Additional Services page, click Next.
13. On the Handling Unspecified Services page, click Disable the service, and then click Next.
14. On the Confirm Service Changes page, click Next.
15. On the Network Security page, click Next.
16. On the Network Security Rules page, click Next.
17. On the Registry Settings page, click Next.
18. On the Require SMB Security Signatures page, ensure that the All computers that connect to it satisfy the following minimum operating system requirements and the It has surplus processor capacity that can be used to sign file and print traffic check boxes are selected, and then click Next.
19. On the Require LDAP Signing page, select the Windows 2000 Service Pack 3 or later check box, and then click Next.
20. On the Outbound Authentication Methods page, ensure that Domain Accounts is selected, and then click Next.
21. On the Outbound Authentication using Domain Accounts page, select the Clocks that are synchronized with the selected server’s clock check box, and then click Next.
22. On the Inbound Authentication Methods section, clear all the check boxes, and then click Next.
23. On the Registry Settings Summary page click Next.
24. On the Audit Policy page, click Next.
25. On the System Audit Policy page, click Audit successful and unsuccessful activities, and then click Next.
26. On the Audit Policy Summary page, click Next.
27. On the Save Security Policy page, click Next.
28. On the Security Policy File Name page, in the Security policy file name (a ‘.xml’ file extension will be appended if not provided) box, click Browse.
29. In the the Save As dialog box, browse through Computer\Local Disk (C:), click New Folder, type Policies, and then click Open.
30. In the File name box of the Save As dialog box, type policy, and then click Save.
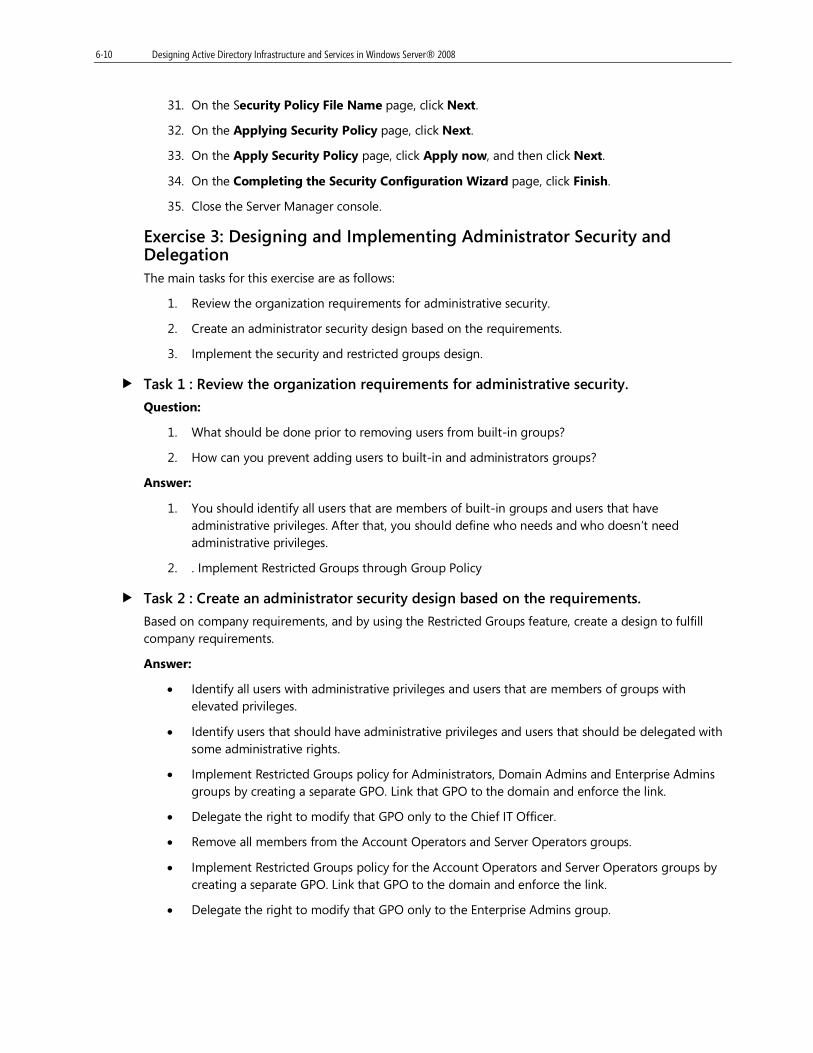
6-10 Designing Active Directory Infrastructure and Services in Windows Server® 2008
31. On the Security Policy File Name page, click Next.
32. On the Applying Security Policy page, click Next.
33. On the Apply Security Policy page, click Apply now, and then click Next.
34. On the Completing the Security Configuration Wizard page, click Finish.
35. Close the Server Manager console.
Exercise 3: Designing and Implementing Administrator Security and Delegation The main tasks for this exercise are as follows:
1. Review the organization requirements for administrative security.
2. Create an administrator security design based on the requirements.
3. Implement the security and restricted groups design.
Task 1 : Review the organization requirements for administrative security.
Question:
1. What should be done prior to removing users from built-in groups?
2. How can you prevent adding users to built-in and administrators groups?
Answer:
1. You should identify all users that are members of built-in groups and users that have administrative privileges. After that, you should define who needs and who doesn’t need administrative privileges.
2. . Implement Restricted Groups through Group Policy
Task 2 : Create an administrator security design based on the requirements.
Based on company requirements, and by using the Restricted Groups feature, create a design to fulfill company requirements.
Answer:
• Identify all users with administrative privileges and users that are members of groups with elevated privileges.
• Identify users that should have administrative privileges and users that should be delegated with some administrative rights.
• Implement Restricted Groups policy for Administrators, Domain Admins and Enterprise Admins groups by creating a separate GPO. Link that GPO to the domain and enforce the link.
• Delegate the right to modify that GPO only to the Chief IT Officer.
• Remove all members from the Account Operators and Server Operators groups.
• Implement Restricted Groups policy for the Account Operators and Server Operators groups by creating a separate GPO. Link that GPO to the domain and enforce the link.
• Delegate the right to modify that GPO only to the Enterprise Admins group.
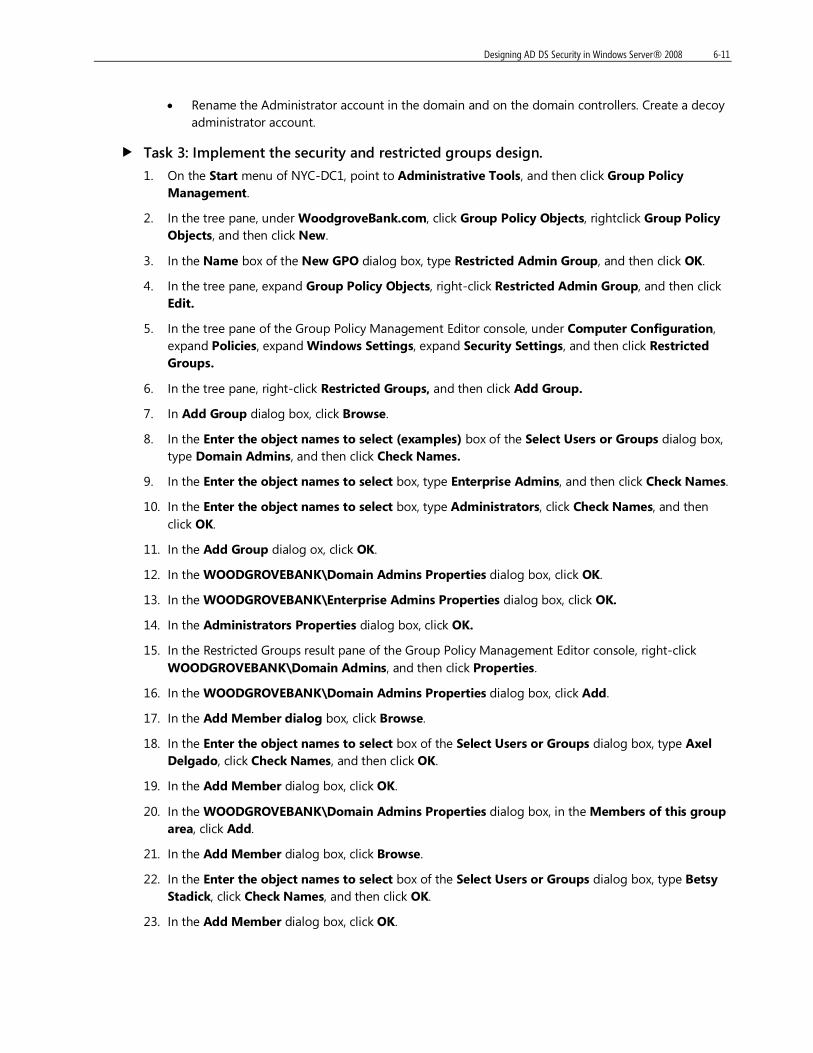
Designing AD DS Security in Windows Server® 2008 6-11
• Rename the Administrator account in the domain and on the domain controllers. Create a decoy administrator account.
Task 3: Implement the security and restricted groups design.
1. On the Start menu of NYC-DC1, point to Administrative Tools, and then click Group Policy Management.
2. In the tree pane, under WoodgroveBank.com, click Group Policy Objects, rightclick Group Policy Objects, and then click New.
3. In the Name box of the New GPO dialog box, type Restricted Admin Group, and then click OK.
4. In the tree pane, expand Group Policy Objects, right-click Restricted Admin Group, and then click Edit.
5. In the tree pane of the Group Policy Management Editor console, under Computer Configuration, expand Policies, expand Windows Settings, expand Security Settings, and then click Restricted Groups.
6. In the tree pane, right-click Restricted Groups, and then click Add Group.
7. In Add Group dialog box, click Browse.
8. In the Enter the object names to select (examples) box of the Select Users or Groups dialog box, type Domain Admins, and then click Check Names.
9. In the Enter the object names to select box, type Enterprise Admins, and then click Check Names.
10. In the Enter the object names to select box, type Administrators, click Check Names, and then click OK.
11. In the Add Group dialog ox, click OK.
12. In the WOODGROVEBANK\Domain Admins Properties dialog box, click OK.
13. In the WOODGROVEBANK\Enterprise Admins Properties dialog box, click OK.
14. In the Administrators Properties dialog box, click OK.
15. In the Restricted Groups result pane of the Group Policy Management Editor console, right-click WOODGROVEBANK\Domain Admins, and then click Properties.
16. In the WOODGROVEBANK\Domain Admins Properties dialog box, click Add.
17. In the Add Member dialog box, click Browse.
18. In the Enter the object names to select box of the Select Users or Groups dialog box, type Axel Delgado, click Check Names, and then click OK.
19. In the Add Member dialog box, click OK.
20. In the WOODGROVEBANK\Domain Admins Properties dialog box, in the Members of this group area, click Add.
21. In the Add Member dialog box, click Browse.
22. In the Enter the object names to select box of the Select Users or Groups dialog box, type Betsy Stadick, click Check Names, and then click OK.
23. In the Add Member dialog box, click OK.

6-12 Designing Active Directory Infrastructure and Services in Windows Server® 2008
24. In the WOODGROVEBANK\Domain Admins Properties dialog box, in the Members of this group area, click Add.
25. In the Add Member dialog box, click Browse.
26. In the Enter the object names to select box of the Select Users or Groups dialog box, type Darren Gehring, click Check Names, and then click OK.
27. In the Add Member dialog box, click OK.
28. In the WOODGROVEBANK\Domain Admins Properties dialog box, in the Members of this group area, click Add.
29. In the Add Member dialog box, click Browse.
30. In the Enter the object names to select box of the Select Users or Groups dialog box, type Herbert Dorner, click Check Names, and then click OK.
31. In the Add Member dialog box, click OK.
32. In the WOODGROVEBANK\Domain Admins Properties dialog box, in the Members of this group area, click Add.
33. In the Add Member dialog box, click Browse.
34. In the Enter the object names to select box of the Select Users or Groups dialog box, type Jinghao Liu, click Check Names, and then click OK.
35. In the Add Member dialog box, click OK.
36. In the WOODGROVEBANK\Domain Admins Properties dialog box, in the Members of this group area, click Add.
37. In the Add Member dialog box, click Browse.
38. In the Enter the object names to select box of the Select Users or Groups dialog box, type Markus Breyer, click Check Names, and then click OK.
39. In the Add Member dialog box, click OK.
40. In the WOODGROVEBANK\Domain Admins Properties dialog box, in the Members of this group area, click Add.
41. In the Add Member dialog box, click Browse.
42. In the Enter the object names to select box of the Select Users or Groups dialog box, type Nuno Bento, click Check Names, and then click OK.
43. In the Add Member dialog box, click OK.
44. In the WOODGROVEBANK\Domain Admins Properties dialog box, in the Members of this group area, click Add.
45. In the Add Member dialog box, click Browse.
46. In the Enter the object names to select box of the Select Users or Groups dialog box, type Oliver Kiel, click Check Names, and then click OK.
47. In the Add Member dialog box, click OK.
48. In the WOODGROVEBANK\Domain Admins Properties dialog box, in the Members of this group area, click Add.
Designing AD DS Security in Windows Server® 2008 6-13
49. In the Add Member dialog box, click Browse.
50. In the Enter the object names to select box of the Select Users or Groups dialog box, type Punya Palit, click Check Names, and then click OK.
51. In the Add Member dialog box, click OK.
52. In the WOODGROVEBANK\Domain Admins Properties dialog box, in the Members of this group area, click Add.
53. In the Add Member dialog box, click Browse.
54. In the Enter the object names to select box of the Select Users or Groups dialog box, type Roland Wacker, click Check Names, and then click OK.
55. In the Add Member dialog box, click OK.
56. In the WOODGROVEBANK\Domain Admins Properties dialog box, in the Members of this group area, click Add.
57. In the Add Member dialog box, click Browse.
58. In the Enter the object names to select box of the Select Users or Groups dialog box, type Tamer Salah, click Check Names, and then click OK.
59. In the Add Member dialog box, click OK.
60. In the WOODGROVEBANK\Domain Admins Properties dialog box, in the Members of this group area, click Add.
61. In the Add Member dialog box, click Browse.
62. In the Enter the object names to select box of the Select Users or Groups dialog box, type Thomas Andersen, click Check Names, and then click OK.
63. In the Add Member dialog box, click OK.
64. In the WOODGROVEBANK\Domain Admins Properties dialog box, click OK.
65. In the Restricted Groups result pane of the Group Policy Management Editor console, right-click WOODGROVEBANK\Enterprise Admins, and then click Properties.
66. In the WOODGROVEBANK\Enterprise Admins Properties dialog box, in the Members of this group area, click Add.
67. In the Add Member dialog box, click Browse.
68. In the Enter the object names to select box of the Select Users or Groups dialog box, type Thomas Andersen, click Check Names, and then click OK.
69. In the Add Member dialog box, click OK.
70. In the WOODGROVEBANK\Enterprise Admins Properties dialog box, in the Members of the Group area, click Add.
71. In the Add Member dialog box, click Browse.
72. In the Enter the object names to select box of the Select Users or Groups dialog box, type Tamer Salah, click Check Names, and then click OK.
73. In the Add Member dialog box, click OK.
74. In the WOODGROVEBANK\Enterprise Admins Properties dialog box, click OK
6-14 Designing Active Directory Infrastructure and Services in Windows Server® 2008
75. In the Restricted Groups result pane of the Group Policy Management Editor console, right-click Administrators, and then click Properties.
76. In the Administrators Properties dialog box, in the Members of the Group area, click Add.
77. In the Add Member dialog box, click Browse.
78. In the Enter the object names to select box of the Select Users or Groups dialog box, type Administrator, click Check Names, and then click OK.
79. In the Add Member dialog box, click OK.
80. In the Administrators Properties dialog box, in the Members of the Group area, click Add.
81. In the Add Member dialog box, click Browse.
82. In the Enter the object names to select box of the Select Users or Groups dialog box, type Domain Admins, click Check Names, and then click OK.
83. In the Add Member dialog box, click OK.
84. In the Administrators Properties dialog box, in the Members of the Group area, click Add.
85. In the Add Member dialog box, click Browse.
86. In the Enter the object names to select box of the Select Users or Groups dialog box, type Enterprise Admins, click Check Names, and then click OK.
87. In the Add Member dialog box, click OK.
88. In the Administrators Properties dialog box, click OK
89. Close the Group Policy Management Editor console.
90. In the tree pane of the Group Policy Management console, under Group Policy Objects, click Restricted Admin Group.
91. On the Delegation tab of the Restricted Admin Group result pane, in the Name list, click Domain Admins [WOODGROVEBANK\Domain Admins], and then click Remove.
92. In the Group Policy Management message box, click OK.
93. In the Name list, click Enterprise Admins [WOODGROVEBANK\Enterprise Admins], and then click Remove.
94. In the Group Policy Management message box, click OK.
95. In the Restricted Admin Group Result pane, click Add.
96. In the Enter the object name to select (examples) box of the Select User, Computer, or Group dialog box, type Thomas, click Check Names, and then click OK.
97. In the Permissions box of the Add Group or User dialog box, click Edit settings, delete, modify security, and then click OK.
98. In the tree pane of the Group Policy Management console, under Domains, rightclick WoodgroveBank.com, and then click Link an Existing GPO.
99. In the Select GPO dialog box, click Restricted Admin Group, and then click OK.
100. In the tree pane of the Group Policy Management console, under Domains, click WoodgroveBank.com.
Designing AD DS Security in Windows Server® 2008 6-15
101. In the WoodgroveBank result pane, in the GPO list, right-click the Restricted Admin Group, and then click Enforced.
102. In the Group Policy Management message box, click OK.
103. In the tree pane of the Group Policy Management console, under WoodgroveBank.com, click Group Policy Objects.
104. In the Group Policy Objects in WoodgroveBank.com result pane, in the Name list, right-click Default Domain Policy, and then click Edit.
105. In the Group Policy Management Editor console, under Computer Configuration, expand Policies, expand Windows Settings, and then expand Security Settings.
106. In the tree pane, under Security Settings, expand Local Policies, and then click Security Options.
107. In the Security Options result pane, in the Policy list, double-click Accounts: Rename administrator account.
108. In the Accounts: Rename administrator account Properties dialog box, select the Define this policy setting check box; in the Define this policy setting box, type Admin1, and then click OK..
109. On the Start menu, in the Start Search box, type gpupdate /force, and then press ENTER
110. On the Start menu, point to Administrative Tools, and then click Active Directory Users and Computers.
111. In the tree pane of the Active Directory Users and Computers console, under WoodgroveBank.com, click Users, right-click Users, point to New, and then click User.
112. In the First name box of the New Object – User dialog box, type Decoy, in the Last name box, type Admin, in the User logon name box, type Administrator, and then click Next.
113. In the Create in: WoodgroveBank.com/Users page, in the Password box, type Pa$$w0rd12, in the Confirm password box, type Pa$$w0rd12.
114. In the Create in: WoodgroveBank.com/Users page, clear the User must change password at next login check box, select the Password never expires check box, and then click Next.
115. In the Create in: WoodgroveBank.com/Users page, click Finish.
116. In the tree pane of the Active Directory Users and Computers console, under WoodgroveBank.com, right-click Users, point to New, and then click Group.
117. In the New Object – Group dialog box, in the Group name box, type Decoy group, and then click OK.
118. In the Users result pane, in the Name list, right-click Decoy Admin, and then click Properties.
119. On the Member Of tab of the Decoy Admin Properties dialog box, click Add.
120. In the Enter the object names to select (examples) of the Select Users or Groups dialog box, type Decoy group, click Check Names, and then click OK.
121. In the Decoy Admin Properties dialog box, in the Name list, click Decoy group, and then click Set Primary Group.
122. In the Decoy Admin Properties dialog box, in the Name list, click Domain Users, and then click Remove.
123. In the Remove user from group message box, click Yes.
6-16 Designing Active Directory Infrastructure and Services in Windows Server® 2008
124. In the Decoy Admin Properties dialog box, click OK.
125. Close the Active Directory Users and Computers console.
126. Close the Group Policy Management Editor console.
127. Close the Group Policy Management console.
Task 4: Close all virtual machines and discard undo disks.
1. For each virtual machine that is running, close the Virtual Machine Remote Control window.
2. In the Close box, select Turn off machine and discard changes. Click OK.
3. Close the 6436A Lab Launcher.

Designing AD DS High Availability in Windows Server® 2008 7-1
Module 7 Designing AD DS High Availability in Windows Server® 2008
Contents: Lab Answer Keys 2
7-2 Designing Active Directory Infrastructure and Services in Windows Server® 2008
Lab Answer Keys Lab 7: Designing AD DS Availability in Windows Server 2008
Exercise 1: Designing a High Availability Plan for AD DS The main tasks for this exercise are to:
1. Review information about the organization’s locations and where users for each domain are located.
2. Review information on the organization’s availability requirements for domain controllers.
3. Create a domain controller deployment and network design that addresses the company requirements.
Task 1: Review information about the organization’s locations and where users for each domain are located.
Questions:
1. How would you describe Woodgrove Bank’s geographical organization and administration model?
2. In what sites are users located in each country?
Answers:
1. Woodgrove Bank has 7 locations in various countries. Each location is a separate forest. On each location, there is one hub site and several branch sites. The administration model is decentralized.
2. Users are located in hub sites (around 300 users per site) and in branch offices (around 150 users per site).
Task 2: Review information on the organization’s availability requirements for domain controllers.
Questions:
1. What can be done to mitigate single points of failure on domain controllers?
2. How can you improve user experience for user logon and Active Directory search in branch offices?
Answers:
1. By adding one more domain controller per site, the single point of failure domain controller problem will be solved.
2. Implement a Global Catalog on branch office domain controllers.
Task 3: Create a domain controller deployment and network design that addresses the company requirements.
Consider the following points when completing this task:
• Ensure that redundant network infrastructure is available
• Ensure that you deploy enough domain controllers to mitigate single point of failure
• Implement Global Catalogs where necessary

Designing AD DS High Availability in Windows Server® 2008 7-3
Answers:
One possible solution is represented in following figure:
Key components for the design:
• Implement an additional domain controller in every site
• Implement two NICs per domain controller
• Implement redundant network infrastructure devices (switches and routers) and connect them to different network cards on domain controllers
• Implement an additional link between branch and hub, via an alternative Telco operator. Increase the speed of the link between hub and branch
• Distribute business services to branch offices
Exercise 2: Discussions about Exercise 1 Design Decisions In this exercise, the instructor will lead a discussion about the design decisions made in Exercise 1.

Designing AD DS Disaster Recovery in Windows Server® 2008 8-1
Module 8 Designing AD DS Disaster Recovery in Windows Server® 2008
Contents: Lab Answer Keys 2
8-2 Designing Active Directory Infrastructure and Services in Windows Server® 2008
Lab Answer Keys Lab 8: Designing Active Directory Disaster Recovery in Windows Server 2008
Exercise 1: Designing and Implementing a Domain Controller Maintenance Plan The main tasks for this exercise are:
1. Review information about the organization’s domain controller maintenance and restore requirements.
2. Design domain controller maintenance guidelines.
3. Design a domain controller backup and restore strategy.
4. Verify the authoritative restore process.
Task 1: Review information about the organization’s domain controller maintenance and restore requirements.
Questions:
1. What should the company define to avoid situations such as the recent domain controller failure and data loss?
2. What tools would you propose using to accomplish this?
Answers:
1. The company should define backup, restore, and maintenance procedures for AD DS, as well as a monitoring strategy.
2. Windows Server Backup for backup and restore tasks, ntdsutil.exe for database maintenance, and the Reliability and Performance console for monitoring tasks. You should recommend System Center Operations Manager 2007 as the monitoring solution to implement for the entire whole network infrastructure.
Task 2: Design domain controller maintenance guidelines.
Questions:
• How would you recommend configuring domain controller files, and what is your recommendation as to when to perform database maintenance?
Answers:
• When using ntdsutil.exe, all AD DS related files on all domain controllers should be moved according to these recommendations:
o Store operating system files, Ntds.dit, the Active Directory database, log files and SYSVOL on separate volumes that do not contain other users, operating systems, or application data.
• Procedures should be developed for the maintenance of database files according to these recommendations:
o Online maintenance will be performed automatically, so no action is required.
Designing AD DS Disaster Recovery in Windows Server® 2008 8-3
o Offline maintenance should be performed only in case of limited disk space and for integrity checks. Integrity checks of the database should be scheduled.
Task 3: Design a domain controller backup and restore strategy.
Questions:
• Based on the scenario, what are your recommendations for a domain controller backup and restore strategy?
Answers:
The AD DS backup strategy depends on the DC redundancy already in place and should be designed proactively based on business needs, service requirements, and data growth.
In the case of Woodgrove Bank, you should first deploy an additional domain controller in all locations where only single domain controller exists. This will provide a first level of redundancy.
At least one domain controller that is also a global catalog server and represents each domain should be regularly backed up at each location. Each domain controller at each location must be backed up at least twice within the tombstone lifetime. The default tombstone lifetime is 180 days. You should assign a user with appropriate rights, at each location to perform regular backups.
Windows Server Backup should be used to perform backup of critical volumes. Backup files should be stored on DVD media and in an alternative online location.
You should define a procedure for restoration of AD DS and domain controllers. When the server fails, you can perform a nonauthoritative restore operation and then let AD DS replication update the domain controller with changes that have occurred since the time of the backup. Using this type of restore, the domain controller is recovered to a current state.
Authoritative restore can be used to recover objects and containers that have been deleted from AD DS. This process returns a designated object or container of objects to its state at the time of the backup.
Full domain controller restore should be performed in the event of permanent hardware failure on a domain controller, and the domain controller should be restored on new hardware.
Task 4: Verify the authoritative restore process.
You will verify the authoritative restore process.
Note: Two Domain Controllers in the same domain are required for this exercise.
1. On one of the domain controllers, perform regular AD DS critical volumes backup.
2. After the backup is finished, delete an object from AD (for example, OU or user object).
3. Replicate the two domain controllers.
4. Perform an authoritative restore of the deleted objects from backup.
5. Verify that the deleted object has reappeared.
Results: After this exercise, you should have designed and implemented a domain controller maintenance plan.
8-4 Designing Active Directory Infrastructure and Services in Windows Server® 2008
Exercise 2: Designing and Implementing a Domain Controller Monitoring Plan The main tasks for this exercise are as follows:
1. Review the organizational requirements for domain controller availability and performance.
2. Create a monitoring plan.
3. Implement part of the monitoring plan.
Task 1: Review the organizational requirements for domain controller availability and performance.
You will Review the organizational requirements for domain controller availability and performance.
Questions:
• What are the organizational requirements for AD DS availability?
Answers:
• The availability and reliability of Active Directory is critical to the company’s business. Therefore, the service must be available as much as possible. To achieve this, you must create and implement a precise monitoring plan.
Task 2: Create a monitoring plan.
You will create a monitoring plan that describes what domain controller components should be monitored, how frequently these components should be monitored, and which tools to use for monitoring domain controllers.
Questions:
• What recommendations would you make for your organization’s domain controller monitoring plan?
Answers:
• Because there is no additional budget for the current year, only the tools that are integrated in Windows Server 2008 may be used for monitoring. These tools are built into Windows Server 2008 and include Reliability and Performance Monitor, Event Viewer, and Task Manager. You can use Data Collector Sets in the Reliability and Performance Monitor to organize multiple data collection points into a single component for reviewing or logging performance. You can also use event forwarding to centralize specific Event IDs.
You should first establish a performance baseline for all domain controllers. After the baseline is established, you can use Reliability and Performance Monitor. Configure the performance counters to track and analyze domain controller performance against the baseline. This analysis will help you determine domain controller behavior under normal conditions, and configure threshold values that are appropriate for each domain controller.
The frequency will differ for different types of counters. For example, the AD Database and Log File should be monitored every 15 minutes, while the monitoring of CPU utilization for Active Directory (LSASS.exe) should be performed more frequently (for example, every minute). If you plan on storing the performance statistics, you should consider the storage requirements for doing so. The higher the frequency, the more space will be required.
Designing AD DS Disaster Recovery in Windows Server® 2008 8-5
Active Directory consists of a number of interdependent components that run on each domain controller, along with several components that are external to Active Directory but on which Active Directory relies heavily. Some of the more important components include: LDAP, global catalog, replication, LSASS, CPU, memory, directory information tree (DIT), flexible single master operations (FSMO) role holders, Netlogon, W32Time, SYSVOL, DNS, and so on.
Task 3: Implement part of the monitoring plan.
You will implement part of the monitoring plan.
1. On your host machine, click Start, point to All Programs, point to Microsoft Learning, and then click 6436A. The Lab Launcher starts.
2. In the Lab Launcher, next to 6436A-NYC-DC3, click Launch.
3. Log on to NYC-DC3 as WoodgroveBank\Administrator with the password Pa$$w0rd.
4. Minimize the Lab Launcher window.
5. On the Start menu of NYC-DC1, point to Administrative Tools, and then click Services.
6. In the Services (Local) result pane of the Services console, in the Name list, right-click DNS Server, and then click Stop.
7. In the Name list of the Services (Local) result pane, right-click DNS Server, and then click Start.
8. In the Services console, click the Close button.
9. On the Start menu of NYC-DC1, point to Administrative Tools, and then click Active Directory Users and Computers.
10. In the tree pane of the Active Directory Users and Computers console, expand WoodgroveBank.com, right-click Users, point to New, and then click User.
11. In the New Object – User dialog box, in the First name box, type DCperf, in the User logon name box, type DCperf, and then click Next.
12. In the Password box, type Pa$$w0rd, and then in the Confirm password box, type Pa$$w0rd.
13. In the New Object – User dialog box, clear the User must change password at next logon checkbox, select the User cannot change password checkbox, click Next, and then click Finish.
14. In the tree pane of the Active Directory Users and Computers console, click User.
15. In the Name list of the Users result pane, right-click DCperf, and then click Add to a group.
16. In the Enter the object names to select (examples) box of the Select Groups dialog box, type Domain Admins, and then click OK.
17. In the Active Directory Domain Services message box, click OK.
18. In the Active Directory Users and Computers console, click the Close button.
19. On the Start menu of NYC-DC1, point to Administrative Tools, and then click Reliability and Performance Monitor.
20. In the tree pane of the Reliability and Performance Monitor console, click Data Collector Sets.
21. In the Name list of the Data Collector Sets result pane, right click User Defined, point to New, and then click Data Collector Set.
8-6 Designing Active Directory Infrastructure and Services in Windows Server® 2008
22. In the Name box of the Create new Data Collector Set dialog box, type DC Performance, and then click Next.
23. In the Template Data Collector Set box of the Which template would you like to use? area, click Active Directory Diagnostics, and then click Next.
24. In the Where would you like the data to be saved? area, click Next.
Note: Ensure that in the Root directory box, the %systemdrive%\PerfLogs\Admin\DC performance option is selected.
25. In the Create the data collector set? area, click Change.
26. In the Reliability and Performance Monitor dialog box, in the User name box, type woodgrovebank\DCperf, in the Password box, type Pa$$w0rd, and then click OK.
27. In the Create the data collector set? area, click Open properties for this data collector set, and then click Finish.
28. On the Schedule tab of the DC Performance Properties dialog box, click Add.
29. In the Launch area of the Folder Action dialog box, in the Start time box, type 7:30:00 AM, clear the Saturday and Sunday check boxes, and then click OK.
30. On the Stop Condition tab of the DC Performance Properties dialog box, in the Overall duration box, type 2, and then in the Units box, click Hours.
31. In the Limits area, select the Duration check box, in the Duration box, type 5, and then in the Units box, click Minutes.
32. In the DC Performance Properties dialog box, click OK.
33. In the Reliability and Performance Monitor dialog box, in the User name box, type WoodgroveBank\DCperf, in the Password box, type Pa$$w0rd, and then click OK.
34. In the Reliability and Performance Monitor console, click the Close button.
Task 4: Close all virtual machines and discard undo disks.
1. For each virtual machine that is running, close the Virtual Machine Remote Control window.
2. In the Close box, select Turn off machine and discard changes. Click OK.
3. Close the 6436A Lab Launcher.
Results: After this exercise, you should have designed and implemented a domain controller monitoring plan.
Exercise 3: Discussion In this exercise, the instructor will lead a discussion about the design decisions made in Exercises 1 and 2.

Designing Public Key Infrastructure in Windows Server® 2008 9-1
Module 9 Designing Public Key Infrastructure in Windows Server® 2008
Contents: Lab Answer Keys 2
9-2 Designing Active Directory Infrastructure and Services in Windows Server® 2008
Lab Answer Keys Lab 9: Designing Public Key Infrastructure in Windows Server 2008
Exercise 1: Designing and Implementing a CA Hierarchy
Task 1 : Review information about Woodgrove Bank and its requirements for implementing a PKI.
Question:
1. For what purposes will Woodgrove Bank use certificates?
2. What kind of certificate issuing will Woodgrove Bank use?
3. Who will manage the Woodgrove Bank CAs and who will approve certificates?
4. What should be done to maximize the security of AD CS?
Answer:
1. Woodgrove Bank will use certificates for the following purposes:
• All employees will secure confidential data using EFS.
• User certificates are required for the applications that require the validation of a user’s identity through certificates, and for smart-card logon (for managers).
• Exchange Server Web services will need a certificate to secure Outlook Web Access, Active Sync, and Autodiscover services. A certificate with Subject Alternative Names should be deployed.
• Web server certificates are required for the Web servers that can only be accessed via SSL.
• Computer certificates are required for a L2TP/IPSec VPN connection.
2. The certificates will be issued as follows:
• The EFS, user and computer certificates will be issued through autoenrollment.
• Smart card certificates will be issued by enrollment agents.
• An exchange certificate will be issued manually, using the .req file generated by the Exchange administrator.
• The Web server certificates will be issued manually.
• Computer certificates for VPN will be issued manually after they are approved by the Chief Security Officer.
3. The CAs will be managed by a single team at Woodgrove Bank. Approval for specific types of certificates will be done by the Chief Security Officer.
4. The CAs must be secured. The root CA will be taken offline after issuing a certificate to the Enterprise Subordinate CA.
Task 2 : Create a CA hierarchy design that includes the CAs that will be deployed, the hierarchy levels, and the certificate trust configuration.
Question:
1. How many levels will the CA hierarchy have?

Designing Public Key Infrastructure in Windows Server® 2008 9-3
2. How will trusts be designed in the hierarchy?
Answer:
The following is one design solution:
• Woodgrove Bank will deploy one stand-alone Root CA, and one Enterprise Subordinate CA. After the RootCA issues a certificate to the Enterprise Subordinate CA, the RootCA should be taken offline.
• The Enterprise Subordinate CA will trust the RootCA.
• Client computers and member servers will trust the Enterprise Subordinate CA.
• On the Enterprise CA, Web Enrollment will be configured.
Task 3: Deploy a root CA and subordinate CA. Issue a certificate to subordinate CA. Publish the Root CA certificate and CRL to Active Directory.
Deploying the RootCA:
1. On your host machine, click Start, point to All Programs, point to Microsoft Learning, and then click 6436A. The Lab Launcher starts.
2. In the Lab Launcher, next to 6436A-NYC-DC3, click Launch.
3. Log on to NYC-DC3 as WoodgroveBank\Administrator with the password Pa$$w0rd.
4. Minimize the Lab Launcher window.
5. On your host machine, click Start, point to All Programs, point to Microsoft Learning, and then click 6436A. The Lab Launcher starts.
6. In the Lab Launcher, next to 6436A-NYC-SVR1, click Launch.
7. Log on to NYC-SVR1 as WoodgroveBank\Administrator with the password Pa$$w0rd.
8. Minimize the Lab Launcher window.
9. On the Start menu of NYC-SVR1, click Server Manager.
10. In the tree pane of the Server Manager console, click Roles.
11. In the Roles Summary area of the Roles result pane, click Add Roles.
12. On the Before You Begin page of the Add Roles Wizard, click Next.
13. On the Roles box of the Select Server Roles page, select the Active Directory Certificate Services checkbox, and then click Next.
14. On the Introduction to Active Directory Certificate Services page, click Next.
15. On the Select Role Services page, ensure that the Certification Authority checkbox is selected, and then click Next.
16. On the Specify Setup Type page, ensure that Standalone option is selected, and then click Next.
17. On the Specify CA Type page, ensure that the Root CA option is selected, and then click Next.
18. On the Set Up Private Key page, ensure that the Create a new private key option is selected, and then click Next.
19. On the Configure Cryptography for CA page, click Next.
9-4 Designing Active Directory Infrastructure and Services in Windows Server® 2008
20. On the Configure CA Name page, in the Common name for this CA box, type RootCA, and then click Next.
21. On the Set Validity Period page, click Next.
22. On the Configure Certificate Database page, click Next.
23. On the Confirm Installation Selections page, click Install.
24. On the Confirm Installation Selections page, click Install.
Deploying the Subordinate CA:
1. On the Start menu of NYC-DC1, point to Administrative Tools, and then click Services.
2. In the Services (Local) result pane of the Services console, in the Name list, right-click DNS Server, and then click Stop.
3. In the Name list of the Services (Local) result pane, right-click DNS Server, and then click Start.
4. In the Services console, click the Close button.
5. On the Start menu of NYC-DC1, click Server Manager.
6. In the tree pane of the Server Manager console, click Roles.
7. In the Roles Summary area of the Roles result pane, click Add Roles.
8. On the Before You Begin page of the Add Roles Wizard, click Next.
9. On the Select Server Roles page, in the Roles box, select the Active Directory Certificate Services checkbox, and then Next.
10. On the Introduction to Active Directory Certificate Services page, click Next.
11. On the Select Role Services page, in the Role services box, select the Certification Authority Web Enrollment checkbox.
12. In the Add Roles Wizard dialog box, click Add Required Role Services.
13. On the Select Role Services page, click Next.
14. On the Specify Setup Type page, ensure that the Enterprise option is selected, and then click Next.
15. On the Specify CA Type page, click Subordinate CA, and then click Next.
16. On the Set Up Private Key page, ensure that the Create a new private key is selected, and then click Next.
17. On the Configure Cryptography for CA page, click Next.
18. On the Configure CA Name page, in the Common name for this CA box, type IssuingCA, and then click Next.
19. On the Request Certificate from a Parent CA page, click Computer name, then click Browse.
20. In the Enter the object name to select (example) box of the Select Computer dialog box, type NYC-SVR1, click Check Names, and then click OK.
21. On the Request Certificate from a Parent CA page, click Next.
22. On the Configure Certificate Database page, click Next.
23. On the Web Server (IIS) page, click Next.
Designing Public Key Infrastructure in Windows Server® 2008 9-5
24. On the Select Role Services page, click Next.
25. On the Confirm Installation Selections page, click Install.
26. On the Installation Results page, click Close.
27. In the Server Manager console, click the Close button.
Issuing a certificate to the Subordinate CA, and publishing the RootCA certificate and CRL to Active Directory:
1. Switch to NYC-SVR1.
2. On the Start menu of NYC-SVR1, point to Administrative Tools, and then click Certification Authority.
3. In the tree pane of the certsrv – [Certification Authority (Local)] console, expand RootCA, and then click Pending Requests.
4. In the Request ID list of the Pending Requests result pane, right-click 2, point to All Tasks, and then click Issue.
5. Close all open windows.
6. Switch to NYC-DC3.
7. On the Start menu of the NYC-DC1, click Command Prompt.
8. At the command prompt of the Administrator: Command Prompt window, type Certutil -f -dspublish \\nycsvr1\C$\Windows\System32\CertSrv\CertEnroll\NYCSVR1.woodgrovebank.com_RootCA.crt RootCA, and then press ENTER.
9. At the command prompt, type Certutil -addstore -f Root \\nycsvr1\C$\Windows\System32\CertSrv\CertEnroll\RootCA.crl, and then press ENTER.
10. On the Start menu, point to Administrative Tools, and then click Certification Authority.
11. In the tree pane of the certsrv – [Certification Authority (Local)] console, right-click IssuingCA, point to All Tasks, and then click Start Service.
12. In the Microsoft Active Directory Certificate Services message box, click Yes.
13. In the Select file to complete CA installation dialog box, click Cancel.
14. In the CA Certificate Request dialog box, click OK.
15. Close all open windows.
Exercise 2: Designing and Implementing AD CS Certificate Templates
Task 1: Review the requirements for issuing and managing certificates at Woodgrove Bank.
Question:
1. How will certificates be issued at Woodgrove Bank?
2. How will certificates be managed at Woodgrove Bank?
3. Are there any customized certificate requirements for Woodgrove Bank?
9-6 Designing Active Directory Infrastructure and Services in Windows Server® 2008
Answer:
1. User and computer certificates will be issued through autoenrollment. The exception being, the certificate for Exchange Server 2007 Web services.
2. Certificates for VPN access should be approved by the Chief Security Officer. Certificates for smart card logon will be issued by Enrollment Agents.
3. Computer certificates for VPN must have a validity period of 6 months. Certificates for Exchange Server 2007 Web Services must have subject alternative names.
Task 2: Create a certificate template design that identifies which certificates will be updated or superseded and describes the configuration settings for the certificates.
The certificate template for computer certificates for VPN access design will require a new certificate template for the VPN Access and will be configured as follows:
• Based on the default computer certificate template
• Configured to supersede the computer certificate template
• Named Computer VPN
• Validity of 6 months.
• Configured to require Certificate Manager approval.
Task 3: Update an existing template by superseding the template and then modify the permissions and configuration of the new template.
1. On the Start menu of NYC-DC1, click Run.
2. In the Open box of the Run dialog box, type MMC, and then click OK.
3. On the File menu of the Console1 – [Console Root] console, click Add/Remove snap-in.
4. In the Available snap-ins box of the Add or Remove Snap-ins dialog box, click Certificate Templates, click Add, and then click OK.
5. In the tree pane of the Console1 – [Console Root] console, click Certificate Templates.
6. In the Template Display Name list of the Certificate Templates result pane, right-click Computer, and then click Duplicate Template.
7. In the Duplicate Template dialog box, click Windows Server 2008, Enterprise Edition, and then click OK.
8. On the General tab of the Properties of New Template dialog box, in the Template display name box, type Computer VPN, and then in the Validity period box, type 6 months.
9. On the Issuance Requirements tab, select the CA certificate manager approval and the This number of authorized signatures checkboxes, and then click OK.
10. In the Template Display Name list of the Certificate Templates (NYCDC1. WoodgroveBank.com) result pane, right-click Computer VPN, and then click Properties.
11. On the Superseded Templates tab of the Computer VPN Properties dialog box, click Add.
12. In the Certificate templates box of the Add Superseded Template dialog box, click Computer, and then click OK.
13. In the Computer VPN Properties dialog box, click OK.
Designing Public Key Infrastructure in Windows Server® 2008 9-7
14. Close all open windows.
15. In Microsoft Management Console message box, click No.
Exercise 3: Designing and Implementing Certificate Enrollment and Revocation
Task 1: Review the requirements at Woodgrove Bank for issuing and revoking certificates
Question:
1. What are the issuing requirements of Woodgrove Bank?
2. What are the revocation requirements of Woodgrove Bank?
Answer:
1. Woodgrove Bank’s issuing requirements are as follows:
• Reduce the daily management tasks, which can be achieved through autoenrollment
• EFS certificates must be issued to all employees.
• Computer certificates must be issued to computers used for VPN access and approved by the Chief Security Officer.
• Some individuals need to request certificates through a Web interface.
2. Woodgrove Bank’s revocation requirements are as follows:
• Employees and contractors that have left the bank should be unable to use their certificates.
Task 2: Create a certificate enrollment design that enables Web enrollment, autoenrollment, and enrollment agents.
The Woodgrove Bank’s enrollment design will be as follows:
• EFS certificates will be used
• Autoenrollment will be enabled in the Default Domain Policy
• User certificates will be issued automatically through autoenrollment
• Computer certificates will be issued manually after approval
• Smart card certificates will be issued manually
• Certificates for Exchange Server 2007 Web services will be issued manually by submitting requests with Subject Alternative names to the CA
• The Web Server certificate will be issued through the AD DS Web Enrollment Role Service
Task 3: Create a certificate revocation design.
• The Root CAs CRL will be published on NYC-C1’s file system and in AD DS.
• The Root CAs CRL will include a Delta CRL. D
• The Issuing CAs CRL will be published on NYC-SVR1’s file system, in AD DS, and through the AD CS Web Enrollment role service on NYC-SVR1.
9-8 Designing Active Directory Infrastructure and Services in Windows Server® 2008
Task 4: Implement the autoenrollment for users component of the design.
1. On the Start menu, point to Administrative Tools, and then click Group Policy Management.
2. In the tree pane of the Group Policy Management console, expand Forest: WoodgroveBank.com, expand Domains, and then expand WoodgroveBank.com.
3. In the tree pane, under WoodgroveBank.com, expand Group Policy objects, right-click Default Domain Policy, and then click Edit.
4. In the tree pane of the Group Policy Management Editor console, expand User Configuration, expand Policies, expand Windows Settings, and then expand Security Settings.
5. In the tree pane, under Security Settings, click Public Key Policies.
6. In the Object Type list of the Public Key Policies result pane, right-click Certificate Services Client – Auto-Enrollment, and then click Properties.
7. In the Configuration Model box of the Certificate Services Client – Auto- Enrollment Properties dialog box, click Enabled.
8. In the Certificate Services Client – Auto-Enrollment Properties dialog box, select the Renew expired certificates, update pending certificates, and remove revoked certificates and the Update certificates that use certificate templates checkboxes, and then click OK.
9. Close all the open windows.
Task 5: Close all virtual machines and discard undo disks.
1. For each virtual machine that is running, close the Virtual Machine Remote Control window.
2. In the Close box, select Turn off machine and discard changes. Click OK.
3. Close the 6436A Lab Launcher.
Exercise 4: Discussion In this exercise, the instructor will lead a discussion about the design decisions made in Exercises 1-3.

Designing Active Directory Domain Administrative Structures in Windows Server® 2008 10-1
Module 10 Designing Active Directory Domain Administrative Structures in Windows Server® 2008
Contents: Lab Answer Keys 2
10-2 Designing Active Directory Infrastructure and Services in Windows Server® 2008
Lab Answer Keys Lab 10: Designing an AD RMS Infrastructure in Windows Server 2008
Exercise 1: Designing AD RMS Clusters and Access
Task 1 : Review the requirements at Woodgrove Bank for securing content by using AD RMS.
Question:
1. What is the type of content that should be protected?
2. What type of data protection must be provided?
3. What must users be able to do with documents and e-mails?
Answer:
1. Sensitive corporate documents and e-mail messages have been identified as the data requiring protection.
2. The bank’s sensitive information needs to be protected in a way that prevents unauthorized users inside and outside the corporate network from accessing or modifying the content. Users must not deal with NTFS permissions to achieve this.
3. Users will be able to protect their documents, and they will have the possibility to assign various access rights to users that should have access to documents.
Task 2: Create an AD RMS design that will include an AD RMS cluster design, a design for granting internal and external users access to AD RMS, and a template design.
Question:
1. What technology from Window Server 2008 can be used to satisfy company requirements?
2. What type of AD RMS cluster should be created so you can achieve availability and also load balancing?
3. How can you make the AD RMS accessible to internal and external users? What needs to be done so external users can access AD RMS?
4. How can the traffic to the AD RMS server be secured? What needs to be done to achieve this?
5. What can you do to provide secure publishing of AD RMS resources on the Internet?
6. How would you address the requirement to provide users with the ability to set custom permissions to the rights-protected content?
Answer:
1. The AD RMS server role in Windows Server 2008 and the AD RMS client can be used to protect sensitive information. This is done through the use of persistentusage policies, which remain with the content, no matter where it is moved.
2. AD RMS must provide redundancy in case of server failure. You should therefore create a multi-server cluster. You can use load-balancing technologies, such as the Network Load Balancing (NLB) service to distribute the requests across the cluster and provide the fault tolerance.

Designing Active Directory Domain Administrative Structures in Windows Server® 2008 10-3
3. To allow internal and external users to share AD RMS-protected content, you must set the root certification cluster URL to an address that can be accessed and resolved from the Internet. You must publish the external URL on a firewall and make it resolvable in the external DNS. Additionally, you must set up a license server and configure it with the extranet cluster URL.
4. You can control access to the AD RMS server in the same manner as you would with other Web services, by using access control lists and Secure Sockets Layer (SSL). An SSL connection should be enforced to secure traffic between AD RMS clients and the AD RMS server. In order to use SSL, you must require encrypted connections to AD RMS, and also, you must deploy proper certificates on servers.
5. Use ISA Server 2006. Configure listeners and publishing rules to provide secure access to AD RMS. In order to use ISA Server, you should export the certificate from AD RMS and install it on the ISA Server, so that you can create secure publishing.
6. You can use AD RMS rights policy templates to specify the rights and conditions that apply to protected content. The default rights policy templates define basic usage rights, such as copy, edit, and print. You can create custom templates to meet the organization’s specific needs.
Exercise 2: Designing AD RMS Backup and Recovery
Task 1: Identify and document key technical requirements from the scenario.
Question:
1. What must be backed up to allow the recovery of AD RMS in case of failure?
2. What tools can you use to backup the AD RMS key components?
Answer:
1. You must backup Active Directory, the database server that holds a database of AD RMS and licensing and certification pipelines in IIS.
2. You can use Windows Backup or a third-party backup utility.
Task 2: Generate a detailed design for ADRMS backup and recovery (including certificate status updates).
Question:
1. How will the Active Directory backup be designed?
2. How will you perform and schedule database backup?
3. What options do you have for certificate backup?
4. What are the options for restoring AD RMS servers?
Answer:
1. Active Directory will be backed up by using scheduled System State backups. You should schedule System State backups to be done automatically, every day.
2. If the AD RMS database is stored within the Windows Internal database, you can use scheduled Windows backup or some third-party utility for backing up the database. If you host a database on a separate SQL server, you should follow the backup and restore procedure of a SQL server database. Schedule one normal backup per week, and an incremental backup every day.

10-4 Designing Active Directory Infrastructure and Services in Windows Server® 2008
3. Certificates should be backed up by exporting them to a .pfx file, secured by a password, and stored on alternative media. You should backup certificates each time you obtain a new certificate.
4. You can restore the whole AD RMS server by re-provisioning it and deleting the ServiceConnectionPoint in Active Directory, or you can restore just the database.
Exercise 3: Discussion In this exercise, the instructor will lead a discussion about the design decisions made in Exercises 1 and 2.
Designing an Active Directory Federation Services Implementation in Windows Server® 2008 11-1
Module 11 Designing an Active Directory Federation Services Implementation in Windows Server® 2008
Contents: Lab Answer Keys 2
11-2 Designing Active Directory Infrastructure and Services in Windows Server® 2008
Lab Answer Keys Lab 11: Designing an Active Directory Federation Services Implementation in Windows Server 2008
Exercise 1: Designing Active Directory Federation Services Access to Applications in a Perimeter Network The main tasks for this exercise are:
1. Review the requirements for providing access to Web applications in a perimeter network.
2. Create an AD FS design that will include server roles and placements, Web application and authorization designs, and account store design.
Task 1: Review the requirements for providing access to Web applications in a perimeter network.
Question:
1. Based on the scenario, which applications have been identified, of which type, and who needs to access them?
2. Which design of AD FS will be used in this case?
3. What will be used for authentication and security?
Answer:
1. The bank is developing a web based application that needs to be securely accessed by both internal and external clients.
2. In this case, the Web SSO design is appropriate.
3. The client will provide credentials, and the server will provide a server authentication SSL certificate to ensure security.
Task 2 : Create an AD FS design that will include server roles and placements, Web application and authorization designs, and account store design.
Question:
1. Based on the scenario, how will you provide access to internal corporate users?
2. Based on the scenario, how will you provide access to external employees?
3. What components of an AD FS solution need to be installed for the Woodgrove Bank organization, and where should they be placed?
4. What account store would best address the above scenario?
5. What types of claims are supported by the Federation Service, in the above scenario?
6. How should you configure firewalls (front and back) in order to secure AD FS solution in this case?
7. How will you manage certificates? What type of certificates would you need in this case? How they will be obtained?
Designing an Active Directory Federation Services Implementation in Windows Server® 2008 11-3
Answer:
1. Employees who are logged on to an Active Directory forest in the corporate network can use SSO to access multiple applications, which are secured by ADFS, in the perimeter network in your own organization.
2. External employees will need to obtain access via the ADFS proxy. They will get tokens from the account federation server. After it obtains the tokens, the remote employee’s client computer can use the ADFS tokens to gain federated access to ADFS-secured applications that are hosted in the perimeter of their own organization.
3. The components that need to be installed include Active Directory Domain Services, Account Federation Server, AD FS-enabled Web server, Resource Federation server, Account Federation Server proxy, and external/perimeter DNS. Active Directory Domain Services DC and Account Federation Server will be placed in internal network, while Account Federation Server proxy, AD FS enabled Web server, Resource Federation server and external/perimeter DNS server will be placed in the perimeter network between two firewalls.
4. The Active Directory account store is appropriate in this case, because all employees are from Woodgrove Bank organization.
5. The identity claims, group claims, or custom claims can be used in the scenario. With AD DS in place, however, it makes sense to use identity claims, because all of the information required to construct a claim, such as users’ UPN, E-mail, or common name, is likely to already exist in the AD SD account store.
6. A front firewall (ISA Server) should be configured with the publishing rule to publish the Account Federation Server proxy server and public DNS server. ISA Server can pre-authenticate the client before passing it to AD FS proxy. On the firewall at the back, you should allow communication between the AD FS proxy and Account Federation server with the AD DS.
7. Certificates for the verification and token signing certificates will be issued and managed by the local CA authority. Certificates for SSL will be obtained for commercial public CA, due to the trust issues on external client computers.
The following schema describes the required design:
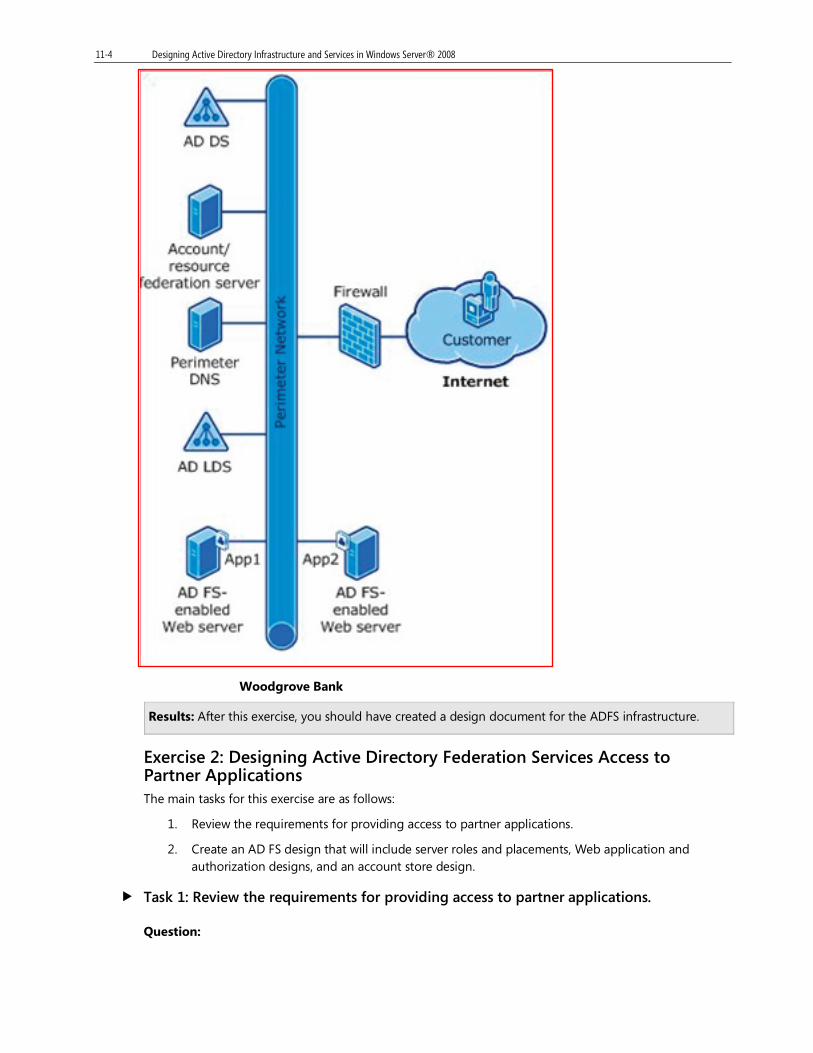
11-4 Designing Active Directory Infrastructure and Services in Windows Server® 2008
Woodgrove Bank
Results: After this exercise, you should have created a design document for the ADFS infrastructure.
Exercise 2: Designing Active Directory Federation Services Access to Partner Applications The main tasks for this exercise are as follows:
1. Review the requirements for providing access to partner applications.
2. Create an AD FS design that will include server roles and placements, Web application and authorization designs, and an account store design.
Task 1: Review the requirements for providing access to partner applications.
Question:
Designing an Active Directory Federation Services Implementation in Windows Server® 2008 11-5
1. Based on the scenario, what applications have been identified and who needs to access them?
2. Are there trusts in place between the bank and the partner organizations?
3. What types of applications have been identified?
4. Which type of design should be applied to this scenario?
Answer:
1. Woodgrove Bank needs to access applications located in the perimeter network of the partner organization.
2. There are no external or forest trusts in place between the bank and the partner organizations.
3. The application that needs to be made accessible is Web-based. It is also claims-aware, which makes it a perfect candidate for federation-based authentication.
4. Federated Web SSO Design is the most appropriate solution for the scenario.
Task 2: Create an AD FS design that will include server roles and placements, Web application and authorization designs, and an account store design.
Question:
1. Based on the scenario, which solution would provide Woodgrove Bank with access to its partner organization’s web applications?
2. What is the role of each partner organization?
3. Which AD FS server roles need to be installed for the Woodgrove Bank and where should they be placed?
4. Which AD FS server roles need to be installed for the partner organization and where should they be placed?
5. Which account store would best suit the scenario?
6. What types of claims are supported by the Federation Service in the scenario?
7. How should you configure firewalls (front and back) in order to secure the AD FS solution in this case?
Answer:
1. EmpBecause there are no external or forest trusts in place, organizations can securely share users’ identity information with the use of AD FS, which does not require creating and maintaining trusts between the organizations.
2. In this scenario, the partner organization acts as a resource partner organization, and provides the web application to Woodgrove Bank, where in, Woodgrove Bank is the account organization.
3. Woodgrove Bank requires the following AD FS server roles:
a. Account Federation server placed on the organization’s corporate intranet
b. Account Federation server proxy placed between the firewalls, on the perimeter network
c. An account store (AD DS in this case)
d. Perimeter DNS
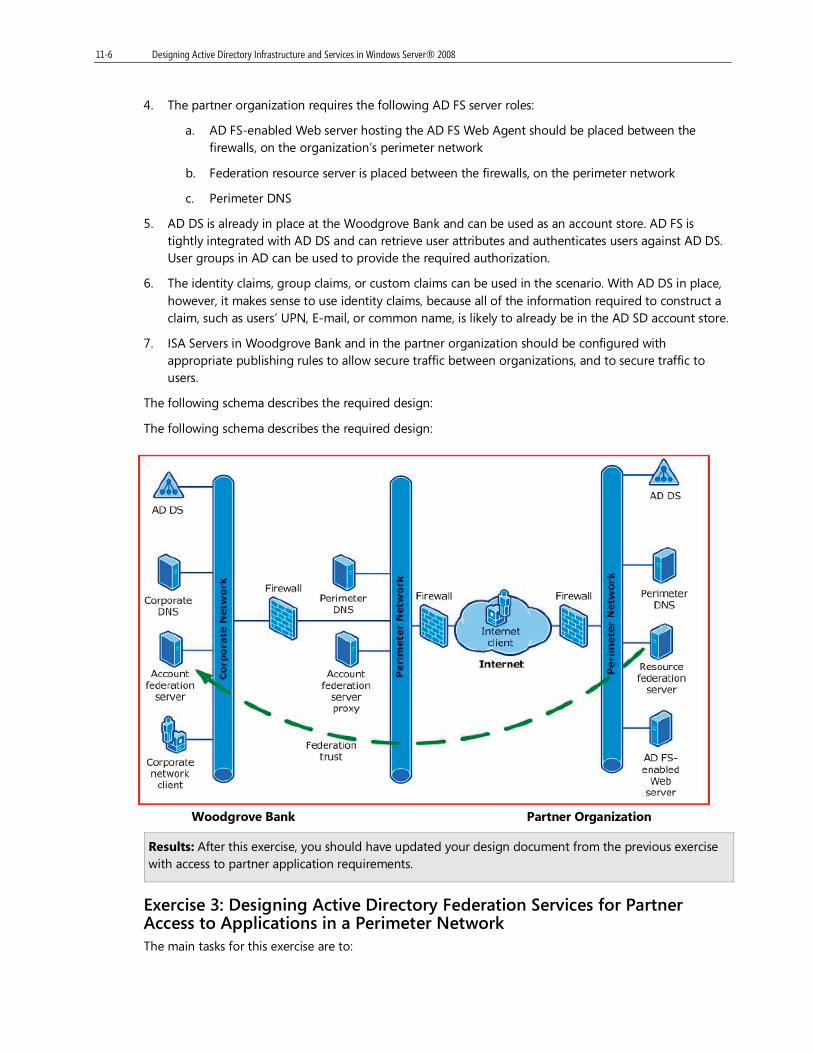
11-6 Designing Active Directory Infrastructure and Services in Windows Server® 2008
4. The partner organization requires the following AD FS server roles:
a. AD FS-enabled Web server hosting the AD FS Web Agent should be placed between the firewalls, on the organization’s perimeter network
b. Federation resource server is placed between the firewalls, on the perimeter network
c. Perimeter DNS
5. AD DS is already in place at the Woodgrove Bank and can be used as an account store. AD FS is tightly integrated with AD DS and can retrieve user attributes and authenticates users against AD DS. User groups in AD can be used to provide the required authorization.
6. The identity claims, group claims, or custom claims can be used in the scenario. With AD DS in place, however, it makes sense to use identity claims, because all of the information required to construct a claim, such as users’ UPN, E-mail, or common name, is likely to already be in the AD SD account store.
7. ISA Servers in Woodgrove Bank and in the partner organization should be configured with appropriate publishing rules to allow secure traffic between organizations, and to secure traffic to users.
The following schema describes the required design:
The following schema describes the required design:
Woodgrove Bank Partner Organization
Results: After this exercise, you should have updated your design document from the previous exercise with access to partner application requirements.
Exercise 3: Designing Active Directory Federation Services for Partner Access to Applications in a Perimeter Network The main tasks for this exercise are to:

Designing an Active Directory Federation Services Implementation in Windows Server® 2008 11-7
1. Review the requirements for providing partner access to applications in a perimeter network.
2. Create an AD FS design that will include server roles and placements, Web application and authorization designs, and account store design.
Task 1: Review the requirements for providing partner access to applications in a perimeter network.
Question:
1. Which applications will partner company users need to access in Woodgrove Bank?
2. Which type of design should be applied here?
Answer:
1. Partner company users require access to Web-based applications in Woodgrove Bank.
2. The type of design that should be applied is Federated Web SSO.
Task 2: Create an AD FS design that will include server roles and placements, Web application and authorization designs, and account store design.
Question:
1. What is the role of each organization in this case?
2. What AD FS server roles need to be installed for the Woodgrove Bank organization and where should they be placed?
3. What AD FS server roles need to be installed for the partner organization and where should they be placed?
4. What account store would best fit the above scenario?
5. What types of claims are supported by the Federation Service, in the above scenario?
6. How should you configure firewalls (front and back) in order to secure AD FS solution in this case?
Answer:
1. In this case, Woodgrove Bank has the role of resource organization, and the partner organization has the role of account organization.
2. In addition to what already has been installed in Exercises 1 and 2, there is no need to install any other AD FS server roles because Woodgrove Bank already has a Resource Federation Server in place. All that is needed is to update it with trust policies. Woodgrove Bank uses its trust policy to map the incoming claims to claims that are understood by its Web application, which uses the claims to make authorization decisions.
3. The partner organizations needs to have the following installed:
a. Account Federation server placed on the organization’s corporate intranet.
b. Account Federation server proxy placed between the firewalls, on the perimeter network
c. An account store (AD DS in this case)
4. AD DS is the most appropriate account store for the scenario.

11-8 Designing Active Directory Infrastructure and Services in Windows Server® 2008
5. The identity claims, group claims, or custom claims can be used in the scenario. With AD DS in place, however, it makes sense to use identity claims, because all of the information required to construct a claim, such as users’ UPN, E-mail, or common name, is likely already in the AD SD account store.
6. ISA Servers in Woodgrove Bank and in the partner organization should be configured with appropriate publishing rules, to allow secure traffic between organizations, and secure traffic to users.
Results: After this exercise, you should have updated your design document for the ADFS infrastructure (from Exercises 1 and 2) with the requirements for partner access to applications in the perimeter network.
Exercise 4: Discussion In this exercise, the instructor will lead a discussion about the design decisions made in Exercises 1-3. Questions and answers will vary.

Designing an AD LDS Implementation 12-1
Module 12 Designing an AD LDS Implementation
Contents: Lab Answer Keys 2
12-2 Designing Active Directory Infrastructure and Services in Windows Server® 2008
Lab Answer Keys Lab 12: Designing an AD LDS Implementation
Exercise 1: Designing and Configuring AD LDS Replication for Internal Applications The main tasks for this exercise are:
1. Identify and document key technical requirements from the scenario.
2. Generate a detailed design for AD LDS instance replication.
3. Implement an AD LDS instance. Create an application directory and a replica. Verify the replication.
Task 1: Identify and document key technical requirements from the scenario.
Question:
1. What should be implemented to satisfy company requirements?
2. What is the primary requirement?
3. What kind of administration will be used?
Answer:
1. You should implement AD LDS replication for the currently existing instance and application partition.
2. The desired result is to provide replicas of the AD LDS instance that exists in New York, to the locations in Tokyo and London.
3. The application will be using decentralized administration.
Task 2: Generate a detailed design for AD LDS instance replication.
Question:
1. How many instances of AD LDS will be needed?
2. How many sites will be included in the AD LDS design?
3. How will you configure site links?
4. How many replication partners will be included?
5. What tool will be used to create the application directory partition?
6. What tool will be used to create the replication instance?
7. How will you schedule replication?
8. How will you monitor replication?
Answer:
1. Only one instance of AD LDS is required because there is only one application.
2. Because there are three locations, you should create three sites that represent London, Tokyo, and New York. Also, create subnets to represent IP networks on these three locations.
3. Site links will be configured to represent real connections between sites.

Designing an AD LDS Implementation 12-3
4. Three replication partners will be included.
5. Active Directory Lightweight Directory Services Setup Wizard.
6. By using the Active Directory Sites and Services tool.
7. Replication effects can be monitored by using ADSIEdit or LDP.exe utilities.
Task 3: Implement an AD LDS instance. Create an application directory and a replica. Verify the replication.
Answer:
To install the AD LDS server role on NYC-DC1 and NYC-SVR1:
1. On your host machine, click Start, point to All Programs, point to Microsoft Learning, and then click 6436A. The Lab Launcher starts.
2. In the Lab Launcher, next to 6436A-NYC-DC3, click Launch.
3. Log on to NYC-DC3 as WoodgroveBank\Administrator with the password Pa$$w0rd.
4. On your host machine, click Start, point to All Programs, point to Microsoft Learning, and then click 6436A. The Lab Launcher starts.
5. In the Lab Launcher, next to 6436A-NYC-SVR1, click Launch.
6. Log on to NYC-SVR1 as WoodgroveBank\Administrator with the password Pa$$w0rd.
7. Minimize the Lab Launcher window.
8. On the Start menu of NYC-DC1, point to Administrative Tools, and then click Services.
9. In the Services (Local) result pane of the Services console, in the Name list, right-click DNS Server, and then click Stop.
10. In the Name list of the Services (Local) result pane, right-click DNS Server, and then click Start.
11. In the Services console, click the Close button.
12. On the Start menu of NYC-DC1, point to Administrative Tools, and then click Server Manager.
13. In the tree pane of the Server Manager console, right-click Roles, and then click Add Roles.
14. In the Add Roles Wizard, on the Before You Begin page, click Next.
15. On the Select Server Roles page, in the Roles box, select the Active Directory Lightweight Directory Services checkbox, and then click Next.
16. On the Active Directory Lightweight Directory Services page, click Next.
17. On the Confirm Installation Selections page, click Install.
18. On the Installation Results page, click Close.
19. In the Server Manager console, click the Close button.
20. On the Start menu of NYC-SVR1, point to Administrative Tools, and then click Server Manager.
21. In the tree pane of the Server Manager console, right-click Roles, and then click Add Roles.
22. In the Add Roles Wizard, on the Before You Begin page, click Next.
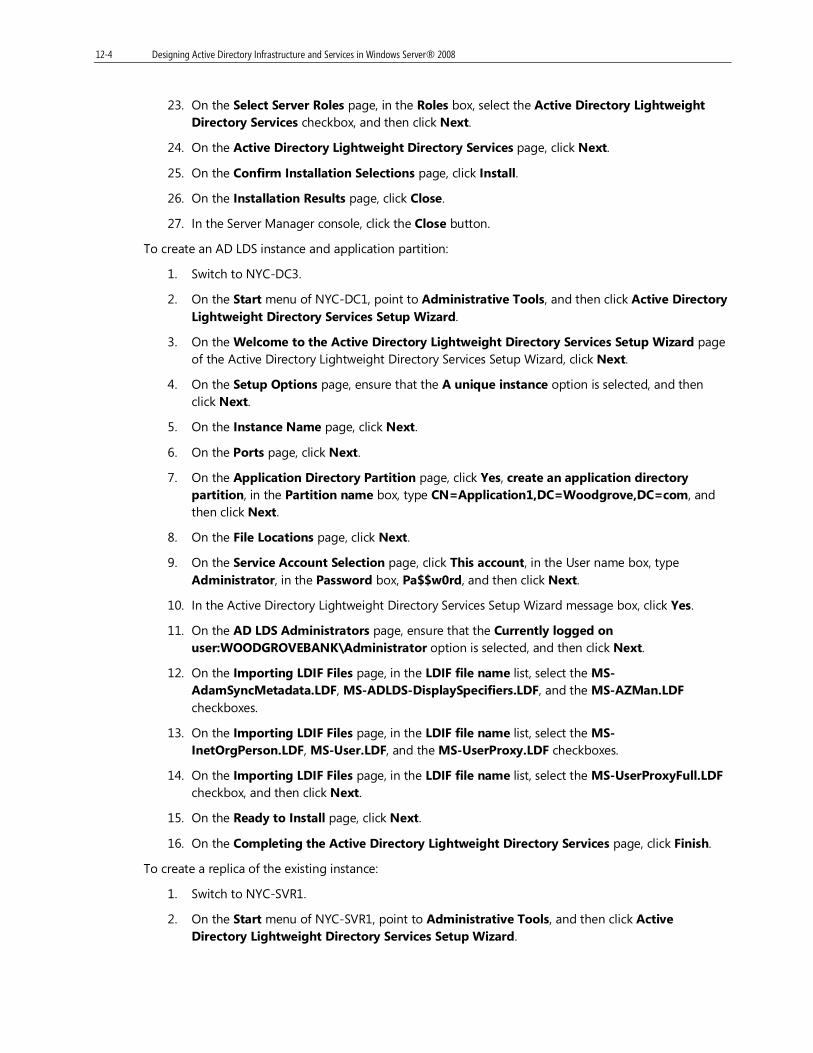
12-4 Designing Active Directory Infrastructure and Services in Windows Server® 2008
23. On the Select Server Roles page, in the Roles box, select the Active Directory Lightweight Directory Services checkbox, and then click Next.
24. On the Active Directory Lightweight Directory Services page, click Next.
25. On the Confirm Installation Selections page, click Install.
26. On the Installation Results page, click Close.
27. In the Server Manager console, click the Close button.
To create an AD LDS instance and application partition:
1. Switch to NYC-DC3.
2. On the Start menu of NYC-DC1, point to Administrative Tools, and then click Active Directory Lightweight Directory Services Setup Wizard.
3. On the Welcome to the Active Directory Lightweight Directory Services Setup Wizard page of the Active Directory Lightweight Directory Services Setup Wizard, click Next.
4. On the Setup Options page, ensure that the A unique instance option is selected, and then click Next.
5. On the Instance Name page, click Next.
6. On the Ports page, click Next.
7. On the Application Directory Partition page, click Yes, create an application directory partition, in the Partition name box, type CN=Application1,DC=Woodgrove,DC=com, and then click Next.
8. On the File Locations page, click Next.
9. On the Service Account Selection page, click This account, in the User name box, type Administrator, in the Password box, Pa$$w0rd, and then click Next.
10. In the Active Directory Lightweight Directory Services Setup Wizard message box, click Yes.
11. On the AD LDS Administrators page, ensure that the Currently logged on user:WOODGROVEBANK\Administrator option is selected, and then click Next.
12. On the Importing LDIF Files page, in the LDIF file name list, select the MS-AdamSyncMetadata.LDF, MS-ADLDS-DisplaySpecifiers.LDF, and the MS-AZMan.LDF checkboxes.
13. On the Importing LDIF Files page, in the LDIF file name list, select the MS-InetOrgPerson.LDF, MS-User.LDF, and the MS-UserProxy.LDF checkboxes.
14. On the Importing LDIF Files page, in the LDIF file name list, select the MS-UserProxyFull.LDF checkbox, and then click Next.
15. On the Ready to Install page, click Next.
16. On the Completing the Active Directory Lightweight Directory Services page, click Finish.
To create a replica of the existing instance:
1. Switch to NYC-SVR1.
2. On the Start menu of NYC-SVR1, point to Administrative Tools, and then click Active Directory Lightweight Directory Services Setup Wizard.
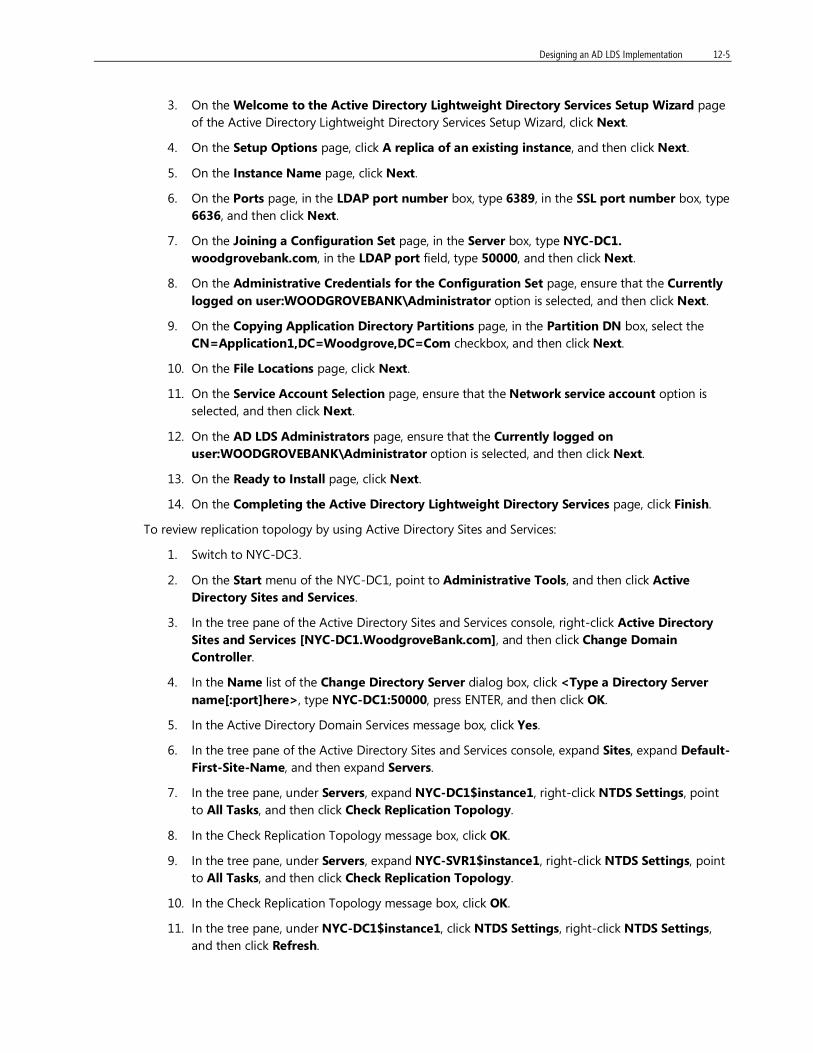
Designing an AD LDS Implementation 12-5
3. On the Welcome to the Active Directory Lightweight Directory Services Setup Wizard page of the Active Directory Lightweight Directory Services Setup Wizard, click Next.
4. On the Setup Options page, click A replica of an existing instance, and then click Next.
5. On the Instance Name page, click Next.
6. On the Ports page, in the LDAP port number box, type 6389, in the SSL port number box, type 6636, and then click Next.
7. On the Joining a Configuration Set page, in the Server box, type NYC-DC1. woodgrovebank.com, in the LDAP port field, type 50000, and then click Next.
8. On the Administrative Credentials for the Configuration Set page, ensure that the Currently logged on user:WOODGROVEBANK\Administrator option is selected, and then click Next.
9. On the Copying Application Directory Partitions page, in the Partition DN box, select the CN=Application1,DC=Woodgrove,DC=Com checkbox, and then click Next.
10. On the File Locations page, click Next.
11. On the Service Account Selection page, ensure that the Network service account option is selected, and then click Next.
12. On the AD LDS Administrators page, ensure that the Currently logged on user:WOODGROVEBANK\Administrator option is selected, and then click Next.
13. On the Ready to Install page, click Next.
14. On the Completing the Active Directory Lightweight Directory Services page, click Finish.
To review replication topology by using Active Directory Sites and Services:
1. Switch to NYC-DC3.
2. On the Start menu of the NYC-DC1, point to Administrative Tools, and then click Active Directory Sites and Services.
3. In the tree pane of the Active Directory Sites and Services console, right-click Active Directory Sites and Services [NYC-DC1.WoodgroveBank.com], and then click Change Domain Controller.
4. In the Name list of the Change Directory Server dialog box, click <Type a Directory Server name[:port]here>, type NYC-DC1:50000, press ENTER, and then click OK.
5. In the Active Directory Domain Services message box, click Yes.
6. In the tree pane of the Active Directory Sites and Services console, expand Sites, expand Default-First-Site-Name, and then expand Servers.
7. In the tree pane, under Servers, expand NYC-DC1$instance1, right-click NTDS Settings, point to All Tasks, and then click Check Replication Topology.
8. In the Check Replication Topology message box, click OK.
9. In the tree pane, under Servers, expand NYC-SVR1$instance1, right-click NTDS Settings, point to All Tasks, and then click Check Replication Topology.
10. In the Check Replication Topology message box, click OK.
11. In the tree pane, under NYC-DC1$instance1, click NTDS Settings, right-click NTDS Settings, and then click Refresh.
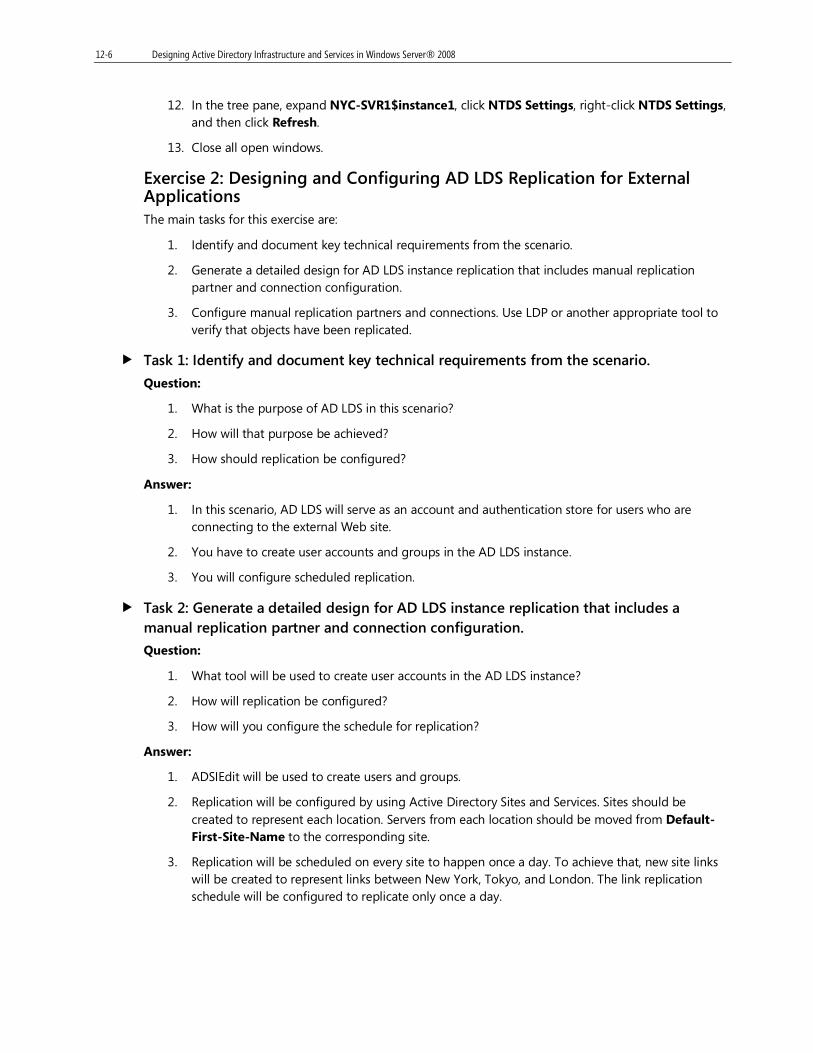
12-6 Designing Active Directory Infrastructure and Services in Windows Server® 2008
12. In the tree pane, expand NYC-SVR1$instance1, click NTDS Settings, right-click NTDS Settings, and then click Refresh.
13. Close all open windows.
Exercise 2: Designing and Configuring AD LDS Replication for External Applications The main tasks for this exercise are:
1. Identify and document key technical requirements from the scenario.
2. Generate a detailed design for AD LDS instance replication that includes manual replication partner and connection configuration.
3. Configure manual replication partners and connections. Use LDP or another appropriate tool to verify that objects have been replicated.
Task 1: Identify and document key technical requirements from the scenario.
Question:
1. What is the purpose of AD LDS in this scenario?
2. How will that purpose be achieved?
3. How should replication be configured?
Answer:
1. In this scenario, AD LDS will serve as an account and authentication store for users who are connecting to the external Web site.
2. You have to create user accounts and groups in the AD LDS instance.
3. You will configure scheduled replication.
Task 2: Generate a detailed design for AD LDS instance replication that includes a manual replication partner and connection configuration.
Question:
1. What tool will be used to create user accounts in the AD LDS instance?
2. How will replication be configured?
3. How will you configure the schedule for replication?
Answer:
1. ADSIEdit will be used to create users and groups.
2. Replication will be configured by using Active Directory Sites and Services. Sites should be created to represent each location. Servers from each location should be moved from Default-First-Site-Name to the corresponding site.
3. Replication will be scheduled on every site to happen once a day. To achieve that, new site links will be created to represent links between New York, Tokyo, and London. The link replication schedule will be configured to replicate only once a day.
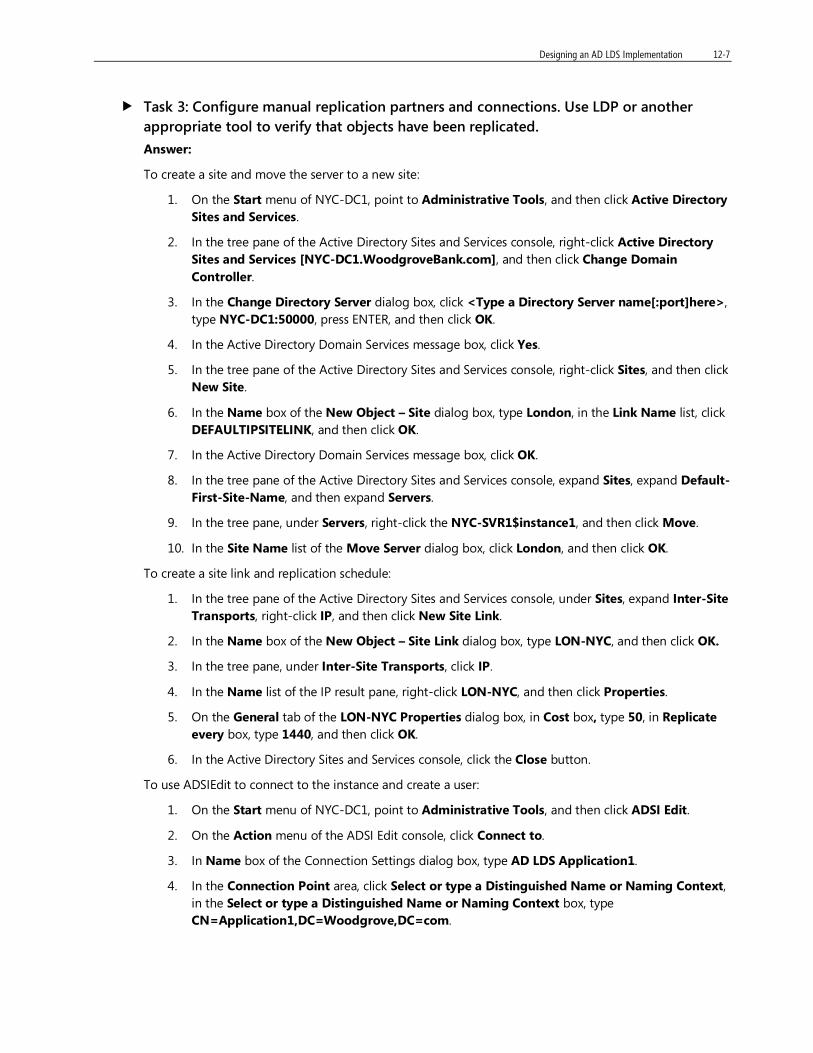
Designing an AD LDS Implementation 12-7
Task 3: Configure manual replication partners and connections. Use LDP or another appropriate tool to verify that objects have been replicated.
Answer:
To create a site and move the server to a new site:
1. On the Start menu of NYC-DC1, point to Administrative Tools, and then click Active Directory Sites and Services.
2. In the tree pane of the Active Directory Sites and Services console, right-click Active Directory Sites and Services [NYC-DC1.WoodgroveBank.com], and then click Change Domain Controller.
3. In the Change Directory Server dialog box, click <Type a Directory Server name[:port]here>, type NYC-DC1:50000, press ENTER, and then click OK.
4. In the Active Directory Domain Services message box, click Yes.
5. In the tree pane of the Active Directory Sites and Services console, right-click Sites, and then click New Site.
6. In the Name box of the New Object – Site dialog box, type London, in the Link Name list, click DEFAULTIPSITELINK, and then click OK.
7. In the Active Directory Domain Services message box, click OK.
8. In the tree pane of the Active Directory Sites and Services console, expand Sites, expand Default-First-Site-Name, and then expand Servers.
9. In the tree pane, under Servers, right-click the NYC-SVR1$instance1, and then click Move.
10. In the Site Name list of the Move Server dialog box, click London, and then click OK.
To create a site link and replication schedule:
1. In the tree pane of the Active Directory Sites and Services console, under Sites, expand Inter-Site Transports, right-click IP, and then click New Site Link.
2. In the Name box of the New Object – Site Link dialog box, type LON-NYC, and then click OK.
3. In the tree pane, under Inter-Site Transports, click IP.
4. In the Name list of the IP result pane, right-click LON-NYC, and then click Properties.
5. On the General tab of the LON-NYC Properties dialog box, in Cost box, type 50, in Replicate every box, type 1440, and then click OK.
6. In the Active Directory Sites and Services console, click the Close button.
To use ADSIEdit to connect to the instance and create a user:
1. On the Start menu of NYC-DC1, point to Administrative Tools, and then click ADSI Edit.
2. On the Action menu of the ADSI Edit console, click Connect to.
3. In Name box of the Connection Settings dialog box, type AD LDS Application1.
4. In the Connection Point area, click Select or type a Distinguished Name or Naming Context, in the Select or type a Distinguished Name or Naming Context box, type CN=Application1,DC=Woodgrove,DC=com.
12-8 Designing Active Directory Infrastructure and Services in Windows Server® 2008
5. In the Computer area, click Select or type a domain or server: (Server | Domain [:port]) box, in the Select or type a domain or server: (Server | Domain [:port]) box, type NYC-DC1:50000, and then click OK.
6. In the tree pane of the ADSI Edit console, click and expand AD LDs Application1 [NYC-DC1:50000], and then click CN=Application1,DC=Woodgrove,DC=com.
7. In the Name list of the CN=Application1,DC=Woodgrove,DC=com result pane, right-click CN=Roles, point to New, and then click Object.
8. In the Select a class box of the Create Object dialog box, click user, and then click Next.
9. In the Value box, type user1, click Next, and then click Finish.
To confirm replication:
1. On the Start menu of NYC-SVR1, point to Administrative Tools, and then click Active Directory Sites and Services.
2. In the tree pane of the Active Directory Sites and Services console, right-click Active Directory Sites and Services [NYC-SVR1.WoodgroveBank.com], and then click Change Domain Controller.
3. In the Change Directory Server dialog box, click <Type a Directory Server name[:port]here>, type NYC-SVR1:6389, and then click OK.
4. In the Active Directory Domain Services message box, click Yes.
5. In the tree pane of the Active Directory Sites and Services console, expand Sites, expand London, expand Servers, expand NYC-SVR1$instance1, and then click NTDS Settings.
6. In the Name list of the NTDS Settings result pane, right-click automatically generated, and then click Replicate Now.
7. In the Replicate Now message box, click OK.
8. On the Start menu, point to Administrative Tools, and then click ADSI Edit.
9. On the Action menu of the ADSI Edit console, click Connect to.
10. In the Name box of the Connection Settings dialog box, type AD LDS Application1.
11. In the Connection Point area, click Select or type a Distinguished Name or Naming Context, and then in the Select or type a Distinguished Name or Naming Context box, type CN=Application1,DC=Woodgrove,DC=com.
12. In the Computer area, in the Select or type a domain or server: (Server | Domain[:port]), type NYC-SVR1:6389, and then click OK.
13. In the tree pane of the ADSI Edit console, click and expand AD LDs Application1 [NYC-SVR1:6389], click and expand CN=Application1,DC=Woodgrove,DC=com, and then double-click CN=Roles.
Note: Verify that user1 has appeared in the CN=Roles result pane.
14. On the File menu of the ADSI Edit console, click Exit.
Task 4: Close all virtual machines and discard undo disks.
1. For each virtual machine that is running, close the Virtual Machine Remote Control window.

Designing an AD LDS Implementation 12-9
2. In the Close box, select Turn off machine and discard changes. Click OK.
3. Close the 6436A Lab Launcher.
Exercise 3: Designing Highly Available LDAP Services for Multiple Applications The main tasks for this exercise are to:
1. Identify and document key technical requirements from the scenario.
2. Generate a conceptual design for highly available ADLDS by using network load balancing (NLB) and multiple AD LDS instance hosting.
3. Class discussion.
Task 1: Identify and document key technical requirements from the scenario.
Question:What is the main purpose of AD LDS in this scenario?
Answer: The main purpose of AD LDS in this scenario is to serve as a highly available directory store for various applications, and integrate with Active Directory.
Task 2: Generate a conceptual design for highly available AD LDS by using NLB and multiple AD LDS instance hosting
Question:
1. How will high availability be achieved?
2. How many instances of AD LDS will be used for these applications?
3. How will AD DS integration be achieved?
4. Which tool will be used to integrate AD LDS with AD DS?
Answer:
1. High availability will be achieved by implementing NLB. AD LDS supports NLB as the only method for high availability because clusters are not supported.
2. If applications have compatible schemas, a single instance will be sufficient. If the schemas are not compatible, then each application will require a designated instance of AD LDS.
3. Integration with AD DS will be achieved by implementing synchronization between AD LDS and AD DS.
4. AdamSync. Before running AdamSync, you should prepare AD LDS by importing the appropriate LDIF files to support integration.
Task 3: Class discussion
Answers will vary.
Exercise 4: Discussions about Exercises 1-3 design decisions In this exercise, the instructor will lead a discussion about the design decisions made in Exercise 1 through 3.

Designing Active Directory Migrations in Windows Server® 2008 13-1
Module 13 Designing Active Directory Migrations in Windows Server® 2008
Contents: Lab Answer Keys 2

13-2 Designing Active Directory Infrastructure and Services in Windows Server® 2008
Lab Answer Keys Lab 13: Designing Active Directory Migrations in Windows Server 2008
Exercise 1: Designing an Active Directory Migration Strategy The main tasks for this exercise are as follows:
1. Review information about the subsidiary information and review the requirements for integrating the subsidiary into woodgrovebank.com.
2. Choose an Active Directory migration strategy.
Task 1: Review information about the subsidiary information and review the requirements for integrating the subsidiary into woodgrovebank.com.
Answer the following questions:
Question:
1. Is the acquired subsidiary capable of a smooth migration to a Windows Server 2008 domain?
2. What is the specific requirement for users in adatum.com domain, from a migration standpoint?
3. What should be done after the migration is finished?
Answer:
1. Yes, it is. Because the domain/forest is in Windows Server 2003 functional level, migration can be performed.
2. Users must be able to access resources in the old domain adatum.com for a while.
3. Domain controllers in the adatum.com domain must be demoted and the domain must be removed.
Task 2 : Choose an Active Directory migration strategy.
Answer the following question:
Question:
• Which Active Directory migration strategy is appropriate for the given scenario?
Answer:
• A domain restructure strategy is appropriate for the given scenario.
Results: After this exercise, you should have designed an Active Directory migration strategy.
Exercise 2: Designing an Active Directory Migration Implementation Plan In this exercise, you will create a migration implementation plan based on the migration strategy determined in the previous exercise.
The main task for this exercise is as follows:
• Create a migration implementation plan.
Designing Active Directory Migrations in Windows Server® 2008 13-3
Task 1: Create a migration implementation plan.
• Create a plan that includes:
• Preparing the source and target domains.
• Cleaning the source domain.
• Establishing administration in target domain.
• Running ADMT.
Answer:
The implementation plan for migrating adatum.com users and resources to woodgrovebank.com domain will include following steps:
1. Identify users, groups, computers, and other objects that should be removed.
2. Clean the source domain.
3. Implement the required trusts between domains.
4. Enable the SIDHistory attribute for accessing resources in the source domain.
5. Establish the OU structure in the destination domain for accepting the moved objects.
6. Install ADMT.
7. Move accounts, groups, computer, and resources to woodgrovebank.com domain.
8. Verify the functionality of moved accounts and other objects.
Results: After this exercise, you should have designed an Active Directory migration implementation plan.
Exercise 3: Discussion In this exercise, the instructor will lead a discussion about the design decisions made in Exercises 1 and 2. Questions and answers will vary.
Designing Active Directory Infrastructure and Services in Windows Server® 2008 R-1
Send Us Your Feedback You can search the Microsoft Knowledge Base for known issues at Microsoft Help and Support before submitting feedback. Search using either the course number and revision, or the course title.
Note Not all training products will have a Knowledge Base article – if that is the case, please ask your instructor whether or not there are existing error log entries.
Courseware Feedback Send all courseware feedback to [email protected]. We truly appreciate your time and effort. We review every e-mail received and forward the information on to the appropriate team. Unfortunately, because of volume, we are unable to provide a response but we may use your feedback to improve your future experience with Microsoft Learning products.
Reporting Errors When providing feedback, include the training product name and number in the subject line of your e-mail. When you provide comments or report bugs, please include the following:
• Document or CD part number
• Page number or location
• Complete description of the error or suggested change
Please provide any details that are necessary to help us verify the issue.
Important All errors and suggestions are evaluated, but only those that are validated are added to the product Knowledge Base article.