6 free earring patterns - interweavemagazines.interweave.com/cdtv/0611_bd_earrings.pdf6 free earring...
TRANSCRIPT

to Learn How to Make Earrings:
6 Free Earring Patterns
Designs and Instructions for Handmade Earrings

iiContents
12
3
4
6 Free Earring Patterns to Learn How to Make Earrings:
Designs and Instructions for Handmade Earrings
123456
Desert Skies EarringsTERRI WLASCHIN . . . . . . . . . . . . . . . . . . . . . . . . . . . . . . . . . . . . . . . . . . . . . . . . . . . PAGE 1
Crystal Corona EarringsMICHELLE MACH . . . . . . . . . . . . . . . . . . . . . . . . . . . . . . . . . . . . . . . . . . . . . . . . . . . PAGE 2
Figure 8 EarringsLESLIE ROGALSKI . . . . . . . . . . . . . . . . . . . . . . . . . . . . . . . . . . . . . . . . . . . . . . . . . . . PAGE 4
Twigs & BranchesPAT WEXELBLAT . . . . . . . . . . . . . . . . . . . . . . . . . . . . . . . . . . . . . . . . . . . . . . . . . . . . PAGE 6
Hydrangea EarringsKELLI BURNS . . . . . . . . . . . . . . . . . . . . . . . . . . . . . . . . . . . . . . . . . . . . . . . . . . . . . . . PAGE 9
Umber Pheasant Feather EarringsMELODY MACDUFFEE . . . . . . . . . . . . . . . . . . . . . . . . . . . . . . . . . . . . . . . . . . . . . . . PAGE 11
Techniques . . . . . . . . . . . . . . . . . . . . . . . . . . . . . . . . . . . . . . . . . . . . . . . . . PAGE 13
56

6 FrEE EArrING PATTErNS to Learn How to Make Earrings: Designs and Instructions for Handmade Earrings
editor, beadingdaily JENNIFER VANBENSCHOTEN
designer JANICE TAPIA / photography JOE COCA, ANN SWANSON or as noted
Projects and information are for inspiration and personal use only. BeadingDaily, Beadwork, and Stringing do not recom-mend, approve, or endorse any of the advertisers, products, services, or views advertised in this publication. Nor do BeadingDaily, Beadwork, or Stringing evaluate the advertisers’ claims in any way. You should, therefore, use your own judg-ment in evaluating the advertisers, products, services, and views advertised in BeadingDaily, Beadwork, and Stringing.
iii
Beaded earrings don’t have to match a bracelet or a necklace. In fact, when I wear earrings I prefer them to be statements all by themselves. Beaded earrings are like little miniature works of beadwoven art. And once you get started, they really are addicting – make one pair and you won’t be able to stop!
Looking at all the gorgeous earring designs available in the Beading Daily Shop and on Beading Daily made me think about some of the reasons I love beaded earrings:
1. Beaded earrings are (usually) easier to wear than a large statement necklace or bracelet. Most of the time, if an earring is done right, you won’t even know that it’s there.
2. Beaded earrings are great projects for beginners because they don’t have to take a lot of materials or time. You can make a gorgeous pair of beaded earrings using just a few special beads in just a couple of hours.
3. Learning a new technique can sometimes be easier if you try it by making a pair of beaded earrings.
Fringe earrings are fun and fast, as you can see in Pat Wexelblat’s Twigs and Branches. Make up several pairs in your favorite colors or experiment with different shapes of leaf beads for fun results. Move on to Teri Wlachin’s easy Desert Skies earrings, made with basic branched fringe and a spectacular color combination reminiscent of the American Southwest. Bead artist Leslie Rogalski shows us that it really is hip to be square with the cool cube beads she uses in her Figure 8 earrings. Feathers are another hot trend, showing up everywhere from runway models to American Idol, and you can get your own feathery fix with Melody MacDuffee’s Umber Pheasant Feather Earrings.
Beaded earrings make a great weekend beading project, and they’re great for informal beading get-togethers. Why not grab a few of your friends and pass the ear wires? Have fun making your own beautiful beaded earrings!
Jennifer VanBenschoten, Beading Daily editor
6 Free Earring Patterns to Learn How to Make Earrings:
Designs and Instructions for Handmade Earrings

More wonderful beadwork projects are available at interweavestore.com© 2011 Interweave Press LLC. Not to be reprinted. All rights reserved.
page 1
Step 1: Cut 16" inches of FireLine and tie one end to a jump ring, using a surgeon’s knot. Dab jewelry glue on the knot. Thread the needle on the other end of the FireLine.
Step 2: Pick up 8 size 11° seed beads, 1 size 6° seed bead, 1 barrel bead, and 1 size 11° seed bead. Skipping the last size 11° stitched, bring the thread back through the barrel bead, 1 size 6° seed bead, and 1 size 11 seed bead. This is the core of your fringe.
Step 3: Pick up 5 size 11°s, 1 size 6°, and 1 size 11°. Skipping the last bead strung, come back through the size 6°, 5 size 11°s, and the next size 11° of the core. Repeat until you have 7 rows. Exit the last size 11° of the core.
Step 4: Sew back through the jump ring, 1 seed bead, and tie a half-hitch knot. Stitch down through 2 more size 11°s and tie another half-hitch knot. Stitch down and exit through a size 6° bead. Snip off excess FireLine. Attach the jump ring to the ear wire.
Step 5: Repeat Steps 1–4 for to make the matching earring.
project
The cool blue beads paired with the warm, deep browns bring this inspiration to life.
desert skies earrings
T E R R I W L A S C H I N
Materials2 jump rings2 earring wires93 size 11° seed beads18 size 6° seed beads2 faceted 7×5mm barrel beadsFireLine
toolsBeading needleWire cuttersJewelry glue
techniquesRight angle weaveFringe
RESOURCESCheck your local bead shop.
teRRI WLASCHIN lives in Rockville, Maryland and sells her jewelry pri-
marily through home-based shows and craft shows. Her work has been
featured several times in Creative Jewelry. Terri can be reached via e-mail
at [email protected]. See more of her work on Etsy at star
seedjewelry.etsy.com.

More wonderful beadwork projects are available at interweavestore.com© 2011 Interweave Press LLC. Not to be reprinted. All rights reserved.
page 2
Materials40 bicone 4mm crystals.5 g size 15° Japanese seed beadsFireLine 6lb test1 pair French ear wires
toolsScissorsRound-nose pliersSize 12 thin beading needle
techniquesNetting
FiniShED SizE: 1" (noT inCLuDing E AR wiRE)
project
These crystal sunbursts can be made in any color combo you choose. Just
mix your favorite color of bicones with contrasting or matching seed beads.
This easy, but beautiful design begs to be repeated again and again!
crystal corona earrings
P I L A R B U R G
Jim
Law
son
Make the medallionStep 1: String a needle onto a 1yard
length of Fireline, leaving an 8” tail. String the inside of the medallion as follows for a total of 12 beads: 1 size 11° seed, 1 crystal, 1 seed, 1 crystal, 1 seed, 1 crystal, 1 seed, 1 crystal, 1 seed, 1 crystal, 1 seed, 1 crystal (Figure 1).
Step 2: Tie the beads into a circle using a surgeon’s knot. Pass through the cir-cle to exit bead 3 (Figure 2).
Figure 1
1 2 3 4 5 6 7 8 9 10 11 12
Figure 2
2 31
4
5
6
789
10
11
12
Figure 3
2 31
4
5
6
789
10
11
12
Figure 4
2 31
4
5
6
789
10
11
12
Figure 5
51
3 16
23
30
37
44 1314 15
Figure 1
Figure 1
1 2 3 4 5 6 7 8 9 10 11 12
Figure 2
2 31
4
5
6
789
10
11
12
Figure 3
2 31
4
5
6
789
10
11
12
Figure 4
2 31
4
5
6
789
10
11
12
Figure 5
51
3 16
23
30
37
44 1314 15
Figure 2

© 2011 Interweave Press LLC. Not to be reprinted. All rights reserved.page 3
More wonderful beadwork projects are available at interweavestore.com
Step 3: String 3 seeds, 1 crystal, 3 seeds, skip the next crystal in the circle and pass through the seed bead 5 (Figure 3).
Step 4: Continue around the circle, repeating the bead pattern in Step 3, passing through the seed beads 7, 9, 11, 1 and exiting bead 3 (Figure 4).
Step 5: Pass through the next 3 seeds and crystal, beads 13-16. String 1 seed, 1 crystal, 1 seed and pass through the next crystal, bead 23 (Figure 5).
Step 6: Continue around the circle, repeating the bead pattern in Step 5, passing through beads 30, 37, 44, 51, and exiting bead (crystal) 16 (Figure 6).
Step 7: Pass back through outer cir-cle of beads created in Steps 5 and 6 to tighten the circle, exiting crystal bead 51. Do not pull too snug or the shape will cup. Knot the working thread to existing thread between beads in several half hitches, but do not cut the thread.
Make the bailStep 8: String 1 seed, 1 crystal, 1
seed, 1 crystal, 1 seed and pass back through bead 51 (Figure 7). Reinforce, passing pass back through the beads just added, beads 52-56, and continue through beads 52, 53 and 54.
Step 9: String 6 seeds and pass back through bead 54. Repeat through the loop of beads again including bead 54 to reinforce (Figure 8).
Step 10: For added security, pass through beads added in step 8 (Figure 7).
Step 11: weave thread into beads and tie off using half-hitch knots. Trim. Thread a needle on the tail and weave that into the beads; trim.
Step 12: using round-nose pliers, open the loop on an ear wire. Slip the loop of the ear wire through the loop of seeds at the top of the medallion. Close the loop of the ear wire. Repeat Steps 1–12 to make a second earring.
pILAR BURG is an active member of the Iowa
Bead Society and lives in Iowa, where she
works as a computer programmer. She can be
reached at [email protected]
Figure 1
1 2 3 4 5 6 7 8 9 10 11 12
Figure 2
2 31
4
5
6
789
10
11
12
Figure 3
2 31
4
5
6
789
10
11
12
Figure 4
2 31
4
5
6
789
10
11
12
Figure 5
51
3 16
23
30
37
44 1314 15
Figure 1
1 2 3 4 5 6 7 8 9 10 11 12
Figure 2
2 31
4
5
6
789
10
11
12
Figure 3
2 31
4
5
6
789
10
11
12
Figure 4
2 31
4
5
6
789
10
11
12
Figure 5
51
3 16
23
30
37
44 1314 15
Figure 1
1 2 3 4 5 6 7 8 9 10 11 12
Figure 2
2 31
4
5
6
789
10
11
12
Figure 3
2 31
4
5
6
789
10
11
12
Figure 4
2 31
4
5
6
789
10
11
12
Figure 5
51
3 16
23
30
37
44 1314 15
51
16
23
30
37
44
51
55 53
52
54
56
51
55 53
52
54
56
Figure 3 Figure 4 Figure 5
Figure 6 Figure 7 Figure 8
More wonderful beadwork projects are available at interweavestore.com© 2011 Interweave Press LLC. Not to be reprinted. All rights reserved.
page 4
project
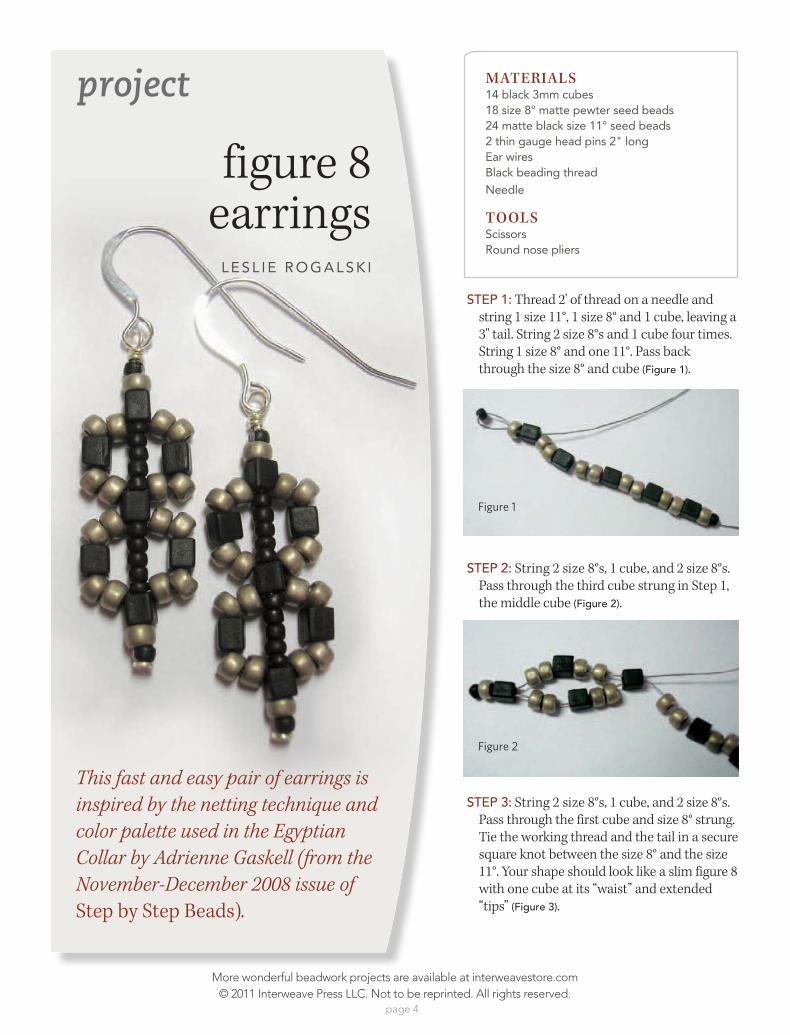
This fast and easy pair of earrings is inspired by the netting technique and color palette used in the Egyptian Collar by Adrienne Gaskell (from the November-December 2008 issue of Step by Step Beads).
figure 8 earrings
L E S L I E R O G A L S K I
Step 1: Thread 2' of thread on a needle and string 1 size 11°, 1 size 8° and 1 cube, leaving a 3" tail. String 2 size 8°s and 1 cube four times. String 1 size 8° and one 11°. Pass back through the size 8° and cube (Figure 1).
Step 2: String 2 size 8°s, 1 cube, and 2 size 8°s. Pass through the third cube strung in Step 1, the middle cube (Figure 2).
Step 3: String 2 size 8°s, 1 cube, and 2 size 8°s. Pass through the first cube and size 8° strung. Tie the working thread and the tail in a secure square knot between the size 8° and the size 11°. Your shape should look like a slim figure 8 with one cube at its “waist” and extended “tips” (Figure 3).
Materials14 black 3mm cubes18 size 8° matte pewter seed beads24 matte black size 11° seed beads2 thin gauge head pins 2" longEar wiresBlack beading threadNeedle
toolsScissorsRound nose pliers
Figure 1
Figure 2

© 2011 Interweave Press LLC. Not to be reprinted. All rights reserved.page 5
More wonderful beadwork projects are available at interweavestore.com
Step 4: weave the working thread and tail back into the beads to the middle cube and trim. You will need to rethread the tail on a new needle (Figure 4).
Step 5: Pass one head pin carefully through one of the tip size 11° beads, a size 8° and the cube. use your fingers to turn the tip size 11° bead so the pin can pass straight through it into the other beads. As the head pin emerges from the cube into the space between the sides of the shape, string 5 size 11° beads. Pass through the “waist” cube. String 5 more size 11°s. Pass through the top cube, size 8°, and tip size 11° bead (Figure 5).
Step 6: use your fingers to push the beads towards the head of the pin, to squash the figure 8 into a rounder shape. holding the beads in place, use your round nose pliers to make a small wrapped loop above the size 11° to secure the beads in that squashed shape.
Step 7: Attach your ear wire to the wrapped loop. That’s it! (Make a second earring, naturally.) Try varying other beads in lieu of the cubes.
Figure 4
Figure 5
Figure 3

More wonderful beadwork projects are available at interweavestore.com© 2011 Interweave Press LLC. Not to be reprinted. All rights reserved.
page 6
project
twigs & branches
PAT W E X E L B L AT
Fran
k D
eSan
tis
These earrings are fun to make and can be a wonderful seasonal addition to your wardrobe. The basic branch design shown is a
great technique for adding fringe to your work.

© 2011 Interweave Press LLC. Not to be reprinted. All rights reserved.page 7
More wonderful beadwork projects are available at interweavestore.com
Step 1: Cut 5’ of thread. i recom-mend Little Fiskars® scissors for cut-ting Fireline® because of their unique ability to cut this product cleanly. Thread your needle to the center of the thread to work with a doubled thread. if using nymo®, run the thread twice over the beeswax. Pass the needle through a jump ring and tie a square knot, leaving a 6” thread tail.
Step 2: Making the main stem. Pick up 1 size 8 bead, 1 leaf, 1 size 8, 14 size 11s, 1 leaf, and 3 size 11s. Slide all the beads up against the knot at the jump ring. Skip the last 3 beads (the 3 nearest to the needle) and “sew back through” the leaf and 2 size 11s just above the leaf. note: “Sew back through” means to pass the needle and thread again through the indi-cated beads, in the opposite direction to the first pass. Exit between bead 13 and bead 12. Tighten up the work. The main key to success with making branches lies in keeping a firm, even tension (Figure 1).
Step 3: Making a simple branch: Pick up 7 size 11s. Skip the last 3 beads then sew back through the next 2. Pick up 5 size 11s. Skip the last 3 size 11s, sew back through the next 2, then through the first 2 of the branch. Sew back up through the next 2 of the main stem, toward the jump ring.
Step 4: Exit between bead 11 and bead 10. Tighten up the work. Repeat Step 3 three more times, each time ending by passing up through the next 2 beads on the main stem. Tighten the work each time and finally exit between beads 5 and 4 (Figure 2).
Step 5: Making a leaf branch: Pick up 4 size 11s, 1 leaf, and 3 size 11s. Skip the last 3 size 11s then sew back through the leaf and 2 size 11s. Pick up 5 size 11s. Skip the last 3 size 11s, sew back through the next 2, then the first 2 of this branch, and finally up through the next 2 on the main stem.
Step 6: Exit between bead 3 and bead 2. Tighten the work. Repeat Step 5 but pass through only 1 bead on the main stem, exiting between bead 2 and bead 1 (Figure 3).
Step 7: Pick up 5 size 11s. Skip the last 3, sew back through the next 2 on this branch, then up into the
Materials8 leaf-shaped beads, drilled lengthwise 4 size 8 seed beadsSize 11 seed beads, about a
teaspoonfulFireLine®/4lb, or Nymo® D thread2 soldered round jump rings, 4.5mm,
or 2 small oval jump rings1 pair of ear wiresG-S Hypo Cement
toolsLittle Fiskars® scissors (for Fireline®)Beading needle, size 10
techniquesFringeStringing
Figure 2Figure 1 Figure 3

More wonderful beadwork projects are available at interweavestore.com© 2011 Interweave Press LLC. Not to be reprinted. All rights reserved.
page 8
main stem through the last 11, the size 8, the leaf, and the top size 8. Pass through the jump ring and tie a square knot with the thread tail. Cut the threads even, leaving 6" tails (Figure 4).
Step 8: Thread the needle with both tails. Sew down through the top size 8 and the leaf. Make a half-hitch knot around the threads between the leaf and the second size 8, then continue down through the size 8 and several of the main stem beads to hide the thread ends. Put a tiny dot of glue on the knots and allow to dry. Trim thread close to beads, being careful not to cut into your work (Figure 5).
Step 9: Before attaching the ear wires, flip one of the earrings over from left to right, so that it becomes a mirror image of the other one.
pAt WeXeLBLAt is a former English country dance/New England contra dance musician, machine knitter, and wood turner. She has three adult chil-dren and is married to her best friend who is also a mentor, advocate, and enabler. She’s doing what she loves best and having the time of her life!
Figure 4 Figure 5
stringingmagazine.com/go/BDST
Beads are hot and so is Stringing magazine!
RISK-FREETRIAL OFFER
SUBSCRIBE NOW!
No matter what your level of ability is, you will �nd plenty of inspiration in every issue of Stringing magazine.
Take advantage of this special risk-free offer today!

More wonderful beadwork projects are available at interweavestore.com© 2011 Interweave Press LLC. Not to be reprinted. All rights reserved.
page 9
project
hydrangea earrings
K E L L I B U R N S
Kelli wanted to use marguerites for a simple
project she could teach her clients. The sparkle of
the flower-shaped crystals and transparent seed
beads make these a pair of earrings you’ll want in
every color.
A R T I S T ’ S T I PDo not pull your thread too hard; the marguerites may fray or even cut the thread.

© 2011 Interweave Press LLC. Not to be reprinted. All rights reserved.page 10
More wonderful beadwork projects are available at interweavestore.com
Step 1: Leafy vine. use 6’ of thread to string 6 green seed beads; pass through them again to form a circle.
Large leaves. String 12 green; pass back through the fourth and fifth beads to form a loop. String 8 green and pass back through the second and first beads to form a loop (Figure 1).
Small leaves. String 10 green; pass back through the fifth and sixth beads. String 6 green; pass back through the second and first beads to form a loop (Figure 2).
Repeat to make a second set of large and small leaves (or for the desired length). End the vine with a set of large leaves, then string 4 green and pass back through the first 3 beads to form a fringe, exiting between the last set of leaves (Figure 3).
Step 2: Flowers. String 1 crystal and 1 rose seed bead; pull snug and pass back through the crystal. Repeat three times to form a cluster of four flowers. Pass through the first crys-tal and seed bead again to tighten the cluster. Pass back through the next 4 green to exit between the next set of leaves (Figure 4). Repeat four times for a total of five flower clusters. use the pliers to twist the ear-wire loop open and attach it to the seed bead loop at the start of the vine. Repeat all steps for a sec-ond earring.
KeLLI BURNS owns and teaches at The Hole
Bead Shoppe in Bartlesville, Oklahoma. Reach
her at www.theholebeadshop.com or the hole
[email protected]. She is a frequent con-
tributor to Beadwork.
Materials1 g rose size 15° Japanese seed beads4 g transparent green size 11° Czech
seed beads40 rose 6mm marguerite crystals2 sterling silver French ear wires6 lb braided beading thread
toolsSize 12 beading needleChain-nose pliersScissors
techniquesLeaf fringe
FiniShED SizE: 2"
Figure 1
Figure 2
Figure 3
Figure 4
RESOURCESCheck your local bead shop or contact: Swarovski marguerite crystals, seed beads, ear wires, and thread: The Hole Bead Shoppe, (918) 338-2444, www.theholebead shop.com.

More wonderful beadwork projects are available at interweavestore.com© 2011 Interweave Press LLC. Not to be reprinted. All rights reserved.
page 11
project
It is always a good thing to incorporate gifts of nature into artwork—you gain a sense of connectedness to the world around you. A farmer’s gift of feathers gathered from his free-range chickens’
coop inspired a run of ideas for this designer, who incorporated pheasant
quills into these earrings.
umber pheasant
feather earrings
M E L O D Y M A C D U F F E E
Step 1: Sort the feathers into two sets of seven feathers. The center feather of each set should be the longest, and the three feathers on each side of it should symmetri-cally decrease in size.
Step 2: Cut 1" of 26-gauge wire. Make a mod-ified head pin by using the flat-nose pliers to bend one end of the wire into a u-shape just wide enough to hold a 4mm bead (the heads of traditional head pins will bend the shafts of the feathers and they won’t hang straight). String 1 topaz. Dab glue on the shaft of a short feather and pass into the bead at the end of the head pin (Figure 1). Repeat for three more pins and set aside to dry. You may want to test the strength of the glue bond by tug-ging gently on the feather.
Step 3: Make another modified head pin using 11⁄4" wire. String 1 topaz, 1 spacer, and 1 brown, and attach a feather slightly larger than the one used in Step 2. Repeat for three more pins and set aside to dry.
Step 4: Make another 11⁄4" modified head pin. String 1 topaz, 1 spacer, 1 brown, 1 spacer, and 1 topaz, and attach a feather slightly larger than the one used in Step 3. Repeat for three more pins and set aside to dry.
Step 5: using a 11⁄2" modified head pin, string 1 topaz, 1 spacer, 1 brown, 1 spacer, 1 topaz, 1 spacer, and 1 topaz. Repeat once and glue the largest feathers into the beads.
Step 6: use round-nose pliers to form wrapped loops at the top of each of the 14 beaded feather head pins.
Step 7: Cut the piece of 22-gauge wire in half. use round-nose pliers to curl one end of each piece up to form a simple loop. String the head pins on the crossbar with 3mm
Figure 1

© 2011 Interweave Press LLC. Not to be reprinted. All rights reserved.page 12
More wonderful beadwork projects are available at interweavestore.com
smoke beads between them so that the feathers form a V. Form a loop at the other end of the wire, trim-ming off any unnecessary length
(Figure 2).
Step 8: Cut 2" of 26-gauge wire and wire-wrap a loop at one end. String 1 brown, 1 spacer, 1 topaz, 1 spacer, and 1 smoke. Attach to a jump ring with another wire-wrapped loop. Repeat once using the same jump ring. Attach each end to the wire loops of the feathered crossbar, using pliers if necessary to close the loops.
Step 9: use a 11⁄4" piece of 26-gauge wire to make another modified head pin. String 1 smoke, 1 spacer, 1 brown, 1 spacer, and 1 topaz. Form a wrapped loop to attach the head pin to the jump ring between the two pins already there. Attach the
jump ring to the soldered ring on an earring post. Repeat to finish the other earring.
Materials14 pheasant or other feathers measur-
ing 1" to 11⁄4" in slightly graduated lengths
18 smoke 3mm round fire-polished beads
28 topaz round 4mm round fire-pol-ished beads
16 metallic brown 4mm button-shaped fire-polished beads
30 copper 4mm daisy spacers31⁄2" of 22-gauge sterling silver wire2' of 26-gauge sterling silver wire2 sterling silver 4-6mm soldered jump
rings1 pair of sterling silver ear postsG-S Hypo Tube Cement
toolsRound-nose pliersFlat-nose pliersWire cutters
techniquesWire loopsStringing
FiniShED SizE: 21⁄ 2"
Jewelry artist MeLODY MACDUFFee loves
finding ways to use nontraditional, not-so-
common materials in her pieces. She works
part-time in a state-of-the-art bead store in
Mobile, Alabama, where she organizes and
teaches classes on a variety of beading tech-
niques. She is widely published in both bead
and crochet publications.
Figure 2

More wonderful beadwork projects are available at interweavestore.com© 2011 Interweave Press LLC. Not to be reprinted. All rights reserved.
page 13
techniques
Netting (single thread)Begin by stringing a base row of 13 beads. String 5 beads and go back through the fifth bead from the end of the base row. String another 5 beads, skip 3 beads of the base row, and go back through the next; repeat to the end of the row. To turn, pass back through the last 3 beads (one leg of the last net). String 5 beads, pass back through the center bead of the next net and continue.
FringeExit from your foun-dation row of beads or fabric. String a length of beads plus 1 bead. Skipping the last bead, pass back through all the beads just strung to create a fringe leg. Pass back into the foundation row or fabric.
StringingStringing is a technique in which you use beading wire, needle and thread, or other material to gather beads into a strand.
WireworkingTo make a simple loop, grasp one end of the wire with round-nose pliers. Holding on to the wire with one hand, gently turn the pliers until the wire end and wire body touch. Create a 90° reverse bend where they meet. For a wire-wrapped loop, cut the desired length of wire and make a 90° bend 2" from one end. Use round-nose pliers to hold the wire near the angle and bend the short end up and around the pliers until it meets itself. Wrap the wire tightly down the neck of the wire to create a couple of coils. Trim the excess to finish.
Right-Angle Weave (single needle)String 4 beads and pass through them again to form the first unit. For the rest of the row, string 3 beads, pass through the last bead passed through in the previous unit, and the first two just strung; the thread path will resemble a figure-eight, alternating directions with each unit. To begin the next row, pass through the last 3 beads strung to exit the side of the last unit. String 3 beads, pass through the last bead passed through, and the first bead just strung. *String 2 beads, pass through the next edge bead of the previous row, the last bead passed through in the previous unit, and the last 2 beads just strung. Pass through the next edge bead of the previous row, string 2 beads, pass through the last bead of the previous unit, the edge bead just passed through, and the first bead just strung. Repeat from * to complete the row then begin a new row as before.
Surgeon’s KnotThe surgeon’s knot is very secure and therefore good for finishing off most string-ing materials. Tie an over-hand knot, right over left, but instead of one twist over the left cord, make at least two. Tie another overhand knot, left over right, and pull tight.