3m drill product manual - amazon s3 drilling machines tapping machines multi head drills tool...
TRANSCRIPT

Precision Drilling Machines Tapping Machines Multi Head Drills Tool Grinders
Machine Vices Special Production Equipment
Accessories Pedestal Grinders Metal Cutting Saws
YOUR BROBO DISTRIBUTOR IS:
PRODUCT AND MAINTENANCE MANUAL
3M PRECISION DRILLING MACHINE
BROBO WALDOWN (AUST) PTY. LTD.
A.C.N. 098 264 316 A.B.N. 42 098 264 316
65-67 Williams Rd, Dandenong, 3175 PO BOX 4274 Dandenong Sth, 3164 Victoria, AUSTRALIA. Tel: 61 3 9794 8751 Email: [email protected] Fax: 61 3 9794 8792 Website: www.brobo.com.au
Cer
tifi
ed S
yste
m
Quality ISO 9001

OPERATING MANUAL FOR 3M PRECISION DRILLING MACHINE TECHNICAL SPECIFICATION i CHAPTER 1: Installation of the Machine
1.1 Unpacking and Handling the Machine 1 1.2 Parts Checklist 2 1.3 Minimum Requirements 2 1.4 Anchoring the Drill Unit 2
1.5 Connection to Power Source 3 CHAPTER 2: Safety and Accident Prevention
2.1 Operation of the Machine 4 2.1.1 Noise Level 4 2.1.2 Power Supply 5 2.2 General Requirements 5 2.3 Advice for the Operator 5 2.4 Machine Safety Devices 6 2.4.1 Reference Standards 6
CHAPTER 3: Main Functions and Operation of the Machine
3.1.1 Drill Head Pulley & Belt Assembly 7 3.1.2 Safety Eye Shields 7 3.1.3 Depth Adjustment 7 3.1.4 Racklift Assembly 7 3.1.5 Column Support 8 3.2 Preparation for Operation 8 3.3 Operation Recommendations 8
CHAPTER 4: Drawings, Layouts, Assembly and Spare Parts 4.1.1 Assembly Drawing (1 of 5) 9 4.1.2 Assembly Drawing (2 of 5) 10 4.1.3 Assembly Drawing (3 of 5) 11 4.1.4 Assembly Drawing (4 of 5) 12 4.1.5 Miscellaneous Part List 13 4.2 Switch Assembly 14
CHAPTER 5: Maintenance and Selection of Consumables 5.1 Role of the Operator 15 5.2 Maintenance Requirements 15 5.3 General Maintenance of Functioning Components 15
CHAPTER 6: Troubleshoot
6.1 Troubleshooting For Blade and Cutting Problems 17 APPENDIX i. Hazard/Risk Assessment 1
ii. Warranty 209

TECHNICAL SPECIFICATION
MACHINE SPECIFICATION 3M SERIES (BENCH MOUNTED) 3M SERIES (FLOOR MOUNTED)
DRILLING CAPACITY 32mm 32mm
SIZE OF TABLE
� Standard Square � Optional Round � Optional T-Slots
- -
305 305
-
350 305 305
SPINDLE TRAVEL 101 101
COLUMN DIAMETER 74.6 74.6
MAXIMUM DISTANCE SPINDLE TO TABLE 340 714
MAXIMUM DISTANCE SPINDLE TO BASE 530 1208
THROAT DEPTH 191 191
MOTOR kW 1.1 1.1
SPINDLE SPEEDS
(NOMINAL) STRAIGHT DRIVE
INTERMEDIATE DRIVE
480, 850, 1450, 2500
150, 280, 320, 480, 570, 650, 1800,
2000, 3000
480, 850, 1450, 2500
150, 280, 320, 480, 570, 650, 1800,
2000, 3000
WEIGHT UNPACKED 130kg 145kg
WEIGHT PACKED
149kg 164kg
HEIGHT PACKED (mm) 985 1390
HEIGHT INSTALLED (mm) 985 1690
BASE AREA (mm) 368 600 368 600
i

WARNING – HEAD HEAVY MACHINE
The 3M drill is heaviest where the drill head is fitted and as such, care must be taken while relocating or moving the machine. !!!
!
CHAPTER 1 - Installation of the Machine 1.1 Unpacking and Handling the Machine Upon receiving the Brobo Group 3M Drill, the machine should be sitting upright and bolted centrally on top of a wooden pallet. While the machine is situated on the pallet, position the forklift arms under the pallet between the runners, keeping in mind that the machine is head heavy and minimal force should be exerted on the electrical box located beneath the machine (Figure 1). Move the entire unit to an accessible area as close as possible to the final location. Carefully remove the packaging surrounding the drill unit and the bolts restraining the drill to the pallet. Once completed, proceed by elevating the machine away from the pallet base using a sling harness wrapped around the entire unit ensuring that it is equally supported. Ensure that the floor is as level as possible and enough clearance is allocated before finally positioning the machine to the desired location. Once in position, verify that the electrical supply is connected. Attached the 3MT arbour and chuck set (not provided) into the quill housing, while ensuring that the arbour step correctly mates into the quill housing slot. Figure 1. Assembly of 3M Drill
PLEASE OBSERVE AND FOLLOW THE INSTALLATION INTRUCTIONS ON PAGE 2
1
WARNING – OPERATING VOLTAGE VARIATION
The drill unit has an inbuilt safety electrical system to protect it against voltage variations. However, for the machine to operate efficiently, ensure that the drill operates within ±10% limits of the recommended voltage on the motor.
!!!!
WARNING – EXCEEDING MAXIMUM HEIGHT
Do not extend the height of the machine past the maximum ‘height installed’ indicated (Page i). Exceeding past this limit will cause the column to extend out of the column support, which might subsequently cause damage to the machine, as well as causing injury to any person in the vicinity.
!!!!
1.2 Parts Checklist Along with the drill unit, check that the following accessories, packed "loose", are included as follows: A. ACCESSORIES
i. 1 Operation Manual 1.3 Minimum Requirements For the machine to function correctly, the room in which the drill unit is to be installed must be in the vicinity of, and satisfy the following conditions: 415/240V Power Supply Ambient Temperature: From -10 to + 50 degrees C. Relative Humidity: Not more than 90%. Lighting: More than 500 LUX.
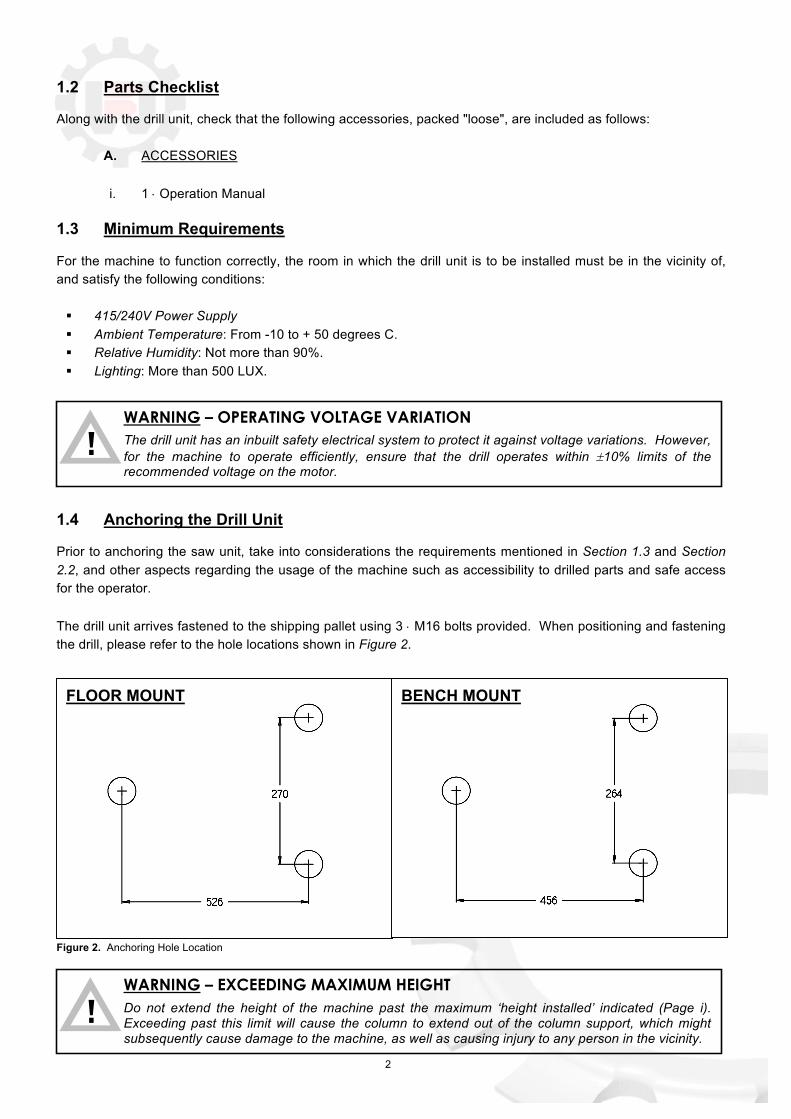
1.4 Anchoring the Drill Unit Prior to anchoring the saw unit, take into considerations the requirements mentioned in Section 1.3 and Section 2.2, and other aspects regarding the usage of the machine such as accessibility to drilled parts and safe access for the operator. The drill unit arrives fastened to the shipping pallet using 3 M16 bolts provided. When positioning and fastening the drill, please refer to the hole locations shown in Figure 2.
Figure 2. Anchoring Hole Location
2
FLOOR MOUNT BENCH MOUNT

VOLTAGE MAIN VOLTAGE 415/240V 3 PH 240V
1.5 Connection to Power Source Before connecting the machine to the power supply, check that the socket is not connected in series with other machines. This condition is critical for the ideal operation of the drill (Referring to Figure 3 for wiring of “4-CORE” power supply cable from the machine to a power plug. Check that the spindle rotary direction and change the phasing if required; clockwise rotation observing top-down on top of the motor pulley.) Note that single-phase machines are supplied in Australia with 15-amp plug). Furthermore, ensure that all the electrical leads and cables (including supply leads) are well maintained and should be immediately replaced if cut, sliced or damaged in any manner.
Figure 3. Connection for “4-CORE” Wire System with Neutral To connect the machine to the power supply, proceed as follows:
1) Insert the power plug into the socket, while ensuring that the mains voltage is compatible for which the drill is operating at.
2) Inspect that the power switch on the main box is
closed and set to OFF position.
3) To prepare the machine for operation, release the STOP/EMERGENCY STOP button by twisting the red mushroom button. To activate the drill, engage the green START button.
4) If all of the above procedures have been carried out correctly, the drill should now be operational
The Brobo Group 3M Drill is now ready for use. Chapter 3 provides a detailed description of the various functional features of the drill and its operating cycle.
3

WARNING – UNAUTHORISED MODIFICATIONS/REPLACEMENTS/USE
The manufacturer declines any responsibility whatsoever, either civil of criminal, in the case of unauthorised interference or replacement of one or more parts or assemblies on the machine, or if accessories, tools and consumable materials are used that are different from those recommended by the manufacturer himself or if the machine is inserted in a plant system and its proper function is altered.
!!!!
CHAPTER 2 - Safety and Accident Prevention The Brobo Group 3M Drill has been designed and manufactured in accordance to Australian Standards. It is HIGHLY RECOMMENDED that the instructions and warnings contained in this chapter be carefully followed for correct usage of the machine. 2.1 Operation of the Machine The Brobo Group 3M Drill is specifically design to drill through ferrous metal cross sections with thin-walled or ‘plate’ profiles. Other types of material and machining are not compatible for use with the specifications of the drill. This machine involves high-speed revolutions; therefore extreme caution is required when operating the device. The employer is responsible for instructing the personnel who, in turn, are obliged to inform the operator of any accident risks, safety devices, noise emission and accident prevention regulations provided for by national and international laws governing the use of the machine. The operator must be perfectly aware of the position and functions of all the machine’s controls. All those concerned must strictly adhere to ALL instructions, warnings and accident prevention standards in this manual. The following definitions are those provided for by the EEC DIRECTIVE ON MACHINERY No. 98/37/CE: Danger Zone - any zone in and/or around a machine in which the presence of a person constitutes a risk
for the safety and health of that person.
Person Exposed - any person finding him or herself, either completely or partly in a danger zone. Operator - the person or persons given the responsibility of installing, operating, adjusting, maintaining,
cleaning, repairing and transporting the machine.
2.1.1 Noise Level The noise level of an idling drill unit has been measured to be below 85 dBA. This complies with the Australian Occupational Health and Safety (Noise) Regulations 1992.
Please note that peak impulse noise levels will be experienced due to variables including drill characteristics, type, and condition. This will also vary accordingly depending on the size and type of sample being drilled. Under these circumstances, management should make available to the operator(s) the appropriate hearing protection equipment as prescribed under the above stated act.
4

2.1.2 Power Supply The 415/240V power supply requirements for this machine are of a high level and unauthorised interference and or inadequate maintenance could result in a situation that could put the operator at risk. A qualified electrical engineer should be assigned to maintain and repair the system. 2.2 General Requirements Lighting Insufficient lighting during the operation of the drill unit would constitute a safety hazard for the people concerned. For this reason, the user of the machine must provide adequate lighting in the working area to eliminate areas in shadow, whilst also preventing dazzling illumination sources (reference standard ISO 8995 - 2002 ‘Lighting of Indoor Workplaces’). Connections Check that the power supply cables, compressed air supply and/or coolant system complies with, and are operating within the acceptable range of the drill capabilities. Faulty, damaged or worn components must be replaced immediately. Earthing Systems The installation of the earthing system must comply with the requirements stated in the IEC Standards Part 195: Earthing and Protection Against Electric Shocks 1998. 2.3 Advice for the Operator
Protective eyewear or goggles must be worn at all times while attending and operating the drill.
Ensure that hands and arms are kept clear of the drilling zone when the machine is operating.
Do not wear oversize clothing with long sleeves and oversize gloves, bracelets, necklaces or any other loose object that may become entangled in the machine’s tooling bit during drilling. Long hair must be tied back or placed in a hair net.
Always disconnect the power supply to the machine before carrying out any maintenance
work or adjustments. This includes cases of abnormal operations of the machine.
The operator MUST NOT conduct any risky operations or those not required for the drilling in course (eg. remove swarf shavings from the machine while drilling). Never move the 3M drill while the machine is operating.
Always keep the workplace area as clean as possible. Remove equipment, tools or any other objects from the drilling zone.
5

Support the work piece on both sides of the machine to prevent it falling or jamming during the drilling cycle.
If the drill bit is jammed, press the emergency stop push button immediately. Do not continue forcing the bit through. This could damage the drill, the specimen or be a cause for potential injury to the operator.
Always turn off the machine before carrying out any repair work. Consult the Brobo Group Engineering Department in the country in which the machine was initially purchased.
2.4 Machine Safety Devices This product and maintenance manual is not purely intended as a guide for the usage, operation and maintenance of the drill unit in a strictly production environment; it is instead an instrument to providing information on how to use the machine correctly and safely. The following standards listed in section 2.4.1, which are applicable to the Brobo Group 3M Drill, are those specified by the EEC Committee that governs safety of machinery, health and safety at work, personal protection and safeguarding of the work environment. In addition, the saw also complies with the Australian Standards regarding the safeguarding and general requirements for electrical equipment. 2.4.1 Reference Standards MACHINE SAFETY EEC Directive No. 98/37/CE - Machines Directive EEC Directive No. 91/368 - 94/68 - Amends sections of EEC Directive No. 98/37/CE relating to machine
safety EEC Directive No. 73/23 - Low Voltage Directive
AS4024.1 - 1996 - Safeguarding of Machinery
HEALTH AND SAFETY AT WORK AS3100 - 2002 - General Requirements for Electrical Equipment Operational Health and Safety (OHS) 1995.81/1995 - Compliance References EEC Directive No. 80/1107; 83/477; 86/188; 88/188; 88/642 - Protection of Workers against risks caused
by exposure to physical, chemical and biological agents in workplace EEC Directive No. 73/23 and Special EEC Directives No. 89/654; 89/655 - Improvements in health and
safety at work
6

CHAPTER 3 - Main Functions and Operation of the Machine 3.1.1 Drill Head – Pulley & Belt Assembly The full set of motor drive, intermediate and quill pulleys are all housed within the protective drill guard cover. Facing the front of the drill unit, the spindle speed setting is located on the right hand side of the cover, beneath the locking mechanism. To change the spindle speed settings, the user must manually change the V-belt positions as shown in the black panel. 3.1.2 Safety Eye Shields As the name suggests, the safety eye shield should be lowered into position prior to drilling to prevent any swarf dislodging in the direction of the user. 3.1.3 Depth Adjustment Situated beneath the 3-pronged handle boss is the depth adjustment gauge. Using the gauge and the scale indicator shown on the left hand side of the drill, the operator can manually set the desired depth for a drill hole and lock its position. 3.1.4 Racklift Assembly Available in round or rectangular profile, all workpiece is fastened to the racklift table using a standard mechanical vie (not provided). The racklift can be adjusted up or down via the rack handle, to obtain optimum user working height.
2
4
5
KEY: 1. Drill Head – Pulleys and Belt Assembly 2. Safety Eye Shields 3. Depth Adjustment 4. Racklift Assembly 5. Column Support
7
1
3
Figure 4. Electrical Unit

3.1.5 Column Support Prior to usage, ensure that the column support is securely fastened to the ground using the 3 x M16 bolt holes provided (see Figure 2). 3.2 Preparation for Operation The following procedure is recommended for the correct drilling using the Brobo Group 3M Drill. PROCEDURE
i) Clean the workpiece to ensure it is free of any grit, swarf or flammable substances. It is highly recommended that a solvent be used to remove any residue, while ensuring the solvent is inflammable and non-toxic.
ii) Prior to drilling, clear the drill and the work area around the work piece of any swarf or/and tools to
minimise the likelihood of the user getting injured during the drilling operation. iii) Load the workpiece into the mechanical vice (sold separately), located on the racklift, and fastened
workpiece securely. Loosen the racklift and adjust the height and horizontal position. Once you have position the workpiece into the desired location, relock the racklift assembly.
iv) Check that the correct speed drill speed setting is selected, and the safety eye shield is directly positioned
to deflect swarf and any dislodged particles. v) Turn the machine on. Proceed by slowly drilling into the workpiece until a guide indent is created. Steadily
increase the feed rate of drilling by applying a constant yet steady force on the feed handle until the desired hole depth is reached.
vi) Reverse the direction of the drill fed until it come to rest in its start position and turn the drill machine off. 3.3 Operation Recommendations To reduce the amount of frictional contact between the drill bit and work piece, a light coating of oil or
lubricant can be applied onto the drill bit price to drilling. Do not force the drill bit through the workpiece as this significantly reduces the lifespan of the bit, as well as
increasing the risk of the bit bending and/or breaking and injuring the operator. When drilling through larger hole diameters through thick materials, its is advisable to split the drilling
operation into two or three stages, starting from drilling a smaller hole size and increasing it until the desired final hole size.
8

CHAPTER 4 - Drawings, Layouts, Assembly and Spare Parts
4.1.1 Assembly Drawing (Sheet 1 of 5)
9

4.1.2 Assembly Drawing (Sheet 2 of 5)
10

4.1.3 Assembly Drawing (Sheet 3 of 5)
11

4.1.4 Assembly Drawing (Sheet 4 of 5)
12

4.1.5 Miscellaneous Part List Please find below of most commonly replaced spare parts, aside from those specified on pages 9 - 12. These listed parts draw reference to components found predominantly on the rack lift assembly and drill column support. Should you require a spare part that you are not familiar with, or not shown in Chapter 4, please contact Brobo Group Engineering department.
PART NUMBER SPARE PART DESCRIPTION
1132010 BASE, FLOOR TYPE
2112010 COLUMN SUPPORT ( use with Floor Base)
2114060 COLUMN, FLOOR (Solid, 1220mm)
1035190 COLUMN, BENCH (Solid, 767mm)
2122020 COLUMN CLAMP (includes 1042000 & 2124050)
2121310 RACKLIFT ASSEMBLY, COMPLETE (Floor Type)
1041080 RACKLIFT ASSEMBLY, COMPLETE (Bench Type)
2114010 RACK
2111140 WORMWHEEL & BUSH ASSEMBLY
2114020 WORM
2114040 SPINDLE WORMWHEEL
2111170 SPINDLE & EXTENSION ASSEMBLY
2111300 QUILL ASSEMBLY
2125200 MOTOR (0.75kW, 1HP, 1PH, TEFC)
2125180 MOTOR (0.75kW, 1HP, 3PH, TEFC)
13

4.2 Switch Assembly
14

CHAPTER 5 – Maintenance and Selection of Consumables 5.1 Role of the Operator The person operating and maintaining the Brobo Group 3M Drill must familiarise themselves with these instructions for their own safety and that of others, in addition to safeguarding the production of the machine. Responsibility must be taken by the user on the general maintenance and up keeping of the unit as specified in this chapter, with particular emphasis on:
Check to ensure that other operators of the machine always aware of and comply with the relevant safety instructions and standards as specified in Chapter 2 - Safety and Accident Prevention. Therefore, check that the safety devices are operational and work perfectly and that personal safety requirements are complied with.
Ensure that the working cycle is efficient and guarantees maximum productivity, inspect the:
- Functions of the main components of the machine - Sharpness of the drill bits and lubricating fluid - Correct working parameters for the type of material being drilled
Verify that the quality of each drilled hole meets the requirements and that the final product is free from
any machining defects. 5.2 Maintenance Requirements
All maintenance must be carried out with the power switched off and the machine in emergency stop condition.
To guarantee perfection operation, all spare parts must be Brobo Group originals.
On completion of maintenance works, ensure that the replaced parts or any tools used have been
removed from the machines before starting it up.
Any behaviour not in accordance with the instructions for using the machine specified in this manual may create hazards and/or safety risks for the operator.
Therefore, read and follow all the instructions for use and maintenance of the machine and those on the
product itself. 5.3 General Maintenance of Functioning Components The general maintenance operations that should be carried out regularly are as follows:
i) Keep the rack lift table, overall machine and path of the drilling free of any offcuts, accumulated swarf and lubricants by using compressed air or preferably thread-free cloth.
ii) Lubricate the drill shaft and rotary chuck regularly with an NLGI 2 extreme pressure grease, Shell Alvania
No.1 grease or equivalent.
iii) Check the belt condition and tension regularly. Do not over tighten belts, as this will inadvertently exert tension on the spindle and motor bearings. To provide the right tension, follow the belt manufacturer’s recommendations and specifications.
15

iv) Clean and lubricate any moving joints or sliding surfaces with good quality oil. v) Clean the drill machine regularly and keep any unpainted surfaces lightly oiled to protect from rust and
corrosion. vi) Ensure that the machine performs drill perpendicular to the work surface. If not, contact Brobo Group
engineering department.
16

CHAPTER 6 - Troubleshoot 6.1 General Troubleshooting Below lists of some of the most common problems associated with the Brobo Group 3M Drill and the recommended troubleshooting procedures to undertake to rectify the situation. If the solutions provided do not resolve the problems, or the problem identified differs from those listed, immediately contact Brobo Group engineering department.
PROBLEM IDENTIFIED DIAGNOSIS SOLUTIONS
Drilling is not at 90° , or is angled to the rack lift table Drill bit not turning penetrating the material
Work piece not held firmly in vice clamp Excessively fast feed rate forcing the drill bit through the material Drill bit is not locked properly inside the chuck unit Work piece exceeds the recommended drilling capacity V-Belt slipping Blunt drill bit Excessive swarf trapped in the drill hole
Ensure that the vice clamps is securely fastened to the work piece prior to drilling. Slow down the drill feed rate, else it might cause the drill bit to break and cause harm to the operator. Check that no swarf is lodged in the chuck unit. Remove aggregate using an air gun. Also check that the chuck teeth are not worn. If so, the chuck unit might need to be replaced. Please ensure that the work piece required drilling area does not exceed the recommended drilling capacity. Check that the motor/pulley belts are not worn and if so, promptly replace them. The V-belts are available for purchase from Brobo Group. Replace or resharpen the drill bit to continue with the drilling process. To reduce the amount of friction between the drill bit and parent material, apply a light coating or grease/lubricant onto the drill bit prior to drilling. Back off the feed rate on the drill. Use an airgun to clean out any remaining swarf in the hole. Reapply lubricant on the drill bit and continue with the drilling process.
17
X"

Worn/broken component
Worn bearings/seal in quill housing
Replace worn/broken component
The bearing and seal components can be purchase direct from your nearest Brobo distributor. For more information, please check www.brobo.com.au All component to the 3M drill are sold as spare parts (pending availability). Please contact your nearest Brobo distributor or our Brobo Group head office. Please visit www.brobo.com.au for more details.
18

APPENDIX - RISK/HAZARD ASSESSMENT
Hazard Type Hazard Identification Hazard Assessment
Hazard Management Strategies (Recommended for the Purchasing / Buyer / User)
Cutting/Severing Low/Med Keep machine correctly guarded and operational at
all times. Keep hands clear of rotating drill bit.
Entanglement Low Do not wear loose jewellery, clothing or items that
might get caught in the drill. Always keep the work area free of unnecessary
objects or tools. Mechanical
Impact Low Wear protective safety glasses when utilising the
drilling machine. Strongly encouraged that steel-capped safety boots
be worn during operation of drill machine.
Electrical Electrocution Low Remove the power supply when any maintenance
and/or repairs are to be undertaken. Power source is to be isolated prior to opening
electrical enclosures.
Noise - Low
Under no load testing, the noise level measured is below 80db (A).
If the noise level becomes too high during a drilling cycle, stop the process and inspect for problem, if any are present.
Substance - Low
Keep the work area clean and regularly remove excess coolant, oils and other aggregate.
Hazardous Events Unexpected Start Up Low During a power failure, turn the machine off. If problem persists, please contact Brobo Group
engineering department.
Additional
Hazards Operator Error
Low Ensure blades, clamps and materials are correctly
secured.
MACHINE TYPE: SERIAL NO.: RECEVING COMPANY: (SAFETY OFFICER)
19
BROBO WALDOWN (AUST) PTY. LTD.
A.C.N. 098 264 316 A.B.N. 42 098 264 316
65-67 Williams Rd, Dandenong, 3175 PO BOX 4274 Dandenong Sth, 3164 Victoria, AUSTRALIA. Tel: 61 3 9794 8751 Email: [email protected] Fax: 61 3 9794 8792 Website: www.brobo.com.au
Quality Endorsed Company
ISO 9001 Lic. 10292
SAI GLOBAL Qu
alit
y S
yste
m

Brobo Group Warranty 1.1 The supplier warrants that all goods supplied by it, shall be free from defects in materials and workmanship for a period of twenty four (24) months from the date of delivery to the Customer. ("the Warranty Period"), on the following terms and conditions. 1.2 The Customer shall promptly provide written particulars to the supplier on becoming aware of any defect in the goods during the Warranty Period, and shall provide the Supplier with all necessary access, facilities and information to enable the Supplier to ascertain or verify the nature and the cause of the defect and to carry out its obligations under this warranty. 1.3 The Supplier's obligation under this warranty is limited to repairs of the defect goods and the Supplier is under no obligation to replace the goods or refund the value of the goods to the Customer. 1.4 If the goods are, in the opinion of the Supplier, not defective or if any defect is attributable to any one or more of the following circumstances then the Supplier is under no obligation whatsoever to the Customer: 1.4.1 The use of the goods for a purpose other than that for which they were intended to be used; 1.4.2 The repair, modification or alteration of the goods by any person other than the Supplier; 1.4.3 Where the defect has arisen due to misuse, neglect or accident, howsoever arising; 1.4.4 Where the defect has arisen due to installation of the goods which were, in the reasonable opinion of the Supplier, incorrectly carried out 1.4.5 Where the goods have not been correctly stored or maintained 1.4.6 Where the defect has arisen due to normal wear and tear on the goods 1.5 The Supplier is under no obligation under this warranty where the Customer has failed to observe the terms of payment for the goods or any other obligation imposed by the terms and conditions of this warranty. 1.6 In the event that the Supplier is supplying goods, which have been manufactured by third parties, the Customer shall be entitled to the benefit of any Manufacturer's Warranty in respect of such goods. The Customer acknowledges that the Supplier accepts no responsibility whatsoever for any Manufacturer's Warranty or any claim howsoever arising from the use of the goods, whether singularly or in combination with other products. 1.7 The Supplier shall not be liable for any indirect or consequential losses or expenses suffered by the Customer, howsoever caused. 1.8 Except as specifically set out herein, or in writing by way of catalogue or pamphlet or otherwise provided by the Supplier to the Customer any term, representation, condition or warranty in respect of the quality, condition or description of the goods, whether implied by statute, common law, trade usage, custom or otherwise, is hereby expressly excluded. This warranty is given by Brobo Group Pty Ltd, ABN: 42 098 264 316 Address: 65‐67 Williams Rd, Dandenong, VIC 3175 Ph: 03 9794 8751 Fax: 03 9794 8792 Email: [email protected] This warranty is provided in addition to other rights and remedies you have under law: Our goods come with guarantees which cannot be excluded under the Australian Consumer Law. You are entitled to replacement or refund for a major failure and to compensation for other reasonably foreseeable loss or damage. You are also entitled to have the goods repaired or replaced if the goods fail to be of acceptable quality and the failure does not amount to a major failure.