©2008 prentice hall ©2011 prentice hall adobe illustrator cs5 adobe photoshop cs5 adobe indesign...
TRANSCRIPT

©2008 Prentice Hall
©2011 Prentice Hall
Adobe Illustrator CS5
Adobe Photoshop CS5
Adobe InDesign CS5
Learning Media Design with Adobe CS5

©2011 Prentice Hall
Contents2
Adobe CS5 Basics
Lesson 1
Lesson 2
Lesson 3
Lesson 4
Lesson 5
Lesson 6
Lesson 7
Lesson 8
Lesson 9
Lesson 10
Lesson 11
©2011 Prentice Hall

©2011 Prentice Hall
Adobe CS5 Basics
3

©2011 Prentice Hall
Adobe Design Interface4
Adobe CS5 Basics: Exercise 1
Illustrator CS5 work area with common features labeled
Illustrator CS5 work area with common features labeled

©2011 Prentice Hall
Adobe Design Interface (cont.)5
Application bar, Tools panel, and other panels are arranged the same way in all applications.
The Tools panel at the left side of the window organizes tools.
A panel dock at the right side of the window organizes groups of panels.
Adobe CS5 Basics: Exercise 1

©2011 Prentice Hall
Adobe Design Interface (cont.)6
The CS5 Design Standard applications display open documents as tabbed document windows.
The active document’s tab is light gray; inactive document tabs are darker gray.
The Arrange Documents palette allows you to display multiple documents in the workspace.
Adobe CS5 Basics: Exercise 1
Arrange Documents
palette
Arrange Documents
palette

©2011 Prentice Hall
Workspaces and Zoom7
A workspace is an application window with a specific arrangement of panels.
The Workspace Switcher on the Application bar is available in all Adobe Creative Suite programs.
To zoom in on a specific area, use the Zoom tool to drag a marquee around the area, as shown in the image at the right.
Adobe CS5 Basics: Exercise 2

©2011 Prentice Hall
Understand File Formats
Adobe Default File Extensions Graphic File Formats
8
Illustrator files are saved by default with the .ai extension.
InDesign files are saved with the .indd extension.
Photoshop files are saved with the .psd extension
GIF (Graphics Interchange Format)Used for graphics that have up
to 256 colors. Can include transparent areas.
JPG or JPEG (Joint Photographic Experts Group)Used for continuous tone images
such as photos. JPG keeps file sizes low by
discarding some image data when the image is saved.
Adobe CS5 Basics: Exercise 3

©2011 Prentice Hall
Adobe Bridge9
Adobe Bridge is one of the Creative Suite shared programs.
Bridge is a file management utility that has the capability to show thumbnail images of a wide variety of content.
Access Bridge by clicking the Bridge button on a program’s Application bar or by using the Browse in Bridge command on the File menu.
Adobe CS5 Basics: Exercise 3

©2011 Prentice Hall
Adobe Mini Bridge10
Photoshop CS5 and InDesign CS5 also offer the Mini Bridge.
Mini Bridge is a panel that allows you to access files and folders as in Bridge, without leaving the application.
Use this panel to preview files, or drag files from the panel to the workspace.
Adobe CS5 Basics: Exercise 3

©2011 Prentice Hall
Lesson 1
Work with Basic Graphic Tools in Illustrator CS5
11

©2011 Prentice Hall
About Adobe Illustrator12
Start a new drawing in Illustrator using the Welcome screen or the File > New command.
Illustrator displays the New Document dialog box.
This illustration shows the dialog box with all options (including advanced options) displayed.
Lesson 1: Exercise 4

©2011 Prentice Hall
Bitmap vs. Vector13
Illustrations produced in drawing or painting programs create either vector graphics or bitmap images.Vector graphics are created
using mathematical expressions called vectors and retain their detail and clarity if the graphic is resized.
Bitmap images are formed of tiny squares called pixels. Pixels remain the same size when a bitmap image is resized.
Lesson 1: Exercise 4
Vector image at 300%
Vector image at 300%
Bitmap image at 300%
Bitmap image at 300%

©2011 Prentice Hall
Illustrator Tools14
Lesson 1: Exercise 4
Illustrator Tool panel in expanded viewIllustrator Tool panel in expanded view
Tools may have other tools hidden beneath
them
Tools may have other tools hidden beneath
them

©2011 Prentice Hall
Rulers and Guides15
Display the rulers using the View > Rulers > Show Rulers command.
To display a horizontal guide, click on the horizontal ruler and drag downward to display the guide and then drag the guide into position.
Use the same process to drag a vertical guide from the vertical ruler.
Lesson 1: Exercise 4

©2011 Prentice Hall
Bounding Boxes and Anchor Points16
If an object is rectangular, the bounding box is the same dimensions as the object.
For an ellipse, line, or irregular object, the bounding box creates a frame around the object.
When bounding boxes are hidden, a selected object shows a colored path and small colored squares called anchor points.
Lesson 1: Exercise 5

©2011 Prentice Hall
More Drawing Techniques17
Rather than size an object as you draw it, you can display a dialog box and specify measurements and in some cases other options for the object.
Display a tool’s dialog box by selecting the tool and then clicking in the work area.
Lesson 1: Exercise 5

©2011 Prentice Hall
Paintbrush Basics18
Use the Paintbrush tool to draw a line that looks as if it has been brushed.
Paintbrush paths can have thick and thin areas such as those that would be created by a paintbrush.
Double-click the Paintbrush tool in the Tools panel to display the Paintbrush Tool Options dialog box.
Lesson 1: Exercise 6

©2011 Prentice Hall
Blob Brush19
Blob Brush tool paints like a brush (left) and creates a closed shape (right).
Anchor points can be adjusted with the Smooth tool for a smoother outline.
The Blob Brush can also create objects that intersect with other objects, sharing attributes such as fill and effects.
The illustration at right shows how a Blob Brush path has been merged with a star shape.
Lesson 1: Exercise 6

©2011 Prentice Hall
Fill and Stroke20
Select the Fill or Stroke box and then:Apply a color or other attribute.Restore default colors by
clicking the Default Fill and Stroke icon.
Click the Swap Fill and Stroke icon to switch fill and stroke attributes.
Eliminate the fill or stroke color by clicking the None button.
Use the Swatches and Color panels to apply color to fill or stroke.
Lesson 1: Exercise 6
Fill
Stroke
Default Fill and Stroke
Swap Fill and Stroke
None

©2011 Prentice Hall
Copy and Select Objects21
Illustrator offers an easy keyboard shortcut for copying an object:Select the object and hold down Alt while dragging the object.
Use the Selection tool to drag a marquee that touches all items to be selected.
The marquee does not have to surround the objects, merely intersect them at some point.
Lesson 1: Exercise 7

©2011 Prentice Hall
Align and Distribute22
When you select more than one object, the align and distribute options become active in the Control panel.
Or, use the Align panel to select alignment and distribution options.
You can also align to a key object (the middle, blue-bordered object in the illustration at right).
Lesson 1: Exercise 7

©2011 Prentice Hall©2011 Prentice Hall
Work with Multiple Artboards23
Illustrator allows you to work with multiple artboards. Use the Artboards panel to work with artboards.
Lesson 1: Exercise 8
Use the Artboards panel to add a new artboard, delete an
artboard, or rearrange artboards
Use the Artboards panel to add a new artboard, delete an
artboard, or rearrange artboards

©2011 Prentice Hall
Ways to Cut Objects24
Lesson 1: Exercise 8
Illustrator’s cutting tools make it easy to cut objects into segments
Illustrator’s cutting tools make it easy to cut objects into segments

©2011 Prentice Hall
Work with Text25
Click to place an insertion point to type text on a single line.
Or, drag with the Type tool to create a type container to hold text.
Use options on the Control panel to change font, size, and style.
All Creative Suite applications offer similar text formatting options.
Lesson 1: Exercise 8

©2011 Prentice Hall
Lesson 2
Work with Paths and Layers
26

©2011 Prentice Hall
Modify Stroke Attributes27
The Stroke panel has four sets of options: The top section lets you change
stroke weight, apply a cap option, choose a corner style, and control where the stroke sits with relation to an object’s path.
Use the second section to apply dash formatting to a path.
Use the third section to apply arrowheads of various types to paths.
The last section lets you choose a profile for a path.
Lesson 2: Exercise 13
You can adjust a dashed line so that corners or line endings do not fall in a gap.
You can adjust a dashed line so that corners or line endings do not fall in a gap.

©2011 Prentice Hall
Variable Profiles and Width Tool28
Variable Width Profiles can be accessed from the Stroke panel or the Control panel.
These profiles can add visual interest to most paths, include line segments and object strokes.
Use the Width tool to adjust the width of a path by dragging at a specific point.
Use the Width tool on any path created with the Line Segment tool, Pencil tool, and shape tools such as Rectangle or Star.
Lesson 2: Exercise 13

©2011 Prentice Hall
Eyedropper and Direct Selection Tools29
Use the Eyedropper tool to copy attributes from an unselected object (such as the yellow box) to the currently selected object (the unfilled ellipse).
Use the Direct Selection tool to select a single point on a path or a single line segment.
Selected points or segments can be dragged to reshape an object.
Lesson 2: Exercise 13

©2011 Prentice Hall
Draw Behind and Inside30
Use Draw Behind to draw an object behind another, selected object.
This tool makes it unnecessary to use Arrange options to reorder objects.
Use Draw Inside to place one object inside another object.
The two objects are linked so they stay together, and each is separately editable.
Lesson 2: Exercise 14

©2011 Prentice Hall
Select Objects from Groups31
Use the Group Selection tool to select a single star from the grouped object.
Click the Group Selection tool again to select all items grouped with the first item selected.
Hold down the Ctrl key while clicking the left mouse button to select an object behind other objects.
Continue to click to select objects further back in the stack.
Lesson 2: Exercise 14

©2011 Prentice Hall
Pen Tool32
To create a line or shape, specify a starting point and direction and then click and/or drag the pointer at a new location to continue the line.
To create a closed shape, return the Pen tool pointer to the first endpoint.
Use the Direct Selection tool to move an anchor point on a curve.
Lesson 2: Exercise 15
To turn off the Pen tool after drawing one or more lines, select another tool, such as the Selection tool.
To turn off the Pen tool after drawing one or more lines, select another tool, such as the Selection tool.

©2011 Prentice Hall
Use Brush Libraries33
Illustrator offers many brush libraries that you can open to select a variety of calligraphic, scatter, art, and pattern brushes.
Lesson 2: Exercise 16
Libraries are available for many Illustrator features, including swatches, gradients, and graphic styles.
Libraries are available for many Illustrator features, including swatches, gradients, and graphic styles.

©2011 Prentice Hall
Modify Brush Formats34
You can modify the default formats of any brush in the Brushes panel.
The five types of brushes offer different options for customizing.
The illustration at right shows options for a scatter brush.
Lesson 2: Exercise 16

©2011 Prentice Hall©2011 Prentice Hall
Use Live Trace35
Use Live Trace to create a vector object from sources such as GIF images or raster objects created in Photoshop.
Live Trace can reproduce not only outlines but the detail inside the object.
Lesson 2: Exercise 17

©2011 Prentice Hall
Work with Layers36
A layer is a level in the stacking order that can hold one or more objects.
To the left of the layer name is a small thumbnail that shows the objects on the layer.
To the left of the thumbnail is a right-pointing arrow that, when clicked, expands the selected layer to show the objects on the layer.
Lesson 2: Exercise 18
Click to expand the layer

©2011 Prentice Hall
Work with Layers (cont.)37
Clicking the target symbol at the far right of the layer name selects all objects on that layer and displays the colored selection square on the Layers panel.
Selecting an object in the work area will also select the layer on which it appears in the Layers panel.
Lesson 2: Exercise 18
Click to select all items on the layer

©2011 Prentice Hall
Work with Layers (cont.)38
Dragging a layer’s selection square to another layer will move all objects from the original layer to the new layer.
To move a layer in the panel, click the layer to select it, hold down the mouse button, and drag the layer to its new position.
You can also move objects on layers to different positions by dragging.
Lesson 2: Exercise 18

©2011 Prentice Hall
Work with Layers (cont.)39
By default, all layers and sublayers are visible.Click the visibility eye to hide a layer.Click in the empty visibility box to redisplay the
layer.
To prevent changes to a layer, you can lock it.Lock a layer by clicking the edit box.When a layer is locked, it cannot be selected or
edited.
Lesson 2: Exercise 19

©2011 Prentice Hall
Lesson 3
Work with Colors, Effects, and Styles
40

©2011 Prentice Hall
Color Models and the Color Panel41
The Grayscale Color panel shows 100% black (K) at the right end and 0% black at the left end.
The CMYK model shows the four basic ink colors—cyan, magenta, yellow, and black.
A spot Color panel displays only one color, similar to the Grayscale model.
The HSB model displays settings for hue, saturation, and brightness.
Lesson 3: Exercise 24

©2011 Prentice Hall
Opacity and Masks42
By default, colors are 100% opaque when applied from the Swatches panel or Color panel.
Use the Opacity box in the Transparency panel to adjust opacity.
Create an opacity mask by placing one object on another and adjusting its opacity to allow the artwork below to display in the top object’s shape.
Lesson 3: Exercise 25

©2011 Prentice Hall
Normal
Darken
Color Burn
Blending Modes43
You can also set a blending mode from the Transparency panel.
A blending mode combines the blend color of the current object with the base color of the underlying object to create the resulting color.
Lesson 3: Exercise 25

©2011 Prentice Hall
Shape Builder Tool44
Use the Shape Builder tool to merge shapes or portions of shapes to create complex objects.
Drag in the direction you want to merge to combine portions of an object into a single object.
Click on a region rather than dragging to break the object into separate shapes.
Erase a region by holding down Alt while clicking the Shape Builder tool on the area.
Lesson 3: Exercise 26

©2011 Prentice Hall
Paint a face using Live Paint
Bucket
Paint a stroke using Live Paint Bucket
Use Live Paint45
The Live Paint feature allows you to pour color into any portion of a Live Paint object.
First create a Live Paint object, and then use the Live Paint Bucket tool to paint faces and edges.
To control the flow of “paint,” use the Live Paint Selection tool to select and delete lines.
Lesson 3: Exercise 27

©2011 Prentice Hall
Work with Live Color46
Lesson 3: Exercise 27
Use Live Color to edit colors in an illustration.
In the Recolor Artwork dialog box, you can:Display colors in the current
illustration.Modify any color.Use a color wheel to edit colors
by changing hue, saturation, and brightness of any or all colors simultaneously.

©2011 Prentice Hall
Radial gradient (left) and linear gradient (right)
About Gradients47
A gradient is fill created from gradations of one or more colors.
Gradients may be radial, linear, or elliptical.
Use the Gradient panel to create and edit gradients.
Apply color to gradient stops, then move the stops to the desired location.
Opacity settings may be applied to gradient stops to allow background to show through.
Lesson 3: Exercise 28

©2011 Prentice Hall
Adjust color of gradient stop on the gradient bar
Change gradient angle with the Gradient tool
Adjust Gradients48
You can adjust gradient colors, stop position, and angle by editing directly on an object.
Lesson 3: Exercise 28
Gradient bar displayed on a linear gradient

©2011 Prentice Hall©2011 Prentice Hall
Distort & Transform effects: Pucker & Bloat, Roughen, and Tweak
About Effects49
An effect is an attribute that changes the appearance of an object without changing the object itself.
The Effect menu offers Illustrator effects and Photoshop effects.
Lesson 3: Exercise 29
Stylize effects: Feather and Inner Glow

©2011 Prentice Hall©2011 Prentice Hall
Use the Effect Gallery50
Choosing a Photoshop effect opens the Effect Gallery dialog box, where you can select from a number of categories and specify settings.
Lesson 3: Exercise 29

©2011 Prentice Hall
Stroke, fill, and stroke and fill graphic styles
Graphic Styles51
A graphic style is a group of appearance attributes that can be saved and named.
A graphic style can consist of a fill, stroke, pattern, gradient, transparency setting, or effect.
Use the Graphic Styles panel to create new styles, display how an object will look with a style applied, and delete styles.
Lesson 3: Exercise 30

©2011 Prentice Hall
The Appearance Panel52
The Appearance panel shows appearance attributes applied to objects, groups, and layers in an illustration.
You can hide any attribute using the eye symbols.
Use the Appearance panel to adjust object attributes such as stroke, fill, and opacity.
Effects can also be applied and modified from this panel.
Lesson 3: Exercise 31
Adjust stroke color in the Appearance
panel

©2011 Prentice Hall
Lesson 4
Work with Drawing and Selecting Tools in Photoshop CS5
53
©2011 Prentice Hall
Create a Photoshop Image54
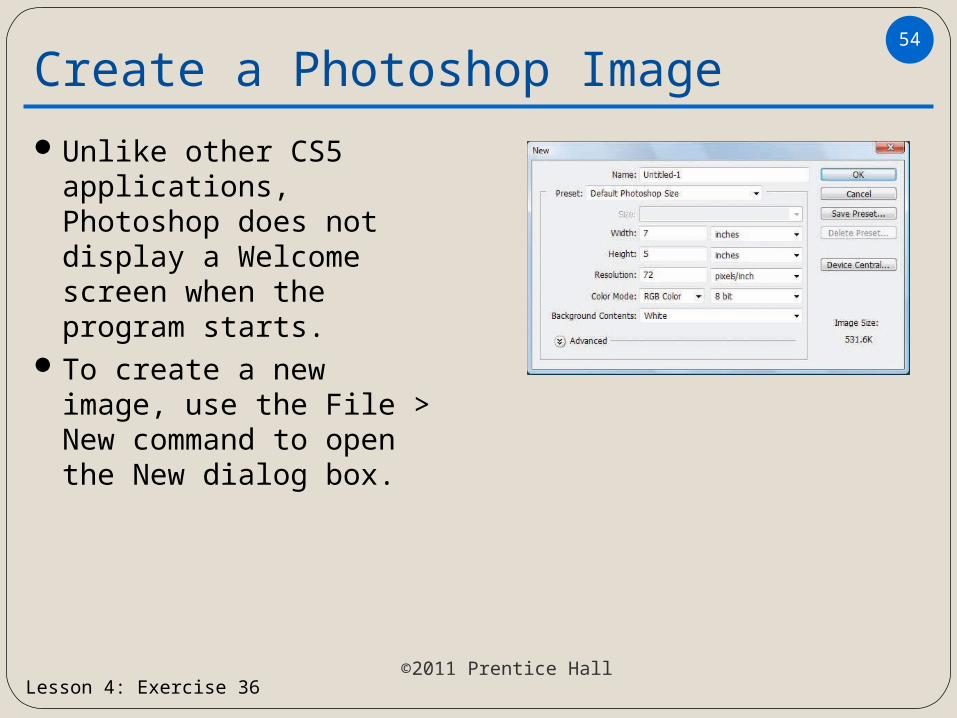
Unlike other CS5 applications, Photoshop does not display a Welcome screen when the program starts.
To create a new image, use the File > New command to open the New dialog box.
Lesson 4: Exercise 36
©2011 Prentice Hall
Photoshop Tools55
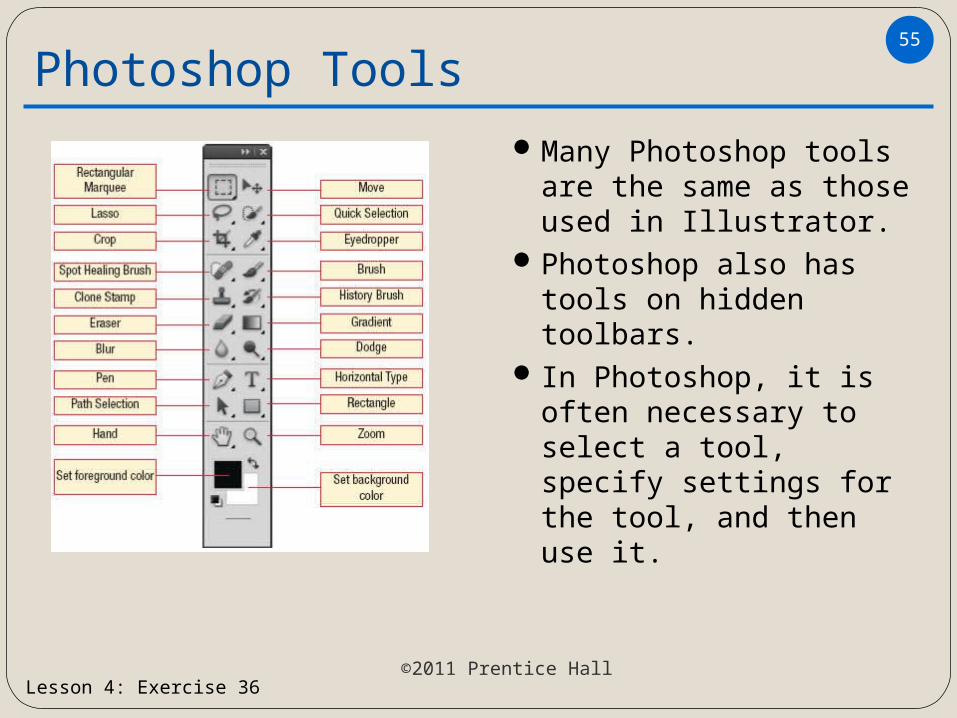
Many Photoshop tools are the same as those used in Illustrator.
Photoshop also has tools on hidden toolbars.
In Photoshop, it is often necessary to select a tool, specify settings for the tool, and then use it.
Lesson 4: Exercise 36

©2011 Prentice Hall
Work with Colors in Photoshop56
By default, the foreground color is black and the background color is white.
To choose a new foreground or back-ground color, click the appropriate box in the toolbox.
Photoshop also offers a Color panel and a Swatches panel, like Illustrator.
Rest the pointer on a swatch thumbnail to see the swatch name.
Lesson 4: Exercise 36
Background color
Foreground color

©2011 Prentice Hall
Photoshop Brushes57
Use the Brush Preset menu to select size and hardness of a brush.
Scroll down the menu of brushes to find various diameters and brush tips that provide special effects.
The Mixer Brush lets you apply color as if with wet paint, mixing colors on the canvas.
The Mixer Brush can also be used to mix colors on images for a painterly effect.
Lesson 4: Exercise 37

©2011 Prentice Hall
Draw Lines and Shapes58
Photoshop offers some familiar tools for drawing lines and shapes on the toolbar stored below the Rectangle tool.
After selecting the Custom Shape tool, select from many different shapes using the Custom Shape picker on the options bar.
When using any of the shape tools or the Pen, select the desired drawing mode before drawing the shape.
Shape layers mode creates both a vector object and a fill layer, as shown in the Layers panel.
Lesson 4: Exercise 37

©2011 Prentice Hall
Insert Text59
Photoshop always adds text (type) on a new layer in the image.
Type objects are vector objects rather than raster images.
Select options such as font, font size, font style, and color in the options bar before typing.
After inserting text, click the Commit current edits button to finish the task.
Lesson 4: Exercise 37
Use the Move tool to move a type object to the desired location on the image.
Use the Move tool to move a type object to the desired location on the image.

©2011 Prentice Hall
Layers Panel60
The background layer always appears at the bottom of the Layers panel, and it cannot be moved to a different position in the layer list.
If the background layer contains the entire image content, as shown to the right, it is good practice to copy the layer and then hide the original background layer.
Lesson 4: Exercise 38

©2011 Prentice Hall
Eraser Tools61
Photoshop’s Eraser tools let you remove portions of an image. Use the Eraser tool to remove or
change pixels on a layer using brush or pencil strokes.
Use the Background Eraser tool to erase pixels to transparency on any layer.
Use the Magic Eraser tool to delete areas of color by clicking on a specific color, as shown at left.
Lesson 4: Exercise 38

©2011 Prentice Hall
Make Selections62
Use the Rectangular Marquee and Elliptical Marquee tools to make simple rectangular or oval selections.
Hold down Shift if desired to make perfect squares or circles.
Use the Lasso tools for freeform selections.The Lasso tool makes a selection with a
freeform shape.The Polygonal Lasso makes a selection of line
segments and angles.The Magnetic Lasso (right) makes a selection
that follows the contours of an object.
Lesson 4: Exercise 39

©2011 Prentice Hall
Work with Selections63
You can manipulate a selection in a number of ways:Delete the selected area.Move or copy the selection.Transform the selection by
scaling, rotating, skewing, distorting, and so on.
Feather the selection.Apply a fill or stroke to the
selection.Save the selection to be loaded
for future use.
Lesson 4: Exercise 40
©2011 Prentice Hall
Magic Wand and Quick Selection Tools64
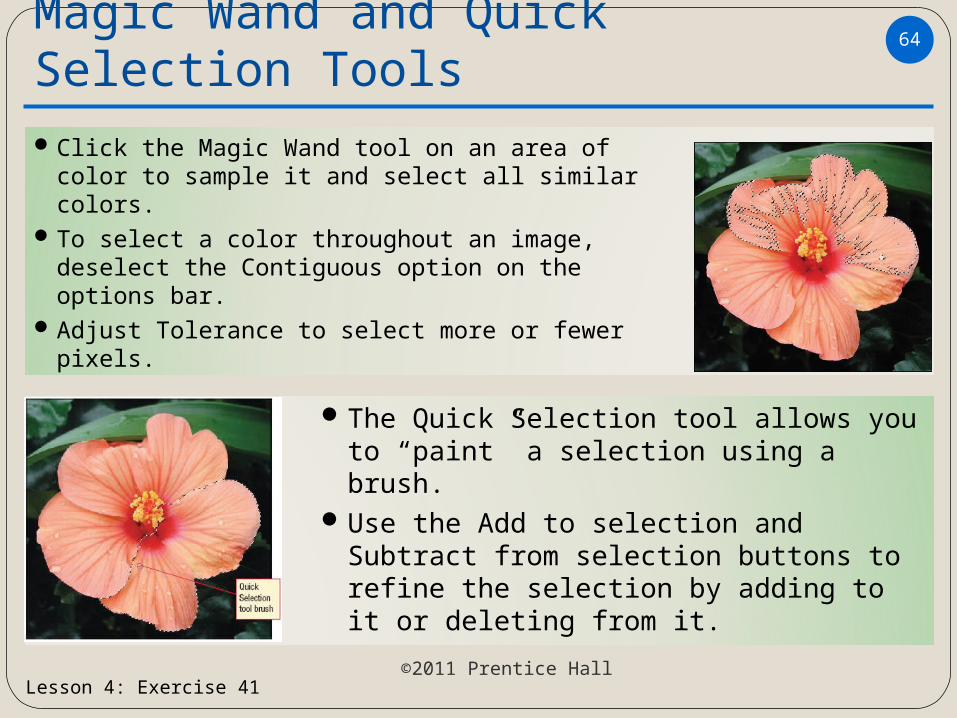
Click the Magic Wand tool on an area of color to sample it and select all similar colors.
To select a color throughout an image, deselect the Contiguous option on the options bar.
Adjust Tolerance to select more or fewer pixels.
The Quick Selection tool allows you to “paint” a selection using a brush.
Use the Add to selection and Subtract from selection buttons to refine the selection by adding to it or deleting from it.
Lesson 4: Exercise 41

©2011 Prentice Hall
Refine Selection Edges65
Use the Refine Edge dialog box to improve a selection outline.Choose a different view mode to
see the selection against a different background.
Turn on edge detection to refine according to hardness of edges.
Select adjustment options to smooth, feather, adjust contrast, or shift edge.
Choose an output option to decontaminate colors and create a new selection or layer.
Lesson 4: Exercise 41

©2011 Prentice Hall
Lesson 5
Correct and Modify Images
66

©2011 Prentice Hall
About Image Adjustments67
Options for adjusting image appearance:Adjustment options on the
Image > Adjustments submenu alter the actual pixels of an image.
Adjustment layers apply adjustments to a layer that will affect all layers below it; modifying the look of an image without actually changing it.
Whenever possible, adjustment layers should be used rather than the Image > Adjustment commands.
Lesson 5: Exercise 46

©2011 Prentice Hall
Apply an Adjustment Layer68
Select the desired adjustment from the Adjustments panel.
A new adjustment layer appears in the Layers panel.
Adjust settings as desired using the Adjustments panel options.
Use the buttons at the bottom of the Adjustments panel to:Return to the Adjustments panel
list.Turn visibility on or off.View the previous state.Restore default settings.
Lesson 5: Exercise 46

©2011 Prentice Hall
Use Correction Tools69
Commonly used correction tools:The Red Eye tool corrects the
flaw created when a flash bounces off a retina.
The Healing Brush tool samples an image area and then paints the sample over another area.
The Spot Healing Brush tool corrects by sampling the pixels around it and creating a matching fill or texture.
The Patch tool uses an area as a patch to repair another similar area in the image.
Lesson 5: Exercise 47
The Patch tool covers an image
flaw

©2011 Prentice Hall
Use Correction Tools (cont.)70
Content-aware corrections are new in Photoshop CS5.
Make content-aware corrections by:Selecting Content-Aware as a
setting for the Spot Healing Brush.
Selecting an area of an image, choosing Edit > Fill, and specifying Content-Aware in the Use list.
Lesson 5: Exercise 47

©2011 Prentice Hall
Use Correction Tools (cont.)71
Use the Clone Stamp tool to sample an area in an image, and then to paint all or part of the duplicate in another location.
Use the Clone Source panel to set options for how the clone appears, such as size and rotation.
Use the History panel to view the image at a particular point in the correction process or quickly reverse a whole series of changes by dragging the slider upward.
The History panel by default tracks 20 states during the current work session.
Lesson 5: Exercise 47

©2011 Prentice Hall
More Image Adjustments72
Use the Photo Filter adjustment to correct color balance and temperature.
Use the Exposure adjustment to correct flaws such as over- or underexposure.
Use the Vibrance adjustment to increase saturation (right), while minimizing color clipping.
Use Image > Adjustments > Shadows and Highlights to correct for backlighting.
Lesson 5: Exercise 48

©2011 Prentice Hall
Dodge, Burn, and Sponge73
Use the Dodge tool to reduce exposure or lighten shadows, midtones, or highlights in an area of an image (see top left).
Use the Burn tool to increase exposure or darken shadows, midtones, or highlights in an area of an image (see bottom left).
Use the Sponge tool to enhance or reduce the color saturation in a particular area in the image.
Lesson 5: Exercise 49

©2011 Prentice Hall
Blur, Sharpen, and Smudge74
Use the Blur tool to paint blurring onto an image to soften edges (top right).
The Sharpen tool can help enhance detail, particularly in an edge where two colors abut in the image.
Use the Smudge tool to distort and reposition content in an image, as if the image is a puddle of paint that you drag your finger through (bottom right).
Lesson 5: Exercise 49

©2011 Prentice Hall
Crop an Image75
You can crop to any selection (top left), or you can use the Crop tool to draw a rectangular marquee that defines the crop area.
By default, the crop marquee displays the Rule of Thirds grid (bottom left) to help you crop attractively.
Drag the crop marquee handles and then commit the change to crop the image.
Lesson 5: Exercise 50

©2011 Prentice Hall
Resize an Image76
Use the Image Size dialog box to adjust image size and resolution.If you change pixel dimensions
first, document size changes but resolution does not.
If you change document size first, pixel dimensions also change and file size increases or decreases.
If you change resolution first, only pixel dimensions change; you can then adjust them to change document size.
Lesson 5: Exercise 50

©2011 Prentice Hall
Other Image Transformations77
Content-aware scaling allows you to adjust image size without cropping.
This feature recognizes some content and preserves it from scaling, or you can create a selection of content to preserve.
Puppet Warp allows you to rearrange content of an image by dragging at specific areas on the image.
Set pins as desired in a warp mesh and then drag the pins to pull portions of the image into new positions.
Lesson 5: Exercise 50

©2011 Prentice Hall
Lesson 6
Explore Advanced Image Techniques
78

©2011 Prentice Hall
Path created using a Custom Shape
Work with Paths79
A path is a vector-based outline used to add content or save selections in an image file.
To create a path:Draw a line or shape with the
Paths button on the options bar active.
Convert any selection you make in an image to a path.
Use the Pen tool to draw a path.Work with paths using the Paths
panel.
Lesson 6: Exercise 55

©2011 Prentice Hall
Fill Layers and Layer Styles80
Fill layers can consist of solid color, a gradient, or a pattern.
The fill can be confined to a selected area; fill layers can be easily edited when changes are necessary.
Layer styles are special effects applied to a layer to modify the look of the layer’s contents.
Layer styles include options such as shadows, glows, overlays, and even an option that makes layer content look embossed.
Lesson 6: Exercise 56

©2011 Prentice Hall©2011 Prentice Hall
Use the Filter Gallery81
The Photoshop Filter Gallery is similar to the Illustrator Effects Gallery; more than one filter can be selected in this dialog box.
Lesson 6: Exercise 57

©2011 Prentice Hall
Masks and Channels82
A mask protects one area of an image while leaving other areas available to be modified.
Any selection is also a mask, as shown at right.
Saving a selection stores it as a channel
Photoshop’s channels display information for each color in an image.
Saved selections such as Flower and Vignette at left are stored as alpha channels.
Each channel can be viewed or hidden to allow you to work with colors separately.
Lesson 6: Exercise 58
Mask created by selection

©2011 Prentice Hall
Types of Masks83
A layer mask is used to conceal part or all of a layer.
Create a layer mask by selecting an area and then clicking the Add layer mask or Add a pixel mask button.
A clipping mask uses pixels on one layer to clip another layer into the shape of those pixels.
The layer to be clipped must be above the layer that provides the clipping shape.
Lesson 6: Exercise 59

©2011 Prentice Hall
Types of Masks (cont.)84
A vector mask is created using a vector object such as a shape or Pen path.
A vector mask looks similar in the Layers panel to a layer mask.
Use the Masks panel to modify masks:Adjust density and feathering.Refine the mask edge.Use Color Range to refine a
mask selected by color.Use Invert to display everything
except the mask.
Lesson 6: Exercise 59

©2011 Prentice Hall©2011 Prentice Hall
Optimize Images for the Web85
Use the Save for Web & Devices dialog box to optimize images as GIFs, JPGs, or PNGs.
Lesson 6: Exercise 60
©2011 Prentice Hall
Color Management86
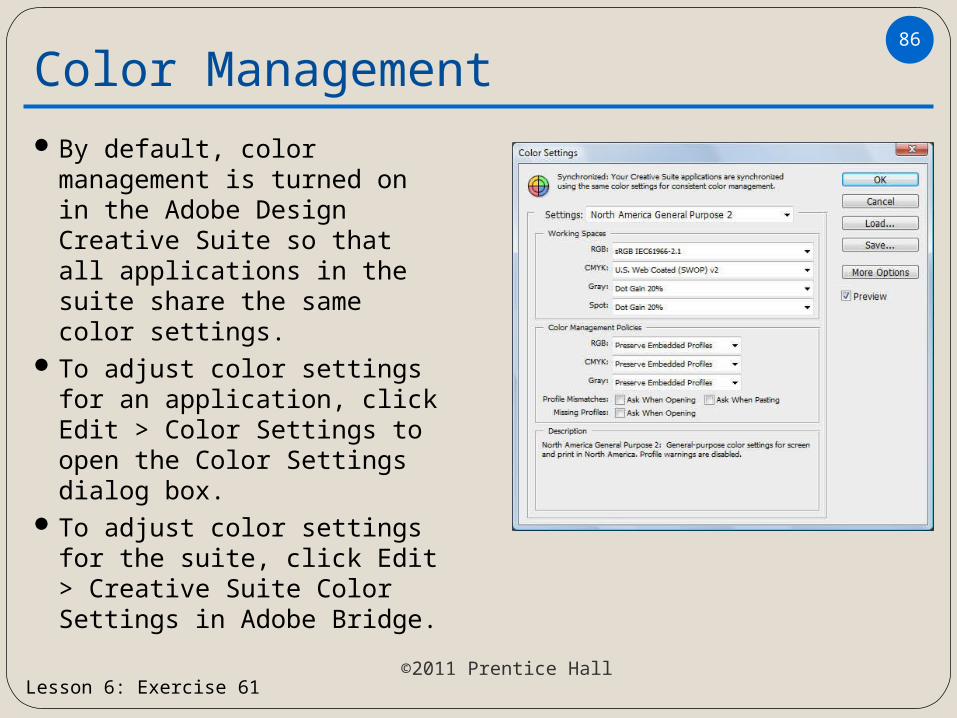
By default, color management is turned on in the Adobe Design Creative Suite so that all applications in the suite share the same color settings.
To adjust color settings for an application, click Edit > Color Settings to open the Color Settings dialog box.
To adjust color settings for the suite, click Edit > Creative Suite Color Settings in Adobe Bridge.
Lesson 6: Exercise 61

©2011 Prentice Hall
Lesson 7
Work with Basic Layout Tools in InDesign CS5
87

©2011 Prentice Hall
Start an InDesign Document88
Adobe InDesign is a page layout application that allows you to create a wide variety of sophisticated publications.
Use the New Document dialog box to set up a new document. The Facing Pages option is
selected by default. Choose the page number to start
on.Select the desired number of
columns.Specify settings for margins,
bleed, and slug areas.
Lesson 7: Exercise 66
©2011 Prentice Hall©2011 Prentice Hall
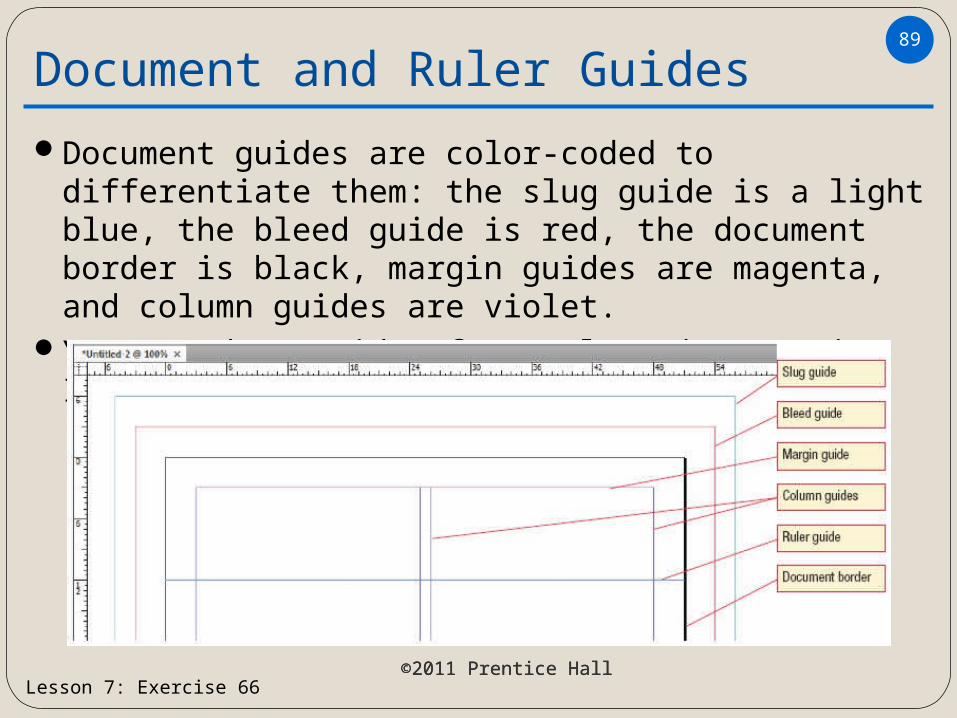
Document and Ruler Guides89
Document guides are color-coded to differentiate them: the slug guide is a light blue, the bleed guide is red, the document border is black, margin guides are magenta, and column guides are violet.
You can drag guides from rulers just as in Illustrator.
Lesson 7: Exercise 66

©2011 Prentice Hall
Insert Frames90
Text and graphics in an InDesign publication are controlled using frames.
Create a text frame by drawing with the Type tool; position the I-beam pointer where you want to begin the frame and drag to create the frame.
Create a graphic frame using the Rectangle Frame tool, the Ellipse Frame tool, or the Polygon Frame tool.
Lesson 7: Exercise 66

©2011 Prentice Hall
Work with Frames91
Add text to a frame by clicking in the frame and typing.
Or, use File > Place to import a text file. If there is more text than room in the
frame, the overset indicator displays.
Use the File > Place command or Bridge to import and place a graphic file.
Or, use the loaded graphic cursor to draw a frame as you place the file.
Use the content grabber to adjust the graphic in the frame.
Lesson 7: Exercise 67

©2011 Prentice Hall
Apply Fill and Stroke92
Frames may appear to be filled with white, but they are really transparent.
A stroke is the border around the outside of a frame or shape.
To apply fill or stroke color, use options on the Control panel or the Color and Swatches panels.
You can apply color to text much as you apply it to the fill or stroke of a frame.
Lesson 7: Exercise 68

©2011 Prentice Hall
Live Corners and Text Wrap93
The Live Corners feature, new in InDesign CS5, lets you round one or all corners of any rectangular object.
Click the yellow square and then drag the diamond to adjust corner roundness.
Text wrap options on the Control panel:Wrap around bounding box wraps text
around an object’s bounding box.Wrap around object shape wraps text
around the shape of the object . Jump object wraps text above and below
an object.
Lesson 7: Exercise 68

©2011 Prentice Hall
Pages Panel94
The Pages panel shows each page in a document as a thumbnail.
Facing pages are designated as recto (right) or verso (left).
InDesign CS5 lets you work with multiple page sizes in a single document.
A master is a template backdrop on which you can place elements that should repeat on each page.
Lesson 7: Exercise 69
You can modify the default master or create new masters for specific page layouts.
You can modify the default master or create new masters for specific page layouts.

©2011 Prentice Hall
Thread Text and Insert Page Numbers95
Every text frame has an in port and an out port that show how text is threaded.
To thread overset text, click the overset indicator in one frame and then click in another frame.
To insert a current page number, click Type > Insert Special Character > Markers > Current Page Number.
On master pages, the page number marker displays using the letter of the master, such as A or B.
Lesson 7: Exercise 69

©2011 Prentice Hall
Layers Panel96
The InDesign Layers panel assigns a color to each layer, as in Illustrator.
In InDesign CS5, the Layers panel now displays all objects on a layer in a stacking order so they can be rearranged easily.
The Layer Options dialog box allows you to make a number of decisions about layer display as you create the layer.
Lesson 7: Exercise 70

©2011 Prentice Hall
Lesson 8
Work with Objects, Colors, and Masters
97

©2011 Prentice Hall
Use Direct Selection tool to modify an
object
Use Direct Selection tool to modify an
object
Use transform commands to flip,
shear, rotate, or scale
Use transform commands to flip,
shear, rotate, or scale
Use Smart Dimensions to resize, align, or distribute
objects
Use Smart Dimensions to resize, align, or distribute
objects
Transform, Align, and Distribute Objects98
Lesson 8: Exercise 75
Use the Gap tool to adjust object size while maintaining white
space
Use the Gap tool to adjust object size while maintaining white
space

©2011 Prentice Hall
Work with Swatches99
The InDesign Swatches panel displays only six CMYK colors, plus black and white.
You can create new swatches, tints, or gradients to add to the Swatches panel.
Symbols in the panel identify the color mode and spot vs. process colors.
Lesson 8: Exercise 76

©2011 Prentice Hall
Transparency Effects100
Transparency effects are similar to Illustrator effects and Photoshop layer styles.
Use the Effects panel to apply transparency effects to the object as a whole, to the stroke only, to the fill only, or to text.
Use the Effects dialog box to specify settings for transparency effects.
Current effects applied are listed in the lower-left corner of the dialog box.
Lesson 8: Exercise 77

©2011 Prentice Hall
Work with Master Pages101
Modify a document’s master pages by:Changing the master nameCreating new masters from
scratch or based on other masters
Apply masters to pages by dragging the master to a page or use Apply Master Pages on the panel menu.
To override a master page element and make it editable, press Shift + Ctrl and click on the element.
Lesson 8: Exercise 78

©2011 Prentice Hall
Lesson 9
Work with Type and Styles
102

©2011 Prentice Hall
Text Flow and Find/Change103
When you place text, you can choose among these text flow options:Use the loaded text icon to click in a frame or drag to create a frame.Hold down Shift to display the autoflow icon and create any necessary
frames or pages as the text is placed.Hold down Alt to display the semi-autoflow icon that will fill a frame and
then reload so you can fill the next frame.
Lesson 9: Exercise 83
Use Find/Change to locate and change object formats, text and text formats, and characters (glyphs).
Search the current story, the entire document, or all documents and use options such as Whole Word to limit what is found.

©2011 Prentice Hall
Work with Fonts104
InDesign uses outline fonts such as TrueType and OpenType.
You can select font, font style, and font size on the Control panel with Character Formatting options displayed or from the Character panel.
If InDesign cannot find the font specified, it displays a warning.
Use the Find Font dialog box to locate or replace a font.
Lesson 9: Exercise 84

©2011 Prentice Hall
Tracking
Tracking
LeadingLeading
KerningKerning
Modify Character Formats105
Lesson 9: Exercise 85
ScalingScaling

©2011 Prentice Hall
More Character Formats and Glyphs106
Additional character formats (shown at right) display on the Character Formatting Control panel.
These formats can be toggled on or off.
A glyph is a specific form of a character.The Glyphs panel displays glyphs available
for a font.Use this panel also to display other special
characters and symbols and numbering options.
Lesson 9: Exercise 86

©2011 Prentice Hall
Apply Paragraph Formats107
Use the Paragraph Formatting controls on the Control panel or the Paragraph panel to apply:Alignment commandsParagraph and first and last line indentsSpace before and after paragraphs
Use the Text Frame Options dialog box to:Specify number of columns in the text frameApply inset spacing between text and the frame
edgeChange vertical justification in the text frame
Lesson 9: Exercise 87

©2011 Prentice Hall
Use tab stops to specify points where text will align when Tab is pressed
Use tab stops to specify points where text will align when Tab is pressed
Apply a drop cap to emphasize the first word of a
paragraph
Apply a drop cap to emphasize the first word of a
paragraphApply a paragraph rule above
or below a paragraph for visual interest
Apply a paragraph rule above or below a paragraph for visual
interest
More Paragraph Formats108
Lesson 9: Exercise 88
Use bullets and numbering to create
unordered and ordered lists
Use bullets and numbering to create
unordered and ordered lists

©2011 Prentice Hall
Multiple Columns and Keep Options109
Text frames can be divided into multiple columns for easier layout.
Use the Span Columns option to allow a paragraph to span multiple columns.
Use the Keep Options dialog box to control how many lines stay together after headings or at the start or end of a paragraph.
Lesson 9: Exercise 89

©2011 Prentice Hall
A character style is applied to individual characters and contains only character-based formatting
A character style is applied to individual characters and contains only character-based formatting
A paragraph style can be applied to individual paragraphs and can contain a
mixture of character-based formatting and paragraph-based formatting
A paragraph style can be applied to individual paragraphs and can contain a
mixture of character-based formatting and paragraph-based formatting
Character and Paragraph Styles110
Lesson 9: Exercise 90

©2011 Prentice Hall
Lesson 10
Work with Tables and Graphics
111

©2011 Prentice Hall
Insert and Modify Tables112
To create a table, place the insertion point in a text frame and then choose Table > Insert Table.
Select the desired number of rows and columns and then click OK to insert the table in the frame.
Modify a table using Control panel or Table panel options:Insert or delete rows or columnsAdjust cell widths and heightsMerge or split cellsSpecify vertical alignment and text direction
Lesson 10: Exercise 95

©2011 Prentice Hall
Format Tables and Table Cells113
Lesson 10: Exercise 96
Begin formatting on the cell level in the Cell Options dialog box, where you can adjust stroke and fill options
Begin formatting on the cell level in the Cell Options dialog box, where you can adjust stroke and fill options
Use the Table Options dialog box to apply formats to the entire table, such
as a table border or row or column strokes and fills
Use the Table Options dialog box to apply formats to the entire table, such
as a table border or row or column strokes and fills

©2011 Prentice Hall
Original fit as placed
Original fit as placed
Graphic Fitting Options114
Lesson 10: Exercise 97
Fit Content to Frame
Fit Content to Frame
Fit Content Proportionally
Fit Content Proportionally
Fill Frame Proportionally
Fill Frame Proportionally
Center Content can be used with other fitting options to center a graphic in a frame.
Center Content can be used with other fitting options to center a graphic in a frame.

©2011 Prentice Hall
Manage Graphic Links115
Use the Links panel to:See information about linked
graphics.Update links.Open original graphic files for
editing.Use the Panel Options
command on the panel menu to specify the attributes that display in the top part of the panel.
Lesson 10: Exercise 97

©2011 Prentice Hall
Clipping Paths and Text Wrap Options116
Clipping paths can be created:Using a Photoshop path or channelUsing Detect Edges in the Clipping Path
dialog boxUsing a Pen path
Use the Text Wrap panel to:Select a wrapping optionSpecify an offset to add space between text and objectChoose what side of the object to wrap aroundSelect the type of contour to wrap to, such as a path or
alpha channel
Lesson 10: Exercise 98

©2011 Prentice Hall
Text converted to outlines
Text converted to outlines
Shape filled with text
Shape filled with text
Adjust type position by dragging a bracket
Adjust type position by dragging a bracket
Text on a path
Text on a path
Graphic Effects for Type117
Lesson 10: Exercise 99

©2011 Prentice Hall
Lesson 11
Assemble and Print Publications
118

©2011 Prentice Hall
Rearrange Pages and Create Sections119
Use the Pages panel to rearrange pages in a document by dragging a page to a new location.
Use the New Section dialog box to create new sections for different page number formats.
Section starts display with a downward-pointing arrow.
In InDesign CS5, you can add color labels to pages to provide a visual cue about sections.
Lesson 11: Exercise 104
Section marker
Color label

©2011 Prentice Hall
Create a Book120
A book is a container file for organizing multiple InDesign documents into a single unified publication.
Use a book to synchronize styles across a group of related files and number the pages in the files consecutively.
If a document has been changed outside of the book, a warning symbol indicates it needs to be updated.
Lesson 11: Exercise 105

©2011 Prentice Hall©2011 Prentice Hall
Create a Table of Contents121
You can create a TOC automatically based on paragraph styles you specify.
Choose styles for the title and the entries and then generate the TOC.
Lesson 11: Exercise 106

©2011 Prentice Hall
Preflight and Preview Separations122
Lesson 11: Exercise 107
After creating a preflight profile, check the document against the profile to locate errors that should be fixed before printing
After creating a preflight profile, check the document against the profile to locate errors that should be fixed before printing
Use the Separations Preview panel to preview each color
separation
Use the Separations Preview panel to preview each color
separation

©2011 Prentice Hall
Print a Document123
View each group of settings in the Print dialog box, and make the desired changes for the document.
To view color separation output information, you must select a PostScript printer or choose to print to Adobe PDF.
Click Print after choosing Separations in the Output settings to print pages showing objects that use each color.
Lesson 11: Exercise 108

©2011 Prentice Hall
Export Documents124
You can export to a number of formats, including Encapsulated PostScript (EPS) and PDF.
After you supply a name and location for the file, a dialog box opens in which you can choose additional setting for the export.
If exporting to PDF, you now have a choice of Adobe PDF (Print) and Adobe PDF (Interactive).
Lesson 11: Exercise 109

©2011 Prentice Hall
Interactive Features125
You can create interactive features for documents such as:Hyperlinks and cross-referencesRollover buttonsPage transitions
Use the new Preview panel to preview interactive elements.
To give users full access to interactive features, export the document using the Adobe PDF (Interactive) settings.
Lesson 11: Exercise 109

©2011 Prentice Hall©2011 Prentice Hall
All rights reserved. No part of this publication may be reproduced, stored in a retrieval system, or transmitted, in any form or by any means, electronic, mechanical, photocopying, recording, or otherwise, without the prior written
permission of the publisher. Printed in the United States of America.
Copyright © 2011 Pearson Education, Inc. Publishing as Prentice Hall