18v li - 22 cordless hedge trimmer clht2218b€¦ · 18v li - 22" cordless hedge trimmer...
TRANSCRIPT

18V Li - 22" Cordless Hedge Trimmer
CLHT2218B
CLHT2218B_V1
Operators Manual
EN p. 2
Read all safety rules and instructions carefully before operating this tool.
Distributed By Cleva North America 601 Regent Park Court Greenville, SC 29607 (866)-384-8432

2
Contents 2
Product Specifications 2
General Safety Rules 3-4
Electrical Information 5
Know Your Cordless Hedge Trimmer 6
Charging Started 7-10
Operating 11-12
Warranty 13
Exploded Diagram 14
Parts List 15
Notes 16
CONTENTS
18V Li - 22" Cordless Hedge Trimmer
Capacity 1.5 Ah
Motor Voltage 18Vd.c
Idling Speed 1100 min-1 (rpm)
Cutting Capacity 9/16"
Weight(with battery) 5.3 lbs
PRODUCT SPECIFICATIONS
Model No.: 18LC01-ETL
Rated Input Voltage
Rated Output Voltage
Rated Output Current
Charging Time
Charger
120 V~, 60Hz
20.8 V
1.85 A
approx. 1 h
GENERAL SAFETY RULES
3
WARNINGRead and understand all instructions before using this product. Failure to follow all
liquids, gases, or dust. Power tools create sparks which may ignite the dust or fumes.
Do not allow children or untrained individuals to use this unit.
Don’t expose power tools to rain or wet conditions. Water entering a power tool will increasethe risk of electric shock.
Do not handle plug or tool with wet hands.
Never allow children to operate the equipment. Never allow adults to operate the equipmentwithout proper instruction.
Always wear safety glasses with side shields. Everyday glasses have only impact resistantlenses. They are NOT safety glasses. Following this rule will reduce the risk of eye injury. Useface mask if operation is dusty.
Wear eye protection when operating this product. Secure long hair above shoulder level toprevent entanglement in moving parts.
Do not expose to rain, store indoors.
Do not operate in poor lighting.
Keep all parts of your body away from any moving part.
Wear heavy long pants, boots, and gloves. Avoid loose garments or jewelry that could getcaught in moving parts of the machine or its motor.
Do not force tool. Use the correct tool for your application. The correct tool will do the jobbetter and safer at the rate for which it is designed.
Do not operate the equipment while barefoot or when wearing sandals or similar lightweightfootwear. Wear protective footwear that will protect your feet and improve your footing onslippery surfaces.
Secure long hair so it is above shoulder level to prevent entanglement in any moving parts.
Do not allow to be used as a toy. Close attention is necessary when used by or near children.
Do not use tool if switch does not turn it on or off. Any tool that cannot be controlled with theswitch is dangerous and must be repaired.
Keep all bystanders, children, and pets at least 50 ft. away.
medication.
Do not operate in poor lighting.
Keep all parts of your body away from any moving parts and all hot surfaces of the unit.

GENERAL SAFETY RULES
4
may create a hazard or cause product damage.
risk of electric shock.
therefore, they are always in operating condition. Be aware of possible hazards when not using
your battery tool or when
personal injury.
they are always in operating condition. Be aware of possible hazards when not using your battery
tool or when Remove or disconnect battery before servicing, cleaning or removing material from
the gardening appliance.
appliance should be stored indoors in a dry, locked place out of the reach of children.
possible special disposal instructions.
to the eyes or skin. It may be toxic if swallowed.
explosion and possibly injury.
Batteries can explode in the presence of a source of ignition, such as a pilot light. To reduce
the risk of serious personal injury, never use any cordless product in the presence of open
immediately.
been dropped or received a sharp blow. A damaged battery is subject to explosion. Properly
dispose of a dropped or damaged battery immediately.
such as rings, bracelets, and keys. The battery or conductor may overheat and cause burns.
Do not open or mutilate the batteries. Released electrolyte is corrosive and may cause damage
to the eyes or skin. It may be toxic if swallowed.
than 50°F but less than 100°F. To reduce the risk of serious personal injury, do not store outside
or in vehicles.
contact with your skin, wash immediately with soap and water, then neutralize with lemon juice
then seek immediate medical attention. Following this rule will reduce the risk of serious
personal injury.

5
If the power supply cord is damaged, it must be replaced only by the manufacturer or by an
authorized service center to avoid risk.
Maintain tool with care. Keep fan and blade area clean for best and safest performance. Follow
removing the battery pack.
To reduce the risk of electrical shock, do not expose to rain, do not use on wet surfaces. Store
indoors.
Save these instructions. Refer to them frequently and use them to instruct others who may
use this power tool. If you loan someone this power tool, loan them these instructions also.
WARNING (PROPOSITION 65)
Some dust created by power sanding, sawing, grinding, drilling, and other construction activities
contains chemicals known to cause cancer, birth defects or other reproductive harm. Some
examples of these chemicals are:
Lead from lead-based paints
Crystalline silica from bricks and cement and other masonry products, and
Arsenic and chromium from chemically treated lumber.
Your risk of exposure to these chemicals varies depending on how often you do this type of
work. To reduce your exposure to these chemicals, work in a well-ventilated area, and work with
particles.
CHILD SAFETY
Tragic accidents can occur if the operator is not aware of the presence of children.
Keep children out of the working area and under the watchful care of a responsible adult.
Do not allow children under the age of 14 to operate this hedger. Children who are 14
years of age and older must read and understand the operating instructions and safety
rules in this manual and must be trained and supervised by a parent.
Stay alert, and turn the hedger off if a child or any other person enters the working area.
Look behind and down for small children before and while cutting backwards.
Use extreme care when approaching blind corners, doorways, shrubs, trees, or other
objects that may obscure your view of a child who may run into the path of the hedger.
GENERAL SAFETY RULES
6
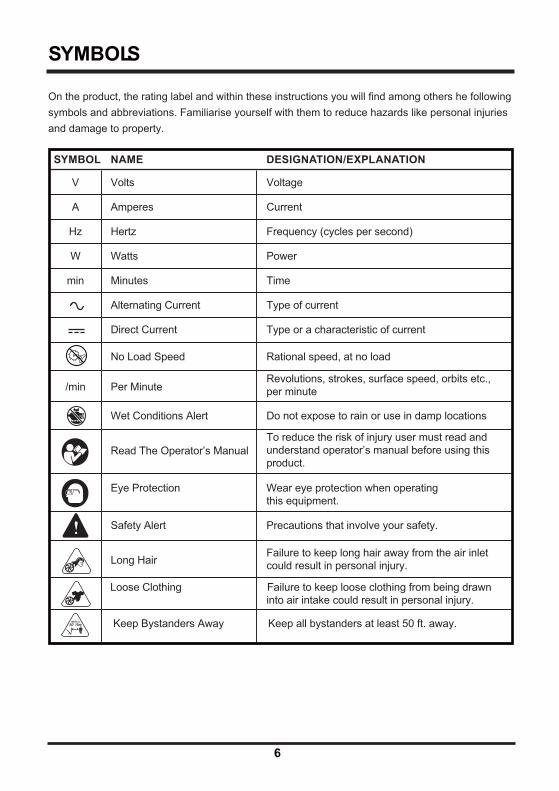
SYMBOLS
On the product, the rating label and within these instructions you will find among others he following
symbols and abbreviations. Familiarise yourself with them to reduce hazards like personal injuries
and damage to property.
SYMBOL NAME DESIGNATION/EXPLANATION
V Volts Voltage
A Amperes Current
Hz Hertz Frequency (cycles per second)
W Watts Power
min Minutes Time
Alternating Current Type of current
Direct Current Type or a characteristic of current
No Load Speed Rational speed, at no load
/min Per MinuteRevolutions, strokes, surface speed, orbits etc.,
per minute
Wet Conditions Alert Do not expose to rain or use in damp locations
Read The Operator’s Manual
To reduce the risk of injury user must read and
understand operator’s manual before using this
product.
Eye Protection Wear eye protection when operating
this equipment.
Safety Alert Precautions that involve your safety.
Long HairFailure to keep long hair away from the air inlet
could result in personal injury.
Loose Clothing Failure to keep loose clothing from being drawn
into air intake could result in personal injury.
Keep Bystanders Away Keep all bystanders at least 50 ft. away.
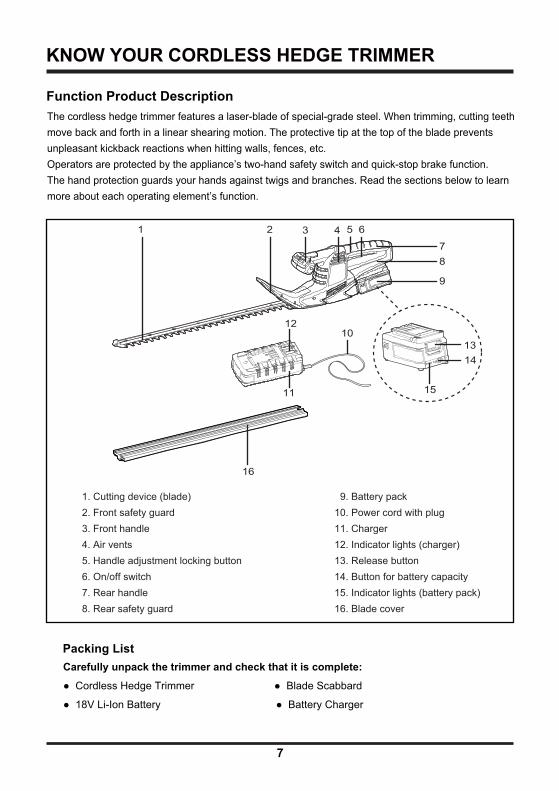
Packing List
Carefully unpack the trimmer and check that it is complete:
Cordless Hedge Trimmer Blade Scabbard
18V Li-Ion Battery Battery Charger
Function Product Description
The cordless hedge trimmer features a laser-blade of special-grade steel. When trimming, cutting teeth
move back and forth in a linear shearing motion. The protective tip at the top of the blade prevents
unpleasant kickback reactions when hitting walls, fences, etc.
Operators are protected by the appliance’s two-hand safety switch and quick-stop brake function.
The hand protection guards your hands against twigs and branches. Read the sections below to learn
more about each operating element’s function.
KNOW YOUR CORDLESS HEDGE TRIMMER
7
1. Cutting device (blade)
2. Front safety guard
3. Front handle
4. Air vents
5. Handle adjustment locking button
6. On/off switch
7. Rear handle
8. Rear safety guard
9. Battery pack
10. Power cord with plug
11. Charger
12. Indicator lights (charger)
13. Release button
14. Button for battery capacity
15. Indicator lights (battery pack)
16. Blade cover
1 2 3 4 5 6
7
8
9
16
1012
11
13
14
15
8
Unpack
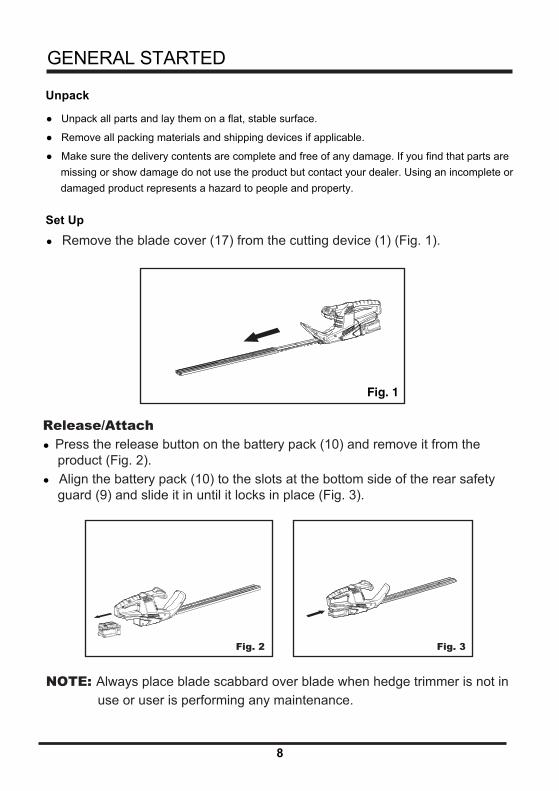
Set Up
GENERAL STARTED
Unpack all parts and lay them on a flat, stable surface.
Remove all packing materials and shipping devices if applicable.
Make sure the delivery contents are complete and free of any damage. If you find that parts are
missing or show damage do not use the product but contact your dealer. Using an incomplete or
damaged product represents a hazard to people and property.
Remove the blade cover (17) from the cutting device (1) (Fig. 1).
NOTE: Always place blade scabbard over blade when hedge trimmer is not in
use or user is performing any maintenance.
Fig. 1
Release/Attach
Press the release button on the battery pack (10) and remove it from the
product (Fig. 2).
Align the battery pack (10) to the slots at the bottom side of the rear safety
guard (9) and slide it in until it locks in place (Fig. 3).
Fig. 2 Fig. 3
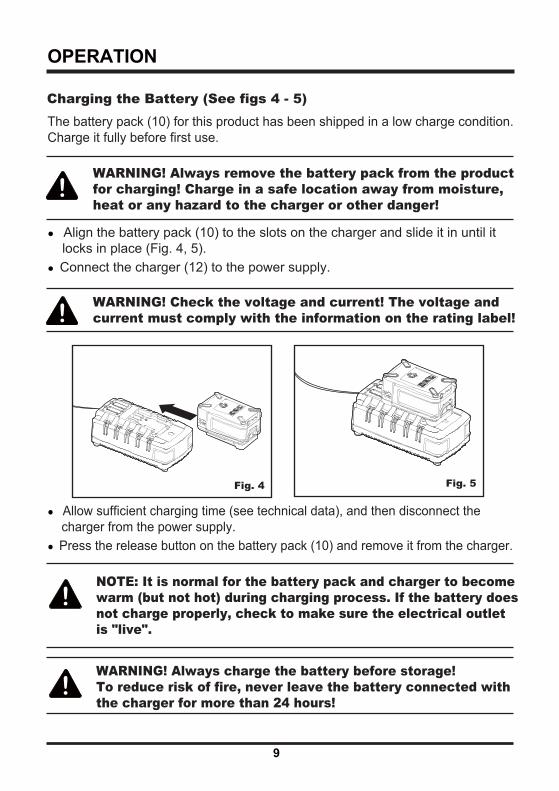
Charging the Battery (See figs 4 - 5)
The battery pack (10) for this product has been shipped in a low charge condition.
Charge it fully before first use.
9
OPERATION
WARNING! Always remove the battery pack from the product
for charging! Charge in a safe location away from moisture,
heat or any hazard to the charger or other danger!
NOTE: It is normal for the battery pack and charger to become
warm (but not hot) during charging process. If the battery does
not charge properly, check to make sure the electrical outlet
is "live".
WARNING! Always charge the battery before storage!
To reduce risk of fire, never leave the battery connected with
the charger for more than 24 hours!
WARNING! Check the voltage and current! The voltage and
current must comply with the information on the rating label!
Align the battery pack (10) to the slots on the charger and slide it in until it
locks in place (Fig. 4, 5).
Connect the charger (12) to the power supply.
Allow sufficient charging time (see technical data), and then disconnect the
charger from the power supply.
Press the release button on the battery pack (10) and remove it from the charger.
Fig. 4 Fig. 5
10
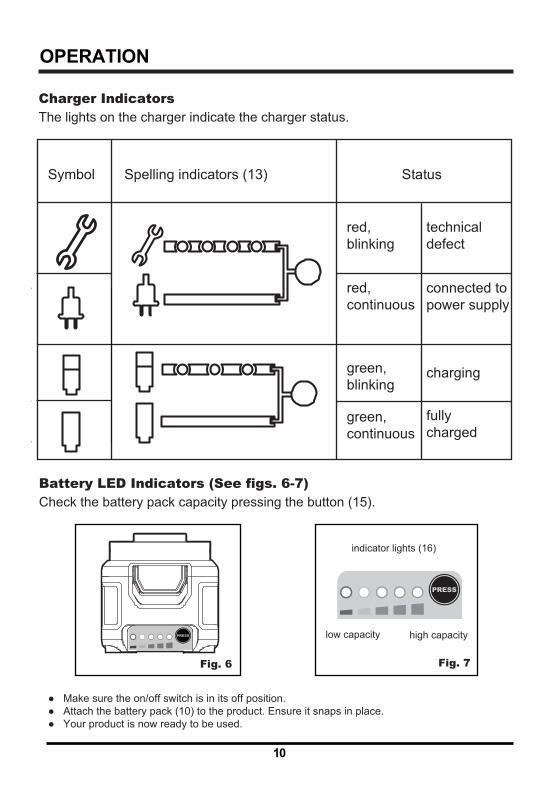
Charger Indicators
The lights on the charger indicate the charger status.
OPERATION
Symbol Spelling indicators (13) Status
red,
blinking
technical
defect
red,
continuous
connected to
power supply
green,
blinkingcharging
green,
continuous
fully
charged
Battery LED Indicators (See figs. 6-7)
Check the battery pack capacity pressing the button (15).
Fig. 6 Fig. 7
indicator lights (16)
low capacity high capacity
11
OPERATION
Intended use
This hedge trimmer CMHT2218B is with rated battery voltage of 18V. charger model no.
CMHT2218B designates the respective charger with a charging voltage of 120V ~ 60Hz .
The product is intended for trimming hedges, bushes and shrubs. Observe the technical data for the
maximum cutting capacity. Do not cut branches exceeding the stated maximum capacity.
This product is intended for private domestic use only, not for any commercial trade use. It must not
be used for any purposes other than those described.
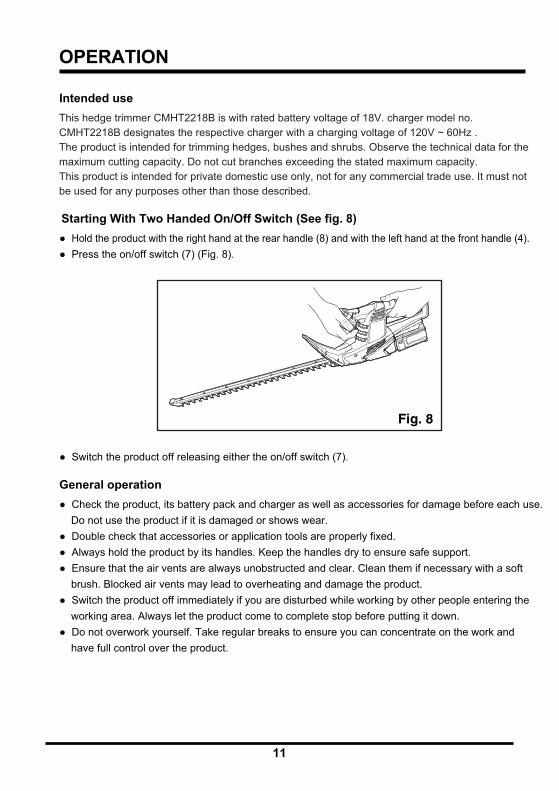
Starting With Two Handed On/Off Switch (See fig. 8)
Hold the product with the right hand at the rear handle (8) and with the left hand at the front handle (4).
Press the on/off switch (7) (Fig. 8).
General operation
Do not use the product if it is damaged or shows wear.
brush. Blocked air vents may lead to overheating and damage the product.
working area. Always let the product come to complete stop before putting it down.
have full control over the product.
Switch the product off releasing either the on/off switch (7).
Fig. 8
OPERATION
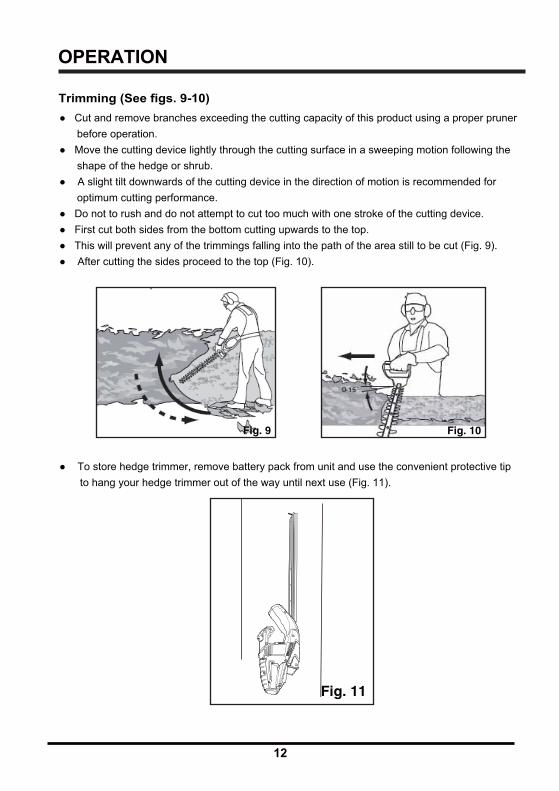
Trimming (See figs. 9-10)
before operation.
shape of the hedge or shrub.
optimum cutting performance.
to hang your hedge trimmer out of the way until next use (Fig. 11).
12
Fig. 11
Fig. 9 Fig. 10

13
WARRANTY
We take pride in producing a high quality, durable product. This Lawnmaster® product carries a
limited two (2) year warranty against defects in workmanship and materials from date of purchase
under normal household use. If product is to be used for commercial, industrial or rental use, a 30
day limited warranty will apply. Batteries carry a one-year warranty against defects in workmanship
and materials. Batteries must be charged in accordance with the operator's manuals directions and
regulations in order to be valid. Warranty does not apply to defects due to direct or indirect abuse,
negligence, misuse, accidents, repairs or alterations and lack of maintenance. Please keep your
receipt/packing list as proof of purchase. This warranty gives you specific legal rights, and you
may have other rights, which vary from state to state. For product service call Customer Service at
(866) 384-8432.
Items not covered by warranty :
1. Any part that has become inoperative due to misuse, commercial use, abuse, neglect, accident,
5. Normal deterioration of the exterior finish due to use or exposure.
Transportation Charges : Transportation charges for the movement of any power equipment unit or
attachment are the responsibility of the purchaser. It is the purchaser’s responsibility to pay
transportation charges for any part submitted for replacement under this warranty unless such
return is requested in writing by LawnMaster.

14
EXPLODED VIEW
33

15
ITEM NO. PART NO. DESCRIPTION
PART LIST
QTY
1
2
3
4
5
6
7
8
9
10
11
12
13
14
15
16
17
18
19
20
21
22
23
24
25
26
27
28
29
30
31
32
33
1
1
1
1
1
1
1
2
1
1
2
1
1
1
2
1
1
1
1
1
1
1
2
13
1
1
1
1
2
1
2
1
1
TGDQ24.10.00
GH70DC.00.02
TODXL1.A4.UL
WODQ10.04.16
BOD1YZ.15.19
GH13EP.00.04
TMDC50.01.11
GH01EP.00.07
GH13EP.00.07
GH80DC.00.01
TOTHYY.08.07
GH85DC.10.01
GH80DC.00.02
TMDC50.01.20
BOD1YZ.04.36
GH85DC.00.01
GH85DC.30.10
BOA4ZZ.05.24
GH01EP.10.13
GH01EP.10.16
GH70DC.00.03
BOB2FQ.05.1X
GH01EP.10.01
BOA2SP.39.16
GH80DC.00.03
GH85DC.20.01
BOD1YZ.25.12
TMDC50.01.12
BOF101.30.08
TGDQ30.11.00
BOC1YX.03.NS
FG6401.01.00
Rear handle
Connected Assembly
Inner cable
Switch
Pin
Switch Plate
Motor
Switch washer
Inner cable clamp
Front handle
Spring
Left housing assm.
Left decorating cover
Support
Pin
Scabbard
Blades
Bolt
Frilttion Reduction Pad
Bearing Sleave
Bearing Sleave
Washer
Nut
Screw
Right decorating cover
Right housing assm.
Pin
Gear
Screw
PCB
Washer
Battery Assm.
Tip Protector

NOTES
16