18499447 youth football drills
DESCRIPTION
Youth Football drillsTRANSCRIPT
ALL Drills (sorted alphabetically by name)
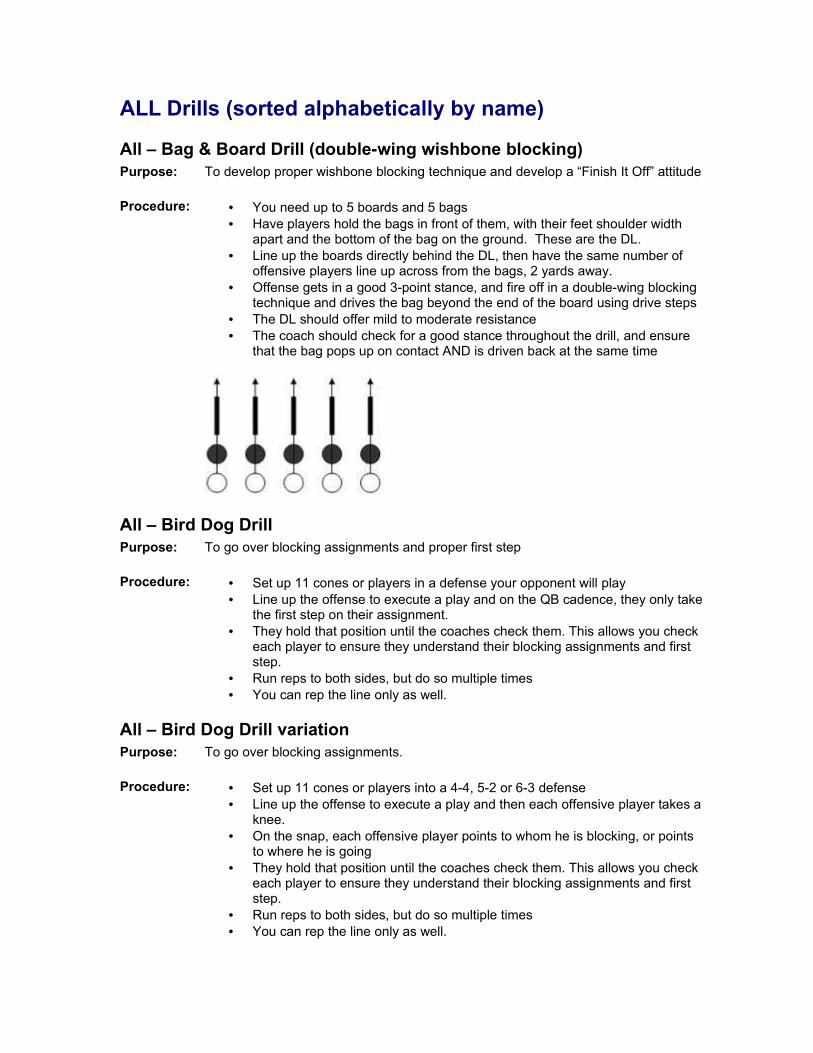
All – Bag & Board Drill (double-wing wishbone blocking)Purpose: To develop proper wishbone blocking technique and develop a “Finish It Off” attitude Procedure: • You need up to 5 boards and 5 bags
• Have players hold the bags in front of them, with their feet shoulder width apart and the bottom of the bag on the ground. These are the DL.
• Line up the boards directly behind the DL, then have the same number of offensive players line up across from the bags, 2 yards away.
• Offense gets in a good 3-point stance, and fire off in a double-wing blocking technique and drives the bag beyond the end of the board using drive steps
• The DL should offer mild to moderate resistance• The coach should check for a good stance throughout the drill, and ensure
that the bag pops up on contact AND is driven back at the same time
All – Bird Dog DrillPurpose: To go over blocking assignments and proper first step Procedure: • Set up 11 cones or players in a defense your opponent will play
• Line up the offense to execute a play and on the QB cadence, they only take the first step on their assignment.
• They hold that position until the coaches check them. This allows you check each player to ensure they understand their blocking assignments and first step.
• Run reps to both sides, but do so multiple times• You can rep the line only as well.
All – Bird Dog Drill variationPurpose: To go over blocking assignments. Procedure: • Set up 11 cones or players into a 4-4, 5-2 or 6-3 defense
• Line up the offense to execute a play and then each offensive player takes a knee.
• On the snap, each offensive player points to whom he is blocking, or points to where he is going
• They hold that position until the coaches check them. This allows you check each player to ensure they understand their blocking assignments and first step.
• Run reps to both sides, but do so multiple times• You can rep the line only as well.
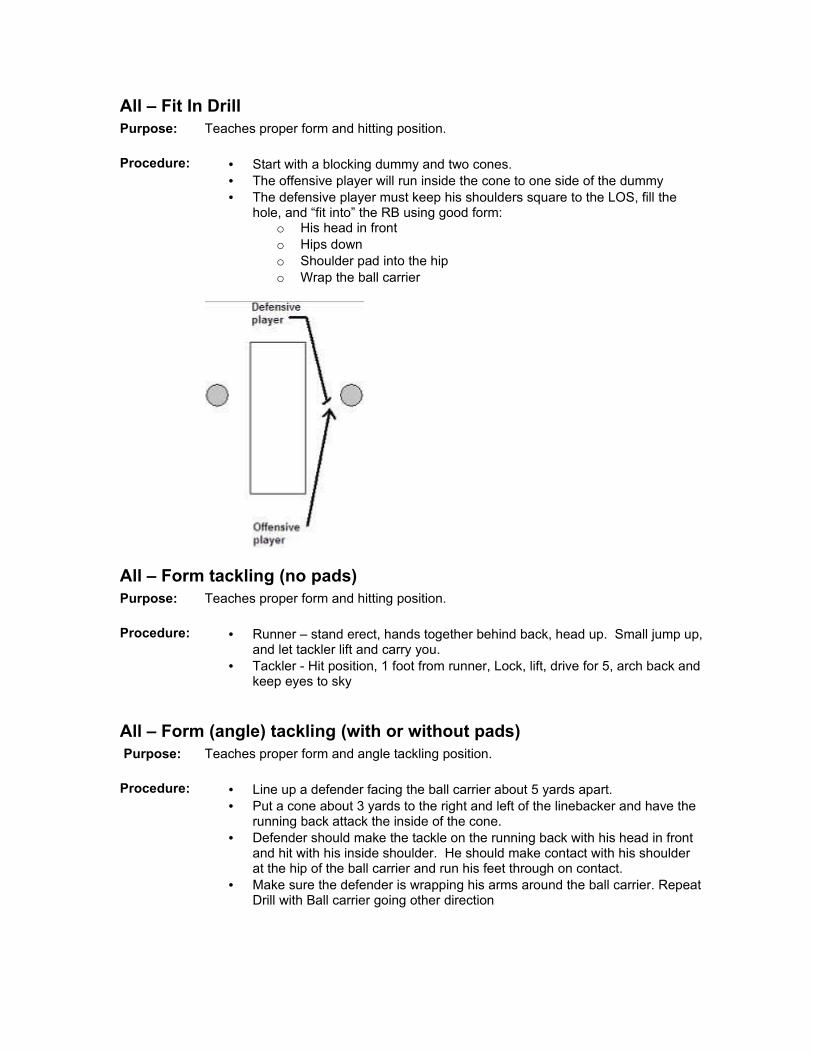
All – Fit In DrillPurpose: Teaches proper form and hitting position. Procedure: • Start with a blocking dummy and two cones.
• The offensive player will run inside the cone to one side of the dummy• The defensive player must keep his shoulders square to the LOS, fill the
hole, and “fit into” the RB using good form:o His head in fronto Hips downo Shoulder pad into the hipo Wrap the ball carrier
All – Form tackling (no pads)Purpose: Teaches proper form and hitting position. Procedure: • Runner – stand erect, hands together behind back, head up. Small jump up,
and let tackler lift and carry you.• Tackler - Hit position, 1 foot from runner, Lock, lift, drive for 5, arch back and
keep eyes to sky
All – Form (angle) tackling (with or without pads) Purpose: Teaches proper form and angle tackling position. Procedure: • Line up a defender facing the ball carrier about 5 yards apart.
• Put a cone about 3 yards to the right and left of the linebacker and have the running back attack the inside of the cone.
• Defender should make the tackle on the running back with his head in front and hit with his inside shoulder. He should make contact with his shoulder at the hip of the ball carrier and run his feet through on contact.
• Make sure the defender is wrapping his arms around the ball carrier. Repeat Drill with Ball carrier going other direction
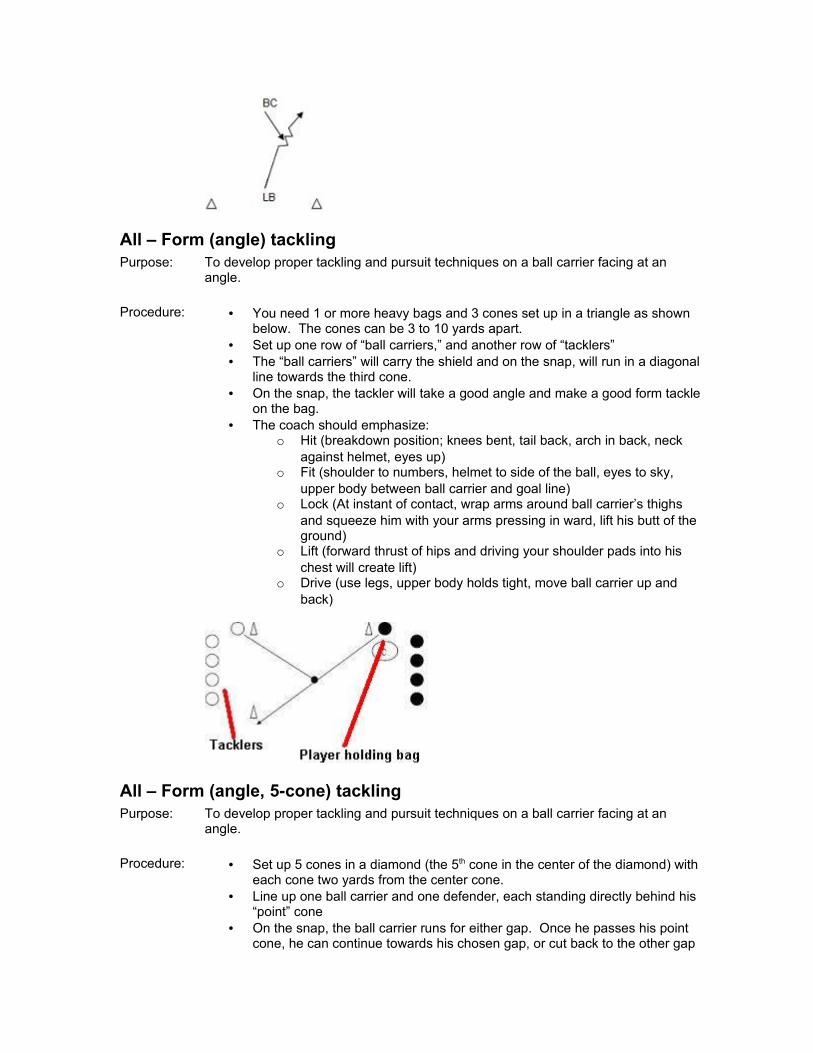
All – Form (angle) tacklingPurpose: To develop proper tackling and pursuit techniques on a ball carrier facing at an
angle. Procedure: • You need 1 or more heavy bags and 3 cones set up in a triangle as shown
below. The cones can be 3 to 10 yards apart.• Set up one row of “ball carriers,” and another row of “tacklers”• The “ball carriers” will carry the shield and on the snap, will run in a diagonal
line towards the third cone.• On the snap, the tackler will take a good angle and make a good form tackle
on the bag.• The coach should emphasize:
o Hit (breakdown position; knees bent, tail back, arch in back, neck against helmet, eyes up)
o Fit (shoulder to numbers, helmet to side of the ball, eyes to sky, upper body between ball carrier and goal line)
o Lock (At instant of contact, wrap arms around ball carrier’s thighs and squeeze him with your arms pressing in ward, lift his butt of the ground)
o Lift (forward thrust of hips and driving your shoulder pads into his chest will create lift)
o Drive (use legs, upper body holds tight, move ball carrier up and back)
All – Form (angle, 5-cone) tacklingPurpose: To develop proper tackling and pursuit techniques on a ball carrier facing at an
angle. Procedure: • Set up 5 cones in a diamond (the 5th cone in the center of the diamond) with
each cone two yards from the center cone.• Line up one ball carrier and one defender, each standing directly behind his
“point” cone• On the snap, the ball carrier runs for either gap. Once he passes his point
cone, he can continue towards his chosen gap, or cut back to the other gap
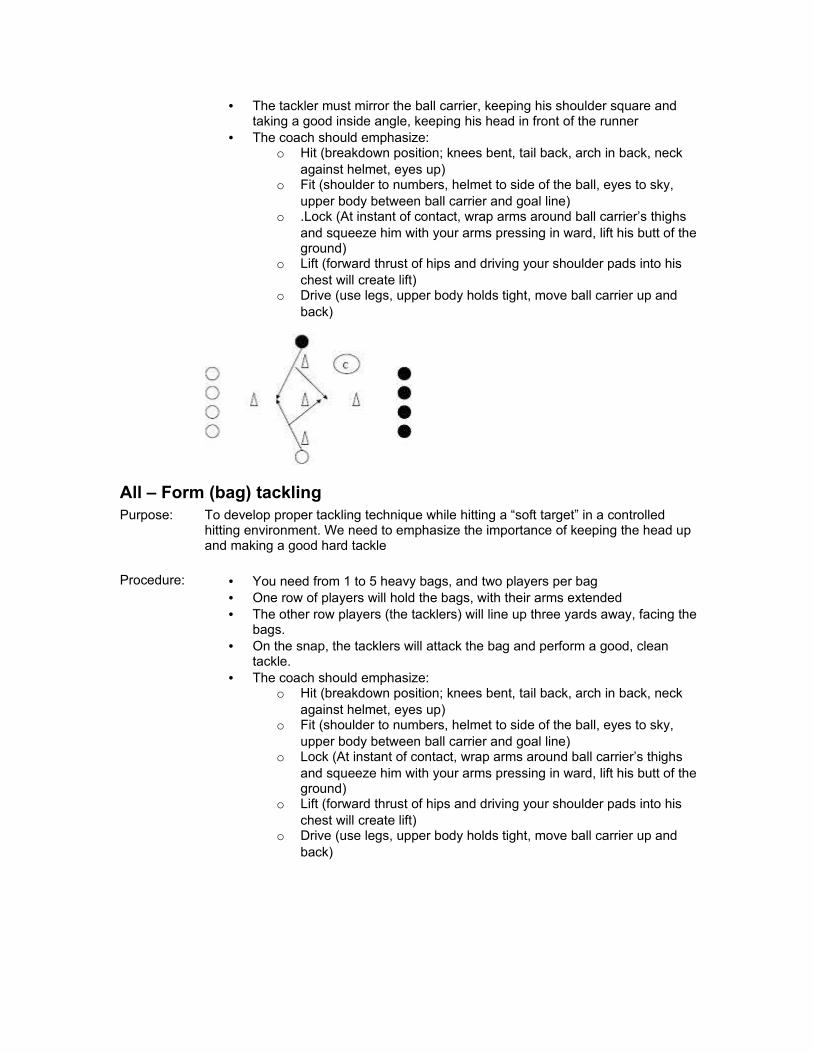
• The tackler must mirror the ball carrier, keeping his shoulder square and taking a good inside angle, keeping his head in front of the runner
• The coach should emphasize:o Hit (breakdown position; knees bent, tail back, arch in back, neck
against helmet, eyes up)o Fit (shoulder to numbers, helmet to side of the ball, eyes to sky,
upper body between ball carrier and goal line)o .Lock (At instant of contact, wrap arms around ball carrier’s thighs
and squeeze him with your arms pressing in ward, lift his butt of the ground)
o Lift (forward thrust of hips and driving your shoulder pads into his chest will create lift)
o Drive (use legs, upper body holds tight, move ball carrier up and back)
All – Form (bag) tacklingPurpose: To develop proper tackling technique while hitting a “soft target” in a controlled
hitting environment. We need to emphasize the importance of keeping the head up and making a good hard tackle
Procedure: • You need from 1 to 5 heavy bags, and two players per bag
• One row of players will hold the bags, with their arms extended• The other row players (the tacklers) will line up three yards away, facing the
bags.• On the snap, the tacklers will attack the bag and perform a good, clean
tackle.• The coach should emphasize:
o Hit (breakdown position; knees bent, tail back, arch in back, neck against helmet, eyes up)
o Fit (shoulder to numbers, helmet to side of the ball, eyes to sky, upper body between ball carrier and goal line)
o Lock (At instant of contact, wrap arms around ball carrier’s thighs and squeeze him with your arms pressing in ward, lift his butt of the ground)
o Lift (forward thrust of hips and driving your shoulder pads into his chest will create lift)
o Drive (use legs, upper body holds tight, move ball carrier up and back)

All – Form (butt, bench and fury) tacklingPurpose: To develop proper tackling and pursuit techniques on a ball carrier facing at an
angle, and who has a blocker. Procedure: • Set up 4 cones in a diamond
• At one cone, set up an offensive blocker, with a ball carrier behind him• At the opposite cone, line up one defender, with the extra players behind
their cone• On the snap, the blocker attacks the defender. The defender should take on
the block, extend his arms (keep the blocker off your body!), and prepare to shed
• On the second whistle, the ball carrier runs directly towards one of the cones.
• At that point, the defender should shed the blocker in the opposite direction, and make the tackle
All – Form (lateral movement #1) tacklingPurpose: To develop quick and proper footwork, to stay balanced while avoiding obstacles
and proper tacking technique Procedure: • Set up at least three shields or heavy bags on the ground in a line, each
about 1.5 to 2 yards from the others• Line up one player as the defender at the end of the line, and a coach (or
another player) at the other end of the line with a bag• The defender can either face forward and “shuffle” over the bags on the
ground, or he can face the bags and “high step” over the bags on the ground• On the snap, the defender makes his way over each bag, gets in good
position, and tackles the bag at the end of the line.
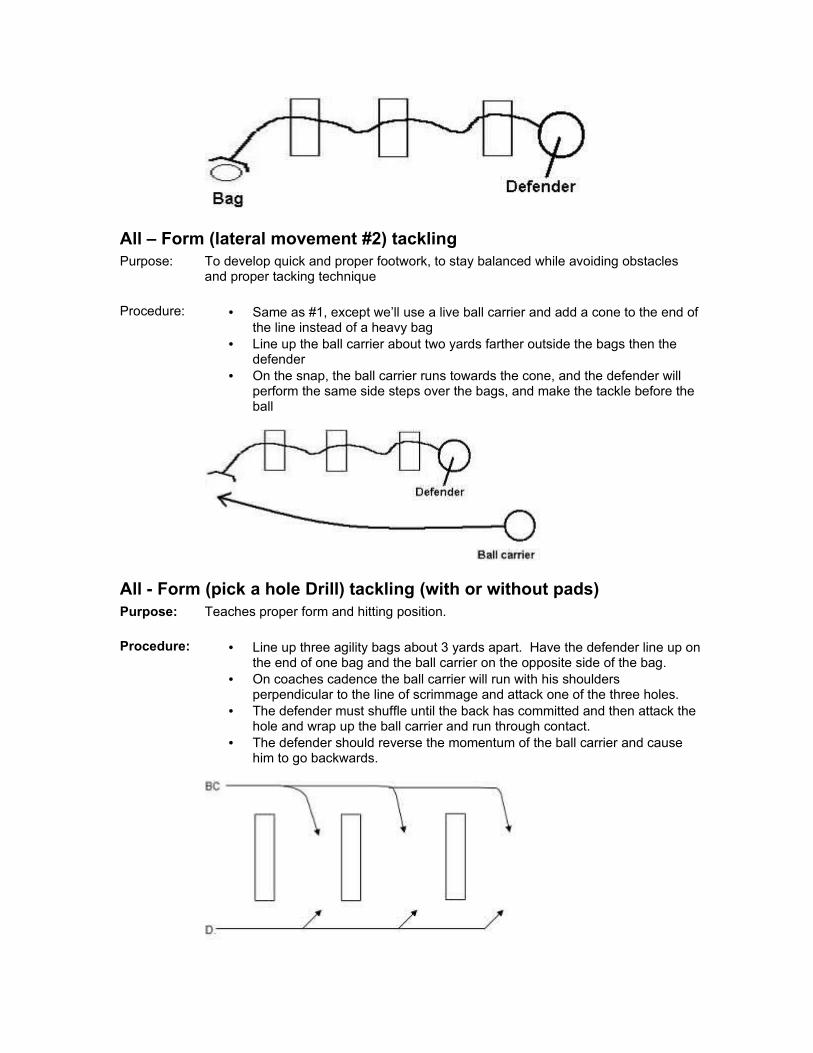
All – Form (lateral movement #2) tacklingPurpose: To develop quick and proper footwork, to stay balanced while avoiding obstacles
and proper tacking technique Procedure: • Same as #1, except we’ll use a live ball carrier and add a cone to the end of
the line instead of a heavy bag• Line up the ball carrier about two yards farther outside the bags then the
defender • On the snap, the ball carrier runs towards the cone, and the defender will
perform the same side steps over the bags, and make the tackle before the ball
All - Form (pick a hole Drill) tackling (with or without pads)Purpose: Teaches proper form and hitting position. Procedure: • Line up three agility bags about 3 yards apart. Have the defender line up on
the end of one bag and the ball carrier on the opposite side of the bag. • On coaches cadence the ball carrier will run with his shoulders
perpendicular to the line of scrimmage and attack one of the three holes. • The defender must shuffle until the back has committed and then attack the
hole and wrap up the ball carrier and run through contact. • The defender should reverse the momentum of the ball carrier and cause
him to go backwards.
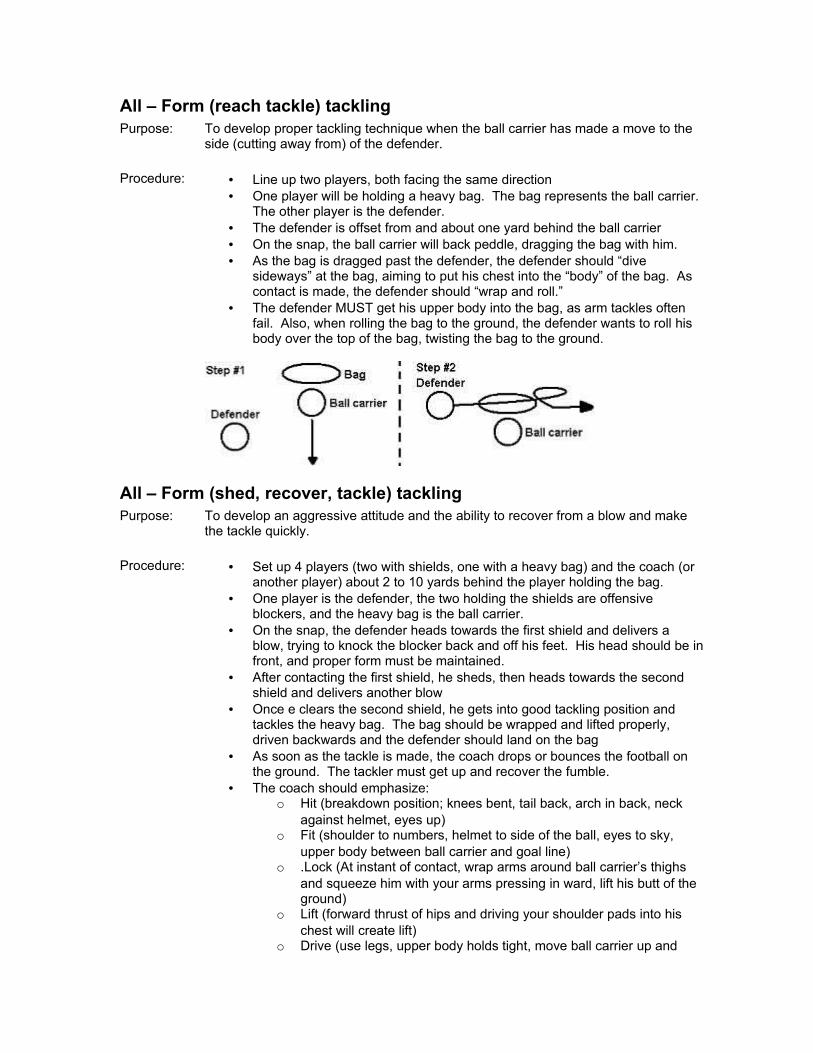
All – Form (reach tackle) tacklingPurpose: To develop proper tackling technique when the ball carrier has made a move to the
side (cutting away from) of the defender. Procedure: • Line up two players, both facing the same direction
• One player will be holding a heavy bag. The bag represents the ball carrier. The other player is the defender.
• The defender is offset from and about one yard behind the ball carrier• On the snap, the ball carrier will back peddle, dragging the bag with him.• As the bag is dragged past the defender, the defender should “dive
sideways” at the bag, aiming to put his chest into the “body” of the bag. As contact is made, the defender should “wrap and roll.”
• The defender MUST get his upper body into the bag, as arm tackles often fail. Also, when rolling the bag to the ground, the defender wants to roll his body over the top of the bag, twisting the bag to the ground.
All – Form (shed, recover, tackle) tacklingPurpose: To develop an aggressive attitude and the ability to recover from a blow and make
the tackle quickly. Procedure: • Set up 4 players (two with shields, one with a heavy bag) and the coach (or
another player) about 2 to 10 yards behind the player holding the bag. • One player is the defender, the two holding the shields are offensive
blockers, and the heavy bag is the ball carrier.• On the snap, the defender heads towards the first shield and delivers a
blow, trying to knock the blocker back and off his feet. His head should be in front, and proper form must be maintained.
• After contacting the first shield, he sheds, then heads towards the second shield and delivers another blow
• Once e clears the second shield, he gets into good tackling position and tackles the heavy bag. The bag should be wrapped and lifted properly, driven backwards and the defender should land on the bag
• As soon as the tackle is made, the coach drops or bounces the football on the ground. The tackler must get up and recover the fumble.
• The coach should emphasize:o Hit (breakdown position; knees bent, tail back, arch in back, neck
against helmet, eyes up)o Fit (shoulder to numbers, helmet to side of the ball, eyes to sky,
upper body between ball carrier and goal line)o .Lock (At instant of contact, wrap arms around ball carrier’s thighs
and squeeze him with your arms pressing in ward, lift his butt of the ground)
o Lift (forward thrust of hips and driving your shoulder pads into his chest will create lift)
o Drive (use legs, upper body holds tight, move ball carrier up and
back)o When recovering the fumble, the defender SHOULD NOT land
stomach or chest first on top of the ball. Rather, fall along side of the ball, cradle it with both hands and bring it into your midsection, wrapping your body around it. Make the official come to you to get the ball.
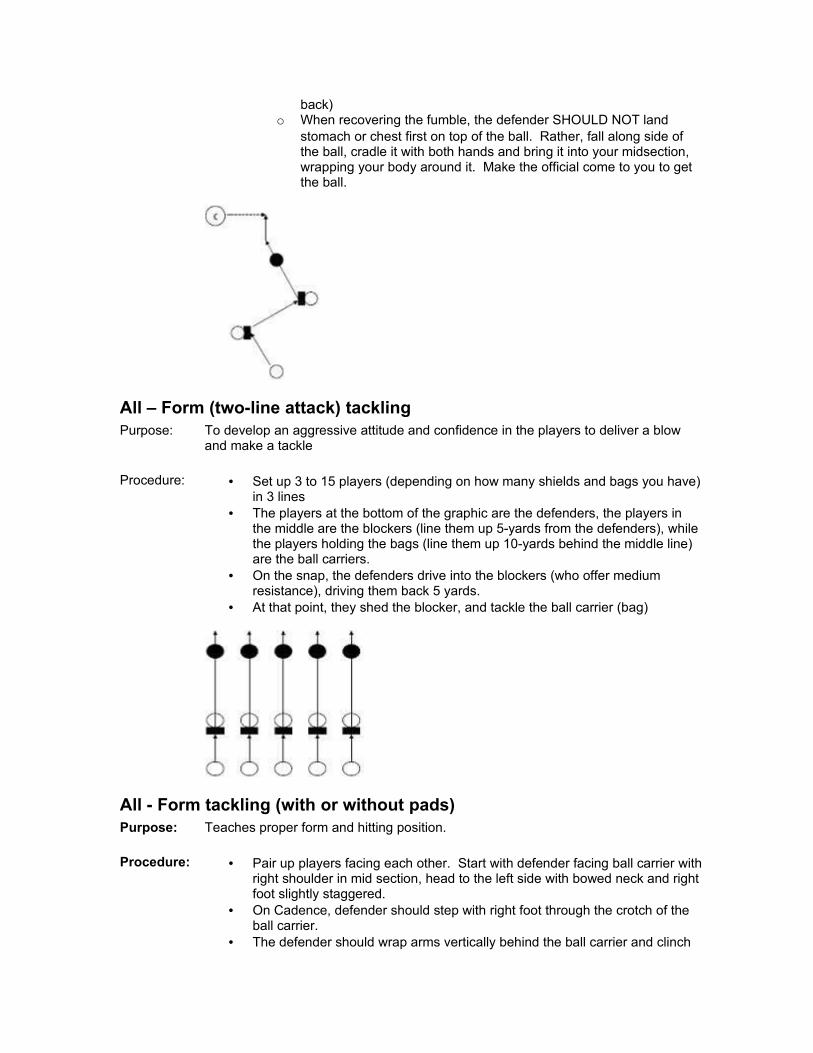
All – Form (two-line attack) tacklingPurpose: To develop an aggressive attitude and confidence in the players to deliver a blow
and make a tackle Procedure: • Set up 3 to 15 players (depending on how many shields and bags you have)
in 3 lines • The players at the bottom of the graphic are the defenders, the players in
the middle are the blockers (line them up 5-yards from the defenders), while the players holding the bags (line them up 10-yards behind the middle line) are the ball carriers.
• On the snap, the defenders drive into the blockers (who offer medium resistance), driving them back 5 yards.
• At that point, they shed the blocker, and tackle the ball carrier (bag)
All - Form tackling (with or without pads)Purpose: Teaches proper form and hitting position. Procedure: • Pair up players facing each other. Start with defender facing ball carrier with
right shoulder in mid section, head to the left side with bowed neck and right foot slightly staggered.
• On Cadence, defender should step with right foot through the crotch of the ball carrier.
• The defender should wrap arms vertically behind the ball carrier and clinch
wrists together at lower back. These are a form rep activity and should only be done at about half speed.
• Repeat with both shoulders
All - Form tackling (no pads) with shieldPurpose: Teaches proper form and hitting position. Procedure: • At least one player holding shield, backpedal upon contact, offering
moderate resistance• Tackler - Hit position, 1 feet from runner, Lock, lift, drive for 5, arch back and
keep eyes to sky
All - Form tackling (with pads)Purpose: Teaches proper form and hitting position. Procedure: • Runner – stand erect, hands together behind back, head up. Small jump up,
and let tackler lift and carry you.• Tackler - Hit position, 1 feet from runner, Lock, lift, drive for 5, arch back and
keep eyes to sky
All - Form tackling (with pads) with shieldPurpose: Teaches proper form and hitting position. Procedure: • At least one player holding shield, move forward into contact, offering
moderate resistance• Tackler - Hit position, 1 feet from runner, Lock, lift, drive for 5, arch back and
keep eyes to sky
All - Form tackling (with pads) from backpedal with shieldPurpose: Teaches proper form and hitting position. Procedure: • At least one player holding shield, move forward on snap
• Tackler starts by backpedaling 5 yards, then reverse direction, and make tackle
All - Form tackling (with pads) from up/down with shieldPurpose: Teaches proper form and hitting position. Procedure: • Same as above, but tackler will backpedal 5 yards, do one “hit it,” pop up,
then move forward and make tackle
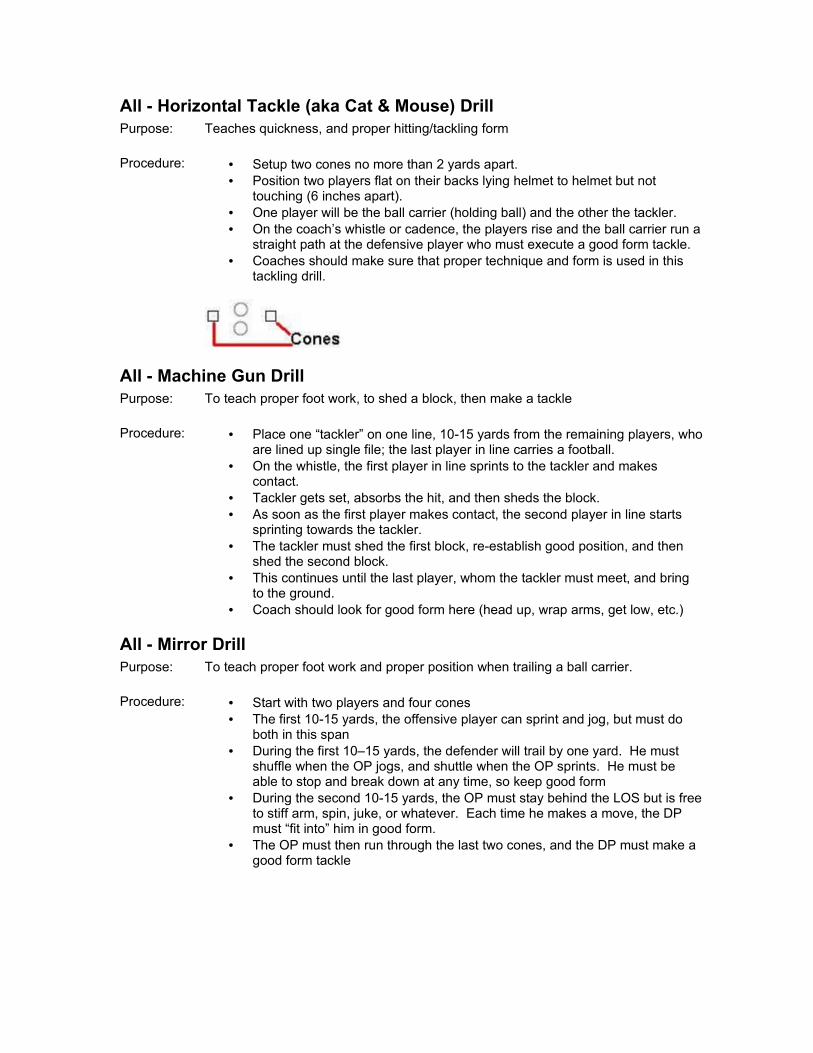
All - Horizontal Tackle (aka Cat & Mouse) DrillPurpose: Teaches quickness, and proper hitting/tackling form Procedure: • Setup two cones no more than 2 yards apart.
• Position two players flat on their backs lying helmet to helmet but not touching (6 inches apart).
• One player will be the ball carrier (holding ball) and the other the tackler. • On the coach’s whistle or cadence, the players rise and the ball carrier run a
straight path at the defensive player who must execute a good form tackle.• Coaches should make sure that proper technique and form is used in this
tackling drill.
All - Machine Gun DrillPurpose: To teach proper foot work, to shed a block, then make a tackle Procedure: • Place one “tackler” on one line, 10-15 yards from the remaining players, who
are lined up single file; the last player in line carries a football. • On the whistle, the first player in line sprints to the tackler and makes
contact. • Tackler gets set, absorbs the hit, and then sheds the block. • As soon as the first player makes contact, the second player in line starts
sprinting towards the tackler. • The tackler must shed the first block, re-establish good position, and then
shed the second block. • This continues until the last player, whom the tackler must meet, and bring
to the ground. • Coach should look for good form here (head up, wrap arms, get low, etc.)
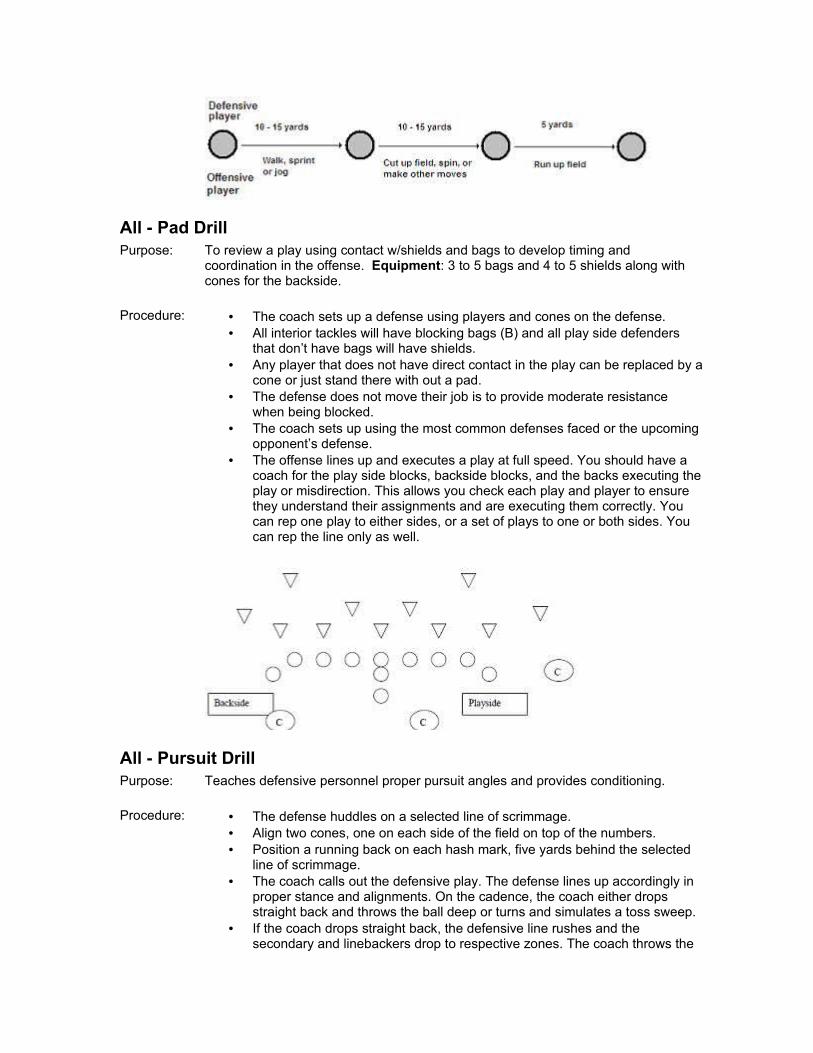
All - Mirror DrillPurpose: To teach proper foot work and proper position when trailing a ball carrier. Procedure: • Start with two players and four cones
• The first 10-15 yards, the offensive player can sprint and jog, but must do both in this span
• During the first 10–15 yards, the defender will trail by one yard. He must shuffle when the OP jogs, and shuttle when the OP sprints. He must be able to stop and break down at any time, so keep good form
• During the second 10-15 yards, the OP must stay behind the LOS but is free to stiff arm, spin, juke, or whatever. Each time he makes a move, the DP must “fit into” him in good form.
• The OP must then run through the last two cones, and the DP must make a good form tackle
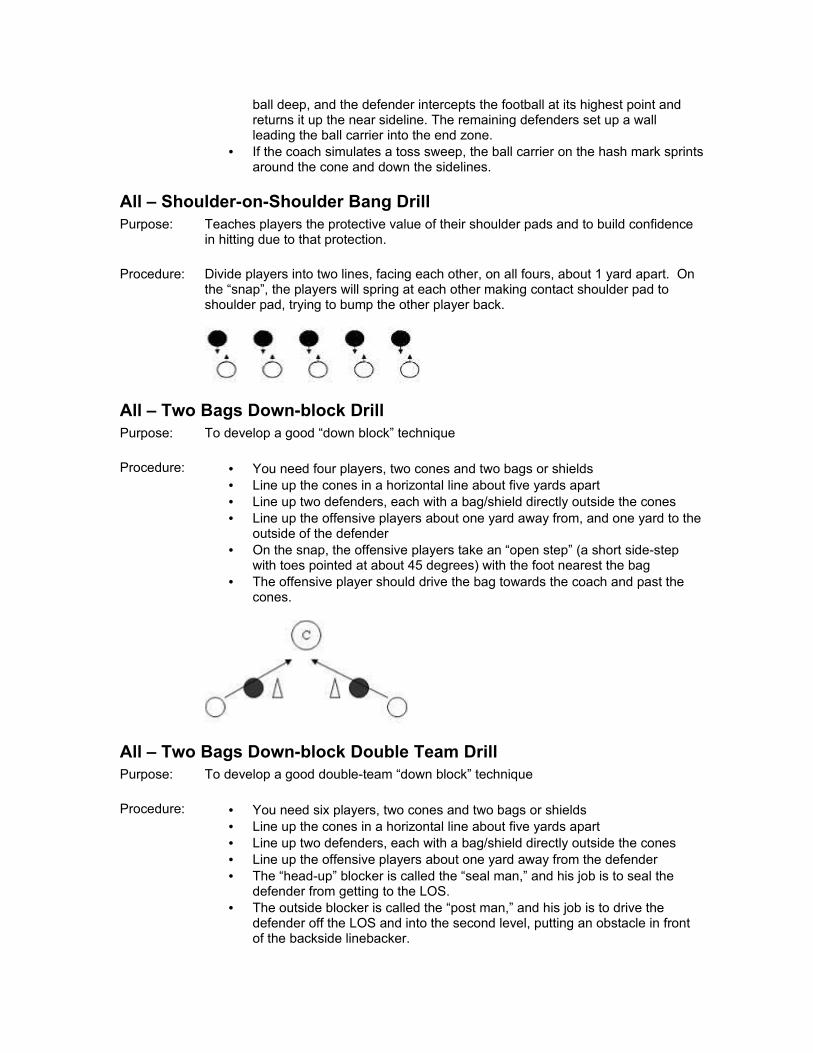
All - Pad DrillPurpose: To review a play using contact w/shields and bags to develop timing and
coordination in the offense. Equipment: 3 to 5 bags and 4 to 5 shields along with cones for the backside.
Procedure: • The coach sets up a defense using players and cones on the defense.
• All interior tackles will have blocking bags (B) and all play side defenders that don’t have bags will have shields.
• Any player that does not have direct contact in the play can be replaced by a cone or just stand there with out a pad.
• The defense does not move their job is to provide moderate resistance when being blocked.
• The coach sets up using the most common defenses faced or the upcoming opponent’s defense.
• The offense lines up and executes a play at full speed. You should have a coach for the play side blocks, backside blocks, and the backs executing the play or misdirection. This allows you check each play and player to ensure they understand their assignments and are executing them correctly. You can rep one play to either sides, or a set of plays to one or both sides. You can rep the line only as well.
All - Pursuit DrillPurpose: Teaches defensive personnel proper pursuit angles and provides conditioning. Procedure: • The defense huddles on a selected line of scrimmage.
• Align two cones, one on each side of the field on top of the numbers. • Position a running back on each hash mark, five yards behind the selected
line of scrimmage. • The coach calls out the defensive play. The defense lines up accordingly in
proper stance and alignments. On the cadence, the coach either drops straight back and throws the ball deep or turns and simulates a toss sweep.
• If the coach drops straight back, the defensive line rushes and the secondary and linebackers drop to respective zones. The coach throws the
ball deep, and the defender intercepts the football at its highest point and returns it up the near sideline. The remaining defenders set up a wall leading the ball carrier into the end zone.
• If the coach simulates a toss sweep, the ball carrier on the hash mark sprints around the cone and down the sidelines.
All – Shoulder-on-Shoulder Bang DrillPurpose: Teaches players the protective value of their shoulder pads and to build confidence
in hitting due to that protection. Procedure: Divide players into two lines, facing each other, on all fours, about 1 yard apart. On
the “snap”, the players will spring at each other making contact shoulder pad to shoulder pad, trying to bump the other player back.
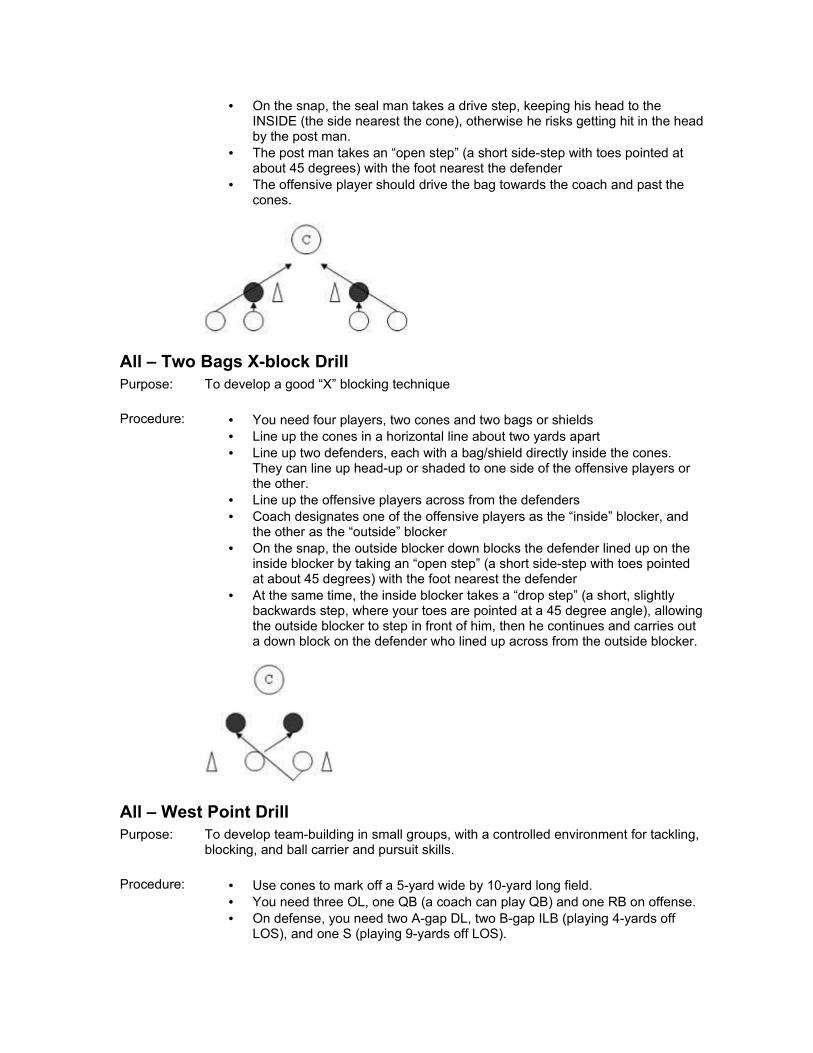
All – Two Bags Down-block DrillPurpose: To develop a good “down block” technique Procedure: • You need four players, two cones and two bags or shields
• Line up the cones in a horizontal line about five yards apart• Line up two defenders, each with a bag/shield directly outside the cones• Line up the offensive players about one yard away from, and one yard to the
outside of the defender• On the snap, the offensive players take an “open step” (a short side-step
with toes pointed at about 45 degrees) with the foot nearest the bag• The offensive player should drive the bag towards the coach and past the
cones.
All – Two Bags Down-block Double Team DrillPurpose: To develop a good double-team “down block” technique Procedure: • You need six players, two cones and two bags or shields
• Line up the cones in a horizontal line about five yards apart• Line up two defenders, each with a bag/shield directly outside the cones• Line up the offensive players about one yard away from the defender• The “head-up” blocker is called the “seal man,” and his job is to seal the
defender from getting to the LOS.• The outside blocker is called the “post man,” and his job is to drive the
defender off the LOS and into the second level, putting an obstacle in front of the backside linebacker.
• On the snap, the seal man takes a drive step, keeping his head to the INSIDE (the side nearest the cone), otherwise he risks getting hit in the head by the post man.
• The post man takes an “open step” (a short side-step with toes pointed at about 45 degrees) with the foot nearest the defender
• The offensive player should drive the bag towards the coach and past the cones.
All – Two Bags X-block DrillPurpose: To develop a good “X” blocking technique Procedure: • You need four players, two cones and two bags or shields
• Line up the cones in a horizontal line about two yards apart• Line up two defenders, each with a bag/shield directly inside the cones.
They can line up head-up or shaded to one side of the offensive players or the other.
• Line up the offensive players across from the defenders• Coach designates one of the offensive players as the “inside” blocker, and
the other as the “outside” blocker• On the snap, the outside blocker down blocks the defender lined up on the
inside blocker by taking an “open step” (a short side-step with toes pointed at about 45 degrees) with the foot nearest the defender
• At the same time, the inside blocker takes a “drop step” (a short, slightly backwards step, where your toes are pointed at a 45 degree angle), allowing the outside blocker to step in front of him, then he continues and carries out a down block on the defender who lined up across from the outside blocker.
All – West Point DrillPurpose: To develop team-building in small groups, with a controlled environment for tackling,
blocking, and ball carrier and pursuit skills. Procedure: • Use cones to mark off a 5-yard wide by 10-yard long field.
• You need three OL, one QB (a coach can play QB) and one RB on offense. • On defense, you need two A-gap DL, two B-gap ILB (playing 4-yards off
LOS), and one S (playing 9-yards off LOS).
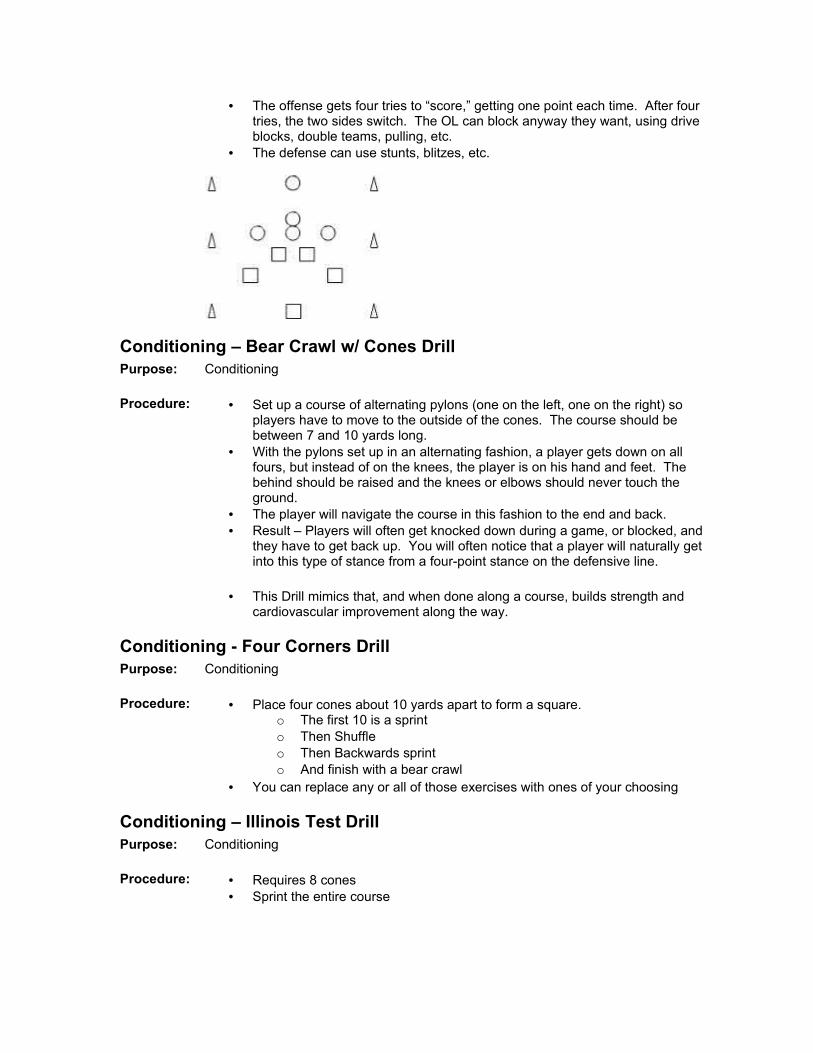
• The offense gets four tries to “score,” getting one point each time. After four tries, the two sides switch. The OL can block anyway they want, using drive blocks, double teams, pulling, etc.
• The defense can use stunts, blitzes, etc.
Conditioning – Bear Crawl w/ Cones DrillPurpose: Conditioning Procedure: • Set up a course of alternating pylons (one on the left, one on the right) so
players have to move to the outside of the cones. The course should be between 7 and 10 yards long.
• With the pylons set up in an alternating fashion, a player gets down on all fours, but instead of on the knees, the player is on his hand and feet. The behind should be raised and the knees or elbows should never touch the ground.
• The player will navigate the course in this fashion to the end and back.• Result – Players will often get knocked down during a game, or blocked, and
they have to get back up. You will often notice that a player will naturally get into this type of stance from a four-point stance on the defensive line.
• This Drill mimics that, and when done along a course, builds strength and cardiovascular improvement along the way.
Conditioning - Four Corners DrillPurpose: Conditioning Procedure: • Place four cones about 10 yards apart to form a square.
o The first 10 is a sprinto Then Shuffleo Then Backwards sprinto And finish with a bear crawl
• You can replace any or all of those exercises with ones of your choosing
Conditioning – Illinois Test DrillPurpose: Conditioning Procedure: • Requires 8 cones
• Sprint the entire course
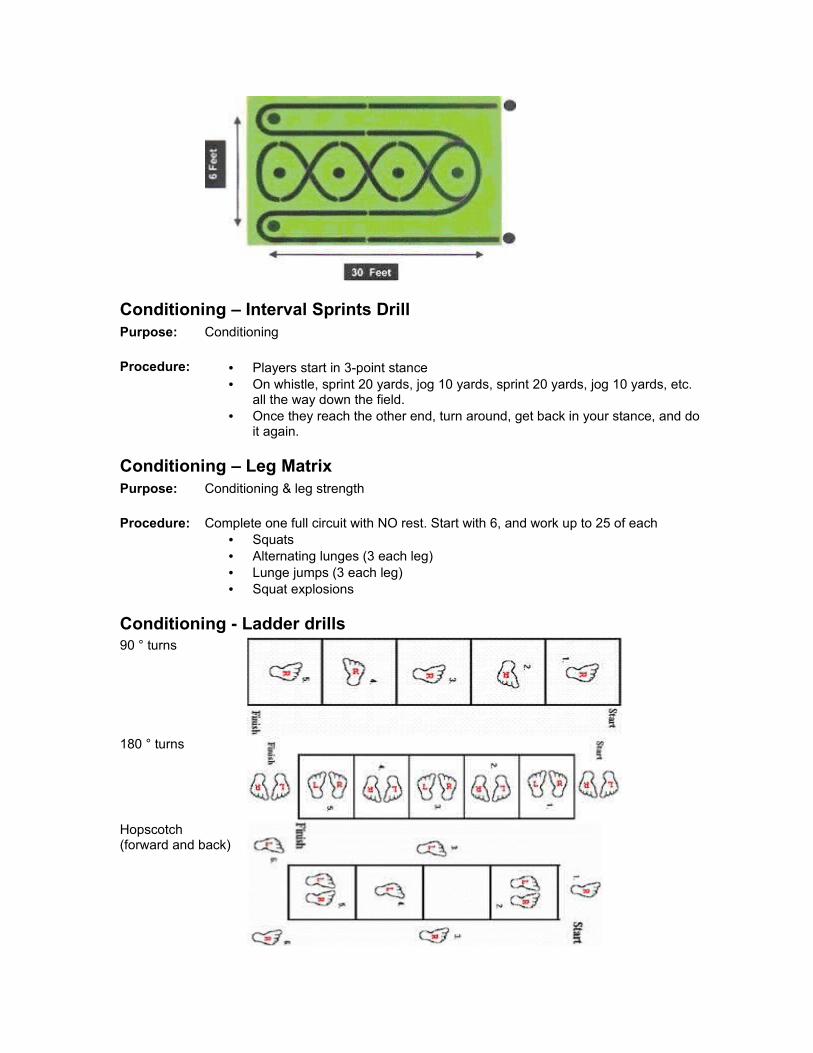
Conditioning – Interval Sprints DrillPurpose: Conditioning Procedure: • Players start in 3-point stance
• On whistle, sprint 20 yards, jog 10 yards, sprint 20 yards, jog 10 yards, etc. all the way down the field.
• Once they reach the other end, turn around, get back in your stance, and do it again.
Conditioning – Leg MatrixPurpose: Conditioning & leg strength Procedure: Complete one full circuit with NO rest. Start with 6, and work up to 25 of each
• Squats• Alternating lunges (3 each leg)• Lunge jumps (3 each leg)• Squat explosions
Conditioning - Ladder drills90 ° turns
180 ° turns
Hopscotch (forward and back)
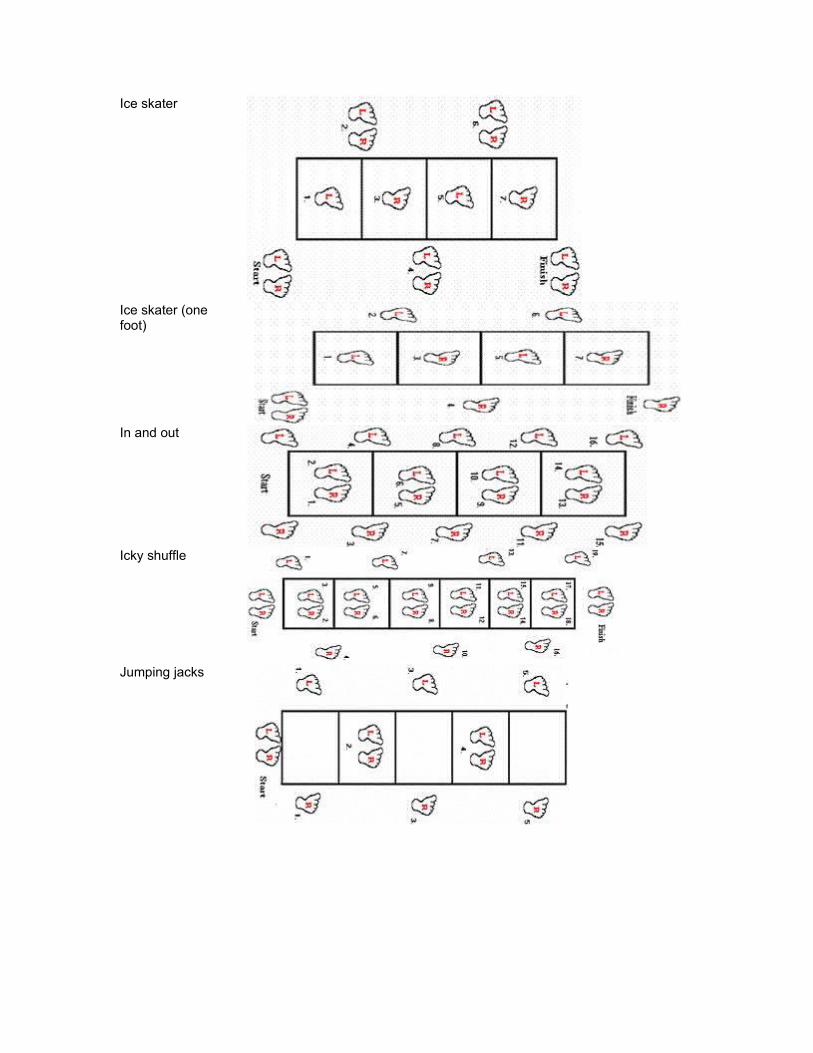
Ice skater
Ice skater (one foot)
In and out
Icky shuffle
Jumping jacks
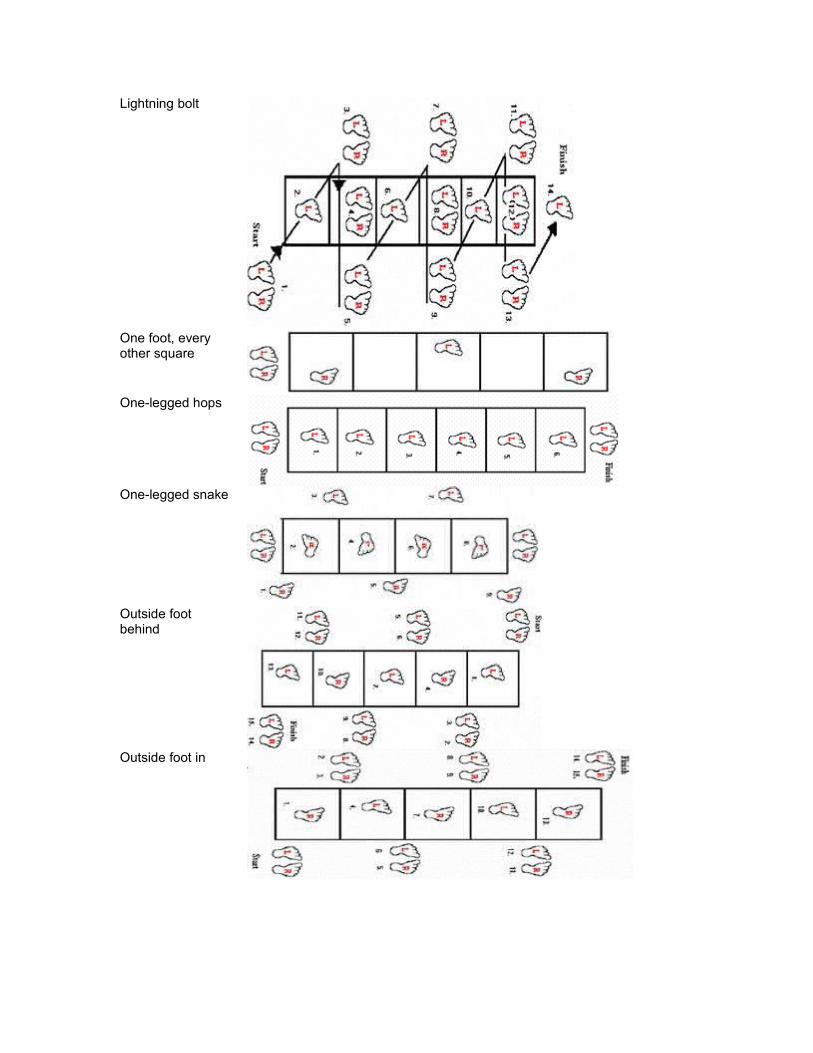
Lightning bolt
One foot, every other square
One-legged hops
One-legged snake
Outside foot behind
Outside foot in
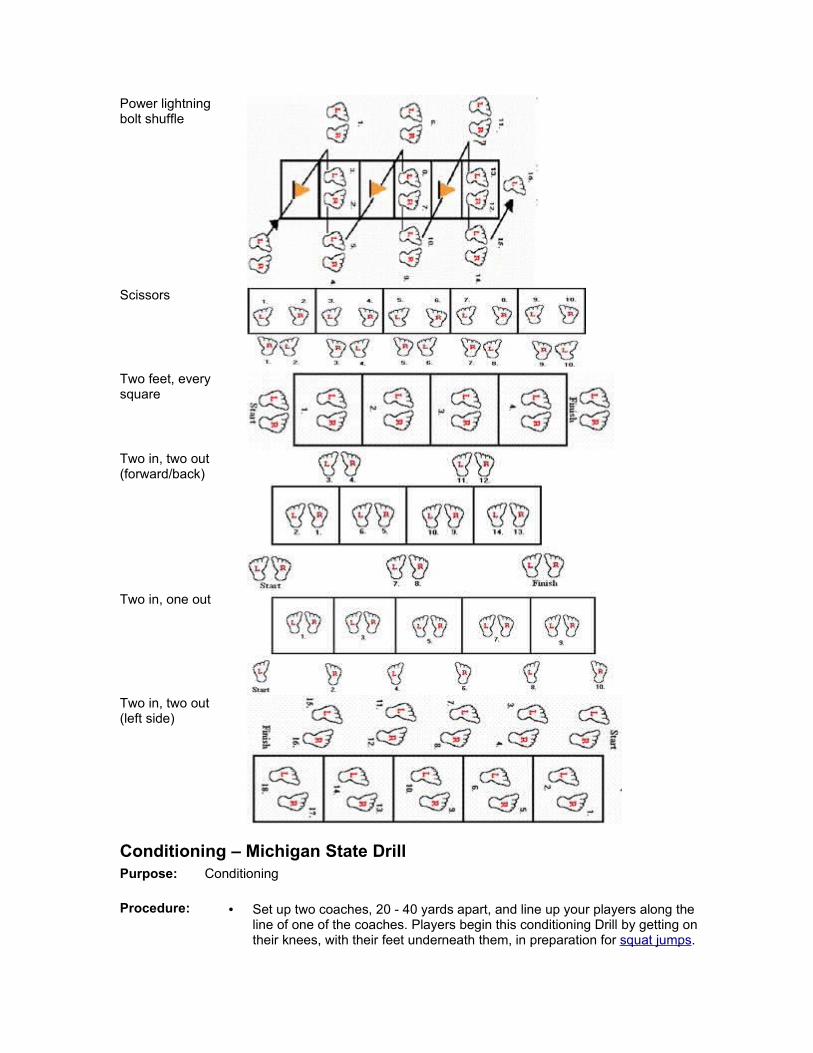
Power lightning bolt shuffle
Scissors
Two feet, every square
Two in, two out (forward/back)
Two in, one out
Two in, two out (left side)
Conditioning – Michigan State DrillPurpose: Conditioning Procedure: • Set up two coaches, 20 - 40 yards apart, and line up your players along the
line of one of the coaches. Players begin this conditioning Drill by getting on their knees, with their feet underneath them, in preparation for squat jumps.
The Drill involves doing a number of different motions, following by a sprint to the other coach.
• Executiono On the coach's signal, the players are to rock back onto their heels
and do 10 squat jumps. o Immediately following their squat jumps, the players sprint to the
other coach where they will do 10 sit-ups upon crossing the line he represents.
o After their 10 sit-ups, the players then sprint back to the other coach for 10 up-downs.
o Sprint followed by 10 push-ups.o Sprint followed by 10 mountain climbers. o Sprint followed by 10 heel touches. o Sprint followed by 10 jumping jacks o Sprint followed by 10 push-ups
o Sprint one 20 to 40-yard dash to finish the Drill
Conditioning - PT DrillPurpose: Conditioning Procedure: • Break the team up into four groups
• Have one group with a coach at each corner of the football field • On the whistle, two groups diagonal from one another will begin doing push-
ups, while the other two groups sprint around the field • Once each of the sprint groups arrive back to their original corner, they
begin doing push-ups while the other two groups runo That’s one rep.
• For subsequent reps, do crunches/sit-ups, mountain climbers, lower back stabilizers, squat jumps, etc. instead of pushups.
Conditioning – Running DrillsPurpose: Conditioning Procedure: • Wind sprints
• 20 yard footwork Drillso Carioca 20 yards, then sprint backo Shuffle 20 yards, then sprint backo Etc.
• 10 yard drop and goo Sprint 10 yards, do a “hit it”o On the whistle, pop up, sprint another 10 yards, do another “hit it”o Etc.
Conditioning – Speed Test DrillsPurpose: Conditioning, speed and agility Procedure: Set up five cones (ten if you have them) one on the LOS, and at 5-yard intervals off
the LOS (a cone at the 5-yard mark, the 10-yard mark, etc.). Each player will
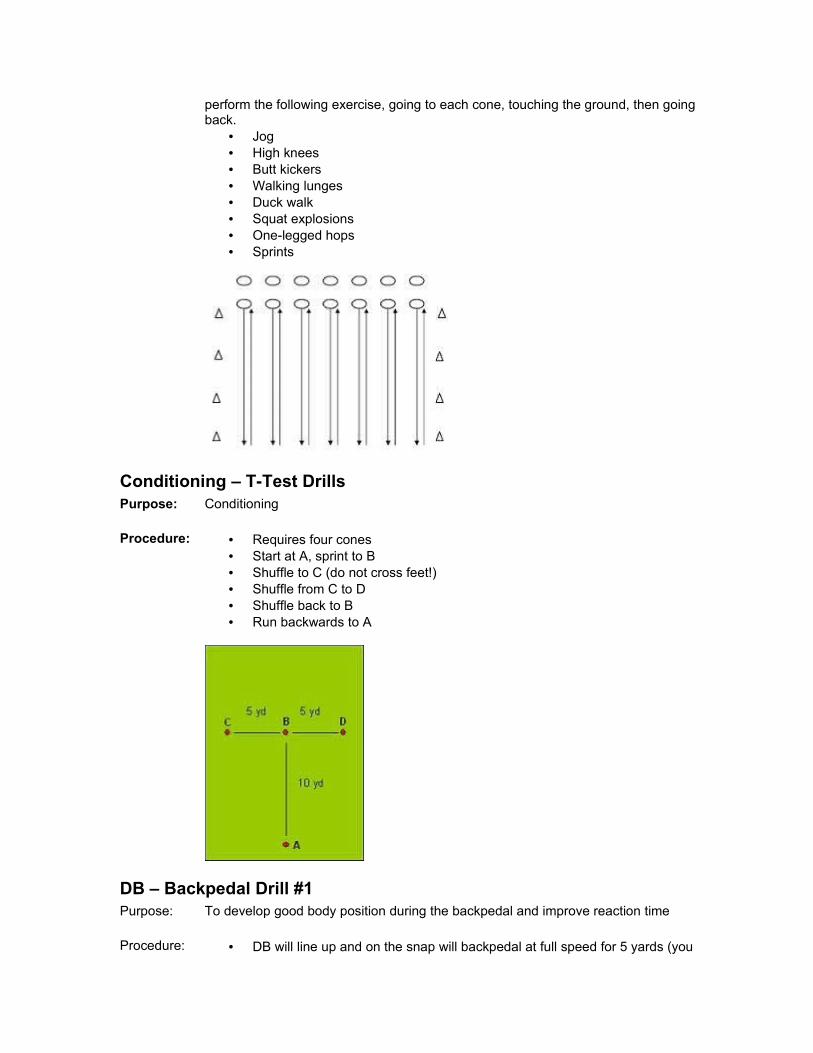
perform the following exercise, going to each cone, touching the ground, then going back.
• Jog• High knees• Butt kickers• Walking lunges• Duck walk• Squat explosions• One-legged hops• Sprints
Conditioning – T-Test DrillsPurpose: Conditioning Procedure: • Requires four cones
• Start at A, sprint to B• Shuffle to C (do not cross feet!)• Shuffle from C to D• Shuffle back to B• Run backwards to A
DB – Backpedal Drill #1Purpose: To develop good body position during the backpedal and improve reaction time Procedure: • DB will line up and on the snap will backpedal at full speed for 5 yards (you
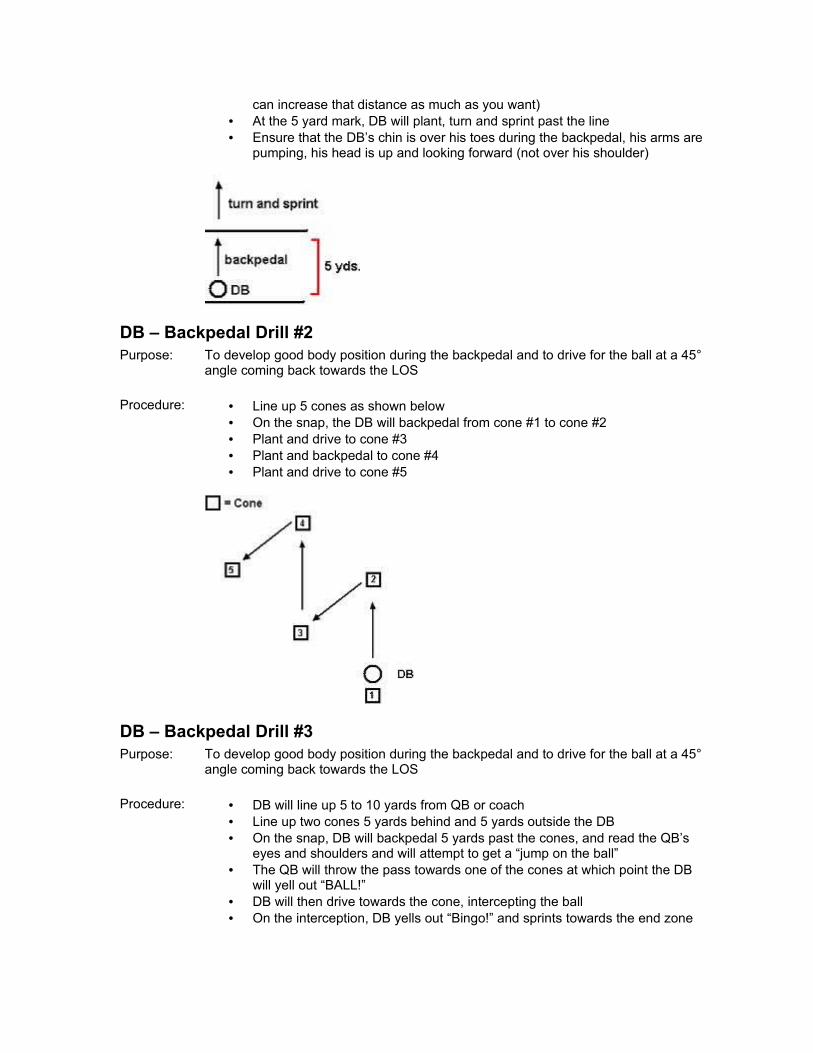
can increase that distance as much as you want)• At the 5 yard mark, DB will plant, turn and sprint past the line• Ensure that the DB’s chin is over his toes during the backpedal, his arms are
pumping, his head is up and looking forward (not over his shoulder)
DB – Backpedal Drill #2Purpose: To develop good body position during the backpedal and to drive for the ball at a 45°
angle coming back towards the LOS Procedure: • Line up 5 cones as shown below
• On the snap, the DB will backpedal from cone #1 to cone #2• Plant and drive to cone #3• Plant and backpedal to cone #4• Plant and drive to cone #5
DB – Backpedal Drill #3Purpose: To develop good body position during the backpedal and to drive for the ball at a 45°
angle coming back towards the LOS Procedure: • DB will line up 5 to 10 yards from QB or coach
• Line up two cones 5 yards behind and 5 yards outside the DB• On the snap, DB will backpedal 5 yards past the cones, and read the QB’s
eyes and shoulders and will attempt to get a “jump on the ball”• The QB will throw the pass towards one of the cones at which point the DB
will yell out “BALL!”• DB will then drive towards the cone, intercepting the ball• On the interception, DB yells out “Bingo!” and sprints towards the end zone

DB – Backpedal and Weave DrillPurpose: Stress the proper body position during backpedal and drive for the ball and to
develop the ability to keep lateral position on the WR Procedure: • DB can run this by himself, or you can line up a WR in front of him
• On the snap, the DB will backpedal, then weave (bend) to the outside• As the WR runs his route, the DB will then push off with the opposite foot of
the desired direction, while turning his hips, and drive for the ball• DO NOT cross your feet or turn your shoulders during the weave
DB – Banjo DrillPurpose: To teach CB’s how to cover receivers that are crossing either at the LOS or directly
past the LOS. Procedure: • Line up 2 WRs and two CBs.
• On the snap, the inside WR releases around the outside of the outside WR, while the outside WR runs a quick slant across the middle.
• When seeing this, the inside CB yells out “banjo”
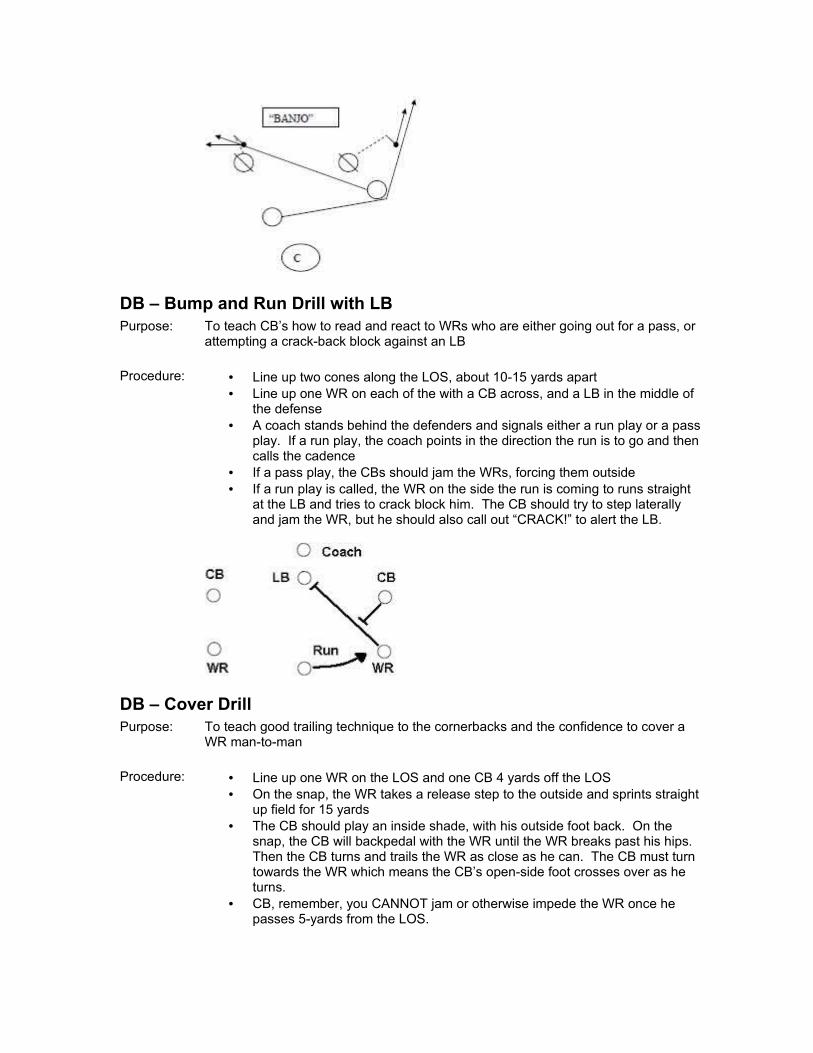
DB – Bump and Run Drill with LBPurpose: To teach CB’s how to read and react to WRs who are either going out for a pass, or
attempting a crack-back block against an LB Procedure: • Line up two cones along the LOS, about 10-15 yards apart
• Line up one WR on each of the with a CB across, and a LB in the middle of the defense
• A coach stands behind the defenders and signals either a run play or a pass play. If a run play, the coach points in the direction the run is to go and then calls the cadence
• If a pass play, the CBs should jam the WRs, forcing them outside• If a run play is called, the WR on the side the run is coming to runs straight
at the LB and tries to crack block him. The CB should try to step laterally and jam the WR, but he should also call out “CRACK!” to alert the LB.
DB – Cover DrillPurpose: To teach good trailing technique to the cornerbacks and the confidence to cover a
WR man-to-man Procedure: • Line up one WR on the LOS and one CB 4 yards off the LOS
• On the snap, the WR takes a release step to the outside and sprints straight up field for 15 yards
• The CB should play an inside shade, with his outside foot back. On the snap, the CB will backpedal with the WR until the WR breaks past his hips. Then the CB turns and trails the WR as close as he can. The CB must turn towards the WR which means the CB’s open-side foot crosses over as he turns.
• CB, remember, you CANNOT jam or otherwise impede the WR once he passes 5-yards from the LOS.
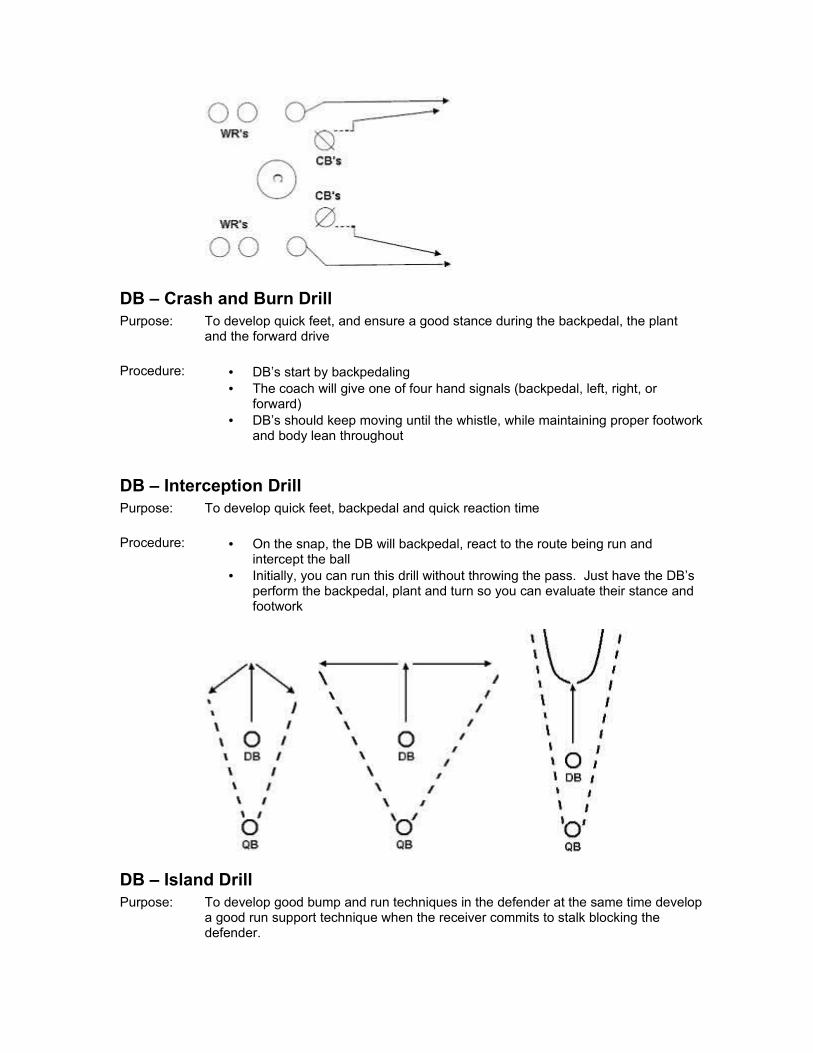
DB – Crash and Burn DrillPurpose: To develop quick feet, and ensure a good stance during the backpedal, the plant
and the forward drive Procedure: • DB’s start by backpedaling
• The coach will give one of four hand signals (backpedal, left, right, or forward)
• DB’s should keep moving until the whistle, while maintaining proper footwork and body lean throughout
DB – Interception DrillPurpose: To develop quick feet, backpedal and quick reaction time Procedure: • On the snap, the DB will backpedal, react to the route being run and
intercept the ball• Initially, you can run this drill without throwing the pass. Just have the DB’s
perform the backpedal, plant and turn so you can evaluate their stance and footwork
DB – Island DrillPurpose: To develop good bump and run techniques in the defender at the same time develop
a good run support technique when the receiver commits to stalk blocking the defender.
Procedure: • Line up one WR against one CB. The CB should play an inside shade with
his outside foot back.• Coach tells the WR what route to run, OR to stalk block the CB (the running
game makes up at least 90% of youth football, even when a team lines up with WR’s split out.)
• If the WR runs a pass route, the CB should jam him, the trail and cover.• If the WR comes out to block the CB, the CB should jam, then shed the
block and attack the ball carrier
DB – Jam DrillPurpose: To teach good jamming fundamentals while using an inside shade bump and run Procedure: • Line up one WR on the LOS and one CB 4 yards off the LOS
• On the snap, the WR runs a downfield route and the cornerback executes a good jam.
o A “good jam” is defined as one that knocks the WR off his route for 1 – 2 seconds, but not if the CB has to hold or grab cloth
• The CB should line up with his outside should even with the inside shoulder of the WR, his outside foot back, and his hands up (ready to jam the WR)
o If you prefer your CB’s playing an outside shade, simply switch shoulders and have the CB move his inside foot back
• The CB should strike the WR in the sternum with his outside arm, and the inside shoulder with his inside arm; striking with both arms at the same time
• Watch the hips of the WR as the CB will get faked out by watching the eyes, head or feet.
DB – M DrillPurpose: To teach good DB technique, hip turns and changes in direction using quick feet Procedure: • Set up 5 cones to resemble a capital letter “M”
• The distance between cones 1 & 2 and 4 & 5 is 10 yards. The distance between cones 2 & 3 and 3 & 4 is 5 yards.
• DB starts at cone 1 and backpedals to cone 2. Then he turns his hips and runs to cone 3. As he approaches cone 3, he begins turning his hips towards cone 4. When he reaches cone 3, he will run towards cone 4. The coach or a QB will throw the ball towards cone 4 at this point. The DB should intercept it and sprint to cone 5.
• The coach should check for hip turns at cones 2 and 4 and watch that the DB does not get his feet “crossed up.”
DB – Safety Read DrillPurpose: To teach the safeties to read the QB’s eyes and move
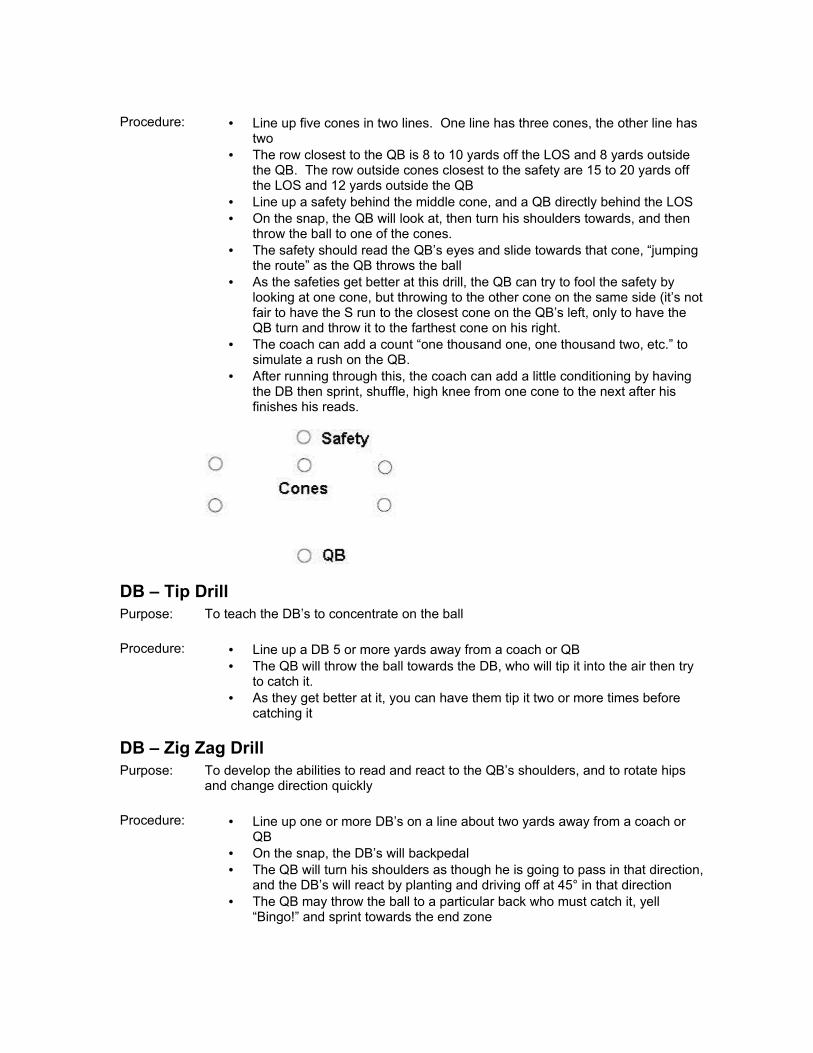
Procedure: • Line up five cones in two lines. One line has three cones, the other line has
two• The row closest to the QB is 8 to 10 yards off the LOS and 8 yards outside
the QB. The row outside cones closest to the safety are 15 to 20 yards off the LOS and 12 yards outside the QB
• Line up a safety behind the middle cone, and a QB directly behind the LOS• On the snap, the QB will look at, then turn his shoulders towards, and then
throw the ball to one of the cones. • The safety should read the QB’s eyes and slide towards that cone, “jumping
the route” as the QB throws the ball• As the safeties get better at this drill, the QB can try to fool the safety by
looking at one cone, but throwing to the other cone on the same side (it’s not fair to have the S run to the closest cone on the QB’s left, only to have the QB turn and throw it to the farthest cone on his right.
• The coach can add a count “one thousand one, one thousand two, etc.” to simulate a rush on the QB.
• After running through this, the coach can add a little conditioning by having the DB then sprint, shuffle, high knee from one cone to the next after his finishes his reads.
DB – Tip DrillPurpose: To teach the DB’s to concentrate on the ball Procedure: • Line up a DB 5 or more yards away from a coach or QB
• The QB will throw the ball towards the DB, who will tip it into the air then try to catch it.
• As they get better at it, you can have them tip it two or more times before catching it
DB – Zig Zag DrillPurpose: To develop the abilities to read and react to the QB’s shoulders, and to rotate hips
and change direction quickly Procedure: • Line up one or more DB’s on a line about two yards away from a coach or
QB• On the snap, the DB’s will backpedal• The QB will turn his shoulders as though he is going to pass in that direction,
and the DB’s will react by planting and driving off at 45° in that direction• The QB may throw the ball to a particular back who must catch it, yell
“Bingo!” and sprint towards the end zone
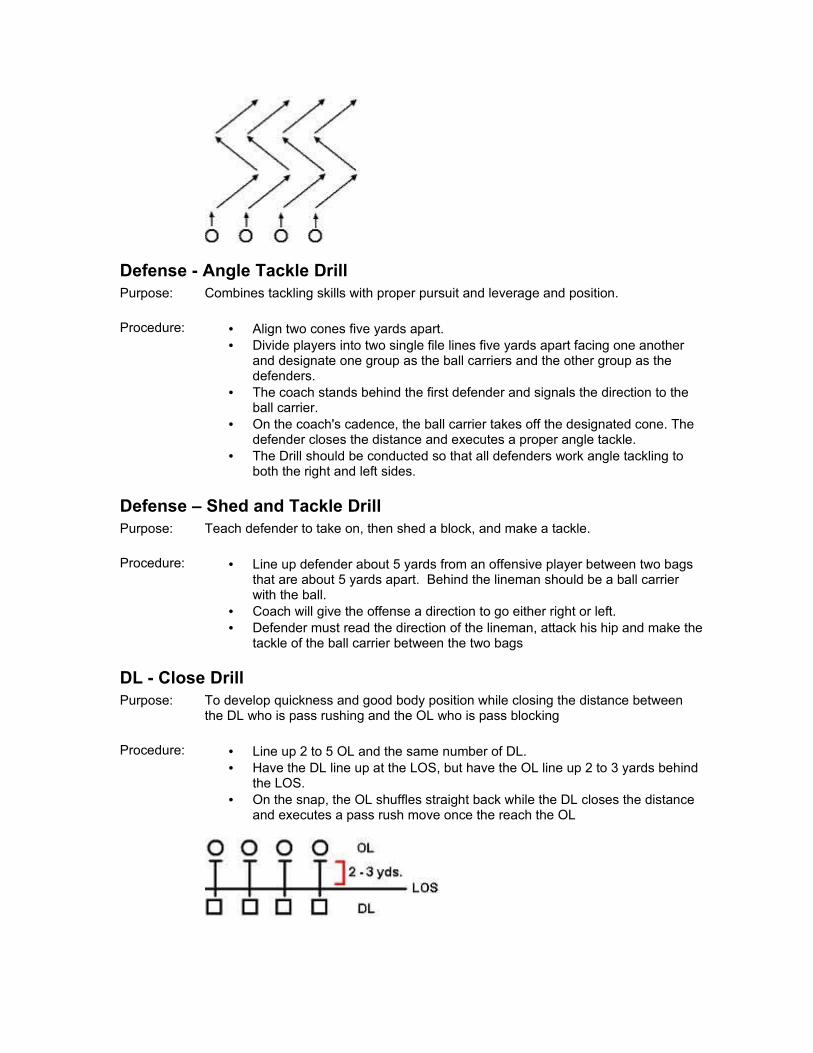
Defense - Angle Tackle DrillPurpose: Combines tackling skills with proper pursuit and leverage and position. Procedure: • Align two cones five yards apart.
• Divide players into two single file lines five yards apart facing one another and designate one group as the ball carriers and the other group as the defenders.
• The coach stands behind the first defender and signals the direction to the ball carrier.
• On the coach's cadence, the ball carrier takes off the designated cone. The defender closes the distance and executes a proper angle tackle.
• The Drill should be conducted so that all defenders work angle tackling to both the right and left sides.
Defense – Shed and Tackle DrillPurpose: Teach defender to take on, then shed a block, and make a tackle. Procedure: • Line up defender about 5 yards from an offensive player between two bags
that are about 5 yards apart. Behind the lineman should be a ball carrier with the ball.
• Coach will give the offense a direction to go either right or left.• Defender must read the direction of the lineman, attack his hip and make the
tackle of the ball carrier between the two bags
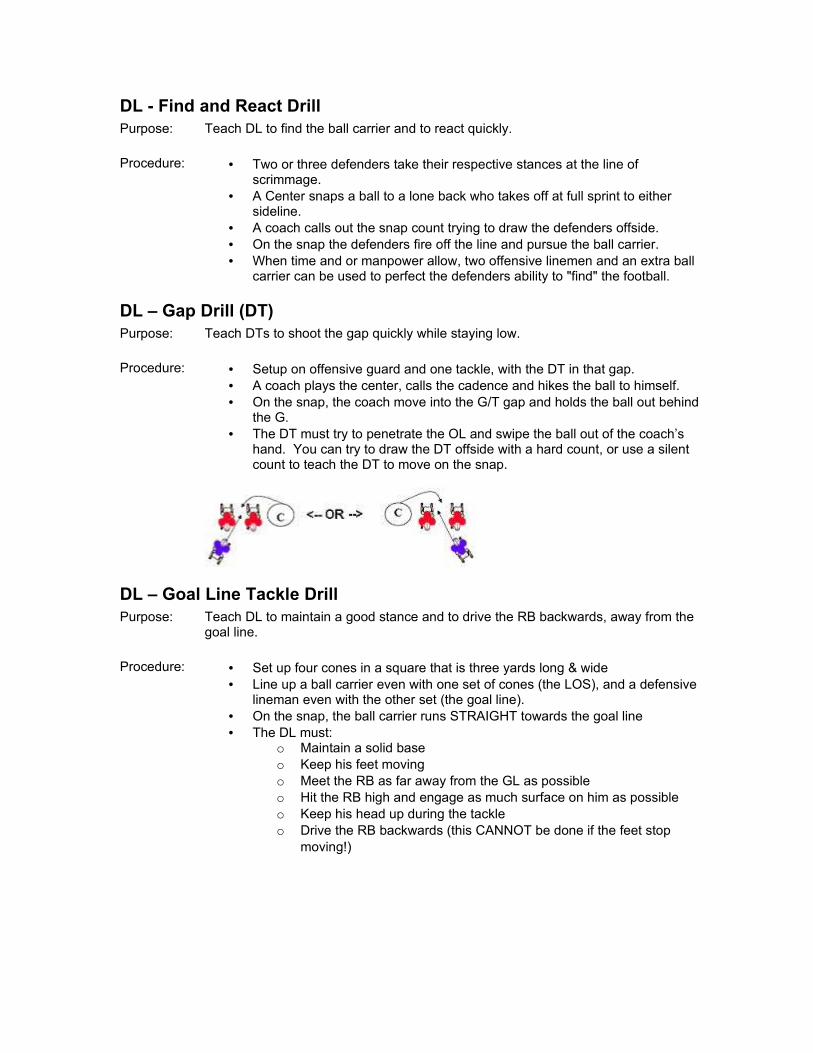
DL - Close DrillPurpose: To develop quickness and good body position while closing the distance between
the DL who is pass rushing and the OL who is pass blocking Procedure: • Line up 2 to 5 OL and the same number of DL.
• Have the DL line up at the LOS, but have the OL line up 2 to 3 yards behind the LOS.
• On the snap, the OL shuffles straight back while the DL closes the distance and executes a pass rush move once the reach the OL
DL - Find and React DrillPurpose: Teach DL to find the ball carrier and to react quickly. Procedure: • Two or three defenders take their respective stances at the line of
scrimmage. • A Center snaps a ball to a lone back who takes off at full sprint to either
sideline. • A coach calls out the snap count trying to draw the defenders offside. • On the snap the defenders fire off the line and pursue the ball carrier.• When time and or manpower allow, two offensive linemen and an extra ball
carrier can be used to perfect the defenders ability to "find" the football.
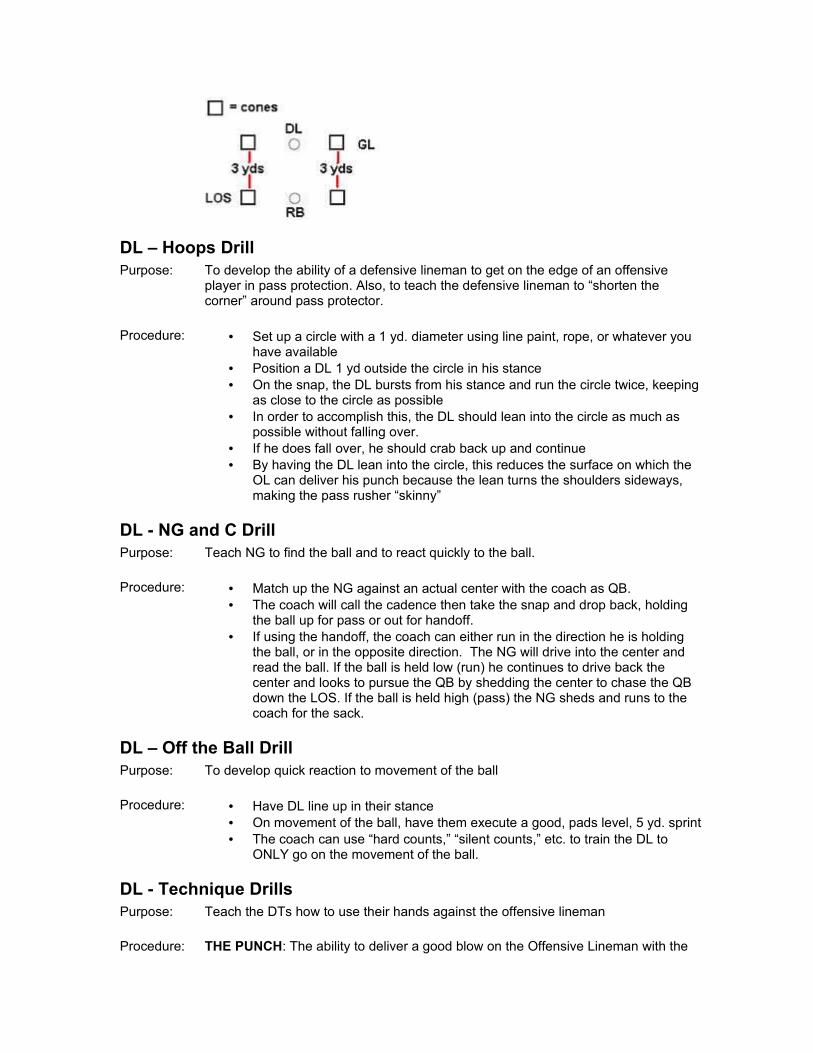
DL – Gap Drill (DT)Purpose: Teach DTs to shoot the gap quickly while staying low. Procedure: • Setup on offensive guard and one tackle, with the DT in that gap.
• A coach plays the center, calls the cadence and hikes the ball to himself. • On the snap, the coach move into the G/T gap and holds the ball out behind
the G. • The DT must try to penetrate the OL and swipe the ball out of the coach’s
hand. You can try to draw the DT offside with a hard count, or use a silent count to teach the DT to move on the snap.
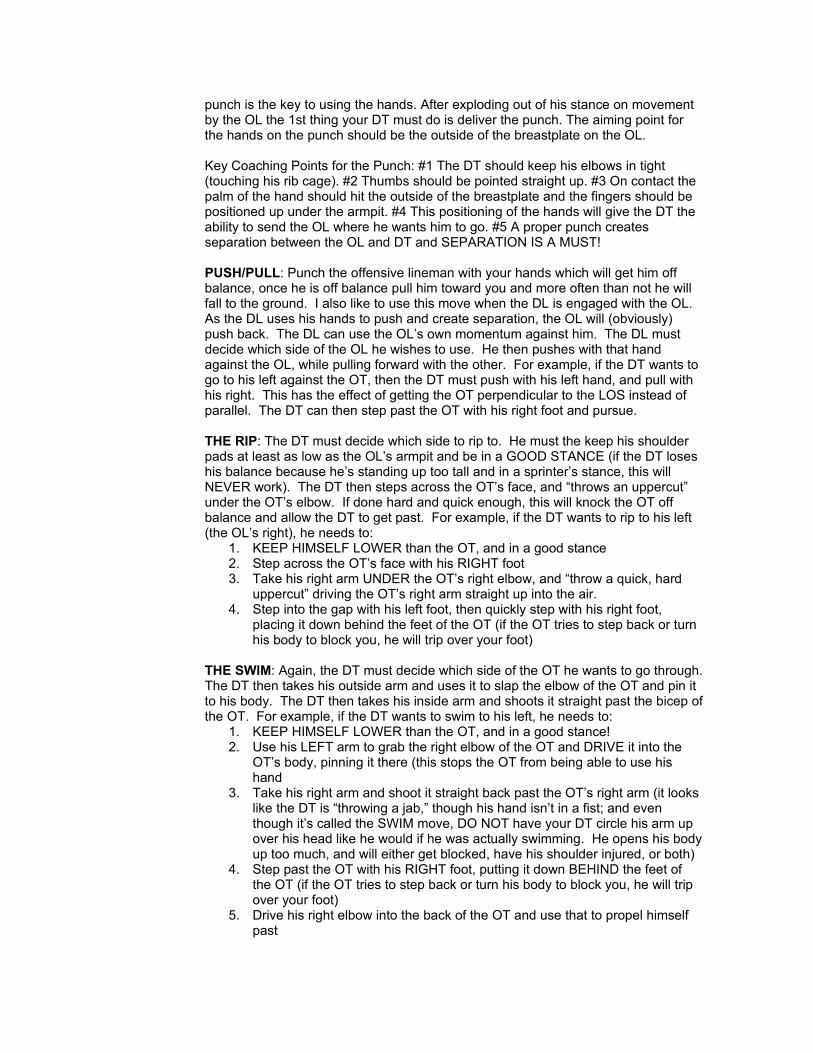
DL – Goal Line Tackle Drill Purpose: Teach DL to maintain a good stance and to drive the RB backwards, away from the
goal line. Procedure: • Set up four cones in a square that is three yards long & wide
• Line up a ball carrier even with one set of cones (the LOS), and a defensive lineman even with the other set (the goal line).
• On the snap, the ball carrier runs STRAIGHT towards the goal line• The DL must:
o Maintain a solid baseo Keep his feet movingo Meet the RB as far away from the GL as possibleo Hit the RB high and engage as much surface on him as possibleo Keep his head up during the tackleo Drive the RB backwards (this CANNOT be done if the feet stop
moving!)
DL – Hoops DrillPurpose: To develop the ability of a defensive lineman to get on the edge of an offensive
player in pass protection. Also, to teach the defensive lineman to “shorten the corner” around pass protector.
Procedure: • Set up a circle with a 1 yd. diameter using line paint, rope, or whatever you
have available• Position a DL 1 yd outside the circle in his stance• On the snap, the DL bursts from his stance and run the circle twice, keeping
as close to the circle as possible • In order to accomplish this, the DL should lean into the circle as much as
possible without falling over.• If he does fall over, he should crab back up and continue• By having the DL lean into the circle, this reduces the surface on which the
OL can deliver his punch because the lean turns the shoulders sideways, making the pass rusher “skinny”
DL - NG and C DrillPurpose: Teach NG to find the ball and to react quickly to the ball. Procedure: • Match up the NG against an actual center with the coach as QB.
• The coach will call the cadence then take the snap and drop back, holding the ball up for pass or out for handoff.
• If using the handoff, the coach can either run in the direction he is holding the ball, or in the opposite direction. The NG will drive into the center and read the ball. If the ball is held low (run) he continues to drive back the center and looks to pursue the QB by shedding the center to chase the QB down the LOS. If the ball is held high (pass) the NG sheds and runs to the coach for the sack.
DL – Off the Ball DrillPurpose: To develop quick reaction to movement of the ball Procedure: • Have DL line up in their stance
• On movement of the ball, have them execute a good, pads level, 5 yd. sprint• The coach can use “hard counts,” “silent counts,” etc. to train the DL to
ONLY go on the movement of the ball.
DL - Technique DrillsPurpose: Teach the DTs how to use their hands against the offensive lineman Procedure: THE PUNCH: The ability to deliver a good blow on the Offensive Lineman with the
punch is the key to using the hands. After exploding out of his stance on movement by the OL the 1st thing your DT must do is deliver the punch. The aiming point for the hands on the punch should be the outside of the breastplate on the OL.
Key Coaching Points for the Punch: #1 The DT should keep his elbows in tight (touching his rib cage). #2 Thumbs should be pointed straight up. #3 On contact the palm of the hand should hit the outside of the breastplate and the fingers should be positioned up under the armpit. #4 This positioning of the hands will give the DT the ability to send the OL where he wants him to go. #5 A proper punch creates separation between the OL and DT and SEPARATION IS A MUST!
PUSH/PULL: Punch the offensive lineman with your hands which will get him off balance, once he is off balance pull him toward you and more often than not he will fall to the ground. I also like to use this move when the DL is engaged with the OL. As the DL uses his hands to push and create separation, the OL will (obviously) push back. The DL can use the OL’s own momentum against him. The DL must decide which side of the OL he wishes to use. He then pushes with that hand against the OL, while pulling forward with the other. For example, if the DT wants to go to his left against the OT, then the DT must push with his left hand, and pull with his right. This has the effect of getting the OT perpendicular to the LOS instead of parallel. The DT can then step past the OT with his right foot and pursue.
THE RIP: The DT must decide which side to rip to. He must the keep his shoulder pads at least as low as the OL’s armpit and be in a GOOD STANCE (if the DT loses his balance because he’s standing up too tall and in a sprinter’s stance, this will NEVER work). The DT then steps across the OT’s face, and “throws an uppercut” under the OT’s elbow. If done hard and quick enough, this will knock the OT off balance and allow the DT to get past. For example, if the DT wants to rip to his left (the OL’s right), he needs to:
1. KEEP HIMSELF LOWER than the OT, and in a good stance2. Step across the OT’s face with his RIGHT foot3. Take his right arm UNDER the OT’s right elbow, and “throw a quick, hard
uppercut” driving the OT’s right arm straight up into the air.4. Step into the gap with his left foot, then quickly step with his right foot,
placing it down behind the feet of the OT (if the OT tries to step back or turn his body to block you, he will trip over your foot)
THE SWIM: Again, the DT must decide which side of the OT he wants to go through. The DT then takes his outside arm and uses it to slap the elbow of the OT and pin it to his body. The DT then takes his inside arm and shoots it straight past the bicep of the OT. For example, if the DT wants to swim to his left, he needs to:
1. KEEP HIMSELF LOWER than the OT, and in a good stance!2. Use his LEFT arm to grab the right elbow of the OT and DRIVE it into the
OT’s body, pinning it there (this stops the OT from being able to use his hand
3. Take his right arm and shoot it straight back past the OT’s right arm (it looks like the DT is “throwing a jab,” though his hand isn’t in a fist; and even though it’s called the SWIM move, DO NOT have your DT circle his arm up over his head like he would if he was actually swimming. He opens his body up too much, and will either get blocked, have his shoulder injured, or both)
4. Step past the OT with his RIGHT foot, putting it down BEHIND the feet of the OT (if the OT tries to step back or turn his body to block you, he will trip over your foot)
5. Drive his right elbow into the back of the OT and use that to propel himself past
DL - Rapid Fire DrillPurpose: Works on pass rush techniques in a controlled environment Procedure: • Divide linemen into two groups.
• Position three defenders in a single file line, three yards apart. The defensive player will face the first of three blockers in a line. On the coach's command, the defender will consecutively engage and execute a pass rush technique on each of the blockers.
• The Drill should be conducted until all defenders have had sufficient number of repetitions.
• Check for proper form and technique in each of the defender's moves.
DL - Read and React DrillPurpose: Teaches the defensive lineman to read and recognize the type of block of the
opposing offensive lineman by the first head movement. Procedure: • This is a progressive Drill:
• First have 3 defensive linemen at a time lineup and face the coach, who will do the head motions. The defensive line man must react quickly to the head movements.
• Next pair up the defensive linemen, and a coach standing behind the designated defensive lineman signaling the kind of block and snap count to the designated offensive lineman. Have the defensive lineman react to the movement of the opposing offensive lineman.
• Finally, lineup one defensive lineman against three offensive linemen to work on correct reactions to away and combination blocks. Again the coach will stand behind the defensive lineman and signal block and snap count.
LB – 1-step DrillPurpose: Teaches linebackers how to make contact with an offensive player Procedure: • Pair up linebackers facing each other. The linebacker will line up opposite a
bag holder and be shaded to the left. • The linebacker’s right foot should be slightly back and in the middle of the
bag. The right shoulder should be on the bag. • On command, LB will take a six inch step with his right foot to the bag and
throw his forearm through the bag. The foot should make contact on the ground at the same time the forearm hits the bag.
• Emphasize a quick step and contact and accelerate through contact. Repeat Drill with left shoulder
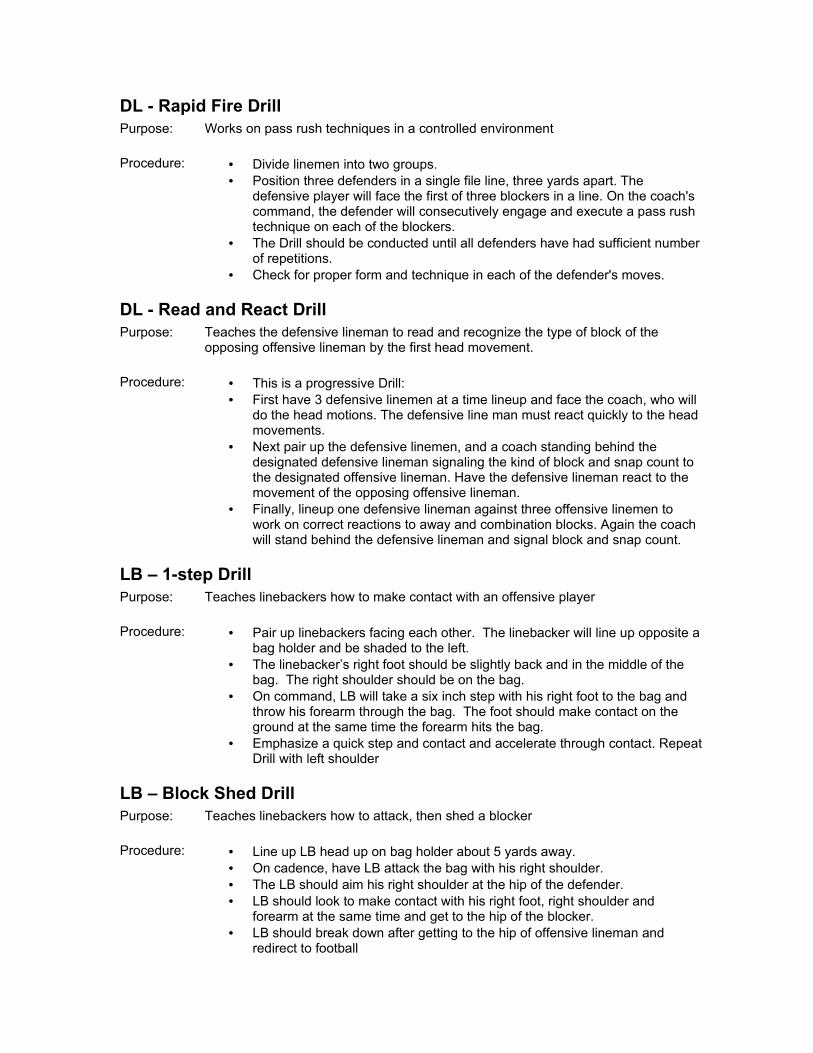
LB – Block Shed DrillPurpose: Teaches linebackers how to attack, then shed a blocker Procedure: • Line up LB head up on bag holder about 5 yards away.
• On cadence, have LB attack the bag with his right shoulder. • The LB should aim his right shoulder at the hip of the defender. • LB should look to make contact with his right foot, right shoulder and
forearm at the same time and get to the hip of the blocker. • LB should break down after getting to the hip of offensive lineman and
redirect to football
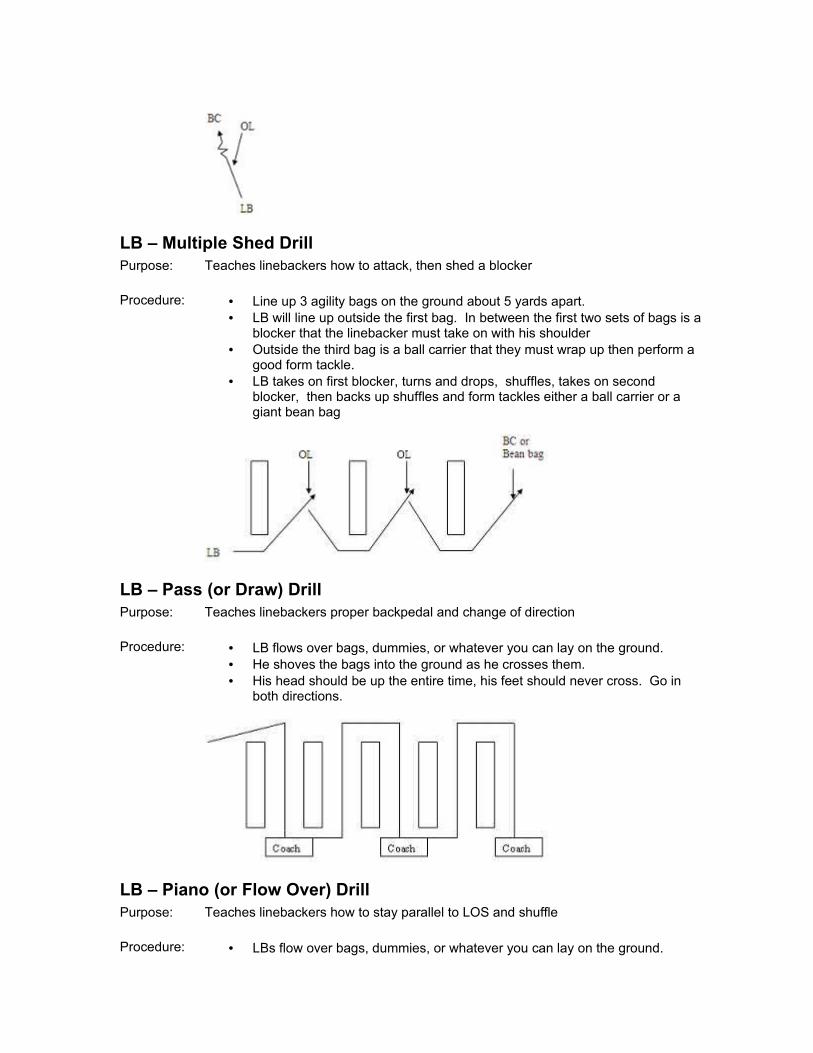
LB – Multiple Shed DrillPurpose: Teaches linebackers how to attack, then shed a blocker Procedure: • Line up 3 agility bags on the ground about 5 yards apart.
• LB will line up outside the first bag. In between the first two sets of bags is a blocker that the linebacker must take on with his shoulder
• Outside the third bag is a ball carrier that they must wrap up then perform a good form tackle.
• LB takes on first blocker, turns and drops, shuffles, takes on second blocker, then backs up shuffles and form tackles either a ball carrier or a giant bean bag
LB – Pass (or Draw) DrillPurpose: Teaches linebackers proper backpedal and change of direction Procedure: • LB flows over bags, dummies, or whatever you can lay on the ground.
• He shoves the bags into the ground as he crosses them. • His head should be up the entire time, his feet should never cross. Go in
both directions.
LB – Piano (or Flow Over) DrillPurpose: Teaches linebackers how to stay parallel to LOS and shuffle Procedure: • LBs flow over bags, dummies, or whatever you can lay on the ground.
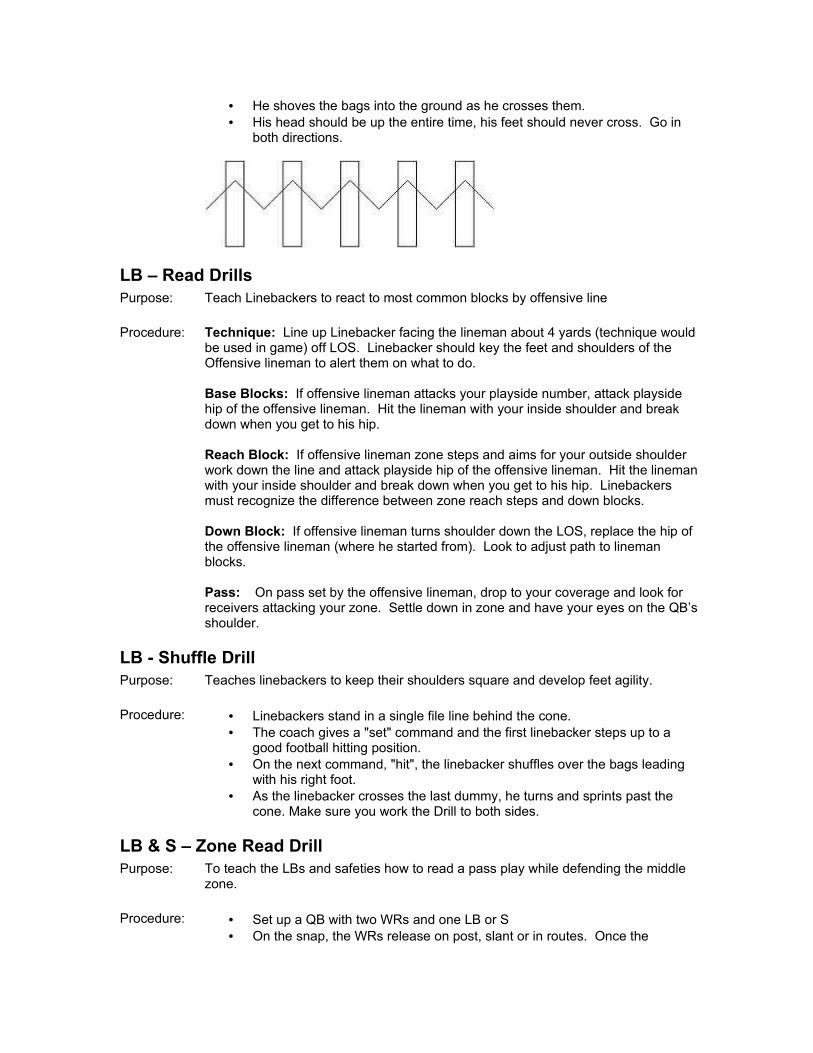
• He shoves the bags into the ground as he crosses them. • His head should be up the entire time, his feet should never cross. Go in
both directions.
LB – Read DrillsPurpose: Teach Linebackers to react to most common blocks by offensive line Procedure: Technique: Line up Linebacker facing the lineman about 4 yards (technique would
be used in game) off LOS. Linebacker should key the feet and shoulders of the Offensive lineman to alert them on what to do.
Base Blocks: If offensive lineman attacks your playside number, attack playside hip of the offensive lineman. Hit the lineman with your inside shoulder and break down when you get to his hip.
Reach Block: If offensive lineman zone steps and aims for your outside shoulder work down the line and attack playside hip of the offensive lineman. Hit the lineman with your inside shoulder and break down when you get to his hip. Linebackers must recognize the difference between zone reach steps and down blocks.
Down Block: If offensive lineman turns shoulder down the LOS, replace the hip of the offensive lineman (where he started from). Look to adjust path to lineman blocks.
Pass: On pass set by the offensive lineman, drop to your coverage and look for receivers attacking your zone. Settle down in zone and have your eyes on the QB’s shoulder.
LB - Shuffle DrillPurpose: Teaches linebackers to keep their shoulders square and develop feet agility. Procedure: • Linebackers stand in a single file line behind the cone.
• The coach gives a "set" command and the first linebacker steps up to a good football hitting position.
• On the next command, "hit", the linebacker shuffles over the bags leading with his right foot.
• As the linebacker crosses the last dummy, he turns and sprints past the cone. Make sure you work the Drill to both sides.
LB & S – Zone Read DrillPurpose: To teach the LBs and safeties how to read a pass play while defending the middle
zone. Procedure: • Set up a QB with two WRs and one LB or S
• On the snap, the WRs release on post, slant or in routes. Once the
defenders get the hang of this, then have the WRs release straight up the field
• The QB will take a three, five, or seven-step drop then throw to one receiver. If the defender slides early, the QB should throw to the other receiver
• Once he sees the QB drop back to pass, the defender should yell out “PASS!” He should also take three backwards steps.
• Once the QB throws the ball, the defender makes a play on the ball.• If the QB rolls, the defender must mirror his movements, staying square to
the LOS.• You can also add the OL and DL to teach run/pass blocking recognition.
OL – 1st Steps DrillPurpose: To teach offensive lineman each of the first steps they may be required to use Procedure: • The first couple of practices, you can start the OL in a two-point stance.
Once they get comfortable with these steps, drop them into a three-point stance.
• Jab step: This is the step to use if the OL has to perform a “gap block.” On the “snap,” have each OL take a 6” forward directional step and punch through with the up hand
• Drive step: On the snap, have each OL take a forward step about 8” to 12”. Punch with the up hand.
• Open step: This is the step to use if the OL has to perform a down block, short trap or up on an LB. On the snap, the OL takes a 6” step at 45°. Again, punch with the up hand.
• Drop step: This is the step to use on long trap, pass, the kick out part of an “X” block and the fold block. On the snap, the OL takes a step straight backwards
• Slide step: This is the step to use on a reach block or by a TE who has an outside release. On the snap, take an 8” step to the outside
OL – Best Move DrillPurpose: To teach offensive lineman to stay in the proper stance while working on footwork
and delivering a punch to the DL Procedure: • Requires two cones, one OL and one DL.
• Starting at one cone, the two linemen will shuffle to the other cone. The OL will deliver a punch every couple of steps.
Coaching points while shuffling:• Do not let heels click
• Keep your weight balanced• Keep your hips down• The punch should only be about 6”. DO NOT reach for the DL
OL - Blocking Linebackers DrillPurpose: To teach offensive lineman the proper angle to take when blocking an LB and to
help them be more effective delivering a blow when the LB reacts to the ball carrier Procedure: • Requires at least one OL, a tennis ball, and one LB with a shield.
• A coach will tell the OL which way the ball carrier (represented by the tennis ball) is going to run, and will stand behind the OL.
• On the snap, the coach rolls the ball in the assigned direction, and the OL must fire out and block the LB.
• The LB, on the snap, will read the direction of the play (based on the direction the OL leads, and then finding the ball carrier), and attack.
• The OL needs to block the LB at the point where the LB attacks the ball carrier.
OL - Body Position DrillPurpose: Teaches proper body position for pass blocking. Procedure: • The defensive lineman aligns in a challenge position with his hands
grabbing the shoulders of the blocker. • The blocker assumes the proper lock out position. • Align a cone in the backfield, representing the quarterback. • On the coach's command, the blocker shuffles his feet, maintaining an
inside position as the defender moves side to side and toward the passing point.
OL – Counter (Pull) Blocking DrillPurpose: Teaches proper footwork and blocking technique when pulling Procedure: Line up the C, G and T from either the left or right side of the OL, and the opposite
side DT, DE, and ILB on defense.
Center:• Down block the DT
Guards:• Step back with foot nearest the C, then push out with far-side foot• Work downhill towards the inside half of the DE• As you prepare to make contact, keep your feet wide, and in a good stance• Deliver a forearm shiver, then lift and drive the DE
Tackle:• Step back with foot nearest the C, then push out with far-side foot• Work on getting depth so you don’t get bunched up with the C or G• Find the LB and take him on as soon as you can• As you prepare to make contact, keep your feet shoulder width apart and in
a good stance• Deliver a good 2-hand punch and drive him out of the hole
OL – Duck, FIT, Finish DrillPurpose: To strengthen the legs, then to teach the proper progression from fit position to initial
contact, to drive Procedure: Requires OL and at least one blocking dummy
• DL will line up 6 yards off the LOS• OL will duck walk five yards, then come up to proper fit position• OL will then deliver a 2 hand punch to the pectoral area of DL• Finally, OL will lift the DL and snap his hips under, driving DL backwards
Coaching points:• OL MUST stay low and maintain a good base throughout
OL – Duck Walk DrillPurpose: • Your natural tendency after the ball is snapped is to “fire up” instead of “fire
out.” You MUST stay low and use leverage (not just your strength) to defeat the defender. Your legs should be strong and you should have good endurance to block properly for the entire 40 minutes
Procedure: • Begin with the feet shoulder width apart and slightly staggered (either one
foot slightly further back than the other).• Bend the knees, not the back, to a 90 degree angle so that hips are parallel
with their knees. This is a weightlifting squatting technique. • Bend at the waist setting your belly on your thighs. Try to make your back as
flat as possible.• With a flat back, DO NOT pick your belly up off your thighs, lift your neck
back so that your eyes are looking forward.• Walk this way for 5 yards, you should get tired right away, but work on it
throughout the day to build up stamina and strength in your legs.• Try to build yourself up to 10 yards, 15 yards, 20 yards, etc.
OL – Finish DrillPurpose: To teach proper leverage, hand thrust, along with hip and foot movement to finish a
block Procedure: • Place payers into three lines. Have line one (defense) step out and face line
two (offense) • The coach will stand behind line two and give line one a hand signal in the
direction he wants them to move after the initial collision. • On command, line two (offense) will carry out the entire drive block from
start to finish.Coaching points:
• When the defender reacts to the ball and the offensive player feels his weight shift, he (the OL) “comes alive,” utilizing the momentum of his opponent to finish the block.
• Strike a blow simultaneously with screws and hands
• Thrust the arms, lead the hips, and knees inside
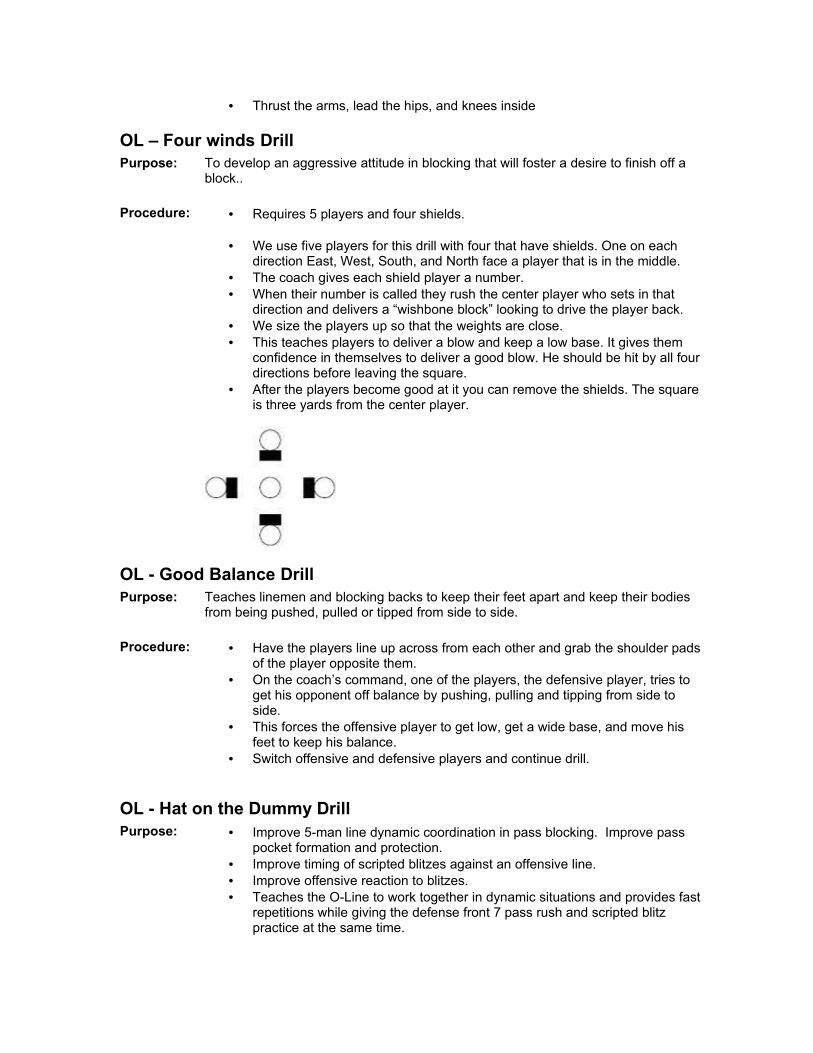
OL – Four winds DrillPurpose: To develop an aggressive attitude in blocking that will foster a desire to finish off a
block.. Procedure: • Requires 5 players and four shields.
• We use five players for this drill with four that have shields. One on each direction East, West, South, and North face a player that is in the middle.
• The coach gives each shield player a number. • When their number is called they rush the center player who sets in that
direction and delivers a “wishbone block” looking to drive the player back. • We size the players up so that the weights are close. • This teaches players to deliver a blow and keep a low base. It gives them
confidence in themselves to deliver a good blow. He should be hit by all four directions before leaving the square.
• After the players become good at it you can remove the shields. The square is three yards from the center player.
OL - Good Balance DrillPurpose: Teaches linemen and blocking backs to keep their feet apart and keep their bodies
from being pushed, pulled or tipped from side to side. Procedure: • Have the players line up across from each other and grab the shoulder pads
of the player opposite them. • On the coach’s command, one of the players, the defensive player, tries to
get his opponent off balance by pushing, pulling and tipping from side to side.
• This forces the offensive player to get low, get a wide base, and move his feet to keep his balance.
• Switch offensive and defensive players and continue drill.
OL - Hat on the Dummy Drill Purpose: • Improve 5-man line dynamic coordination in pass blocking. Improve pass
pocket formation and protection.• Improve timing of scripted blitzes against an offensive line.• Improve offensive reaction to blitzes.• Teaches the O-Line to work together in dynamic situations and provides fast
repetitions while giving the defense front 7 pass rush and scripted blitz practice at the same time.
Procedure: • You will need all 5 interior offensive linemen, the defensive front 7 including down linemen and linebackers, 1 heavy blocking/tackling bag, 1 cone and 1 football.
• Set offensive line at LOS with heavy bag positioned at 5 or 7 step QB distance behind center. Place cone on top of bag just for fun. Set defensive front 7 at LOS in their usual alignments.
• On coach’s cadence and snap count, center snaps ball out of the way and Drill begins at full speed with offensive line dropping for pass protection. Defensive front applies pass rush attempting to tackle heavy bag or retrieve cone within 5 seconds of the snap.
• Defense is permitted to run any of its scripted blitz schemes but must be encouraged not to recklessly rush all 7 men just to defeat the offensive line.
• This Drill is intended to be productive for both the offense and defense at LOS. Coach blows whistle 5 seconds after snap ending the Drill if defense has not sacked QB (bag).
• Repeat Drill moving bag to different pocket locations and changing defensive front to give different looks for the offensive line. Offensive line must protect the QB for 5 seconds while defensive front must apply aggressive pass rush to sack QB within 5 seconds. Add 1 RB to backfield to improve pass protection once blitz schemes start to dominate O-Line.
Coaching Points:
• Make sure O-Line protect inside lanes first• Coach O-Line to keep heads up looking for the blitz• Check proper pass drop and contact techniques for O-Line• Make sure defensive down linemen use varying techniques - bull, swim, rip,
stunt.• Make sure linebackers do not hesitate when their number comes up for
scripted blitz
OL - Hip Extension DrillPurpose: Teaches players how to use his big muscle group in drive block Procedure: • Setup one player holding blocking shield and a “blocker” on his knees in
front of the shield. • The blocker must be on his knees with his toes pointing backwards (do not
let him curl his feet under because we don’t want him pushing off with his toes).
• On the snap, the blocker fires out and into the shield with his shoulder pad using his hips, back and thigh muscles.
OL - Lock on DrillPurpose: To teach the blocker to maintain contact in the follow through phase of blocking. Procedure: • Align the offensive blocker under the chute in a three-point stance, standing
at the edge of the board. • Place the defender one foot away in a two-point stance. (Alternate the
defenders between two and three-point stance). • On the cadence, the blocker will fire out of his stance and drive the defender
down the board. The defender will collide with the blocker and give resistance as he is being driven back.
• As the drill progresses, vary the distance between the blocker and the defender.
• When the defender reaches the end of the board, the coach will give a direction to spin. The blocker must continue to fight pressure where he feels pressure, lock on, and finish the block.
OL - Mirror DrillPurpose: To develop the ability to move and maintain the proper relationship with a moving
defender Procedure: Requires to linemen and two cones
• Two Linemen face each other with the offensive player in his stance.• They are about 1 yd apart and have the two cones on each side of them with
about 5 yds. between the cones.• On command the offensive player snaps to a set position and begins to
shuffle in relation to the defender who is working laterally back and forth between the cones.
• Drill should last 5 seconds and you should evaluate your lineman on set position, shuffle technique and relationship with defender.
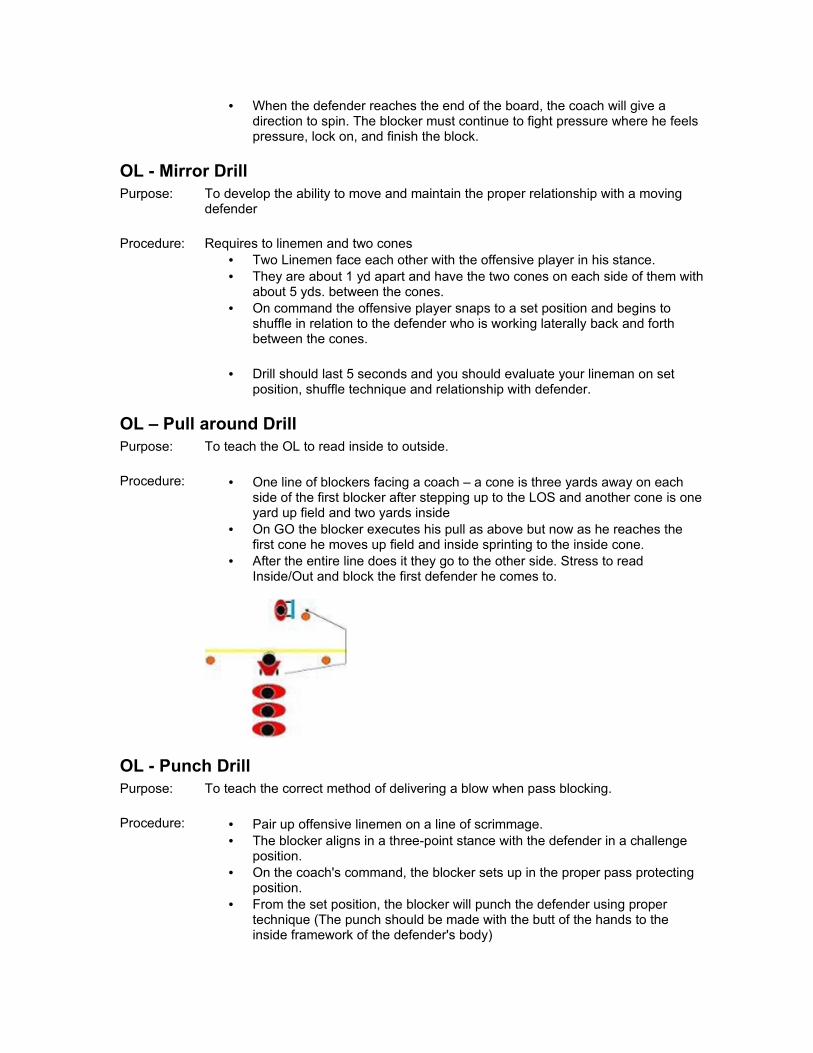
OL – Pull around DrillPurpose: To teach the OL to read inside to outside. Procedure: • One line of blockers facing a coach – a cone is three yards away on each
side of the first blocker after stepping up to the LOS and another cone is one yard up field and two yards inside
• On GO the blocker executes his pull as above but now as he reaches the first cone he moves up field and inside sprinting to the inside cone.
• After the entire line does it they go to the other side. Stress to read Inside/Out and block the first defender he comes to.
OL - Punch DrillPurpose: To teach the correct method of delivering a blow when pass blocking. Procedure: • Pair up offensive linemen on a line of scrimmage.
• The blocker aligns in a three-point stance with the defender in a challenge position.
• On the coach's command, the blocker sets up in the proper pass protecting position.
• From the set position, the blocker will punch the defender using proper technique (The punch should be made with the butt of the hands to the inside framework of the defender's body)
OL - Quick Hit DrillPurpose: Teaches linemen and blocking backs to quickly get from their stance to a blocking
position. Procedure: • Line up the players in a circle, each in a good stance.
• On the coach’s command, they pop up into a correct pass protection position, taking a quick step with the outside foot, putting their hands up in a punch position, and assuming a squat position, ready to strike a blow. Have the players continue to repeat Drill - up, down, up.
OL – Shoeshine DrillPurpose: To develop the proper cutoff block technique in our backside blockers. Procedure: How – To execute a proper shoeshine block the blocker starts in a three-point
stance. On “GO” he takes an open step and lunges to the inside (just above the nose of the next man inside) and shoots his backside/away arm across the defenders shoes and then crawls down the LOS. If each blocker executes their block correctly their backside shoulder would be near the next blockers near hip. The object is not to block the defender in the gap but to take away the gap from the defender by forcing the defender to go over or around the cutoff block. He must stay flat to the LOS and not cross it he is trying t o create a wall on the backside. Let them bear crawl for 2 yards. Try to do 3 reps to each side.
Shoeshine block – a backside blocker’s technique that cuts off the inside defender on the backside when we are pulling either a backside guard or a backside guard and tackle.
Open Step – a short side-step with toes at about 45 degrees.
OL – Stay Low DrillPurpose: Teaches linemen to fire off the ball while staying low Procedure: Needs: One blocking dummy for each OL.
Lay the dummies on the ground length wise, with the heavy end towards the OL. On the cadence, the OL will fire out and execute a shoulder block on the butt end of the bag, driving it forward until the whistle blows.
OL - Three Ball DrillPurpose: Teaches footwork and pass block techniques. Procedure: Set Up: This Drill requires three tennis balls
Players are to line up in a single file line facing the coach who is on one knee about 5 yards in front facing the player. On the coach's command, the player is to have his feet about shoulder width apart with his butt down and head up in a good football stance. The coach is then going to roll one ball to one side and the player should SHUFFLE to the ball then roll it back. Immediately roll another ball to the opposite side and continue this for about 15 seconds. Once time is called, the next player is to move into position for his turn. Each player should get at least 5 reps before going to another Drill.
Coaching Points:Players have a tendency to drop their heads and bend their back to get the ball. Make sure they are using their legs to squat. Also watch their feet as they will cross over as fatigue sets in. Be sure and mix up the directions you roll the ball and roll it to the same side sometimes so the player will not get into the habit of guessing or anticipating the direction the ball will be coming from.
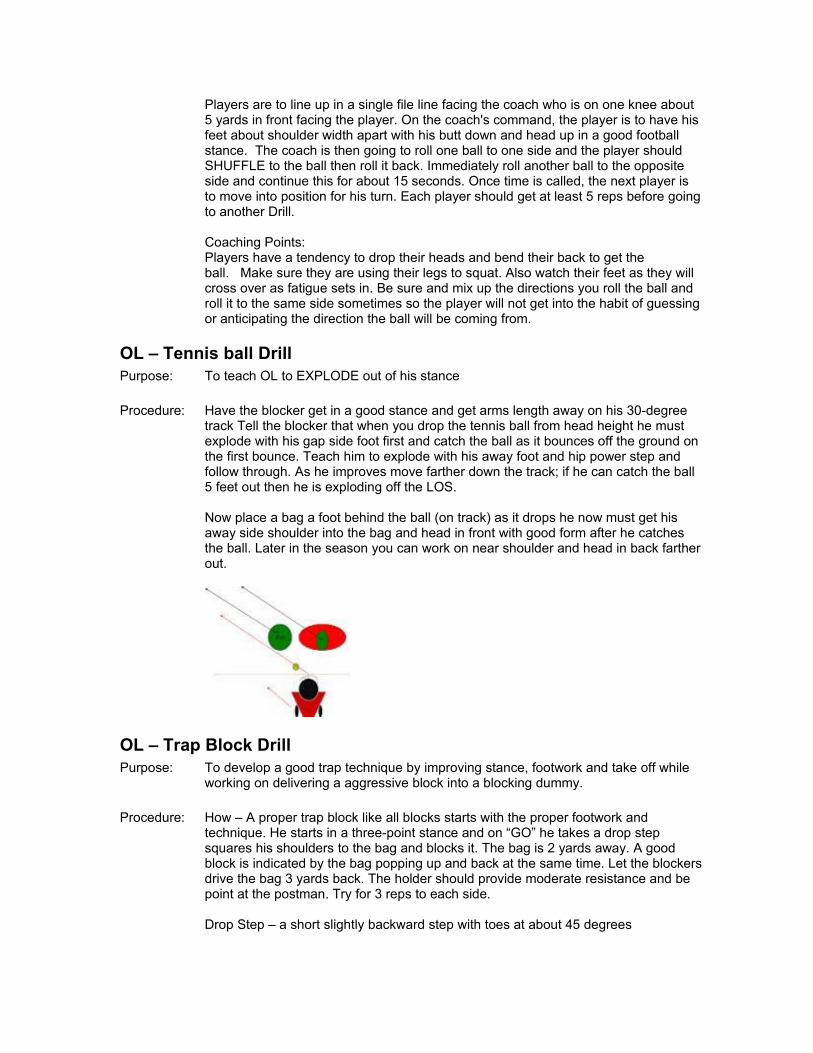
OL – Tennis ball Drill Purpose: To teach OL to EXPLODE out of his stance Procedure: Have the blocker get in a good stance and get arms length away on his 30-degree
track Tell the blocker that when you drop the tennis ball from head height he must explode with his gap side foot first and catch the ball as it bounces off the ground on the first bounce. Teach him to explode with his away foot and hip power step and follow through. As he improves move farther down the track; if he can catch the ball 5 feet out then he is exploding off the LOS.
Now place a bag a foot behind the ball (on track) as it drops he now must get his away side shoulder into the bag and head in front with good form after he catches the ball. Later in the season you can work on near shoulder and head in back farther out.
OL – Trap Block DrillPurpose: To develop a good trap technique by improving stance, footwork and take off while
working on delivering a aggressive block into a blocking dummy. Procedure: How – A proper trap block like all blocks starts with the proper footwork and
technique. He starts in a three-point stance and on “GO” he takes a drop step squares his shoulders to the bag and blocks it. The bag is 2 yards away. A good block is indicated by the bag popping up and back at the same time. Let the blockers drive the bag 3 yards back. The holder should provide moderate resistance and be point at the postman. Try for 3 reps to each side.
Drop Step – a short slightly backward step with toes at about 45 degrees

OL – Trap Block Drill #2Purpose: To develop a good trap technique by improving stance, footwork and take off while
working on delivering a aggressive block into a blocking dummy. Procedure: Needs – 1 to 5 cones and the same number of shields, dummies
A proper pull block like all blocks starts with the proper footwork and technique. He starts in a three-point stance and on “GO” he takes a drop step and does his best to keep his shoulders squares to the LOS until he pulls around the cone which is 2 yards away and come around and meet the bag. He must attack the bag and block it. Make the bag pop when you hit it. Let the blockers drive the bag 3 yards back. The holder should provide moderate resistance and be pointed at the point where the blocker will meet the bag. Try for 3 reps to each side.
Drop Step – a short slightly backward step with toes at 45 degrees
OL - Whistle Drill Purpose: To teach proper first step, and to improve that first step quickness. Procedure: Line up the OL either one-at-a-time or as a group. Get in proper 3-point stance. On
the snap, each OL takes proper 6-inch step with right foot (drive block), bringing his hands up in the proper position (thumbs up, ready to grab DL’s armpits), then freezes so coach can check for proper position (firing OUT, not “up”, back straight, head up, feet shoulder-width apart, etc.). Next, get back into stance, and have OL fire out with left-foot.We can use this Drill to teach pass blocking, trap blocking, or pretty much any blocking technique.
OL & DL - Beat Your Man DrillPurpose: Teaches good fundamentals of blocking, holding the block, and fighting through the
block.
Procedure: Set-up bags or cones on both sides of the players 5-6 feet apart. This limits the
lateral distance each player can move. The coach stands behind the defensive player and assigns the direction he wants the blocker to take the defender. The defender needs to read the block and fight through the pressure to the hole.
OL & DL - Finish Alive DrillPurpose: Teaches proper leverage, hand thrust, along with hip and foot movement to finish a
block. Procedure: Place players into three lines. Have line one step out and face line two. Line one
(defense) will face line two. The coach will stand behind line two and give line one a hand signal in the direction he wants them to move after the initial contact. On command, line two (offensive) will carry out the entire drive block from start to finish.
OL & DL - One on One Pass Protection Purpose: To teach the OL to maintain his block and to protect his QB. Also to teach DL to
defeat the block and get to an area. Procedure: Setup boundary 3 to 5 yards wide. DL must stay within this boundary and get to QB.
OL tries to drive DL outside the boundary. Set up dummy as “QB dropping back to pass”. On the snap, DL rushes the passer using bull rush, rip, and/or swim techniques, while OL tries to protect his QB.
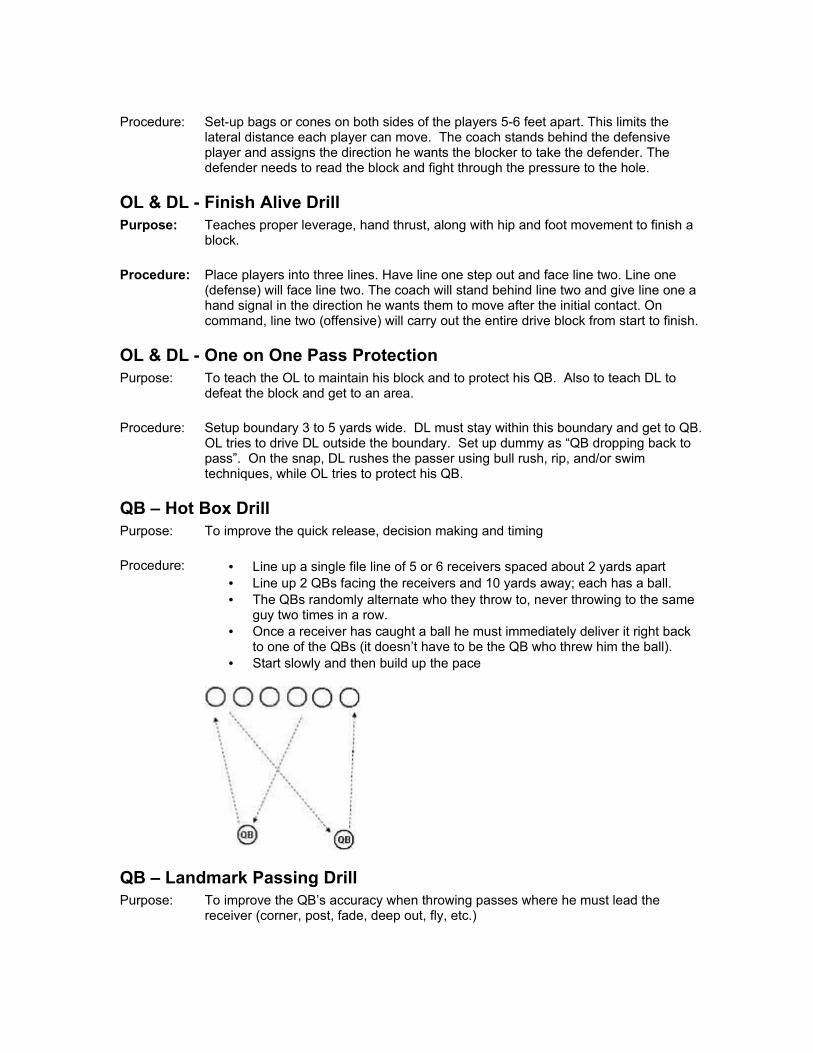
QB – Hot Box DrillPurpose: To improve the quick release, decision making and timing Procedure: • Line up a single file line of 5 or 6 receivers spaced about 2 yards apart
• Line up 2 QBs facing the receivers and 10 yards away; each has a ball.• The QBs randomly alternate who they throw to, never throwing to the same
guy two times in a row.• Once a receiver has caught a ball he must immediately deliver it right back
to one of the QBs (it doesn’t have to be the QB who threw him the ball).• Start slowly and then build up the pace
QB – Landmark Passing DrillPurpose: To improve the QB’s accuracy when throwing passes where he must lead the
receiver (corner, post, fade, deep out, fly, etc.)
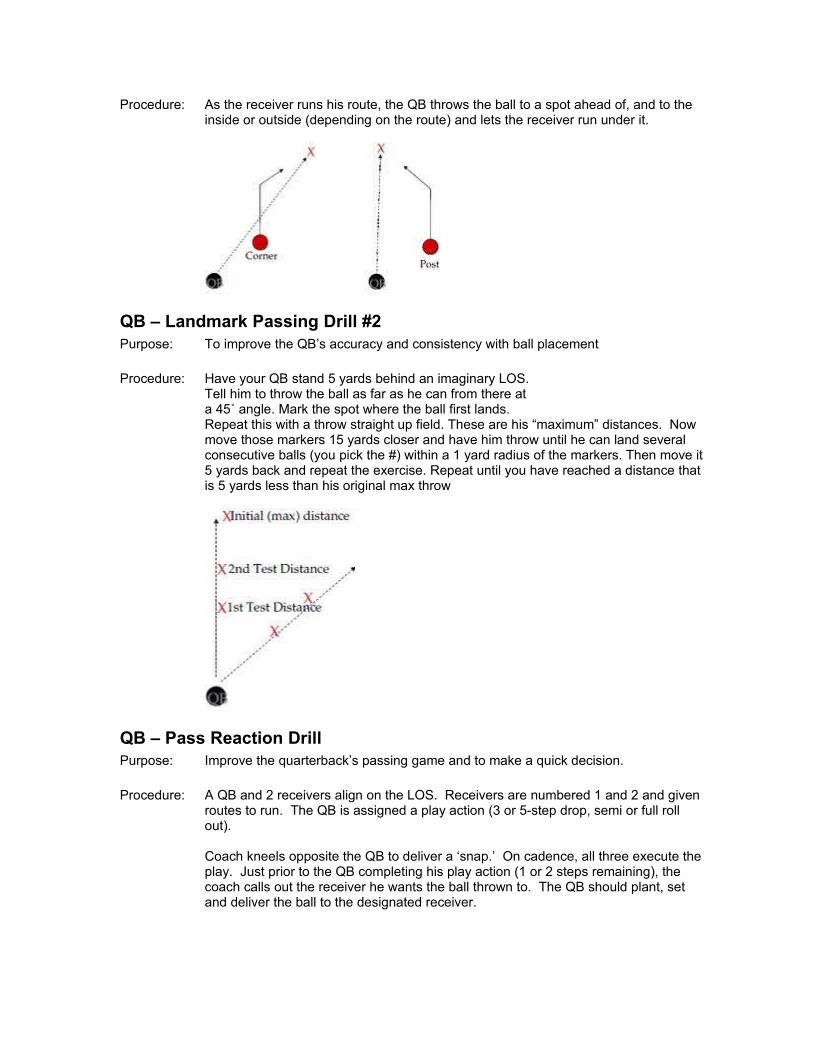
Procedure: As the receiver runs his route, the QB throws the ball to a spot ahead of, and to the inside or outside (depending on the route) and lets the receiver run under it.
QB – Landmark Passing Drill #2Purpose: To improve the QB’s accuracy and consistency with ball placement Procedure: Have your QB stand 5 yards behind an imaginary LOS.
Tell him to throw the ball as far as he can from there ata 45˚ angle. Mark the spot where the ball first lands.Repeat this with a throw straight up field. These are his “maximum” distances. Now move those markers 15 yards closer and have him throw until he can land several consecutive balls (you pick the #) within a 1 yard radius of the markers. Then move it 5 yards back and repeat the exercise. Repeat until you have reached a distance that is 5 yards less than his original max throw
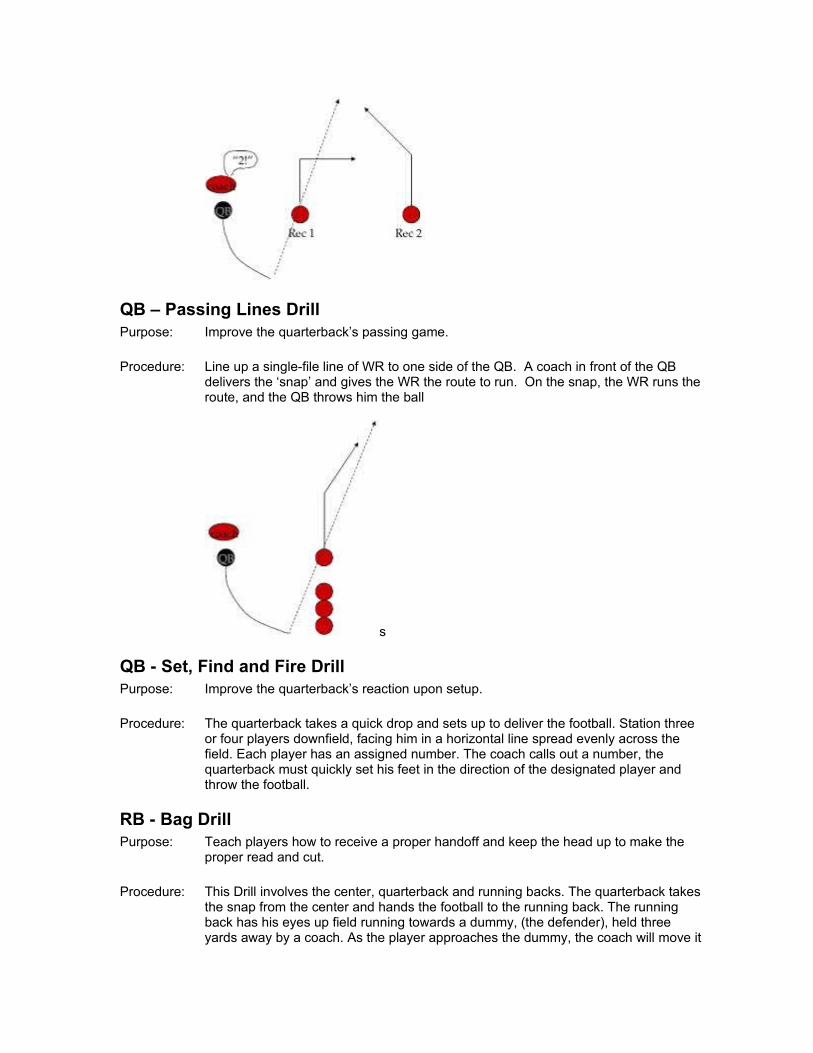
QB – Pass Reaction DrillPurpose: Improve the quarterback’s passing game and to make a quick decision. Procedure: A QB and 2 receivers align on the LOS. Receivers are numbered 1 and 2 and given
routes to run. The QB is assigned a play action (3 or 5-step drop, semi or full roll out).
Coach kneels opposite the QB to deliver a ‘snap.’ On cadence, all three execute the play. Just prior to the QB completing his play action (1 or 2 steps remaining), the coach calls out the receiver he wants the ball thrown to. The QB should plant, set and deliver the ball to the designated receiver.
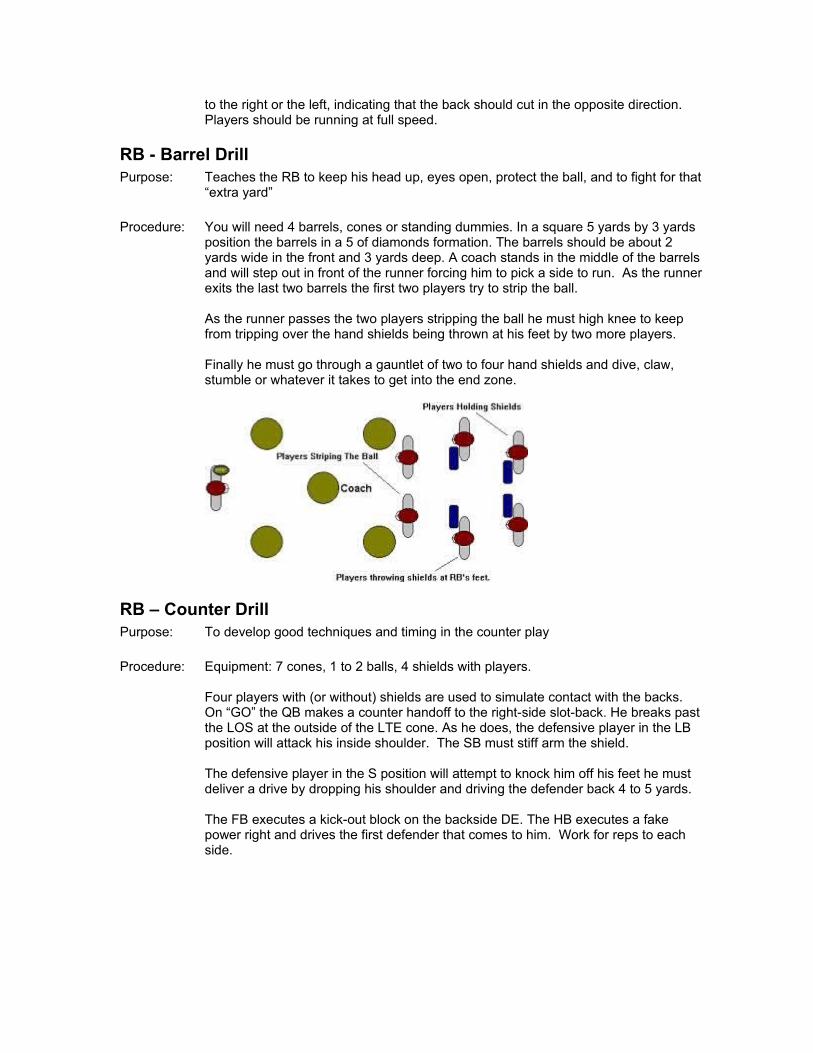
QB – Passing Lines DrillPurpose: Improve the quarterback’s passing game. Procedure: Line up a single-file line of WR to one side of the QB. A coach in front of the QB
delivers the ‘snap’ and gives the WR the route to run. On the snap, the WR runs the route, and the QB throws him the ball
s
QB - Set, Find and Fire DrillPurpose: Improve the quarterback’s reaction upon setup. Procedure: The quarterback takes a quick drop and sets up to deliver the football. Station three
or four players downfield, facing him in a horizontal line spread evenly across the field. Each player has an assigned number. The coach calls out a number, the quarterback must quickly set his feet in the direction of the designated player and throw the football.
RB - Bag DrillPurpose: Teach players how to receive a proper handoff and keep the head up to make the
proper read and cut. Procedure: This Drill involves the center, quarterback and running backs. The quarterback takes
the snap from the center and hands the football to the running back. The running back has his eyes up field running towards a dummy, (the defender), held three yards away by a coach. As the player approaches the dummy, the coach will move it
to the right or the left, indicating that the back should cut in the opposite direction. Players should be running at full speed.
RB - Barrel DrillPurpose: Teaches the RB to keep his head up, eyes open, protect the ball, and to fight for that
“extra yard” Procedure: You will need 4 barrels, cones or standing dummies. In a square 5 yards by 3 yards
position the barrels in a 5 of diamonds formation. The barrels should be about 2 yards wide in the front and 3 yards deep. A coach stands in the middle of the barrels and will step out in front of the runner forcing him to pick a side to run. As the runner exits the last two barrels the first two players try to strip the ball.
As the runner passes the two players stripping the ball he must high knee to keep from tripping over the hand shields being thrown at his feet by two more players.
Finally he must go through a gauntlet of two to four hand shields and dive, claw, stumble or whatever it takes to get into the end zone.
RB – Counter DrillPurpose: To develop good techniques and timing in the counter play Procedure: Equipment: 7 cones, 1 to 2 balls, 4 shields with players.
Four players with (or without) shields are used to simulate contact with the backs. On “GO” the QB makes a counter handoff to the right-side slot-back. He breaks past the LOS at the outside of the LTE cone. As he does, the defensive player in the LB position will attack his inside shoulder. The SB must stiff arm the shield.
The defensive player in the S position will attempt to knock him off his feet he must deliver a drive by dropping his shoulder and driving the defender back 4 to 5 yards.
The FB executes a kick-out block on the backside DE. The HB executes a fake power right and drives the first defender that comes to him. Work for reps to each side.
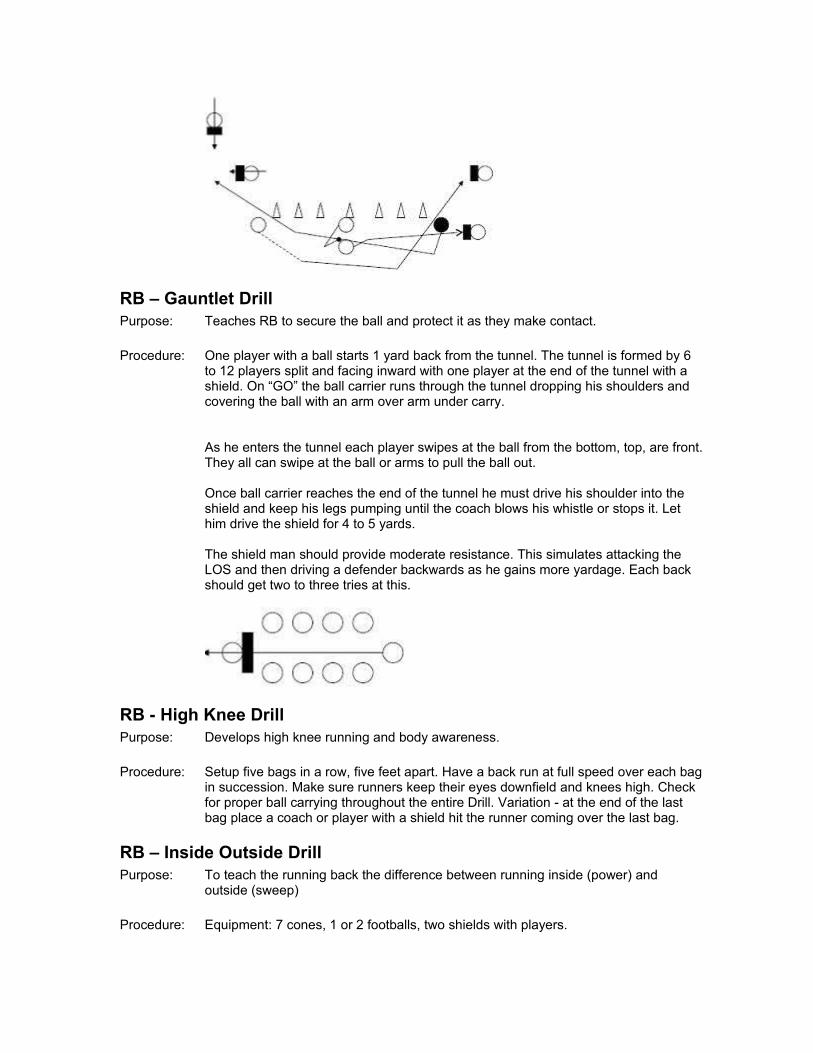
RB – Gauntlet DrillPurpose: Teaches RB to secure the ball and protect it as they make contact. Procedure: One player with a ball starts 1 yard back from the tunnel. The tunnel is formed by 6
to 12 players split and facing inward with one player at the end of the tunnel with a shield. On “GO” the ball carrier runs through the tunnel dropping his shoulders and covering the ball with an arm over arm under carry.
As he enters the tunnel each player swipes at the ball from the bottom, top, are front. They all can swipe at the ball or arms to pull the ball out.
Once ball carrier reaches the end of the tunnel he must drive his shoulder into the shield and keep his legs pumping until the coach blows his whistle or stops it. Let him drive the shield for 4 to 5 yards.
The shield man should provide moderate resistance. This simulates attacking the LOS and then driving a defender backwards as he gains more yardage. Each back should get two to three tries at this.
RB - High Knee DrillPurpose: Develops high knee running and body awareness. Procedure: Setup five bags in a row, five feet apart. Have a back run at full speed over each bag
in succession. Make sure runners keep their eyes downfield and knees high. Check for proper ball carrying throughout the entire Drill. Variation - at the end of the last bag place a coach or player with a shield hit the runner coming over the last bag.
RB – Inside Outside DrillPurpose: To teach the running back the difference between running inside (power) and
outside (sweep) Procedure: Equipment: 7 cones, 1 or 2 footballs, two shields with players.
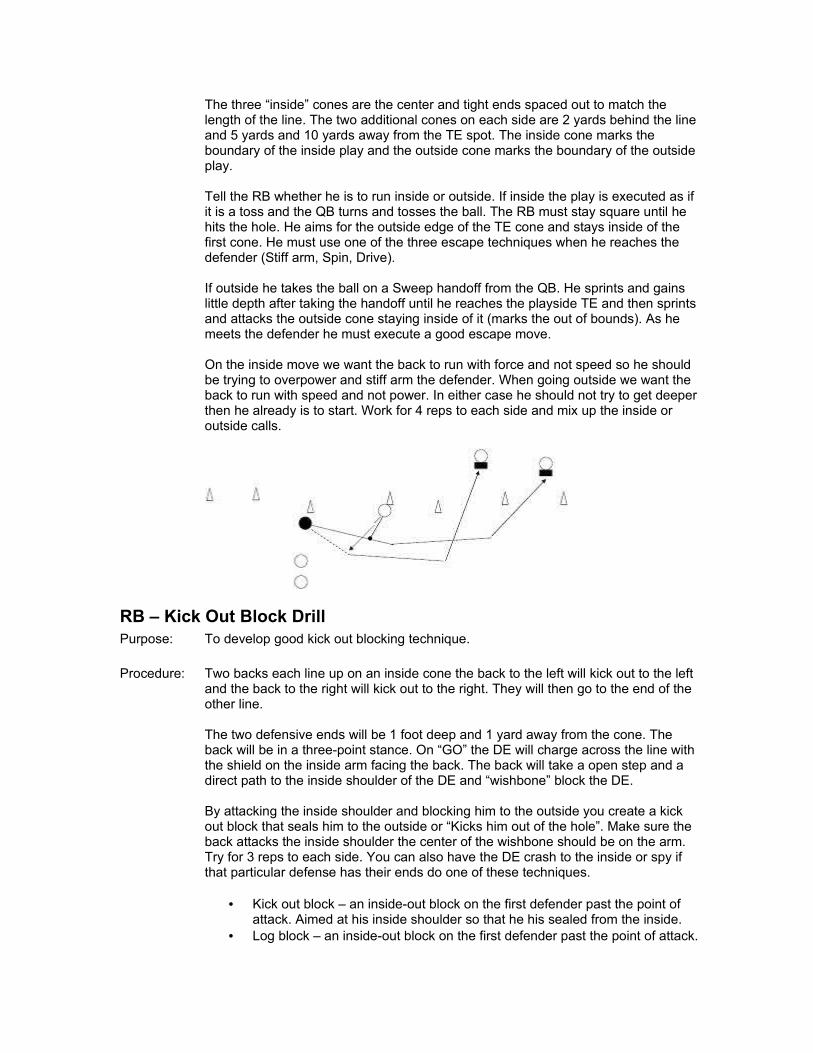
The three “inside” cones are the center and tight ends spaced out to match the length of the line. The two additional cones on each side are 2 yards behind the line and 5 yards and 10 yards away from the TE spot. The inside cone marks the boundary of the inside play and the outside cone marks the boundary of the outside play.
Tell the RB whether he is to run inside or outside. If inside the play is executed as if it is a toss and the QB turns and tosses the ball. The RB must stay square until he hits the hole. He aims for the outside edge of the TE cone and stays inside of the first cone. He must use one of the three escape techniques when he reaches the defender (Stiff arm, Spin, Drive).
If outside he takes the ball on a Sweep handoff from the QB. He sprints and gains little depth after taking the handoff until he reaches the playside TE and then sprints and attacks the outside cone staying inside of it (marks the out of bounds). As he meets the defender he must execute a good escape move.
On the inside move we want the back to run with force and not speed so he should be trying to overpower and stiff arm the defender. When going outside we want the back to run with speed and not power. In either case he should not try to get deeper then he already is to start. Work for 4 reps to each side and mix up the inside or outside calls.
RB – Kick Out Block DrillPurpose: To develop good kick out blocking technique. Procedure: Two backs each line up on an inside cone the back to the left will kick out to the left
and the back to the right will kick out to the right. They will then go to the end of the other line.
The two defensive ends will be 1 foot deep and 1 yard away from the cone. The back will be in a three-point stance. On “GO” the DE will charge across the line with the shield on the inside arm facing the back. The back will take a open step and a direct path to the inside shoulder of the DE and “wishbone” block the DE.
By attacking the inside shoulder and blocking him to the outside you create a kick out block that seals him to the outside or “Kicks him out of the hole”. Make sure the back attacks the inside shoulder the center of the wishbone should be on the arm. Try for 3 reps to each side. You can also have the DE crash to the inside or spy if that particular defense has their ends do one of these techniques.
• Kick out block – an inside-out block on the first defender past the point of attack. Aimed at his inside shoulder so that he his sealed from the inside.
• Log block – an inside-out block on the first defender past the point of attack.
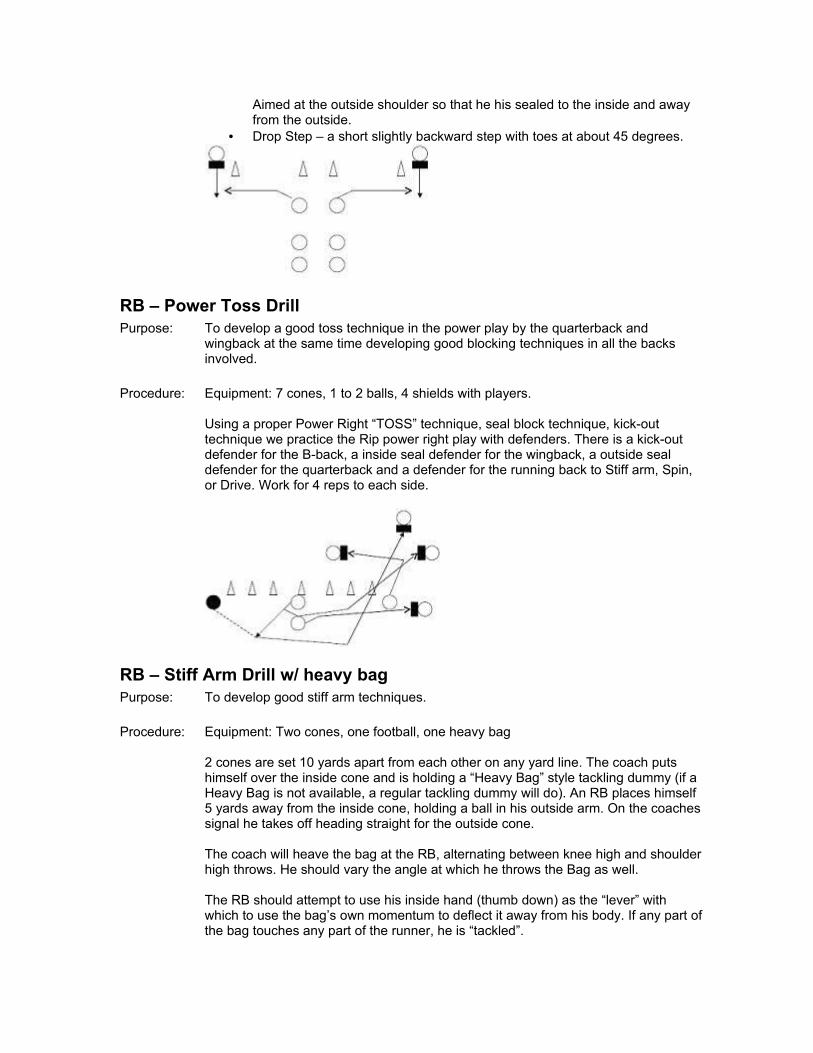
Aimed at the outside shoulder so that he his sealed to the inside and away from the outside.
• Drop Step – a short slightly backward step with toes at about 45 degrees.
RB – Power Toss DrillPurpose: To develop a good toss technique in the power play by the quarterback and
wingback at the same time developing good blocking techniques in all the backs involved.
Procedure: Equipment: 7 cones, 1 to 2 balls, 4 shields with players.
Using a proper Power Right “TOSS” technique, seal block technique, kick-out technique we practice the Rip power right play with defenders. There is a kick-out defender for the B-back, a inside seal defender for the wingback, a outside seal defender for the quarterback and a defender for the running back to Stiff arm, Spin, or Drive. Work for 4 reps to each side.
RB – Stiff Arm Drill w/ heavy bagPurpose: To develop good stiff arm techniques. Procedure: Equipment: Two cones, one football, one heavy bag
2 cones are set 10 yards apart from each other on any yard line. The coach puts himself over the inside cone and is holding a “Heavy Bag” style tackling dummy (if a Heavy Bag is not available, a regular tackling dummy will do). An RB places himself 5 yards away from the inside cone, holding a ball in his outside arm. On the coaches signal he takes off heading straight for the outside cone.
The coach will heave the bag at the RB, alternating between knee high and shoulder high throws. He should vary the angle at which he throws the Bag as well.
The RB should attempt to use his inside hand (thumb down) as the “lever” with which to use the bag’s own momentum to deflect it away from his body. If any part of the bag touches any part of the runner, he is “tackled”.
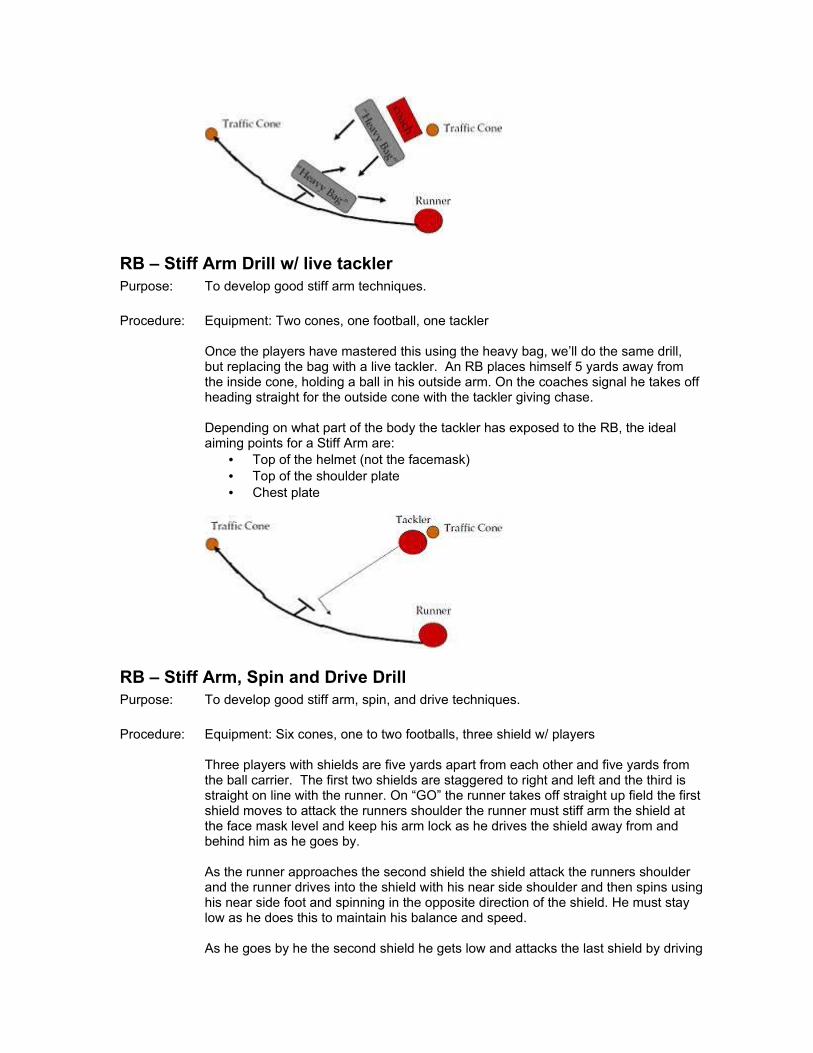
RB – Stiff Arm Drill w/ live tacklerPurpose: To develop good stiff arm techniques. Procedure: Equipment: Two cones, one football, one tackler
Once the players have mastered this using the heavy bag, we’ll do the same drill, but replacing the bag with a live tackler. An RB places himself 5 yards away from the inside cone, holding a ball in his outside arm. On the coaches signal he takes off heading straight for the outside cone with the tackler giving chase.
Depending on what part of the body the tackler has exposed to the RB, the ideal aiming points for a Stiff Arm are:
• Top of the helmet (not the facemask)• Top of the shoulder plate• Chest plate
RB – Stiff Arm, Spin and Drive DrillPurpose: To develop good stiff arm, spin, and drive techniques. Procedure: Equipment: Six cones, one to two footballs, three shield w/ players
Three players with shields are five yards apart from each other and five yards from the ball carrier. The first two shields are staggered to right and left and the third is straight on line with the runner. On “GO” the runner takes off straight up field the first shield moves to attack the runners shoulder the runner must stiff arm the shield at the face mask level and keep his arm lock as he drives the shield away from and behind him as he goes by.
As the runner approaches the second shield the shield attack the runners shoulder and the runner drives into the shield with his near side shoulder and then spins using his near side foot and spinning in the opposite direction of the shield. He must stay low as he does this to maintain his balance and speed.
As he goes by he the second shield he gets low and attacks the last shield by driving
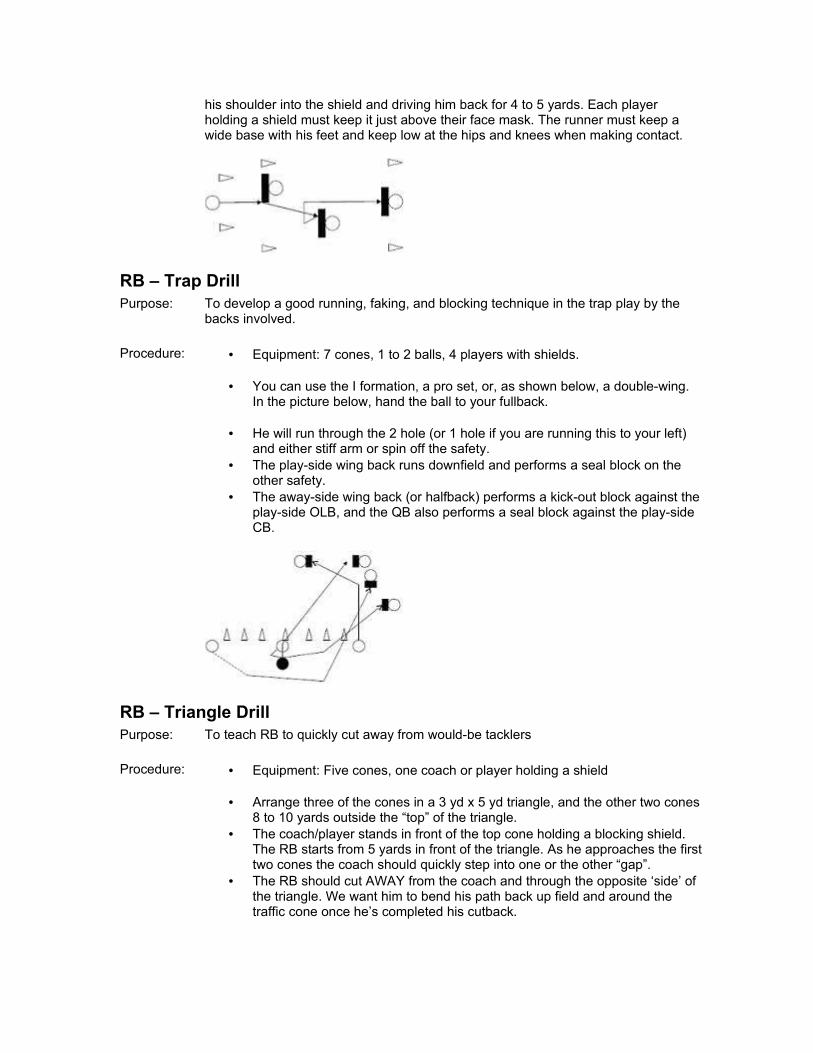
his shoulder into the shield and driving him back for 4 to 5 yards. Each player holding a shield must keep it just above their face mask. The runner must keep a wide base with his feet and keep low at the hips and knees when making contact.
RB – Trap DrillPurpose: To develop a good running, faking, and blocking technique in the trap play by the
backs involved. Procedure: • Equipment: 7 cones, 1 to 2 balls, 4 players with shields.
• You can use the I formation, a pro set, or, as shown below, a double-wing. In the picture below, hand the ball to your fullback.
• He will run through the 2 hole (or 1 hole if you are running this to your left) and either stiff arm or spin off the safety.
• The play-side wing back runs downfield and performs a seal block on the other safety.
• The away-side wing back (or halfback) performs a kick-out block against the play-side OLB, and the QB also performs a seal block against the play-side CB.
RB – Triangle DrillPurpose: To teach RB to quickly cut away from would-be tacklers Procedure: • Equipment: Five cones, one coach or player holding a shield
• Arrange three of the cones in a 3 yd x 5 yd triangle, and the other two cones 8 to 10 yards outside the “top” of the triangle.
• The coach/player stands in front of the top cone holding a blocking shield. The RB starts from 5 yards in front of the triangle. As he approaches the first two cones the coach should quickly step into one or the other “gap”.
• The RB should cut AWAY from the coach and through the opposite ‘side’ of the triangle. We want him to bend his path back up field and around the traffic cone once he’s completed his cutback.
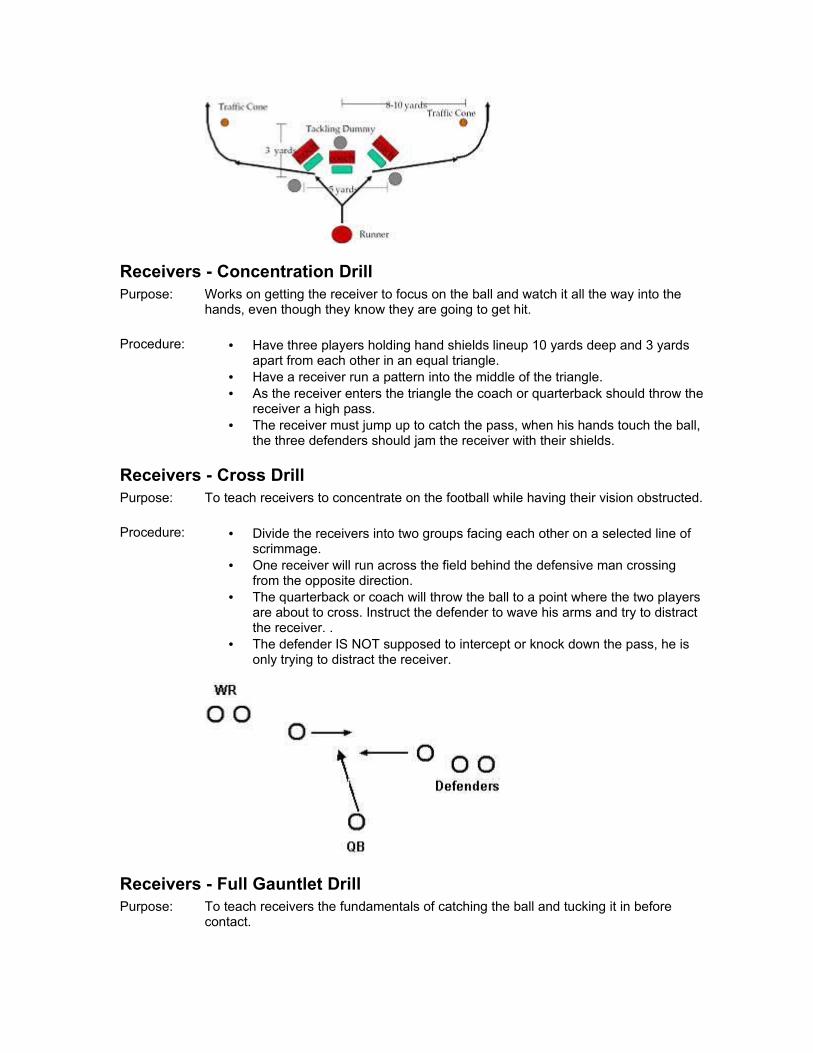
Receivers - Concentration DrillPurpose: Works on getting the receiver to focus on the ball and watch it all the way into the
hands, even though they know they are going to get hit. Procedure: • Have three players holding hand shields lineup 10 yards deep and 3 yards
apart from each other in an equal triangle. • Have a receiver run a pattern into the middle of the triangle. • As the receiver enters the triangle the coach or quarterback should throw the
receiver a high pass. • The receiver must jump up to catch the pass, when his hands touch the ball,
the three defenders should jam the receiver with their shields.
Receivers - Cross DrillPurpose: To teach receivers to concentrate on the football while having their vision obstructed. Procedure: • Divide the receivers into two groups facing each other on a selected line of
scrimmage. • One receiver will run across the field behind the defensive man crossing
from the opposite direction. • The quarterback or coach will throw the ball to a point where the two players
are about to cross. Instruct the defender to wave his arms and try to distract the receiver. .
• The defender IS NOT supposed to intercept or knock down the pass, he is only trying to distract the receiver.
Receivers - Full Gauntlet DrillPurpose: To teach receivers the fundamentals of catching the ball and tucking it in before
contact.
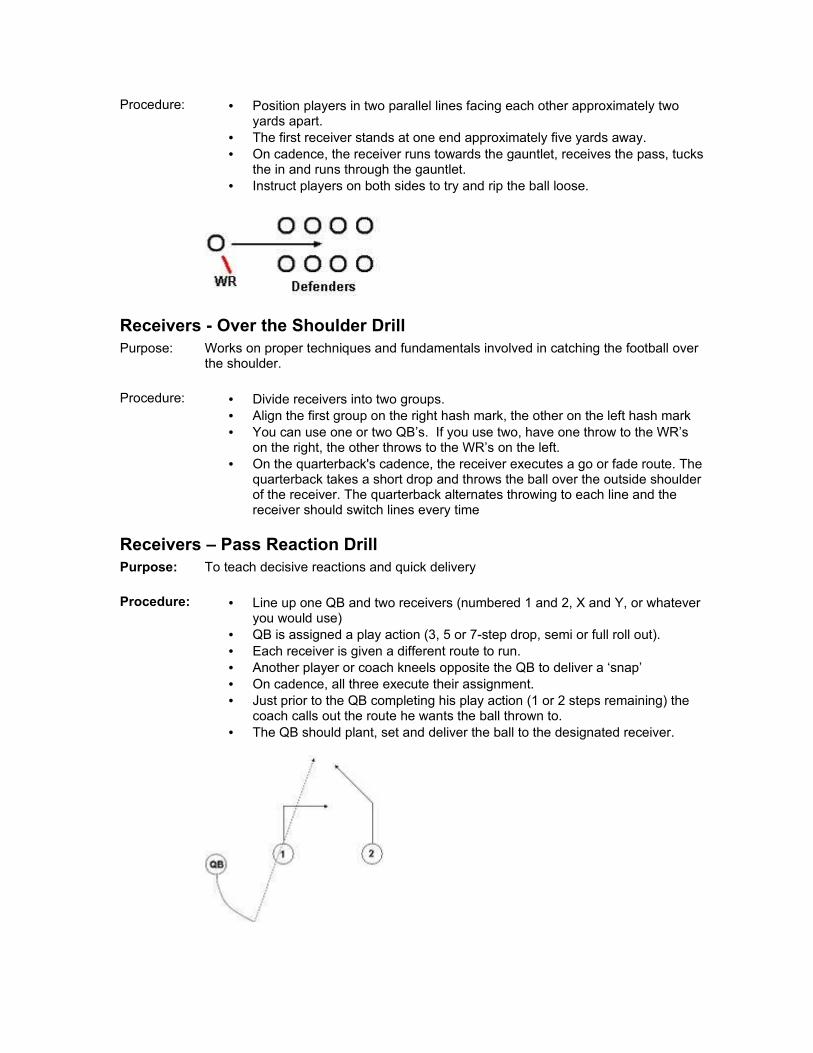
Procedure: • Position players in two parallel lines facing each other approximately two yards apart.
• The first receiver stands at one end approximately five yards away. • On cadence, the receiver runs towards the gauntlet, receives the pass, tucks
the in and runs through the gauntlet. • Instruct players on both sides to try and rip the ball loose.
Receivers - Over the Shoulder DrillPurpose: Works on proper techniques and fundamentals involved in catching the football over
the shoulder. Procedure: • Divide receivers into two groups.
• Align the first group on the right hash mark, the other on the left hash mark• You can use one or two QB’s. If you use two, have one throw to the WR’s
on the right, the other throws to the WR’s on the left.• On the quarterback's cadence, the receiver executes a go or fade route. The
quarterback takes a short drop and throws the ball over the outside shoulder of the receiver. The quarterback alternates throwing to each line and the receiver should switch lines every time
Receivers – Pass Reaction DrillPurpose: To teach decisive reactions and quick delivery Procedure: • Line up one QB and two receivers (numbered 1 and 2, X and Y, or whatever
you would use)• QB is assigned a play action (3, 5 or 7-step drop, semi or full roll out).• Each receiver is given a different route to run.• Another player or coach kneels opposite the QB to deliver a ‘snap’• On cadence, all three execute their assignment.• Just prior to the QB completing his play action (1 or 2 steps remaining) the
coach calls out the route he wants the ball thrown to. • The QB should plant, set and deliver the ball to the designated receiver.
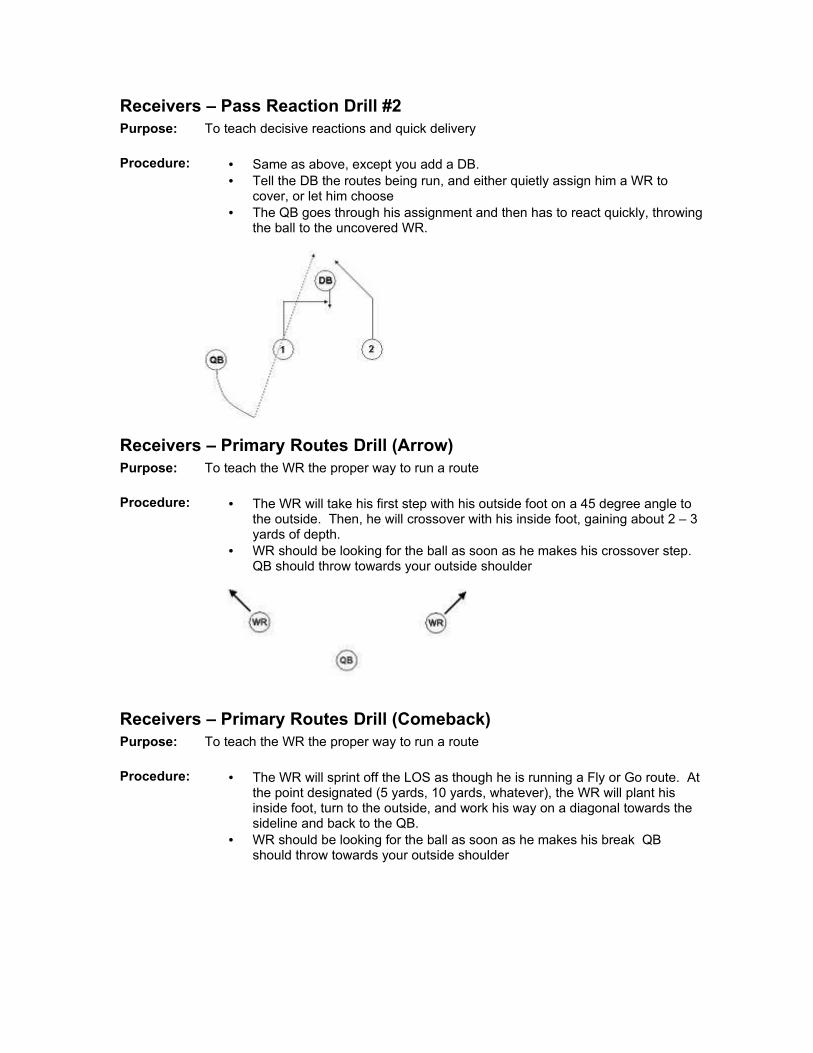
Receivers – Pass Reaction Drill #2Purpose: To teach decisive reactions and quick delivery Procedure: • Same as above, except you add a DB.
• Tell the DB the routes being run, and either quietly assign him a WR to cover, or let him choose
• The QB goes through his assignment and then has to react quickly, throwing the ball to the uncovered WR.
Receivers – Primary Routes Drill (Arrow)Purpose: To teach the WR the proper way to run a route Procedure: • The WR will take his first step with his outside foot on a 45 degree angle to
the outside. Then, he will crossover with his inside foot, gaining about 2 – 3 yards of depth.
• WR should be looking for the ball as soon as he makes his crossover step. QB should throw towards your outside shoulder
Receivers – Primary Routes Drill (Comeback)Purpose: To teach the WR the proper way to run a route Procedure: • The WR will sprint off the LOS as though he is running a Fly or Go route. At
the point designated (5 yards, 10 yards, whatever), the WR will plant his inside foot, turn to the outside, and work his way on a diagonal towards the sideline and back to the QB.
• WR should be looking for the ball as soon as he makes his break QB should throw towards your outside shoulder
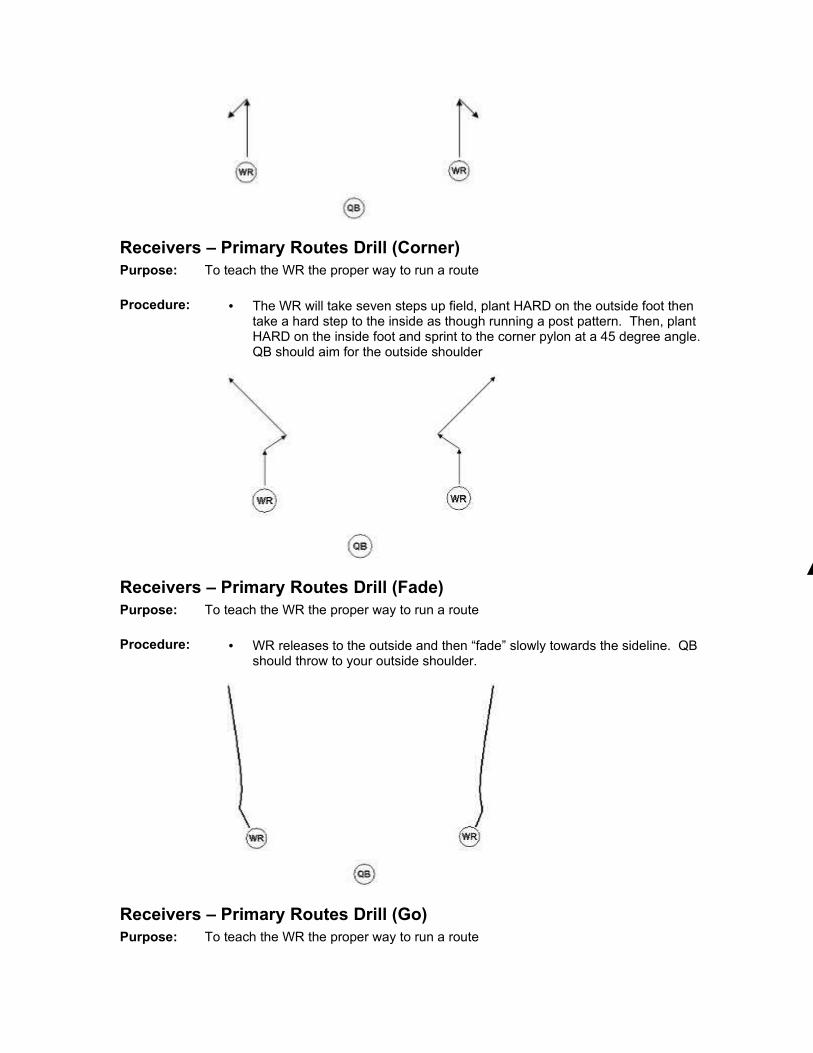
Receivers – Primary Routes Drill (Corner)Purpose: To teach the WR the proper way to run a route Procedure: • The WR will take seven steps up field, plant HARD on the outside foot then
take a hard step to the inside as though running a post pattern. Then, plant HARD on the inside foot and sprint to the corner pylon at a 45 degree angle. QB should aim for the outside shoulder
Receivers – Primary Routes Drill (Fade)Purpose: To teach the WR the proper way to run a route Procedure: • WR releases to the outside and then “fade” slowly towards the sideline. QB
should throw to your outside shoulder.
Receivers – Primary Routes Drill (Go)Purpose: To teach the WR the proper way to run a route
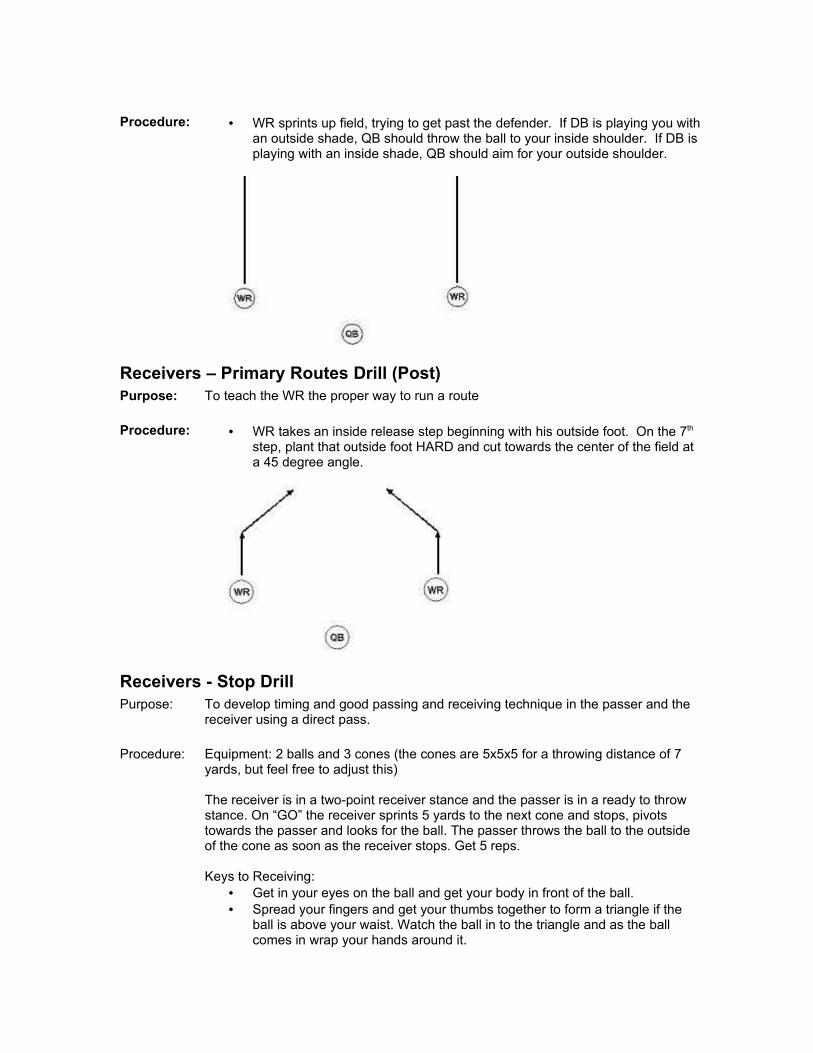
Procedure: • WR sprints up field, trying to get past the defender. If DB is playing you with
an outside shade, QB should throw the ball to your inside shoulder. If DB is playing with an inside shade, QB should aim for your outside shoulder.
Receivers – Primary Routes Drill (Post)Purpose: To teach the WR the proper way to run a route Procedure: • WR takes an inside release step beginning with his outside foot. On the 7th
step, plant that outside foot HARD and cut towards the center of the field at a 45 degree angle.
Receivers - Stop DrillPurpose: To develop timing and good passing and receiving technique in the passer and the
receiver using a direct pass. Procedure: Equipment: 2 balls and 3 cones (the cones are 5x5x5 for a throwing distance of 7
yards, but feel free to adjust this)
The receiver is in a two-point receiver stance and the passer is in a ready to throw stance. On “GO” the receiver sprints 5 yards to the next cone and stops, pivots towards the passer and looks for the ball. The passer throws the ball to the outside of the cone as soon as the receiver stops. Get 5 reps.
Keys to Receiving:• Get in your eyes on the ball and get your body in front of the ball.• Spread your fingers and get your thumbs together to form a triangle if the
ball is above your waist. Watch the ball in to the triangle and as the ball comes in wrap your hands around it.
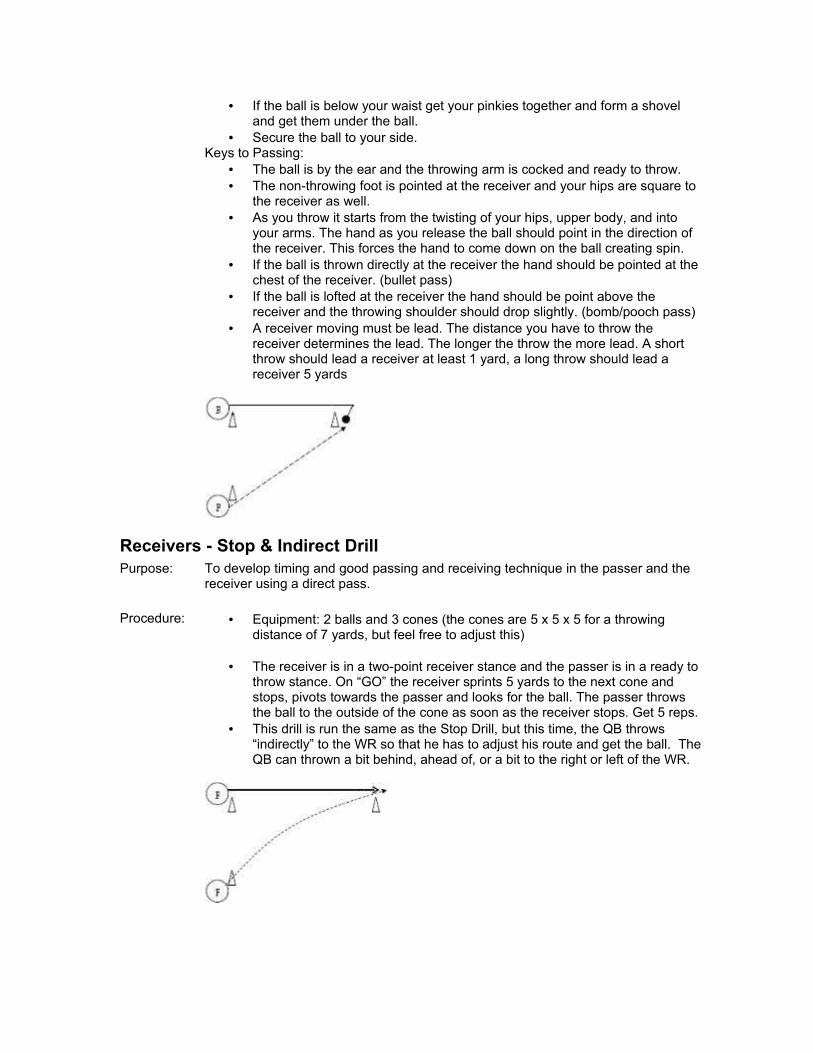
• If the ball is below your waist get your pinkies together and form a shovel and get them under the ball.
• Secure the ball to your side.Keys to Passing:
• The ball is by the ear and the throwing arm is cocked and ready to throw.• The non-throwing foot is pointed at the receiver and your hips are square to
the receiver as well.• As you throw it starts from the twisting of your hips, upper body, and into
your arms. The hand as you release the ball should point in the direction of the receiver. This forces the hand to come down on the ball creating spin.
• If the ball is thrown directly at the receiver the hand should be pointed at the chest of the receiver. (bullet pass)
• If the ball is lofted at the receiver the hand should be point above the receiver and the throwing shoulder should drop slightly. (bomb/pooch pass)
• A receiver moving must be lead. The distance you have to throw the receiver determines the lead. The longer the throw the more lead. A short throw should lead a receiver at least 1 yard, a long throw should lead a receiver 5 yards
Receivers - Stop & Indirect DrillPurpose: To develop timing and good passing and receiving technique in the passer and the
receiver using a direct pass. Procedure: • Equipment: 2 balls and 3 cones (the cones are 5 x 5 x 5 for a throwing
distance of 7 yards, but feel free to adjust this)
• The receiver is in a two-point receiver stance and the passer is in a ready to throw stance. On “GO” the receiver sprints 5 yards to the next cone and stops, pivots towards the passer and looks for the ball. The passer throws the ball to the outside of the cone as soon as the receiver stops. Get 5 reps.
• This drill is run the same as the Stop Drill, but this time, the QB throws “indirectly” to the WR so that he has to adjust his route and get the ball. The QB can thrown a bit behind, ahead of, or a bit to the right or left of the WR.
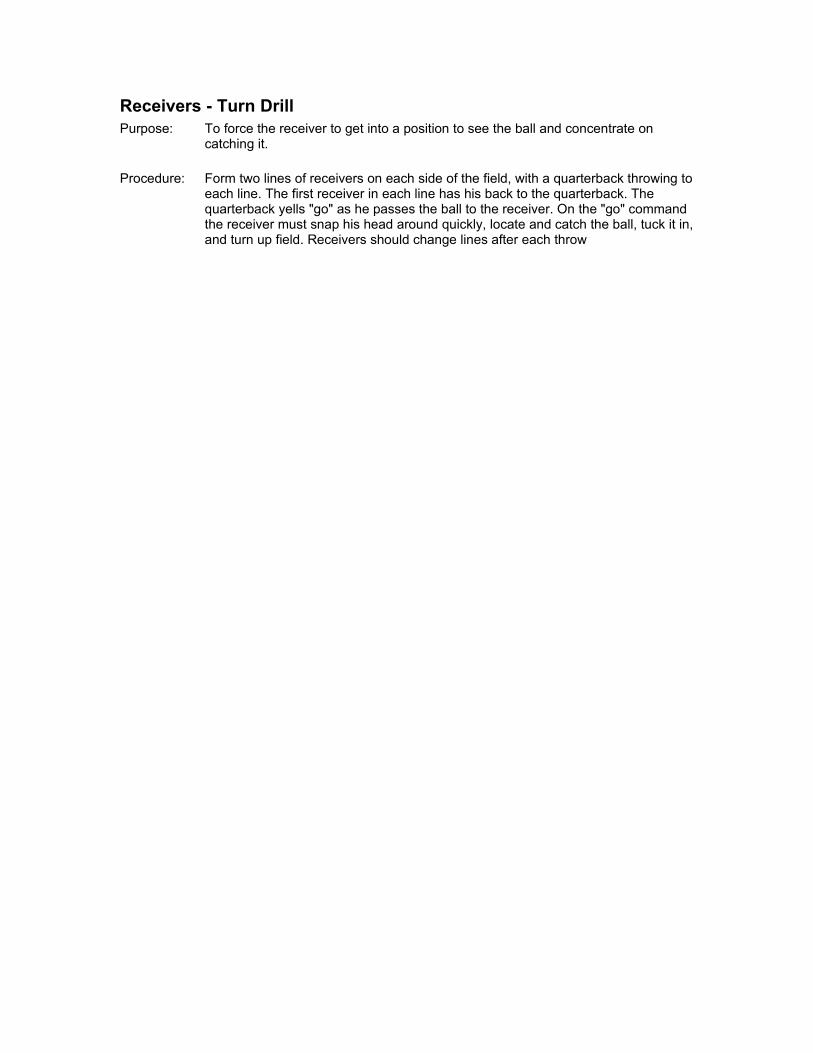
Receivers - Turn DrillPurpose: To force the receiver to get into a position to see the ball and concentrate on
catching it. Procedure: Form two lines of receivers on each side of the field, with a quarterback throwing to
each line. The first receiver in each line has his back to the quarterback. The quarterback yells "go" as he passes the ball to the receiver. On the "go" command the receiver must snap his head around quickly, locate and catch the ball, tuck it in, and turn up field. Receivers should change lines after each throw