10 essentials - real estate photography
DESCRIPTION
10 essentials to make real estate photography. Courtesy of Larry Lohrman, photographyforrealestate.netTRANSCRIPT

The sole purpose of a real estate photo is to sell. You want potential buyers who see the photos of the listing on the web or in other advertising to say: “Wow - I like that, I want to see more!” Although professionally staging rooms is always a big help, be careful not to focus too much attention on furniture and décor because the buyer is not purchasing these. Focus more on the architecture and room spaces since each photo you shoot must present a particular room at its best. The way I do this is to ask myself, “What are the most important features of this room?” and then present these features in the photo. Example: Both photos below are meant to show off the features of a large daylight basement room. The important features of this room are a unique, custom-designed fireplace, a wall of windows
looking out to a wooded area and a wall of storage to the left of the fireplace.
Photo 1-Cannot see main features well
Photo 2-Shows the features better
Photo 1 is weak at presenting the most important features of this room because: • The furniture hides the fireplace so you
can’t tell from photo that the fireplace design is anything out of the ordinary.
1– Understand the Purpose of Each Photo
Chapter 2 10 Essentials of Real Estate Photography
The following 10 principles are based on first being clear about what the purpose of each image is and then making every aspect of the image support that purpose. Then simplifying the image so the purpose is clear and direct. Simplifying an image and making it’s message direct is done by removing distractions. Distractions are things like color casts, slanted and curved walls that distract the viewers attention Even things like mixing portrait and landscape mode in a slide presentation is a distraction in the way images are presented.
Page 7

Page 8
10 Essent ia ls of Real Es tate Photography
• You don’t get a strong sense of the outside view even though you can see out the windows.
• The focus of the photo is more about the couches and patterned rug (furniture and décor) rather than the architecture or the unique features of the room.
• Although this was indeed large and long room, the exaggerated perspective caused by me opening my lens as wide as possible (16mm) makes it look like a small bowling alley! This perspective exaggeration also distracts the viewer’s attention away from what you want to communicate about this room.
Photo 2 on the other hand is a much stronger photo because: • The photo feels less cluttered with
furniture, and was taken closer to the fireplace to show off its custom design.
• You get a much better sense of the view from the windows, even though you do not see the storage wall to the left of the fireplace. Better to be clear and show less.
• The perspective exaggeration is not as distracting as in photo 1, since this photo was taken with the wide angle zoom set to 24mm instead of 16mm.
2– Use a Wide-angle Lens to Shoot Rooms You are frequently going to be forced to shoot in tight spaces when taking interior shots. Without a wide-angle lens, you are not going to be able to present as much of the room as you need to! Wide-angle zoom lenses are ideal for shooting interiors because you can adjust them to get enough of a field of view for the shot, but not enough to have distracting perspective distortion. In my experience, you need to use at least a 24mm equivalent lens for effective interior shots – many situations benefit from an even wider-angle lens! Unfortunately, very few off-the-shelf compact digital cameras come with lenses that are wide enough to effectively shoot interiors. DSLRs allow you to add a lens that’s 24mm or
wider, but you need to keep in mind that the crop factor may reduce a lens’ angle of view. For example, when you mount a 24mm lens on a DSLR that has a crop factor of 1.5, you end up with a 36mm equivalent lens, not a 24mm. (To learn about crop factors and/or to see some cam-era recommendations, check out Chapter 3, Choosing a Digital Camera or at: www.lohrman.com/cameratab.htm) Example:
Photo 1– Shot with 35mm lens
Photo 2– Shot with 16mm lens Both of these photos were shot with my back against one wall of a master bedroom. In photo 1, you can hardly tell anything about the room except it has a bed in it and there’s a window off to one side because the room was shot with a 35mm lens, which is very similar to what most off-the-shelf cameras come with.
In photo 2, you can tell a lot more about the room because it was shot with a wide-angle

lens, which in this case was set to 16mm. This photo shows most of the windows in the room, as well as its high, peaked ceiling. Interestingly, photo 1 in the previous example and photo 2 here were shot with the same 16mm lens setting on my wide-angle lens. How-ever, the perspective distortion is less noticeable in photo 2 above because the room is much smaller. This is why you need to use your judgment when using wide-angle lenses to avoid introducing distracting perspective exageration in your shots.
Page 9
10 Essent ia ls of Real Es tate Photography
3– Simplify Images
Remove everything (and I mean EVERY-THING) from the image that distracts from the purpose of the photo. A common problem when shooting real estate photos is that homes that are currently occupied are usually cluttered with furniture and other stuff. These items can distract attention away from the purpose of the photo. The best way to simplify your photo is to have a professional home stager or stylist arrange the home before you shoot it. However, using a stager is a decision made by the Realtor with the homeowner since there are costs involved with doing this. A good Realtor will explain home staging and/or real estate photography to the seller and makes sure that their home is “parade ready” before photographs are taken and their home goes on the market. Although staging makes a huge difference in how fast a home sells, not all Realtors understand or are good at doing this. So if a home you’re about to shoot is not staged, you may need to move things out of the way and make adjustments (within reason) needed to make the home to look its best. Often this involves removing refrigerator clutter, clearing off counters, and moving extraneous decorative items out of the photo.
Example:
Photo 1– Staged living room
Photo 2– Staged small bedroom Both Photo 1 and 2 are staged rooms: a professional designer started with empty rooms, brought in all the furniture and decorator items and arranged the rooms to look their best. Because no one lives in these rooms and they were arranged for photography, the resulting photos are simpler and less cluttered. It’s also possible to simplify images of homes that are cluttered by temporarily moving items off counter tops and choosing the angle of a shot to exclude rather than include non-essential décor items or the normal clutter of a lived in home.

Page 10
10 Essent ia ls of Real Es tate Photography
4– The Primary Exterior Shot is THE Most Important Photo
Realtors are frequently limited to a single image to promote the property in their web and print advertising, and the one image they most frequently use is an exterior shot of the home. (Not surprisingly, this is often also the one image required by the MLS when listing a property.) You need to spend extra time on this shot to make sure it is strong and communicates as many of the property’s features as possible. Remember – this may be the only image a buyer sees of the home! Example:
Photo 1– Front of the home
Photo 2– Rear view used for marketing In photo 1, you see a pretty standard front shot of the home. Unfortunately, the home in this example was not very photogenic from the front
so this shot doesn’t show many of the features of the home beyond the 3-car garage. In Photo 2, you see the back of the property of the same home, revealing that this property has a wonderfully landscaped yard, as well as a great view. This photo took me three days (because of weather) to capture and is a composite of the house from one day and the view from a different day. This second shot was the main marketing photograph since it shows so much more about the home .
5– Render Interiors Light and Bright
Make sure your interior shots are light and bright. Buyers are attracted to homes that have bright, cheery interiors, not dark, moody ones. To make a room look this way, you need an external flash unit, a tripod for long exposures and photo-editing software to adjust and improve overall brightness and contrast. Example: Photo 1– Interior too dark Photo 2– Bright interior
Page 11
10 Essentials of Real Estate Photography
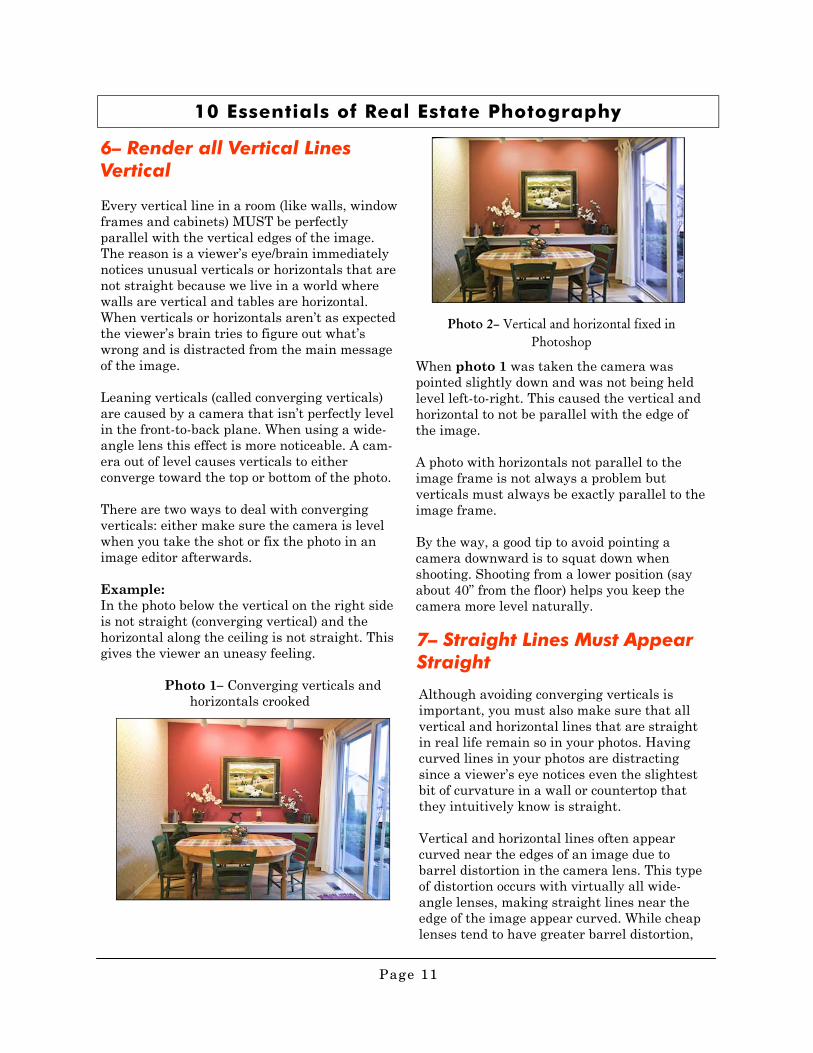
6– Render all Vertical Lines Vertical
Every vertical line in a room (like walls, window frames and cabinets) MUST be perfectly parallel with the vertical edges of the image. The reason is a viewer’s eye/brain immediately notices unusual verticals or horizontals that are not straight because we live in a world where walls are vertical and tables are horizontal. When verticals or horizontals aren’t as expected the viewer’s brain tries to figure out what’s wrong and is distracted from the main message of the image. Leaning verticals (called converging verticals) are caused by a camera that isn’t perfectly level in the front-to-back plane. When using a wide-angle lens this effect is more noticeable. A cam-era out of level causes verticals to either converge toward the top or bottom of the photo. There are two ways to deal with converging verticals: either make sure the camera is level when you take the shot or fix the photo in an image editor afterwards. Example: In the photo below the vertical on the right side is not straight (converging vertical) and the horizontal along the ceiling is not straight. This gives the viewer an uneasy feeling.
Photo 1– Converging verticals and horizontals crooked
Photo 2– Vertical and horizontal fixed in Photoshop
When photo 1 was taken the camera was pointed slightly down and was not being held level left-to-right. This caused the vertical and horizontal to not be parallel with the edge of the image. A photo with horizontals not parallel to the image frame is not always a problem but verticals must always be exactly parallel to the image frame. By the way, a good tip to avoid pointing a camera downward is to squat down when shooting. Shooting from a lower position (say about 40” from the floor) helps you keep the camera more level naturally.
7– Straight Lines Must Appear Straight
Although avoiding converging verticals is important, you must also make sure that all vertical and horizontal lines that are straight in real life remain so in your photos. Having curved lines in your photos are distracting since a viewer’s eye notices even the slightest bit of curvature in a wall or countertop that they intuitively know is straight. Vertical and horizontal lines often appear curved near the edges of an image due to barrel distortion in the camera lens. This type of distortion occurs with virtually all wide-angle lenses, making straight lines near the edge of the image appear curved. While cheap lenses tend to have greater barrel distortion,

Page 12
10 Essentials of Real Estate Photography
even the most expensive wide-angle lenses have it to some extent. You can correct barrel distortion either using an image editor or by keeping straight lines away from the edge of a photo where barrel distortion is most pronounced. The following example shows how to correct this type of distortion using both strategies.
Example:
Photo 1– Barrel distortion at edges of photo
Photo 2– Barrel distortion corrected
In photo 1, you can see an obvious case of barrel distortion with the refrigerator along the right side of the image. In photo 2, the barrel distortion was removed using the Distort > Lens correction filter in Photoshop. (Photoshop CS3, CS2 and Photoshop Elements 5.0 have this filter.) Other popular software applications that you can use to correct barrel distortion are called DXO and PTlens.
Another way to minimize barrel distortion appearance while shooting is to keep straight lines away from the edge of photos. Notice that barrel distortion is much less apparent along the left side of photo 1 than on the right side. This is because there are no long straight lines near the edge of the frame that can be distorted by the lens.
8– Don’t Let Burned Out Windows Distract
Windows can be hundreds of times brighter than the rest of a room, causing them to appear pure white or “burned-out”. This can be distracting since the human eye is naturally attracted to the brightest part of an image and this huge bright area distracts the viewer from the rest of the photo. Burned-out windows in listing photos are distracting for any home, but are a major problem for homes with great views. In these homes, agents and sellers expect that photos show both the interior, as well as the exterior view. You can control window burn-out by doing the following:
• Using an external flash unit to increase the interior light level.
• Shooting when the light level outside is close to the inside light level, usually just before and after sunset.
• Equalizing the brightness of the win-dows and interior in a photo-editor.
Example:
Photo 1– Window too burned out

10 Essentials of Real Estate Photography
Page 13
Photo 2– Window not burned-out
In photo 1, the window is so overexposed that your attention is continually drawn to this large, white area. It looks like a nuclear explosion is going on outside! In photo 2, the photo was taken when the light inside and outside were at similar levels. The strength of this image is increased because you can see the view outside. Note that bright windows are only a problem if they distract; some times they add to the feeling of room brightness and don’t distract.
9– Remove Color Casts
Control your white balance and light sources to avoid ugly color casts. Viewers expect to get an idea of the actual colors in a room and an improperly set white balance can add a distracting color cast to the photo. In the following examples, I walked into this room from a room that had large windows and didn’t change the white balance on my camera from daylight to incandescent light. One way to avoid this problem is to pay careful attention to whether most of the light in the room is coming from the outside or if it is from interior lighting. Knowing this will help you set the camera white balance accordingly. In many situations the white balance is a mix between daylight and artificial light. I find the easiest work flow is to leave the camera white balance set to Daylight (5000K) and adjust the balance to what looks the best when I open the image in Adobe Lightroom. However, if you
don’t routinely make adjustments for each image in Lightoom, or Photoshop you’ll need to pay careful attention to the light and keep the camera set to the correct white balance. Example: Photo 1– Distracting color cast Photo 2– Color cast corrected In photo 1, a distracting yellow-orange color cast appears because all of the light in this interior room comes from artificial (tungsten) light and the camera’s white balance was set to daylight. In photo 2, I adjusted the white bal-ance in Adobe Lightroom for artificial (tungsten) light to remove the color cast. You can make similar adjustments with Photoshop Elements and Photoshop.

10 Essentials of Real Estate Photography
Page 14
Vertical format (portrait mode) images don’t work well for most real estate web sites so just shoot horizontal shots unless you know you are going to use the image for a magazine cover or a vertical mode flyer. The reason vertical and/or mixed orientation doesn’t work on real estate web sites is these sites frequently use an automatic slide show presentation of the photos where each image dissolves into the next image. In this kind of slide show horizontal (landscape mode) images fill the frame and are shown full size where as vertical images are scrunched to fit the horizontal frame and thus have a large blank space left and right. This negates the smooth photo to photo transition and looks awkward. If you don’t believe me, purchase one of the new digital picture frames that display digital photos continuously in a slide show and sit it on your desk. After the first few hours of viewing you will swear never to mix portrait and landscape images again! For some reason many photographers feel it is essential to shoot small bathrooms and entries in vertical mode. But this is not true, the example below shows the essence of a small bathroom can just as easily be communicated in horizontal mode as vertical. In Photo 1 to the right, you see a typical powder room shot in vertical mode and in Photo 2, you see how a horizontal shot of the same powder room. The horizontal shot commu-nicates the essence of the powder room as does the vertical shot and the horizontal shot will work much better in slide shows.
Example:
Photo 1– Vertical mode small bathroom
Photo 2– Horizontal mode small bathroom Moving Beyond These Rules These 10 Essentials reflect the most common mistakes I see new real estate photographers making. Once you understand these issues and know how to control them, there will be cases where you will move beyond these rules. Bright windows are a good example. Many times window brightness can add to the feel of a bright room. The main issue is to be in control of the window brightness and use it to complement the image.
10– Use Only Horizontal mode Photos for Real Estate Websites