1 pointer a pointer is a variable that stores an address of another variable of a particular type. a...
TRANSCRIPT

1
Pointer
• A pointer is a variable that stores an address of another variable of a particular type.
• A pointer has a variable name just like any other variable and also has a type which designates what kind of variables its contents refer to.
type* name
type *name

2
Example 26
#include <iostream.h>
int main()
{
long *pointer=NULL;
long x=10, y=20;
pointer=&x;
*pointer +=5;
cout <<"x = " <<x
<<"\t &x= " <<hex <<pointer;
cout <<endl;
pointer = &y;
x=*pointer*10;
cout <<endl
<<"x= "<<dec <<x
<<"\t pointer = " <<hex <<pointer
<<"\t *pointer = " <<dec <<*pointer;
cout <<endl;
return 0;
}

3
Pointer
• Pointer is a variable that holds a memory address.
• Address of a variable is available by using the address - of operator (&).

4
Example 27
#include <iostream.h>
int main()
{
unsigned short x=8;
unsigned long y=56432;
signed long z=-76543;
cout <<"x:\t" <<x <<"\t Address of x: \t" <<&x <<"\n";
cout <<"y:\t" <<y <<"\t Address of y: \t" <<&y <<"\n";
cout <<"z:\t" <<z <<"\t Address of z: \t" <<&z <<"\n";
return 0;
}

5
Example 28
#include <iostream.h>
int main()
{
unsigned short int x=8;
int y=16;
unsigned short int *pointerx=0;
pointerx=&x;
cout <<"x=" <<x <<"\t pointerx=" <<pointerx;
cout <<endl;
int *pointery=&y;
cout <<"y=" <<y <<"\t pointery=" <<pointery;
cout <<endl;
return 0;
}

6
Indirection Operator
• The indirection operator (*) is called the dereference operator.
• The indirection operator mean “the value stored at”.
• When a pointer is dereferenced, the value at the address stored by pointer is retrieved.

7
Example 29
#include <iostream.h>
int main()
{
unsigned short int x=8;
int y=16, z;
unsigned short int *pointerx=0;
pointerx=&x;
cout <<"x = " <<x <<"\t pointerx = " <<pointerx;
cout <<endl;
int *pointery=&y;
cout <<"y = " <<y <<"\t pointery = " <<pointery;
cout <<endl;
z=*pointerx + *pointery;
cout <<"z = x + y = " <<z ;
cout <<endl <<endl;
return 0;
}

8
Debugging
• When you have written a program that doesn’t work as it should, the debug facilities enable you to work through a program one step at a time to find out where and how it’s going wrong.

9
To Display Debug Toolbar
• Select Tools from main menu.
• Select Customize from Tool menu.
• Select Toolbars tab.
• Check the box against Build.
• Uncheck Build MiniBar if it is checked.

10
Setting Breakpoint
• Place the cursor in the statement where you want execution to stop and click the Insert/Remove Breakpoint button or press F9.

11
Removing Breakpoint
• Place the cursor in the same line as an existing breakpoint and click the Insert/Remove Breakpoint button or press F9.

12
Starting Debugging
• Select Build from main menu.
• Select Start Debug from Build menu.
• Select one of the four way listed in Start Debug submenu.

13
GO
• The Go option executes a program to the first breakpoint, where execution will halt.
• After you have examined all you need to at a breakpoint, selecting Go again will continue execution up to the next breakpoint.

14
Run to Cursor
• It executes the program up to the statement where you left the cursor in the text editor window.
15
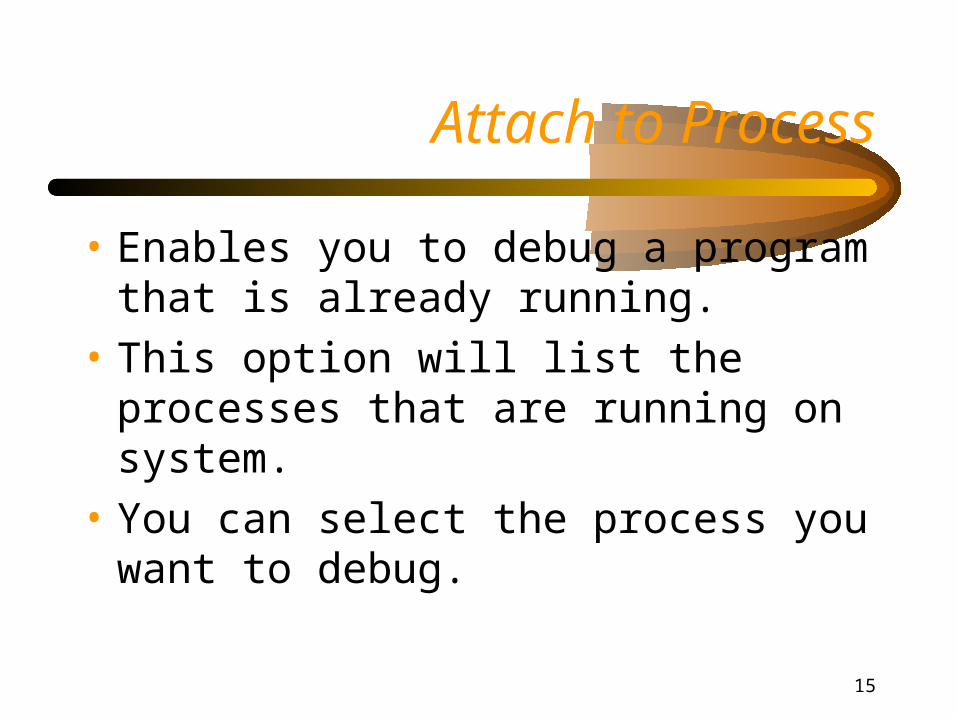
Attach to Process
• Enables you to debug a program that is already running.
• This option will list the processes that are running on system.
• You can select the process you want to debug.

16
Step Into
• Execute your program one statement at a time.
• It would also execute all the code for stream output (#include).

17
Step Over
• Execute the statements in function main( ) and jump over all the code used by the stream operations without stopping.

18
Variable Window
• Variable window has three tabs– Auto– Locals– this

19
Auto, Local and this Tabs
• Auto tab shows the variables in use in the current and previous statements.
• Local tab shows the values of the variable local to the current function.
• this tab is useful as we progress into object-oriented programming.

20
Viewing Variable in the Edit Window
• Position the cursor over the variable for a second.– A tooltip will pop up showing the current value
of the variable.
• You can highlight a section and rest the cursor over the highlighted area and the tooltip will display the value.

21
Watching Variables’ Values
• Position the cursor in the Text Editor window in the middle of the variable name.
• Select QuickWatch from the Debug menu.– If you had any problem the whole name or
expression and then select QuickWatch.

22
Watching Variables’ Values
• Variable or expressions can be added to Watch window in two other ways:– type the name of the variable into the Name
field in the Watch window– highlight and drag a variable from the Text
Editor or Variables window

23
Window Programming
• Microsoft Foundation Classes (MFC).
• Single Document Interface (SDI).
• Multiple Document Interface (MDI).
• AppWizard.

24
Window Programming With C++
• AppWizard– for creating the basic program code.
• ClassWizard– for extending and customizing the classes in
programs.
• Resource Editor– for editing or creating such things as menus and
toolbars.

25
Classes
• A class is a collection of variables often of different types combined with a set of related function.
• A class enables you to bundle various parts and various functions into a single collection called object.

26
Classes
• A class can consist of any combination of the variable types and other class types.
• The variables in the class are called the member variable or data member.
• Function in the class typically manipulate the member variables -- that is, what the objects of a class can do.

27
Declaring a Class
• Use the class keyword followed by { and then list the data members and function members of that class.class car
{
int door ;
int seats ;
speed ( );
};

28
Access Control in a Class
• Public– means members of an object of the class can be
accessed anywhere within the scope of the class object.
• Private– can only be accessed by member functions of a
class.

29
Access Control in a Class
• If you omit the access specification altogether, the members have the default attribute, private.
30
Example 30
#include <iostream.h>
class box
{
public:
int length, height, width;
};
int main(void)
{
box box1, box2;
int volume1=0, volume2=0;
box1.length=10, box1.height=12, box1.width=8;
box2.length=14, box2.height=13, box2.width=9;
volume1=box1.height*box1.length*box1.width;
cout <<endl <<"Volume of Box # 1 is = " <<volume1 <<endl;
volume2=box2.height*box2.length*box2.width;
cout <<endl <<"Volume of Box # 2 is = " <<volume2 <<endl <<endl;
return 0;
}

31
Example 31
#include <iostream.h>
class box
{
public:
int length, height, width;
int volume(void)
{
return length*height*width;
}
};
int main(void)
{
box box1, box2;
int volume1=0, volume2=0;
box1.length=10, box1.height=12, box1.width=8;
box2.length=14, box2.height=13, box2.width=9;
volume1=box1.volume(), volume2=box2.volume();
cout <<endl <<"Volume of Box # 1 is = " <<volume1 <<endl;
cout <<endl <<"Volume of Box # 2 is = " <<volume2 <<endl <<endl;
return 0;
}

32
Example 32
#include <iostream.h>
class box
{
public:
int length, height, width;
int volume(void);
};
int box::volume(void)
{
return length*height*width;
}
int main(void)
{
box box1, box2;
int volume1=0, volume2=0;
box1.length=10, box1.height=12, box1.width=8;
box2.length=14, box2.height=13, box2.width=9;
volume1=box1.volume(), volume2=box2.volume();
cout <<endl <<"Volume of Box # 1 is = " <<volume1 <<endl;
cout <<endl <<"Volume of Box # 2 is = " <<volume2 <<endl <<endl;
return 0;
}

33
Example 33
#include <iostream.h>
class box
{
public:
int length, height, width;
int volume(void);
};
inline int box::volume(void)
{
return length*height*width;
}
int main(void)
{
box box1, box2;
int volume1=0, volume2=0;
box1.length=10, box1.height=12, box1.width=8;
box2.length=14, box2.height=13, box2.width=9;
volume1=box1.volume(), volume2=box2.volume();
cout <<endl <<"Volume of Box # 1 is = " <<volume1 <<endl;
cout <<endl <<"Volume of Box # 2 is = " <<volume2 <<endl <<endl;
return 0;
}

34
Example 34
#include <iostream.h>
class box
{
public:
int length, height, width;
box(int l, int h, int w)
{
length=l, height=h, width=w;
}
int volume(void)
{
return length*height*width;
}
};
int main(void)
{
box box1(10, 12, 8), box2(14, 13, 9);
cout <<endl <<"Volume of Box # 1 is = " <<box1.volume() <<endl;
cout <<endl <<"Volume of Box # 2 is = " <<box2.volume() <<endl <<endl;
return 0;
}

35
Example 35
#include <iostream.h>
class box
{
public:
int length, height, width;
box(int l=0, int h=0, int w=0)
{
length=l, height=h, width=w;
}
int volume(void)
{
return length*height*width;
}
};
int main(void)
{
box box1(10, 12, 8), box2(14, 13, 9);
cout <<endl <<"Volume of Box # 1 is = " <<box1.volume() <<endl;
cout <<endl <<"Volume of Box # 2 is = " <<box2.volume() <<endl <<endl;
return 0;
}

36
Example 36
#include <iostream.h>
class box
{
public:
box(int l=0, int h=0, int w=0)
{
length=l, height=h, width=w;
}
int volume(void)
{
return length*height*width;
}
private:
int length, height, width;
};

37
Example 36 (continue)
int main(void)
{
box box1(10, 12, 8), box2(6,8,9);
//box2.width=12;
cout <<endl <<"Volume of Box # 1 is = " <<box1.volume() <<endl;
cout <<endl <<"Volume of Box # 2 is = " <<box2.volume() <<endl <<endl;
return 0;
}
If we uncomment the box2.width=12 what will happen? Why?

38
friend Functions
• friend functions are selected functions which are not member of a class to, nonetheless, be able access all members of a class.
• friend functions are not members of the class, and therefore the access attributes do not apply to them.
• friend are just ordinary global functions with special privileges.

39
Example 37
#include <iostream.h>
class box
{
public:
box(int l=1, int h=1, int w=1)
{
length=l, height=h, width=w;
}
int volume(void)
{
return length*height*width;
}
private:
int length, height, width;
friend int boxsurfacearea(box area);
};

40
Example 37 (continue)
int boxsurfacearea(box area)
{
return 2*(area.length*area.width+area.length*area.height+area.height*area.width);
}
int main(void)
{
box box1(10, 12, 8), box2(6,8,9);
cout <<endl <<"Volume of Box # 1 is = " <<box1.volume() <<endl;
cout <<endl <<"Surface area of Box # 1 is = " <<boxsurfacearea(box1) <<endl;
cout <<endl <<"Volume of Box # 2 is = " <<box2.volume() <<endl;
cout <<endl <<"Surface area of Box # 2 is = " <<boxsurfacearea(box2) <<endl <<endl;
return 0;
}

41
Example 38
#include <iostream.h>
class box
{
public:
box(int l=1, int h=1, int w=1)
{
length=l, height=h, width=w;
}
int volume(void)
{
return length*height*width;
}
int compare(box xbox)
{
return this-> volume()>xbox.volume();
}
private:
int length, height, width;
};

42
Example 38 (continue)
int main(void)
{
int x=0, y=0, z=0;
cout <<"length of box # 2 is = ";
cin >>x;
cout <<endl <<"height of box # 2 is = ";
cin >>y;
cout <<endl <<"width of box # 2 is = ";
cin >>z;
box box1(10, 12, 8), box2(x,y,z);
if(box2.compare(box1))
cout <<endl
<<"Box # 1 is smaller than Box # 2";
else
cout <<endl
<<"Box # 1 is equal to or larger than Box # 2";
cout <<endl <<endl;
return 0;
}

43
Exercises
• Write the code that declares a class called employee with these data members:– age– sex– years of service– salary

44
Exercises
• Write a program with the employee class that creates ten employees; sets their age, sex, years of service, and salary; and prints their values.

45
Essential Pieces of a Window Program
• WinMain ( )– which is called by windows at the start of
execution of the program.
• WndProc ( ) or WindowProc ( )– which will be called by the operating system
whenever a message is to be passed to your application’s window. (procedure for each window class you’ve defined)

46
WinMain ( )
• The function WinMain ( ) does any initialization and sets up the window or windows that will be the primary interface to the user.

47
WindowProc ( )
• The function WindowProc ( ) handles all the messages that aren’t queued, which will include those initiated in the message loop in WinMain ( ).

48
WindowProc ( )
• WindowProc ( ) is where you code your application-specific response to each window message which should handle all the communications with the user by processing the windows message generated by user action.

49
MFC
• MFC are a set of predefined classes upon which windows programming with Visual C++ is built.
• MFC represent an object - oriented approach to windows programming that encapsulates the windows API.

50
MFC
• All the classes in MFC have names beginning with with C.– Cview– Cdocument
• Data member of an MFC class are prefixed with m_ .– m_lpCmdLine

51
MFC
• MFC uses other prefix such as p for pointer, n for an int, l for long, h for a handle.– m_lpCmdLine
data member of class that is of type ‘long pointer’
52
Other MFC Prefix
• b a logical variable of type BOOL• by type unsigned char; a byte• c type char• dw type DWORD• fn a function• i int• s string• w WORD

53
Create MFC Application
• Step one– Select File from main menu.– Select New from File menu.– Select Win32 Application (under Project Tab).– Type project name. – Click the ok button.

54
Create MFC Application
• Step two– Select Project from main menu.– Select Settings from Project menu.– Select General tab from Project Settings dialog.– Select MFC option (MFC in a Shared DLL).

55
Create MFC Application
• Step three– Create a new source file.– Type your program.– Save.– Build.– Execute.

56
To begin programming
• Include the header file afxwin.h– This contains the definitions for many MFC
classes.
• To produce the complete program, we’ll only need to drive two classes from MFC:– application class– window class

57
To begin programming
• We won’t need to write a WinMain ( ) function because this is automatically provided by the MFC library.

58
The Application Class
• CWinApp is fundamental to any Windows program written using MFC.
• An object of this class includes everything necessary for starting, initializing, running and closing the application.

59
The Application Class
• m_nCmdShow– specifies how the application window is to be
shown when the application starts up.
• m_pszAppName– stores a pointer to a string that defines the
name of the application.

60
The Application Class (example)
class ourApp: public CWinApp
{
public:
virtual BOOL InitInstance ( );
};

61
The Window Class
• FMC application needs a window as the interface to the user, referred to as a frame window. CFrameWnd is designed for this purpose.
• CFrameWnd provides everything for creating and managing a window for an application, all we need to add to our derived window class is a constructor.

62
The Window Class (example)
class ourWnd: public CFrameWnd
{
public:
ourWnd ( )
{
Create (0, “My first window”);
}
};
63
Example 39
# include<afxwin.h>
class OurApp:public CWinApp
{
public:
virtual BOOL InitInstance();
};
class OurWnd:public CFrameWnd
{
public:
OurWnd()
{
Create(0, "My first window");
}
};
BOOL OurApp::InitInstance(void)
{
m_pMainWnd = new OurWnd;
m_pMainWnd -> ShowWindow(m_nCmdShow);
return TRUE;
}
OurApp AnApplication;

64
Create an SDI Application With AppWizard
• Select File from main menu.
• Select New from File menu.
• Select MFC AppWizard(exe) (under project tab).
• Type project name.
• Click on ok button.

65
Create an SDI Application With AppWizard
• Select the SDI option.
• Select the language you like your resources in.
• Click on Next> button.
• Click on Next> button once again.

66
Create an SDI Application With AppWizard
• This step gives you a range of choices relating to Object Linking and Embedding (OLE), under the label of compound document support.
• OLE enables you to write programs that can import objects from other programs.
• OLE enables you to import your program into another application.

67
Create an SDI Application With AppWizard
• The default setting at for this step is ActiveX Controls.– This means that AppWizard will include code
that allows the possibility of using ActiveX controls in our application.
• Accept the default set choice.
• Move to next step.

68
Create an SDI Application With AppWizard
• This step offers you a range of functions that can be included in your application by AppWizard.– Docking toolbar– Initial status bar– Printing and print preview– Context-sensitive Help– 3D control

69
Create an SDI Application With AppWizard
• Docking toolbar– provides a standard range of buttons that are
alternatives to using menu option.
• Initial status bar– status bar appears at the bottom of the
application window. (Num Lock, Caps Lock, Scroll Lock)
70
Create an SDI Application With AppWizard
• Printing and print preview– This add the standard Page Setup, Print
Preview and Print option to the File menu.
• Context-sensitive Help– Enables a basic set of facilities to support
context-sensitive help.
• 3D control– Gives a 3D appearance.

71
Create an SDI Application With AppWizard
• The second group of choice concern Window Open Services Architecture (WOSA).
• This is for implementing communication with other computer. This provide two options for communication:– MAPI– Windows Sockets

72
Create an SDI Application With AppWizard
• MAPI– This option allows you to send and receive
messages.
• Windows Sockets– This allows you to implement TCP/IP
capability within your program.

73
Create an SDI Application With AppWizard
• Accepts all the default at this point.
• Select the Advanced button. – This brings up a range of options for your
application grouped under two tabs.• Document Template Strings
• Window Styles

74
Create an SDI Application With AppWizard
• Document Template Strings– allows to choose the file extension which will
identify files that are generated by your application.
– Allows you to modify the File Type ID• File Type ID is used to label the file type in the
system registry.
– Doc type name: entry is a default name for a document.

75
Create an SDI Application With AppWizard
• Type file extension.
• Click on Window Styles tab.– Main frame styles area enable you to tailor your
application window.– Select Thick frame, Minimize box, Maximize
box, and System menu.
• Click on Close button to exit from Advanced option.

76
Create an SDI Application With AppWizard
• Click on Next > .
• This step offers two options– whether or not comments are to be included in
the source code generated by AppWizard.– Relates how MFC library code is used in your
program.• Default setting is shared DLL (Dynamic Link
Library) means that your program will link to MFC library routines at run time.
77
Create an SDI Application With AppWizard
• Accept the default setting.
• Click on Next >.– This presents you with a list of the classes that
AppWizard will be generating in your program code.
• Click on Finish.
• Click on ok