1 norma lab. 2 revision: unary and binary fact types ternary fact types inclusive-or constraints...
TRANSCRIPT
1
NORMA Lab. 2
• Revision: Unary and Binary Fact Types
• Ternary Fact Types
• Inclusive-Or Constraints
• External Uniqueness Constraints
• Value Constraints
• Derived Fact Types
• Renaming Pages
In this lab, we will enter the first page of the following 2 page ORM schema.
File: NORMA_Lab2.ppt. Author: T. Halpin. Last updated: 2009 June 9
2
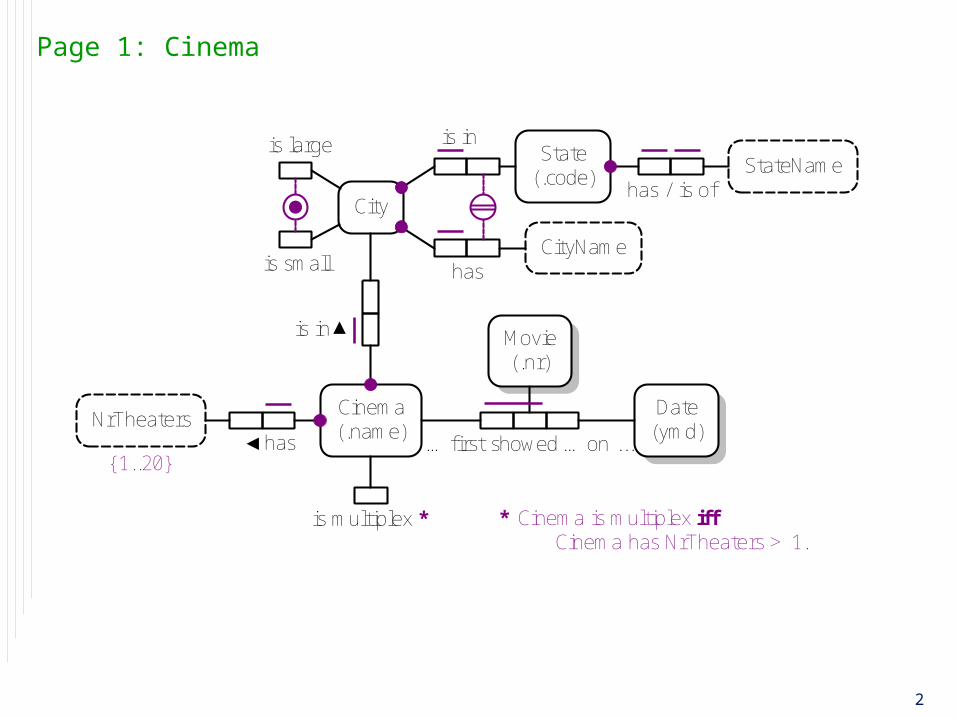
Page 1: Cinema
Movie(.nr)
Movie(.nr)
City
is large
is small
is inState
(.code)
hasCityName
has / is ofStateName
is in
Cinema(.name)
NrTheatershas
is multiplex *
… first showed … on ...
Movie(.nr)
Date(ymd)
* Cinema is multiplex iff Cinema has NrTheaters > 1.
{1..20}
3
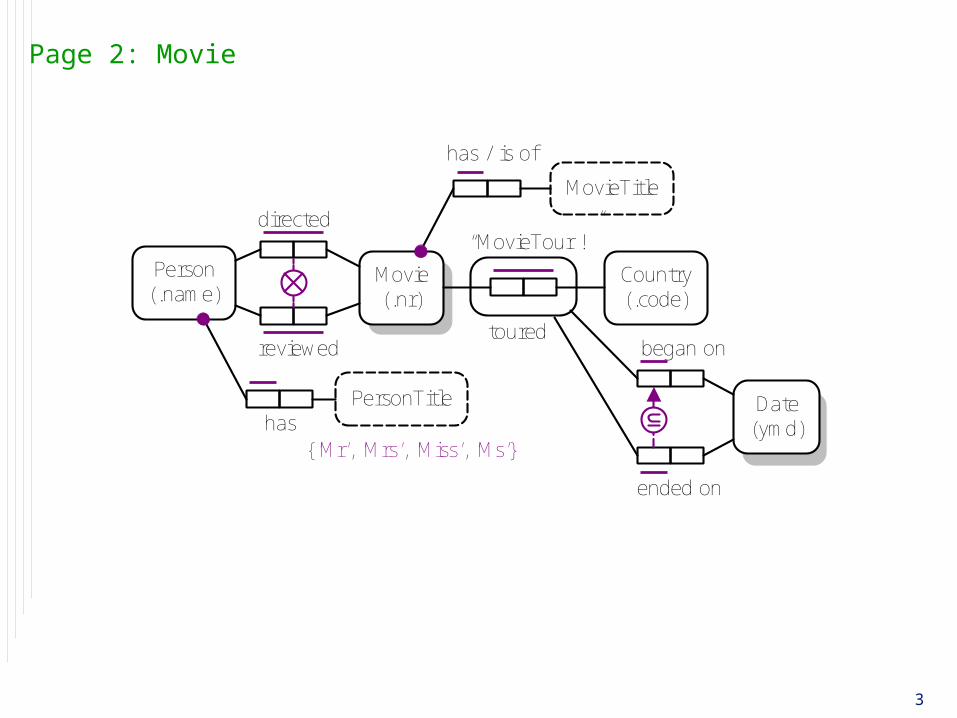
Page 2: Movie
Movie(.nr)
Movie(.nr)
Movie(.nr)
has / is of
MovieTitle
toured
Country(.code)
“MovieTour !”
began on
Date(ymd)
Person(.name)
directed
reviewed
hasPersonTitle
{‘Mr’, ‘Mrs’, ‘Miss’, ‘Ms’}
ended on
4
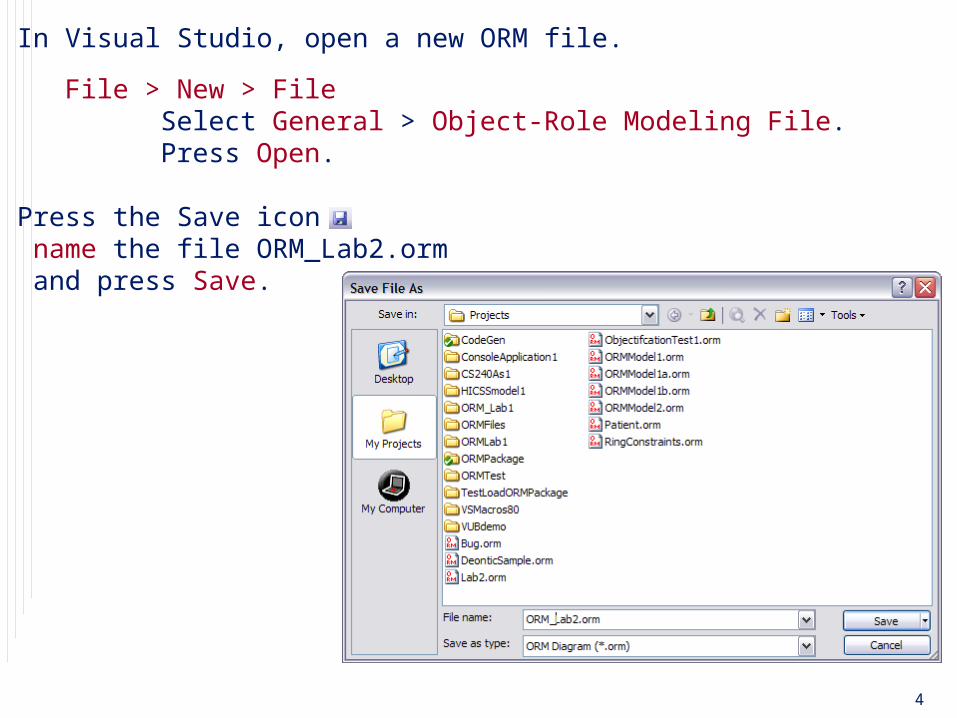
1. In Visual Studio, open a new ORM file.
File > New > File Select General > Object-Role Modeling File. Press Open.
2. Press the Save icon name the file ORM_Lab2.orm and press Save.
5
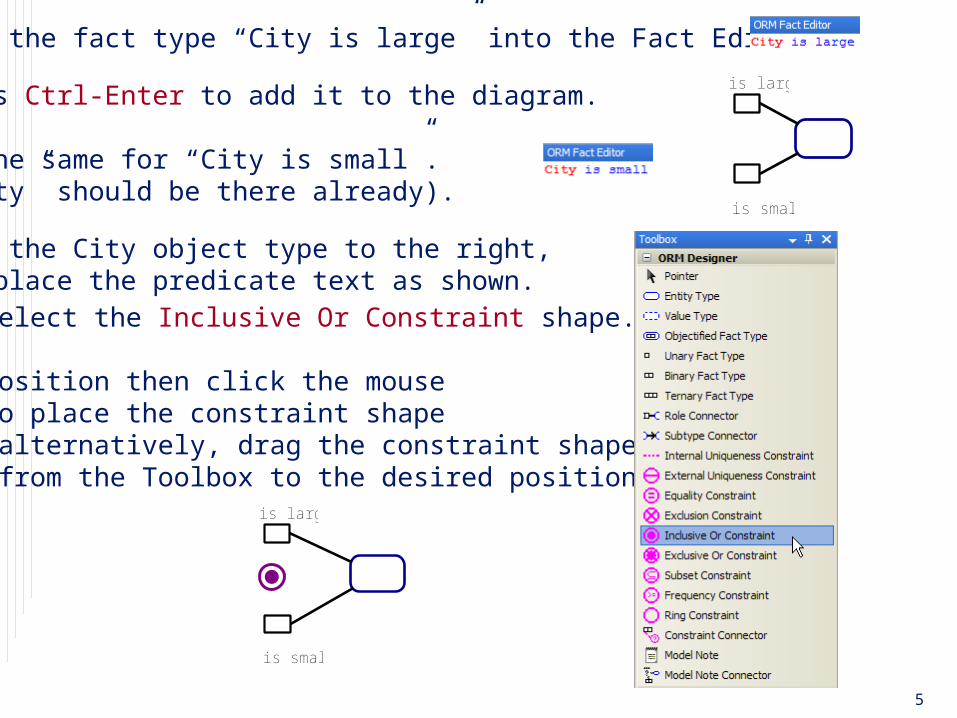
Type the fact type “City is large” into the Fact Editor.
Press Ctrl-Enter to add it to the diagram.
Do the same for “City is small”.(“City” should be there already).
Move the City object type to the right, and place the predicate text as shown.
Select the Inclusive Or Constraint shape.
Position then click the mouse to place the constraint shape(alternatively, drag the constraint shape from the Toolbox to the desired position).
City
is large
is small
City
is large
is small
6
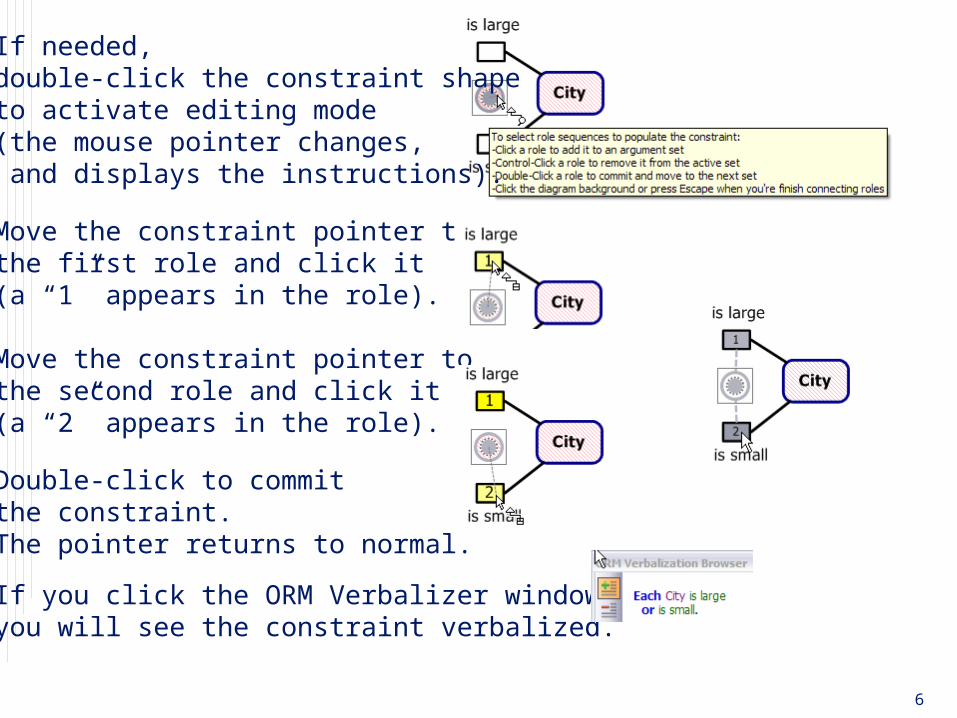
If needed, double-click the constraint shapeto activate editing mode(the mouse pointer changes, and displays the instructions).
Move the constraint pointer to the first role and click it(a “1” appears in the role).
Move the constraint pointer tothe second role and click it(a “2” appears in the role).
Double-click to committhe constraint. The pointer returns to normal.
If you click the ORM Verbalizer windowyou will see the constraint verbalized.
7
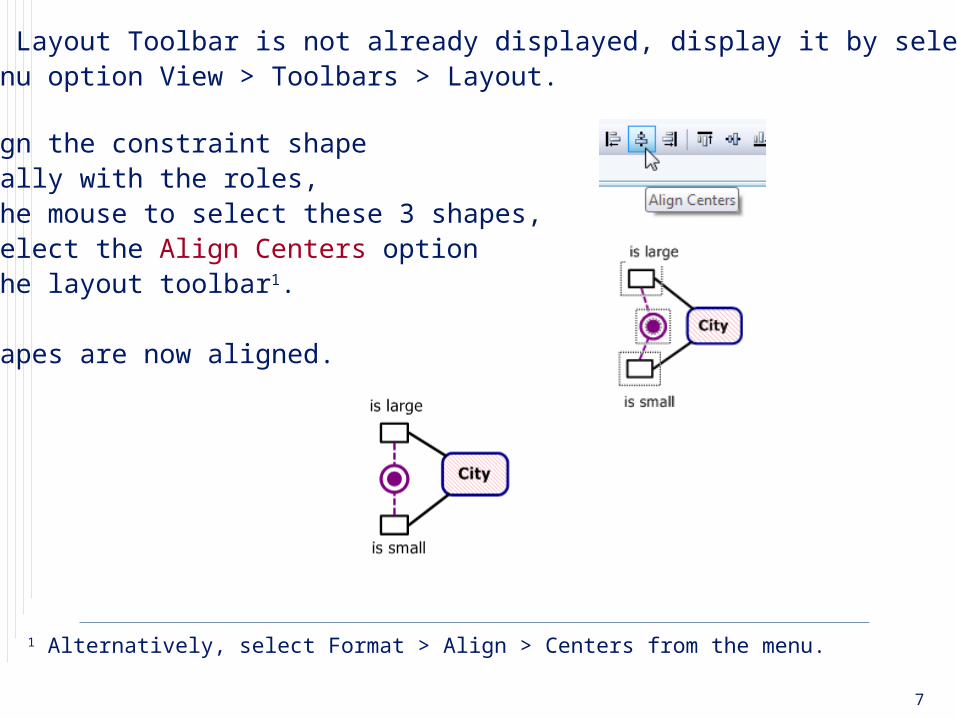
If the Layout Toolbar is not already displayed, display it by selecting the menu option View > Toolbars > Layout.
To align the constraint shapevertically with the roles,drag the mouse to select these 3 shapes, then select the Align Centers optionfrom the layout toolbar1.
The shapes are now aligned.
1 Alternatively, select Format > Align > Centers from the menu.
8
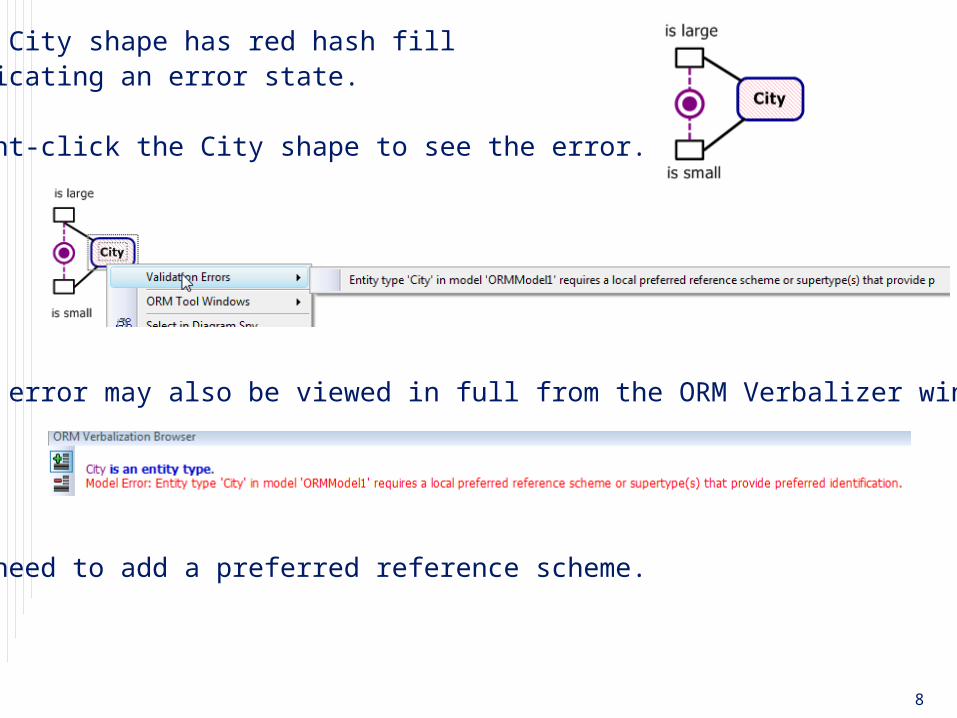
The City shape has red hash fillindicating an error state. Right-click the City shape to see the error.
The error may also be viewed in full from the ORM Verbalizer window.
We need to add a preferred reference scheme.
9
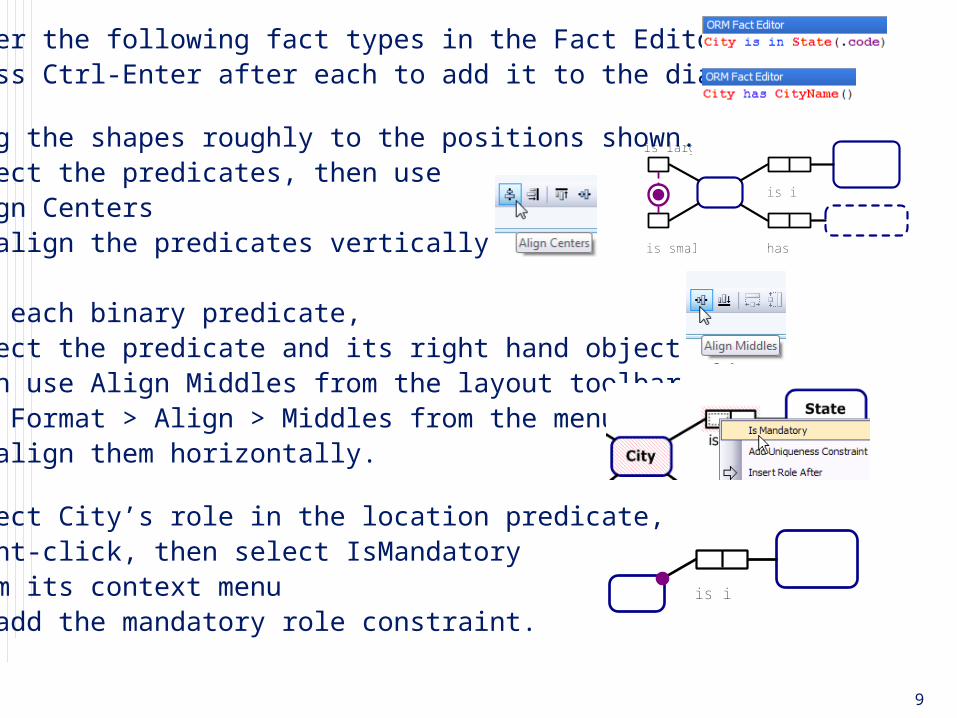
Enter the following fact types in the Fact Editor.Press Ctrl-Enter after each to add it to the diagram.
Drag the shapes roughly to the positions shown.Select the predicates, then useAlign Centersto align the predicates vertically.
For each binary predicate, select the predicate and its right hand object type,then use Align Middles from the layout toolbar(or Format > Align > Middles from the menu)to align them horizontally.
Select City’s role in the location predicate,right-click, then select IsMandatoryfrom its context menuto add the mandatory role constraint.
City
is large
is small
State(.code)
is in
CityName
has
City
State(.code)
is in
10
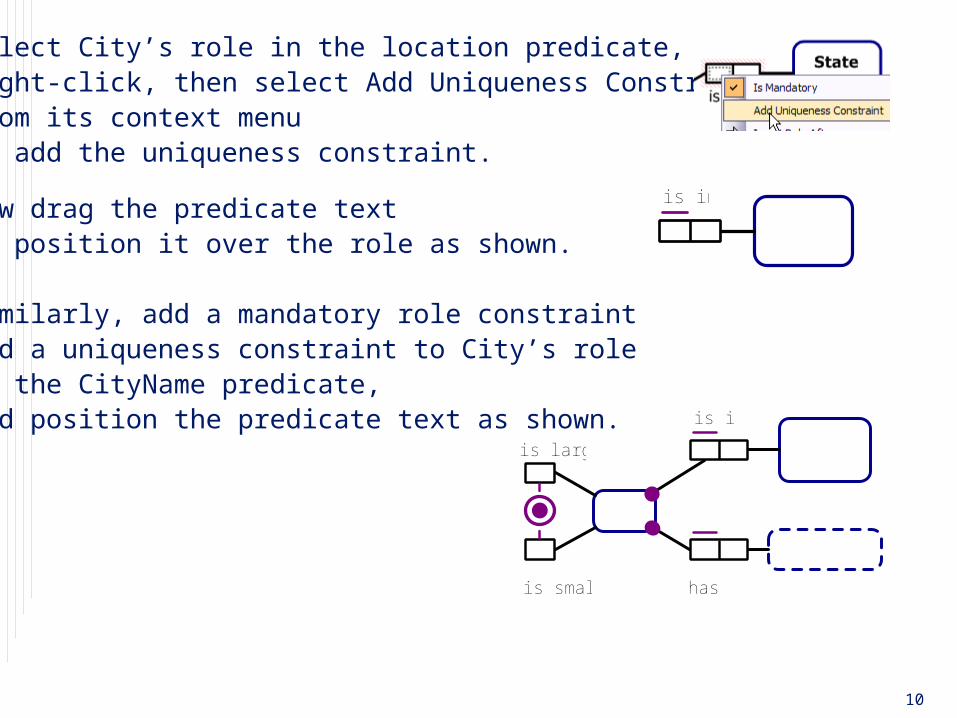
Select City’s role in the location predicate,right-click, then select Add Uniqueness Constraintfrom its context menuto add the uniqueness constraint.
Now drag the predicate textto position it over the role as shown.
Similarly, add a mandatory role constraintand a uniqueness constraint to City’s rolein the CityName predicate,and position the predicate text as shown.
State(.code)
is in
City
is large
is small
State(.code)
is in
CityName
has
11
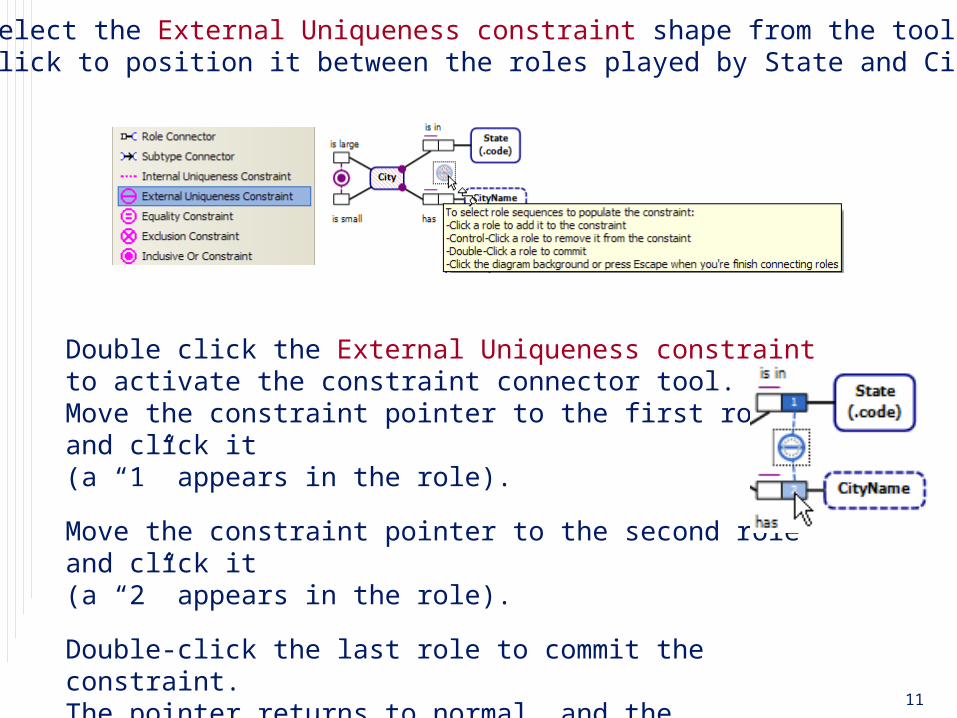
Now select the External Uniqueness constraint shape from the tool boxand click to position it between the roles played by State and CityName.
Double click the External Uniqueness constraint to activate the constraint connector tool.Move the constraint pointer to the first role and click it(a “1” appears in the role).
Move the constraint pointer to the second role and click it(a “2” appears in the role).
Double-click the last role to commit the constraint. The pointer returns to normal, and the constraint is verbalized.
12
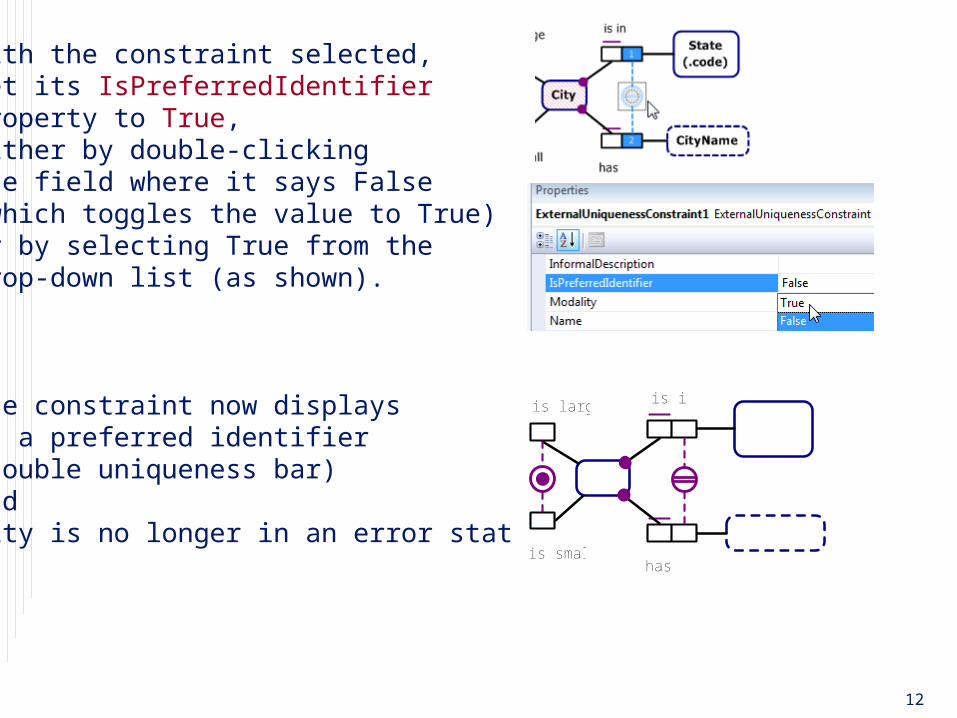
With the constraint selected,set its IsPreferredIdentifierproperty to True,either by double-clicking the field where it says False(which toggles the value to True)or by selecting True from thedrop-down list (as shown).
The constraint now displaysas a preferred identifier(double uniqueness bar)and City is no longer in an error state.
City
is large
is small
State(.code)
is in
CityName
has
13
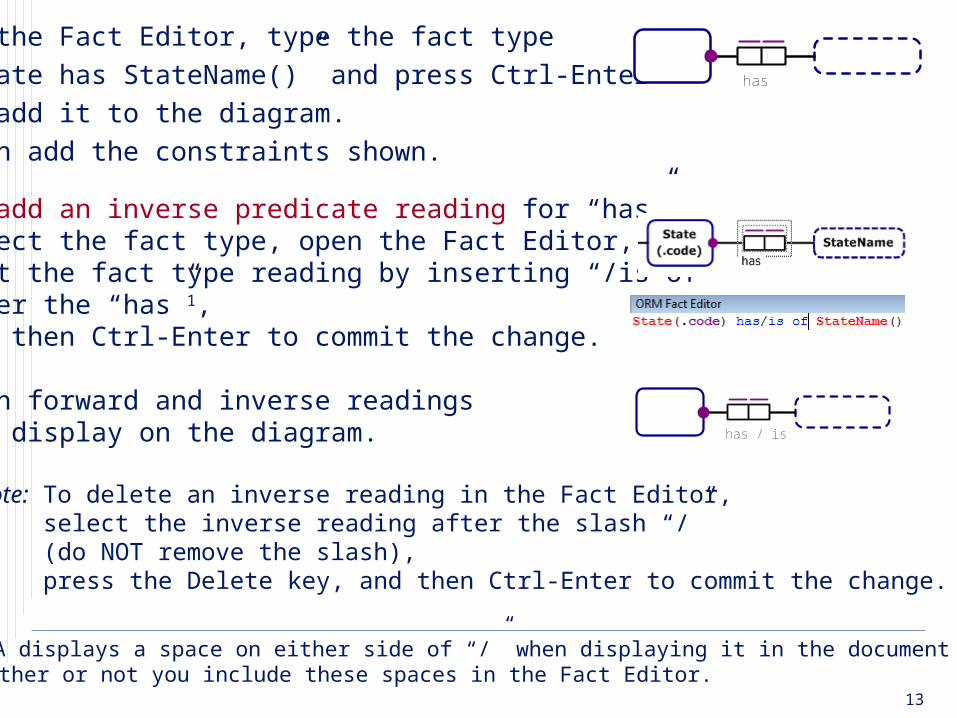
In the Fact Editor, type the fact type “State has StateName()” and press Ctrl-Enterto add it to the diagram. Then add the constraints shown.
To add an inverse predicate reading for “has”,select the fact type, open the Fact Editor,edit the fact type reading by inserting “/is of”after the “has”1,and then Ctrl-Enter to commit the change.
Both forward and inverse readingsnow display on the diagram.
Note: To delete an inverse reading in the Fact Editor,select the inverse reading after the slash “/” (do NOT remove the slash), press the Delete key, and then Ctrl-Enter to commit the change.
State(.code)
StateName
has
State(.code)
StateName
has / is of
1NORMA displays a space on either side of “/” when displaying it in the document window, whether or not you include these spaces in the Fact Editor.
14
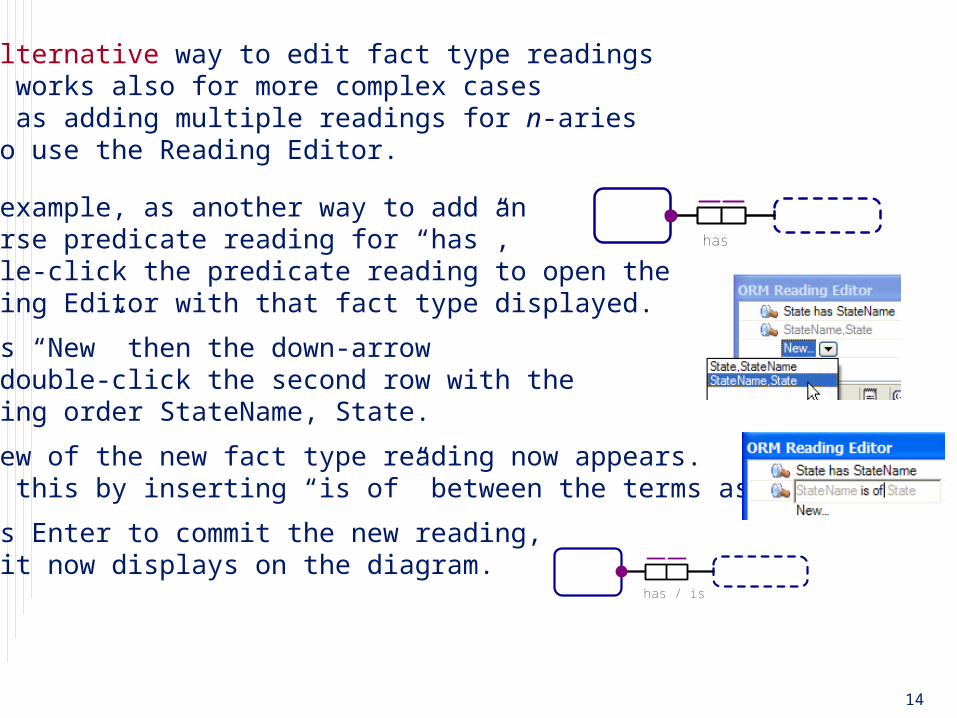
An alternative way to edit fact type readingsthat works also for more complex casessuch as adding multiple readings for n-ariesis to use the Reading Editor.
For example, as another way to add aninverse predicate reading for “has”,double-click the predicate reading to open the Reading Editor with that fact type displayed.
Press “New” then the down-arrowand double-click the second row with the reading order StateName, State.
A view of the new fact type reading now appears.Edit this by inserting “is of” between the terms as shown.
Press Enter to commit the new reading,and it now displays on the diagram.
State(.code)
StateName
has
State(.code)
StateName
has / is of
15
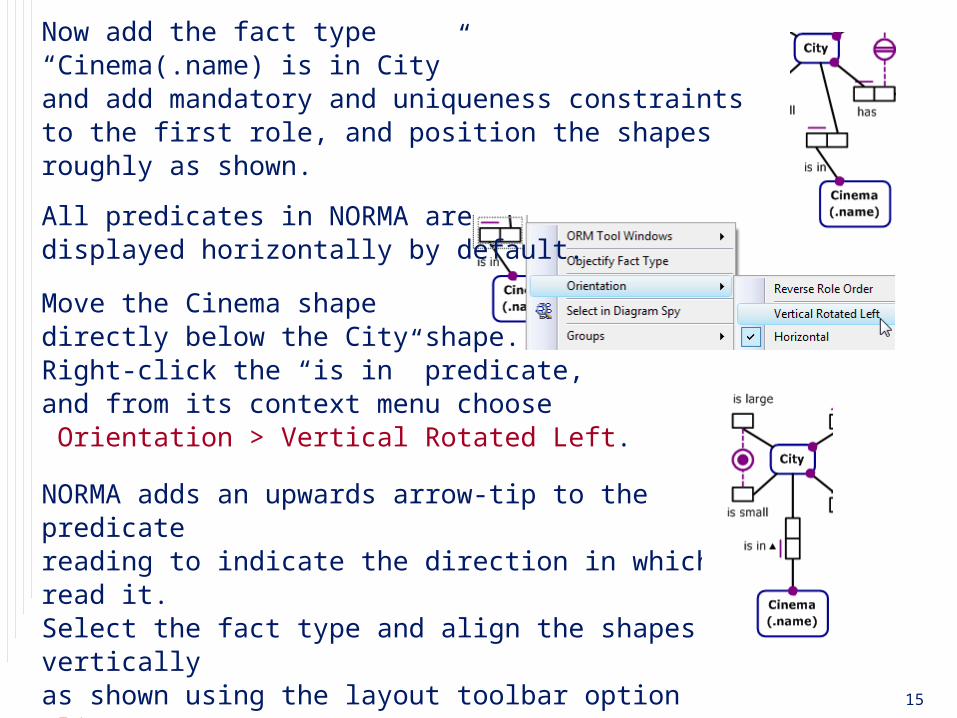
Now add the fact type“Cinema(.name) is in City”and add mandatory and uniqueness constraintsto the first role, and position the shapes roughly as shown.
All predicates in NORMA aredisplayed horizontally by default.
Move the Cinema shapedirectly below the City shape. Right-click the “is in” predicate, and from its context menu choose Orientation > Vertical Rotated Left.
NORMA adds an upwards arrow-tip to the predicatereading to indicate the direction in which to read it.Select the fact type and align the shapes verticallyas shown using the layout toolbar option Align Centers(or the menu option Format > Align > Centers).
16
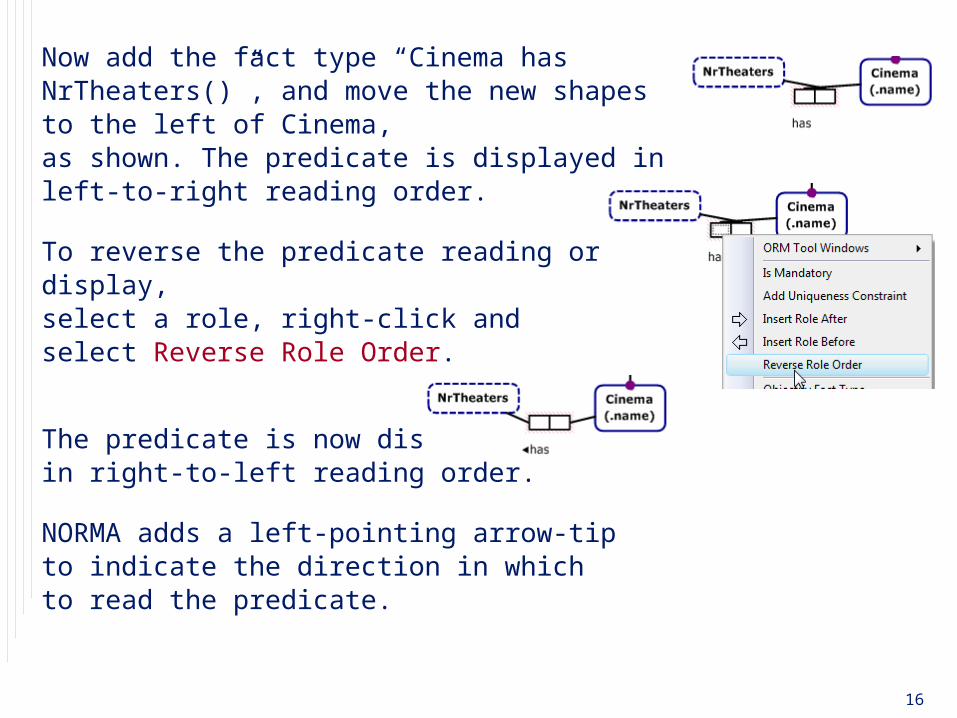
Now add the fact type “Cinema has NrTheaters()”, and move the new shapes to the left of Cinema,as shown. The predicate is displayed in left-to-right reading order.
To reverse the predicate reading order display,select a role, right-click andselect Reverse Role Order.
The predicate is now displayedin right-to-left reading order.
NORMA adds a left-pointing arrow-tipto indicate the direction in whichto read the predicate.

17
Add mandatory and uniquenessconstraints to the right-hand rolethen use Align Middles to alignas shown.
Then select NrTheaters,and change its DataType propertyto numeric (e.g. Unsigned Integer).
Now select NrTheaters andenter the value constraint 1..20in its ValueRange property(don’t add braces, as NORMA does that for you).
Pressing Enter displays the constraintin braces on the diagram. Position it as shown.
Cinema(.name)
NrTheaters
has
NrTheaters
{ 1..20 }
18
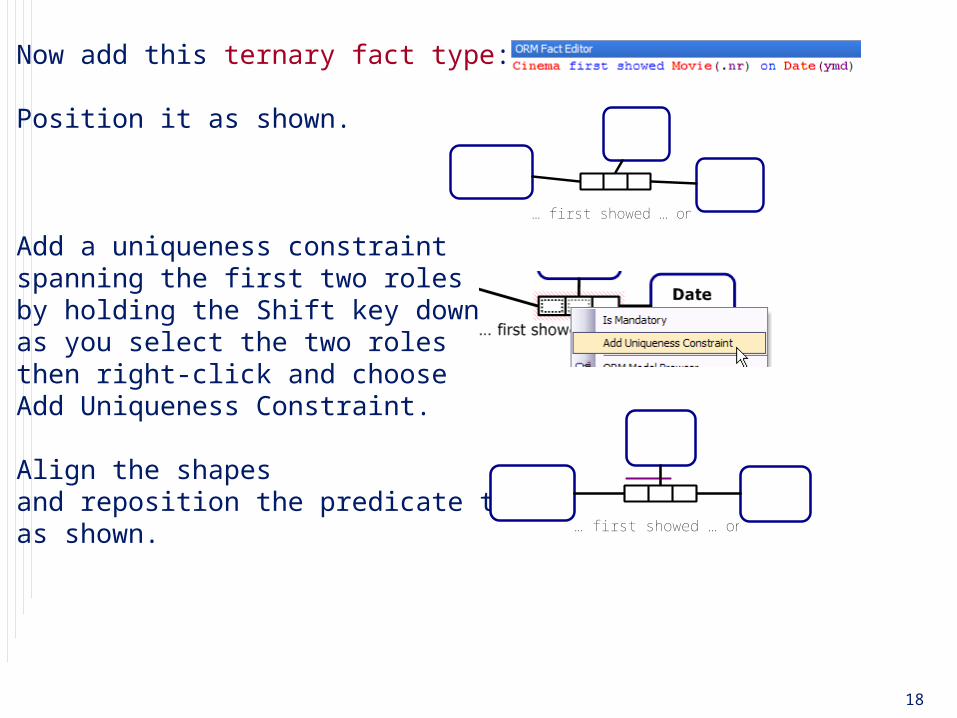
Now add this ternary fact type:
Position it as shown.
Add a uniqueness constraintspanning the first two rolesby holding the Shift key downas you select the two rolesthen right-click and chooseAdd Uniqueness Constraint.
Align the shapesand reposition the predicate textas shown.
Cinema(.name)
Movie(.nr)
Date(ymd)
… first showed … on …
Cinema(.name)
Movie(.nr)
Date(ymd)
… first showed … on …
19
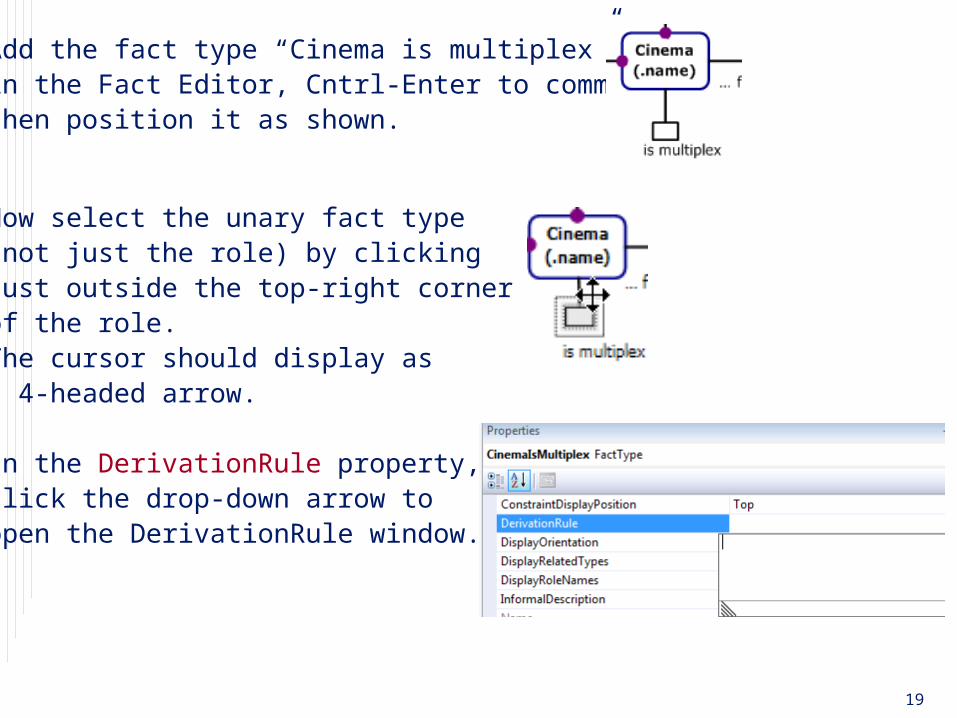
Add the fact type “Cinema is multiplex”in the Fact Editor, Cntrl-Enter to commit,then position it as shown.
Now select the unary fact type(not just the role) by clickingjust outside the top-right cornerof the role.The cursor should display as a 4-headed arrow.
In the DerivationRule property,click the drop-down arrow toopen the DerivationRule window.

20
Now type the derivation rule shown.Press Ctrl-Enter after “iff”to move to the next line,then indent a few spaces before typing the rest.
Press Enter to commit the rule.The tool now displays an asteriskafter the predicate reading on the diagramand enters “Derived” in theDerivationStorage property,indicating the fact type is fully derivedand not stored.
For later use in a model note, select the derivation ruleand press Ctrl-C to copy the rule to the clipboard.
21
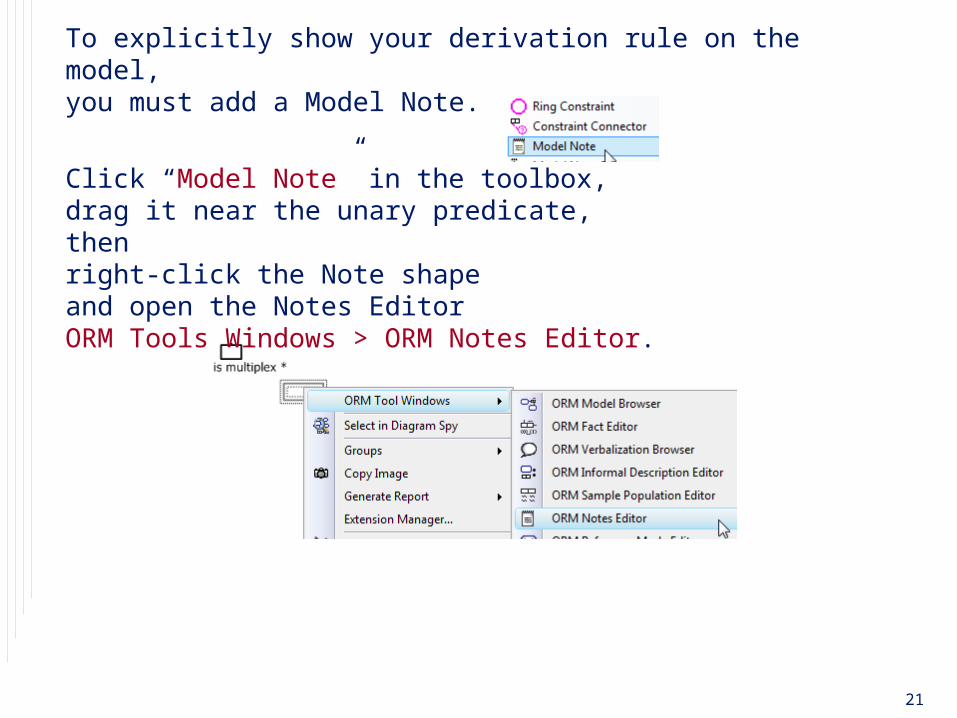
To explicitly show your derivation rule on the model,you must add a Model Note.
Click “Model Note” in the toolbox,drag it near the unary predicate,then right-click the Note shapeand open the Notes EditorORM Tools Windows > ORM Notes Editor.
22
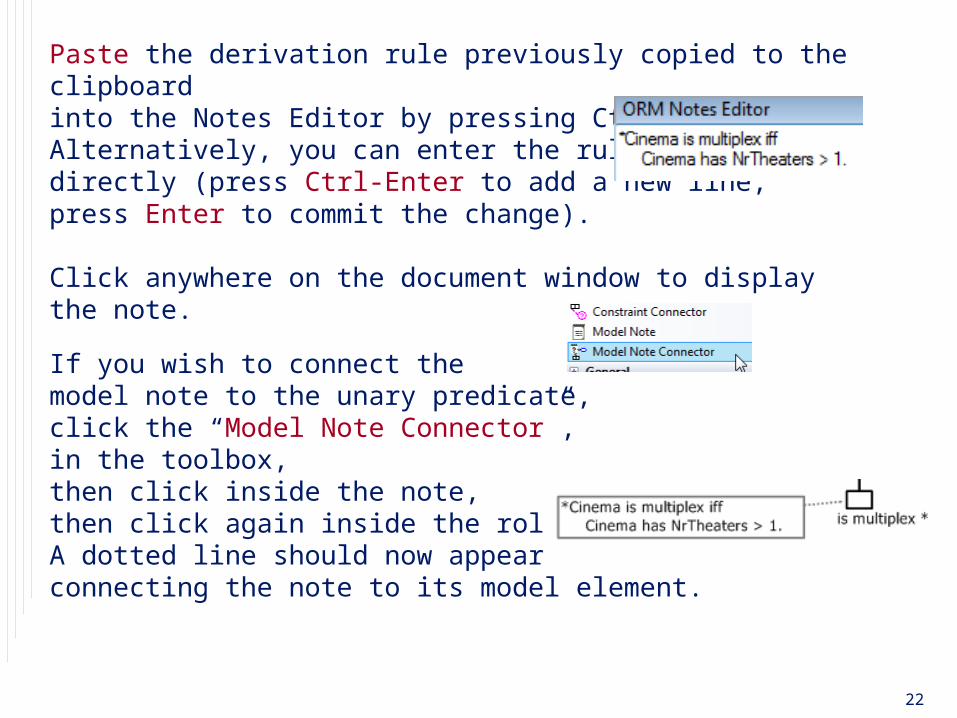
Paste the derivation rule previously copied to the clipboardinto the Notes Editor by pressing Ctrl-V.Alternatively, you can enter the ruledirectly (press Ctrl-Enter to add a new line; press Enter to commit the change).
Click anywhere on the document window to display the note.
If you wish to connect the model note to the unary predicate,click the “Model Note Connector”, in the toolbox, then click inside the note,then click again inside the role box to connect.A dotted line should now appearconnecting the note to its model element.
23
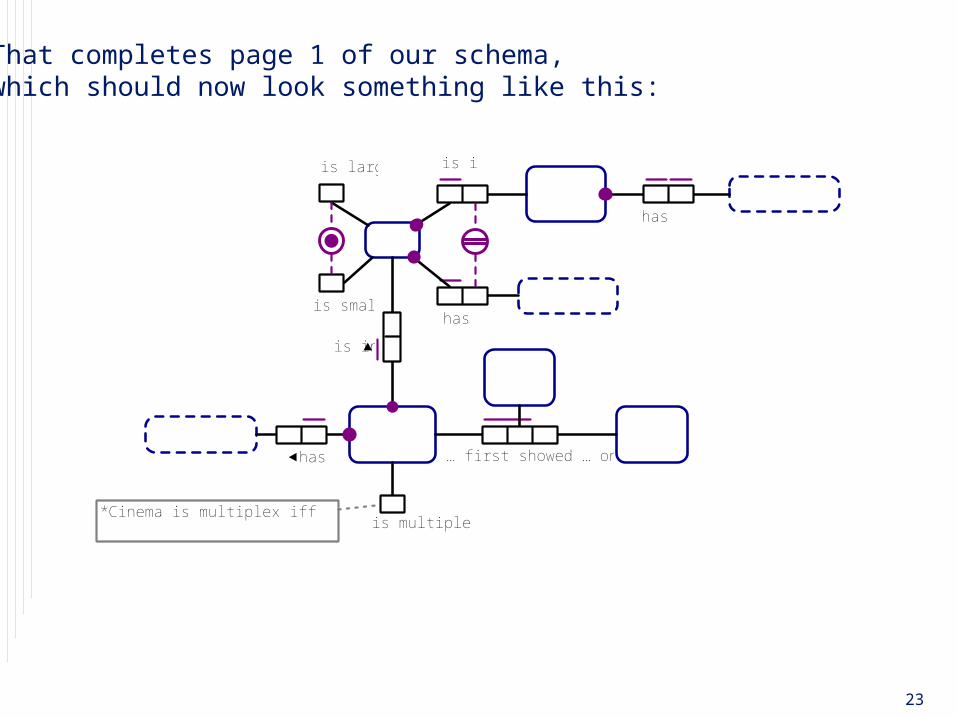
That completes page 1 of our schema,which should now look something like this:
City
is large
is small
State(.code)
is in
CityName
has
has
StateName
Cinema(.name)
is in
NrTheaters
{ 1..20 }
has
Movie(.nr)
Date(ymd)
… first showed … on …
is multiplex **Cinema is multiplex iff Cinema has NrTheaters > 1.
24
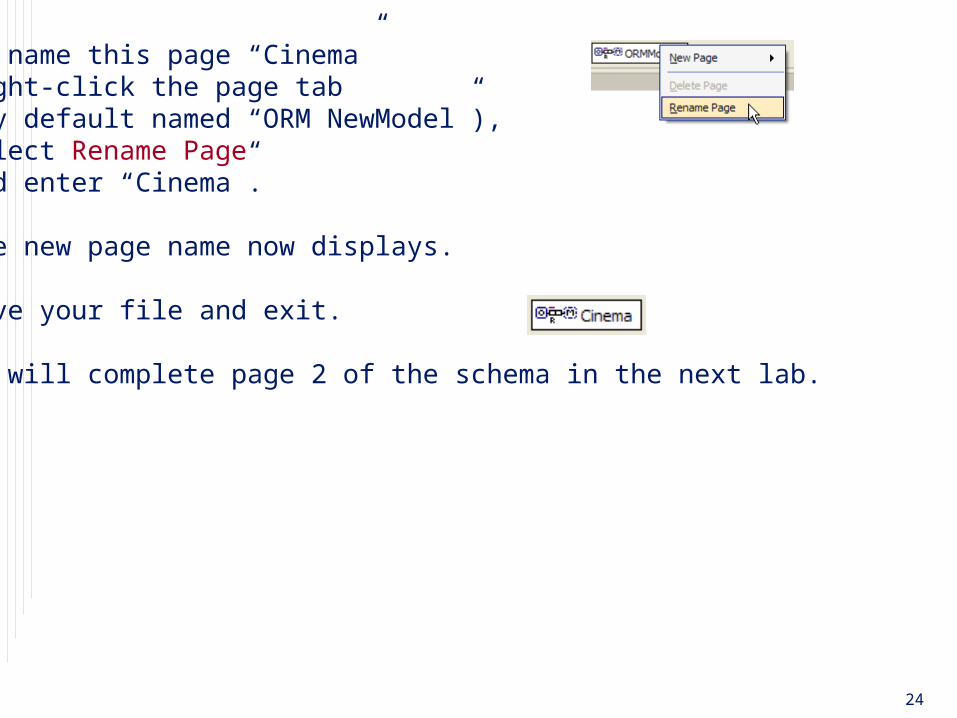
To name this page “Cinema”right-click the page tab(by default named “ORM NewModel”),select Rename Pageand enter “Cinema”.
The new page name now displays.
Save your file and exit.
We will complete page 2 of the schema in the next lab.