~ john emerich edward dalberg-acton photoshop · photoshop tips & tricks updated may 2017 3...
TRANSCRIPT
updated May 2017 v 21
An introduction to image processing
httpwwwadobecom
College of Communications
ldquoPower tends to corrupt and absolute power corrupts absolutelyrdquo
~ John Emerich Edward Dalberg-Acton
Photoshop
Photoshop
2
Ta b l e o f C o n t e n t sTOPIC PAGE
Introduction 3Workspace 4Tool Bar 5Tools 7 Lasso Tool 7 Quick Selection Tool 7 Crop Tool 7 Eyedropper 8 Healing Brush 8 Brushes 8 Clone Tool 8 History Brush 9 Burn amp Dodge Tools 9 Type Tool 9 Zoom Tool 9 Toning 10 Captioning 23 Saving Images 24Shooting Raw 26
Photoshop
Tips amp Tricks
updated May 20173
Introduction
Photoshop is an extremely power tool for editing and manipulating im-ages And with great power comes great responsibility Simply because we can do something doesnrsquot mean we should
There is tremendous power in the truth of a photograph Even if yoursquore not working in journalism consider this before altering the con-tent of a photograph
There are many stories of journalists losing their jobs and ending their careers because they abused the power of Photoshop
This tutorial is designed to introduce you to a very complicated pro-gram and teach you some basic skills for adjusting a photograph
It is NOT designed to detail every single feature of the programIT is specifically written for Photoshop CC 201711 and is current as of May 2017
This tutorial will look at these key features of Photoshop
1 Viewing photos
2 Adjust tonecolorcontrastcaptions
3 CroppingResizing
5 Working with Raw files
bullNOTE This tutorial was written for the Mac OS But the program should look very similar on a Windows computer
There is a tablet version of Photoshop as well - it offers fewer features than
the desktop versionbull
Photoshop
Tips amp Tricks
updated May 20174
bullIf you want to learn more about Photoshop one great resource is LyndacomThe site offers tutorials on a wide range of ap-plications and is free to Penn State students
bull
If you donrsquot like the layout of the Pho-toshop display you can rearrange panels and create a cus-tom workspace Go WindowgtWorkspace
bull
Tools and Workspace
Photoshop is part of the Adobe Creative Suite of applications This means the look and interface will feel familiar as you move from app to app from Photoshop to Premiere to Audition to Indesign etc
Open the application To open an image You can use FilegtOpen you can use the quick keys O or you can drag an image file onto the applicationrsquos icon
Once you open an image you should see something like this
There is a lot going and a lot of information For now the key points
1 The image itself is displayed in the center You can zoom in and zoom out using the tools or Viewgt Zoom in or Zoom out
Photoshop
Tips amp Tricks
updated May 20175
2 The tool bar In Photoshop you select a tool to complete different tasks Wersquoll talk about some of the tools in depth during this tutorial but not all of them
3 Notice the settings at the top They will change depending on what tool is selected - allowing you change the size of the tool for example or its intensity
4 Panels ndash Photoshop has a host of panels that give access to differ-ent functions You can find them under the Window dropdown tab Again wersquoll talk about a few of them during this tutorial
bullRollover a tool to see itrsquos name and keyboard shortcut Learning the short-cuts will let you work faster
bull
The Tool Bar
Select different tools to adjust your photos in different ways You might want to select part of the image ndash someonersquos face for example We have different tools that will allow you to do that
There is a cropping tool for cropping your image
A tool for removing imperfections ndash dust on your camerarsquos sensor can create blemishes in your photo
Tools that will allow you darken or lighten an area of your photo
You can add text to an image ndash if yoursquore creating an ad or poster for example
Photoshop
Tips amp Tricks
updated May 20176
marquee tool (M) - move area of an image lasso tool (L) - select an area by drawing a shape around itquick selection (W) - selects an area of similar tone crop tool (C) - click and drag a box to crop the imageeye dropper (i) - use with info panel to measure imagehealing brush (J) - use with care to remove sensor dust
clone tool (S) - use with care to remove sensor dusthistory brush (Y) - use with history panel as a toning tool
burndodge tool (O) - lighten and darken selective areas
type tool (T) - apply type over an image
zoom tool (Z) zoom in for a closer look
Some of the key tools and their keyboard shortcuts
bullNot to beat a dead horse but learning the keyboard short-cuts for a program will let you work more quicklyRollover a tool and the name and short-cut are revealed For exampleC ndash CropY ndash History BrushT ndash Type Tool
bull
Photoshop
Tips amp Tricks
updated May 20177
Tools in depth
bullNote that many tools have lsquosub-toolsrsquoClick and hold the small rectangle to see other options within a specific tool
bullWith all the selection tools if you want to add to a selection or select an additional area hold down the
Shift keyHold down the Op-tion key to deselect part of a selection
bull
The Lasso Tool (L) Click and draw to select an area of the photo You could outline a personrsquos face or the sky for ex-ample This would allow you to adjust just the selected area - make it darker adjust the color etc
Watch a 210 video on using the Lasso tool
The Quick Selection Tool (W) offers two other ways of selecting an area of the image To use the Quick selection tool click and drag over an area of the photo that has a consistent tone You can quickly select the sky for example or the grassThe Magic Wand tool is similar But you can just click on part of the image and the wand will expand to select similar areas
Watch a 241 video on using the Quick SelectionMagic Wand tools
The Crop Tool (C) Crop your photo to improve the compo-sition or to fit it to a specific shape If you are using a photo in a video for example you would probably crop it to fit the 169 perspective of a video which is skinnier than an un-cropped still image You can crop to a specific dimension or crop using your eye for what looks best
Watch a 212 video on using the Crop tool
Photoshop
Tips amp Tricks
updated May 20178
The Eyedropper Tool (I) can be used to give you detailed information about the density or color of your image Use it in conjunction with the Info Panel
Watch a 324 video on using the Info Panel
The Spot Healing Brush Tool (J) A powerful tool that pres-ents ethical concerns in journalism Brush over an area of a photo and Photoshop will try to lsquohealrsquo or fix what is brushed This usually means eliminating it and trying to fill in the background If you have dust on the camera sensor and it shows up as a small mark on the file you could ethically use the tool to remove that blemish But for journalists changing the reality of the photo is forbidden If you are a commercial photographer you could use the tool to remove distractions
Watch a 533 video on using the Spot Healing Brush and Clone Stamp tool tool
The Brush Tool (B) and its related sub-tools allows you to draw on your photo
The Clone Stamp Tool (S) is similar to the Healing Brush Tool and presents the same ethical issues to journalists It allows you to copy from one area of a photo to the other Hold down the option key to select the area to copy Then click and drag to copy that information somewhere else lsquocloning itrsquo
See video for Spot Healing Brush above
bullWhen using the eyedropper tool one number to measure is the image density for skin ndash We want people to look good in photosA rough rule for caucasians skin tone should be about 35-40 in the light (not in shadow)African-American skin values can go as high as 70
bull
Photoshop
Tips amp Tricks
updated May 20179
The History Brush Tool (Y) is a tool I use a lot when toning or adjusting an image Use it in conjunction with the History panel You can use the brush to paint in the previous state of an image in a selected areaFor example yoursquove lightened the entire image but you really want the sky to look as it did in the original photo ndash select the original state in the History panel and then use the History Brush to lsquopaintrsquo in that original darkness of the sky
Watch a 432 video on using the History tool
The Burn amp Dodge Tools(O) are useful for quickly and easily darkening or lightening an area of a photo The Burn Tool will darken an area You can adjust the intensity and size of the brush at the top of the screen The Dodge Tool is used in the same way but lightens an area Once you select the brush size and intensity click and drag to paint over an area Use the History panel to undo if necessary
Watch a 223 video on using the BurnDodge tool
The Type Tool (T) can apply type to a photo Once select-ed yoursquoll have options for fonts and sizes
Watch a 455 video on using the Type Tool
bullIf you want blank space around a photo to add type to for example you can extend the size of the canvas ndash the area around the photoGo ImagegtCanvas Size You can select whether the image remains cen-tered on the canvas or not
bull
The Zoom Tool (Z) allows you to zoom in on an image - this can make it easier to see if the photo is sharp and allows for more precise control of an area of the photo Click to zoom in Old the option key to zoom out
Watch a 55 video on using the Zoom Tool
These are the tools we are most likely to use in this tutorial You can explore the other tools and features of Photoshop on your own
Photoshop
Tips amp Tricks
updated May 201710
ToningWe will define toning as making basic adjustments to color brightness contrast and cropping These are basic changes to the image that aim to bring it more in line with what we actually saw and to make the photo suitable for publication in either print or a digital environment
The tutorial will not cover retouching ndash the removal or changing of content in the photo You can certainly learn those skills in other classes or by using online resources such as Lyndacom
Photoshop is an extremely powerful program and there are many ways to get to the same place If you have used the program before you may have learned other ways of adjusting an image I donrsquot think there is a single best way ndash I will cover one method that I find works well for most situations
My goal with this tutorial is to give you a basic set of skills that will al-low you to make simple adjustments to your images quickly and easily
Less time using Photoshop equals more time for other things
Toning a photo in Photoshop in 10 (ish) steps
Properly exposed and photographed images should NOT require extensive toning
Photoshop is NOT the fix-it tool for lazy and bad photography
bullRemember that changes you make in Photoshop are per-manent If you make a mistake you may not be able to undo it later on
That is why I strongly suggest always work-ing on a copy of your original When you are selecting images make a copy of your best photos and work on the copy
While it is possible to save your adjustments as separate layers in a photo that workflow is beyond the scope of this tutorial
Working on a copy is always a smart idea
bull
Photoshop
Tips amp Tricks
updated May 201711
If you get it right in the field it should take less than 10 minutes to tone a photograph
ALWAYS WORK ON A COPY ndash NEVER YOUR ORIGINAL FILE
1 AnalyzeOpen your photo in Photoshop and take a moment to consider con-trast tonal qualities and sharpness Check tonal values for key areas such as skin tones using the eyedropper and info palette
In the info palette set second lsquoeyedropperrsquo to grayscale Read the skin tone with the eyedropper - avoid highlights or shadows when looking for skin values ~36 K Value for front lit Caucasian skin and up to 70 for African American skin tones
The eyedropper was placed on his forehead an area of his skin that was not in shadow or too bright from the reflection of light Note the K value is 36 ndash where you want to be for typical caucasian skin values Notice on the left the RGB values - these measure the color Blue has the lowest value and the opposite of blue is yellow - in gen-eral skin has a yellowish cast to it
bullWhen you select the eyedropper tool set the lsquosample sizersquo at the top left to lsquo3 by 3rsquo This way the eye dropper will average a small group of pix-els and not be fooled by a single aberrant one
bullIt is worth know-
ing your colors Un-derstand the color
wheel
If you subtract one color you add its op-posite Remove yel-
low and you get blue for example
Photoshop
Tips amp Tricks
updated May 201712
2 Rotate and CropDecide how to best crop the photo There is no reason to spend time toning part of a photo if yoursquore going to crop it You can crop to a spe-cific dimension or leave it open to what you think looks best
Try to avoid cropping to odd sizes and shapes But certainly crop to eliminate distractions and improve composition
Click on the Crop tool and then resize the box Double click in the middle of the image when yoursquore done
3 Basic Tonal Adjustment Use Wersquoll use Levels (L) to adjust Black and White points The goal is to adjust the brightness and the range of tones within the image You want brightwhite tones to look white and darkblack tones to look black while still keeping a full range of tones If your image looks grey and muddy and flat it will feel dull If all we see are stark black and white tones the image will lack detail and richness
Drag the black and white points to the base of the curve
It may be hard to see but by dragging the end points you are extending
Before Black and white points ex-tend beyond the lsquomountainrsquo of data The image is flatter and duller
After Black and white points are dragged into the lsquobase of the moun-tainrsquo creating a richer tone
Photoshop
Tips amp Tricks
updated May 201713
the range of tone of the image You are resetting the range
Be careful if you slide into the lsquomountainrsquo you will start to lose informa-tion Sometimes that wonrsquot be a problem - the information isnrsquot im-portant
But if yoursquore not careful yoursquoll lose detail in highlights andor shadow areas
Watch a 451 minute video on setting tonal range using Levels
4 Color CastSometimes the camera wonrsquot capture the color accurately
The photo may be too yellow or blue or green or whatever This hap-pens most commonly in unusual lighting situations ndash a mix of kinds of light or unusual fluorescent lighting etc Our cameras if set properly do a very good job outdoors in natural light but sometimes struggle with artificial lighting
IF the color cast is extreme we probably canrsquot do a very good of fixing the problem So it is important to make sure yoursquore capturing your im-age with the proper settings BUT if the color is off by a little bit there is a nice technique for removing that color cast
The theory is simple If we can make something in the photo that is supposed to be whitegrey look whitegrey then all the other colors will fall into place If the whites are too yellow everything is probably too yellow
By lsquosettingrsquo a white we reset the baseline and hopefully everything falls into place
bullIf you hold the option key down while drag-ging either the black or white arrow yoursquoll get a display that shows you where yoursquore losing detail The screen will turn black and areas that have lost all their de-tail will be highlighted
bull
bullI will talk about lsquoset-ting a whitersquo but make sure you use an area in the image that has detail A pure white like the sun wonrsquot work ndash it has no information Light greys are the best
bull
Photoshop
Tips amp Tricks
updated May 201714
bullIf you set a white and
donrsquot like the results use the History Tab to undo and start over It usually
means you either moved the mouse accidentally or
hadnrsquot picked a neutral area to work on
bull
OF all the steps this is the most complicated to follow But once yoursquove done it a few times it becomes pretty simple to master
There are six steps to this technique1 Open Levels2 Double click on the white eye dropper3 Click on an light neutral area ndash light white to medium grey AFTER CLICKING DONrsquoT MOVE THE MOUSE LEAVE THE CURSOR WHERE YOU CLICKED4 Use tab key to scroll through the color picker and set the A amp B channels to zero5 Click return to close the color picker6 Click the mouse without moving it (if yoursquove moved the mouse at any point you need to start over) This should lsquoset the whitersquo
The levels are open wersquove clicked on the manrsquos white shirt and are ready to zero out the AampB channels
Photoshop
Tips amp Tricks
updated May 201715
Notice the mouse hasnrsquot movedTHIS IS KEYAfter clicking on his white shirt I use the keyboardNOT THE MOUSETo set the AampB channels to zeroThen click lsquoreturnrsquo And FINALLY click the mouse on the samespot of his shirt And voila
Watch a 315 video on removing color cast using Levels
5 MidtonesTo this point wersquove corrected the color and over tonal range Some-times we may need to adjust the midtones those middle grays that may be too bright or too dark Correcting the color will sometimes shift these so make sure to do this step after color correcting
Photoshop
Tips amp Tricks
updated May 201716
We use the midtone control the gray middle arrow in Levels to lsquoopen up the shadowsrsquo and let in some detail while keeping the range of
tones we set with the black and white points
Watch a 122 video on adjusting the midtones of an image
6 Local AdjustmentsTo this point wersquove made global changes to the photo ndash all or noth-ing changes Now is the time to look and see if a specific area needs adjusting We might lighten a face or darken the foreground or back-ground of an image If yoursquore a journalist you want to take GREAT CARE in making these adjustments It is easy to step beyond the ethi-cal standards of photojournalism
In general we donrsquot want to remove an element or change it so dra-matically that wersquove altered the reality of the scene A photojournalist should never eliminate a pole that is sticking out of someonersquos head just because it is a distraction or add a cloud to a blue sky Neither should they so darken something that we canrsquot recognize that it was there
Never make a change that would mislead or misrepresent what actually occurred
bullThe National Press Photographers As-sociation (NPPA) has a code of ethics that speaks to the manip-ulation of imageshttpsnppaorgcode_of_ethics
bull
Photoshop
Tips amp Tricks
updated May 201717
For other kinds of photographers working in advertising or as an artist or wedding photographer for example you will need to use your judgement and
the judgement of your employer or client
This tutorial will only cover very basic adjustments Photoshop is a very powerful program You can change the color shape perspective of ele-ments You can remove blemishes and alter the appearance of light And on and on Those skills are beyond the scope of this tutorial
For the basic toning of an image we will talk about two things1 Lighteningdarkening2 Adjusting color
IF you want to adjust a part of a photograph you need to select the area you want to adjust
The Lasso and Quick Selection tools explained earlier in the tutorial are easy ways to isolate someonersquos face or the sky or some other area of the photograph
Once selected you can apply the same tools wersquove used to adjust the entire image Levels can be used to lighten or darken or even alter the color of the selected area
1 Select the area that needs lsquofixingrsquo2 Feather the selection so that the edge is softened between the selec-tion and the rest of the image3 Make the adjustment
The burndodge tool can also be useful for lightening or darkening a area of a photoThe Burn Tool makes an area darker
Photoshop
Tips amp Tricks
updated May 201718
Herersquos a photo of a protest from the Democratic National Convention in Philadelphia in July 2016 Overall the color looks good and there is a wide range of tone But I want to make sure the viewer is drawn to the protesterrsquos expression I wish her face were a little lighter
If I lighten the whole photo her face looks better but the rest of the photo looks washed out
Photoshop
Tips amp Tricks
updated May 201719
Here are three ways to lighten her face without lightening the rest of the image
A Select and LightenUse the Lasso or Quick Selection tools to select her face and armFeather the selection and then use Levels to lighten the selection
If you look closely you can see the outline of the selection of her arm and face I then used Levels to lighten just those elements The rest of the photo is the same as the original on the previous page
B Burn and DodgeUse the Dodge tool to lighten her face and arm by painting over it You can adjust the size and intensity of the tool
I find a good starting point is to set the brush to lsquomidtonesrsquo and about 30 You can keep lsquopaintingrsquo to lighten more if you need to
Photoshop
Tips amp Tricks
updated May 201720
Note that her skin looks little redderwarmer You can get a shift of color when you use the dodge tool
C History BrushThis method can seem a little more complicated but often gives the most natural results
The history brush allows you to lsquopaintrsquo in the previous state So you can lighten the entire image for example and then revert part of the image back to where it started
To use the History brush you also need to open the History Win-dow Pane
I find this method allows for the most natural adjustments in many cases And with practice is very fast
bullSometimes colors shift when you lighten them especially with the dodge tool
The HueSaturation tool can bring those colors back into line You want to make sure a personrsquos skin tone remains consis-tent
bull
Photoshop
Tips amp Tricks
updated May 201721
In this example I opened the image and then used Levels to lighten the entire photograph
I click the check box next to the origi-nal image above the change I made in Levels
Then each time I use the History brush I am returning that area of the photo to the original state
You are less likely to get a color shift this way and less likely to see the edge between an area you changed and the rest of the photograph
Photoshop
Tips amp Tricks
updated May 201722
IF yoursquove done a good job shooting your photo - set a proper expo-sure and white balance ndash you should be done toning your photo at this point
If it takes more than 5-10 minutes to adjust your photo yoursquore prob-ably trying to fix something that went wrong And yoursquoll probably find itrsquos is difficult or impossible to make it perfect
It is VERY important that you donrsquot rely on Photoshop to fix mistakes in the field
You may sometimes need to use other tools especially if the scene was lit by more than one type of light or under difficult conditions
7 Selective Color amp HueSaturationBoth tools can by used to correct tricky lighting and fix the color of images If the scene is lit by more than kind of light ndash window light mixed with overhead lighting or sunlight and shadow for example the color of part of the scene may be wrong
Selective Color ImagegtAdjustmentsgtSelective Color allows you to alter the color of one specific color So if the yellow channel has too much red in it you can remove the red without changing other colors that might have red in their mix
Hue Saturation ImagegtAdjustmentsgtHueSaturation allows you to adjust the hue saturation and brightness of the image or individual color channels Another useful tool in adjusting of fixing the color mix of a photo
Watch a 430 video on using Selective Color and HueSaturation
Photoshop
Tips amp Tricks
updated May 201723
8 CaptionsIt is vital to caption your images Captions make the image searchable on your computer and on the Internet
Captions give the photo context and make them more valuable
Photos are an historical record and the caption is part of that record
Captions explain and give meaning to your photographs
The caption information is part of what we call metadata It is informa-tion about information
You can apply the caption information in Photoshop or in Lightroom or Photo Mechanic ndash Depending on what software you have available
Once saved it is digitally stored with the photo ndash part of the image file
In Photoshop go FilegtFile info
The Description field is where you type your complete caption infor-mation
You can add information to the other fields includ-ing your photo credit under the Origin tab
Watch a 416 video on adding a caption to a photo
Photoshop
Tips amp Tricks
updated May 201724
9 Save your Image FilesPart of your workflow needs to be a way to stay organized If you canrsquot find your photos they have no value They are certainly worthless as part of an assignment but even worse in the real world where if you canrsquot find a photo or lose a file yoursquoll be in deep doo doo (a technical term)
YOU SHOULD HAVE BEEN WORKING ON A COPY
If you follow good workflow you still have an original untouched version of your file This version the toned and captioned version should be saved with a unique name that tells you something about the photo
File names should have no spaces and no special characters
Use only letters numbers hyphen and dash
My system
date_name_slug The date the photo was takenYour name (so a teacher or client or boss immediately knows who took the photo)A slug that tells what assignment the photo goes with
20160901_YourName_Circus_01
This photo for example was taken on September 1 2016 by you and is the first photo from the Circus assignment
bullI use the year at the beginning of my file name because I think sorting by year makes sense for me It puts all the 2016 files to-gether
bull
Photoshop
Tips amp Tricks
updated May 201725
10 Reformat your cardIf possible donrsquot do this until the end Your card is your backup incase everything goes wrong )
Format the card in the camera
Use the camera to format the card never delete files off a card from the computer You want to use the format function of the device to properly erase and ready the card for next time
DONrsquoT reformat until you are SURE you have properly saved your images
There are many many many other features and tools in Photoshop
There are some other ways to adjust photos that can be useful includ-ing
ShadowHighlights ndash you can open up shadows or add detail back into highlights (within limits)
BrightnessContrast ndash another way to control the brightness and contrast of a photo
Curves ndash Similar to Levels but instead of three arrows you can adjust the image anywhere along the curve
You can explore these tools as you gain familiarity with the program
bullIdeally you should have a card dedicat-ed to one device
It is better not to use a card in more than one camera
And it is a terrible idea to store fold-ers of other files on your card
Each device writes a lsquotable of contentsrsquo on the card to keep files organized Multiple devices means mul-tiple tables increasing the odds that your card will fail
bull
Photoshop
Tips amp Tricks
updated May 201726
SHOOTING RAW
Until now I have assumed you are shooting jpegs This is the almost universal image file format that is found on almost every device and website
JPEGS are small image files that can be viewed online opened in most applications They offer compatibility and small file size
But think about that ndash how can they be so small Why are they so universal
JPEGS are small because the files are compressed Information is dis-carded to reduce the file size Enough is kept so the image still looks good
When you take a photo with your camera a lot of information is applied to the file ndash the white balance you set perhaps contrast or sharpness
All of this is stored in the JPEG file and used to display the image
What if it wasnrsquot
What if you could take the lsquorawrsquo unprocessed digital information and manipulate it after the fact in Photoshop
Well you can Each camera manufacturer has itrsquos own formula for what we call a Raw file And Photoshop can open almost all of them
bullWhen a brand new camera is introduced it may take Photo-shop a few weeks or months to introduce an update for pro-cessing the Raw file
bull
Photoshop
Tips amp Tricks
updated May 201727
Nikon calls its Raw files NEFS Canon has CR2 files etc
The advantage of Raws is that you start in Photoshop with a lot more information and data Nothing is compressed no settings locked into the file
The disadvantage is that the files are much larger ndash your camerarsquos card will hold fewer imagesNot all software can edit or see a Raw file Yoursquoll need to use Photo-shop or some other image editor to convert the files to a universal format like a jpeg
IF you decide to shoot in the RAW format the image will open in a different window inside Photoshop
Note the controls You can set a white by using the eyedropper and clicking on something neutral You can fine tune your settings with the adjustments on the right ndash changing exposure contrast color etc
Photoshop
Tips amp Tricks
updated May 201728
You can make local adjustments by using the Adjustment brush
To use the brush lsquopaintrsquo over the area you want to adjust You can change the settings before or after using the brush You canrsquot select an area as you would with the Lasso or Quick Selection tools but you can still make many adjustments
When yoursquore done open the image make any final corrections add a caption and save it as a jpeg or other format The original Raw file remains as a backup
Watch a 610 video on using Camera Raw
Photoshop
Tips amp Tricks
updated May 201729
Photoshop is an extremely powerful application This tutorial only scratches the surface of what the app can do
The goal of this document is to introduce you to the program and give you the skills to adjust a photographrsquos basic tone and color These basic adjustments compensate for the limits of photography
A photograph canrsquot (yet) see as well as the human eye It canrsquot see the range of brightness or detail
And both the camera and the camera operator (you) are imperfect Exposures may not be perfect color and contrast may not look as wersquod hoped or as the scene actually appeared
These basic Photoshop skills can help make a photo look better online or in print
For those of you looking to dig deeper into Photoshoprsquos magical abili-ties to transform images there are numerous online resources Lyndacom (free to Penn State students) offers tutorials You can find many free resources on Youtubecom and Adobecom offers tutorials as well
And you can always contact me if you have questions
Will Yurmanwillyurmangmailcom
Photoshop
Tips amp Tricks
updated May 20173
Introduction
Photoshop is an extremely power tool for editing and manipulating im-ages And with great power comes great responsibility Simply because we can do something doesnrsquot mean we should
There is tremendous power in the truth of a photograph Even if yoursquore not working in journalism consider this before altering the con-tent of a photograph
There are many stories of journalists losing their jobs and ending their careers because they abused the power of Photoshop
This tutorial is designed to introduce you to a very complicated pro-gram and teach you some basic skills for adjusting a photograph
It is NOT designed to detail every single feature of the programIT is specifically written for Photoshop CC 201711 and is current as of May 2017
This tutorial will look at these key features of Photoshop
1 Viewing photos
2 Adjust tonecolorcontrastcaptions
3 CroppingResizing
5 Working with Raw files
bullNOTE This tutorial was written for the Mac OS But the program should look very similar on a Windows computer
There is a tablet version of Photoshop as well - it offers fewer features than
the desktop versionbull
Photoshop
Tips amp Tricks
updated May 20174
bullIf you want to learn more about Photoshop one great resource is LyndacomThe site offers tutorials on a wide range of ap-plications and is free to Penn State students
bull
If you donrsquot like the layout of the Pho-toshop display you can rearrange panels and create a cus-tom workspace Go WindowgtWorkspace
bull
Tools and Workspace
Photoshop is part of the Adobe Creative Suite of applications This means the look and interface will feel familiar as you move from app to app from Photoshop to Premiere to Audition to Indesign etc
Open the application To open an image You can use FilegtOpen you can use the quick keys O or you can drag an image file onto the applicationrsquos icon
Once you open an image you should see something like this
There is a lot going and a lot of information For now the key points
1 The image itself is displayed in the center You can zoom in and zoom out using the tools or Viewgt Zoom in or Zoom out
Photoshop
Tips amp Tricks
updated May 20175
2 The tool bar In Photoshop you select a tool to complete different tasks Wersquoll talk about some of the tools in depth during this tutorial but not all of them
3 Notice the settings at the top They will change depending on what tool is selected - allowing you change the size of the tool for example or its intensity
4 Panels ndash Photoshop has a host of panels that give access to differ-ent functions You can find them under the Window dropdown tab Again wersquoll talk about a few of them during this tutorial
bullRollover a tool to see itrsquos name and keyboard shortcut Learning the short-cuts will let you work faster
bull
The Tool Bar
Select different tools to adjust your photos in different ways You might want to select part of the image ndash someonersquos face for example We have different tools that will allow you to do that
There is a cropping tool for cropping your image
A tool for removing imperfections ndash dust on your camerarsquos sensor can create blemishes in your photo
Tools that will allow you darken or lighten an area of your photo
You can add text to an image ndash if yoursquore creating an ad or poster for example
Photoshop
Tips amp Tricks
updated May 20176
marquee tool (M) - move area of an image lasso tool (L) - select an area by drawing a shape around itquick selection (W) - selects an area of similar tone crop tool (C) - click and drag a box to crop the imageeye dropper (i) - use with info panel to measure imagehealing brush (J) - use with care to remove sensor dust
clone tool (S) - use with care to remove sensor dusthistory brush (Y) - use with history panel as a toning tool
burndodge tool (O) - lighten and darken selective areas
type tool (T) - apply type over an image
zoom tool (Z) zoom in for a closer look
Some of the key tools and their keyboard shortcuts
bullNot to beat a dead horse but learning the keyboard short-cuts for a program will let you work more quicklyRollover a tool and the name and short-cut are revealed For exampleC ndash CropY ndash History BrushT ndash Type Tool
bull
Photoshop
Tips amp Tricks
updated May 20177
Tools in depth
bullNote that many tools have lsquosub-toolsrsquoClick and hold the small rectangle to see other options within a specific tool
bullWith all the selection tools if you want to add to a selection or select an additional area hold down the
Shift keyHold down the Op-tion key to deselect part of a selection
bull
The Lasso Tool (L) Click and draw to select an area of the photo You could outline a personrsquos face or the sky for ex-ample This would allow you to adjust just the selected area - make it darker adjust the color etc
Watch a 210 video on using the Lasso tool
The Quick Selection Tool (W) offers two other ways of selecting an area of the image To use the Quick selection tool click and drag over an area of the photo that has a consistent tone You can quickly select the sky for example or the grassThe Magic Wand tool is similar But you can just click on part of the image and the wand will expand to select similar areas
Watch a 241 video on using the Quick SelectionMagic Wand tools
The Crop Tool (C) Crop your photo to improve the compo-sition or to fit it to a specific shape If you are using a photo in a video for example you would probably crop it to fit the 169 perspective of a video which is skinnier than an un-cropped still image You can crop to a specific dimension or crop using your eye for what looks best
Watch a 212 video on using the Crop tool
Photoshop
Tips amp Tricks
updated May 20178
The Eyedropper Tool (I) can be used to give you detailed information about the density or color of your image Use it in conjunction with the Info Panel
Watch a 324 video on using the Info Panel
The Spot Healing Brush Tool (J) A powerful tool that pres-ents ethical concerns in journalism Brush over an area of a photo and Photoshop will try to lsquohealrsquo or fix what is brushed This usually means eliminating it and trying to fill in the background If you have dust on the camera sensor and it shows up as a small mark on the file you could ethically use the tool to remove that blemish But for journalists changing the reality of the photo is forbidden If you are a commercial photographer you could use the tool to remove distractions
Watch a 533 video on using the Spot Healing Brush and Clone Stamp tool tool
The Brush Tool (B) and its related sub-tools allows you to draw on your photo
The Clone Stamp Tool (S) is similar to the Healing Brush Tool and presents the same ethical issues to journalists It allows you to copy from one area of a photo to the other Hold down the option key to select the area to copy Then click and drag to copy that information somewhere else lsquocloning itrsquo
See video for Spot Healing Brush above
bullWhen using the eyedropper tool one number to measure is the image density for skin ndash We want people to look good in photosA rough rule for caucasians skin tone should be about 35-40 in the light (not in shadow)African-American skin values can go as high as 70
bull
Photoshop
Tips amp Tricks
updated May 20179
The History Brush Tool (Y) is a tool I use a lot when toning or adjusting an image Use it in conjunction with the History panel You can use the brush to paint in the previous state of an image in a selected areaFor example yoursquove lightened the entire image but you really want the sky to look as it did in the original photo ndash select the original state in the History panel and then use the History Brush to lsquopaintrsquo in that original darkness of the sky
Watch a 432 video on using the History tool
The Burn amp Dodge Tools(O) are useful for quickly and easily darkening or lightening an area of a photo The Burn Tool will darken an area You can adjust the intensity and size of the brush at the top of the screen The Dodge Tool is used in the same way but lightens an area Once you select the brush size and intensity click and drag to paint over an area Use the History panel to undo if necessary
Watch a 223 video on using the BurnDodge tool
The Type Tool (T) can apply type to a photo Once select-ed yoursquoll have options for fonts and sizes
Watch a 455 video on using the Type Tool
bullIf you want blank space around a photo to add type to for example you can extend the size of the canvas ndash the area around the photoGo ImagegtCanvas Size You can select whether the image remains cen-tered on the canvas or not
bull
The Zoom Tool (Z) allows you to zoom in on an image - this can make it easier to see if the photo is sharp and allows for more precise control of an area of the photo Click to zoom in Old the option key to zoom out
Watch a 55 video on using the Zoom Tool
These are the tools we are most likely to use in this tutorial You can explore the other tools and features of Photoshop on your own
Photoshop
Tips amp Tricks
updated May 201710
ToningWe will define toning as making basic adjustments to color brightness contrast and cropping These are basic changes to the image that aim to bring it more in line with what we actually saw and to make the photo suitable for publication in either print or a digital environment
The tutorial will not cover retouching ndash the removal or changing of content in the photo You can certainly learn those skills in other classes or by using online resources such as Lyndacom
Photoshop is an extremely powerful program and there are many ways to get to the same place If you have used the program before you may have learned other ways of adjusting an image I donrsquot think there is a single best way ndash I will cover one method that I find works well for most situations
My goal with this tutorial is to give you a basic set of skills that will al-low you to make simple adjustments to your images quickly and easily
Less time using Photoshop equals more time for other things
Toning a photo in Photoshop in 10 (ish) steps
Properly exposed and photographed images should NOT require extensive toning
Photoshop is NOT the fix-it tool for lazy and bad photography
bullRemember that changes you make in Photoshop are per-manent If you make a mistake you may not be able to undo it later on
That is why I strongly suggest always work-ing on a copy of your original When you are selecting images make a copy of your best photos and work on the copy
While it is possible to save your adjustments as separate layers in a photo that workflow is beyond the scope of this tutorial
Working on a copy is always a smart idea
bull
Photoshop
Tips amp Tricks
updated May 201711
If you get it right in the field it should take less than 10 minutes to tone a photograph
ALWAYS WORK ON A COPY ndash NEVER YOUR ORIGINAL FILE
1 AnalyzeOpen your photo in Photoshop and take a moment to consider con-trast tonal qualities and sharpness Check tonal values for key areas such as skin tones using the eyedropper and info palette
In the info palette set second lsquoeyedropperrsquo to grayscale Read the skin tone with the eyedropper - avoid highlights or shadows when looking for skin values ~36 K Value for front lit Caucasian skin and up to 70 for African American skin tones
The eyedropper was placed on his forehead an area of his skin that was not in shadow or too bright from the reflection of light Note the K value is 36 ndash where you want to be for typical caucasian skin values Notice on the left the RGB values - these measure the color Blue has the lowest value and the opposite of blue is yellow - in gen-eral skin has a yellowish cast to it
bullWhen you select the eyedropper tool set the lsquosample sizersquo at the top left to lsquo3 by 3rsquo This way the eye dropper will average a small group of pix-els and not be fooled by a single aberrant one
bullIt is worth know-
ing your colors Un-derstand the color
wheel
If you subtract one color you add its op-posite Remove yel-
low and you get blue for example
Photoshop
Tips amp Tricks
updated May 201712
2 Rotate and CropDecide how to best crop the photo There is no reason to spend time toning part of a photo if yoursquore going to crop it You can crop to a spe-cific dimension or leave it open to what you think looks best
Try to avoid cropping to odd sizes and shapes But certainly crop to eliminate distractions and improve composition
Click on the Crop tool and then resize the box Double click in the middle of the image when yoursquore done
3 Basic Tonal Adjustment Use Wersquoll use Levels (L) to adjust Black and White points The goal is to adjust the brightness and the range of tones within the image You want brightwhite tones to look white and darkblack tones to look black while still keeping a full range of tones If your image looks grey and muddy and flat it will feel dull If all we see are stark black and white tones the image will lack detail and richness
Drag the black and white points to the base of the curve
It may be hard to see but by dragging the end points you are extending
Before Black and white points ex-tend beyond the lsquomountainrsquo of data The image is flatter and duller
After Black and white points are dragged into the lsquobase of the moun-tainrsquo creating a richer tone
Photoshop
Tips amp Tricks
updated May 201713
the range of tone of the image You are resetting the range
Be careful if you slide into the lsquomountainrsquo you will start to lose informa-tion Sometimes that wonrsquot be a problem - the information isnrsquot im-portant
But if yoursquore not careful yoursquoll lose detail in highlights andor shadow areas
Watch a 451 minute video on setting tonal range using Levels
4 Color CastSometimes the camera wonrsquot capture the color accurately
The photo may be too yellow or blue or green or whatever This hap-pens most commonly in unusual lighting situations ndash a mix of kinds of light or unusual fluorescent lighting etc Our cameras if set properly do a very good job outdoors in natural light but sometimes struggle with artificial lighting
IF the color cast is extreme we probably canrsquot do a very good of fixing the problem So it is important to make sure yoursquore capturing your im-age with the proper settings BUT if the color is off by a little bit there is a nice technique for removing that color cast
The theory is simple If we can make something in the photo that is supposed to be whitegrey look whitegrey then all the other colors will fall into place If the whites are too yellow everything is probably too yellow
By lsquosettingrsquo a white we reset the baseline and hopefully everything falls into place
bullIf you hold the option key down while drag-ging either the black or white arrow yoursquoll get a display that shows you where yoursquore losing detail The screen will turn black and areas that have lost all their de-tail will be highlighted
bull
bullI will talk about lsquoset-ting a whitersquo but make sure you use an area in the image that has detail A pure white like the sun wonrsquot work ndash it has no information Light greys are the best
bull
Photoshop
Tips amp Tricks
updated May 201714
bullIf you set a white and
donrsquot like the results use the History Tab to undo and start over It usually
means you either moved the mouse accidentally or
hadnrsquot picked a neutral area to work on
bull
OF all the steps this is the most complicated to follow But once yoursquove done it a few times it becomes pretty simple to master
There are six steps to this technique1 Open Levels2 Double click on the white eye dropper3 Click on an light neutral area ndash light white to medium grey AFTER CLICKING DONrsquoT MOVE THE MOUSE LEAVE THE CURSOR WHERE YOU CLICKED4 Use tab key to scroll through the color picker and set the A amp B channels to zero5 Click return to close the color picker6 Click the mouse without moving it (if yoursquove moved the mouse at any point you need to start over) This should lsquoset the whitersquo
The levels are open wersquove clicked on the manrsquos white shirt and are ready to zero out the AampB channels
Photoshop
Tips amp Tricks
updated May 201715
Notice the mouse hasnrsquot movedTHIS IS KEYAfter clicking on his white shirt I use the keyboardNOT THE MOUSETo set the AampB channels to zeroThen click lsquoreturnrsquo And FINALLY click the mouse on the samespot of his shirt And voila
Watch a 315 video on removing color cast using Levels
5 MidtonesTo this point wersquove corrected the color and over tonal range Some-times we may need to adjust the midtones those middle grays that may be too bright or too dark Correcting the color will sometimes shift these so make sure to do this step after color correcting
Photoshop
Tips amp Tricks
updated May 201716
We use the midtone control the gray middle arrow in Levels to lsquoopen up the shadowsrsquo and let in some detail while keeping the range of
tones we set with the black and white points
Watch a 122 video on adjusting the midtones of an image
6 Local AdjustmentsTo this point wersquove made global changes to the photo ndash all or noth-ing changes Now is the time to look and see if a specific area needs adjusting We might lighten a face or darken the foreground or back-ground of an image If yoursquore a journalist you want to take GREAT CARE in making these adjustments It is easy to step beyond the ethi-cal standards of photojournalism
In general we donrsquot want to remove an element or change it so dra-matically that wersquove altered the reality of the scene A photojournalist should never eliminate a pole that is sticking out of someonersquos head just because it is a distraction or add a cloud to a blue sky Neither should they so darken something that we canrsquot recognize that it was there
Never make a change that would mislead or misrepresent what actually occurred
bullThe National Press Photographers As-sociation (NPPA) has a code of ethics that speaks to the manip-ulation of imageshttpsnppaorgcode_of_ethics
bull
Photoshop
Tips amp Tricks
updated May 201717
For other kinds of photographers working in advertising or as an artist or wedding photographer for example you will need to use your judgement and
the judgement of your employer or client
This tutorial will only cover very basic adjustments Photoshop is a very powerful program You can change the color shape perspective of ele-ments You can remove blemishes and alter the appearance of light And on and on Those skills are beyond the scope of this tutorial
For the basic toning of an image we will talk about two things1 Lighteningdarkening2 Adjusting color
IF you want to adjust a part of a photograph you need to select the area you want to adjust
The Lasso and Quick Selection tools explained earlier in the tutorial are easy ways to isolate someonersquos face or the sky or some other area of the photograph
Once selected you can apply the same tools wersquove used to adjust the entire image Levels can be used to lighten or darken or even alter the color of the selected area
1 Select the area that needs lsquofixingrsquo2 Feather the selection so that the edge is softened between the selec-tion and the rest of the image3 Make the adjustment
The burndodge tool can also be useful for lightening or darkening a area of a photoThe Burn Tool makes an area darker
Photoshop
Tips amp Tricks
updated May 201718
Herersquos a photo of a protest from the Democratic National Convention in Philadelphia in July 2016 Overall the color looks good and there is a wide range of tone But I want to make sure the viewer is drawn to the protesterrsquos expression I wish her face were a little lighter
If I lighten the whole photo her face looks better but the rest of the photo looks washed out
Photoshop
Tips amp Tricks
updated May 201719
Here are three ways to lighten her face without lightening the rest of the image
A Select and LightenUse the Lasso or Quick Selection tools to select her face and armFeather the selection and then use Levels to lighten the selection
If you look closely you can see the outline of the selection of her arm and face I then used Levels to lighten just those elements The rest of the photo is the same as the original on the previous page
B Burn and DodgeUse the Dodge tool to lighten her face and arm by painting over it You can adjust the size and intensity of the tool
I find a good starting point is to set the brush to lsquomidtonesrsquo and about 30 You can keep lsquopaintingrsquo to lighten more if you need to
Photoshop
Tips amp Tricks
updated May 201720
Note that her skin looks little redderwarmer You can get a shift of color when you use the dodge tool
C History BrushThis method can seem a little more complicated but often gives the most natural results
The history brush allows you to lsquopaintrsquo in the previous state So you can lighten the entire image for example and then revert part of the image back to where it started
To use the History brush you also need to open the History Win-dow Pane
I find this method allows for the most natural adjustments in many cases And with practice is very fast
bullSometimes colors shift when you lighten them especially with the dodge tool
The HueSaturation tool can bring those colors back into line You want to make sure a personrsquos skin tone remains consis-tent
bull
Photoshop
Tips amp Tricks
updated May 201721
In this example I opened the image and then used Levels to lighten the entire photograph
I click the check box next to the origi-nal image above the change I made in Levels
Then each time I use the History brush I am returning that area of the photo to the original state
You are less likely to get a color shift this way and less likely to see the edge between an area you changed and the rest of the photograph
Photoshop
Tips amp Tricks
updated May 201722
IF yoursquove done a good job shooting your photo - set a proper expo-sure and white balance ndash you should be done toning your photo at this point
If it takes more than 5-10 minutes to adjust your photo yoursquore prob-ably trying to fix something that went wrong And yoursquoll probably find itrsquos is difficult or impossible to make it perfect
It is VERY important that you donrsquot rely on Photoshop to fix mistakes in the field
You may sometimes need to use other tools especially if the scene was lit by more than one type of light or under difficult conditions
7 Selective Color amp HueSaturationBoth tools can by used to correct tricky lighting and fix the color of images If the scene is lit by more than kind of light ndash window light mixed with overhead lighting or sunlight and shadow for example the color of part of the scene may be wrong
Selective Color ImagegtAdjustmentsgtSelective Color allows you to alter the color of one specific color So if the yellow channel has too much red in it you can remove the red without changing other colors that might have red in their mix
Hue Saturation ImagegtAdjustmentsgtHueSaturation allows you to adjust the hue saturation and brightness of the image or individual color channels Another useful tool in adjusting of fixing the color mix of a photo
Watch a 430 video on using Selective Color and HueSaturation
Photoshop
Tips amp Tricks
updated May 201723
8 CaptionsIt is vital to caption your images Captions make the image searchable on your computer and on the Internet
Captions give the photo context and make them more valuable
Photos are an historical record and the caption is part of that record
Captions explain and give meaning to your photographs
The caption information is part of what we call metadata It is informa-tion about information
You can apply the caption information in Photoshop or in Lightroom or Photo Mechanic ndash Depending on what software you have available
Once saved it is digitally stored with the photo ndash part of the image file
In Photoshop go FilegtFile info
The Description field is where you type your complete caption infor-mation
You can add information to the other fields includ-ing your photo credit under the Origin tab
Watch a 416 video on adding a caption to a photo
Photoshop
Tips amp Tricks
updated May 201724
9 Save your Image FilesPart of your workflow needs to be a way to stay organized If you canrsquot find your photos they have no value They are certainly worthless as part of an assignment but even worse in the real world where if you canrsquot find a photo or lose a file yoursquoll be in deep doo doo (a technical term)
YOU SHOULD HAVE BEEN WORKING ON A COPY
If you follow good workflow you still have an original untouched version of your file This version the toned and captioned version should be saved with a unique name that tells you something about the photo
File names should have no spaces and no special characters
Use only letters numbers hyphen and dash
My system
date_name_slug The date the photo was takenYour name (so a teacher or client or boss immediately knows who took the photo)A slug that tells what assignment the photo goes with
20160901_YourName_Circus_01
This photo for example was taken on September 1 2016 by you and is the first photo from the Circus assignment
bullI use the year at the beginning of my file name because I think sorting by year makes sense for me It puts all the 2016 files to-gether
bull
Photoshop
Tips amp Tricks
updated May 201725
10 Reformat your cardIf possible donrsquot do this until the end Your card is your backup incase everything goes wrong )
Format the card in the camera
Use the camera to format the card never delete files off a card from the computer You want to use the format function of the device to properly erase and ready the card for next time
DONrsquoT reformat until you are SURE you have properly saved your images
There are many many many other features and tools in Photoshop
There are some other ways to adjust photos that can be useful includ-ing
ShadowHighlights ndash you can open up shadows or add detail back into highlights (within limits)
BrightnessContrast ndash another way to control the brightness and contrast of a photo
Curves ndash Similar to Levels but instead of three arrows you can adjust the image anywhere along the curve
You can explore these tools as you gain familiarity with the program
bullIdeally you should have a card dedicat-ed to one device
It is better not to use a card in more than one camera
And it is a terrible idea to store fold-ers of other files on your card
Each device writes a lsquotable of contentsrsquo on the card to keep files organized Multiple devices means mul-tiple tables increasing the odds that your card will fail
bull
Photoshop
Tips amp Tricks
updated May 201726
SHOOTING RAW
Until now I have assumed you are shooting jpegs This is the almost universal image file format that is found on almost every device and website
JPEGS are small image files that can be viewed online opened in most applications They offer compatibility and small file size
But think about that ndash how can they be so small Why are they so universal
JPEGS are small because the files are compressed Information is dis-carded to reduce the file size Enough is kept so the image still looks good
When you take a photo with your camera a lot of information is applied to the file ndash the white balance you set perhaps contrast or sharpness
All of this is stored in the JPEG file and used to display the image
What if it wasnrsquot
What if you could take the lsquorawrsquo unprocessed digital information and manipulate it after the fact in Photoshop
Well you can Each camera manufacturer has itrsquos own formula for what we call a Raw file And Photoshop can open almost all of them
bullWhen a brand new camera is introduced it may take Photo-shop a few weeks or months to introduce an update for pro-cessing the Raw file
bull
Photoshop
Tips amp Tricks
updated May 201727
Nikon calls its Raw files NEFS Canon has CR2 files etc
The advantage of Raws is that you start in Photoshop with a lot more information and data Nothing is compressed no settings locked into the file
The disadvantage is that the files are much larger ndash your camerarsquos card will hold fewer imagesNot all software can edit or see a Raw file Yoursquoll need to use Photo-shop or some other image editor to convert the files to a universal format like a jpeg
IF you decide to shoot in the RAW format the image will open in a different window inside Photoshop
Note the controls You can set a white by using the eyedropper and clicking on something neutral You can fine tune your settings with the adjustments on the right ndash changing exposure contrast color etc
Photoshop
Tips amp Tricks
updated May 201728
You can make local adjustments by using the Adjustment brush
To use the brush lsquopaintrsquo over the area you want to adjust You can change the settings before or after using the brush You canrsquot select an area as you would with the Lasso or Quick Selection tools but you can still make many adjustments
When yoursquore done open the image make any final corrections add a caption and save it as a jpeg or other format The original Raw file remains as a backup
Watch a 610 video on using Camera Raw
Photoshop
Tips amp Tricks
updated May 201729
Photoshop is an extremely powerful application This tutorial only scratches the surface of what the app can do
The goal of this document is to introduce you to the program and give you the skills to adjust a photographrsquos basic tone and color These basic adjustments compensate for the limits of photography
A photograph canrsquot (yet) see as well as the human eye It canrsquot see the range of brightness or detail
And both the camera and the camera operator (you) are imperfect Exposures may not be perfect color and contrast may not look as wersquod hoped or as the scene actually appeared
These basic Photoshop skills can help make a photo look better online or in print
For those of you looking to dig deeper into Photoshoprsquos magical abili-ties to transform images there are numerous online resources Lyndacom (free to Penn State students) offers tutorials You can find many free resources on Youtubecom and Adobecom offers tutorials as well
And you can always contact me if you have questions
Will Yurmanwillyurmangmailcom

Photoshop
Tips amp Tricks
updated May 20174
bullIf you want to learn more about Photoshop one great resource is LyndacomThe site offers tutorials on a wide range of ap-plications and is free to Penn State students
bull
If you donrsquot like the layout of the Pho-toshop display you can rearrange panels and create a cus-tom workspace Go WindowgtWorkspace
bull
Tools and Workspace
Photoshop is part of the Adobe Creative Suite of applications This means the look and interface will feel familiar as you move from app to app from Photoshop to Premiere to Audition to Indesign etc
Open the application To open an image You can use FilegtOpen you can use the quick keys O or you can drag an image file onto the applicationrsquos icon
Once you open an image you should see something like this
There is a lot going and a lot of information For now the key points
1 The image itself is displayed in the center You can zoom in and zoom out using the tools or Viewgt Zoom in or Zoom out
Photoshop
Tips amp Tricks
updated May 20175
2 The tool bar In Photoshop you select a tool to complete different tasks Wersquoll talk about some of the tools in depth during this tutorial but not all of them
3 Notice the settings at the top They will change depending on what tool is selected - allowing you change the size of the tool for example or its intensity
4 Panels ndash Photoshop has a host of panels that give access to differ-ent functions You can find them under the Window dropdown tab Again wersquoll talk about a few of them during this tutorial
bullRollover a tool to see itrsquos name and keyboard shortcut Learning the short-cuts will let you work faster
bull
The Tool Bar
Select different tools to adjust your photos in different ways You might want to select part of the image ndash someonersquos face for example We have different tools that will allow you to do that
There is a cropping tool for cropping your image
A tool for removing imperfections ndash dust on your camerarsquos sensor can create blemishes in your photo
Tools that will allow you darken or lighten an area of your photo
You can add text to an image ndash if yoursquore creating an ad or poster for example
Photoshop
Tips amp Tricks
updated May 20176
marquee tool (M) - move area of an image lasso tool (L) - select an area by drawing a shape around itquick selection (W) - selects an area of similar tone crop tool (C) - click and drag a box to crop the imageeye dropper (i) - use with info panel to measure imagehealing brush (J) - use with care to remove sensor dust
clone tool (S) - use with care to remove sensor dusthistory brush (Y) - use with history panel as a toning tool
burndodge tool (O) - lighten and darken selective areas
type tool (T) - apply type over an image
zoom tool (Z) zoom in for a closer look
Some of the key tools and their keyboard shortcuts
bullNot to beat a dead horse but learning the keyboard short-cuts for a program will let you work more quicklyRollover a tool and the name and short-cut are revealed For exampleC ndash CropY ndash History BrushT ndash Type Tool
bull
Photoshop
Tips amp Tricks
updated May 20177
Tools in depth
bullNote that many tools have lsquosub-toolsrsquoClick and hold the small rectangle to see other options within a specific tool
bullWith all the selection tools if you want to add to a selection or select an additional area hold down the
Shift keyHold down the Op-tion key to deselect part of a selection
bull
The Lasso Tool (L) Click and draw to select an area of the photo You could outline a personrsquos face or the sky for ex-ample This would allow you to adjust just the selected area - make it darker adjust the color etc
Watch a 210 video on using the Lasso tool
The Quick Selection Tool (W) offers two other ways of selecting an area of the image To use the Quick selection tool click and drag over an area of the photo that has a consistent tone You can quickly select the sky for example or the grassThe Magic Wand tool is similar But you can just click on part of the image and the wand will expand to select similar areas
Watch a 241 video on using the Quick SelectionMagic Wand tools
The Crop Tool (C) Crop your photo to improve the compo-sition or to fit it to a specific shape If you are using a photo in a video for example you would probably crop it to fit the 169 perspective of a video which is skinnier than an un-cropped still image You can crop to a specific dimension or crop using your eye for what looks best
Watch a 212 video on using the Crop tool
Photoshop
Tips amp Tricks
updated May 20178
The Eyedropper Tool (I) can be used to give you detailed information about the density or color of your image Use it in conjunction with the Info Panel
Watch a 324 video on using the Info Panel
The Spot Healing Brush Tool (J) A powerful tool that pres-ents ethical concerns in journalism Brush over an area of a photo and Photoshop will try to lsquohealrsquo or fix what is brushed This usually means eliminating it and trying to fill in the background If you have dust on the camera sensor and it shows up as a small mark on the file you could ethically use the tool to remove that blemish But for journalists changing the reality of the photo is forbidden If you are a commercial photographer you could use the tool to remove distractions
Watch a 533 video on using the Spot Healing Brush and Clone Stamp tool tool
The Brush Tool (B) and its related sub-tools allows you to draw on your photo
The Clone Stamp Tool (S) is similar to the Healing Brush Tool and presents the same ethical issues to journalists It allows you to copy from one area of a photo to the other Hold down the option key to select the area to copy Then click and drag to copy that information somewhere else lsquocloning itrsquo
See video for Spot Healing Brush above
bullWhen using the eyedropper tool one number to measure is the image density for skin ndash We want people to look good in photosA rough rule for caucasians skin tone should be about 35-40 in the light (not in shadow)African-American skin values can go as high as 70
bull
Photoshop
Tips amp Tricks
updated May 20179
The History Brush Tool (Y) is a tool I use a lot when toning or adjusting an image Use it in conjunction with the History panel You can use the brush to paint in the previous state of an image in a selected areaFor example yoursquove lightened the entire image but you really want the sky to look as it did in the original photo ndash select the original state in the History panel and then use the History Brush to lsquopaintrsquo in that original darkness of the sky
Watch a 432 video on using the History tool
The Burn amp Dodge Tools(O) are useful for quickly and easily darkening or lightening an area of a photo The Burn Tool will darken an area You can adjust the intensity and size of the brush at the top of the screen The Dodge Tool is used in the same way but lightens an area Once you select the brush size and intensity click and drag to paint over an area Use the History panel to undo if necessary
Watch a 223 video on using the BurnDodge tool
The Type Tool (T) can apply type to a photo Once select-ed yoursquoll have options for fonts and sizes
Watch a 455 video on using the Type Tool
bullIf you want blank space around a photo to add type to for example you can extend the size of the canvas ndash the area around the photoGo ImagegtCanvas Size You can select whether the image remains cen-tered on the canvas or not
bull
The Zoom Tool (Z) allows you to zoom in on an image - this can make it easier to see if the photo is sharp and allows for more precise control of an area of the photo Click to zoom in Old the option key to zoom out
Watch a 55 video on using the Zoom Tool
These are the tools we are most likely to use in this tutorial You can explore the other tools and features of Photoshop on your own
Photoshop
Tips amp Tricks
updated May 201710
ToningWe will define toning as making basic adjustments to color brightness contrast and cropping These are basic changes to the image that aim to bring it more in line with what we actually saw and to make the photo suitable for publication in either print or a digital environment
The tutorial will not cover retouching ndash the removal or changing of content in the photo You can certainly learn those skills in other classes or by using online resources such as Lyndacom
Photoshop is an extremely powerful program and there are many ways to get to the same place If you have used the program before you may have learned other ways of adjusting an image I donrsquot think there is a single best way ndash I will cover one method that I find works well for most situations
My goal with this tutorial is to give you a basic set of skills that will al-low you to make simple adjustments to your images quickly and easily
Less time using Photoshop equals more time for other things
Toning a photo in Photoshop in 10 (ish) steps
Properly exposed and photographed images should NOT require extensive toning
Photoshop is NOT the fix-it tool for lazy and bad photography
bullRemember that changes you make in Photoshop are per-manent If you make a mistake you may not be able to undo it later on
That is why I strongly suggest always work-ing on a copy of your original When you are selecting images make a copy of your best photos and work on the copy
While it is possible to save your adjustments as separate layers in a photo that workflow is beyond the scope of this tutorial
Working on a copy is always a smart idea
bull
Photoshop
Tips amp Tricks
updated May 201711
If you get it right in the field it should take less than 10 minutes to tone a photograph
ALWAYS WORK ON A COPY ndash NEVER YOUR ORIGINAL FILE
1 AnalyzeOpen your photo in Photoshop and take a moment to consider con-trast tonal qualities and sharpness Check tonal values for key areas such as skin tones using the eyedropper and info palette
In the info palette set second lsquoeyedropperrsquo to grayscale Read the skin tone with the eyedropper - avoid highlights or shadows when looking for skin values ~36 K Value for front lit Caucasian skin and up to 70 for African American skin tones
The eyedropper was placed on his forehead an area of his skin that was not in shadow or too bright from the reflection of light Note the K value is 36 ndash where you want to be for typical caucasian skin values Notice on the left the RGB values - these measure the color Blue has the lowest value and the opposite of blue is yellow - in gen-eral skin has a yellowish cast to it
bullWhen you select the eyedropper tool set the lsquosample sizersquo at the top left to lsquo3 by 3rsquo This way the eye dropper will average a small group of pix-els and not be fooled by a single aberrant one
bullIt is worth know-
ing your colors Un-derstand the color
wheel
If you subtract one color you add its op-posite Remove yel-
low and you get blue for example
Photoshop
Tips amp Tricks
updated May 201712
2 Rotate and CropDecide how to best crop the photo There is no reason to spend time toning part of a photo if yoursquore going to crop it You can crop to a spe-cific dimension or leave it open to what you think looks best
Try to avoid cropping to odd sizes and shapes But certainly crop to eliminate distractions and improve composition
Click on the Crop tool and then resize the box Double click in the middle of the image when yoursquore done
3 Basic Tonal Adjustment Use Wersquoll use Levels (L) to adjust Black and White points The goal is to adjust the brightness and the range of tones within the image You want brightwhite tones to look white and darkblack tones to look black while still keeping a full range of tones If your image looks grey and muddy and flat it will feel dull If all we see are stark black and white tones the image will lack detail and richness
Drag the black and white points to the base of the curve
It may be hard to see but by dragging the end points you are extending
Before Black and white points ex-tend beyond the lsquomountainrsquo of data The image is flatter and duller
After Black and white points are dragged into the lsquobase of the moun-tainrsquo creating a richer tone
Photoshop
Tips amp Tricks
updated May 201713
the range of tone of the image You are resetting the range
Be careful if you slide into the lsquomountainrsquo you will start to lose informa-tion Sometimes that wonrsquot be a problem - the information isnrsquot im-portant
But if yoursquore not careful yoursquoll lose detail in highlights andor shadow areas
Watch a 451 minute video on setting tonal range using Levels
4 Color CastSometimes the camera wonrsquot capture the color accurately
The photo may be too yellow or blue or green or whatever This hap-pens most commonly in unusual lighting situations ndash a mix of kinds of light or unusual fluorescent lighting etc Our cameras if set properly do a very good job outdoors in natural light but sometimes struggle with artificial lighting
IF the color cast is extreme we probably canrsquot do a very good of fixing the problem So it is important to make sure yoursquore capturing your im-age with the proper settings BUT if the color is off by a little bit there is a nice technique for removing that color cast
The theory is simple If we can make something in the photo that is supposed to be whitegrey look whitegrey then all the other colors will fall into place If the whites are too yellow everything is probably too yellow
By lsquosettingrsquo a white we reset the baseline and hopefully everything falls into place
bullIf you hold the option key down while drag-ging either the black or white arrow yoursquoll get a display that shows you where yoursquore losing detail The screen will turn black and areas that have lost all their de-tail will be highlighted
bull
bullI will talk about lsquoset-ting a whitersquo but make sure you use an area in the image that has detail A pure white like the sun wonrsquot work ndash it has no information Light greys are the best
bull
Photoshop
Tips amp Tricks
updated May 201714
bullIf you set a white and
donrsquot like the results use the History Tab to undo and start over It usually
means you either moved the mouse accidentally or
hadnrsquot picked a neutral area to work on
bull
OF all the steps this is the most complicated to follow But once yoursquove done it a few times it becomes pretty simple to master
There are six steps to this technique1 Open Levels2 Double click on the white eye dropper3 Click on an light neutral area ndash light white to medium grey AFTER CLICKING DONrsquoT MOVE THE MOUSE LEAVE THE CURSOR WHERE YOU CLICKED4 Use tab key to scroll through the color picker and set the A amp B channels to zero5 Click return to close the color picker6 Click the mouse without moving it (if yoursquove moved the mouse at any point you need to start over) This should lsquoset the whitersquo
The levels are open wersquove clicked on the manrsquos white shirt and are ready to zero out the AampB channels
Photoshop
Tips amp Tricks
updated May 201715
Notice the mouse hasnrsquot movedTHIS IS KEYAfter clicking on his white shirt I use the keyboardNOT THE MOUSETo set the AampB channels to zeroThen click lsquoreturnrsquo And FINALLY click the mouse on the samespot of his shirt And voila
Watch a 315 video on removing color cast using Levels
5 MidtonesTo this point wersquove corrected the color and over tonal range Some-times we may need to adjust the midtones those middle grays that may be too bright or too dark Correcting the color will sometimes shift these so make sure to do this step after color correcting
Photoshop
Tips amp Tricks
updated May 201716
We use the midtone control the gray middle arrow in Levels to lsquoopen up the shadowsrsquo and let in some detail while keeping the range of
tones we set with the black and white points
Watch a 122 video on adjusting the midtones of an image
6 Local AdjustmentsTo this point wersquove made global changes to the photo ndash all or noth-ing changes Now is the time to look and see if a specific area needs adjusting We might lighten a face or darken the foreground or back-ground of an image If yoursquore a journalist you want to take GREAT CARE in making these adjustments It is easy to step beyond the ethi-cal standards of photojournalism
In general we donrsquot want to remove an element or change it so dra-matically that wersquove altered the reality of the scene A photojournalist should never eliminate a pole that is sticking out of someonersquos head just because it is a distraction or add a cloud to a blue sky Neither should they so darken something that we canrsquot recognize that it was there
Never make a change that would mislead or misrepresent what actually occurred
bullThe National Press Photographers As-sociation (NPPA) has a code of ethics that speaks to the manip-ulation of imageshttpsnppaorgcode_of_ethics
bull
Photoshop
Tips amp Tricks
updated May 201717
For other kinds of photographers working in advertising or as an artist or wedding photographer for example you will need to use your judgement and
the judgement of your employer or client
This tutorial will only cover very basic adjustments Photoshop is a very powerful program You can change the color shape perspective of ele-ments You can remove blemishes and alter the appearance of light And on and on Those skills are beyond the scope of this tutorial
For the basic toning of an image we will talk about two things1 Lighteningdarkening2 Adjusting color
IF you want to adjust a part of a photograph you need to select the area you want to adjust
The Lasso and Quick Selection tools explained earlier in the tutorial are easy ways to isolate someonersquos face or the sky or some other area of the photograph
Once selected you can apply the same tools wersquove used to adjust the entire image Levels can be used to lighten or darken or even alter the color of the selected area
1 Select the area that needs lsquofixingrsquo2 Feather the selection so that the edge is softened between the selec-tion and the rest of the image3 Make the adjustment
The burndodge tool can also be useful for lightening or darkening a area of a photoThe Burn Tool makes an area darker
Photoshop
Tips amp Tricks
updated May 201718
Herersquos a photo of a protest from the Democratic National Convention in Philadelphia in July 2016 Overall the color looks good and there is a wide range of tone But I want to make sure the viewer is drawn to the protesterrsquos expression I wish her face were a little lighter
If I lighten the whole photo her face looks better but the rest of the photo looks washed out
Photoshop
Tips amp Tricks
updated May 201719
Here are three ways to lighten her face without lightening the rest of the image
A Select and LightenUse the Lasso or Quick Selection tools to select her face and armFeather the selection and then use Levels to lighten the selection
If you look closely you can see the outline of the selection of her arm and face I then used Levels to lighten just those elements The rest of the photo is the same as the original on the previous page
B Burn and DodgeUse the Dodge tool to lighten her face and arm by painting over it You can adjust the size and intensity of the tool
I find a good starting point is to set the brush to lsquomidtonesrsquo and about 30 You can keep lsquopaintingrsquo to lighten more if you need to
Photoshop
Tips amp Tricks
updated May 201720
Note that her skin looks little redderwarmer You can get a shift of color when you use the dodge tool
C History BrushThis method can seem a little more complicated but often gives the most natural results
The history brush allows you to lsquopaintrsquo in the previous state So you can lighten the entire image for example and then revert part of the image back to where it started
To use the History brush you also need to open the History Win-dow Pane
I find this method allows for the most natural adjustments in many cases And with practice is very fast
bullSometimes colors shift when you lighten them especially with the dodge tool
The HueSaturation tool can bring those colors back into line You want to make sure a personrsquos skin tone remains consis-tent
bull
Photoshop
Tips amp Tricks
updated May 201721
In this example I opened the image and then used Levels to lighten the entire photograph
I click the check box next to the origi-nal image above the change I made in Levels
Then each time I use the History brush I am returning that area of the photo to the original state
You are less likely to get a color shift this way and less likely to see the edge between an area you changed and the rest of the photograph
Photoshop
Tips amp Tricks
updated May 201722
IF yoursquove done a good job shooting your photo - set a proper expo-sure and white balance ndash you should be done toning your photo at this point
If it takes more than 5-10 minutes to adjust your photo yoursquore prob-ably trying to fix something that went wrong And yoursquoll probably find itrsquos is difficult or impossible to make it perfect
It is VERY important that you donrsquot rely on Photoshop to fix mistakes in the field
You may sometimes need to use other tools especially if the scene was lit by more than one type of light or under difficult conditions
7 Selective Color amp HueSaturationBoth tools can by used to correct tricky lighting and fix the color of images If the scene is lit by more than kind of light ndash window light mixed with overhead lighting or sunlight and shadow for example the color of part of the scene may be wrong
Selective Color ImagegtAdjustmentsgtSelective Color allows you to alter the color of one specific color So if the yellow channel has too much red in it you can remove the red without changing other colors that might have red in their mix
Hue Saturation ImagegtAdjustmentsgtHueSaturation allows you to adjust the hue saturation and brightness of the image or individual color channels Another useful tool in adjusting of fixing the color mix of a photo
Watch a 430 video on using Selective Color and HueSaturation
Photoshop
Tips amp Tricks
updated May 201723
8 CaptionsIt is vital to caption your images Captions make the image searchable on your computer and on the Internet
Captions give the photo context and make them more valuable
Photos are an historical record and the caption is part of that record
Captions explain and give meaning to your photographs
The caption information is part of what we call metadata It is informa-tion about information
You can apply the caption information in Photoshop or in Lightroom or Photo Mechanic ndash Depending on what software you have available
Once saved it is digitally stored with the photo ndash part of the image file
In Photoshop go FilegtFile info
The Description field is where you type your complete caption infor-mation
You can add information to the other fields includ-ing your photo credit under the Origin tab
Watch a 416 video on adding a caption to a photo
Photoshop
Tips amp Tricks
updated May 201724
9 Save your Image FilesPart of your workflow needs to be a way to stay organized If you canrsquot find your photos they have no value They are certainly worthless as part of an assignment but even worse in the real world where if you canrsquot find a photo or lose a file yoursquoll be in deep doo doo (a technical term)
YOU SHOULD HAVE BEEN WORKING ON A COPY
If you follow good workflow you still have an original untouched version of your file This version the toned and captioned version should be saved with a unique name that tells you something about the photo
File names should have no spaces and no special characters
Use only letters numbers hyphen and dash
My system
date_name_slug The date the photo was takenYour name (so a teacher or client or boss immediately knows who took the photo)A slug that tells what assignment the photo goes with
20160901_YourName_Circus_01
This photo for example was taken on September 1 2016 by you and is the first photo from the Circus assignment
bullI use the year at the beginning of my file name because I think sorting by year makes sense for me It puts all the 2016 files to-gether
bull
Photoshop
Tips amp Tricks
updated May 201725
10 Reformat your cardIf possible donrsquot do this until the end Your card is your backup incase everything goes wrong )
Format the card in the camera
Use the camera to format the card never delete files off a card from the computer You want to use the format function of the device to properly erase and ready the card for next time
DONrsquoT reformat until you are SURE you have properly saved your images
There are many many many other features and tools in Photoshop
There are some other ways to adjust photos that can be useful includ-ing
ShadowHighlights ndash you can open up shadows or add detail back into highlights (within limits)
BrightnessContrast ndash another way to control the brightness and contrast of a photo
Curves ndash Similar to Levels but instead of three arrows you can adjust the image anywhere along the curve
You can explore these tools as you gain familiarity with the program
bullIdeally you should have a card dedicat-ed to one device
It is better not to use a card in more than one camera
And it is a terrible idea to store fold-ers of other files on your card
Each device writes a lsquotable of contentsrsquo on the card to keep files organized Multiple devices means mul-tiple tables increasing the odds that your card will fail
bull
Photoshop
Tips amp Tricks
updated May 201726
SHOOTING RAW
Until now I have assumed you are shooting jpegs This is the almost universal image file format that is found on almost every device and website
JPEGS are small image files that can be viewed online opened in most applications They offer compatibility and small file size
But think about that ndash how can they be so small Why are they so universal
JPEGS are small because the files are compressed Information is dis-carded to reduce the file size Enough is kept so the image still looks good
When you take a photo with your camera a lot of information is applied to the file ndash the white balance you set perhaps contrast or sharpness
All of this is stored in the JPEG file and used to display the image
What if it wasnrsquot
What if you could take the lsquorawrsquo unprocessed digital information and manipulate it after the fact in Photoshop
Well you can Each camera manufacturer has itrsquos own formula for what we call a Raw file And Photoshop can open almost all of them
bullWhen a brand new camera is introduced it may take Photo-shop a few weeks or months to introduce an update for pro-cessing the Raw file
bull
Photoshop
Tips amp Tricks
updated May 201727
Nikon calls its Raw files NEFS Canon has CR2 files etc
The advantage of Raws is that you start in Photoshop with a lot more information and data Nothing is compressed no settings locked into the file
The disadvantage is that the files are much larger ndash your camerarsquos card will hold fewer imagesNot all software can edit or see a Raw file Yoursquoll need to use Photo-shop or some other image editor to convert the files to a universal format like a jpeg
IF you decide to shoot in the RAW format the image will open in a different window inside Photoshop
Note the controls You can set a white by using the eyedropper and clicking on something neutral You can fine tune your settings with the adjustments on the right ndash changing exposure contrast color etc
Photoshop
Tips amp Tricks
updated May 201728
You can make local adjustments by using the Adjustment brush
To use the brush lsquopaintrsquo over the area you want to adjust You can change the settings before or after using the brush You canrsquot select an area as you would with the Lasso or Quick Selection tools but you can still make many adjustments
When yoursquore done open the image make any final corrections add a caption and save it as a jpeg or other format The original Raw file remains as a backup
Watch a 610 video on using Camera Raw
Photoshop
Tips amp Tricks
updated May 201729
Photoshop is an extremely powerful application This tutorial only scratches the surface of what the app can do
The goal of this document is to introduce you to the program and give you the skills to adjust a photographrsquos basic tone and color These basic adjustments compensate for the limits of photography
A photograph canrsquot (yet) see as well as the human eye It canrsquot see the range of brightness or detail
And both the camera and the camera operator (you) are imperfect Exposures may not be perfect color and contrast may not look as wersquod hoped or as the scene actually appeared
These basic Photoshop skills can help make a photo look better online or in print
For those of you looking to dig deeper into Photoshoprsquos magical abili-ties to transform images there are numerous online resources Lyndacom (free to Penn State students) offers tutorials You can find many free resources on Youtubecom and Adobecom offers tutorials as well
And you can always contact me if you have questions
Will Yurmanwillyurmangmailcom
Photoshop
Tips amp Tricks
updated May 20175
2 The tool bar In Photoshop you select a tool to complete different tasks Wersquoll talk about some of the tools in depth during this tutorial but not all of them
3 Notice the settings at the top They will change depending on what tool is selected - allowing you change the size of the tool for example or its intensity
4 Panels ndash Photoshop has a host of panels that give access to differ-ent functions You can find them under the Window dropdown tab Again wersquoll talk about a few of them during this tutorial
bullRollover a tool to see itrsquos name and keyboard shortcut Learning the short-cuts will let you work faster
bull
The Tool Bar
Select different tools to adjust your photos in different ways You might want to select part of the image ndash someonersquos face for example We have different tools that will allow you to do that
There is a cropping tool for cropping your image
A tool for removing imperfections ndash dust on your camerarsquos sensor can create blemishes in your photo
Tools that will allow you darken or lighten an area of your photo
You can add text to an image ndash if yoursquore creating an ad or poster for example
Photoshop
Tips amp Tricks
updated May 20176
marquee tool (M) - move area of an image lasso tool (L) - select an area by drawing a shape around itquick selection (W) - selects an area of similar tone crop tool (C) - click and drag a box to crop the imageeye dropper (i) - use with info panel to measure imagehealing brush (J) - use with care to remove sensor dust
clone tool (S) - use with care to remove sensor dusthistory brush (Y) - use with history panel as a toning tool
burndodge tool (O) - lighten and darken selective areas
type tool (T) - apply type over an image
zoom tool (Z) zoom in for a closer look
Some of the key tools and their keyboard shortcuts
bullNot to beat a dead horse but learning the keyboard short-cuts for a program will let you work more quicklyRollover a tool and the name and short-cut are revealed For exampleC ndash CropY ndash History BrushT ndash Type Tool
bull
Photoshop
Tips amp Tricks
updated May 20177
Tools in depth
bullNote that many tools have lsquosub-toolsrsquoClick and hold the small rectangle to see other options within a specific tool
bullWith all the selection tools if you want to add to a selection or select an additional area hold down the
Shift keyHold down the Op-tion key to deselect part of a selection
bull
The Lasso Tool (L) Click and draw to select an area of the photo You could outline a personrsquos face or the sky for ex-ample This would allow you to adjust just the selected area - make it darker adjust the color etc
Watch a 210 video on using the Lasso tool
The Quick Selection Tool (W) offers two other ways of selecting an area of the image To use the Quick selection tool click and drag over an area of the photo that has a consistent tone You can quickly select the sky for example or the grassThe Magic Wand tool is similar But you can just click on part of the image and the wand will expand to select similar areas
Watch a 241 video on using the Quick SelectionMagic Wand tools
The Crop Tool (C) Crop your photo to improve the compo-sition or to fit it to a specific shape If you are using a photo in a video for example you would probably crop it to fit the 169 perspective of a video which is skinnier than an un-cropped still image You can crop to a specific dimension or crop using your eye for what looks best
Watch a 212 video on using the Crop tool
Photoshop
Tips amp Tricks
updated May 20178
The Eyedropper Tool (I) can be used to give you detailed information about the density or color of your image Use it in conjunction with the Info Panel
Watch a 324 video on using the Info Panel
The Spot Healing Brush Tool (J) A powerful tool that pres-ents ethical concerns in journalism Brush over an area of a photo and Photoshop will try to lsquohealrsquo or fix what is brushed This usually means eliminating it and trying to fill in the background If you have dust on the camera sensor and it shows up as a small mark on the file you could ethically use the tool to remove that blemish But for journalists changing the reality of the photo is forbidden If you are a commercial photographer you could use the tool to remove distractions
Watch a 533 video on using the Spot Healing Brush and Clone Stamp tool tool
The Brush Tool (B) and its related sub-tools allows you to draw on your photo
The Clone Stamp Tool (S) is similar to the Healing Brush Tool and presents the same ethical issues to journalists It allows you to copy from one area of a photo to the other Hold down the option key to select the area to copy Then click and drag to copy that information somewhere else lsquocloning itrsquo
See video for Spot Healing Brush above
bullWhen using the eyedropper tool one number to measure is the image density for skin ndash We want people to look good in photosA rough rule for caucasians skin tone should be about 35-40 in the light (not in shadow)African-American skin values can go as high as 70
bull
Photoshop
Tips amp Tricks
updated May 20179
The History Brush Tool (Y) is a tool I use a lot when toning or adjusting an image Use it in conjunction with the History panel You can use the brush to paint in the previous state of an image in a selected areaFor example yoursquove lightened the entire image but you really want the sky to look as it did in the original photo ndash select the original state in the History panel and then use the History Brush to lsquopaintrsquo in that original darkness of the sky
Watch a 432 video on using the History tool
The Burn amp Dodge Tools(O) are useful for quickly and easily darkening or lightening an area of a photo The Burn Tool will darken an area You can adjust the intensity and size of the brush at the top of the screen The Dodge Tool is used in the same way but lightens an area Once you select the brush size and intensity click and drag to paint over an area Use the History panel to undo if necessary
Watch a 223 video on using the BurnDodge tool
The Type Tool (T) can apply type to a photo Once select-ed yoursquoll have options for fonts and sizes
Watch a 455 video on using the Type Tool
bullIf you want blank space around a photo to add type to for example you can extend the size of the canvas ndash the area around the photoGo ImagegtCanvas Size You can select whether the image remains cen-tered on the canvas or not
bull
The Zoom Tool (Z) allows you to zoom in on an image - this can make it easier to see if the photo is sharp and allows for more precise control of an area of the photo Click to zoom in Old the option key to zoom out
Watch a 55 video on using the Zoom Tool
These are the tools we are most likely to use in this tutorial You can explore the other tools and features of Photoshop on your own
Photoshop
Tips amp Tricks
updated May 201710
ToningWe will define toning as making basic adjustments to color brightness contrast and cropping These are basic changes to the image that aim to bring it more in line with what we actually saw and to make the photo suitable for publication in either print or a digital environment
The tutorial will not cover retouching ndash the removal or changing of content in the photo You can certainly learn those skills in other classes or by using online resources such as Lyndacom
Photoshop is an extremely powerful program and there are many ways to get to the same place If you have used the program before you may have learned other ways of adjusting an image I donrsquot think there is a single best way ndash I will cover one method that I find works well for most situations
My goal with this tutorial is to give you a basic set of skills that will al-low you to make simple adjustments to your images quickly and easily
Less time using Photoshop equals more time for other things
Toning a photo in Photoshop in 10 (ish) steps
Properly exposed and photographed images should NOT require extensive toning
Photoshop is NOT the fix-it tool for lazy and bad photography
bullRemember that changes you make in Photoshop are per-manent If you make a mistake you may not be able to undo it later on
That is why I strongly suggest always work-ing on a copy of your original When you are selecting images make a copy of your best photos and work on the copy
While it is possible to save your adjustments as separate layers in a photo that workflow is beyond the scope of this tutorial
Working on a copy is always a smart idea
bull
Photoshop
Tips amp Tricks
updated May 201711
If you get it right in the field it should take less than 10 minutes to tone a photograph
ALWAYS WORK ON A COPY ndash NEVER YOUR ORIGINAL FILE
1 AnalyzeOpen your photo in Photoshop and take a moment to consider con-trast tonal qualities and sharpness Check tonal values for key areas such as skin tones using the eyedropper and info palette
In the info palette set second lsquoeyedropperrsquo to grayscale Read the skin tone with the eyedropper - avoid highlights or shadows when looking for skin values ~36 K Value for front lit Caucasian skin and up to 70 for African American skin tones
The eyedropper was placed on his forehead an area of his skin that was not in shadow or too bright from the reflection of light Note the K value is 36 ndash where you want to be for typical caucasian skin values Notice on the left the RGB values - these measure the color Blue has the lowest value and the opposite of blue is yellow - in gen-eral skin has a yellowish cast to it
bullWhen you select the eyedropper tool set the lsquosample sizersquo at the top left to lsquo3 by 3rsquo This way the eye dropper will average a small group of pix-els and not be fooled by a single aberrant one
bullIt is worth know-
ing your colors Un-derstand the color
wheel
If you subtract one color you add its op-posite Remove yel-
low and you get blue for example
Photoshop
Tips amp Tricks
updated May 201712
2 Rotate and CropDecide how to best crop the photo There is no reason to spend time toning part of a photo if yoursquore going to crop it You can crop to a spe-cific dimension or leave it open to what you think looks best
Try to avoid cropping to odd sizes and shapes But certainly crop to eliminate distractions and improve composition
Click on the Crop tool and then resize the box Double click in the middle of the image when yoursquore done
3 Basic Tonal Adjustment Use Wersquoll use Levels (L) to adjust Black and White points The goal is to adjust the brightness and the range of tones within the image You want brightwhite tones to look white and darkblack tones to look black while still keeping a full range of tones If your image looks grey and muddy and flat it will feel dull If all we see are stark black and white tones the image will lack detail and richness
Drag the black and white points to the base of the curve
It may be hard to see but by dragging the end points you are extending
Before Black and white points ex-tend beyond the lsquomountainrsquo of data The image is flatter and duller
After Black and white points are dragged into the lsquobase of the moun-tainrsquo creating a richer tone
Photoshop
Tips amp Tricks
updated May 201713
the range of tone of the image You are resetting the range
Be careful if you slide into the lsquomountainrsquo you will start to lose informa-tion Sometimes that wonrsquot be a problem - the information isnrsquot im-portant
But if yoursquore not careful yoursquoll lose detail in highlights andor shadow areas
Watch a 451 minute video on setting tonal range using Levels
4 Color CastSometimes the camera wonrsquot capture the color accurately
The photo may be too yellow or blue or green or whatever This hap-pens most commonly in unusual lighting situations ndash a mix of kinds of light or unusual fluorescent lighting etc Our cameras if set properly do a very good job outdoors in natural light but sometimes struggle with artificial lighting
IF the color cast is extreme we probably canrsquot do a very good of fixing the problem So it is important to make sure yoursquore capturing your im-age with the proper settings BUT if the color is off by a little bit there is a nice technique for removing that color cast
The theory is simple If we can make something in the photo that is supposed to be whitegrey look whitegrey then all the other colors will fall into place If the whites are too yellow everything is probably too yellow
By lsquosettingrsquo a white we reset the baseline and hopefully everything falls into place
bullIf you hold the option key down while drag-ging either the black or white arrow yoursquoll get a display that shows you where yoursquore losing detail The screen will turn black and areas that have lost all their de-tail will be highlighted
bull
bullI will talk about lsquoset-ting a whitersquo but make sure you use an area in the image that has detail A pure white like the sun wonrsquot work ndash it has no information Light greys are the best
bull
Photoshop
Tips amp Tricks
updated May 201714
bullIf you set a white and
donrsquot like the results use the History Tab to undo and start over It usually
means you either moved the mouse accidentally or
hadnrsquot picked a neutral area to work on
bull
OF all the steps this is the most complicated to follow But once yoursquove done it a few times it becomes pretty simple to master
There are six steps to this technique1 Open Levels2 Double click on the white eye dropper3 Click on an light neutral area ndash light white to medium grey AFTER CLICKING DONrsquoT MOVE THE MOUSE LEAVE THE CURSOR WHERE YOU CLICKED4 Use tab key to scroll through the color picker and set the A amp B channels to zero5 Click return to close the color picker6 Click the mouse without moving it (if yoursquove moved the mouse at any point you need to start over) This should lsquoset the whitersquo
The levels are open wersquove clicked on the manrsquos white shirt and are ready to zero out the AampB channels
Photoshop
Tips amp Tricks
updated May 201715
Notice the mouse hasnrsquot movedTHIS IS KEYAfter clicking on his white shirt I use the keyboardNOT THE MOUSETo set the AampB channels to zeroThen click lsquoreturnrsquo And FINALLY click the mouse on the samespot of his shirt And voila
Watch a 315 video on removing color cast using Levels
5 MidtonesTo this point wersquove corrected the color and over tonal range Some-times we may need to adjust the midtones those middle grays that may be too bright or too dark Correcting the color will sometimes shift these so make sure to do this step after color correcting
Photoshop
Tips amp Tricks
updated May 201716
We use the midtone control the gray middle arrow in Levels to lsquoopen up the shadowsrsquo and let in some detail while keeping the range of
tones we set with the black and white points
Watch a 122 video on adjusting the midtones of an image
6 Local AdjustmentsTo this point wersquove made global changes to the photo ndash all or noth-ing changes Now is the time to look and see if a specific area needs adjusting We might lighten a face or darken the foreground or back-ground of an image If yoursquore a journalist you want to take GREAT CARE in making these adjustments It is easy to step beyond the ethi-cal standards of photojournalism
In general we donrsquot want to remove an element or change it so dra-matically that wersquove altered the reality of the scene A photojournalist should never eliminate a pole that is sticking out of someonersquos head just because it is a distraction or add a cloud to a blue sky Neither should they so darken something that we canrsquot recognize that it was there
Never make a change that would mislead or misrepresent what actually occurred
bullThe National Press Photographers As-sociation (NPPA) has a code of ethics that speaks to the manip-ulation of imageshttpsnppaorgcode_of_ethics
bull
Photoshop
Tips amp Tricks
updated May 201717
For other kinds of photographers working in advertising or as an artist or wedding photographer for example you will need to use your judgement and
the judgement of your employer or client
This tutorial will only cover very basic adjustments Photoshop is a very powerful program You can change the color shape perspective of ele-ments You can remove blemishes and alter the appearance of light And on and on Those skills are beyond the scope of this tutorial
For the basic toning of an image we will talk about two things1 Lighteningdarkening2 Adjusting color
IF you want to adjust a part of a photograph you need to select the area you want to adjust
The Lasso and Quick Selection tools explained earlier in the tutorial are easy ways to isolate someonersquos face or the sky or some other area of the photograph
Once selected you can apply the same tools wersquove used to adjust the entire image Levels can be used to lighten or darken or even alter the color of the selected area
1 Select the area that needs lsquofixingrsquo2 Feather the selection so that the edge is softened between the selec-tion and the rest of the image3 Make the adjustment
The burndodge tool can also be useful for lightening or darkening a area of a photoThe Burn Tool makes an area darker
Photoshop
Tips amp Tricks
updated May 201718
Herersquos a photo of a protest from the Democratic National Convention in Philadelphia in July 2016 Overall the color looks good and there is a wide range of tone But I want to make sure the viewer is drawn to the protesterrsquos expression I wish her face were a little lighter
If I lighten the whole photo her face looks better but the rest of the photo looks washed out
Photoshop
Tips amp Tricks
updated May 201719
Here are three ways to lighten her face without lightening the rest of the image
A Select and LightenUse the Lasso or Quick Selection tools to select her face and armFeather the selection and then use Levels to lighten the selection
If you look closely you can see the outline of the selection of her arm and face I then used Levels to lighten just those elements The rest of the photo is the same as the original on the previous page
B Burn and DodgeUse the Dodge tool to lighten her face and arm by painting over it You can adjust the size and intensity of the tool
I find a good starting point is to set the brush to lsquomidtonesrsquo and about 30 You can keep lsquopaintingrsquo to lighten more if you need to
Photoshop
Tips amp Tricks
updated May 201720
Note that her skin looks little redderwarmer You can get a shift of color when you use the dodge tool
C History BrushThis method can seem a little more complicated but often gives the most natural results
The history brush allows you to lsquopaintrsquo in the previous state So you can lighten the entire image for example and then revert part of the image back to where it started
To use the History brush you also need to open the History Win-dow Pane
I find this method allows for the most natural adjustments in many cases And with practice is very fast
bullSometimes colors shift when you lighten them especially with the dodge tool
The HueSaturation tool can bring those colors back into line You want to make sure a personrsquos skin tone remains consis-tent
bull
Photoshop
Tips amp Tricks
updated May 201721
In this example I opened the image and then used Levels to lighten the entire photograph
I click the check box next to the origi-nal image above the change I made in Levels
Then each time I use the History brush I am returning that area of the photo to the original state
You are less likely to get a color shift this way and less likely to see the edge between an area you changed and the rest of the photograph
Photoshop
Tips amp Tricks
updated May 201722
IF yoursquove done a good job shooting your photo - set a proper expo-sure and white balance ndash you should be done toning your photo at this point
If it takes more than 5-10 minutes to adjust your photo yoursquore prob-ably trying to fix something that went wrong And yoursquoll probably find itrsquos is difficult or impossible to make it perfect
It is VERY important that you donrsquot rely on Photoshop to fix mistakes in the field
You may sometimes need to use other tools especially if the scene was lit by more than one type of light or under difficult conditions
7 Selective Color amp HueSaturationBoth tools can by used to correct tricky lighting and fix the color of images If the scene is lit by more than kind of light ndash window light mixed with overhead lighting or sunlight and shadow for example the color of part of the scene may be wrong
Selective Color ImagegtAdjustmentsgtSelective Color allows you to alter the color of one specific color So if the yellow channel has too much red in it you can remove the red without changing other colors that might have red in their mix
Hue Saturation ImagegtAdjustmentsgtHueSaturation allows you to adjust the hue saturation and brightness of the image or individual color channels Another useful tool in adjusting of fixing the color mix of a photo
Watch a 430 video on using Selective Color and HueSaturation
Photoshop
Tips amp Tricks
updated May 201723
8 CaptionsIt is vital to caption your images Captions make the image searchable on your computer and on the Internet
Captions give the photo context and make them more valuable
Photos are an historical record and the caption is part of that record
Captions explain and give meaning to your photographs
The caption information is part of what we call metadata It is informa-tion about information
You can apply the caption information in Photoshop or in Lightroom or Photo Mechanic ndash Depending on what software you have available
Once saved it is digitally stored with the photo ndash part of the image file
In Photoshop go FilegtFile info
The Description field is where you type your complete caption infor-mation
You can add information to the other fields includ-ing your photo credit under the Origin tab
Watch a 416 video on adding a caption to a photo
Photoshop
Tips amp Tricks
updated May 201724
9 Save your Image FilesPart of your workflow needs to be a way to stay organized If you canrsquot find your photos they have no value They are certainly worthless as part of an assignment but even worse in the real world where if you canrsquot find a photo or lose a file yoursquoll be in deep doo doo (a technical term)
YOU SHOULD HAVE BEEN WORKING ON A COPY
If you follow good workflow you still have an original untouched version of your file This version the toned and captioned version should be saved with a unique name that tells you something about the photo
File names should have no spaces and no special characters
Use only letters numbers hyphen and dash
My system
date_name_slug The date the photo was takenYour name (so a teacher or client or boss immediately knows who took the photo)A slug that tells what assignment the photo goes with
20160901_YourName_Circus_01
This photo for example was taken on September 1 2016 by you and is the first photo from the Circus assignment
bullI use the year at the beginning of my file name because I think sorting by year makes sense for me It puts all the 2016 files to-gether
bull
Photoshop
Tips amp Tricks
updated May 201725
10 Reformat your cardIf possible donrsquot do this until the end Your card is your backup incase everything goes wrong )
Format the card in the camera
Use the camera to format the card never delete files off a card from the computer You want to use the format function of the device to properly erase and ready the card for next time
DONrsquoT reformat until you are SURE you have properly saved your images
There are many many many other features and tools in Photoshop
There are some other ways to adjust photos that can be useful includ-ing
ShadowHighlights ndash you can open up shadows or add detail back into highlights (within limits)
BrightnessContrast ndash another way to control the brightness and contrast of a photo
Curves ndash Similar to Levels but instead of three arrows you can adjust the image anywhere along the curve
You can explore these tools as you gain familiarity with the program
bullIdeally you should have a card dedicat-ed to one device
It is better not to use a card in more than one camera
And it is a terrible idea to store fold-ers of other files on your card
Each device writes a lsquotable of contentsrsquo on the card to keep files organized Multiple devices means mul-tiple tables increasing the odds that your card will fail
bull
Photoshop
Tips amp Tricks
updated May 201726
SHOOTING RAW
Until now I have assumed you are shooting jpegs This is the almost universal image file format that is found on almost every device and website
JPEGS are small image files that can be viewed online opened in most applications They offer compatibility and small file size
But think about that ndash how can they be so small Why are they so universal
JPEGS are small because the files are compressed Information is dis-carded to reduce the file size Enough is kept so the image still looks good
When you take a photo with your camera a lot of information is applied to the file ndash the white balance you set perhaps contrast or sharpness
All of this is stored in the JPEG file and used to display the image
What if it wasnrsquot
What if you could take the lsquorawrsquo unprocessed digital information and manipulate it after the fact in Photoshop
Well you can Each camera manufacturer has itrsquos own formula for what we call a Raw file And Photoshop can open almost all of them
bullWhen a brand new camera is introduced it may take Photo-shop a few weeks or months to introduce an update for pro-cessing the Raw file
bull
Photoshop
Tips amp Tricks
updated May 201727
Nikon calls its Raw files NEFS Canon has CR2 files etc
The advantage of Raws is that you start in Photoshop with a lot more information and data Nothing is compressed no settings locked into the file
The disadvantage is that the files are much larger ndash your camerarsquos card will hold fewer imagesNot all software can edit or see a Raw file Yoursquoll need to use Photo-shop or some other image editor to convert the files to a universal format like a jpeg
IF you decide to shoot in the RAW format the image will open in a different window inside Photoshop
Note the controls You can set a white by using the eyedropper and clicking on something neutral You can fine tune your settings with the adjustments on the right ndash changing exposure contrast color etc
Photoshop
Tips amp Tricks
updated May 201728
You can make local adjustments by using the Adjustment brush
To use the brush lsquopaintrsquo over the area you want to adjust You can change the settings before or after using the brush You canrsquot select an area as you would with the Lasso or Quick Selection tools but you can still make many adjustments
When yoursquore done open the image make any final corrections add a caption and save it as a jpeg or other format The original Raw file remains as a backup
Watch a 610 video on using Camera Raw
Photoshop
Tips amp Tricks
updated May 201729
Photoshop is an extremely powerful application This tutorial only scratches the surface of what the app can do
The goal of this document is to introduce you to the program and give you the skills to adjust a photographrsquos basic tone and color These basic adjustments compensate for the limits of photography
A photograph canrsquot (yet) see as well as the human eye It canrsquot see the range of brightness or detail
And both the camera and the camera operator (you) are imperfect Exposures may not be perfect color and contrast may not look as wersquod hoped or as the scene actually appeared
These basic Photoshop skills can help make a photo look better online or in print
For those of you looking to dig deeper into Photoshoprsquos magical abili-ties to transform images there are numerous online resources Lyndacom (free to Penn State students) offers tutorials You can find many free resources on Youtubecom and Adobecom offers tutorials as well
And you can always contact me if you have questions
Will Yurmanwillyurmangmailcom

Photoshop
Tips amp Tricks
updated May 20176
marquee tool (M) - move area of an image lasso tool (L) - select an area by drawing a shape around itquick selection (W) - selects an area of similar tone crop tool (C) - click and drag a box to crop the imageeye dropper (i) - use with info panel to measure imagehealing brush (J) - use with care to remove sensor dust
clone tool (S) - use with care to remove sensor dusthistory brush (Y) - use with history panel as a toning tool
burndodge tool (O) - lighten and darken selective areas
type tool (T) - apply type over an image
zoom tool (Z) zoom in for a closer look
Some of the key tools and their keyboard shortcuts
bullNot to beat a dead horse but learning the keyboard short-cuts for a program will let you work more quicklyRollover a tool and the name and short-cut are revealed For exampleC ndash CropY ndash History BrushT ndash Type Tool
bull
Photoshop
Tips amp Tricks
updated May 20177
Tools in depth
bullNote that many tools have lsquosub-toolsrsquoClick and hold the small rectangle to see other options within a specific tool
bullWith all the selection tools if you want to add to a selection or select an additional area hold down the
Shift keyHold down the Op-tion key to deselect part of a selection
bull
The Lasso Tool (L) Click and draw to select an area of the photo You could outline a personrsquos face or the sky for ex-ample This would allow you to adjust just the selected area - make it darker adjust the color etc
Watch a 210 video on using the Lasso tool
The Quick Selection Tool (W) offers two other ways of selecting an area of the image To use the Quick selection tool click and drag over an area of the photo that has a consistent tone You can quickly select the sky for example or the grassThe Magic Wand tool is similar But you can just click on part of the image and the wand will expand to select similar areas
Watch a 241 video on using the Quick SelectionMagic Wand tools
The Crop Tool (C) Crop your photo to improve the compo-sition or to fit it to a specific shape If you are using a photo in a video for example you would probably crop it to fit the 169 perspective of a video which is skinnier than an un-cropped still image You can crop to a specific dimension or crop using your eye for what looks best
Watch a 212 video on using the Crop tool
Photoshop
Tips amp Tricks
updated May 20178
The Eyedropper Tool (I) can be used to give you detailed information about the density or color of your image Use it in conjunction with the Info Panel
Watch a 324 video on using the Info Panel
The Spot Healing Brush Tool (J) A powerful tool that pres-ents ethical concerns in journalism Brush over an area of a photo and Photoshop will try to lsquohealrsquo or fix what is brushed This usually means eliminating it and trying to fill in the background If you have dust on the camera sensor and it shows up as a small mark on the file you could ethically use the tool to remove that blemish But for journalists changing the reality of the photo is forbidden If you are a commercial photographer you could use the tool to remove distractions
Watch a 533 video on using the Spot Healing Brush and Clone Stamp tool tool
The Brush Tool (B) and its related sub-tools allows you to draw on your photo
The Clone Stamp Tool (S) is similar to the Healing Brush Tool and presents the same ethical issues to journalists It allows you to copy from one area of a photo to the other Hold down the option key to select the area to copy Then click and drag to copy that information somewhere else lsquocloning itrsquo
See video for Spot Healing Brush above
bullWhen using the eyedropper tool one number to measure is the image density for skin ndash We want people to look good in photosA rough rule for caucasians skin tone should be about 35-40 in the light (not in shadow)African-American skin values can go as high as 70
bull
Photoshop
Tips amp Tricks
updated May 20179
The History Brush Tool (Y) is a tool I use a lot when toning or adjusting an image Use it in conjunction with the History panel You can use the brush to paint in the previous state of an image in a selected areaFor example yoursquove lightened the entire image but you really want the sky to look as it did in the original photo ndash select the original state in the History panel and then use the History Brush to lsquopaintrsquo in that original darkness of the sky
Watch a 432 video on using the History tool
The Burn amp Dodge Tools(O) are useful for quickly and easily darkening or lightening an area of a photo The Burn Tool will darken an area You can adjust the intensity and size of the brush at the top of the screen The Dodge Tool is used in the same way but lightens an area Once you select the brush size and intensity click and drag to paint over an area Use the History panel to undo if necessary
Watch a 223 video on using the BurnDodge tool
The Type Tool (T) can apply type to a photo Once select-ed yoursquoll have options for fonts and sizes
Watch a 455 video on using the Type Tool
bullIf you want blank space around a photo to add type to for example you can extend the size of the canvas ndash the area around the photoGo ImagegtCanvas Size You can select whether the image remains cen-tered on the canvas or not
bull
The Zoom Tool (Z) allows you to zoom in on an image - this can make it easier to see if the photo is sharp and allows for more precise control of an area of the photo Click to zoom in Old the option key to zoom out
Watch a 55 video on using the Zoom Tool
These are the tools we are most likely to use in this tutorial You can explore the other tools and features of Photoshop on your own
Photoshop
Tips amp Tricks
updated May 201710
ToningWe will define toning as making basic adjustments to color brightness contrast and cropping These are basic changes to the image that aim to bring it more in line with what we actually saw and to make the photo suitable for publication in either print or a digital environment
The tutorial will not cover retouching ndash the removal or changing of content in the photo You can certainly learn those skills in other classes or by using online resources such as Lyndacom
Photoshop is an extremely powerful program and there are many ways to get to the same place If you have used the program before you may have learned other ways of adjusting an image I donrsquot think there is a single best way ndash I will cover one method that I find works well for most situations
My goal with this tutorial is to give you a basic set of skills that will al-low you to make simple adjustments to your images quickly and easily
Less time using Photoshop equals more time for other things
Toning a photo in Photoshop in 10 (ish) steps
Properly exposed and photographed images should NOT require extensive toning
Photoshop is NOT the fix-it tool for lazy and bad photography
bullRemember that changes you make in Photoshop are per-manent If you make a mistake you may not be able to undo it later on
That is why I strongly suggest always work-ing on a copy of your original When you are selecting images make a copy of your best photos and work on the copy
While it is possible to save your adjustments as separate layers in a photo that workflow is beyond the scope of this tutorial
Working on a copy is always a smart idea
bull
Photoshop
Tips amp Tricks
updated May 201711
If you get it right in the field it should take less than 10 minutes to tone a photograph
ALWAYS WORK ON A COPY ndash NEVER YOUR ORIGINAL FILE
1 AnalyzeOpen your photo in Photoshop and take a moment to consider con-trast tonal qualities and sharpness Check tonal values for key areas such as skin tones using the eyedropper and info palette
In the info palette set second lsquoeyedropperrsquo to grayscale Read the skin tone with the eyedropper - avoid highlights or shadows when looking for skin values ~36 K Value for front lit Caucasian skin and up to 70 for African American skin tones
The eyedropper was placed on his forehead an area of his skin that was not in shadow or too bright from the reflection of light Note the K value is 36 ndash where you want to be for typical caucasian skin values Notice on the left the RGB values - these measure the color Blue has the lowest value and the opposite of blue is yellow - in gen-eral skin has a yellowish cast to it
bullWhen you select the eyedropper tool set the lsquosample sizersquo at the top left to lsquo3 by 3rsquo This way the eye dropper will average a small group of pix-els and not be fooled by a single aberrant one
bullIt is worth know-
ing your colors Un-derstand the color
wheel
If you subtract one color you add its op-posite Remove yel-
low and you get blue for example
Photoshop
Tips amp Tricks
updated May 201712
2 Rotate and CropDecide how to best crop the photo There is no reason to spend time toning part of a photo if yoursquore going to crop it You can crop to a spe-cific dimension or leave it open to what you think looks best
Try to avoid cropping to odd sizes and shapes But certainly crop to eliminate distractions and improve composition
Click on the Crop tool and then resize the box Double click in the middle of the image when yoursquore done
3 Basic Tonal Adjustment Use Wersquoll use Levels (L) to adjust Black and White points The goal is to adjust the brightness and the range of tones within the image You want brightwhite tones to look white and darkblack tones to look black while still keeping a full range of tones If your image looks grey and muddy and flat it will feel dull If all we see are stark black and white tones the image will lack detail and richness
Drag the black and white points to the base of the curve
It may be hard to see but by dragging the end points you are extending
Before Black and white points ex-tend beyond the lsquomountainrsquo of data The image is flatter and duller
After Black and white points are dragged into the lsquobase of the moun-tainrsquo creating a richer tone
Photoshop
Tips amp Tricks
updated May 201713
the range of tone of the image You are resetting the range
Be careful if you slide into the lsquomountainrsquo you will start to lose informa-tion Sometimes that wonrsquot be a problem - the information isnrsquot im-portant
But if yoursquore not careful yoursquoll lose detail in highlights andor shadow areas
Watch a 451 minute video on setting tonal range using Levels
4 Color CastSometimes the camera wonrsquot capture the color accurately
The photo may be too yellow or blue or green or whatever This hap-pens most commonly in unusual lighting situations ndash a mix of kinds of light or unusual fluorescent lighting etc Our cameras if set properly do a very good job outdoors in natural light but sometimes struggle with artificial lighting
IF the color cast is extreme we probably canrsquot do a very good of fixing the problem So it is important to make sure yoursquore capturing your im-age with the proper settings BUT if the color is off by a little bit there is a nice technique for removing that color cast
The theory is simple If we can make something in the photo that is supposed to be whitegrey look whitegrey then all the other colors will fall into place If the whites are too yellow everything is probably too yellow
By lsquosettingrsquo a white we reset the baseline and hopefully everything falls into place
bullIf you hold the option key down while drag-ging either the black or white arrow yoursquoll get a display that shows you where yoursquore losing detail The screen will turn black and areas that have lost all their de-tail will be highlighted
bull
bullI will talk about lsquoset-ting a whitersquo but make sure you use an area in the image that has detail A pure white like the sun wonrsquot work ndash it has no information Light greys are the best
bull
Photoshop
Tips amp Tricks
updated May 201714
bullIf you set a white and
donrsquot like the results use the History Tab to undo and start over It usually
means you either moved the mouse accidentally or
hadnrsquot picked a neutral area to work on
bull
OF all the steps this is the most complicated to follow But once yoursquove done it a few times it becomes pretty simple to master
There are six steps to this technique1 Open Levels2 Double click on the white eye dropper3 Click on an light neutral area ndash light white to medium grey AFTER CLICKING DONrsquoT MOVE THE MOUSE LEAVE THE CURSOR WHERE YOU CLICKED4 Use tab key to scroll through the color picker and set the A amp B channels to zero5 Click return to close the color picker6 Click the mouse without moving it (if yoursquove moved the mouse at any point you need to start over) This should lsquoset the whitersquo
The levels are open wersquove clicked on the manrsquos white shirt and are ready to zero out the AampB channels
Photoshop
Tips amp Tricks
updated May 201715
Notice the mouse hasnrsquot movedTHIS IS KEYAfter clicking on his white shirt I use the keyboardNOT THE MOUSETo set the AampB channels to zeroThen click lsquoreturnrsquo And FINALLY click the mouse on the samespot of his shirt And voila
Watch a 315 video on removing color cast using Levels
5 MidtonesTo this point wersquove corrected the color and over tonal range Some-times we may need to adjust the midtones those middle grays that may be too bright or too dark Correcting the color will sometimes shift these so make sure to do this step after color correcting
Photoshop
Tips amp Tricks
updated May 201716
We use the midtone control the gray middle arrow in Levels to lsquoopen up the shadowsrsquo and let in some detail while keeping the range of
tones we set with the black and white points
Watch a 122 video on adjusting the midtones of an image
6 Local AdjustmentsTo this point wersquove made global changes to the photo ndash all or noth-ing changes Now is the time to look and see if a specific area needs adjusting We might lighten a face or darken the foreground or back-ground of an image If yoursquore a journalist you want to take GREAT CARE in making these adjustments It is easy to step beyond the ethi-cal standards of photojournalism
In general we donrsquot want to remove an element or change it so dra-matically that wersquove altered the reality of the scene A photojournalist should never eliminate a pole that is sticking out of someonersquos head just because it is a distraction or add a cloud to a blue sky Neither should they so darken something that we canrsquot recognize that it was there
Never make a change that would mislead or misrepresent what actually occurred
bullThe National Press Photographers As-sociation (NPPA) has a code of ethics that speaks to the manip-ulation of imageshttpsnppaorgcode_of_ethics
bull
Photoshop
Tips amp Tricks
updated May 201717
For other kinds of photographers working in advertising or as an artist or wedding photographer for example you will need to use your judgement and
the judgement of your employer or client
This tutorial will only cover very basic adjustments Photoshop is a very powerful program You can change the color shape perspective of ele-ments You can remove blemishes and alter the appearance of light And on and on Those skills are beyond the scope of this tutorial
For the basic toning of an image we will talk about two things1 Lighteningdarkening2 Adjusting color
IF you want to adjust a part of a photograph you need to select the area you want to adjust
The Lasso and Quick Selection tools explained earlier in the tutorial are easy ways to isolate someonersquos face or the sky or some other area of the photograph
Once selected you can apply the same tools wersquove used to adjust the entire image Levels can be used to lighten or darken or even alter the color of the selected area
1 Select the area that needs lsquofixingrsquo2 Feather the selection so that the edge is softened between the selec-tion and the rest of the image3 Make the adjustment
The burndodge tool can also be useful for lightening or darkening a area of a photoThe Burn Tool makes an area darker
Photoshop
Tips amp Tricks
updated May 201718
Herersquos a photo of a protest from the Democratic National Convention in Philadelphia in July 2016 Overall the color looks good and there is a wide range of tone But I want to make sure the viewer is drawn to the protesterrsquos expression I wish her face were a little lighter
If I lighten the whole photo her face looks better but the rest of the photo looks washed out
Photoshop
Tips amp Tricks
updated May 201719
Here are three ways to lighten her face without lightening the rest of the image
A Select and LightenUse the Lasso or Quick Selection tools to select her face and armFeather the selection and then use Levels to lighten the selection
If you look closely you can see the outline of the selection of her arm and face I then used Levels to lighten just those elements The rest of the photo is the same as the original on the previous page
B Burn and DodgeUse the Dodge tool to lighten her face and arm by painting over it You can adjust the size and intensity of the tool
I find a good starting point is to set the brush to lsquomidtonesrsquo and about 30 You can keep lsquopaintingrsquo to lighten more if you need to
Photoshop
Tips amp Tricks
updated May 201720
Note that her skin looks little redderwarmer You can get a shift of color when you use the dodge tool
C History BrushThis method can seem a little more complicated but often gives the most natural results
The history brush allows you to lsquopaintrsquo in the previous state So you can lighten the entire image for example and then revert part of the image back to where it started
To use the History brush you also need to open the History Win-dow Pane
I find this method allows for the most natural adjustments in many cases And with practice is very fast
bullSometimes colors shift when you lighten them especially with the dodge tool
The HueSaturation tool can bring those colors back into line You want to make sure a personrsquos skin tone remains consis-tent
bull
Photoshop
Tips amp Tricks
updated May 201721
In this example I opened the image and then used Levels to lighten the entire photograph
I click the check box next to the origi-nal image above the change I made in Levels
Then each time I use the History brush I am returning that area of the photo to the original state
You are less likely to get a color shift this way and less likely to see the edge between an area you changed and the rest of the photograph
Photoshop
Tips amp Tricks
updated May 201722
IF yoursquove done a good job shooting your photo - set a proper expo-sure and white balance ndash you should be done toning your photo at this point
If it takes more than 5-10 minutes to adjust your photo yoursquore prob-ably trying to fix something that went wrong And yoursquoll probably find itrsquos is difficult or impossible to make it perfect
It is VERY important that you donrsquot rely on Photoshop to fix mistakes in the field
You may sometimes need to use other tools especially if the scene was lit by more than one type of light or under difficult conditions
7 Selective Color amp HueSaturationBoth tools can by used to correct tricky lighting and fix the color of images If the scene is lit by more than kind of light ndash window light mixed with overhead lighting or sunlight and shadow for example the color of part of the scene may be wrong
Selective Color ImagegtAdjustmentsgtSelective Color allows you to alter the color of one specific color So if the yellow channel has too much red in it you can remove the red without changing other colors that might have red in their mix
Hue Saturation ImagegtAdjustmentsgtHueSaturation allows you to adjust the hue saturation and brightness of the image or individual color channels Another useful tool in adjusting of fixing the color mix of a photo
Watch a 430 video on using Selective Color and HueSaturation
Photoshop
Tips amp Tricks
updated May 201723
8 CaptionsIt is vital to caption your images Captions make the image searchable on your computer and on the Internet
Captions give the photo context and make them more valuable
Photos are an historical record and the caption is part of that record
Captions explain and give meaning to your photographs
The caption information is part of what we call metadata It is informa-tion about information
You can apply the caption information in Photoshop or in Lightroom or Photo Mechanic ndash Depending on what software you have available
Once saved it is digitally stored with the photo ndash part of the image file
In Photoshop go FilegtFile info
The Description field is where you type your complete caption infor-mation
You can add information to the other fields includ-ing your photo credit under the Origin tab
Watch a 416 video on adding a caption to a photo
Photoshop
Tips amp Tricks
updated May 201724
9 Save your Image FilesPart of your workflow needs to be a way to stay organized If you canrsquot find your photos they have no value They are certainly worthless as part of an assignment but even worse in the real world where if you canrsquot find a photo or lose a file yoursquoll be in deep doo doo (a technical term)
YOU SHOULD HAVE BEEN WORKING ON A COPY
If you follow good workflow you still have an original untouched version of your file This version the toned and captioned version should be saved with a unique name that tells you something about the photo
File names should have no spaces and no special characters
Use only letters numbers hyphen and dash
My system
date_name_slug The date the photo was takenYour name (so a teacher or client or boss immediately knows who took the photo)A slug that tells what assignment the photo goes with
20160901_YourName_Circus_01
This photo for example was taken on September 1 2016 by you and is the first photo from the Circus assignment
bullI use the year at the beginning of my file name because I think sorting by year makes sense for me It puts all the 2016 files to-gether
bull
Photoshop
Tips amp Tricks
updated May 201725
10 Reformat your cardIf possible donrsquot do this until the end Your card is your backup incase everything goes wrong )
Format the card in the camera
Use the camera to format the card never delete files off a card from the computer You want to use the format function of the device to properly erase and ready the card for next time
DONrsquoT reformat until you are SURE you have properly saved your images
There are many many many other features and tools in Photoshop
There are some other ways to adjust photos that can be useful includ-ing
ShadowHighlights ndash you can open up shadows or add detail back into highlights (within limits)
BrightnessContrast ndash another way to control the brightness and contrast of a photo
Curves ndash Similar to Levels but instead of three arrows you can adjust the image anywhere along the curve
You can explore these tools as you gain familiarity with the program
bullIdeally you should have a card dedicat-ed to one device
It is better not to use a card in more than one camera
And it is a terrible idea to store fold-ers of other files on your card
Each device writes a lsquotable of contentsrsquo on the card to keep files organized Multiple devices means mul-tiple tables increasing the odds that your card will fail
bull
Photoshop
Tips amp Tricks
updated May 201726
SHOOTING RAW
Until now I have assumed you are shooting jpegs This is the almost universal image file format that is found on almost every device and website
JPEGS are small image files that can be viewed online opened in most applications They offer compatibility and small file size
But think about that ndash how can they be so small Why are they so universal
JPEGS are small because the files are compressed Information is dis-carded to reduce the file size Enough is kept so the image still looks good
When you take a photo with your camera a lot of information is applied to the file ndash the white balance you set perhaps contrast or sharpness
All of this is stored in the JPEG file and used to display the image
What if it wasnrsquot
What if you could take the lsquorawrsquo unprocessed digital information and manipulate it after the fact in Photoshop
Well you can Each camera manufacturer has itrsquos own formula for what we call a Raw file And Photoshop can open almost all of them
bullWhen a brand new camera is introduced it may take Photo-shop a few weeks or months to introduce an update for pro-cessing the Raw file
bull
Photoshop
Tips amp Tricks
updated May 201727
Nikon calls its Raw files NEFS Canon has CR2 files etc
The advantage of Raws is that you start in Photoshop with a lot more information and data Nothing is compressed no settings locked into the file
The disadvantage is that the files are much larger ndash your camerarsquos card will hold fewer imagesNot all software can edit or see a Raw file Yoursquoll need to use Photo-shop or some other image editor to convert the files to a universal format like a jpeg
IF you decide to shoot in the RAW format the image will open in a different window inside Photoshop
Note the controls You can set a white by using the eyedropper and clicking on something neutral You can fine tune your settings with the adjustments on the right ndash changing exposure contrast color etc
Photoshop
Tips amp Tricks
updated May 201728
You can make local adjustments by using the Adjustment brush
To use the brush lsquopaintrsquo over the area you want to adjust You can change the settings before or after using the brush You canrsquot select an area as you would with the Lasso or Quick Selection tools but you can still make many adjustments
When yoursquore done open the image make any final corrections add a caption and save it as a jpeg or other format The original Raw file remains as a backup
Watch a 610 video on using Camera Raw
Photoshop
Tips amp Tricks
updated May 201729
Photoshop is an extremely powerful application This tutorial only scratches the surface of what the app can do
The goal of this document is to introduce you to the program and give you the skills to adjust a photographrsquos basic tone and color These basic adjustments compensate for the limits of photography
A photograph canrsquot (yet) see as well as the human eye It canrsquot see the range of brightness or detail
And both the camera and the camera operator (you) are imperfect Exposures may not be perfect color and contrast may not look as wersquod hoped or as the scene actually appeared
These basic Photoshop skills can help make a photo look better online or in print
For those of you looking to dig deeper into Photoshoprsquos magical abili-ties to transform images there are numerous online resources Lyndacom (free to Penn State students) offers tutorials You can find many free resources on Youtubecom and Adobecom offers tutorials as well
And you can always contact me if you have questions
Will Yurmanwillyurmangmailcom
Photoshop
Tips amp Tricks
updated May 20177
Tools in depth
bullNote that many tools have lsquosub-toolsrsquoClick and hold the small rectangle to see other options within a specific tool
bullWith all the selection tools if you want to add to a selection or select an additional area hold down the
Shift keyHold down the Op-tion key to deselect part of a selection
bull
The Lasso Tool (L) Click and draw to select an area of the photo You could outline a personrsquos face or the sky for ex-ample This would allow you to adjust just the selected area - make it darker adjust the color etc
Watch a 210 video on using the Lasso tool
The Quick Selection Tool (W) offers two other ways of selecting an area of the image To use the Quick selection tool click and drag over an area of the photo that has a consistent tone You can quickly select the sky for example or the grassThe Magic Wand tool is similar But you can just click on part of the image and the wand will expand to select similar areas
Watch a 241 video on using the Quick SelectionMagic Wand tools
The Crop Tool (C) Crop your photo to improve the compo-sition or to fit it to a specific shape If you are using a photo in a video for example you would probably crop it to fit the 169 perspective of a video which is skinnier than an un-cropped still image You can crop to a specific dimension or crop using your eye for what looks best
Watch a 212 video on using the Crop tool
Photoshop
Tips amp Tricks
updated May 20178
The Eyedropper Tool (I) can be used to give you detailed information about the density or color of your image Use it in conjunction with the Info Panel
Watch a 324 video on using the Info Panel
The Spot Healing Brush Tool (J) A powerful tool that pres-ents ethical concerns in journalism Brush over an area of a photo and Photoshop will try to lsquohealrsquo or fix what is brushed This usually means eliminating it and trying to fill in the background If you have dust on the camera sensor and it shows up as a small mark on the file you could ethically use the tool to remove that blemish But for journalists changing the reality of the photo is forbidden If you are a commercial photographer you could use the tool to remove distractions
Watch a 533 video on using the Spot Healing Brush and Clone Stamp tool tool
The Brush Tool (B) and its related sub-tools allows you to draw on your photo
The Clone Stamp Tool (S) is similar to the Healing Brush Tool and presents the same ethical issues to journalists It allows you to copy from one area of a photo to the other Hold down the option key to select the area to copy Then click and drag to copy that information somewhere else lsquocloning itrsquo
See video for Spot Healing Brush above
bullWhen using the eyedropper tool one number to measure is the image density for skin ndash We want people to look good in photosA rough rule for caucasians skin tone should be about 35-40 in the light (not in shadow)African-American skin values can go as high as 70
bull
Photoshop
Tips amp Tricks
updated May 20179
The History Brush Tool (Y) is a tool I use a lot when toning or adjusting an image Use it in conjunction with the History panel You can use the brush to paint in the previous state of an image in a selected areaFor example yoursquove lightened the entire image but you really want the sky to look as it did in the original photo ndash select the original state in the History panel and then use the History Brush to lsquopaintrsquo in that original darkness of the sky
Watch a 432 video on using the History tool
The Burn amp Dodge Tools(O) are useful for quickly and easily darkening or lightening an area of a photo The Burn Tool will darken an area You can adjust the intensity and size of the brush at the top of the screen The Dodge Tool is used in the same way but lightens an area Once you select the brush size and intensity click and drag to paint over an area Use the History panel to undo if necessary
Watch a 223 video on using the BurnDodge tool
The Type Tool (T) can apply type to a photo Once select-ed yoursquoll have options for fonts and sizes
Watch a 455 video on using the Type Tool
bullIf you want blank space around a photo to add type to for example you can extend the size of the canvas ndash the area around the photoGo ImagegtCanvas Size You can select whether the image remains cen-tered on the canvas or not
bull
The Zoom Tool (Z) allows you to zoom in on an image - this can make it easier to see if the photo is sharp and allows for more precise control of an area of the photo Click to zoom in Old the option key to zoom out
Watch a 55 video on using the Zoom Tool
These are the tools we are most likely to use in this tutorial You can explore the other tools and features of Photoshop on your own
Photoshop
Tips amp Tricks
updated May 201710
ToningWe will define toning as making basic adjustments to color brightness contrast and cropping These are basic changes to the image that aim to bring it more in line with what we actually saw and to make the photo suitable for publication in either print or a digital environment
The tutorial will not cover retouching ndash the removal or changing of content in the photo You can certainly learn those skills in other classes or by using online resources such as Lyndacom
Photoshop is an extremely powerful program and there are many ways to get to the same place If you have used the program before you may have learned other ways of adjusting an image I donrsquot think there is a single best way ndash I will cover one method that I find works well for most situations
My goal with this tutorial is to give you a basic set of skills that will al-low you to make simple adjustments to your images quickly and easily
Less time using Photoshop equals more time for other things
Toning a photo in Photoshop in 10 (ish) steps
Properly exposed and photographed images should NOT require extensive toning
Photoshop is NOT the fix-it tool for lazy and bad photography
bullRemember that changes you make in Photoshop are per-manent If you make a mistake you may not be able to undo it later on
That is why I strongly suggest always work-ing on a copy of your original When you are selecting images make a copy of your best photos and work on the copy
While it is possible to save your adjustments as separate layers in a photo that workflow is beyond the scope of this tutorial
Working on a copy is always a smart idea
bull
Photoshop
Tips amp Tricks
updated May 201711
If you get it right in the field it should take less than 10 minutes to tone a photograph
ALWAYS WORK ON A COPY ndash NEVER YOUR ORIGINAL FILE
1 AnalyzeOpen your photo in Photoshop and take a moment to consider con-trast tonal qualities and sharpness Check tonal values for key areas such as skin tones using the eyedropper and info palette
In the info palette set second lsquoeyedropperrsquo to grayscale Read the skin tone with the eyedropper - avoid highlights or shadows when looking for skin values ~36 K Value for front lit Caucasian skin and up to 70 for African American skin tones
The eyedropper was placed on his forehead an area of his skin that was not in shadow or too bright from the reflection of light Note the K value is 36 ndash where you want to be for typical caucasian skin values Notice on the left the RGB values - these measure the color Blue has the lowest value and the opposite of blue is yellow - in gen-eral skin has a yellowish cast to it
bullWhen you select the eyedropper tool set the lsquosample sizersquo at the top left to lsquo3 by 3rsquo This way the eye dropper will average a small group of pix-els and not be fooled by a single aberrant one
bullIt is worth know-
ing your colors Un-derstand the color
wheel
If you subtract one color you add its op-posite Remove yel-
low and you get blue for example
Photoshop
Tips amp Tricks
updated May 201712
2 Rotate and CropDecide how to best crop the photo There is no reason to spend time toning part of a photo if yoursquore going to crop it You can crop to a spe-cific dimension or leave it open to what you think looks best
Try to avoid cropping to odd sizes and shapes But certainly crop to eliminate distractions and improve composition
Click on the Crop tool and then resize the box Double click in the middle of the image when yoursquore done
3 Basic Tonal Adjustment Use Wersquoll use Levels (L) to adjust Black and White points The goal is to adjust the brightness and the range of tones within the image You want brightwhite tones to look white and darkblack tones to look black while still keeping a full range of tones If your image looks grey and muddy and flat it will feel dull If all we see are stark black and white tones the image will lack detail and richness
Drag the black and white points to the base of the curve
It may be hard to see but by dragging the end points you are extending
Before Black and white points ex-tend beyond the lsquomountainrsquo of data The image is flatter and duller
After Black and white points are dragged into the lsquobase of the moun-tainrsquo creating a richer tone
Photoshop
Tips amp Tricks
updated May 201713
the range of tone of the image You are resetting the range
Be careful if you slide into the lsquomountainrsquo you will start to lose informa-tion Sometimes that wonrsquot be a problem - the information isnrsquot im-portant
But if yoursquore not careful yoursquoll lose detail in highlights andor shadow areas
Watch a 451 minute video on setting tonal range using Levels
4 Color CastSometimes the camera wonrsquot capture the color accurately
The photo may be too yellow or blue or green or whatever This hap-pens most commonly in unusual lighting situations ndash a mix of kinds of light or unusual fluorescent lighting etc Our cameras if set properly do a very good job outdoors in natural light but sometimes struggle with artificial lighting
IF the color cast is extreme we probably canrsquot do a very good of fixing the problem So it is important to make sure yoursquore capturing your im-age with the proper settings BUT if the color is off by a little bit there is a nice technique for removing that color cast
The theory is simple If we can make something in the photo that is supposed to be whitegrey look whitegrey then all the other colors will fall into place If the whites are too yellow everything is probably too yellow
By lsquosettingrsquo a white we reset the baseline and hopefully everything falls into place
bullIf you hold the option key down while drag-ging either the black or white arrow yoursquoll get a display that shows you where yoursquore losing detail The screen will turn black and areas that have lost all their de-tail will be highlighted
bull
bullI will talk about lsquoset-ting a whitersquo but make sure you use an area in the image that has detail A pure white like the sun wonrsquot work ndash it has no information Light greys are the best
bull
Photoshop
Tips amp Tricks
updated May 201714
bullIf you set a white and
donrsquot like the results use the History Tab to undo and start over It usually
means you either moved the mouse accidentally or
hadnrsquot picked a neutral area to work on
bull
OF all the steps this is the most complicated to follow But once yoursquove done it a few times it becomes pretty simple to master
There are six steps to this technique1 Open Levels2 Double click on the white eye dropper3 Click on an light neutral area ndash light white to medium grey AFTER CLICKING DONrsquoT MOVE THE MOUSE LEAVE THE CURSOR WHERE YOU CLICKED4 Use tab key to scroll through the color picker and set the A amp B channels to zero5 Click return to close the color picker6 Click the mouse without moving it (if yoursquove moved the mouse at any point you need to start over) This should lsquoset the whitersquo
The levels are open wersquove clicked on the manrsquos white shirt and are ready to zero out the AampB channels
Photoshop
Tips amp Tricks
updated May 201715
Notice the mouse hasnrsquot movedTHIS IS KEYAfter clicking on his white shirt I use the keyboardNOT THE MOUSETo set the AampB channels to zeroThen click lsquoreturnrsquo And FINALLY click the mouse on the samespot of his shirt And voila
Watch a 315 video on removing color cast using Levels
5 MidtonesTo this point wersquove corrected the color and over tonal range Some-times we may need to adjust the midtones those middle grays that may be too bright or too dark Correcting the color will sometimes shift these so make sure to do this step after color correcting
Photoshop
Tips amp Tricks
updated May 201716
We use the midtone control the gray middle arrow in Levels to lsquoopen up the shadowsrsquo and let in some detail while keeping the range of
tones we set with the black and white points
Watch a 122 video on adjusting the midtones of an image
6 Local AdjustmentsTo this point wersquove made global changes to the photo ndash all or noth-ing changes Now is the time to look and see if a specific area needs adjusting We might lighten a face or darken the foreground or back-ground of an image If yoursquore a journalist you want to take GREAT CARE in making these adjustments It is easy to step beyond the ethi-cal standards of photojournalism
In general we donrsquot want to remove an element or change it so dra-matically that wersquove altered the reality of the scene A photojournalist should never eliminate a pole that is sticking out of someonersquos head just because it is a distraction or add a cloud to a blue sky Neither should they so darken something that we canrsquot recognize that it was there
Never make a change that would mislead or misrepresent what actually occurred
bullThe National Press Photographers As-sociation (NPPA) has a code of ethics that speaks to the manip-ulation of imageshttpsnppaorgcode_of_ethics
bull
Photoshop
Tips amp Tricks
updated May 201717
For other kinds of photographers working in advertising or as an artist or wedding photographer for example you will need to use your judgement and
the judgement of your employer or client
This tutorial will only cover very basic adjustments Photoshop is a very powerful program You can change the color shape perspective of ele-ments You can remove blemishes and alter the appearance of light And on and on Those skills are beyond the scope of this tutorial
For the basic toning of an image we will talk about two things1 Lighteningdarkening2 Adjusting color
IF you want to adjust a part of a photograph you need to select the area you want to adjust
The Lasso and Quick Selection tools explained earlier in the tutorial are easy ways to isolate someonersquos face or the sky or some other area of the photograph
Once selected you can apply the same tools wersquove used to adjust the entire image Levels can be used to lighten or darken or even alter the color of the selected area
1 Select the area that needs lsquofixingrsquo2 Feather the selection so that the edge is softened between the selec-tion and the rest of the image3 Make the adjustment
The burndodge tool can also be useful for lightening or darkening a area of a photoThe Burn Tool makes an area darker
Photoshop
Tips amp Tricks
updated May 201718
Herersquos a photo of a protest from the Democratic National Convention in Philadelphia in July 2016 Overall the color looks good and there is a wide range of tone But I want to make sure the viewer is drawn to the protesterrsquos expression I wish her face were a little lighter
If I lighten the whole photo her face looks better but the rest of the photo looks washed out
Photoshop
Tips amp Tricks
updated May 201719
Here are three ways to lighten her face without lightening the rest of the image
A Select and LightenUse the Lasso or Quick Selection tools to select her face and armFeather the selection and then use Levels to lighten the selection
If you look closely you can see the outline of the selection of her arm and face I then used Levels to lighten just those elements The rest of the photo is the same as the original on the previous page
B Burn and DodgeUse the Dodge tool to lighten her face and arm by painting over it You can adjust the size and intensity of the tool
I find a good starting point is to set the brush to lsquomidtonesrsquo and about 30 You can keep lsquopaintingrsquo to lighten more if you need to
Photoshop
Tips amp Tricks
updated May 201720
Note that her skin looks little redderwarmer You can get a shift of color when you use the dodge tool
C History BrushThis method can seem a little more complicated but often gives the most natural results
The history brush allows you to lsquopaintrsquo in the previous state So you can lighten the entire image for example and then revert part of the image back to where it started
To use the History brush you also need to open the History Win-dow Pane
I find this method allows for the most natural adjustments in many cases And with practice is very fast
bullSometimes colors shift when you lighten them especially with the dodge tool
The HueSaturation tool can bring those colors back into line You want to make sure a personrsquos skin tone remains consis-tent
bull
Photoshop
Tips amp Tricks
updated May 201721
In this example I opened the image and then used Levels to lighten the entire photograph
I click the check box next to the origi-nal image above the change I made in Levels
Then each time I use the History brush I am returning that area of the photo to the original state
You are less likely to get a color shift this way and less likely to see the edge between an area you changed and the rest of the photograph
Photoshop
Tips amp Tricks
updated May 201722
IF yoursquove done a good job shooting your photo - set a proper expo-sure and white balance ndash you should be done toning your photo at this point
If it takes more than 5-10 minutes to adjust your photo yoursquore prob-ably trying to fix something that went wrong And yoursquoll probably find itrsquos is difficult or impossible to make it perfect
It is VERY important that you donrsquot rely on Photoshop to fix mistakes in the field
You may sometimes need to use other tools especially if the scene was lit by more than one type of light or under difficult conditions
7 Selective Color amp HueSaturationBoth tools can by used to correct tricky lighting and fix the color of images If the scene is lit by more than kind of light ndash window light mixed with overhead lighting or sunlight and shadow for example the color of part of the scene may be wrong
Selective Color ImagegtAdjustmentsgtSelective Color allows you to alter the color of one specific color So if the yellow channel has too much red in it you can remove the red without changing other colors that might have red in their mix
Hue Saturation ImagegtAdjustmentsgtHueSaturation allows you to adjust the hue saturation and brightness of the image or individual color channels Another useful tool in adjusting of fixing the color mix of a photo
Watch a 430 video on using Selective Color and HueSaturation
Photoshop
Tips amp Tricks
updated May 201723
8 CaptionsIt is vital to caption your images Captions make the image searchable on your computer and on the Internet
Captions give the photo context and make them more valuable
Photos are an historical record and the caption is part of that record
Captions explain and give meaning to your photographs
The caption information is part of what we call metadata It is informa-tion about information
You can apply the caption information in Photoshop or in Lightroom or Photo Mechanic ndash Depending on what software you have available
Once saved it is digitally stored with the photo ndash part of the image file
In Photoshop go FilegtFile info
The Description field is where you type your complete caption infor-mation
You can add information to the other fields includ-ing your photo credit under the Origin tab
Watch a 416 video on adding a caption to a photo
Photoshop
Tips amp Tricks
updated May 201724
9 Save your Image FilesPart of your workflow needs to be a way to stay organized If you canrsquot find your photos they have no value They are certainly worthless as part of an assignment but even worse in the real world where if you canrsquot find a photo or lose a file yoursquoll be in deep doo doo (a technical term)
YOU SHOULD HAVE BEEN WORKING ON A COPY
If you follow good workflow you still have an original untouched version of your file This version the toned and captioned version should be saved with a unique name that tells you something about the photo
File names should have no spaces and no special characters
Use only letters numbers hyphen and dash
My system
date_name_slug The date the photo was takenYour name (so a teacher or client or boss immediately knows who took the photo)A slug that tells what assignment the photo goes with
20160901_YourName_Circus_01
This photo for example was taken on September 1 2016 by you and is the first photo from the Circus assignment
bullI use the year at the beginning of my file name because I think sorting by year makes sense for me It puts all the 2016 files to-gether
bull
Photoshop
Tips amp Tricks
updated May 201725
10 Reformat your cardIf possible donrsquot do this until the end Your card is your backup incase everything goes wrong )
Format the card in the camera
Use the camera to format the card never delete files off a card from the computer You want to use the format function of the device to properly erase and ready the card for next time
DONrsquoT reformat until you are SURE you have properly saved your images
There are many many many other features and tools in Photoshop
There are some other ways to adjust photos that can be useful includ-ing
ShadowHighlights ndash you can open up shadows or add detail back into highlights (within limits)
BrightnessContrast ndash another way to control the brightness and contrast of a photo
Curves ndash Similar to Levels but instead of three arrows you can adjust the image anywhere along the curve
You can explore these tools as you gain familiarity with the program
bullIdeally you should have a card dedicat-ed to one device
It is better not to use a card in more than one camera
And it is a terrible idea to store fold-ers of other files on your card
Each device writes a lsquotable of contentsrsquo on the card to keep files organized Multiple devices means mul-tiple tables increasing the odds that your card will fail
bull
Photoshop
Tips amp Tricks
updated May 201726
SHOOTING RAW
Until now I have assumed you are shooting jpegs This is the almost universal image file format that is found on almost every device and website
JPEGS are small image files that can be viewed online opened in most applications They offer compatibility and small file size
But think about that ndash how can they be so small Why are they so universal
JPEGS are small because the files are compressed Information is dis-carded to reduce the file size Enough is kept so the image still looks good
When you take a photo with your camera a lot of information is applied to the file ndash the white balance you set perhaps contrast or sharpness
All of this is stored in the JPEG file and used to display the image
What if it wasnrsquot
What if you could take the lsquorawrsquo unprocessed digital information and manipulate it after the fact in Photoshop
Well you can Each camera manufacturer has itrsquos own formula for what we call a Raw file And Photoshop can open almost all of them
bullWhen a brand new camera is introduced it may take Photo-shop a few weeks or months to introduce an update for pro-cessing the Raw file
bull
Photoshop
Tips amp Tricks
updated May 201727
Nikon calls its Raw files NEFS Canon has CR2 files etc
The advantage of Raws is that you start in Photoshop with a lot more information and data Nothing is compressed no settings locked into the file
The disadvantage is that the files are much larger ndash your camerarsquos card will hold fewer imagesNot all software can edit or see a Raw file Yoursquoll need to use Photo-shop or some other image editor to convert the files to a universal format like a jpeg
IF you decide to shoot in the RAW format the image will open in a different window inside Photoshop
Note the controls You can set a white by using the eyedropper and clicking on something neutral You can fine tune your settings with the adjustments on the right ndash changing exposure contrast color etc
Photoshop
Tips amp Tricks
updated May 201728
You can make local adjustments by using the Adjustment brush
To use the brush lsquopaintrsquo over the area you want to adjust You can change the settings before or after using the brush You canrsquot select an area as you would with the Lasso or Quick Selection tools but you can still make many adjustments
When yoursquore done open the image make any final corrections add a caption and save it as a jpeg or other format The original Raw file remains as a backup
Watch a 610 video on using Camera Raw
Photoshop
Tips amp Tricks
updated May 201729
Photoshop is an extremely powerful application This tutorial only scratches the surface of what the app can do
The goal of this document is to introduce you to the program and give you the skills to adjust a photographrsquos basic tone and color These basic adjustments compensate for the limits of photography
A photograph canrsquot (yet) see as well as the human eye It canrsquot see the range of brightness or detail
And both the camera and the camera operator (you) are imperfect Exposures may not be perfect color and contrast may not look as wersquod hoped or as the scene actually appeared
These basic Photoshop skills can help make a photo look better online or in print
For those of you looking to dig deeper into Photoshoprsquos magical abili-ties to transform images there are numerous online resources Lyndacom (free to Penn State students) offers tutorials You can find many free resources on Youtubecom and Adobecom offers tutorials as well
And you can always contact me if you have questions
Will Yurmanwillyurmangmailcom
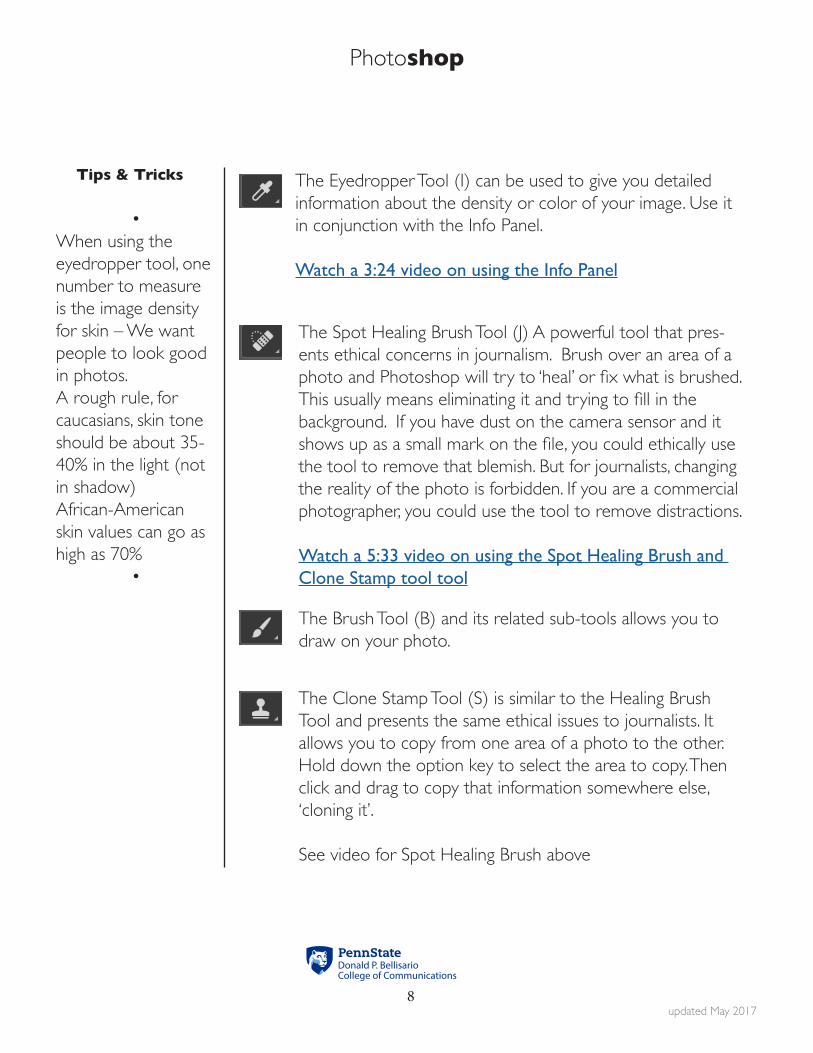
Photoshop
Tips amp Tricks
updated May 20178
The Eyedropper Tool (I) can be used to give you detailed information about the density or color of your image Use it in conjunction with the Info Panel
Watch a 324 video on using the Info Panel
The Spot Healing Brush Tool (J) A powerful tool that pres-ents ethical concerns in journalism Brush over an area of a photo and Photoshop will try to lsquohealrsquo or fix what is brushed This usually means eliminating it and trying to fill in the background If you have dust on the camera sensor and it shows up as a small mark on the file you could ethically use the tool to remove that blemish But for journalists changing the reality of the photo is forbidden If you are a commercial photographer you could use the tool to remove distractions
Watch a 533 video on using the Spot Healing Brush and Clone Stamp tool tool
The Brush Tool (B) and its related sub-tools allows you to draw on your photo
The Clone Stamp Tool (S) is similar to the Healing Brush Tool and presents the same ethical issues to journalists It allows you to copy from one area of a photo to the other Hold down the option key to select the area to copy Then click and drag to copy that information somewhere else lsquocloning itrsquo
See video for Spot Healing Brush above
bullWhen using the eyedropper tool one number to measure is the image density for skin ndash We want people to look good in photosA rough rule for caucasians skin tone should be about 35-40 in the light (not in shadow)African-American skin values can go as high as 70
bull
Photoshop
Tips amp Tricks
updated May 20179
The History Brush Tool (Y) is a tool I use a lot when toning or adjusting an image Use it in conjunction with the History panel You can use the brush to paint in the previous state of an image in a selected areaFor example yoursquove lightened the entire image but you really want the sky to look as it did in the original photo ndash select the original state in the History panel and then use the History Brush to lsquopaintrsquo in that original darkness of the sky
Watch a 432 video on using the History tool
The Burn amp Dodge Tools(O) are useful for quickly and easily darkening or lightening an area of a photo The Burn Tool will darken an area You can adjust the intensity and size of the brush at the top of the screen The Dodge Tool is used in the same way but lightens an area Once you select the brush size and intensity click and drag to paint over an area Use the History panel to undo if necessary
Watch a 223 video on using the BurnDodge tool
The Type Tool (T) can apply type to a photo Once select-ed yoursquoll have options for fonts and sizes
Watch a 455 video on using the Type Tool
bullIf you want blank space around a photo to add type to for example you can extend the size of the canvas ndash the area around the photoGo ImagegtCanvas Size You can select whether the image remains cen-tered on the canvas or not
bull
The Zoom Tool (Z) allows you to zoom in on an image - this can make it easier to see if the photo is sharp and allows for more precise control of an area of the photo Click to zoom in Old the option key to zoom out
Watch a 55 video on using the Zoom Tool
These are the tools we are most likely to use in this tutorial You can explore the other tools and features of Photoshop on your own
Photoshop
Tips amp Tricks
updated May 201710
ToningWe will define toning as making basic adjustments to color brightness contrast and cropping These are basic changes to the image that aim to bring it more in line with what we actually saw and to make the photo suitable for publication in either print or a digital environment
The tutorial will not cover retouching ndash the removal or changing of content in the photo You can certainly learn those skills in other classes or by using online resources such as Lyndacom
Photoshop is an extremely powerful program and there are many ways to get to the same place If you have used the program before you may have learned other ways of adjusting an image I donrsquot think there is a single best way ndash I will cover one method that I find works well for most situations
My goal with this tutorial is to give you a basic set of skills that will al-low you to make simple adjustments to your images quickly and easily
Less time using Photoshop equals more time for other things
Toning a photo in Photoshop in 10 (ish) steps
Properly exposed and photographed images should NOT require extensive toning
Photoshop is NOT the fix-it tool for lazy and bad photography
bullRemember that changes you make in Photoshop are per-manent If you make a mistake you may not be able to undo it later on
That is why I strongly suggest always work-ing on a copy of your original When you are selecting images make a copy of your best photos and work on the copy
While it is possible to save your adjustments as separate layers in a photo that workflow is beyond the scope of this tutorial
Working on a copy is always a smart idea
bull
Photoshop
Tips amp Tricks
updated May 201711
If you get it right in the field it should take less than 10 minutes to tone a photograph
ALWAYS WORK ON A COPY ndash NEVER YOUR ORIGINAL FILE
1 AnalyzeOpen your photo in Photoshop and take a moment to consider con-trast tonal qualities and sharpness Check tonal values for key areas such as skin tones using the eyedropper and info palette
In the info palette set second lsquoeyedropperrsquo to grayscale Read the skin tone with the eyedropper - avoid highlights or shadows when looking for skin values ~36 K Value for front lit Caucasian skin and up to 70 for African American skin tones
The eyedropper was placed on his forehead an area of his skin that was not in shadow or too bright from the reflection of light Note the K value is 36 ndash where you want to be for typical caucasian skin values Notice on the left the RGB values - these measure the color Blue has the lowest value and the opposite of blue is yellow - in gen-eral skin has a yellowish cast to it
bullWhen you select the eyedropper tool set the lsquosample sizersquo at the top left to lsquo3 by 3rsquo This way the eye dropper will average a small group of pix-els and not be fooled by a single aberrant one
bullIt is worth know-
ing your colors Un-derstand the color
wheel
If you subtract one color you add its op-posite Remove yel-
low and you get blue for example
Photoshop
Tips amp Tricks
updated May 201712
2 Rotate and CropDecide how to best crop the photo There is no reason to spend time toning part of a photo if yoursquore going to crop it You can crop to a spe-cific dimension or leave it open to what you think looks best
Try to avoid cropping to odd sizes and shapes But certainly crop to eliminate distractions and improve composition
Click on the Crop tool and then resize the box Double click in the middle of the image when yoursquore done
3 Basic Tonal Adjustment Use Wersquoll use Levels (L) to adjust Black and White points The goal is to adjust the brightness and the range of tones within the image You want brightwhite tones to look white and darkblack tones to look black while still keeping a full range of tones If your image looks grey and muddy and flat it will feel dull If all we see are stark black and white tones the image will lack detail and richness
Drag the black and white points to the base of the curve
It may be hard to see but by dragging the end points you are extending
Before Black and white points ex-tend beyond the lsquomountainrsquo of data The image is flatter and duller
After Black and white points are dragged into the lsquobase of the moun-tainrsquo creating a richer tone
Photoshop
Tips amp Tricks
updated May 201713
the range of tone of the image You are resetting the range
Be careful if you slide into the lsquomountainrsquo you will start to lose informa-tion Sometimes that wonrsquot be a problem - the information isnrsquot im-portant
But if yoursquore not careful yoursquoll lose detail in highlights andor shadow areas
Watch a 451 minute video on setting tonal range using Levels
4 Color CastSometimes the camera wonrsquot capture the color accurately
The photo may be too yellow or blue or green or whatever This hap-pens most commonly in unusual lighting situations ndash a mix of kinds of light or unusual fluorescent lighting etc Our cameras if set properly do a very good job outdoors in natural light but sometimes struggle with artificial lighting
IF the color cast is extreme we probably canrsquot do a very good of fixing the problem So it is important to make sure yoursquore capturing your im-age with the proper settings BUT if the color is off by a little bit there is a nice technique for removing that color cast
The theory is simple If we can make something in the photo that is supposed to be whitegrey look whitegrey then all the other colors will fall into place If the whites are too yellow everything is probably too yellow
By lsquosettingrsquo a white we reset the baseline and hopefully everything falls into place
bullIf you hold the option key down while drag-ging either the black or white arrow yoursquoll get a display that shows you where yoursquore losing detail The screen will turn black and areas that have lost all their de-tail will be highlighted
bull
bullI will talk about lsquoset-ting a whitersquo but make sure you use an area in the image that has detail A pure white like the sun wonrsquot work ndash it has no information Light greys are the best
bull
Photoshop
Tips amp Tricks
updated May 201714
bullIf you set a white and
donrsquot like the results use the History Tab to undo and start over It usually
means you either moved the mouse accidentally or
hadnrsquot picked a neutral area to work on
bull
OF all the steps this is the most complicated to follow But once yoursquove done it a few times it becomes pretty simple to master
There are six steps to this technique1 Open Levels2 Double click on the white eye dropper3 Click on an light neutral area ndash light white to medium grey AFTER CLICKING DONrsquoT MOVE THE MOUSE LEAVE THE CURSOR WHERE YOU CLICKED4 Use tab key to scroll through the color picker and set the A amp B channels to zero5 Click return to close the color picker6 Click the mouse without moving it (if yoursquove moved the mouse at any point you need to start over) This should lsquoset the whitersquo
The levels are open wersquove clicked on the manrsquos white shirt and are ready to zero out the AampB channels
Photoshop
Tips amp Tricks
updated May 201715
Notice the mouse hasnrsquot movedTHIS IS KEYAfter clicking on his white shirt I use the keyboardNOT THE MOUSETo set the AampB channels to zeroThen click lsquoreturnrsquo And FINALLY click the mouse on the samespot of his shirt And voila
Watch a 315 video on removing color cast using Levels
5 MidtonesTo this point wersquove corrected the color and over tonal range Some-times we may need to adjust the midtones those middle grays that may be too bright or too dark Correcting the color will sometimes shift these so make sure to do this step after color correcting
Photoshop
Tips amp Tricks
updated May 201716
We use the midtone control the gray middle arrow in Levels to lsquoopen up the shadowsrsquo and let in some detail while keeping the range of
tones we set with the black and white points
Watch a 122 video on adjusting the midtones of an image
6 Local AdjustmentsTo this point wersquove made global changes to the photo ndash all or noth-ing changes Now is the time to look and see if a specific area needs adjusting We might lighten a face or darken the foreground or back-ground of an image If yoursquore a journalist you want to take GREAT CARE in making these adjustments It is easy to step beyond the ethi-cal standards of photojournalism
In general we donrsquot want to remove an element or change it so dra-matically that wersquove altered the reality of the scene A photojournalist should never eliminate a pole that is sticking out of someonersquos head just because it is a distraction or add a cloud to a blue sky Neither should they so darken something that we canrsquot recognize that it was there
Never make a change that would mislead or misrepresent what actually occurred
bullThe National Press Photographers As-sociation (NPPA) has a code of ethics that speaks to the manip-ulation of imageshttpsnppaorgcode_of_ethics
bull
Photoshop
Tips amp Tricks
updated May 201717
For other kinds of photographers working in advertising or as an artist or wedding photographer for example you will need to use your judgement and
the judgement of your employer or client
This tutorial will only cover very basic adjustments Photoshop is a very powerful program You can change the color shape perspective of ele-ments You can remove blemishes and alter the appearance of light And on and on Those skills are beyond the scope of this tutorial
For the basic toning of an image we will talk about two things1 Lighteningdarkening2 Adjusting color
IF you want to adjust a part of a photograph you need to select the area you want to adjust
The Lasso and Quick Selection tools explained earlier in the tutorial are easy ways to isolate someonersquos face or the sky or some other area of the photograph
Once selected you can apply the same tools wersquove used to adjust the entire image Levels can be used to lighten or darken or even alter the color of the selected area
1 Select the area that needs lsquofixingrsquo2 Feather the selection so that the edge is softened between the selec-tion and the rest of the image3 Make the adjustment
The burndodge tool can also be useful for lightening or darkening a area of a photoThe Burn Tool makes an area darker
Photoshop
Tips amp Tricks
updated May 201718
Herersquos a photo of a protest from the Democratic National Convention in Philadelphia in July 2016 Overall the color looks good and there is a wide range of tone But I want to make sure the viewer is drawn to the protesterrsquos expression I wish her face were a little lighter
If I lighten the whole photo her face looks better but the rest of the photo looks washed out
Photoshop
Tips amp Tricks
updated May 201719
Here are three ways to lighten her face without lightening the rest of the image
A Select and LightenUse the Lasso or Quick Selection tools to select her face and armFeather the selection and then use Levels to lighten the selection
If you look closely you can see the outline of the selection of her arm and face I then used Levels to lighten just those elements The rest of the photo is the same as the original on the previous page
B Burn and DodgeUse the Dodge tool to lighten her face and arm by painting over it You can adjust the size and intensity of the tool
I find a good starting point is to set the brush to lsquomidtonesrsquo and about 30 You can keep lsquopaintingrsquo to lighten more if you need to
Photoshop
Tips amp Tricks
updated May 201720
Note that her skin looks little redderwarmer You can get a shift of color when you use the dodge tool
C History BrushThis method can seem a little more complicated but often gives the most natural results
The history brush allows you to lsquopaintrsquo in the previous state So you can lighten the entire image for example and then revert part of the image back to where it started
To use the History brush you also need to open the History Win-dow Pane
I find this method allows for the most natural adjustments in many cases And with practice is very fast
bullSometimes colors shift when you lighten them especially with the dodge tool
The HueSaturation tool can bring those colors back into line You want to make sure a personrsquos skin tone remains consis-tent
bull
Photoshop
Tips amp Tricks
updated May 201721
In this example I opened the image and then used Levels to lighten the entire photograph
I click the check box next to the origi-nal image above the change I made in Levels
Then each time I use the History brush I am returning that area of the photo to the original state
You are less likely to get a color shift this way and less likely to see the edge between an area you changed and the rest of the photograph
Photoshop
Tips amp Tricks
updated May 201722
IF yoursquove done a good job shooting your photo - set a proper expo-sure and white balance ndash you should be done toning your photo at this point
If it takes more than 5-10 minutes to adjust your photo yoursquore prob-ably trying to fix something that went wrong And yoursquoll probably find itrsquos is difficult or impossible to make it perfect
It is VERY important that you donrsquot rely on Photoshop to fix mistakes in the field
You may sometimes need to use other tools especially if the scene was lit by more than one type of light or under difficult conditions
7 Selective Color amp HueSaturationBoth tools can by used to correct tricky lighting and fix the color of images If the scene is lit by more than kind of light ndash window light mixed with overhead lighting or sunlight and shadow for example the color of part of the scene may be wrong
Selective Color ImagegtAdjustmentsgtSelective Color allows you to alter the color of one specific color So if the yellow channel has too much red in it you can remove the red without changing other colors that might have red in their mix
Hue Saturation ImagegtAdjustmentsgtHueSaturation allows you to adjust the hue saturation and brightness of the image or individual color channels Another useful tool in adjusting of fixing the color mix of a photo
Watch a 430 video on using Selective Color and HueSaturation
Photoshop
Tips amp Tricks
updated May 201723
8 CaptionsIt is vital to caption your images Captions make the image searchable on your computer and on the Internet
Captions give the photo context and make them more valuable
Photos are an historical record and the caption is part of that record
Captions explain and give meaning to your photographs
The caption information is part of what we call metadata It is informa-tion about information
You can apply the caption information in Photoshop or in Lightroom or Photo Mechanic ndash Depending on what software you have available
Once saved it is digitally stored with the photo ndash part of the image file
In Photoshop go FilegtFile info
The Description field is where you type your complete caption infor-mation
You can add information to the other fields includ-ing your photo credit under the Origin tab
Watch a 416 video on adding a caption to a photo
Photoshop
Tips amp Tricks
updated May 201724
9 Save your Image FilesPart of your workflow needs to be a way to stay organized If you canrsquot find your photos they have no value They are certainly worthless as part of an assignment but even worse in the real world where if you canrsquot find a photo or lose a file yoursquoll be in deep doo doo (a technical term)
YOU SHOULD HAVE BEEN WORKING ON A COPY
If you follow good workflow you still have an original untouched version of your file This version the toned and captioned version should be saved with a unique name that tells you something about the photo
File names should have no spaces and no special characters
Use only letters numbers hyphen and dash
My system
date_name_slug The date the photo was takenYour name (so a teacher or client or boss immediately knows who took the photo)A slug that tells what assignment the photo goes with
20160901_YourName_Circus_01
This photo for example was taken on September 1 2016 by you and is the first photo from the Circus assignment
bullI use the year at the beginning of my file name because I think sorting by year makes sense for me It puts all the 2016 files to-gether
bull
Photoshop
Tips amp Tricks
updated May 201725
10 Reformat your cardIf possible donrsquot do this until the end Your card is your backup incase everything goes wrong )
Format the card in the camera
Use the camera to format the card never delete files off a card from the computer You want to use the format function of the device to properly erase and ready the card for next time
DONrsquoT reformat until you are SURE you have properly saved your images
There are many many many other features and tools in Photoshop
There are some other ways to adjust photos that can be useful includ-ing
ShadowHighlights ndash you can open up shadows or add detail back into highlights (within limits)
BrightnessContrast ndash another way to control the brightness and contrast of a photo
Curves ndash Similar to Levels but instead of three arrows you can adjust the image anywhere along the curve
You can explore these tools as you gain familiarity with the program
bullIdeally you should have a card dedicat-ed to one device
It is better not to use a card in more than one camera
And it is a terrible idea to store fold-ers of other files on your card
Each device writes a lsquotable of contentsrsquo on the card to keep files organized Multiple devices means mul-tiple tables increasing the odds that your card will fail
bull
Photoshop
Tips amp Tricks
updated May 201726
SHOOTING RAW
Until now I have assumed you are shooting jpegs This is the almost universal image file format that is found on almost every device and website
JPEGS are small image files that can be viewed online opened in most applications They offer compatibility and small file size
But think about that ndash how can they be so small Why are they so universal
JPEGS are small because the files are compressed Information is dis-carded to reduce the file size Enough is kept so the image still looks good
When you take a photo with your camera a lot of information is applied to the file ndash the white balance you set perhaps contrast or sharpness
All of this is stored in the JPEG file and used to display the image
What if it wasnrsquot
What if you could take the lsquorawrsquo unprocessed digital information and manipulate it after the fact in Photoshop
Well you can Each camera manufacturer has itrsquos own formula for what we call a Raw file And Photoshop can open almost all of them
bullWhen a brand new camera is introduced it may take Photo-shop a few weeks or months to introduce an update for pro-cessing the Raw file
bull
Photoshop
Tips amp Tricks
updated May 201727
Nikon calls its Raw files NEFS Canon has CR2 files etc
The advantage of Raws is that you start in Photoshop with a lot more information and data Nothing is compressed no settings locked into the file
The disadvantage is that the files are much larger ndash your camerarsquos card will hold fewer imagesNot all software can edit or see a Raw file Yoursquoll need to use Photo-shop or some other image editor to convert the files to a universal format like a jpeg
IF you decide to shoot in the RAW format the image will open in a different window inside Photoshop
Note the controls You can set a white by using the eyedropper and clicking on something neutral You can fine tune your settings with the adjustments on the right ndash changing exposure contrast color etc
Photoshop
Tips amp Tricks
updated May 201728
You can make local adjustments by using the Adjustment brush
To use the brush lsquopaintrsquo over the area you want to adjust You can change the settings before or after using the brush You canrsquot select an area as you would with the Lasso or Quick Selection tools but you can still make many adjustments
When yoursquore done open the image make any final corrections add a caption and save it as a jpeg or other format The original Raw file remains as a backup
Watch a 610 video on using Camera Raw
Photoshop
Tips amp Tricks
updated May 201729
Photoshop is an extremely powerful application This tutorial only scratches the surface of what the app can do
The goal of this document is to introduce you to the program and give you the skills to adjust a photographrsquos basic tone and color These basic adjustments compensate for the limits of photography
A photograph canrsquot (yet) see as well as the human eye It canrsquot see the range of brightness or detail
And both the camera and the camera operator (you) are imperfect Exposures may not be perfect color and contrast may not look as wersquod hoped or as the scene actually appeared
These basic Photoshop skills can help make a photo look better online or in print
For those of you looking to dig deeper into Photoshoprsquos magical abili-ties to transform images there are numerous online resources Lyndacom (free to Penn State students) offers tutorials You can find many free resources on Youtubecom and Adobecom offers tutorials as well
And you can always contact me if you have questions
Will Yurmanwillyurmangmailcom
Photoshop
Tips amp Tricks
updated May 201710
ToningWe will define toning as making basic adjustments to color brightness contrast and cropping These are basic changes to the image that aim to bring it more in line with what we actually saw and to make the photo suitable for publication in either print or a digital environment
The tutorial will not cover retouching ndash the removal or changing of content in the photo You can certainly learn those skills in other classes or by using online resources such as Lyndacom
Photoshop is an extremely powerful program and there are many ways to get to the same place If you have used the program before you may have learned other ways of adjusting an image I donrsquot think there is a single best way ndash I will cover one method that I find works well for most situations
My goal with this tutorial is to give you a basic set of skills that will al-low you to make simple adjustments to your images quickly and easily
Less time using Photoshop equals more time for other things
Toning a photo in Photoshop in 10 (ish) steps
Properly exposed and photographed images should NOT require extensive toning
Photoshop is NOT the fix-it tool for lazy and bad photography
bullRemember that changes you make in Photoshop are per-manent If you make a mistake you may not be able to undo it later on
That is why I strongly suggest always work-ing on a copy of your original When you are selecting images make a copy of your best photos and work on the copy
While it is possible to save your adjustments as separate layers in a photo that workflow is beyond the scope of this tutorial
Working on a copy is always a smart idea
bull
Photoshop
Tips amp Tricks
updated May 201711
If you get it right in the field it should take less than 10 minutes to tone a photograph
ALWAYS WORK ON A COPY ndash NEVER YOUR ORIGINAL FILE
1 AnalyzeOpen your photo in Photoshop and take a moment to consider con-trast tonal qualities and sharpness Check tonal values for key areas such as skin tones using the eyedropper and info palette
In the info palette set second lsquoeyedropperrsquo to grayscale Read the skin tone with the eyedropper - avoid highlights or shadows when looking for skin values ~36 K Value for front lit Caucasian skin and up to 70 for African American skin tones
The eyedropper was placed on his forehead an area of his skin that was not in shadow or too bright from the reflection of light Note the K value is 36 ndash where you want to be for typical caucasian skin values Notice on the left the RGB values - these measure the color Blue has the lowest value and the opposite of blue is yellow - in gen-eral skin has a yellowish cast to it
bullWhen you select the eyedropper tool set the lsquosample sizersquo at the top left to lsquo3 by 3rsquo This way the eye dropper will average a small group of pix-els and not be fooled by a single aberrant one
bullIt is worth know-
ing your colors Un-derstand the color
wheel
If you subtract one color you add its op-posite Remove yel-
low and you get blue for example
Photoshop
Tips amp Tricks
updated May 201712
2 Rotate and CropDecide how to best crop the photo There is no reason to spend time toning part of a photo if yoursquore going to crop it You can crop to a spe-cific dimension or leave it open to what you think looks best
Try to avoid cropping to odd sizes and shapes But certainly crop to eliminate distractions and improve composition
Click on the Crop tool and then resize the box Double click in the middle of the image when yoursquore done
3 Basic Tonal Adjustment Use Wersquoll use Levels (L) to adjust Black and White points The goal is to adjust the brightness and the range of tones within the image You want brightwhite tones to look white and darkblack tones to look black while still keeping a full range of tones If your image looks grey and muddy and flat it will feel dull If all we see are stark black and white tones the image will lack detail and richness
Drag the black and white points to the base of the curve
It may be hard to see but by dragging the end points you are extending
Before Black and white points ex-tend beyond the lsquomountainrsquo of data The image is flatter and duller
After Black and white points are dragged into the lsquobase of the moun-tainrsquo creating a richer tone
Photoshop
Tips amp Tricks
updated May 201713
the range of tone of the image You are resetting the range
Be careful if you slide into the lsquomountainrsquo you will start to lose informa-tion Sometimes that wonrsquot be a problem - the information isnrsquot im-portant
But if yoursquore not careful yoursquoll lose detail in highlights andor shadow areas
Watch a 451 minute video on setting tonal range using Levels
4 Color CastSometimes the camera wonrsquot capture the color accurately
The photo may be too yellow or blue or green or whatever This hap-pens most commonly in unusual lighting situations ndash a mix of kinds of light or unusual fluorescent lighting etc Our cameras if set properly do a very good job outdoors in natural light but sometimes struggle with artificial lighting
IF the color cast is extreme we probably canrsquot do a very good of fixing the problem So it is important to make sure yoursquore capturing your im-age with the proper settings BUT if the color is off by a little bit there is a nice technique for removing that color cast
The theory is simple If we can make something in the photo that is supposed to be whitegrey look whitegrey then all the other colors will fall into place If the whites are too yellow everything is probably too yellow
By lsquosettingrsquo a white we reset the baseline and hopefully everything falls into place
bullIf you hold the option key down while drag-ging either the black or white arrow yoursquoll get a display that shows you where yoursquore losing detail The screen will turn black and areas that have lost all their de-tail will be highlighted
bull
bullI will talk about lsquoset-ting a whitersquo but make sure you use an area in the image that has detail A pure white like the sun wonrsquot work ndash it has no information Light greys are the best
bull
Photoshop
Tips amp Tricks
updated May 201714
bullIf you set a white and
donrsquot like the results use the History Tab to undo and start over It usually
means you either moved the mouse accidentally or
hadnrsquot picked a neutral area to work on
bull
OF all the steps this is the most complicated to follow But once yoursquove done it a few times it becomes pretty simple to master
There are six steps to this technique1 Open Levels2 Double click on the white eye dropper3 Click on an light neutral area ndash light white to medium grey AFTER CLICKING DONrsquoT MOVE THE MOUSE LEAVE THE CURSOR WHERE YOU CLICKED4 Use tab key to scroll through the color picker and set the A amp B channels to zero5 Click return to close the color picker6 Click the mouse without moving it (if yoursquove moved the mouse at any point you need to start over) This should lsquoset the whitersquo
The levels are open wersquove clicked on the manrsquos white shirt and are ready to zero out the AampB channels
Photoshop
Tips amp Tricks
updated May 201715
Notice the mouse hasnrsquot movedTHIS IS KEYAfter clicking on his white shirt I use the keyboardNOT THE MOUSETo set the AampB channels to zeroThen click lsquoreturnrsquo And FINALLY click the mouse on the samespot of his shirt And voila
Watch a 315 video on removing color cast using Levels
5 MidtonesTo this point wersquove corrected the color and over tonal range Some-times we may need to adjust the midtones those middle grays that may be too bright or too dark Correcting the color will sometimes shift these so make sure to do this step after color correcting
Photoshop
Tips amp Tricks
updated May 201716
We use the midtone control the gray middle arrow in Levels to lsquoopen up the shadowsrsquo and let in some detail while keeping the range of
tones we set with the black and white points
Watch a 122 video on adjusting the midtones of an image
6 Local AdjustmentsTo this point wersquove made global changes to the photo ndash all or noth-ing changes Now is the time to look and see if a specific area needs adjusting We might lighten a face or darken the foreground or back-ground of an image If yoursquore a journalist you want to take GREAT CARE in making these adjustments It is easy to step beyond the ethi-cal standards of photojournalism
In general we donrsquot want to remove an element or change it so dra-matically that wersquove altered the reality of the scene A photojournalist should never eliminate a pole that is sticking out of someonersquos head just because it is a distraction or add a cloud to a blue sky Neither should they so darken something that we canrsquot recognize that it was there
Never make a change that would mislead or misrepresent what actually occurred
bullThe National Press Photographers As-sociation (NPPA) has a code of ethics that speaks to the manip-ulation of imageshttpsnppaorgcode_of_ethics
bull
Photoshop
Tips amp Tricks
updated May 201717
For other kinds of photographers working in advertising or as an artist or wedding photographer for example you will need to use your judgement and
the judgement of your employer or client
This tutorial will only cover very basic adjustments Photoshop is a very powerful program You can change the color shape perspective of ele-ments You can remove blemishes and alter the appearance of light And on and on Those skills are beyond the scope of this tutorial
For the basic toning of an image we will talk about two things1 Lighteningdarkening2 Adjusting color
IF you want to adjust a part of a photograph you need to select the area you want to adjust
The Lasso and Quick Selection tools explained earlier in the tutorial are easy ways to isolate someonersquos face or the sky or some other area of the photograph
Once selected you can apply the same tools wersquove used to adjust the entire image Levels can be used to lighten or darken or even alter the color of the selected area
1 Select the area that needs lsquofixingrsquo2 Feather the selection so that the edge is softened between the selec-tion and the rest of the image3 Make the adjustment
The burndodge tool can also be useful for lightening or darkening a area of a photoThe Burn Tool makes an area darker
Photoshop
Tips amp Tricks
updated May 201718
Herersquos a photo of a protest from the Democratic National Convention in Philadelphia in July 2016 Overall the color looks good and there is a wide range of tone But I want to make sure the viewer is drawn to the protesterrsquos expression I wish her face were a little lighter
If I lighten the whole photo her face looks better but the rest of the photo looks washed out
Photoshop
Tips amp Tricks
updated May 201719
Here are three ways to lighten her face without lightening the rest of the image
A Select and LightenUse the Lasso or Quick Selection tools to select her face and armFeather the selection and then use Levels to lighten the selection
If you look closely you can see the outline of the selection of her arm and face I then used Levels to lighten just those elements The rest of the photo is the same as the original on the previous page
B Burn and DodgeUse the Dodge tool to lighten her face and arm by painting over it You can adjust the size and intensity of the tool
I find a good starting point is to set the brush to lsquomidtonesrsquo and about 30 You can keep lsquopaintingrsquo to lighten more if you need to
Photoshop
Tips amp Tricks
updated May 201720
Note that her skin looks little redderwarmer You can get a shift of color when you use the dodge tool
C History BrushThis method can seem a little more complicated but often gives the most natural results
The history brush allows you to lsquopaintrsquo in the previous state So you can lighten the entire image for example and then revert part of the image back to where it started
To use the History brush you also need to open the History Win-dow Pane
I find this method allows for the most natural adjustments in many cases And with practice is very fast
bullSometimes colors shift when you lighten them especially with the dodge tool
The HueSaturation tool can bring those colors back into line You want to make sure a personrsquos skin tone remains consis-tent
bull
Photoshop
Tips amp Tricks
updated May 201721
In this example I opened the image and then used Levels to lighten the entire photograph
I click the check box next to the origi-nal image above the change I made in Levels
Then each time I use the History brush I am returning that area of the photo to the original state
You are less likely to get a color shift this way and less likely to see the edge between an area you changed and the rest of the photograph
Photoshop
Tips amp Tricks
updated May 201722
IF yoursquove done a good job shooting your photo - set a proper expo-sure and white balance ndash you should be done toning your photo at this point
If it takes more than 5-10 minutes to adjust your photo yoursquore prob-ably trying to fix something that went wrong And yoursquoll probably find itrsquos is difficult or impossible to make it perfect
It is VERY important that you donrsquot rely on Photoshop to fix mistakes in the field
You may sometimes need to use other tools especially if the scene was lit by more than one type of light or under difficult conditions
7 Selective Color amp HueSaturationBoth tools can by used to correct tricky lighting and fix the color of images If the scene is lit by more than kind of light ndash window light mixed with overhead lighting or sunlight and shadow for example the color of part of the scene may be wrong
Selective Color ImagegtAdjustmentsgtSelective Color allows you to alter the color of one specific color So if the yellow channel has too much red in it you can remove the red without changing other colors that might have red in their mix
Hue Saturation ImagegtAdjustmentsgtHueSaturation allows you to adjust the hue saturation and brightness of the image or individual color channels Another useful tool in adjusting of fixing the color mix of a photo
Watch a 430 video on using Selective Color and HueSaturation
Photoshop
Tips amp Tricks
updated May 201723
8 CaptionsIt is vital to caption your images Captions make the image searchable on your computer and on the Internet
Captions give the photo context and make them more valuable
Photos are an historical record and the caption is part of that record
Captions explain and give meaning to your photographs
The caption information is part of what we call metadata It is informa-tion about information
You can apply the caption information in Photoshop or in Lightroom or Photo Mechanic ndash Depending on what software you have available
Once saved it is digitally stored with the photo ndash part of the image file
In Photoshop go FilegtFile info
The Description field is where you type your complete caption infor-mation
You can add information to the other fields includ-ing your photo credit under the Origin tab
Watch a 416 video on adding a caption to a photo
Photoshop
Tips amp Tricks
updated May 201724
9 Save your Image FilesPart of your workflow needs to be a way to stay organized If you canrsquot find your photos they have no value They are certainly worthless as part of an assignment but even worse in the real world where if you canrsquot find a photo or lose a file yoursquoll be in deep doo doo (a technical term)
YOU SHOULD HAVE BEEN WORKING ON A COPY
If you follow good workflow you still have an original untouched version of your file This version the toned and captioned version should be saved with a unique name that tells you something about the photo
File names should have no spaces and no special characters
Use only letters numbers hyphen and dash
My system
date_name_slug The date the photo was takenYour name (so a teacher or client or boss immediately knows who took the photo)A slug that tells what assignment the photo goes with
20160901_YourName_Circus_01
This photo for example was taken on September 1 2016 by you and is the first photo from the Circus assignment
bullI use the year at the beginning of my file name because I think sorting by year makes sense for me It puts all the 2016 files to-gether
bull
Photoshop
Tips amp Tricks
updated May 201725
10 Reformat your cardIf possible donrsquot do this until the end Your card is your backup incase everything goes wrong )
Format the card in the camera
Use the camera to format the card never delete files off a card from the computer You want to use the format function of the device to properly erase and ready the card for next time
DONrsquoT reformat until you are SURE you have properly saved your images
There are many many many other features and tools in Photoshop
There are some other ways to adjust photos that can be useful includ-ing
ShadowHighlights ndash you can open up shadows or add detail back into highlights (within limits)
BrightnessContrast ndash another way to control the brightness and contrast of a photo
Curves ndash Similar to Levels but instead of three arrows you can adjust the image anywhere along the curve
You can explore these tools as you gain familiarity with the program
bullIdeally you should have a card dedicat-ed to one device
It is better not to use a card in more than one camera
And it is a terrible idea to store fold-ers of other files on your card
Each device writes a lsquotable of contentsrsquo on the card to keep files organized Multiple devices means mul-tiple tables increasing the odds that your card will fail
bull
Photoshop
Tips amp Tricks
updated May 201726
SHOOTING RAW
Until now I have assumed you are shooting jpegs This is the almost universal image file format that is found on almost every device and website
JPEGS are small image files that can be viewed online opened in most applications They offer compatibility and small file size
But think about that ndash how can they be so small Why are they so universal
JPEGS are small because the files are compressed Information is dis-carded to reduce the file size Enough is kept so the image still looks good
When you take a photo with your camera a lot of information is applied to the file ndash the white balance you set perhaps contrast or sharpness
All of this is stored in the JPEG file and used to display the image
What if it wasnrsquot
What if you could take the lsquorawrsquo unprocessed digital information and manipulate it after the fact in Photoshop
Well you can Each camera manufacturer has itrsquos own formula for what we call a Raw file And Photoshop can open almost all of them
bullWhen a brand new camera is introduced it may take Photo-shop a few weeks or months to introduce an update for pro-cessing the Raw file
bull
Photoshop
Tips amp Tricks
updated May 201727
Nikon calls its Raw files NEFS Canon has CR2 files etc
The advantage of Raws is that you start in Photoshop with a lot more information and data Nothing is compressed no settings locked into the file
The disadvantage is that the files are much larger ndash your camerarsquos card will hold fewer imagesNot all software can edit or see a Raw file Yoursquoll need to use Photo-shop or some other image editor to convert the files to a universal format like a jpeg
IF you decide to shoot in the RAW format the image will open in a different window inside Photoshop
Note the controls You can set a white by using the eyedropper and clicking on something neutral You can fine tune your settings with the adjustments on the right ndash changing exposure contrast color etc
Photoshop
Tips amp Tricks
updated May 201728
You can make local adjustments by using the Adjustment brush
To use the brush lsquopaintrsquo over the area you want to adjust You can change the settings before or after using the brush You canrsquot select an area as you would with the Lasso or Quick Selection tools but you can still make many adjustments
When yoursquore done open the image make any final corrections add a caption and save it as a jpeg or other format The original Raw file remains as a backup
Watch a 610 video on using Camera Raw
Photoshop
Tips amp Tricks
updated May 201729
Photoshop is an extremely powerful application This tutorial only scratches the surface of what the app can do
The goal of this document is to introduce you to the program and give you the skills to adjust a photographrsquos basic tone and color These basic adjustments compensate for the limits of photography
A photograph canrsquot (yet) see as well as the human eye It canrsquot see the range of brightness or detail
And both the camera and the camera operator (you) are imperfect Exposures may not be perfect color and contrast may not look as wersquod hoped or as the scene actually appeared
These basic Photoshop skills can help make a photo look better online or in print
For those of you looking to dig deeper into Photoshoprsquos magical abili-ties to transform images there are numerous online resources Lyndacom (free to Penn State students) offers tutorials You can find many free resources on Youtubecom and Adobecom offers tutorials as well
And you can always contact me if you have questions
Will Yurmanwillyurmangmailcom
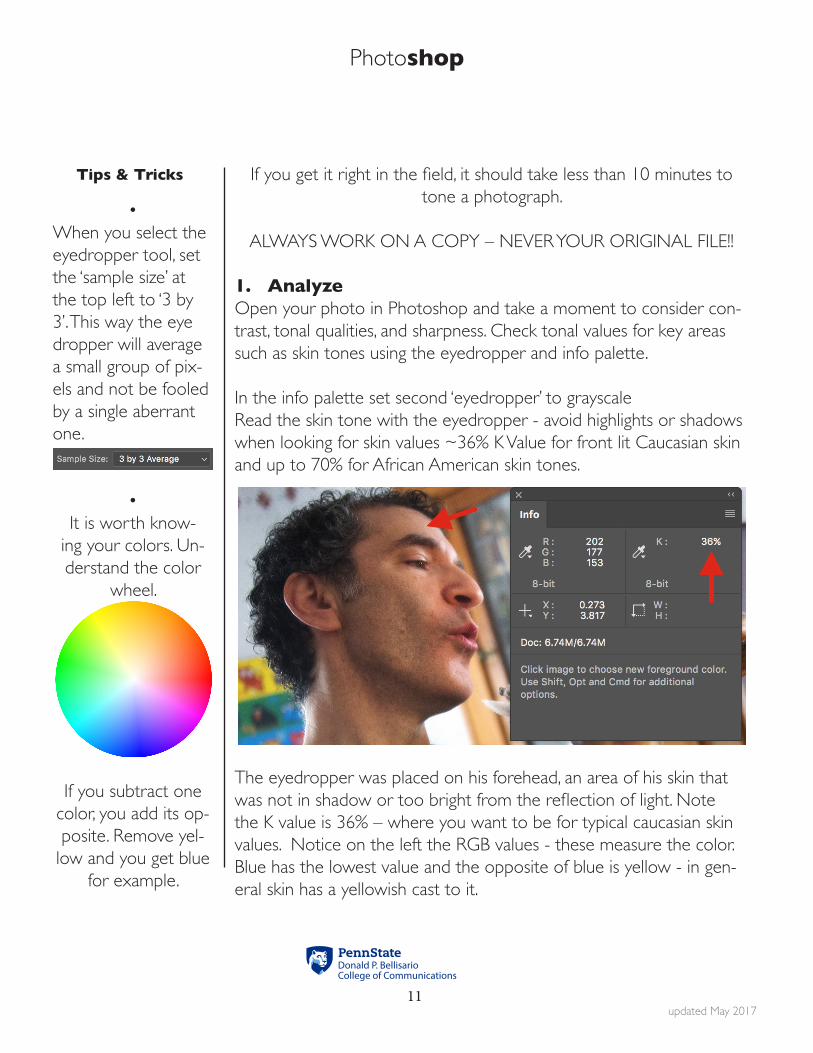
Photoshop
Tips amp Tricks
updated May 201711
If you get it right in the field it should take less than 10 minutes to tone a photograph
ALWAYS WORK ON A COPY ndash NEVER YOUR ORIGINAL FILE
1 AnalyzeOpen your photo in Photoshop and take a moment to consider con-trast tonal qualities and sharpness Check tonal values for key areas such as skin tones using the eyedropper and info palette
In the info palette set second lsquoeyedropperrsquo to grayscale Read the skin tone with the eyedropper - avoid highlights or shadows when looking for skin values ~36 K Value for front lit Caucasian skin and up to 70 for African American skin tones
The eyedropper was placed on his forehead an area of his skin that was not in shadow or too bright from the reflection of light Note the K value is 36 ndash where you want to be for typical caucasian skin values Notice on the left the RGB values - these measure the color Blue has the lowest value and the opposite of blue is yellow - in gen-eral skin has a yellowish cast to it
bullWhen you select the eyedropper tool set the lsquosample sizersquo at the top left to lsquo3 by 3rsquo This way the eye dropper will average a small group of pix-els and not be fooled by a single aberrant one
bullIt is worth know-
ing your colors Un-derstand the color
wheel
If you subtract one color you add its op-posite Remove yel-
low and you get blue for example
Photoshop
Tips amp Tricks
updated May 201712
2 Rotate and CropDecide how to best crop the photo There is no reason to spend time toning part of a photo if yoursquore going to crop it You can crop to a spe-cific dimension or leave it open to what you think looks best
Try to avoid cropping to odd sizes and shapes But certainly crop to eliminate distractions and improve composition
Click on the Crop tool and then resize the box Double click in the middle of the image when yoursquore done
3 Basic Tonal Adjustment Use Wersquoll use Levels (L) to adjust Black and White points The goal is to adjust the brightness and the range of tones within the image You want brightwhite tones to look white and darkblack tones to look black while still keeping a full range of tones If your image looks grey and muddy and flat it will feel dull If all we see are stark black and white tones the image will lack detail and richness
Drag the black and white points to the base of the curve
It may be hard to see but by dragging the end points you are extending
Before Black and white points ex-tend beyond the lsquomountainrsquo of data The image is flatter and duller
After Black and white points are dragged into the lsquobase of the moun-tainrsquo creating a richer tone
Photoshop
Tips amp Tricks
updated May 201713
the range of tone of the image You are resetting the range
Be careful if you slide into the lsquomountainrsquo you will start to lose informa-tion Sometimes that wonrsquot be a problem - the information isnrsquot im-portant
But if yoursquore not careful yoursquoll lose detail in highlights andor shadow areas
Watch a 451 minute video on setting tonal range using Levels
4 Color CastSometimes the camera wonrsquot capture the color accurately
The photo may be too yellow or blue or green or whatever This hap-pens most commonly in unusual lighting situations ndash a mix of kinds of light or unusual fluorescent lighting etc Our cameras if set properly do a very good job outdoors in natural light but sometimes struggle with artificial lighting
IF the color cast is extreme we probably canrsquot do a very good of fixing the problem So it is important to make sure yoursquore capturing your im-age with the proper settings BUT if the color is off by a little bit there is a nice technique for removing that color cast
The theory is simple If we can make something in the photo that is supposed to be whitegrey look whitegrey then all the other colors will fall into place If the whites are too yellow everything is probably too yellow
By lsquosettingrsquo a white we reset the baseline and hopefully everything falls into place
bullIf you hold the option key down while drag-ging either the black or white arrow yoursquoll get a display that shows you where yoursquore losing detail The screen will turn black and areas that have lost all their de-tail will be highlighted
bull
bullI will talk about lsquoset-ting a whitersquo but make sure you use an area in the image that has detail A pure white like the sun wonrsquot work ndash it has no information Light greys are the best
bull
Photoshop
Tips amp Tricks
updated May 201714
bullIf you set a white and
donrsquot like the results use the History Tab to undo and start over It usually
means you either moved the mouse accidentally or
hadnrsquot picked a neutral area to work on
bull
OF all the steps this is the most complicated to follow But once yoursquove done it a few times it becomes pretty simple to master
There are six steps to this technique1 Open Levels2 Double click on the white eye dropper3 Click on an light neutral area ndash light white to medium grey AFTER CLICKING DONrsquoT MOVE THE MOUSE LEAVE THE CURSOR WHERE YOU CLICKED4 Use tab key to scroll through the color picker and set the A amp B channels to zero5 Click return to close the color picker6 Click the mouse without moving it (if yoursquove moved the mouse at any point you need to start over) This should lsquoset the whitersquo
The levels are open wersquove clicked on the manrsquos white shirt and are ready to zero out the AampB channels
Photoshop
Tips amp Tricks
updated May 201715
Notice the mouse hasnrsquot movedTHIS IS KEYAfter clicking on his white shirt I use the keyboardNOT THE MOUSETo set the AampB channels to zeroThen click lsquoreturnrsquo And FINALLY click the mouse on the samespot of his shirt And voila
Watch a 315 video on removing color cast using Levels
5 MidtonesTo this point wersquove corrected the color and over tonal range Some-times we may need to adjust the midtones those middle grays that may be too bright or too dark Correcting the color will sometimes shift these so make sure to do this step after color correcting
Photoshop
Tips amp Tricks
updated May 201716
We use the midtone control the gray middle arrow in Levels to lsquoopen up the shadowsrsquo and let in some detail while keeping the range of
tones we set with the black and white points
Watch a 122 video on adjusting the midtones of an image
6 Local AdjustmentsTo this point wersquove made global changes to the photo ndash all or noth-ing changes Now is the time to look and see if a specific area needs adjusting We might lighten a face or darken the foreground or back-ground of an image If yoursquore a journalist you want to take GREAT CARE in making these adjustments It is easy to step beyond the ethi-cal standards of photojournalism
In general we donrsquot want to remove an element or change it so dra-matically that wersquove altered the reality of the scene A photojournalist should never eliminate a pole that is sticking out of someonersquos head just because it is a distraction or add a cloud to a blue sky Neither should they so darken something that we canrsquot recognize that it was there
Never make a change that would mislead or misrepresent what actually occurred
bullThe National Press Photographers As-sociation (NPPA) has a code of ethics that speaks to the manip-ulation of imageshttpsnppaorgcode_of_ethics
bull
Photoshop
Tips amp Tricks
updated May 201717
For other kinds of photographers working in advertising or as an artist or wedding photographer for example you will need to use your judgement and
the judgement of your employer or client
This tutorial will only cover very basic adjustments Photoshop is a very powerful program You can change the color shape perspective of ele-ments You can remove blemishes and alter the appearance of light And on and on Those skills are beyond the scope of this tutorial
For the basic toning of an image we will talk about two things1 Lighteningdarkening2 Adjusting color
IF you want to adjust a part of a photograph you need to select the area you want to adjust
The Lasso and Quick Selection tools explained earlier in the tutorial are easy ways to isolate someonersquos face or the sky or some other area of the photograph
Once selected you can apply the same tools wersquove used to adjust the entire image Levels can be used to lighten or darken or even alter the color of the selected area
1 Select the area that needs lsquofixingrsquo2 Feather the selection so that the edge is softened between the selec-tion and the rest of the image3 Make the adjustment
The burndodge tool can also be useful for lightening or darkening a area of a photoThe Burn Tool makes an area darker
Photoshop
Tips amp Tricks
updated May 201718
Herersquos a photo of a protest from the Democratic National Convention in Philadelphia in July 2016 Overall the color looks good and there is a wide range of tone But I want to make sure the viewer is drawn to the protesterrsquos expression I wish her face were a little lighter
If I lighten the whole photo her face looks better but the rest of the photo looks washed out
Photoshop
Tips amp Tricks
updated May 201719
Here are three ways to lighten her face without lightening the rest of the image
A Select and LightenUse the Lasso or Quick Selection tools to select her face and armFeather the selection and then use Levels to lighten the selection
If you look closely you can see the outline of the selection of her arm and face I then used Levels to lighten just those elements The rest of the photo is the same as the original on the previous page
B Burn and DodgeUse the Dodge tool to lighten her face and arm by painting over it You can adjust the size and intensity of the tool
I find a good starting point is to set the brush to lsquomidtonesrsquo and about 30 You can keep lsquopaintingrsquo to lighten more if you need to
Photoshop
Tips amp Tricks
updated May 201720
Note that her skin looks little redderwarmer You can get a shift of color when you use the dodge tool
C History BrushThis method can seem a little more complicated but often gives the most natural results
The history brush allows you to lsquopaintrsquo in the previous state So you can lighten the entire image for example and then revert part of the image back to where it started
To use the History brush you also need to open the History Win-dow Pane
I find this method allows for the most natural adjustments in many cases And with practice is very fast
bullSometimes colors shift when you lighten them especially with the dodge tool
The HueSaturation tool can bring those colors back into line You want to make sure a personrsquos skin tone remains consis-tent
bull
Photoshop
Tips amp Tricks
updated May 201721
In this example I opened the image and then used Levels to lighten the entire photograph
I click the check box next to the origi-nal image above the change I made in Levels
Then each time I use the History brush I am returning that area of the photo to the original state
You are less likely to get a color shift this way and less likely to see the edge between an area you changed and the rest of the photograph
Photoshop
Tips amp Tricks
updated May 201722
IF yoursquove done a good job shooting your photo - set a proper expo-sure and white balance ndash you should be done toning your photo at this point
If it takes more than 5-10 minutes to adjust your photo yoursquore prob-ably trying to fix something that went wrong And yoursquoll probably find itrsquos is difficult or impossible to make it perfect
It is VERY important that you donrsquot rely on Photoshop to fix mistakes in the field
You may sometimes need to use other tools especially if the scene was lit by more than one type of light or under difficult conditions
7 Selective Color amp HueSaturationBoth tools can by used to correct tricky lighting and fix the color of images If the scene is lit by more than kind of light ndash window light mixed with overhead lighting or sunlight and shadow for example the color of part of the scene may be wrong
Selective Color ImagegtAdjustmentsgtSelective Color allows you to alter the color of one specific color So if the yellow channel has too much red in it you can remove the red without changing other colors that might have red in their mix
Hue Saturation ImagegtAdjustmentsgtHueSaturation allows you to adjust the hue saturation and brightness of the image or individual color channels Another useful tool in adjusting of fixing the color mix of a photo
Watch a 430 video on using Selective Color and HueSaturation
Photoshop
Tips amp Tricks
updated May 201723
8 CaptionsIt is vital to caption your images Captions make the image searchable on your computer and on the Internet
Captions give the photo context and make them more valuable
Photos are an historical record and the caption is part of that record
Captions explain and give meaning to your photographs
The caption information is part of what we call metadata It is informa-tion about information
You can apply the caption information in Photoshop or in Lightroom or Photo Mechanic ndash Depending on what software you have available
Once saved it is digitally stored with the photo ndash part of the image file
In Photoshop go FilegtFile info
The Description field is where you type your complete caption infor-mation
You can add information to the other fields includ-ing your photo credit under the Origin tab
Watch a 416 video on adding a caption to a photo
Photoshop
Tips amp Tricks
updated May 201724
9 Save your Image FilesPart of your workflow needs to be a way to stay organized If you canrsquot find your photos they have no value They are certainly worthless as part of an assignment but even worse in the real world where if you canrsquot find a photo or lose a file yoursquoll be in deep doo doo (a technical term)
YOU SHOULD HAVE BEEN WORKING ON A COPY
If you follow good workflow you still have an original untouched version of your file This version the toned and captioned version should be saved with a unique name that tells you something about the photo
File names should have no spaces and no special characters
Use only letters numbers hyphen and dash
My system
date_name_slug The date the photo was takenYour name (so a teacher or client or boss immediately knows who took the photo)A slug that tells what assignment the photo goes with
20160901_YourName_Circus_01
This photo for example was taken on September 1 2016 by you and is the first photo from the Circus assignment
bullI use the year at the beginning of my file name because I think sorting by year makes sense for me It puts all the 2016 files to-gether
bull
Photoshop
Tips amp Tricks
updated May 201725
10 Reformat your cardIf possible donrsquot do this until the end Your card is your backup incase everything goes wrong )
Format the card in the camera
Use the camera to format the card never delete files off a card from the computer You want to use the format function of the device to properly erase and ready the card for next time
DONrsquoT reformat until you are SURE you have properly saved your images
There are many many many other features and tools in Photoshop
There are some other ways to adjust photos that can be useful includ-ing
ShadowHighlights ndash you can open up shadows or add detail back into highlights (within limits)
BrightnessContrast ndash another way to control the brightness and contrast of a photo
Curves ndash Similar to Levels but instead of three arrows you can adjust the image anywhere along the curve
You can explore these tools as you gain familiarity with the program
bullIdeally you should have a card dedicat-ed to one device
It is better not to use a card in more than one camera
And it is a terrible idea to store fold-ers of other files on your card
Each device writes a lsquotable of contentsrsquo on the card to keep files organized Multiple devices means mul-tiple tables increasing the odds that your card will fail
bull
Photoshop
Tips amp Tricks
updated May 201726
SHOOTING RAW
Until now I have assumed you are shooting jpegs This is the almost universal image file format that is found on almost every device and website
JPEGS are small image files that can be viewed online opened in most applications They offer compatibility and small file size
But think about that ndash how can they be so small Why are they so universal
JPEGS are small because the files are compressed Information is dis-carded to reduce the file size Enough is kept so the image still looks good
When you take a photo with your camera a lot of information is applied to the file ndash the white balance you set perhaps contrast or sharpness
All of this is stored in the JPEG file and used to display the image
What if it wasnrsquot
What if you could take the lsquorawrsquo unprocessed digital information and manipulate it after the fact in Photoshop
Well you can Each camera manufacturer has itrsquos own formula for what we call a Raw file And Photoshop can open almost all of them
bullWhen a brand new camera is introduced it may take Photo-shop a few weeks or months to introduce an update for pro-cessing the Raw file
bull
Photoshop
Tips amp Tricks
updated May 201727
Nikon calls its Raw files NEFS Canon has CR2 files etc
The advantage of Raws is that you start in Photoshop with a lot more information and data Nothing is compressed no settings locked into the file
The disadvantage is that the files are much larger ndash your camerarsquos card will hold fewer imagesNot all software can edit or see a Raw file Yoursquoll need to use Photo-shop or some other image editor to convert the files to a universal format like a jpeg
IF you decide to shoot in the RAW format the image will open in a different window inside Photoshop
Note the controls You can set a white by using the eyedropper and clicking on something neutral You can fine tune your settings with the adjustments on the right ndash changing exposure contrast color etc
Photoshop
Tips amp Tricks
updated May 201728
You can make local adjustments by using the Adjustment brush
To use the brush lsquopaintrsquo over the area you want to adjust You can change the settings before or after using the brush You canrsquot select an area as you would with the Lasso or Quick Selection tools but you can still make many adjustments
When yoursquore done open the image make any final corrections add a caption and save it as a jpeg or other format The original Raw file remains as a backup
Watch a 610 video on using Camera Raw
Photoshop
Tips amp Tricks
updated May 201729
Photoshop is an extremely powerful application This tutorial only scratches the surface of what the app can do
The goal of this document is to introduce you to the program and give you the skills to adjust a photographrsquos basic tone and color These basic adjustments compensate for the limits of photography
A photograph canrsquot (yet) see as well as the human eye It canrsquot see the range of brightness or detail
And both the camera and the camera operator (you) are imperfect Exposures may not be perfect color and contrast may not look as wersquod hoped or as the scene actually appeared
These basic Photoshop skills can help make a photo look better online or in print
For those of you looking to dig deeper into Photoshoprsquos magical abili-ties to transform images there are numerous online resources Lyndacom (free to Penn State students) offers tutorials You can find many free resources on Youtubecom and Adobecom offers tutorials as well
And you can always contact me if you have questions
Will Yurmanwillyurmangmailcom
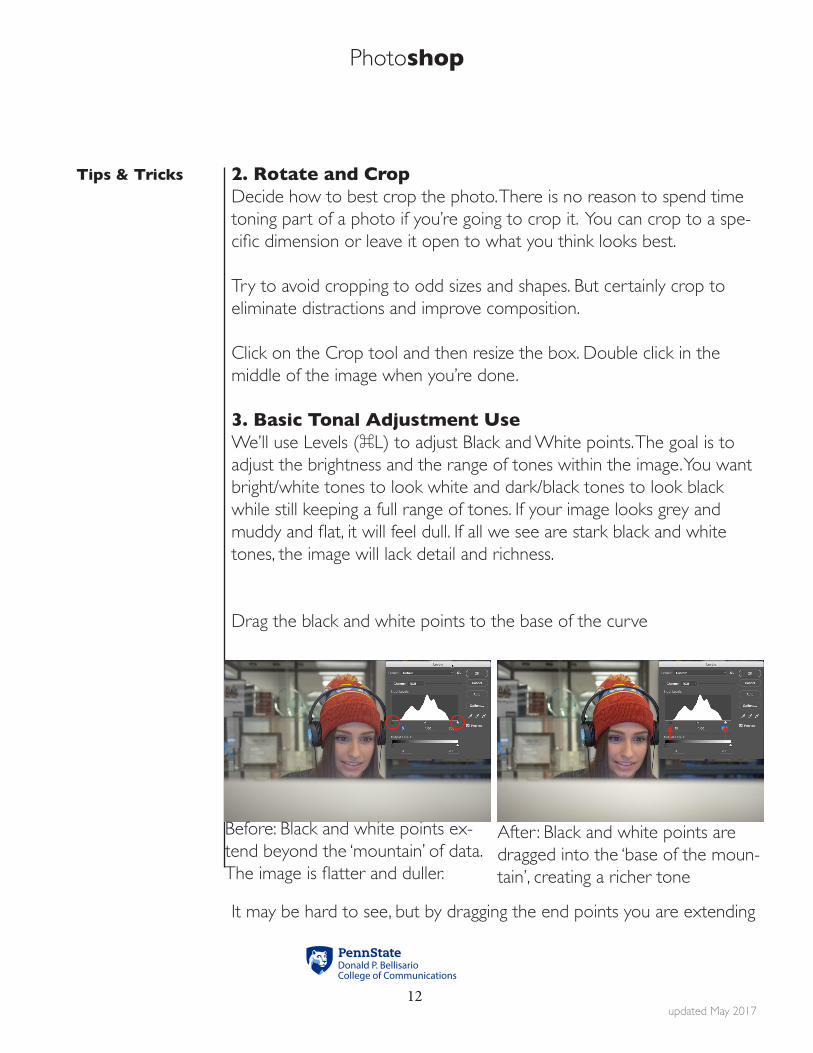
Photoshop
Tips amp Tricks
updated May 201712
2 Rotate and CropDecide how to best crop the photo There is no reason to spend time toning part of a photo if yoursquore going to crop it You can crop to a spe-cific dimension or leave it open to what you think looks best
Try to avoid cropping to odd sizes and shapes But certainly crop to eliminate distractions and improve composition
Click on the Crop tool and then resize the box Double click in the middle of the image when yoursquore done
3 Basic Tonal Adjustment Use Wersquoll use Levels (L) to adjust Black and White points The goal is to adjust the brightness and the range of tones within the image You want brightwhite tones to look white and darkblack tones to look black while still keeping a full range of tones If your image looks grey and muddy and flat it will feel dull If all we see are stark black and white tones the image will lack detail and richness
Drag the black and white points to the base of the curve
It may be hard to see but by dragging the end points you are extending
Before Black and white points ex-tend beyond the lsquomountainrsquo of data The image is flatter and duller
After Black and white points are dragged into the lsquobase of the moun-tainrsquo creating a richer tone
Photoshop
Tips amp Tricks
updated May 201713
the range of tone of the image You are resetting the range
Be careful if you slide into the lsquomountainrsquo you will start to lose informa-tion Sometimes that wonrsquot be a problem - the information isnrsquot im-portant
But if yoursquore not careful yoursquoll lose detail in highlights andor shadow areas
Watch a 451 minute video on setting tonal range using Levels
4 Color CastSometimes the camera wonrsquot capture the color accurately
The photo may be too yellow or blue or green or whatever This hap-pens most commonly in unusual lighting situations ndash a mix of kinds of light or unusual fluorescent lighting etc Our cameras if set properly do a very good job outdoors in natural light but sometimes struggle with artificial lighting
IF the color cast is extreme we probably canrsquot do a very good of fixing the problem So it is important to make sure yoursquore capturing your im-age with the proper settings BUT if the color is off by a little bit there is a nice technique for removing that color cast
The theory is simple If we can make something in the photo that is supposed to be whitegrey look whitegrey then all the other colors will fall into place If the whites are too yellow everything is probably too yellow
By lsquosettingrsquo a white we reset the baseline and hopefully everything falls into place
bullIf you hold the option key down while drag-ging either the black or white arrow yoursquoll get a display that shows you where yoursquore losing detail The screen will turn black and areas that have lost all their de-tail will be highlighted
bull
bullI will talk about lsquoset-ting a whitersquo but make sure you use an area in the image that has detail A pure white like the sun wonrsquot work ndash it has no information Light greys are the best
bull
Photoshop
Tips amp Tricks
updated May 201714
bullIf you set a white and
donrsquot like the results use the History Tab to undo and start over It usually
means you either moved the mouse accidentally or
hadnrsquot picked a neutral area to work on
bull
OF all the steps this is the most complicated to follow But once yoursquove done it a few times it becomes pretty simple to master
There are six steps to this technique1 Open Levels2 Double click on the white eye dropper3 Click on an light neutral area ndash light white to medium grey AFTER CLICKING DONrsquoT MOVE THE MOUSE LEAVE THE CURSOR WHERE YOU CLICKED4 Use tab key to scroll through the color picker and set the A amp B channels to zero5 Click return to close the color picker6 Click the mouse without moving it (if yoursquove moved the mouse at any point you need to start over) This should lsquoset the whitersquo
The levels are open wersquove clicked on the manrsquos white shirt and are ready to zero out the AampB channels
Photoshop
Tips amp Tricks
updated May 201715
Notice the mouse hasnrsquot movedTHIS IS KEYAfter clicking on his white shirt I use the keyboardNOT THE MOUSETo set the AampB channels to zeroThen click lsquoreturnrsquo And FINALLY click the mouse on the samespot of his shirt And voila
Watch a 315 video on removing color cast using Levels
5 MidtonesTo this point wersquove corrected the color and over tonal range Some-times we may need to adjust the midtones those middle grays that may be too bright or too dark Correcting the color will sometimes shift these so make sure to do this step after color correcting
Photoshop
Tips amp Tricks
updated May 201716
We use the midtone control the gray middle arrow in Levels to lsquoopen up the shadowsrsquo and let in some detail while keeping the range of
tones we set with the black and white points
Watch a 122 video on adjusting the midtones of an image
6 Local AdjustmentsTo this point wersquove made global changes to the photo ndash all or noth-ing changes Now is the time to look and see if a specific area needs adjusting We might lighten a face or darken the foreground or back-ground of an image If yoursquore a journalist you want to take GREAT CARE in making these adjustments It is easy to step beyond the ethi-cal standards of photojournalism
In general we donrsquot want to remove an element or change it so dra-matically that wersquove altered the reality of the scene A photojournalist should never eliminate a pole that is sticking out of someonersquos head just because it is a distraction or add a cloud to a blue sky Neither should they so darken something that we canrsquot recognize that it was there
Never make a change that would mislead or misrepresent what actually occurred
bullThe National Press Photographers As-sociation (NPPA) has a code of ethics that speaks to the manip-ulation of imageshttpsnppaorgcode_of_ethics
bull
Photoshop
Tips amp Tricks
updated May 201717
For other kinds of photographers working in advertising or as an artist or wedding photographer for example you will need to use your judgement and
the judgement of your employer or client
This tutorial will only cover very basic adjustments Photoshop is a very powerful program You can change the color shape perspective of ele-ments You can remove blemishes and alter the appearance of light And on and on Those skills are beyond the scope of this tutorial
For the basic toning of an image we will talk about two things1 Lighteningdarkening2 Adjusting color
IF you want to adjust a part of a photograph you need to select the area you want to adjust
The Lasso and Quick Selection tools explained earlier in the tutorial are easy ways to isolate someonersquos face or the sky or some other area of the photograph
Once selected you can apply the same tools wersquove used to adjust the entire image Levels can be used to lighten or darken or even alter the color of the selected area
1 Select the area that needs lsquofixingrsquo2 Feather the selection so that the edge is softened between the selec-tion and the rest of the image3 Make the adjustment
The burndodge tool can also be useful for lightening or darkening a area of a photoThe Burn Tool makes an area darker
Photoshop
Tips amp Tricks
updated May 201718
Herersquos a photo of a protest from the Democratic National Convention in Philadelphia in July 2016 Overall the color looks good and there is a wide range of tone But I want to make sure the viewer is drawn to the protesterrsquos expression I wish her face were a little lighter
If I lighten the whole photo her face looks better but the rest of the photo looks washed out
Photoshop
Tips amp Tricks
updated May 201719
Here are three ways to lighten her face without lightening the rest of the image
A Select and LightenUse the Lasso or Quick Selection tools to select her face and armFeather the selection and then use Levels to lighten the selection
If you look closely you can see the outline of the selection of her arm and face I then used Levels to lighten just those elements The rest of the photo is the same as the original on the previous page
B Burn and DodgeUse the Dodge tool to lighten her face and arm by painting over it You can adjust the size and intensity of the tool
I find a good starting point is to set the brush to lsquomidtonesrsquo and about 30 You can keep lsquopaintingrsquo to lighten more if you need to
Photoshop
Tips amp Tricks
updated May 201720
Note that her skin looks little redderwarmer You can get a shift of color when you use the dodge tool
C History BrushThis method can seem a little more complicated but often gives the most natural results
The history brush allows you to lsquopaintrsquo in the previous state So you can lighten the entire image for example and then revert part of the image back to where it started
To use the History brush you also need to open the History Win-dow Pane
I find this method allows for the most natural adjustments in many cases And with practice is very fast
bullSometimes colors shift when you lighten them especially with the dodge tool
The HueSaturation tool can bring those colors back into line You want to make sure a personrsquos skin tone remains consis-tent
bull
Photoshop
Tips amp Tricks
updated May 201721
In this example I opened the image and then used Levels to lighten the entire photograph
I click the check box next to the origi-nal image above the change I made in Levels
Then each time I use the History brush I am returning that area of the photo to the original state
You are less likely to get a color shift this way and less likely to see the edge between an area you changed and the rest of the photograph
Photoshop
Tips amp Tricks
updated May 201722
IF yoursquove done a good job shooting your photo - set a proper expo-sure and white balance ndash you should be done toning your photo at this point
If it takes more than 5-10 minutes to adjust your photo yoursquore prob-ably trying to fix something that went wrong And yoursquoll probably find itrsquos is difficult or impossible to make it perfect
It is VERY important that you donrsquot rely on Photoshop to fix mistakes in the field
You may sometimes need to use other tools especially if the scene was lit by more than one type of light or under difficult conditions
7 Selective Color amp HueSaturationBoth tools can by used to correct tricky lighting and fix the color of images If the scene is lit by more than kind of light ndash window light mixed with overhead lighting or sunlight and shadow for example the color of part of the scene may be wrong
Selective Color ImagegtAdjustmentsgtSelective Color allows you to alter the color of one specific color So if the yellow channel has too much red in it you can remove the red without changing other colors that might have red in their mix
Hue Saturation ImagegtAdjustmentsgtHueSaturation allows you to adjust the hue saturation and brightness of the image or individual color channels Another useful tool in adjusting of fixing the color mix of a photo
Watch a 430 video on using Selective Color and HueSaturation
Photoshop
Tips amp Tricks
updated May 201723
8 CaptionsIt is vital to caption your images Captions make the image searchable on your computer and on the Internet
Captions give the photo context and make them more valuable
Photos are an historical record and the caption is part of that record
Captions explain and give meaning to your photographs
The caption information is part of what we call metadata It is informa-tion about information
You can apply the caption information in Photoshop or in Lightroom or Photo Mechanic ndash Depending on what software you have available
Once saved it is digitally stored with the photo ndash part of the image file
In Photoshop go FilegtFile info
The Description field is where you type your complete caption infor-mation
You can add information to the other fields includ-ing your photo credit under the Origin tab
Watch a 416 video on adding a caption to a photo
Photoshop
Tips amp Tricks
updated May 201724
9 Save your Image FilesPart of your workflow needs to be a way to stay organized If you canrsquot find your photos they have no value They are certainly worthless as part of an assignment but even worse in the real world where if you canrsquot find a photo or lose a file yoursquoll be in deep doo doo (a technical term)
YOU SHOULD HAVE BEEN WORKING ON A COPY
If you follow good workflow you still have an original untouched version of your file This version the toned and captioned version should be saved with a unique name that tells you something about the photo
File names should have no spaces and no special characters
Use only letters numbers hyphen and dash
My system
date_name_slug The date the photo was takenYour name (so a teacher or client or boss immediately knows who took the photo)A slug that tells what assignment the photo goes with
20160901_YourName_Circus_01
This photo for example was taken on September 1 2016 by you and is the first photo from the Circus assignment
bullI use the year at the beginning of my file name because I think sorting by year makes sense for me It puts all the 2016 files to-gether
bull
Photoshop
Tips amp Tricks
updated May 201725
10 Reformat your cardIf possible donrsquot do this until the end Your card is your backup incase everything goes wrong )
Format the card in the camera
Use the camera to format the card never delete files off a card from the computer You want to use the format function of the device to properly erase and ready the card for next time
DONrsquoT reformat until you are SURE you have properly saved your images
There are many many many other features and tools in Photoshop
There are some other ways to adjust photos that can be useful includ-ing
ShadowHighlights ndash you can open up shadows or add detail back into highlights (within limits)
BrightnessContrast ndash another way to control the brightness and contrast of a photo
Curves ndash Similar to Levels but instead of three arrows you can adjust the image anywhere along the curve
You can explore these tools as you gain familiarity with the program
bullIdeally you should have a card dedicat-ed to one device
It is better not to use a card in more than one camera
And it is a terrible idea to store fold-ers of other files on your card
Each device writes a lsquotable of contentsrsquo on the card to keep files organized Multiple devices means mul-tiple tables increasing the odds that your card will fail
bull
Photoshop
Tips amp Tricks
updated May 201726
SHOOTING RAW
Until now I have assumed you are shooting jpegs This is the almost universal image file format that is found on almost every device and website
JPEGS are small image files that can be viewed online opened in most applications They offer compatibility and small file size
But think about that ndash how can they be so small Why are they so universal
JPEGS are small because the files are compressed Information is dis-carded to reduce the file size Enough is kept so the image still looks good
When you take a photo with your camera a lot of information is applied to the file ndash the white balance you set perhaps contrast or sharpness
All of this is stored in the JPEG file and used to display the image
What if it wasnrsquot
What if you could take the lsquorawrsquo unprocessed digital information and manipulate it after the fact in Photoshop
Well you can Each camera manufacturer has itrsquos own formula for what we call a Raw file And Photoshop can open almost all of them
bullWhen a brand new camera is introduced it may take Photo-shop a few weeks or months to introduce an update for pro-cessing the Raw file
bull
Photoshop
Tips amp Tricks
updated May 201727
Nikon calls its Raw files NEFS Canon has CR2 files etc
The advantage of Raws is that you start in Photoshop with a lot more information and data Nothing is compressed no settings locked into the file
The disadvantage is that the files are much larger ndash your camerarsquos card will hold fewer imagesNot all software can edit or see a Raw file Yoursquoll need to use Photo-shop or some other image editor to convert the files to a universal format like a jpeg
IF you decide to shoot in the RAW format the image will open in a different window inside Photoshop
Note the controls You can set a white by using the eyedropper and clicking on something neutral You can fine tune your settings with the adjustments on the right ndash changing exposure contrast color etc
Photoshop
Tips amp Tricks
updated May 201728
You can make local adjustments by using the Adjustment brush
To use the brush lsquopaintrsquo over the area you want to adjust You can change the settings before or after using the brush You canrsquot select an area as you would with the Lasso or Quick Selection tools but you can still make many adjustments
When yoursquore done open the image make any final corrections add a caption and save it as a jpeg or other format The original Raw file remains as a backup
Watch a 610 video on using Camera Raw
Photoshop
Tips amp Tricks
updated May 201729
Photoshop is an extremely powerful application This tutorial only scratches the surface of what the app can do
The goal of this document is to introduce you to the program and give you the skills to adjust a photographrsquos basic tone and color These basic adjustments compensate for the limits of photography
A photograph canrsquot (yet) see as well as the human eye It canrsquot see the range of brightness or detail
And both the camera and the camera operator (you) are imperfect Exposures may not be perfect color and contrast may not look as wersquod hoped or as the scene actually appeared
These basic Photoshop skills can help make a photo look better online or in print
For those of you looking to dig deeper into Photoshoprsquos magical abili-ties to transform images there are numerous online resources Lyndacom (free to Penn State students) offers tutorials You can find many free resources on Youtubecom and Adobecom offers tutorials as well
And you can always contact me if you have questions
Will Yurmanwillyurmangmailcom
Photoshop
Tips amp Tricks
updated May 201713
the range of tone of the image You are resetting the range
Be careful if you slide into the lsquomountainrsquo you will start to lose informa-tion Sometimes that wonrsquot be a problem - the information isnrsquot im-portant
But if yoursquore not careful yoursquoll lose detail in highlights andor shadow areas
Watch a 451 minute video on setting tonal range using Levels
4 Color CastSometimes the camera wonrsquot capture the color accurately
The photo may be too yellow or blue or green or whatever This hap-pens most commonly in unusual lighting situations ndash a mix of kinds of light or unusual fluorescent lighting etc Our cameras if set properly do a very good job outdoors in natural light but sometimes struggle with artificial lighting
IF the color cast is extreme we probably canrsquot do a very good of fixing the problem So it is important to make sure yoursquore capturing your im-age with the proper settings BUT if the color is off by a little bit there is a nice technique for removing that color cast
The theory is simple If we can make something in the photo that is supposed to be whitegrey look whitegrey then all the other colors will fall into place If the whites are too yellow everything is probably too yellow
By lsquosettingrsquo a white we reset the baseline and hopefully everything falls into place
bullIf you hold the option key down while drag-ging either the black or white arrow yoursquoll get a display that shows you where yoursquore losing detail The screen will turn black and areas that have lost all their de-tail will be highlighted
bull
bullI will talk about lsquoset-ting a whitersquo but make sure you use an area in the image that has detail A pure white like the sun wonrsquot work ndash it has no information Light greys are the best
bull
Photoshop
Tips amp Tricks
updated May 201714
bullIf you set a white and
donrsquot like the results use the History Tab to undo and start over It usually
means you either moved the mouse accidentally or
hadnrsquot picked a neutral area to work on
bull
OF all the steps this is the most complicated to follow But once yoursquove done it a few times it becomes pretty simple to master
There are six steps to this technique1 Open Levels2 Double click on the white eye dropper3 Click on an light neutral area ndash light white to medium grey AFTER CLICKING DONrsquoT MOVE THE MOUSE LEAVE THE CURSOR WHERE YOU CLICKED4 Use tab key to scroll through the color picker and set the A amp B channels to zero5 Click return to close the color picker6 Click the mouse without moving it (if yoursquove moved the mouse at any point you need to start over) This should lsquoset the whitersquo
The levels are open wersquove clicked on the manrsquos white shirt and are ready to zero out the AampB channels
Photoshop
Tips amp Tricks
updated May 201715
Notice the mouse hasnrsquot movedTHIS IS KEYAfter clicking on his white shirt I use the keyboardNOT THE MOUSETo set the AampB channels to zeroThen click lsquoreturnrsquo And FINALLY click the mouse on the samespot of his shirt And voila
Watch a 315 video on removing color cast using Levels
5 MidtonesTo this point wersquove corrected the color and over tonal range Some-times we may need to adjust the midtones those middle grays that may be too bright or too dark Correcting the color will sometimes shift these so make sure to do this step after color correcting
Photoshop
Tips amp Tricks
updated May 201716
We use the midtone control the gray middle arrow in Levels to lsquoopen up the shadowsrsquo and let in some detail while keeping the range of
tones we set with the black and white points
Watch a 122 video on adjusting the midtones of an image
6 Local AdjustmentsTo this point wersquove made global changes to the photo ndash all or noth-ing changes Now is the time to look and see if a specific area needs adjusting We might lighten a face or darken the foreground or back-ground of an image If yoursquore a journalist you want to take GREAT CARE in making these adjustments It is easy to step beyond the ethi-cal standards of photojournalism
In general we donrsquot want to remove an element or change it so dra-matically that wersquove altered the reality of the scene A photojournalist should never eliminate a pole that is sticking out of someonersquos head just because it is a distraction or add a cloud to a blue sky Neither should they so darken something that we canrsquot recognize that it was there
Never make a change that would mislead or misrepresent what actually occurred
bullThe National Press Photographers As-sociation (NPPA) has a code of ethics that speaks to the manip-ulation of imageshttpsnppaorgcode_of_ethics
bull
Photoshop
Tips amp Tricks
updated May 201717
For other kinds of photographers working in advertising or as an artist or wedding photographer for example you will need to use your judgement and
the judgement of your employer or client
This tutorial will only cover very basic adjustments Photoshop is a very powerful program You can change the color shape perspective of ele-ments You can remove blemishes and alter the appearance of light And on and on Those skills are beyond the scope of this tutorial
For the basic toning of an image we will talk about two things1 Lighteningdarkening2 Adjusting color
IF you want to adjust a part of a photograph you need to select the area you want to adjust
The Lasso and Quick Selection tools explained earlier in the tutorial are easy ways to isolate someonersquos face or the sky or some other area of the photograph
Once selected you can apply the same tools wersquove used to adjust the entire image Levels can be used to lighten or darken or even alter the color of the selected area
1 Select the area that needs lsquofixingrsquo2 Feather the selection so that the edge is softened between the selec-tion and the rest of the image3 Make the adjustment
The burndodge tool can also be useful for lightening or darkening a area of a photoThe Burn Tool makes an area darker
Photoshop
Tips amp Tricks
updated May 201718
Herersquos a photo of a protest from the Democratic National Convention in Philadelphia in July 2016 Overall the color looks good and there is a wide range of tone But I want to make sure the viewer is drawn to the protesterrsquos expression I wish her face were a little lighter
If I lighten the whole photo her face looks better but the rest of the photo looks washed out
Photoshop
Tips amp Tricks
updated May 201719
Here are three ways to lighten her face without lightening the rest of the image
A Select and LightenUse the Lasso or Quick Selection tools to select her face and armFeather the selection and then use Levels to lighten the selection
If you look closely you can see the outline of the selection of her arm and face I then used Levels to lighten just those elements The rest of the photo is the same as the original on the previous page
B Burn and DodgeUse the Dodge tool to lighten her face and arm by painting over it You can adjust the size and intensity of the tool
I find a good starting point is to set the brush to lsquomidtonesrsquo and about 30 You can keep lsquopaintingrsquo to lighten more if you need to
Photoshop
Tips amp Tricks
updated May 201720
Note that her skin looks little redderwarmer You can get a shift of color when you use the dodge tool
C History BrushThis method can seem a little more complicated but often gives the most natural results
The history brush allows you to lsquopaintrsquo in the previous state So you can lighten the entire image for example and then revert part of the image back to where it started
To use the History brush you also need to open the History Win-dow Pane
I find this method allows for the most natural adjustments in many cases And with practice is very fast
bullSometimes colors shift when you lighten them especially with the dodge tool
The HueSaturation tool can bring those colors back into line You want to make sure a personrsquos skin tone remains consis-tent
bull
Photoshop
Tips amp Tricks
updated May 201721
In this example I opened the image and then used Levels to lighten the entire photograph
I click the check box next to the origi-nal image above the change I made in Levels
Then each time I use the History brush I am returning that area of the photo to the original state
You are less likely to get a color shift this way and less likely to see the edge between an area you changed and the rest of the photograph
Photoshop
Tips amp Tricks
updated May 201722
IF yoursquove done a good job shooting your photo - set a proper expo-sure and white balance ndash you should be done toning your photo at this point
If it takes more than 5-10 minutes to adjust your photo yoursquore prob-ably trying to fix something that went wrong And yoursquoll probably find itrsquos is difficult or impossible to make it perfect
It is VERY important that you donrsquot rely on Photoshop to fix mistakes in the field
You may sometimes need to use other tools especially if the scene was lit by more than one type of light or under difficult conditions
7 Selective Color amp HueSaturationBoth tools can by used to correct tricky lighting and fix the color of images If the scene is lit by more than kind of light ndash window light mixed with overhead lighting or sunlight and shadow for example the color of part of the scene may be wrong
Selective Color ImagegtAdjustmentsgtSelective Color allows you to alter the color of one specific color So if the yellow channel has too much red in it you can remove the red without changing other colors that might have red in their mix
Hue Saturation ImagegtAdjustmentsgtHueSaturation allows you to adjust the hue saturation and brightness of the image or individual color channels Another useful tool in adjusting of fixing the color mix of a photo
Watch a 430 video on using Selective Color and HueSaturation
Photoshop
Tips amp Tricks
updated May 201723
8 CaptionsIt is vital to caption your images Captions make the image searchable on your computer and on the Internet
Captions give the photo context and make them more valuable
Photos are an historical record and the caption is part of that record
Captions explain and give meaning to your photographs
The caption information is part of what we call metadata It is informa-tion about information
You can apply the caption information in Photoshop or in Lightroom or Photo Mechanic ndash Depending on what software you have available
Once saved it is digitally stored with the photo ndash part of the image file
In Photoshop go FilegtFile info
The Description field is where you type your complete caption infor-mation
You can add information to the other fields includ-ing your photo credit under the Origin tab
Watch a 416 video on adding a caption to a photo
Photoshop
Tips amp Tricks
updated May 201724
9 Save your Image FilesPart of your workflow needs to be a way to stay organized If you canrsquot find your photos they have no value They are certainly worthless as part of an assignment but even worse in the real world where if you canrsquot find a photo or lose a file yoursquoll be in deep doo doo (a technical term)
YOU SHOULD HAVE BEEN WORKING ON A COPY
If you follow good workflow you still have an original untouched version of your file This version the toned and captioned version should be saved with a unique name that tells you something about the photo
File names should have no spaces and no special characters
Use only letters numbers hyphen and dash
My system
date_name_slug The date the photo was takenYour name (so a teacher or client or boss immediately knows who took the photo)A slug that tells what assignment the photo goes with
20160901_YourName_Circus_01
This photo for example was taken on September 1 2016 by you and is the first photo from the Circus assignment
bullI use the year at the beginning of my file name because I think sorting by year makes sense for me It puts all the 2016 files to-gether
bull
Photoshop
Tips amp Tricks
updated May 201725
10 Reformat your cardIf possible donrsquot do this until the end Your card is your backup incase everything goes wrong )
Format the card in the camera
Use the camera to format the card never delete files off a card from the computer You want to use the format function of the device to properly erase and ready the card for next time
DONrsquoT reformat until you are SURE you have properly saved your images
There are many many many other features and tools in Photoshop
There are some other ways to adjust photos that can be useful includ-ing
ShadowHighlights ndash you can open up shadows or add detail back into highlights (within limits)
BrightnessContrast ndash another way to control the brightness and contrast of a photo
Curves ndash Similar to Levels but instead of three arrows you can adjust the image anywhere along the curve
You can explore these tools as you gain familiarity with the program
bullIdeally you should have a card dedicat-ed to one device
It is better not to use a card in more than one camera
And it is a terrible idea to store fold-ers of other files on your card
Each device writes a lsquotable of contentsrsquo on the card to keep files organized Multiple devices means mul-tiple tables increasing the odds that your card will fail
bull
Photoshop
Tips amp Tricks
updated May 201726
SHOOTING RAW
Until now I have assumed you are shooting jpegs This is the almost universal image file format that is found on almost every device and website
JPEGS are small image files that can be viewed online opened in most applications They offer compatibility and small file size
But think about that ndash how can they be so small Why are they so universal
JPEGS are small because the files are compressed Information is dis-carded to reduce the file size Enough is kept so the image still looks good
When you take a photo with your camera a lot of information is applied to the file ndash the white balance you set perhaps contrast or sharpness
All of this is stored in the JPEG file and used to display the image
What if it wasnrsquot
What if you could take the lsquorawrsquo unprocessed digital information and manipulate it after the fact in Photoshop
Well you can Each camera manufacturer has itrsquos own formula for what we call a Raw file And Photoshop can open almost all of them
bullWhen a brand new camera is introduced it may take Photo-shop a few weeks or months to introduce an update for pro-cessing the Raw file
bull
Photoshop
Tips amp Tricks
updated May 201727
Nikon calls its Raw files NEFS Canon has CR2 files etc
The advantage of Raws is that you start in Photoshop with a lot more information and data Nothing is compressed no settings locked into the file
The disadvantage is that the files are much larger ndash your camerarsquos card will hold fewer imagesNot all software can edit or see a Raw file Yoursquoll need to use Photo-shop or some other image editor to convert the files to a universal format like a jpeg
IF you decide to shoot in the RAW format the image will open in a different window inside Photoshop
Note the controls You can set a white by using the eyedropper and clicking on something neutral You can fine tune your settings with the adjustments on the right ndash changing exposure contrast color etc
Photoshop
Tips amp Tricks
updated May 201728
You can make local adjustments by using the Adjustment brush
To use the brush lsquopaintrsquo over the area you want to adjust You can change the settings before or after using the brush You canrsquot select an area as you would with the Lasso or Quick Selection tools but you can still make many adjustments
When yoursquore done open the image make any final corrections add a caption and save it as a jpeg or other format The original Raw file remains as a backup
Watch a 610 video on using Camera Raw
Photoshop
Tips amp Tricks
updated May 201729
Photoshop is an extremely powerful application This tutorial only scratches the surface of what the app can do
The goal of this document is to introduce you to the program and give you the skills to adjust a photographrsquos basic tone and color These basic adjustments compensate for the limits of photography
A photograph canrsquot (yet) see as well as the human eye It canrsquot see the range of brightness or detail
And both the camera and the camera operator (you) are imperfect Exposures may not be perfect color and contrast may not look as wersquod hoped or as the scene actually appeared
These basic Photoshop skills can help make a photo look better online or in print
For those of you looking to dig deeper into Photoshoprsquos magical abili-ties to transform images there are numerous online resources Lyndacom (free to Penn State students) offers tutorials You can find many free resources on Youtubecom and Adobecom offers tutorials as well
And you can always contact me if you have questions
Will Yurmanwillyurmangmailcom
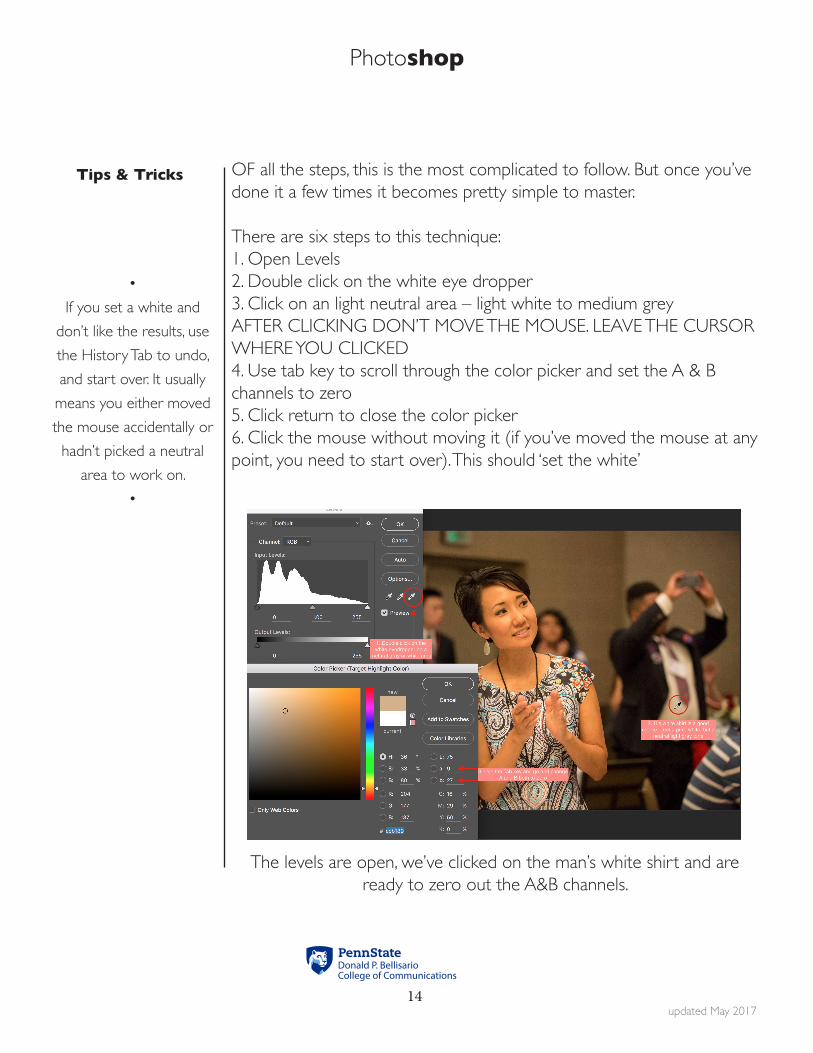
Photoshop
Tips amp Tricks
updated May 201714
bullIf you set a white and
donrsquot like the results use the History Tab to undo and start over It usually
means you either moved the mouse accidentally or
hadnrsquot picked a neutral area to work on
bull
OF all the steps this is the most complicated to follow But once yoursquove done it a few times it becomes pretty simple to master
There are six steps to this technique1 Open Levels2 Double click on the white eye dropper3 Click on an light neutral area ndash light white to medium grey AFTER CLICKING DONrsquoT MOVE THE MOUSE LEAVE THE CURSOR WHERE YOU CLICKED4 Use tab key to scroll through the color picker and set the A amp B channels to zero5 Click return to close the color picker6 Click the mouse without moving it (if yoursquove moved the mouse at any point you need to start over) This should lsquoset the whitersquo
The levels are open wersquove clicked on the manrsquos white shirt and are ready to zero out the AampB channels
Photoshop
Tips amp Tricks
updated May 201715
Notice the mouse hasnrsquot movedTHIS IS KEYAfter clicking on his white shirt I use the keyboardNOT THE MOUSETo set the AampB channels to zeroThen click lsquoreturnrsquo And FINALLY click the mouse on the samespot of his shirt And voila
Watch a 315 video on removing color cast using Levels
5 MidtonesTo this point wersquove corrected the color and over tonal range Some-times we may need to adjust the midtones those middle grays that may be too bright or too dark Correcting the color will sometimes shift these so make sure to do this step after color correcting
Photoshop
Tips amp Tricks
updated May 201716
We use the midtone control the gray middle arrow in Levels to lsquoopen up the shadowsrsquo and let in some detail while keeping the range of
tones we set with the black and white points
Watch a 122 video on adjusting the midtones of an image
6 Local AdjustmentsTo this point wersquove made global changes to the photo ndash all or noth-ing changes Now is the time to look and see if a specific area needs adjusting We might lighten a face or darken the foreground or back-ground of an image If yoursquore a journalist you want to take GREAT CARE in making these adjustments It is easy to step beyond the ethi-cal standards of photojournalism
In general we donrsquot want to remove an element or change it so dra-matically that wersquove altered the reality of the scene A photojournalist should never eliminate a pole that is sticking out of someonersquos head just because it is a distraction or add a cloud to a blue sky Neither should they so darken something that we canrsquot recognize that it was there
Never make a change that would mislead or misrepresent what actually occurred
bullThe National Press Photographers As-sociation (NPPA) has a code of ethics that speaks to the manip-ulation of imageshttpsnppaorgcode_of_ethics
bull
Photoshop
Tips amp Tricks
updated May 201717
For other kinds of photographers working in advertising or as an artist or wedding photographer for example you will need to use your judgement and
the judgement of your employer or client
This tutorial will only cover very basic adjustments Photoshop is a very powerful program You can change the color shape perspective of ele-ments You can remove blemishes and alter the appearance of light And on and on Those skills are beyond the scope of this tutorial
For the basic toning of an image we will talk about two things1 Lighteningdarkening2 Adjusting color
IF you want to adjust a part of a photograph you need to select the area you want to adjust
The Lasso and Quick Selection tools explained earlier in the tutorial are easy ways to isolate someonersquos face or the sky or some other area of the photograph
Once selected you can apply the same tools wersquove used to adjust the entire image Levels can be used to lighten or darken or even alter the color of the selected area
1 Select the area that needs lsquofixingrsquo2 Feather the selection so that the edge is softened between the selec-tion and the rest of the image3 Make the adjustment
The burndodge tool can also be useful for lightening or darkening a area of a photoThe Burn Tool makes an area darker
Photoshop
Tips amp Tricks
updated May 201718
Herersquos a photo of a protest from the Democratic National Convention in Philadelphia in July 2016 Overall the color looks good and there is a wide range of tone But I want to make sure the viewer is drawn to the protesterrsquos expression I wish her face were a little lighter
If I lighten the whole photo her face looks better but the rest of the photo looks washed out
Photoshop
Tips amp Tricks
updated May 201719
Here are three ways to lighten her face without lightening the rest of the image
A Select and LightenUse the Lasso or Quick Selection tools to select her face and armFeather the selection and then use Levels to lighten the selection
If you look closely you can see the outline of the selection of her arm and face I then used Levels to lighten just those elements The rest of the photo is the same as the original on the previous page
B Burn and DodgeUse the Dodge tool to lighten her face and arm by painting over it You can adjust the size and intensity of the tool
I find a good starting point is to set the brush to lsquomidtonesrsquo and about 30 You can keep lsquopaintingrsquo to lighten more if you need to
Photoshop
Tips amp Tricks
updated May 201720
Note that her skin looks little redderwarmer You can get a shift of color when you use the dodge tool
C History BrushThis method can seem a little more complicated but often gives the most natural results
The history brush allows you to lsquopaintrsquo in the previous state So you can lighten the entire image for example and then revert part of the image back to where it started
To use the History brush you also need to open the History Win-dow Pane
I find this method allows for the most natural adjustments in many cases And with practice is very fast
bullSometimes colors shift when you lighten them especially with the dodge tool
The HueSaturation tool can bring those colors back into line You want to make sure a personrsquos skin tone remains consis-tent
bull
Photoshop
Tips amp Tricks
updated May 201721
In this example I opened the image and then used Levels to lighten the entire photograph
I click the check box next to the origi-nal image above the change I made in Levels
Then each time I use the History brush I am returning that area of the photo to the original state
You are less likely to get a color shift this way and less likely to see the edge between an area you changed and the rest of the photograph
Photoshop
Tips amp Tricks
updated May 201722
IF yoursquove done a good job shooting your photo - set a proper expo-sure and white balance ndash you should be done toning your photo at this point
If it takes more than 5-10 minutes to adjust your photo yoursquore prob-ably trying to fix something that went wrong And yoursquoll probably find itrsquos is difficult or impossible to make it perfect
It is VERY important that you donrsquot rely on Photoshop to fix mistakes in the field
You may sometimes need to use other tools especially if the scene was lit by more than one type of light or under difficult conditions
7 Selective Color amp HueSaturationBoth tools can by used to correct tricky lighting and fix the color of images If the scene is lit by more than kind of light ndash window light mixed with overhead lighting or sunlight and shadow for example the color of part of the scene may be wrong
Selective Color ImagegtAdjustmentsgtSelective Color allows you to alter the color of one specific color So if the yellow channel has too much red in it you can remove the red without changing other colors that might have red in their mix
Hue Saturation ImagegtAdjustmentsgtHueSaturation allows you to adjust the hue saturation and brightness of the image or individual color channels Another useful tool in adjusting of fixing the color mix of a photo
Watch a 430 video on using Selective Color and HueSaturation
Photoshop
Tips amp Tricks
updated May 201723
8 CaptionsIt is vital to caption your images Captions make the image searchable on your computer and on the Internet
Captions give the photo context and make them more valuable
Photos are an historical record and the caption is part of that record
Captions explain and give meaning to your photographs
The caption information is part of what we call metadata It is informa-tion about information
You can apply the caption information in Photoshop or in Lightroom or Photo Mechanic ndash Depending on what software you have available
Once saved it is digitally stored with the photo ndash part of the image file
In Photoshop go FilegtFile info
The Description field is where you type your complete caption infor-mation
You can add information to the other fields includ-ing your photo credit under the Origin tab
Watch a 416 video on adding a caption to a photo
Photoshop
Tips amp Tricks
updated May 201724
9 Save your Image FilesPart of your workflow needs to be a way to stay organized If you canrsquot find your photos they have no value They are certainly worthless as part of an assignment but even worse in the real world where if you canrsquot find a photo or lose a file yoursquoll be in deep doo doo (a technical term)
YOU SHOULD HAVE BEEN WORKING ON A COPY
If you follow good workflow you still have an original untouched version of your file This version the toned and captioned version should be saved with a unique name that tells you something about the photo
File names should have no spaces and no special characters
Use only letters numbers hyphen and dash
My system
date_name_slug The date the photo was takenYour name (so a teacher or client or boss immediately knows who took the photo)A slug that tells what assignment the photo goes with
20160901_YourName_Circus_01
This photo for example was taken on September 1 2016 by you and is the first photo from the Circus assignment
bullI use the year at the beginning of my file name because I think sorting by year makes sense for me It puts all the 2016 files to-gether
bull
Photoshop
Tips amp Tricks
updated May 201725
10 Reformat your cardIf possible donrsquot do this until the end Your card is your backup incase everything goes wrong )
Format the card in the camera
Use the camera to format the card never delete files off a card from the computer You want to use the format function of the device to properly erase and ready the card for next time
DONrsquoT reformat until you are SURE you have properly saved your images
There are many many many other features and tools in Photoshop
There are some other ways to adjust photos that can be useful includ-ing
ShadowHighlights ndash you can open up shadows or add detail back into highlights (within limits)
BrightnessContrast ndash another way to control the brightness and contrast of a photo
Curves ndash Similar to Levels but instead of three arrows you can adjust the image anywhere along the curve
You can explore these tools as you gain familiarity with the program
bullIdeally you should have a card dedicat-ed to one device
It is better not to use a card in more than one camera
And it is a terrible idea to store fold-ers of other files on your card
Each device writes a lsquotable of contentsrsquo on the card to keep files organized Multiple devices means mul-tiple tables increasing the odds that your card will fail
bull
Photoshop
Tips amp Tricks
updated May 201726
SHOOTING RAW
Until now I have assumed you are shooting jpegs This is the almost universal image file format that is found on almost every device and website
JPEGS are small image files that can be viewed online opened in most applications They offer compatibility and small file size
But think about that ndash how can they be so small Why are they so universal
JPEGS are small because the files are compressed Information is dis-carded to reduce the file size Enough is kept so the image still looks good
When you take a photo with your camera a lot of information is applied to the file ndash the white balance you set perhaps contrast or sharpness
All of this is stored in the JPEG file and used to display the image
What if it wasnrsquot
What if you could take the lsquorawrsquo unprocessed digital information and manipulate it after the fact in Photoshop
Well you can Each camera manufacturer has itrsquos own formula for what we call a Raw file And Photoshop can open almost all of them
bullWhen a brand new camera is introduced it may take Photo-shop a few weeks or months to introduce an update for pro-cessing the Raw file
bull
Photoshop
Tips amp Tricks
updated May 201727
Nikon calls its Raw files NEFS Canon has CR2 files etc
The advantage of Raws is that you start in Photoshop with a lot more information and data Nothing is compressed no settings locked into the file
The disadvantage is that the files are much larger ndash your camerarsquos card will hold fewer imagesNot all software can edit or see a Raw file Yoursquoll need to use Photo-shop or some other image editor to convert the files to a universal format like a jpeg
IF you decide to shoot in the RAW format the image will open in a different window inside Photoshop
Note the controls You can set a white by using the eyedropper and clicking on something neutral You can fine tune your settings with the adjustments on the right ndash changing exposure contrast color etc
Photoshop
Tips amp Tricks
updated May 201728
You can make local adjustments by using the Adjustment brush
To use the brush lsquopaintrsquo over the area you want to adjust You can change the settings before or after using the brush You canrsquot select an area as you would with the Lasso or Quick Selection tools but you can still make many adjustments
When yoursquore done open the image make any final corrections add a caption and save it as a jpeg or other format The original Raw file remains as a backup
Watch a 610 video on using Camera Raw
Photoshop
Tips amp Tricks
updated May 201729
Photoshop is an extremely powerful application This tutorial only scratches the surface of what the app can do
The goal of this document is to introduce you to the program and give you the skills to adjust a photographrsquos basic tone and color These basic adjustments compensate for the limits of photography
A photograph canrsquot (yet) see as well as the human eye It canrsquot see the range of brightness or detail
And both the camera and the camera operator (you) are imperfect Exposures may not be perfect color and contrast may not look as wersquod hoped or as the scene actually appeared
These basic Photoshop skills can help make a photo look better online or in print
For those of you looking to dig deeper into Photoshoprsquos magical abili-ties to transform images there are numerous online resources Lyndacom (free to Penn State students) offers tutorials You can find many free resources on Youtubecom and Adobecom offers tutorials as well
And you can always contact me if you have questions
Will Yurmanwillyurmangmailcom
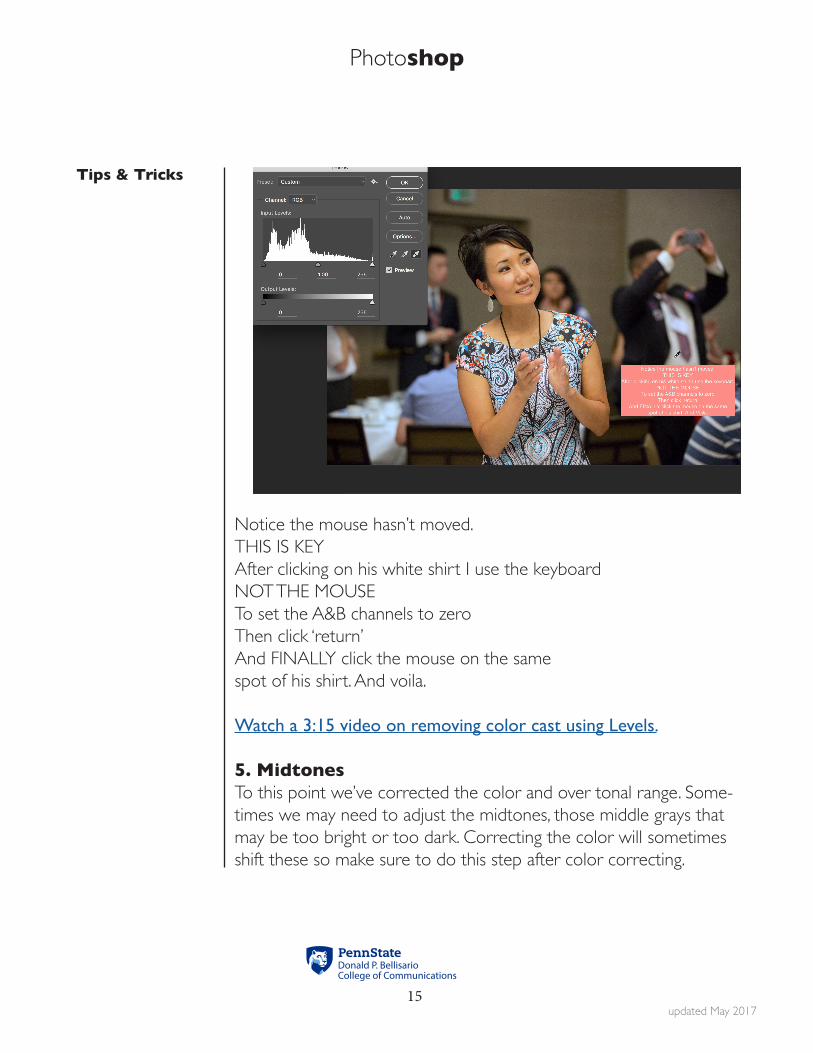
Photoshop
Tips amp Tricks
updated May 201715
Notice the mouse hasnrsquot movedTHIS IS KEYAfter clicking on his white shirt I use the keyboardNOT THE MOUSETo set the AampB channels to zeroThen click lsquoreturnrsquo And FINALLY click the mouse on the samespot of his shirt And voila
Watch a 315 video on removing color cast using Levels
5 MidtonesTo this point wersquove corrected the color and over tonal range Some-times we may need to adjust the midtones those middle grays that may be too bright or too dark Correcting the color will sometimes shift these so make sure to do this step after color correcting
Photoshop
Tips amp Tricks
updated May 201716
We use the midtone control the gray middle arrow in Levels to lsquoopen up the shadowsrsquo and let in some detail while keeping the range of
tones we set with the black and white points
Watch a 122 video on adjusting the midtones of an image
6 Local AdjustmentsTo this point wersquove made global changes to the photo ndash all or noth-ing changes Now is the time to look and see if a specific area needs adjusting We might lighten a face or darken the foreground or back-ground of an image If yoursquore a journalist you want to take GREAT CARE in making these adjustments It is easy to step beyond the ethi-cal standards of photojournalism
In general we donrsquot want to remove an element or change it so dra-matically that wersquove altered the reality of the scene A photojournalist should never eliminate a pole that is sticking out of someonersquos head just because it is a distraction or add a cloud to a blue sky Neither should they so darken something that we canrsquot recognize that it was there
Never make a change that would mislead or misrepresent what actually occurred
bullThe National Press Photographers As-sociation (NPPA) has a code of ethics that speaks to the manip-ulation of imageshttpsnppaorgcode_of_ethics
bull
Photoshop
Tips amp Tricks
updated May 201717
For other kinds of photographers working in advertising or as an artist or wedding photographer for example you will need to use your judgement and
the judgement of your employer or client
This tutorial will only cover very basic adjustments Photoshop is a very powerful program You can change the color shape perspective of ele-ments You can remove blemishes and alter the appearance of light And on and on Those skills are beyond the scope of this tutorial
For the basic toning of an image we will talk about two things1 Lighteningdarkening2 Adjusting color
IF you want to adjust a part of a photograph you need to select the area you want to adjust
The Lasso and Quick Selection tools explained earlier in the tutorial are easy ways to isolate someonersquos face or the sky or some other area of the photograph
Once selected you can apply the same tools wersquove used to adjust the entire image Levels can be used to lighten or darken or even alter the color of the selected area
1 Select the area that needs lsquofixingrsquo2 Feather the selection so that the edge is softened between the selec-tion and the rest of the image3 Make the adjustment
The burndodge tool can also be useful for lightening or darkening a area of a photoThe Burn Tool makes an area darker
Photoshop
Tips amp Tricks
updated May 201718
Herersquos a photo of a protest from the Democratic National Convention in Philadelphia in July 2016 Overall the color looks good and there is a wide range of tone But I want to make sure the viewer is drawn to the protesterrsquos expression I wish her face were a little lighter
If I lighten the whole photo her face looks better but the rest of the photo looks washed out
Photoshop
Tips amp Tricks
updated May 201719
Here are three ways to lighten her face without lightening the rest of the image
A Select and LightenUse the Lasso or Quick Selection tools to select her face and armFeather the selection and then use Levels to lighten the selection
If you look closely you can see the outline of the selection of her arm and face I then used Levels to lighten just those elements The rest of the photo is the same as the original on the previous page
B Burn and DodgeUse the Dodge tool to lighten her face and arm by painting over it You can adjust the size and intensity of the tool
I find a good starting point is to set the brush to lsquomidtonesrsquo and about 30 You can keep lsquopaintingrsquo to lighten more if you need to
Photoshop
Tips amp Tricks
updated May 201720
Note that her skin looks little redderwarmer You can get a shift of color when you use the dodge tool
C History BrushThis method can seem a little more complicated but often gives the most natural results
The history brush allows you to lsquopaintrsquo in the previous state So you can lighten the entire image for example and then revert part of the image back to where it started
To use the History brush you also need to open the History Win-dow Pane
I find this method allows for the most natural adjustments in many cases And with practice is very fast
bullSometimes colors shift when you lighten them especially with the dodge tool
The HueSaturation tool can bring those colors back into line You want to make sure a personrsquos skin tone remains consis-tent
bull
Photoshop
Tips amp Tricks
updated May 201721
In this example I opened the image and then used Levels to lighten the entire photograph
I click the check box next to the origi-nal image above the change I made in Levels
Then each time I use the History brush I am returning that area of the photo to the original state
You are less likely to get a color shift this way and less likely to see the edge between an area you changed and the rest of the photograph
Photoshop
Tips amp Tricks
updated May 201722
IF yoursquove done a good job shooting your photo - set a proper expo-sure and white balance ndash you should be done toning your photo at this point
If it takes more than 5-10 minutes to adjust your photo yoursquore prob-ably trying to fix something that went wrong And yoursquoll probably find itrsquos is difficult or impossible to make it perfect
It is VERY important that you donrsquot rely on Photoshop to fix mistakes in the field
You may sometimes need to use other tools especially if the scene was lit by more than one type of light or under difficult conditions
7 Selective Color amp HueSaturationBoth tools can by used to correct tricky lighting and fix the color of images If the scene is lit by more than kind of light ndash window light mixed with overhead lighting or sunlight and shadow for example the color of part of the scene may be wrong
Selective Color ImagegtAdjustmentsgtSelective Color allows you to alter the color of one specific color So if the yellow channel has too much red in it you can remove the red without changing other colors that might have red in their mix
Hue Saturation ImagegtAdjustmentsgtHueSaturation allows you to adjust the hue saturation and brightness of the image or individual color channels Another useful tool in adjusting of fixing the color mix of a photo
Watch a 430 video on using Selective Color and HueSaturation
Photoshop
Tips amp Tricks
updated May 201723
8 CaptionsIt is vital to caption your images Captions make the image searchable on your computer and on the Internet
Captions give the photo context and make them more valuable
Photos are an historical record and the caption is part of that record
Captions explain and give meaning to your photographs
The caption information is part of what we call metadata It is informa-tion about information
You can apply the caption information in Photoshop or in Lightroom or Photo Mechanic ndash Depending on what software you have available
Once saved it is digitally stored with the photo ndash part of the image file
In Photoshop go FilegtFile info
The Description field is where you type your complete caption infor-mation
You can add information to the other fields includ-ing your photo credit under the Origin tab
Watch a 416 video on adding a caption to a photo
Photoshop
Tips amp Tricks
updated May 201724
9 Save your Image FilesPart of your workflow needs to be a way to stay organized If you canrsquot find your photos they have no value They are certainly worthless as part of an assignment but even worse in the real world where if you canrsquot find a photo or lose a file yoursquoll be in deep doo doo (a technical term)
YOU SHOULD HAVE BEEN WORKING ON A COPY
If you follow good workflow you still have an original untouched version of your file This version the toned and captioned version should be saved with a unique name that tells you something about the photo
File names should have no spaces and no special characters
Use only letters numbers hyphen and dash
My system
date_name_slug The date the photo was takenYour name (so a teacher or client or boss immediately knows who took the photo)A slug that tells what assignment the photo goes with
20160901_YourName_Circus_01
This photo for example was taken on September 1 2016 by you and is the first photo from the Circus assignment
bullI use the year at the beginning of my file name because I think sorting by year makes sense for me It puts all the 2016 files to-gether
bull
Photoshop
Tips amp Tricks
updated May 201725
10 Reformat your cardIf possible donrsquot do this until the end Your card is your backup incase everything goes wrong )
Format the card in the camera
Use the camera to format the card never delete files off a card from the computer You want to use the format function of the device to properly erase and ready the card for next time
DONrsquoT reformat until you are SURE you have properly saved your images
There are many many many other features and tools in Photoshop
There are some other ways to adjust photos that can be useful includ-ing
ShadowHighlights ndash you can open up shadows or add detail back into highlights (within limits)
BrightnessContrast ndash another way to control the brightness and contrast of a photo
Curves ndash Similar to Levels but instead of three arrows you can adjust the image anywhere along the curve
You can explore these tools as you gain familiarity with the program
bullIdeally you should have a card dedicat-ed to one device
It is better not to use a card in more than one camera
And it is a terrible idea to store fold-ers of other files on your card
Each device writes a lsquotable of contentsrsquo on the card to keep files organized Multiple devices means mul-tiple tables increasing the odds that your card will fail
bull
Photoshop
Tips amp Tricks
updated May 201726
SHOOTING RAW
Until now I have assumed you are shooting jpegs This is the almost universal image file format that is found on almost every device and website
JPEGS are small image files that can be viewed online opened in most applications They offer compatibility and small file size
But think about that ndash how can they be so small Why are they so universal
JPEGS are small because the files are compressed Information is dis-carded to reduce the file size Enough is kept so the image still looks good
When you take a photo with your camera a lot of information is applied to the file ndash the white balance you set perhaps contrast or sharpness
All of this is stored in the JPEG file and used to display the image
What if it wasnrsquot
What if you could take the lsquorawrsquo unprocessed digital information and manipulate it after the fact in Photoshop
Well you can Each camera manufacturer has itrsquos own formula for what we call a Raw file And Photoshop can open almost all of them
bullWhen a brand new camera is introduced it may take Photo-shop a few weeks or months to introduce an update for pro-cessing the Raw file
bull
Photoshop
Tips amp Tricks
updated May 201727
Nikon calls its Raw files NEFS Canon has CR2 files etc
The advantage of Raws is that you start in Photoshop with a lot more information and data Nothing is compressed no settings locked into the file
The disadvantage is that the files are much larger ndash your camerarsquos card will hold fewer imagesNot all software can edit or see a Raw file Yoursquoll need to use Photo-shop or some other image editor to convert the files to a universal format like a jpeg
IF you decide to shoot in the RAW format the image will open in a different window inside Photoshop
Note the controls You can set a white by using the eyedropper and clicking on something neutral You can fine tune your settings with the adjustments on the right ndash changing exposure contrast color etc
Photoshop
Tips amp Tricks
updated May 201728
You can make local adjustments by using the Adjustment brush
To use the brush lsquopaintrsquo over the area you want to adjust You can change the settings before or after using the brush You canrsquot select an area as you would with the Lasso or Quick Selection tools but you can still make many adjustments
When yoursquore done open the image make any final corrections add a caption and save it as a jpeg or other format The original Raw file remains as a backup
Watch a 610 video on using Camera Raw
Photoshop
Tips amp Tricks
updated May 201729
Photoshop is an extremely powerful application This tutorial only scratches the surface of what the app can do
The goal of this document is to introduce you to the program and give you the skills to adjust a photographrsquos basic tone and color These basic adjustments compensate for the limits of photography
A photograph canrsquot (yet) see as well as the human eye It canrsquot see the range of brightness or detail
And both the camera and the camera operator (you) are imperfect Exposures may not be perfect color and contrast may not look as wersquod hoped or as the scene actually appeared
These basic Photoshop skills can help make a photo look better online or in print
For those of you looking to dig deeper into Photoshoprsquos magical abili-ties to transform images there are numerous online resources Lyndacom (free to Penn State students) offers tutorials You can find many free resources on Youtubecom and Adobecom offers tutorials as well
And you can always contact me if you have questions
Will Yurmanwillyurmangmailcom
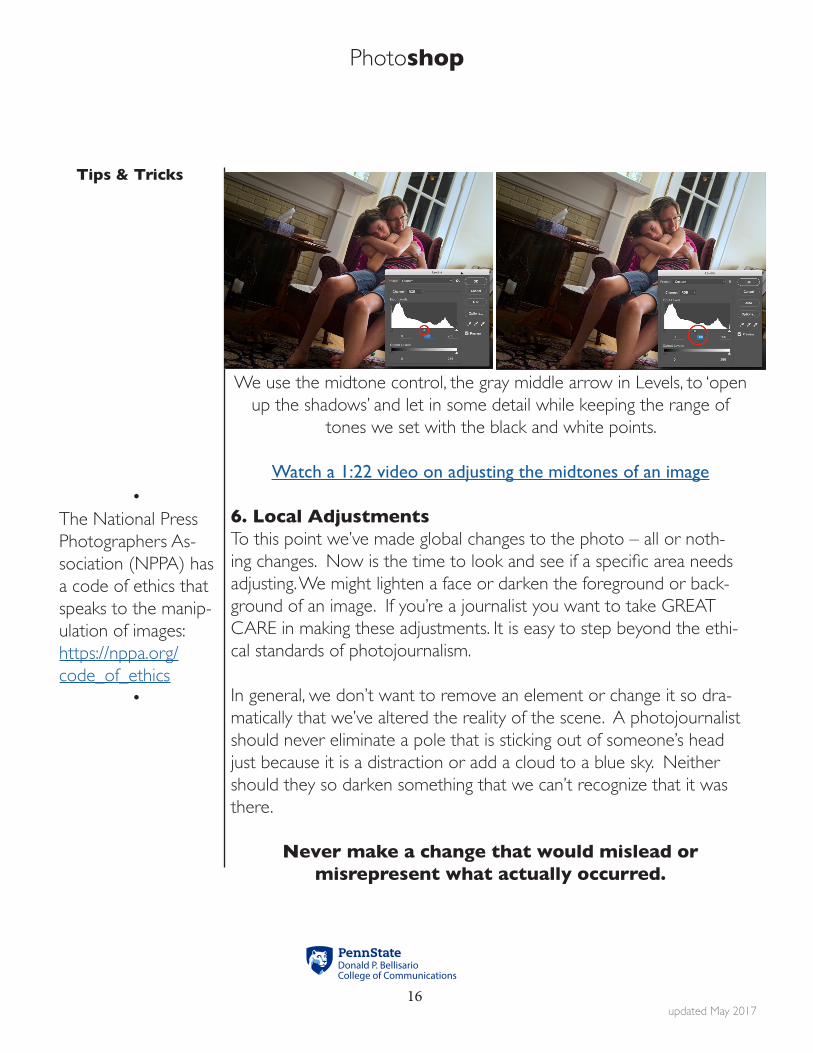
Photoshop
Tips amp Tricks
updated May 201716
We use the midtone control the gray middle arrow in Levels to lsquoopen up the shadowsrsquo and let in some detail while keeping the range of
tones we set with the black and white points
Watch a 122 video on adjusting the midtones of an image
6 Local AdjustmentsTo this point wersquove made global changes to the photo ndash all or noth-ing changes Now is the time to look and see if a specific area needs adjusting We might lighten a face or darken the foreground or back-ground of an image If yoursquore a journalist you want to take GREAT CARE in making these adjustments It is easy to step beyond the ethi-cal standards of photojournalism
In general we donrsquot want to remove an element or change it so dra-matically that wersquove altered the reality of the scene A photojournalist should never eliminate a pole that is sticking out of someonersquos head just because it is a distraction or add a cloud to a blue sky Neither should they so darken something that we canrsquot recognize that it was there
Never make a change that would mislead or misrepresent what actually occurred
bullThe National Press Photographers As-sociation (NPPA) has a code of ethics that speaks to the manip-ulation of imageshttpsnppaorgcode_of_ethics
bull
Photoshop
Tips amp Tricks
updated May 201717
For other kinds of photographers working in advertising or as an artist or wedding photographer for example you will need to use your judgement and
the judgement of your employer or client
This tutorial will only cover very basic adjustments Photoshop is a very powerful program You can change the color shape perspective of ele-ments You can remove blemishes and alter the appearance of light And on and on Those skills are beyond the scope of this tutorial
For the basic toning of an image we will talk about two things1 Lighteningdarkening2 Adjusting color
IF you want to adjust a part of a photograph you need to select the area you want to adjust
The Lasso and Quick Selection tools explained earlier in the tutorial are easy ways to isolate someonersquos face or the sky or some other area of the photograph
Once selected you can apply the same tools wersquove used to adjust the entire image Levels can be used to lighten or darken or even alter the color of the selected area
1 Select the area that needs lsquofixingrsquo2 Feather the selection so that the edge is softened between the selec-tion and the rest of the image3 Make the adjustment
The burndodge tool can also be useful for lightening or darkening a area of a photoThe Burn Tool makes an area darker
Photoshop
Tips amp Tricks
updated May 201718
Herersquos a photo of a protest from the Democratic National Convention in Philadelphia in July 2016 Overall the color looks good and there is a wide range of tone But I want to make sure the viewer is drawn to the protesterrsquos expression I wish her face were a little lighter
If I lighten the whole photo her face looks better but the rest of the photo looks washed out
Photoshop
Tips amp Tricks
updated May 201719
Here are three ways to lighten her face without lightening the rest of the image
A Select and LightenUse the Lasso or Quick Selection tools to select her face and armFeather the selection and then use Levels to lighten the selection
If you look closely you can see the outline of the selection of her arm and face I then used Levels to lighten just those elements The rest of the photo is the same as the original on the previous page
B Burn and DodgeUse the Dodge tool to lighten her face and arm by painting over it You can adjust the size and intensity of the tool
I find a good starting point is to set the brush to lsquomidtonesrsquo and about 30 You can keep lsquopaintingrsquo to lighten more if you need to
Photoshop
Tips amp Tricks
updated May 201720
Note that her skin looks little redderwarmer You can get a shift of color when you use the dodge tool
C History BrushThis method can seem a little more complicated but often gives the most natural results
The history brush allows you to lsquopaintrsquo in the previous state So you can lighten the entire image for example and then revert part of the image back to where it started
To use the History brush you also need to open the History Win-dow Pane
I find this method allows for the most natural adjustments in many cases And with practice is very fast
bullSometimes colors shift when you lighten them especially with the dodge tool
The HueSaturation tool can bring those colors back into line You want to make sure a personrsquos skin tone remains consis-tent
bull
Photoshop
Tips amp Tricks
updated May 201721
In this example I opened the image and then used Levels to lighten the entire photograph
I click the check box next to the origi-nal image above the change I made in Levels
Then each time I use the History brush I am returning that area of the photo to the original state
You are less likely to get a color shift this way and less likely to see the edge between an area you changed and the rest of the photograph
Photoshop
Tips amp Tricks
updated May 201722
IF yoursquove done a good job shooting your photo - set a proper expo-sure and white balance ndash you should be done toning your photo at this point
If it takes more than 5-10 minutes to adjust your photo yoursquore prob-ably trying to fix something that went wrong And yoursquoll probably find itrsquos is difficult or impossible to make it perfect
It is VERY important that you donrsquot rely on Photoshop to fix mistakes in the field
You may sometimes need to use other tools especially if the scene was lit by more than one type of light or under difficult conditions
7 Selective Color amp HueSaturationBoth tools can by used to correct tricky lighting and fix the color of images If the scene is lit by more than kind of light ndash window light mixed with overhead lighting or sunlight and shadow for example the color of part of the scene may be wrong
Selective Color ImagegtAdjustmentsgtSelective Color allows you to alter the color of one specific color So if the yellow channel has too much red in it you can remove the red without changing other colors that might have red in their mix
Hue Saturation ImagegtAdjustmentsgtHueSaturation allows you to adjust the hue saturation and brightness of the image or individual color channels Another useful tool in adjusting of fixing the color mix of a photo
Watch a 430 video on using Selective Color and HueSaturation
Photoshop
Tips amp Tricks
updated May 201723
8 CaptionsIt is vital to caption your images Captions make the image searchable on your computer and on the Internet
Captions give the photo context and make them more valuable
Photos are an historical record and the caption is part of that record
Captions explain and give meaning to your photographs
The caption information is part of what we call metadata It is informa-tion about information
You can apply the caption information in Photoshop or in Lightroom or Photo Mechanic ndash Depending on what software you have available
Once saved it is digitally stored with the photo ndash part of the image file
In Photoshop go FilegtFile info
The Description field is where you type your complete caption infor-mation
You can add information to the other fields includ-ing your photo credit under the Origin tab
Watch a 416 video on adding a caption to a photo
Photoshop
Tips amp Tricks
updated May 201724
9 Save your Image FilesPart of your workflow needs to be a way to stay organized If you canrsquot find your photos they have no value They are certainly worthless as part of an assignment but even worse in the real world where if you canrsquot find a photo or lose a file yoursquoll be in deep doo doo (a technical term)
YOU SHOULD HAVE BEEN WORKING ON A COPY
If you follow good workflow you still have an original untouched version of your file This version the toned and captioned version should be saved with a unique name that tells you something about the photo
File names should have no spaces and no special characters
Use only letters numbers hyphen and dash
My system
date_name_slug The date the photo was takenYour name (so a teacher or client or boss immediately knows who took the photo)A slug that tells what assignment the photo goes with
20160901_YourName_Circus_01
This photo for example was taken on September 1 2016 by you and is the first photo from the Circus assignment
bullI use the year at the beginning of my file name because I think sorting by year makes sense for me It puts all the 2016 files to-gether
bull
Photoshop
Tips amp Tricks
updated May 201725
10 Reformat your cardIf possible donrsquot do this until the end Your card is your backup incase everything goes wrong )
Format the card in the camera
Use the camera to format the card never delete files off a card from the computer You want to use the format function of the device to properly erase and ready the card for next time
DONrsquoT reformat until you are SURE you have properly saved your images
There are many many many other features and tools in Photoshop
There are some other ways to adjust photos that can be useful includ-ing
ShadowHighlights ndash you can open up shadows or add detail back into highlights (within limits)
BrightnessContrast ndash another way to control the brightness and contrast of a photo
Curves ndash Similar to Levels but instead of three arrows you can adjust the image anywhere along the curve
You can explore these tools as you gain familiarity with the program
bullIdeally you should have a card dedicat-ed to one device
It is better not to use a card in more than one camera
And it is a terrible idea to store fold-ers of other files on your card
Each device writes a lsquotable of contentsrsquo on the card to keep files organized Multiple devices means mul-tiple tables increasing the odds that your card will fail
bull
Photoshop
Tips amp Tricks
updated May 201726
SHOOTING RAW
Until now I have assumed you are shooting jpegs This is the almost universal image file format that is found on almost every device and website
JPEGS are small image files that can be viewed online opened in most applications They offer compatibility and small file size
But think about that ndash how can they be so small Why are they so universal
JPEGS are small because the files are compressed Information is dis-carded to reduce the file size Enough is kept so the image still looks good
When you take a photo with your camera a lot of information is applied to the file ndash the white balance you set perhaps contrast or sharpness
All of this is stored in the JPEG file and used to display the image
What if it wasnrsquot
What if you could take the lsquorawrsquo unprocessed digital information and manipulate it after the fact in Photoshop
Well you can Each camera manufacturer has itrsquos own formula for what we call a Raw file And Photoshop can open almost all of them
bullWhen a brand new camera is introduced it may take Photo-shop a few weeks or months to introduce an update for pro-cessing the Raw file
bull
Photoshop
Tips amp Tricks
updated May 201727
Nikon calls its Raw files NEFS Canon has CR2 files etc
The advantage of Raws is that you start in Photoshop with a lot more information and data Nothing is compressed no settings locked into the file
The disadvantage is that the files are much larger ndash your camerarsquos card will hold fewer imagesNot all software can edit or see a Raw file Yoursquoll need to use Photo-shop or some other image editor to convert the files to a universal format like a jpeg
IF you decide to shoot in the RAW format the image will open in a different window inside Photoshop
Note the controls You can set a white by using the eyedropper and clicking on something neutral You can fine tune your settings with the adjustments on the right ndash changing exposure contrast color etc
Photoshop
Tips amp Tricks
updated May 201728
You can make local adjustments by using the Adjustment brush
To use the brush lsquopaintrsquo over the area you want to adjust You can change the settings before or after using the brush You canrsquot select an area as you would with the Lasso or Quick Selection tools but you can still make many adjustments
When yoursquore done open the image make any final corrections add a caption and save it as a jpeg or other format The original Raw file remains as a backup
Watch a 610 video on using Camera Raw
Photoshop
Tips amp Tricks
updated May 201729
Photoshop is an extremely powerful application This tutorial only scratches the surface of what the app can do
The goal of this document is to introduce you to the program and give you the skills to adjust a photographrsquos basic tone and color These basic adjustments compensate for the limits of photography
A photograph canrsquot (yet) see as well as the human eye It canrsquot see the range of brightness or detail
And both the camera and the camera operator (you) are imperfect Exposures may not be perfect color and contrast may not look as wersquod hoped or as the scene actually appeared
These basic Photoshop skills can help make a photo look better online or in print
For those of you looking to dig deeper into Photoshoprsquos magical abili-ties to transform images there are numerous online resources Lyndacom (free to Penn State students) offers tutorials You can find many free resources on Youtubecom and Adobecom offers tutorials as well
And you can always contact me if you have questions
Will Yurmanwillyurmangmailcom
Photoshop
Tips amp Tricks
updated May 201717
For other kinds of photographers working in advertising or as an artist or wedding photographer for example you will need to use your judgement and
the judgement of your employer or client
This tutorial will only cover very basic adjustments Photoshop is a very powerful program You can change the color shape perspective of ele-ments You can remove blemishes and alter the appearance of light And on and on Those skills are beyond the scope of this tutorial
For the basic toning of an image we will talk about two things1 Lighteningdarkening2 Adjusting color
IF you want to adjust a part of a photograph you need to select the area you want to adjust
The Lasso and Quick Selection tools explained earlier in the tutorial are easy ways to isolate someonersquos face or the sky or some other area of the photograph
Once selected you can apply the same tools wersquove used to adjust the entire image Levels can be used to lighten or darken or even alter the color of the selected area
1 Select the area that needs lsquofixingrsquo2 Feather the selection so that the edge is softened between the selec-tion and the rest of the image3 Make the adjustment
The burndodge tool can also be useful for lightening or darkening a area of a photoThe Burn Tool makes an area darker
Photoshop
Tips amp Tricks
updated May 201718
Herersquos a photo of a protest from the Democratic National Convention in Philadelphia in July 2016 Overall the color looks good and there is a wide range of tone But I want to make sure the viewer is drawn to the protesterrsquos expression I wish her face were a little lighter
If I lighten the whole photo her face looks better but the rest of the photo looks washed out
Photoshop
Tips amp Tricks
updated May 201719
Here are three ways to lighten her face without lightening the rest of the image
A Select and LightenUse the Lasso or Quick Selection tools to select her face and armFeather the selection and then use Levels to lighten the selection
If you look closely you can see the outline of the selection of her arm and face I then used Levels to lighten just those elements The rest of the photo is the same as the original on the previous page
B Burn and DodgeUse the Dodge tool to lighten her face and arm by painting over it You can adjust the size and intensity of the tool
I find a good starting point is to set the brush to lsquomidtonesrsquo and about 30 You can keep lsquopaintingrsquo to lighten more if you need to
Photoshop
Tips amp Tricks
updated May 201720
Note that her skin looks little redderwarmer You can get a shift of color when you use the dodge tool
C History BrushThis method can seem a little more complicated but often gives the most natural results
The history brush allows you to lsquopaintrsquo in the previous state So you can lighten the entire image for example and then revert part of the image back to where it started
To use the History brush you also need to open the History Win-dow Pane
I find this method allows for the most natural adjustments in many cases And with practice is very fast
bullSometimes colors shift when you lighten them especially with the dodge tool
The HueSaturation tool can bring those colors back into line You want to make sure a personrsquos skin tone remains consis-tent
bull
Photoshop
Tips amp Tricks
updated May 201721
In this example I opened the image and then used Levels to lighten the entire photograph
I click the check box next to the origi-nal image above the change I made in Levels
Then each time I use the History brush I am returning that area of the photo to the original state
You are less likely to get a color shift this way and less likely to see the edge between an area you changed and the rest of the photograph
Photoshop
Tips amp Tricks
updated May 201722
IF yoursquove done a good job shooting your photo - set a proper expo-sure and white balance ndash you should be done toning your photo at this point
If it takes more than 5-10 minutes to adjust your photo yoursquore prob-ably trying to fix something that went wrong And yoursquoll probably find itrsquos is difficult or impossible to make it perfect
It is VERY important that you donrsquot rely on Photoshop to fix mistakes in the field
You may sometimes need to use other tools especially if the scene was lit by more than one type of light or under difficult conditions
7 Selective Color amp HueSaturationBoth tools can by used to correct tricky lighting and fix the color of images If the scene is lit by more than kind of light ndash window light mixed with overhead lighting or sunlight and shadow for example the color of part of the scene may be wrong
Selective Color ImagegtAdjustmentsgtSelective Color allows you to alter the color of one specific color So if the yellow channel has too much red in it you can remove the red without changing other colors that might have red in their mix
Hue Saturation ImagegtAdjustmentsgtHueSaturation allows you to adjust the hue saturation and brightness of the image or individual color channels Another useful tool in adjusting of fixing the color mix of a photo
Watch a 430 video on using Selective Color and HueSaturation
Photoshop
Tips amp Tricks
updated May 201723
8 CaptionsIt is vital to caption your images Captions make the image searchable on your computer and on the Internet
Captions give the photo context and make them more valuable
Photos are an historical record and the caption is part of that record
Captions explain and give meaning to your photographs
The caption information is part of what we call metadata It is informa-tion about information
You can apply the caption information in Photoshop or in Lightroom or Photo Mechanic ndash Depending on what software you have available
Once saved it is digitally stored with the photo ndash part of the image file
In Photoshop go FilegtFile info
The Description field is where you type your complete caption infor-mation
You can add information to the other fields includ-ing your photo credit under the Origin tab
Watch a 416 video on adding a caption to a photo
Photoshop
Tips amp Tricks
updated May 201724
9 Save your Image FilesPart of your workflow needs to be a way to stay organized If you canrsquot find your photos they have no value They are certainly worthless as part of an assignment but even worse in the real world where if you canrsquot find a photo or lose a file yoursquoll be in deep doo doo (a technical term)
YOU SHOULD HAVE BEEN WORKING ON A COPY
If you follow good workflow you still have an original untouched version of your file This version the toned and captioned version should be saved with a unique name that tells you something about the photo
File names should have no spaces and no special characters
Use only letters numbers hyphen and dash
My system
date_name_slug The date the photo was takenYour name (so a teacher or client or boss immediately knows who took the photo)A slug that tells what assignment the photo goes with
20160901_YourName_Circus_01
This photo for example was taken on September 1 2016 by you and is the first photo from the Circus assignment
bullI use the year at the beginning of my file name because I think sorting by year makes sense for me It puts all the 2016 files to-gether
bull
Photoshop
Tips amp Tricks
updated May 201725
10 Reformat your cardIf possible donrsquot do this until the end Your card is your backup incase everything goes wrong )
Format the card in the camera
Use the camera to format the card never delete files off a card from the computer You want to use the format function of the device to properly erase and ready the card for next time
DONrsquoT reformat until you are SURE you have properly saved your images
There are many many many other features and tools in Photoshop
There are some other ways to adjust photos that can be useful includ-ing
ShadowHighlights ndash you can open up shadows or add detail back into highlights (within limits)
BrightnessContrast ndash another way to control the brightness and contrast of a photo
Curves ndash Similar to Levels but instead of three arrows you can adjust the image anywhere along the curve
You can explore these tools as you gain familiarity with the program
bullIdeally you should have a card dedicat-ed to one device
It is better not to use a card in more than one camera
And it is a terrible idea to store fold-ers of other files on your card
Each device writes a lsquotable of contentsrsquo on the card to keep files organized Multiple devices means mul-tiple tables increasing the odds that your card will fail
bull
Photoshop
Tips amp Tricks
updated May 201726
SHOOTING RAW
Until now I have assumed you are shooting jpegs This is the almost universal image file format that is found on almost every device and website
JPEGS are small image files that can be viewed online opened in most applications They offer compatibility and small file size
But think about that ndash how can they be so small Why are they so universal
JPEGS are small because the files are compressed Information is dis-carded to reduce the file size Enough is kept so the image still looks good
When you take a photo with your camera a lot of information is applied to the file ndash the white balance you set perhaps contrast or sharpness
All of this is stored in the JPEG file and used to display the image
What if it wasnrsquot
What if you could take the lsquorawrsquo unprocessed digital information and manipulate it after the fact in Photoshop
Well you can Each camera manufacturer has itrsquos own formula for what we call a Raw file And Photoshop can open almost all of them
bullWhen a brand new camera is introduced it may take Photo-shop a few weeks or months to introduce an update for pro-cessing the Raw file
bull
Photoshop
Tips amp Tricks
updated May 201727
Nikon calls its Raw files NEFS Canon has CR2 files etc
The advantage of Raws is that you start in Photoshop with a lot more information and data Nothing is compressed no settings locked into the file
The disadvantage is that the files are much larger ndash your camerarsquos card will hold fewer imagesNot all software can edit or see a Raw file Yoursquoll need to use Photo-shop or some other image editor to convert the files to a universal format like a jpeg
IF you decide to shoot in the RAW format the image will open in a different window inside Photoshop
Note the controls You can set a white by using the eyedropper and clicking on something neutral You can fine tune your settings with the adjustments on the right ndash changing exposure contrast color etc
Photoshop
Tips amp Tricks
updated May 201728
You can make local adjustments by using the Adjustment brush
To use the brush lsquopaintrsquo over the area you want to adjust You can change the settings before or after using the brush You canrsquot select an area as you would with the Lasso or Quick Selection tools but you can still make many adjustments
When yoursquore done open the image make any final corrections add a caption and save it as a jpeg or other format The original Raw file remains as a backup
Watch a 610 video on using Camera Raw
Photoshop
Tips amp Tricks
updated May 201729
Photoshop is an extremely powerful application This tutorial only scratches the surface of what the app can do
The goal of this document is to introduce you to the program and give you the skills to adjust a photographrsquos basic tone and color These basic adjustments compensate for the limits of photography
A photograph canrsquot (yet) see as well as the human eye It canrsquot see the range of brightness or detail
And both the camera and the camera operator (you) are imperfect Exposures may not be perfect color and contrast may not look as wersquod hoped or as the scene actually appeared
These basic Photoshop skills can help make a photo look better online or in print
For those of you looking to dig deeper into Photoshoprsquos magical abili-ties to transform images there are numerous online resources Lyndacom (free to Penn State students) offers tutorials You can find many free resources on Youtubecom and Adobecom offers tutorials as well
And you can always contact me if you have questions
Will Yurmanwillyurmangmailcom
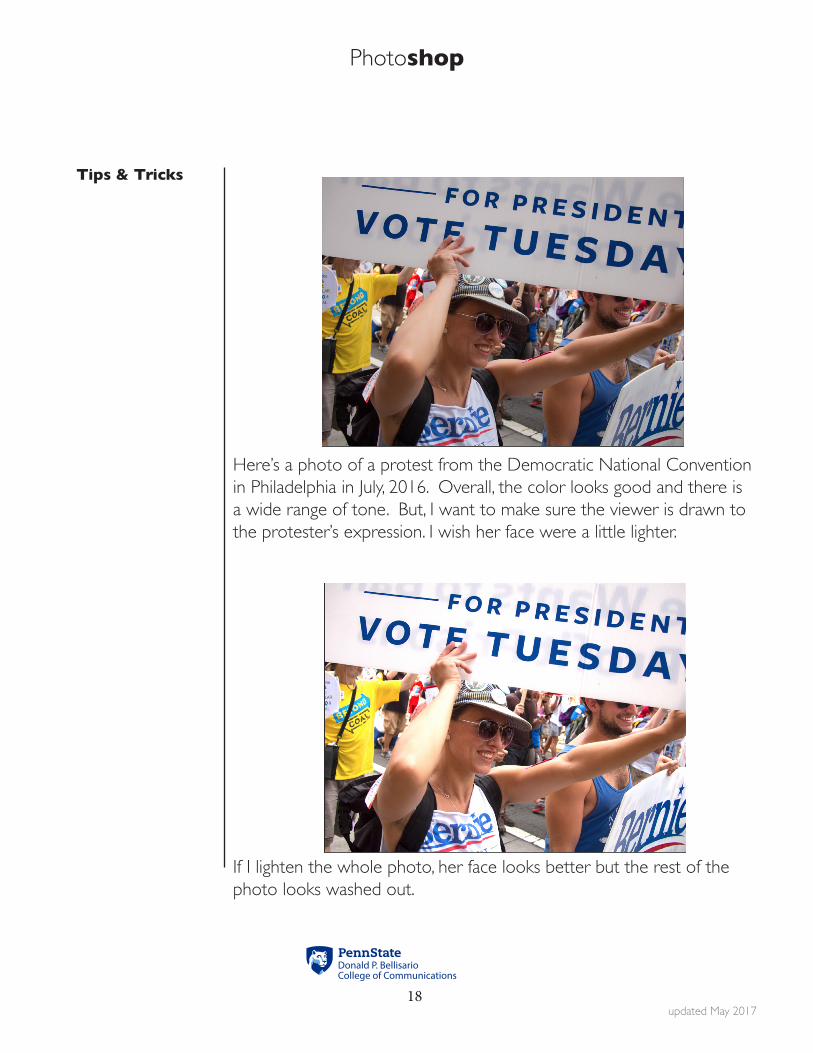
Photoshop
Tips amp Tricks
updated May 201718
Herersquos a photo of a protest from the Democratic National Convention in Philadelphia in July 2016 Overall the color looks good and there is a wide range of tone But I want to make sure the viewer is drawn to the protesterrsquos expression I wish her face were a little lighter
If I lighten the whole photo her face looks better but the rest of the photo looks washed out
Photoshop
Tips amp Tricks
updated May 201719
Here are three ways to lighten her face without lightening the rest of the image
A Select and LightenUse the Lasso or Quick Selection tools to select her face and armFeather the selection and then use Levels to lighten the selection
If you look closely you can see the outline of the selection of her arm and face I then used Levels to lighten just those elements The rest of the photo is the same as the original on the previous page
B Burn and DodgeUse the Dodge tool to lighten her face and arm by painting over it You can adjust the size and intensity of the tool
I find a good starting point is to set the brush to lsquomidtonesrsquo and about 30 You can keep lsquopaintingrsquo to lighten more if you need to
Photoshop
Tips amp Tricks
updated May 201720
Note that her skin looks little redderwarmer You can get a shift of color when you use the dodge tool
C History BrushThis method can seem a little more complicated but often gives the most natural results
The history brush allows you to lsquopaintrsquo in the previous state So you can lighten the entire image for example and then revert part of the image back to where it started
To use the History brush you also need to open the History Win-dow Pane
I find this method allows for the most natural adjustments in many cases And with practice is very fast
bullSometimes colors shift when you lighten them especially with the dodge tool
The HueSaturation tool can bring those colors back into line You want to make sure a personrsquos skin tone remains consis-tent
bull
Photoshop
Tips amp Tricks
updated May 201721
In this example I opened the image and then used Levels to lighten the entire photograph
I click the check box next to the origi-nal image above the change I made in Levels
Then each time I use the History brush I am returning that area of the photo to the original state
You are less likely to get a color shift this way and less likely to see the edge between an area you changed and the rest of the photograph
Photoshop
Tips amp Tricks
updated May 201722
IF yoursquove done a good job shooting your photo - set a proper expo-sure and white balance ndash you should be done toning your photo at this point
If it takes more than 5-10 minutes to adjust your photo yoursquore prob-ably trying to fix something that went wrong And yoursquoll probably find itrsquos is difficult or impossible to make it perfect
It is VERY important that you donrsquot rely on Photoshop to fix mistakes in the field
You may sometimes need to use other tools especially if the scene was lit by more than one type of light or under difficult conditions
7 Selective Color amp HueSaturationBoth tools can by used to correct tricky lighting and fix the color of images If the scene is lit by more than kind of light ndash window light mixed with overhead lighting or sunlight and shadow for example the color of part of the scene may be wrong
Selective Color ImagegtAdjustmentsgtSelective Color allows you to alter the color of one specific color So if the yellow channel has too much red in it you can remove the red without changing other colors that might have red in their mix
Hue Saturation ImagegtAdjustmentsgtHueSaturation allows you to adjust the hue saturation and brightness of the image or individual color channels Another useful tool in adjusting of fixing the color mix of a photo
Watch a 430 video on using Selective Color and HueSaturation
Photoshop
Tips amp Tricks
updated May 201723
8 CaptionsIt is vital to caption your images Captions make the image searchable on your computer and on the Internet
Captions give the photo context and make them more valuable
Photos are an historical record and the caption is part of that record
Captions explain and give meaning to your photographs
The caption information is part of what we call metadata It is informa-tion about information
You can apply the caption information in Photoshop or in Lightroom or Photo Mechanic ndash Depending on what software you have available
Once saved it is digitally stored with the photo ndash part of the image file
In Photoshop go FilegtFile info
The Description field is where you type your complete caption infor-mation
You can add information to the other fields includ-ing your photo credit under the Origin tab
Watch a 416 video on adding a caption to a photo
Photoshop
Tips amp Tricks
updated May 201724
9 Save your Image FilesPart of your workflow needs to be a way to stay organized If you canrsquot find your photos they have no value They are certainly worthless as part of an assignment but even worse in the real world where if you canrsquot find a photo or lose a file yoursquoll be in deep doo doo (a technical term)
YOU SHOULD HAVE BEEN WORKING ON A COPY
If you follow good workflow you still have an original untouched version of your file This version the toned and captioned version should be saved with a unique name that tells you something about the photo
File names should have no spaces and no special characters
Use only letters numbers hyphen and dash
My system
date_name_slug The date the photo was takenYour name (so a teacher or client or boss immediately knows who took the photo)A slug that tells what assignment the photo goes with
20160901_YourName_Circus_01
This photo for example was taken on September 1 2016 by you and is the first photo from the Circus assignment
bullI use the year at the beginning of my file name because I think sorting by year makes sense for me It puts all the 2016 files to-gether
bull
Photoshop
Tips amp Tricks
updated May 201725
10 Reformat your cardIf possible donrsquot do this until the end Your card is your backup incase everything goes wrong )
Format the card in the camera
Use the camera to format the card never delete files off a card from the computer You want to use the format function of the device to properly erase and ready the card for next time
DONrsquoT reformat until you are SURE you have properly saved your images
There are many many many other features and tools in Photoshop
There are some other ways to adjust photos that can be useful includ-ing
ShadowHighlights ndash you can open up shadows or add detail back into highlights (within limits)
BrightnessContrast ndash another way to control the brightness and contrast of a photo
Curves ndash Similar to Levels but instead of three arrows you can adjust the image anywhere along the curve
You can explore these tools as you gain familiarity with the program
bullIdeally you should have a card dedicat-ed to one device
It is better not to use a card in more than one camera
And it is a terrible idea to store fold-ers of other files on your card
Each device writes a lsquotable of contentsrsquo on the card to keep files organized Multiple devices means mul-tiple tables increasing the odds that your card will fail
bull
Photoshop
Tips amp Tricks
updated May 201726
SHOOTING RAW
Until now I have assumed you are shooting jpegs This is the almost universal image file format that is found on almost every device and website
JPEGS are small image files that can be viewed online opened in most applications They offer compatibility and small file size
But think about that ndash how can they be so small Why are they so universal
JPEGS are small because the files are compressed Information is dis-carded to reduce the file size Enough is kept so the image still looks good
When you take a photo with your camera a lot of information is applied to the file ndash the white balance you set perhaps contrast or sharpness
All of this is stored in the JPEG file and used to display the image
What if it wasnrsquot
What if you could take the lsquorawrsquo unprocessed digital information and manipulate it after the fact in Photoshop
Well you can Each camera manufacturer has itrsquos own formula for what we call a Raw file And Photoshop can open almost all of them
bullWhen a brand new camera is introduced it may take Photo-shop a few weeks or months to introduce an update for pro-cessing the Raw file
bull
Photoshop
Tips amp Tricks
updated May 201727
Nikon calls its Raw files NEFS Canon has CR2 files etc
The advantage of Raws is that you start in Photoshop with a lot more information and data Nothing is compressed no settings locked into the file
The disadvantage is that the files are much larger ndash your camerarsquos card will hold fewer imagesNot all software can edit or see a Raw file Yoursquoll need to use Photo-shop or some other image editor to convert the files to a universal format like a jpeg
IF you decide to shoot in the RAW format the image will open in a different window inside Photoshop
Note the controls You can set a white by using the eyedropper and clicking on something neutral You can fine tune your settings with the adjustments on the right ndash changing exposure contrast color etc
Photoshop
Tips amp Tricks
updated May 201728
You can make local adjustments by using the Adjustment brush
To use the brush lsquopaintrsquo over the area you want to adjust You can change the settings before or after using the brush You canrsquot select an area as you would with the Lasso or Quick Selection tools but you can still make many adjustments
When yoursquore done open the image make any final corrections add a caption and save it as a jpeg or other format The original Raw file remains as a backup
Watch a 610 video on using Camera Raw
Photoshop
Tips amp Tricks
updated May 201729
Photoshop is an extremely powerful application This tutorial only scratches the surface of what the app can do
The goal of this document is to introduce you to the program and give you the skills to adjust a photographrsquos basic tone and color These basic adjustments compensate for the limits of photography
A photograph canrsquot (yet) see as well as the human eye It canrsquot see the range of brightness or detail
And both the camera and the camera operator (you) are imperfect Exposures may not be perfect color and contrast may not look as wersquod hoped or as the scene actually appeared
These basic Photoshop skills can help make a photo look better online or in print
For those of you looking to dig deeper into Photoshoprsquos magical abili-ties to transform images there are numerous online resources Lyndacom (free to Penn State students) offers tutorials You can find many free resources on Youtubecom and Adobecom offers tutorials as well
And you can always contact me if you have questions
Will Yurmanwillyurmangmailcom
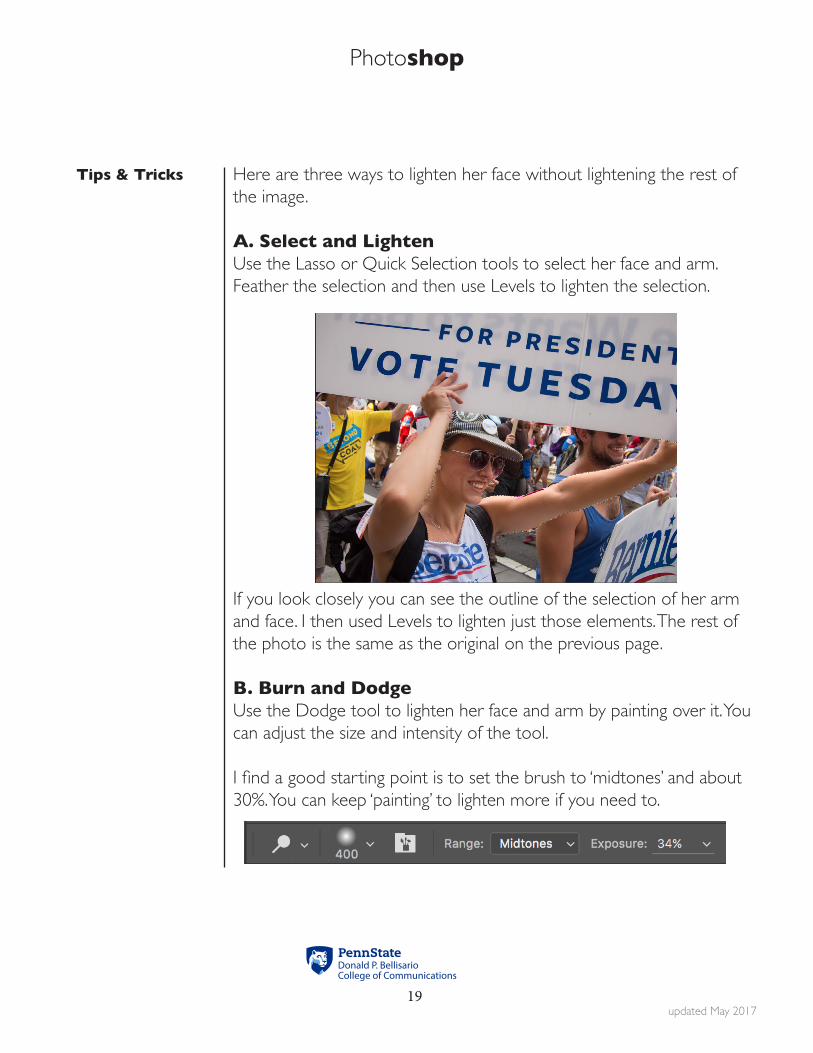
Photoshop
Tips amp Tricks
updated May 201720
Note that her skin looks little redderwarmer You can get a shift of color when you use the dodge tool
C History BrushThis method can seem a little more complicated but often gives the most natural results
The history brush allows you to lsquopaintrsquo in the previous state So you can lighten the entire image for example and then revert part of the image back to where it started
To use the History brush you also need to open the History Win-dow Pane
I find this method allows for the most natural adjustments in many cases And with practice is very fast
bullSometimes colors shift when you lighten them especially with the dodge tool
The HueSaturation tool can bring those colors back into line You want to make sure a personrsquos skin tone remains consis-tent
bull
Photoshop
Tips amp Tricks
updated May 201721
In this example I opened the image and then used Levels to lighten the entire photograph
I click the check box next to the origi-nal image above the change I made in Levels
Then each time I use the History brush I am returning that area of the photo to the original state
You are less likely to get a color shift this way and less likely to see the edge between an area you changed and the rest of the photograph
Photoshop
Tips amp Tricks
updated May 201722
IF yoursquove done a good job shooting your photo - set a proper expo-sure and white balance ndash you should be done toning your photo at this point
If it takes more than 5-10 minutes to adjust your photo yoursquore prob-ably trying to fix something that went wrong And yoursquoll probably find itrsquos is difficult or impossible to make it perfect
It is VERY important that you donrsquot rely on Photoshop to fix mistakes in the field
You may sometimes need to use other tools especially if the scene was lit by more than one type of light or under difficult conditions
7 Selective Color amp HueSaturationBoth tools can by used to correct tricky lighting and fix the color of images If the scene is lit by more than kind of light ndash window light mixed with overhead lighting or sunlight and shadow for example the color of part of the scene may be wrong
Selective Color ImagegtAdjustmentsgtSelective Color allows you to alter the color of one specific color So if the yellow channel has too much red in it you can remove the red without changing other colors that might have red in their mix
Hue Saturation ImagegtAdjustmentsgtHueSaturation allows you to adjust the hue saturation and brightness of the image or individual color channels Another useful tool in adjusting of fixing the color mix of a photo
Watch a 430 video on using Selective Color and HueSaturation
Photoshop
Tips amp Tricks
updated May 201723
8 CaptionsIt is vital to caption your images Captions make the image searchable on your computer and on the Internet
Captions give the photo context and make them more valuable
Photos are an historical record and the caption is part of that record
Captions explain and give meaning to your photographs
The caption information is part of what we call metadata It is informa-tion about information
You can apply the caption information in Photoshop or in Lightroom or Photo Mechanic ndash Depending on what software you have available
Once saved it is digitally stored with the photo ndash part of the image file
In Photoshop go FilegtFile info
The Description field is where you type your complete caption infor-mation
You can add information to the other fields includ-ing your photo credit under the Origin tab
Watch a 416 video on adding a caption to a photo
Photoshop
Tips amp Tricks
updated May 201724
9 Save your Image FilesPart of your workflow needs to be a way to stay organized If you canrsquot find your photos they have no value They are certainly worthless as part of an assignment but even worse in the real world where if you canrsquot find a photo or lose a file yoursquoll be in deep doo doo (a technical term)
YOU SHOULD HAVE BEEN WORKING ON A COPY
If you follow good workflow you still have an original untouched version of your file This version the toned and captioned version should be saved with a unique name that tells you something about the photo
File names should have no spaces and no special characters
Use only letters numbers hyphen and dash
My system
date_name_slug The date the photo was takenYour name (so a teacher or client or boss immediately knows who took the photo)A slug that tells what assignment the photo goes with
20160901_YourName_Circus_01
This photo for example was taken on September 1 2016 by you and is the first photo from the Circus assignment
bullI use the year at the beginning of my file name because I think sorting by year makes sense for me It puts all the 2016 files to-gether
bull
Photoshop
Tips amp Tricks
updated May 201725
10 Reformat your cardIf possible donrsquot do this until the end Your card is your backup incase everything goes wrong )
Format the card in the camera
Use the camera to format the card never delete files off a card from the computer You want to use the format function of the device to properly erase and ready the card for next time
DONrsquoT reformat until you are SURE you have properly saved your images
There are many many many other features and tools in Photoshop
There are some other ways to adjust photos that can be useful includ-ing
ShadowHighlights ndash you can open up shadows or add detail back into highlights (within limits)
BrightnessContrast ndash another way to control the brightness and contrast of a photo
Curves ndash Similar to Levels but instead of three arrows you can adjust the image anywhere along the curve
You can explore these tools as you gain familiarity with the program
bullIdeally you should have a card dedicat-ed to one device
It is better not to use a card in more than one camera
And it is a terrible idea to store fold-ers of other files on your card
Each device writes a lsquotable of contentsrsquo on the card to keep files organized Multiple devices means mul-tiple tables increasing the odds that your card will fail
bull
Photoshop
Tips amp Tricks
updated May 201726
SHOOTING RAW
Until now I have assumed you are shooting jpegs This is the almost universal image file format that is found on almost every device and website
JPEGS are small image files that can be viewed online opened in most applications They offer compatibility and small file size
But think about that ndash how can they be so small Why are they so universal
JPEGS are small because the files are compressed Information is dis-carded to reduce the file size Enough is kept so the image still looks good
When you take a photo with your camera a lot of information is applied to the file ndash the white balance you set perhaps contrast or sharpness
All of this is stored in the JPEG file and used to display the image
What if it wasnrsquot
What if you could take the lsquorawrsquo unprocessed digital information and manipulate it after the fact in Photoshop
Well you can Each camera manufacturer has itrsquos own formula for what we call a Raw file And Photoshop can open almost all of them
bullWhen a brand new camera is introduced it may take Photo-shop a few weeks or months to introduce an update for pro-cessing the Raw file
bull
Photoshop
Tips amp Tricks
updated May 201727
Nikon calls its Raw files NEFS Canon has CR2 files etc
The advantage of Raws is that you start in Photoshop with a lot more information and data Nothing is compressed no settings locked into the file
The disadvantage is that the files are much larger ndash your camerarsquos card will hold fewer imagesNot all software can edit or see a Raw file Yoursquoll need to use Photo-shop or some other image editor to convert the files to a universal format like a jpeg
IF you decide to shoot in the RAW format the image will open in a different window inside Photoshop
Note the controls You can set a white by using the eyedropper and clicking on something neutral You can fine tune your settings with the adjustments on the right ndash changing exposure contrast color etc
Photoshop
Tips amp Tricks
updated May 201728
You can make local adjustments by using the Adjustment brush
To use the brush lsquopaintrsquo over the area you want to adjust You can change the settings before or after using the brush You canrsquot select an area as you would with the Lasso or Quick Selection tools but you can still make many adjustments
When yoursquore done open the image make any final corrections add a caption and save it as a jpeg or other format The original Raw file remains as a backup
Watch a 610 video on using Camera Raw
Photoshop
Tips amp Tricks
updated May 201729
Photoshop is an extremely powerful application This tutorial only scratches the surface of what the app can do
The goal of this document is to introduce you to the program and give you the skills to adjust a photographrsquos basic tone and color These basic adjustments compensate for the limits of photography
A photograph canrsquot (yet) see as well as the human eye It canrsquot see the range of brightness or detail
And both the camera and the camera operator (you) are imperfect Exposures may not be perfect color and contrast may not look as wersquod hoped or as the scene actually appeared
These basic Photoshop skills can help make a photo look better online or in print
For those of you looking to dig deeper into Photoshoprsquos magical abili-ties to transform images there are numerous online resources Lyndacom (free to Penn State students) offers tutorials You can find many free resources on Youtubecom and Adobecom offers tutorials as well
And you can always contact me if you have questions
Will Yurmanwillyurmangmailcom
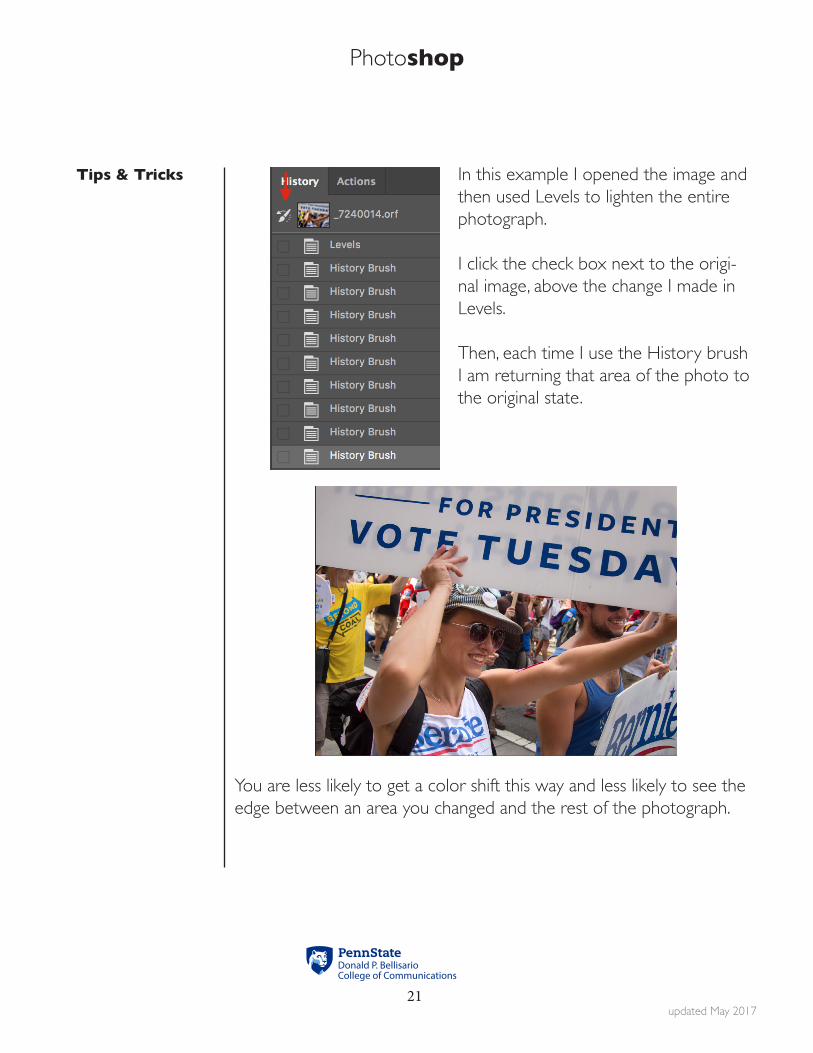
Photoshop
Tips amp Tricks
updated May 201721
In this example I opened the image and then used Levels to lighten the entire photograph
I click the check box next to the origi-nal image above the change I made in Levels
Then each time I use the History brush I am returning that area of the photo to the original state
You are less likely to get a color shift this way and less likely to see the edge between an area you changed and the rest of the photograph
Photoshop
Tips amp Tricks
updated May 201722
IF yoursquove done a good job shooting your photo - set a proper expo-sure and white balance ndash you should be done toning your photo at this point
If it takes more than 5-10 minutes to adjust your photo yoursquore prob-ably trying to fix something that went wrong And yoursquoll probably find itrsquos is difficult or impossible to make it perfect
It is VERY important that you donrsquot rely on Photoshop to fix mistakes in the field
You may sometimes need to use other tools especially if the scene was lit by more than one type of light or under difficult conditions
7 Selective Color amp HueSaturationBoth tools can by used to correct tricky lighting and fix the color of images If the scene is lit by more than kind of light ndash window light mixed with overhead lighting or sunlight and shadow for example the color of part of the scene may be wrong
Selective Color ImagegtAdjustmentsgtSelective Color allows you to alter the color of one specific color So if the yellow channel has too much red in it you can remove the red without changing other colors that might have red in their mix
Hue Saturation ImagegtAdjustmentsgtHueSaturation allows you to adjust the hue saturation and brightness of the image or individual color channels Another useful tool in adjusting of fixing the color mix of a photo
Watch a 430 video on using Selective Color and HueSaturation
Photoshop
Tips amp Tricks
updated May 201723
8 CaptionsIt is vital to caption your images Captions make the image searchable on your computer and on the Internet
Captions give the photo context and make them more valuable
Photos are an historical record and the caption is part of that record
Captions explain and give meaning to your photographs
The caption information is part of what we call metadata It is informa-tion about information
You can apply the caption information in Photoshop or in Lightroom or Photo Mechanic ndash Depending on what software you have available
Once saved it is digitally stored with the photo ndash part of the image file
In Photoshop go FilegtFile info
The Description field is where you type your complete caption infor-mation
You can add information to the other fields includ-ing your photo credit under the Origin tab
Watch a 416 video on adding a caption to a photo
Photoshop
Tips amp Tricks
updated May 201724
9 Save your Image FilesPart of your workflow needs to be a way to stay organized If you canrsquot find your photos they have no value They are certainly worthless as part of an assignment but even worse in the real world where if you canrsquot find a photo or lose a file yoursquoll be in deep doo doo (a technical term)
YOU SHOULD HAVE BEEN WORKING ON A COPY
If you follow good workflow you still have an original untouched version of your file This version the toned and captioned version should be saved with a unique name that tells you something about the photo
File names should have no spaces and no special characters
Use only letters numbers hyphen and dash
My system
date_name_slug The date the photo was takenYour name (so a teacher or client or boss immediately knows who took the photo)A slug that tells what assignment the photo goes with
20160901_YourName_Circus_01
This photo for example was taken on September 1 2016 by you and is the first photo from the Circus assignment
bullI use the year at the beginning of my file name because I think sorting by year makes sense for me It puts all the 2016 files to-gether
bull
Photoshop
Tips amp Tricks
updated May 201725
10 Reformat your cardIf possible donrsquot do this until the end Your card is your backup incase everything goes wrong )
Format the card in the camera
Use the camera to format the card never delete files off a card from the computer You want to use the format function of the device to properly erase and ready the card for next time
DONrsquoT reformat until you are SURE you have properly saved your images
There are many many many other features and tools in Photoshop
There are some other ways to adjust photos that can be useful includ-ing
ShadowHighlights ndash you can open up shadows or add detail back into highlights (within limits)
BrightnessContrast ndash another way to control the brightness and contrast of a photo
Curves ndash Similar to Levels but instead of three arrows you can adjust the image anywhere along the curve
You can explore these tools as you gain familiarity with the program
bullIdeally you should have a card dedicat-ed to one device
It is better not to use a card in more than one camera
And it is a terrible idea to store fold-ers of other files on your card
Each device writes a lsquotable of contentsrsquo on the card to keep files organized Multiple devices means mul-tiple tables increasing the odds that your card will fail
bull
Photoshop
Tips amp Tricks
updated May 201726
SHOOTING RAW
Until now I have assumed you are shooting jpegs This is the almost universal image file format that is found on almost every device and website
JPEGS are small image files that can be viewed online opened in most applications They offer compatibility and small file size
But think about that ndash how can they be so small Why are they so universal
JPEGS are small because the files are compressed Information is dis-carded to reduce the file size Enough is kept so the image still looks good
When you take a photo with your camera a lot of information is applied to the file ndash the white balance you set perhaps contrast or sharpness
All of this is stored in the JPEG file and used to display the image
What if it wasnrsquot
What if you could take the lsquorawrsquo unprocessed digital information and manipulate it after the fact in Photoshop
Well you can Each camera manufacturer has itrsquos own formula for what we call a Raw file And Photoshop can open almost all of them
bullWhen a brand new camera is introduced it may take Photo-shop a few weeks or months to introduce an update for pro-cessing the Raw file
bull
Photoshop
Tips amp Tricks
updated May 201727
Nikon calls its Raw files NEFS Canon has CR2 files etc
The advantage of Raws is that you start in Photoshop with a lot more information and data Nothing is compressed no settings locked into the file
The disadvantage is that the files are much larger ndash your camerarsquos card will hold fewer imagesNot all software can edit or see a Raw file Yoursquoll need to use Photo-shop or some other image editor to convert the files to a universal format like a jpeg
IF you decide to shoot in the RAW format the image will open in a different window inside Photoshop
Note the controls You can set a white by using the eyedropper and clicking on something neutral You can fine tune your settings with the adjustments on the right ndash changing exposure contrast color etc
Photoshop
Tips amp Tricks
updated May 201728
You can make local adjustments by using the Adjustment brush
To use the brush lsquopaintrsquo over the area you want to adjust You can change the settings before or after using the brush You canrsquot select an area as you would with the Lasso or Quick Selection tools but you can still make many adjustments
When yoursquore done open the image make any final corrections add a caption and save it as a jpeg or other format The original Raw file remains as a backup
Watch a 610 video on using Camera Raw
Photoshop
Tips amp Tricks
updated May 201729
Photoshop is an extremely powerful application This tutorial only scratches the surface of what the app can do
The goal of this document is to introduce you to the program and give you the skills to adjust a photographrsquos basic tone and color These basic adjustments compensate for the limits of photography
A photograph canrsquot (yet) see as well as the human eye It canrsquot see the range of brightness or detail
And both the camera and the camera operator (you) are imperfect Exposures may not be perfect color and contrast may not look as wersquod hoped or as the scene actually appeared
These basic Photoshop skills can help make a photo look better online or in print
For those of you looking to dig deeper into Photoshoprsquos magical abili-ties to transform images there are numerous online resources Lyndacom (free to Penn State students) offers tutorials You can find many free resources on Youtubecom and Adobecom offers tutorials as well
And you can always contact me if you have questions
Will Yurmanwillyurmangmailcom
Photoshop
Tips amp Tricks
updated May 201722
IF yoursquove done a good job shooting your photo - set a proper expo-sure and white balance ndash you should be done toning your photo at this point
If it takes more than 5-10 minutes to adjust your photo yoursquore prob-ably trying to fix something that went wrong And yoursquoll probably find itrsquos is difficult or impossible to make it perfect
It is VERY important that you donrsquot rely on Photoshop to fix mistakes in the field
You may sometimes need to use other tools especially if the scene was lit by more than one type of light or under difficult conditions
7 Selective Color amp HueSaturationBoth tools can by used to correct tricky lighting and fix the color of images If the scene is lit by more than kind of light ndash window light mixed with overhead lighting or sunlight and shadow for example the color of part of the scene may be wrong
Selective Color ImagegtAdjustmentsgtSelective Color allows you to alter the color of one specific color So if the yellow channel has too much red in it you can remove the red without changing other colors that might have red in their mix
Hue Saturation ImagegtAdjustmentsgtHueSaturation allows you to adjust the hue saturation and brightness of the image or individual color channels Another useful tool in adjusting of fixing the color mix of a photo
Watch a 430 video on using Selective Color and HueSaturation
Photoshop
Tips amp Tricks
updated May 201723
8 CaptionsIt is vital to caption your images Captions make the image searchable on your computer and on the Internet
Captions give the photo context and make them more valuable
Photos are an historical record and the caption is part of that record
Captions explain and give meaning to your photographs
The caption information is part of what we call metadata It is informa-tion about information
You can apply the caption information in Photoshop or in Lightroom or Photo Mechanic ndash Depending on what software you have available
Once saved it is digitally stored with the photo ndash part of the image file
In Photoshop go FilegtFile info
The Description field is where you type your complete caption infor-mation
You can add information to the other fields includ-ing your photo credit under the Origin tab
Watch a 416 video on adding a caption to a photo
Photoshop
Tips amp Tricks
updated May 201724
9 Save your Image FilesPart of your workflow needs to be a way to stay organized If you canrsquot find your photos they have no value They are certainly worthless as part of an assignment but even worse in the real world where if you canrsquot find a photo or lose a file yoursquoll be in deep doo doo (a technical term)
YOU SHOULD HAVE BEEN WORKING ON A COPY
If you follow good workflow you still have an original untouched version of your file This version the toned and captioned version should be saved with a unique name that tells you something about the photo
File names should have no spaces and no special characters
Use only letters numbers hyphen and dash
My system
date_name_slug The date the photo was takenYour name (so a teacher or client or boss immediately knows who took the photo)A slug that tells what assignment the photo goes with
20160901_YourName_Circus_01
This photo for example was taken on September 1 2016 by you and is the first photo from the Circus assignment
bullI use the year at the beginning of my file name because I think sorting by year makes sense for me It puts all the 2016 files to-gether
bull
Photoshop
Tips amp Tricks
updated May 201725
10 Reformat your cardIf possible donrsquot do this until the end Your card is your backup incase everything goes wrong )
Format the card in the camera
Use the camera to format the card never delete files off a card from the computer You want to use the format function of the device to properly erase and ready the card for next time
DONrsquoT reformat until you are SURE you have properly saved your images
There are many many many other features and tools in Photoshop
There are some other ways to adjust photos that can be useful includ-ing
ShadowHighlights ndash you can open up shadows or add detail back into highlights (within limits)
BrightnessContrast ndash another way to control the brightness and contrast of a photo
Curves ndash Similar to Levels but instead of three arrows you can adjust the image anywhere along the curve
You can explore these tools as you gain familiarity with the program
bullIdeally you should have a card dedicat-ed to one device
It is better not to use a card in more than one camera
And it is a terrible idea to store fold-ers of other files on your card
Each device writes a lsquotable of contentsrsquo on the card to keep files organized Multiple devices means mul-tiple tables increasing the odds that your card will fail
bull
Photoshop
Tips amp Tricks
updated May 201726
SHOOTING RAW
Until now I have assumed you are shooting jpegs This is the almost universal image file format that is found on almost every device and website
JPEGS are small image files that can be viewed online opened in most applications They offer compatibility and small file size
But think about that ndash how can they be so small Why are they so universal
JPEGS are small because the files are compressed Information is dis-carded to reduce the file size Enough is kept so the image still looks good
When you take a photo with your camera a lot of information is applied to the file ndash the white balance you set perhaps contrast or sharpness
All of this is stored in the JPEG file and used to display the image
What if it wasnrsquot
What if you could take the lsquorawrsquo unprocessed digital information and manipulate it after the fact in Photoshop
Well you can Each camera manufacturer has itrsquos own formula for what we call a Raw file And Photoshop can open almost all of them
bullWhen a brand new camera is introduced it may take Photo-shop a few weeks or months to introduce an update for pro-cessing the Raw file
bull
Photoshop
Tips amp Tricks
updated May 201727
Nikon calls its Raw files NEFS Canon has CR2 files etc
The advantage of Raws is that you start in Photoshop with a lot more information and data Nothing is compressed no settings locked into the file
The disadvantage is that the files are much larger ndash your camerarsquos card will hold fewer imagesNot all software can edit or see a Raw file Yoursquoll need to use Photo-shop or some other image editor to convert the files to a universal format like a jpeg
IF you decide to shoot in the RAW format the image will open in a different window inside Photoshop
Note the controls You can set a white by using the eyedropper and clicking on something neutral You can fine tune your settings with the adjustments on the right ndash changing exposure contrast color etc
Photoshop
Tips amp Tricks
updated May 201728
You can make local adjustments by using the Adjustment brush
To use the brush lsquopaintrsquo over the area you want to adjust You can change the settings before or after using the brush You canrsquot select an area as you would with the Lasso or Quick Selection tools but you can still make many adjustments
When yoursquore done open the image make any final corrections add a caption and save it as a jpeg or other format The original Raw file remains as a backup
Watch a 610 video on using Camera Raw
Photoshop
Tips amp Tricks
updated May 201729
Photoshop is an extremely powerful application This tutorial only scratches the surface of what the app can do
The goal of this document is to introduce you to the program and give you the skills to adjust a photographrsquos basic tone and color These basic adjustments compensate for the limits of photography
A photograph canrsquot (yet) see as well as the human eye It canrsquot see the range of brightness or detail
And both the camera and the camera operator (you) are imperfect Exposures may not be perfect color and contrast may not look as wersquod hoped or as the scene actually appeared
These basic Photoshop skills can help make a photo look better online or in print
For those of you looking to dig deeper into Photoshoprsquos magical abili-ties to transform images there are numerous online resources Lyndacom (free to Penn State students) offers tutorials You can find many free resources on Youtubecom and Adobecom offers tutorials as well
And you can always contact me if you have questions
Will Yurmanwillyurmangmailcom
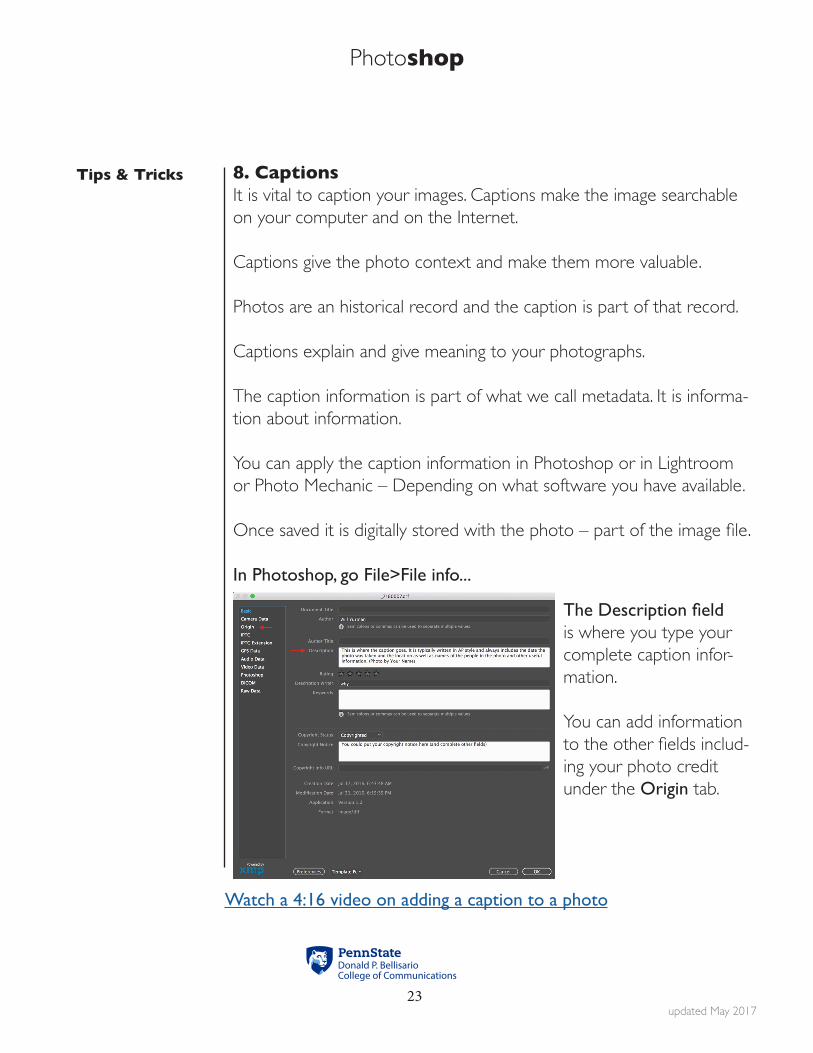
Photoshop
Tips amp Tricks
updated May 201723
8 CaptionsIt is vital to caption your images Captions make the image searchable on your computer and on the Internet
Captions give the photo context and make them more valuable
Photos are an historical record and the caption is part of that record
Captions explain and give meaning to your photographs
The caption information is part of what we call metadata It is informa-tion about information
You can apply the caption information in Photoshop or in Lightroom or Photo Mechanic ndash Depending on what software you have available
Once saved it is digitally stored with the photo ndash part of the image file
In Photoshop go FilegtFile info
The Description field is where you type your complete caption infor-mation
You can add information to the other fields includ-ing your photo credit under the Origin tab
Watch a 416 video on adding a caption to a photo
Photoshop
Tips amp Tricks
updated May 201724
9 Save your Image FilesPart of your workflow needs to be a way to stay organized If you canrsquot find your photos they have no value They are certainly worthless as part of an assignment but even worse in the real world where if you canrsquot find a photo or lose a file yoursquoll be in deep doo doo (a technical term)
YOU SHOULD HAVE BEEN WORKING ON A COPY
If you follow good workflow you still have an original untouched version of your file This version the toned and captioned version should be saved with a unique name that tells you something about the photo
File names should have no spaces and no special characters
Use only letters numbers hyphen and dash
My system
date_name_slug The date the photo was takenYour name (so a teacher or client or boss immediately knows who took the photo)A slug that tells what assignment the photo goes with
20160901_YourName_Circus_01
This photo for example was taken on September 1 2016 by you and is the first photo from the Circus assignment
bullI use the year at the beginning of my file name because I think sorting by year makes sense for me It puts all the 2016 files to-gether
bull
Photoshop
Tips amp Tricks
updated May 201725
10 Reformat your cardIf possible donrsquot do this until the end Your card is your backup incase everything goes wrong )
Format the card in the camera
Use the camera to format the card never delete files off a card from the computer You want to use the format function of the device to properly erase and ready the card for next time
DONrsquoT reformat until you are SURE you have properly saved your images
There are many many many other features and tools in Photoshop
There are some other ways to adjust photos that can be useful includ-ing
ShadowHighlights ndash you can open up shadows or add detail back into highlights (within limits)
BrightnessContrast ndash another way to control the brightness and contrast of a photo
Curves ndash Similar to Levels but instead of three arrows you can adjust the image anywhere along the curve
You can explore these tools as you gain familiarity with the program
bullIdeally you should have a card dedicat-ed to one device
It is better not to use a card in more than one camera
And it is a terrible idea to store fold-ers of other files on your card
Each device writes a lsquotable of contentsrsquo on the card to keep files organized Multiple devices means mul-tiple tables increasing the odds that your card will fail
bull
Photoshop
Tips amp Tricks
updated May 201726
SHOOTING RAW
Until now I have assumed you are shooting jpegs This is the almost universal image file format that is found on almost every device and website
JPEGS are small image files that can be viewed online opened in most applications They offer compatibility and small file size
But think about that ndash how can they be so small Why are they so universal
JPEGS are small because the files are compressed Information is dis-carded to reduce the file size Enough is kept so the image still looks good
When you take a photo with your camera a lot of information is applied to the file ndash the white balance you set perhaps contrast or sharpness
All of this is stored in the JPEG file and used to display the image
What if it wasnrsquot
What if you could take the lsquorawrsquo unprocessed digital information and manipulate it after the fact in Photoshop
Well you can Each camera manufacturer has itrsquos own formula for what we call a Raw file And Photoshop can open almost all of them
bullWhen a brand new camera is introduced it may take Photo-shop a few weeks or months to introduce an update for pro-cessing the Raw file
bull
Photoshop
Tips amp Tricks
updated May 201727
Nikon calls its Raw files NEFS Canon has CR2 files etc
The advantage of Raws is that you start in Photoshop with a lot more information and data Nothing is compressed no settings locked into the file
The disadvantage is that the files are much larger ndash your camerarsquos card will hold fewer imagesNot all software can edit or see a Raw file Yoursquoll need to use Photo-shop or some other image editor to convert the files to a universal format like a jpeg
IF you decide to shoot in the RAW format the image will open in a different window inside Photoshop
Note the controls You can set a white by using the eyedropper and clicking on something neutral You can fine tune your settings with the adjustments on the right ndash changing exposure contrast color etc
Photoshop
Tips amp Tricks
updated May 201728
You can make local adjustments by using the Adjustment brush
To use the brush lsquopaintrsquo over the area you want to adjust You can change the settings before or after using the brush You canrsquot select an area as you would with the Lasso or Quick Selection tools but you can still make many adjustments
When yoursquore done open the image make any final corrections add a caption and save it as a jpeg or other format The original Raw file remains as a backup
Watch a 610 video on using Camera Raw
Photoshop
Tips amp Tricks
updated May 201729
Photoshop is an extremely powerful application This tutorial only scratches the surface of what the app can do
The goal of this document is to introduce you to the program and give you the skills to adjust a photographrsquos basic tone and color These basic adjustments compensate for the limits of photography
A photograph canrsquot (yet) see as well as the human eye It canrsquot see the range of brightness or detail
And both the camera and the camera operator (you) are imperfect Exposures may not be perfect color and contrast may not look as wersquod hoped or as the scene actually appeared
These basic Photoshop skills can help make a photo look better online or in print
For those of you looking to dig deeper into Photoshoprsquos magical abili-ties to transform images there are numerous online resources Lyndacom (free to Penn State students) offers tutorials You can find many free resources on Youtubecom and Adobecom offers tutorials as well
And you can always contact me if you have questions
Will Yurmanwillyurmangmailcom
Photoshop
Tips amp Tricks
updated May 201724
9 Save your Image FilesPart of your workflow needs to be a way to stay organized If you canrsquot find your photos they have no value They are certainly worthless as part of an assignment but even worse in the real world where if you canrsquot find a photo or lose a file yoursquoll be in deep doo doo (a technical term)
YOU SHOULD HAVE BEEN WORKING ON A COPY
If you follow good workflow you still have an original untouched version of your file This version the toned and captioned version should be saved with a unique name that tells you something about the photo
File names should have no spaces and no special characters
Use only letters numbers hyphen and dash
My system
date_name_slug The date the photo was takenYour name (so a teacher or client or boss immediately knows who took the photo)A slug that tells what assignment the photo goes with
20160901_YourName_Circus_01
This photo for example was taken on September 1 2016 by you and is the first photo from the Circus assignment
bullI use the year at the beginning of my file name because I think sorting by year makes sense for me It puts all the 2016 files to-gether
bull
Photoshop
Tips amp Tricks
updated May 201725
10 Reformat your cardIf possible donrsquot do this until the end Your card is your backup incase everything goes wrong )
Format the card in the camera
Use the camera to format the card never delete files off a card from the computer You want to use the format function of the device to properly erase and ready the card for next time
DONrsquoT reformat until you are SURE you have properly saved your images
There are many many many other features and tools in Photoshop
There are some other ways to adjust photos that can be useful includ-ing
ShadowHighlights ndash you can open up shadows or add detail back into highlights (within limits)
BrightnessContrast ndash another way to control the brightness and contrast of a photo
Curves ndash Similar to Levels but instead of three arrows you can adjust the image anywhere along the curve
You can explore these tools as you gain familiarity with the program
bullIdeally you should have a card dedicat-ed to one device
It is better not to use a card in more than one camera
And it is a terrible idea to store fold-ers of other files on your card
Each device writes a lsquotable of contentsrsquo on the card to keep files organized Multiple devices means mul-tiple tables increasing the odds that your card will fail
bull
Photoshop
Tips amp Tricks
updated May 201726
SHOOTING RAW
Until now I have assumed you are shooting jpegs This is the almost universal image file format that is found on almost every device and website
JPEGS are small image files that can be viewed online opened in most applications They offer compatibility and small file size
But think about that ndash how can they be so small Why are they so universal
JPEGS are small because the files are compressed Information is dis-carded to reduce the file size Enough is kept so the image still looks good
When you take a photo with your camera a lot of information is applied to the file ndash the white balance you set perhaps contrast or sharpness
All of this is stored in the JPEG file and used to display the image
What if it wasnrsquot
What if you could take the lsquorawrsquo unprocessed digital information and manipulate it after the fact in Photoshop
Well you can Each camera manufacturer has itrsquos own formula for what we call a Raw file And Photoshop can open almost all of them
bullWhen a brand new camera is introduced it may take Photo-shop a few weeks or months to introduce an update for pro-cessing the Raw file
bull
Photoshop
Tips amp Tricks
updated May 201727
Nikon calls its Raw files NEFS Canon has CR2 files etc
The advantage of Raws is that you start in Photoshop with a lot more information and data Nothing is compressed no settings locked into the file
The disadvantage is that the files are much larger ndash your camerarsquos card will hold fewer imagesNot all software can edit or see a Raw file Yoursquoll need to use Photo-shop or some other image editor to convert the files to a universal format like a jpeg
IF you decide to shoot in the RAW format the image will open in a different window inside Photoshop
Note the controls You can set a white by using the eyedropper and clicking on something neutral You can fine tune your settings with the adjustments on the right ndash changing exposure contrast color etc
Photoshop
Tips amp Tricks
updated May 201728
You can make local adjustments by using the Adjustment brush
To use the brush lsquopaintrsquo over the area you want to adjust You can change the settings before or after using the brush You canrsquot select an area as you would with the Lasso or Quick Selection tools but you can still make many adjustments
When yoursquore done open the image make any final corrections add a caption and save it as a jpeg or other format The original Raw file remains as a backup
Watch a 610 video on using Camera Raw
Photoshop
Tips amp Tricks
updated May 201729
Photoshop is an extremely powerful application This tutorial only scratches the surface of what the app can do
The goal of this document is to introduce you to the program and give you the skills to adjust a photographrsquos basic tone and color These basic adjustments compensate for the limits of photography
A photograph canrsquot (yet) see as well as the human eye It canrsquot see the range of brightness or detail
And both the camera and the camera operator (you) are imperfect Exposures may not be perfect color and contrast may not look as wersquod hoped or as the scene actually appeared
These basic Photoshop skills can help make a photo look better online or in print
For those of you looking to dig deeper into Photoshoprsquos magical abili-ties to transform images there are numerous online resources Lyndacom (free to Penn State students) offers tutorials You can find many free resources on Youtubecom and Adobecom offers tutorials as well
And you can always contact me if you have questions
Will Yurmanwillyurmangmailcom

Photoshop
Tips amp Tricks
updated May 201725
10 Reformat your cardIf possible donrsquot do this until the end Your card is your backup incase everything goes wrong )
Format the card in the camera
Use the camera to format the card never delete files off a card from the computer You want to use the format function of the device to properly erase and ready the card for next time
DONrsquoT reformat until you are SURE you have properly saved your images
There are many many many other features and tools in Photoshop
There are some other ways to adjust photos that can be useful includ-ing
ShadowHighlights ndash you can open up shadows or add detail back into highlights (within limits)
BrightnessContrast ndash another way to control the brightness and contrast of a photo
Curves ndash Similar to Levels but instead of three arrows you can adjust the image anywhere along the curve
You can explore these tools as you gain familiarity with the program
bullIdeally you should have a card dedicat-ed to one device
It is better not to use a card in more than one camera
And it is a terrible idea to store fold-ers of other files on your card
Each device writes a lsquotable of contentsrsquo on the card to keep files organized Multiple devices means mul-tiple tables increasing the odds that your card will fail
bull
Photoshop
Tips amp Tricks
updated May 201726
SHOOTING RAW
Until now I have assumed you are shooting jpegs This is the almost universal image file format that is found on almost every device and website
JPEGS are small image files that can be viewed online opened in most applications They offer compatibility and small file size
But think about that ndash how can they be so small Why are they so universal
JPEGS are small because the files are compressed Information is dis-carded to reduce the file size Enough is kept so the image still looks good
When you take a photo with your camera a lot of information is applied to the file ndash the white balance you set perhaps contrast or sharpness
All of this is stored in the JPEG file and used to display the image
What if it wasnrsquot
What if you could take the lsquorawrsquo unprocessed digital information and manipulate it after the fact in Photoshop
Well you can Each camera manufacturer has itrsquos own formula for what we call a Raw file And Photoshop can open almost all of them
bullWhen a brand new camera is introduced it may take Photo-shop a few weeks or months to introduce an update for pro-cessing the Raw file
bull
Photoshop
Tips amp Tricks
updated May 201727
Nikon calls its Raw files NEFS Canon has CR2 files etc
The advantage of Raws is that you start in Photoshop with a lot more information and data Nothing is compressed no settings locked into the file
The disadvantage is that the files are much larger ndash your camerarsquos card will hold fewer imagesNot all software can edit or see a Raw file Yoursquoll need to use Photo-shop or some other image editor to convert the files to a universal format like a jpeg
IF you decide to shoot in the RAW format the image will open in a different window inside Photoshop
Note the controls You can set a white by using the eyedropper and clicking on something neutral You can fine tune your settings with the adjustments on the right ndash changing exposure contrast color etc
Photoshop
Tips amp Tricks
updated May 201728
You can make local adjustments by using the Adjustment brush
To use the brush lsquopaintrsquo over the area you want to adjust You can change the settings before or after using the brush You canrsquot select an area as you would with the Lasso or Quick Selection tools but you can still make many adjustments
When yoursquore done open the image make any final corrections add a caption and save it as a jpeg or other format The original Raw file remains as a backup
Watch a 610 video on using Camera Raw
Photoshop
Tips amp Tricks
updated May 201729
Photoshop is an extremely powerful application This tutorial only scratches the surface of what the app can do
The goal of this document is to introduce you to the program and give you the skills to adjust a photographrsquos basic tone and color These basic adjustments compensate for the limits of photography
A photograph canrsquot (yet) see as well as the human eye It canrsquot see the range of brightness or detail
And both the camera and the camera operator (you) are imperfect Exposures may not be perfect color and contrast may not look as wersquod hoped or as the scene actually appeared
These basic Photoshop skills can help make a photo look better online or in print
For those of you looking to dig deeper into Photoshoprsquos magical abili-ties to transform images there are numerous online resources Lyndacom (free to Penn State students) offers tutorials You can find many free resources on Youtubecom and Adobecom offers tutorials as well
And you can always contact me if you have questions
Will Yurmanwillyurmangmailcom
Photoshop
Tips amp Tricks
updated May 201726
SHOOTING RAW
Until now I have assumed you are shooting jpegs This is the almost universal image file format that is found on almost every device and website
JPEGS are small image files that can be viewed online opened in most applications They offer compatibility and small file size
But think about that ndash how can they be so small Why are they so universal
JPEGS are small because the files are compressed Information is dis-carded to reduce the file size Enough is kept so the image still looks good
When you take a photo with your camera a lot of information is applied to the file ndash the white balance you set perhaps contrast or sharpness
All of this is stored in the JPEG file and used to display the image
What if it wasnrsquot
What if you could take the lsquorawrsquo unprocessed digital information and manipulate it after the fact in Photoshop
Well you can Each camera manufacturer has itrsquos own formula for what we call a Raw file And Photoshop can open almost all of them
bullWhen a brand new camera is introduced it may take Photo-shop a few weeks or months to introduce an update for pro-cessing the Raw file
bull
Photoshop
Tips amp Tricks
updated May 201727
Nikon calls its Raw files NEFS Canon has CR2 files etc
The advantage of Raws is that you start in Photoshop with a lot more information and data Nothing is compressed no settings locked into the file
The disadvantage is that the files are much larger ndash your camerarsquos card will hold fewer imagesNot all software can edit or see a Raw file Yoursquoll need to use Photo-shop or some other image editor to convert the files to a universal format like a jpeg
IF you decide to shoot in the RAW format the image will open in a different window inside Photoshop
Note the controls You can set a white by using the eyedropper and clicking on something neutral You can fine tune your settings with the adjustments on the right ndash changing exposure contrast color etc
Photoshop
Tips amp Tricks
updated May 201728
You can make local adjustments by using the Adjustment brush
To use the brush lsquopaintrsquo over the area you want to adjust You can change the settings before or after using the brush You canrsquot select an area as you would with the Lasso or Quick Selection tools but you can still make many adjustments
When yoursquore done open the image make any final corrections add a caption and save it as a jpeg or other format The original Raw file remains as a backup
Watch a 610 video on using Camera Raw
Photoshop
Tips amp Tricks
updated May 201729
Photoshop is an extremely powerful application This tutorial only scratches the surface of what the app can do
The goal of this document is to introduce you to the program and give you the skills to adjust a photographrsquos basic tone and color These basic adjustments compensate for the limits of photography
A photograph canrsquot (yet) see as well as the human eye It canrsquot see the range of brightness or detail
And both the camera and the camera operator (you) are imperfect Exposures may not be perfect color and contrast may not look as wersquod hoped or as the scene actually appeared
These basic Photoshop skills can help make a photo look better online or in print
For those of you looking to dig deeper into Photoshoprsquos magical abili-ties to transform images there are numerous online resources Lyndacom (free to Penn State students) offers tutorials You can find many free resources on Youtubecom and Adobecom offers tutorials as well
And you can always contact me if you have questions
Will Yurmanwillyurmangmailcom
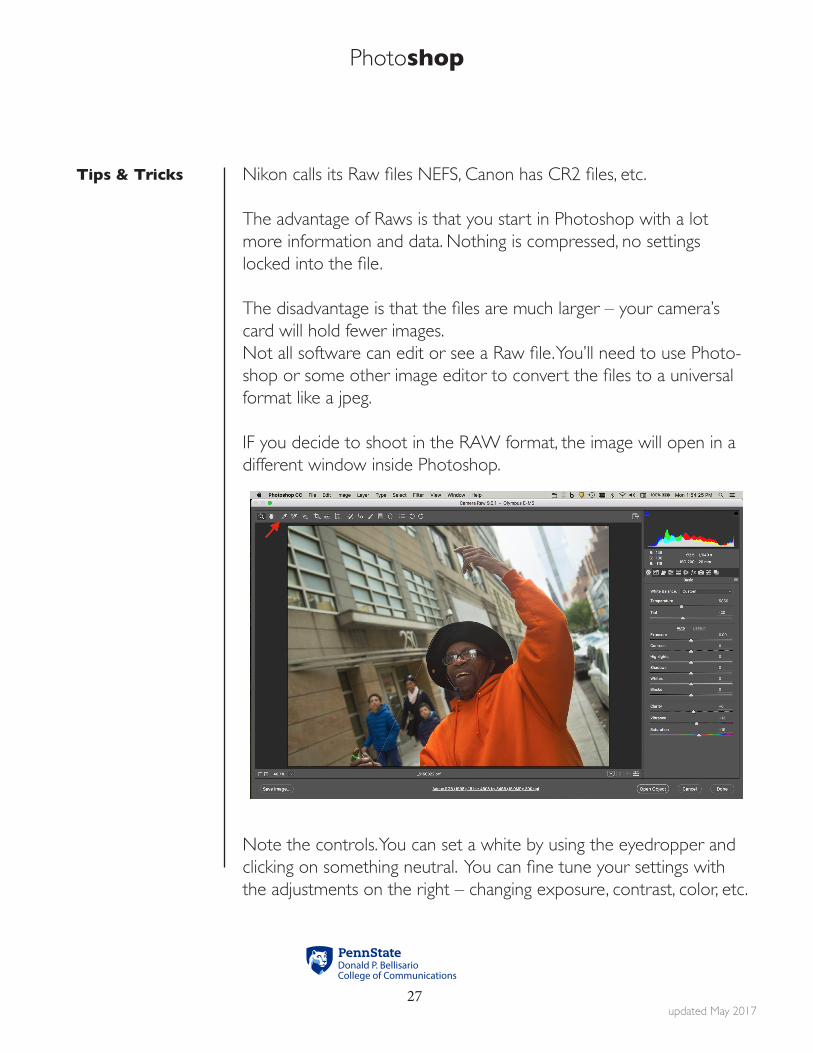
Photoshop
Tips amp Tricks
updated May 201727
Nikon calls its Raw files NEFS Canon has CR2 files etc
The advantage of Raws is that you start in Photoshop with a lot more information and data Nothing is compressed no settings locked into the file
The disadvantage is that the files are much larger ndash your camerarsquos card will hold fewer imagesNot all software can edit or see a Raw file Yoursquoll need to use Photo-shop or some other image editor to convert the files to a universal format like a jpeg
IF you decide to shoot in the RAW format the image will open in a different window inside Photoshop
Note the controls You can set a white by using the eyedropper and clicking on something neutral You can fine tune your settings with the adjustments on the right ndash changing exposure contrast color etc
Photoshop
Tips amp Tricks
updated May 201728
You can make local adjustments by using the Adjustment brush
To use the brush lsquopaintrsquo over the area you want to adjust You can change the settings before or after using the brush You canrsquot select an area as you would with the Lasso or Quick Selection tools but you can still make many adjustments
When yoursquore done open the image make any final corrections add a caption and save it as a jpeg or other format The original Raw file remains as a backup
Watch a 610 video on using Camera Raw
Photoshop
Tips amp Tricks
updated May 201729
Photoshop is an extremely powerful application This tutorial only scratches the surface of what the app can do
The goal of this document is to introduce you to the program and give you the skills to adjust a photographrsquos basic tone and color These basic adjustments compensate for the limits of photography
A photograph canrsquot (yet) see as well as the human eye It canrsquot see the range of brightness or detail
And both the camera and the camera operator (you) are imperfect Exposures may not be perfect color and contrast may not look as wersquod hoped or as the scene actually appeared
These basic Photoshop skills can help make a photo look better online or in print
For those of you looking to dig deeper into Photoshoprsquos magical abili-ties to transform images there are numerous online resources Lyndacom (free to Penn State students) offers tutorials You can find many free resources on Youtubecom and Adobecom offers tutorials as well
And you can always contact me if you have questions
Will Yurmanwillyurmangmailcom
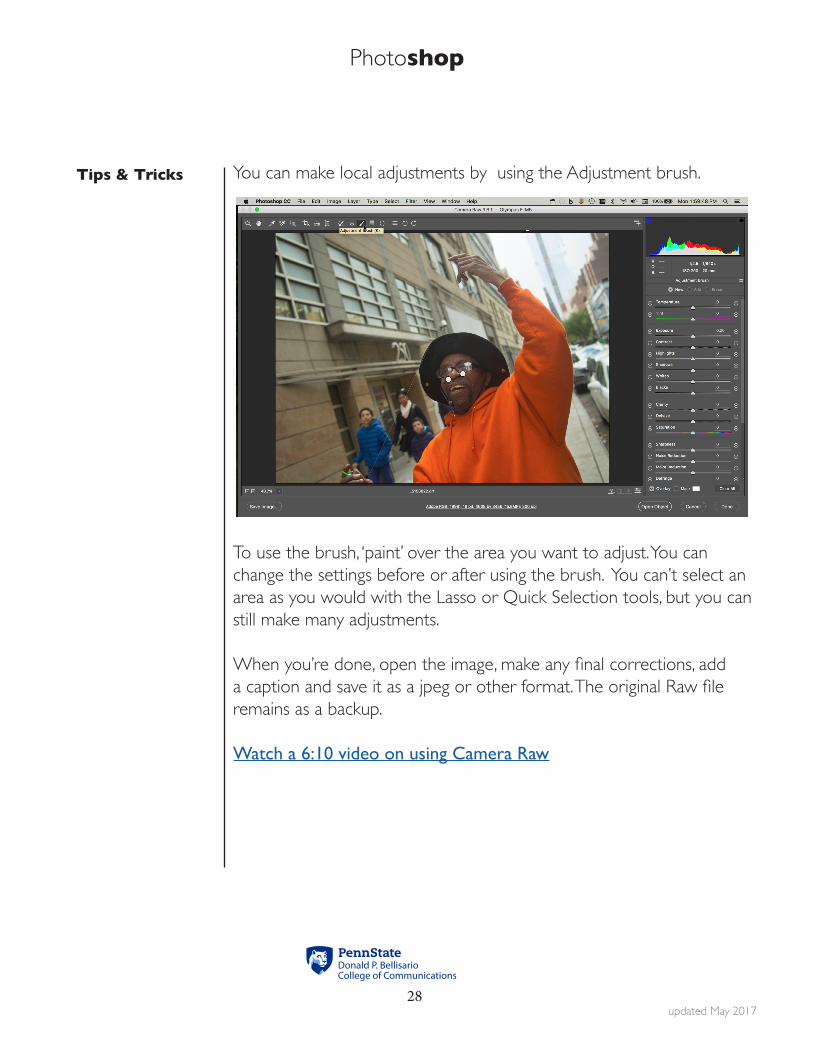
Photoshop
Tips amp Tricks
updated May 201728
You can make local adjustments by using the Adjustment brush
To use the brush lsquopaintrsquo over the area you want to adjust You can change the settings before or after using the brush You canrsquot select an area as you would with the Lasso or Quick Selection tools but you can still make many adjustments
When yoursquore done open the image make any final corrections add a caption and save it as a jpeg or other format The original Raw file remains as a backup
Watch a 610 video on using Camera Raw
Photoshop
Tips amp Tricks
updated May 201729
Photoshop is an extremely powerful application This tutorial only scratches the surface of what the app can do
The goal of this document is to introduce you to the program and give you the skills to adjust a photographrsquos basic tone and color These basic adjustments compensate for the limits of photography
A photograph canrsquot (yet) see as well as the human eye It canrsquot see the range of brightness or detail
And both the camera and the camera operator (you) are imperfect Exposures may not be perfect color and contrast may not look as wersquod hoped or as the scene actually appeared
These basic Photoshop skills can help make a photo look better online or in print
For those of you looking to dig deeper into Photoshoprsquos magical abili-ties to transform images there are numerous online resources Lyndacom (free to Penn State students) offers tutorials You can find many free resources on Youtubecom and Adobecom offers tutorials as well
And you can always contact me if you have questions
Will Yurmanwillyurmangmailcom