instructables.com - interactive multitouch...
TRANSCRIPT
http://www.instructables.com/id/Interactive-Multitouch-Display/
Home Sign Up! Explore Community Submit
All Art Craft Food Games Green Home Kids Life Music Offbeat Outdoors Pets Ride Science Sports Tech
Interactive Multitouch Displayby turkey tek on June 26, 2007
Table of Contents
intro: Interactive Multitouch Display . . . . . . . . . . . . . . . . . . . . . . . . . . . . . . . . . . . . . . . . . . . . . . . . . . . . . . . . . . . . . . . . . . . . . . . . . . . . . . . . . . . . . . . . . . . . . . . 2
Video . . . . . . . . . . . . . . . . . . . . . . . . . . . . . . . . . . . . . . . . . . . . . . . . . . . . . . . . . . . . . . . . . . . . . . . . . . . . . . . . . . . . . . . . . . . . . . . . . . . . . . . . . . . . . . . . . . . . 2
step 1: Theory of operation . . . . . . . . . . . . . . . . . . . . . . . . . . . . . . . . . . . . . . . . . . . . . . . . . . . . . . . . . . . . . . . . . . . . . . . . . . . . . . . . . . . . . . . . . . . . . . . . . . . . . 3
step 2: screen frame . . . . . . . . . . . . . . . . . . . . . . . . . . . . . . . . . . . . . . . . . . . . . . . . . . . . . . . . . . . . . . . . . . . . . . . . . . . . . . . . . . . . . . . . . . . . . . . . . . . . . . . . . . 5
step 3: led rails . . . . . . . . . . . . . . . . . . . . . . . . . . . . . . . . . . . . . . . . . . . . . . . . . . . . . . . . . . . . . . . . . . . . . . . . . . . . . . . . . . . . . . . . . . . . . . . . . . . . . . . . . . . . . . 6
step 4: led mounting and wiring . . . . . . . . . . . . . . . . . . . . . . . . . . . . . . . . . . . . . . . . . . . . . . . . . . . . . . . . . . . . . . . . . . . . . . . . . . . . . . . . . . . . . . . . . . . . . . . . . . 8
step 5: prepare acrylic . . . . . . . . . . . . . . . . . . . . . . . . . . . . . . . . . . . . . . . . . . . . . . . . . . . . . . . . . . . . . . . . . . . . . . . . . . . . . . . . . . . . . . . . . . . . . . . . . . . . . . . . . 9
step 6: screen sandwich assembly . . . . . . . . . . . . . . . . . . . . . . . . . . . . . . . . . . . . . . . . . . . . . . . . . . . . . . . . . . . . . . . . . . . . . . . . . . . . . . . . . . . . . . . . . . . . . . . . 10
step 7: modify webcam . . . . . . . . . . . . . . . . . . . . . . . . . . . . . . . . . . . . . . . . . . . . . . . . . . . . . . . . . . . . . . . . . . . . . . . . . . . . . . . . . . . . . . . . . . . . . . . . . . . . . . . . 13
step 8: projector mount . . . . . . . . . . . . . . . . . . . . . . . . . . . . . . . . . . . . . . . . . . . . . . . . . . . . . . . . . . . . . . . . . . . . . . . . . . . . . . . . . . . . . . . . . . . . . . . . . . . . . . . . 14
step 9: framing support . . . . . . . . . . . . . . . . . . . . . . . . . . . . . . . . . . . . . . . . . . . . . . . . . . . . . . . . . . . . . . . . . . . . . . . . . . . . . . . . . . . . . . . . . . . . . . . . . . . . . . . . 16
step 10: software and demos . . . . . . . . . . . . . . . . . . . . . . . . . . . . . . . . . . . . . . . . . . . . . . . . . . . . . . . . . . . . . . . . . . . . . . . . . . . . . . . . . . . . . . . . . . . . . . . . . . . . 18
step 11: enjoy . . . . . . . . . . . . . . . . . . . . . . . . . . . . . . . . . . . . . . . . . . . . . . . . . . . . . . . . . . . . . . . . . . . . . . . . . . . . . . . . . . . . . . . . . . . . . . . . . . . . . . . . . . . . . . . 19
Related Instructables . . . . . . . . . . . . . . . . . . . . . . . . . . . . . . . . . . . . . . . . . . . . . . . . . . . . . . . . . . . . . . . . . . . . . . . . . . . . . . . . . . . . . . . . . . . . . . . . . . . . . . . . . . . 19
Advertisements . . . . . . . . . . . . . . . . . . . . . . . . . . . . . . . . . . . . . . . . . . . . . . . . . . . . . . . . . . . . . . . . . . . . . . . . . . . . . . . . . . . . . . . . . . . . . . . . . . . . . . . . . . . . . . . 19
Make Magazine Special Offer . . . . . . . . . . . . . . . . . . . . . . . . . . . . . . . . . . . . . . . . . . . . . . . . . . . . . . . . . . . . . . . . . . . . . . . . . . . . . . . . . . . . . . . . . . . . . . . . . . 19
Comments . . . . . . . . . . . . . . . . . . . . . . . . . . . . . . . . . . . . . . . . . . . . . . . . . . . . . . . . . . . . . . . . . . . . . . . . . . . . . . . . . . . . . . . . . . . . . . . . . . . . . . . . . . . . . . . . . . . 19
http://www.instructables.com/id/Interactive-Multitouch-Display/
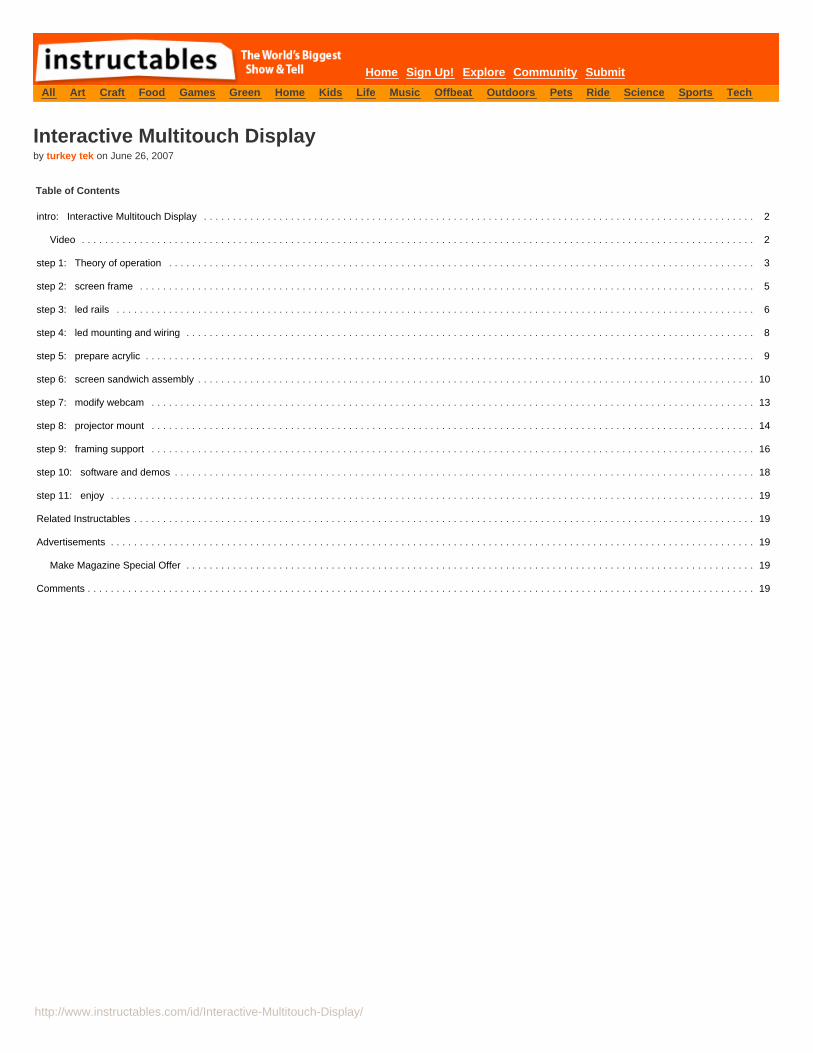
intro: Interactive Multitouch DisplayBetween the Apple iPhone and Microsoft's interactive table, multi-touch displays are all the rage. This instructable will show you how to turn your lcd projector into aninteractive multi-touch display table using a few cheap components readily available from the hardware store.
Here is a video of my display in action:
Video
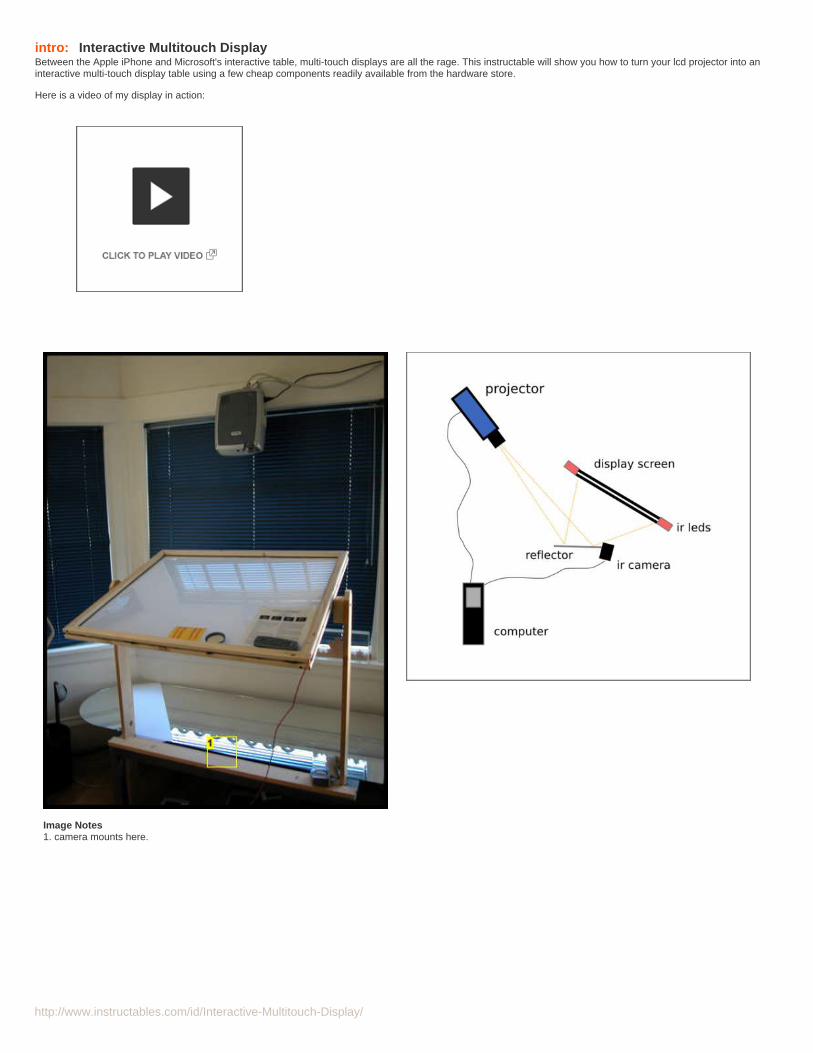
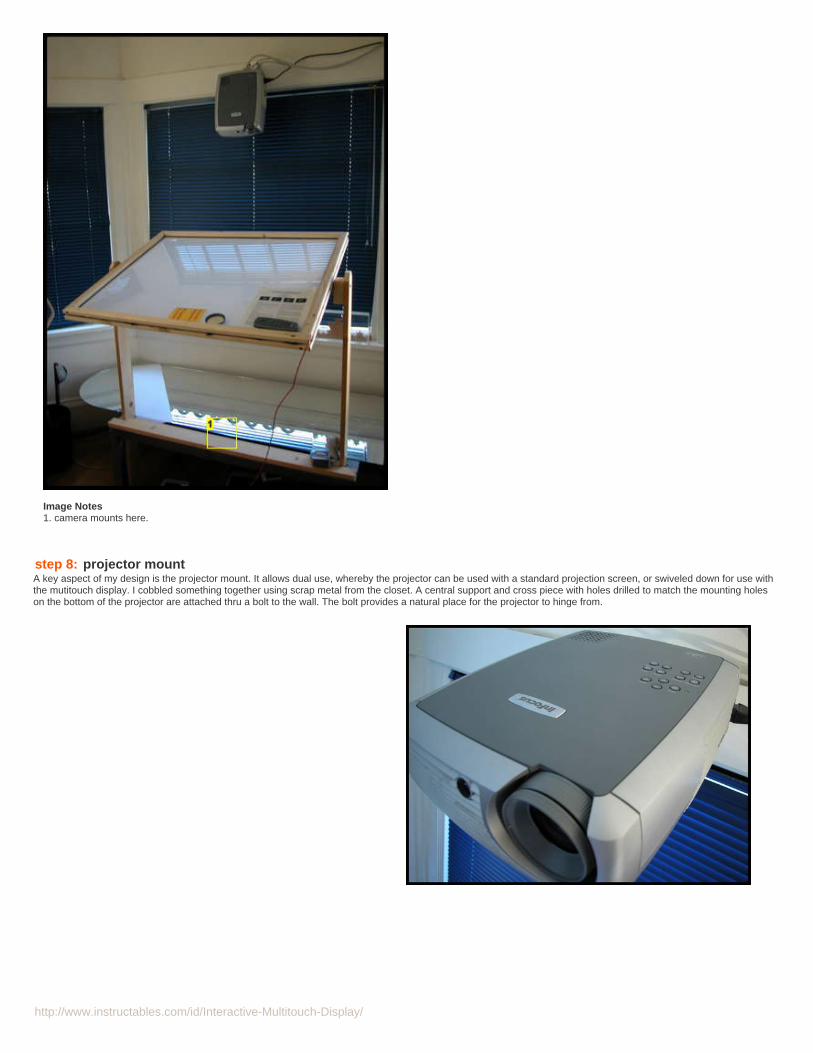
Image Notes1. camera mounts here.
http://www.instructables.com/id/Interactive-Multitouch-Display/
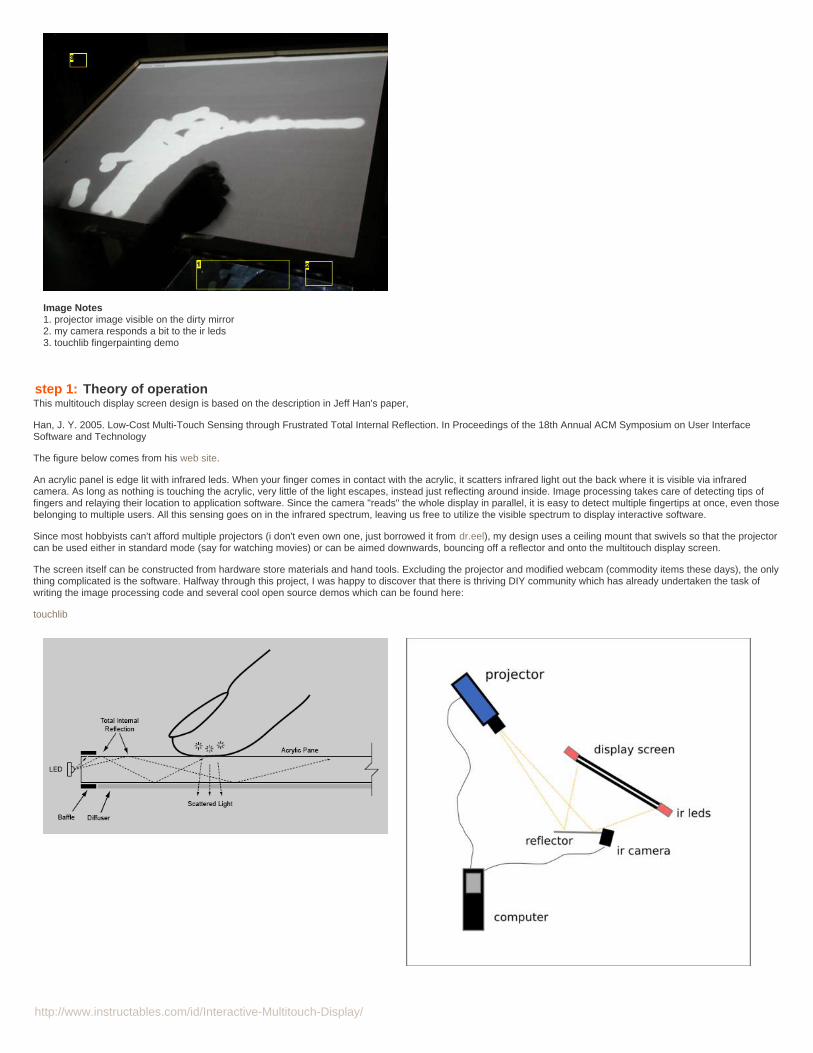
Image Notes1. projector image visible on the dirty mirror2. my camera responds a bit to the ir leds3. touchlib fingerpainting demo
step 1: Theory of operationThis multitouch display screen design is based on the description in Jeff Han's paper,
Han, J. Y. 2005. Low-Cost Multi-Touch Sensing through Frustrated Total Internal Reflection. In Proceedings of the 18th Annual ACM Symposium on User InterfaceSoftware and Technology
The figure below comes from his web site.
An acrylic panel is edge lit with infrared leds. When your finger comes in contact with the acrylic, it scatters infrared light out the back where it is visible via infraredcamera. As long as nothing is touching the acrylic, very little of the light escapes, instead just reflecting around inside. Image processing takes care of detecting tips offingers and relaying their location to application software. Since the camera "reads" the whole display in parallel, it is easy to detect multiple fingertips at once, even thosebelonging to multiple users. All this sensing goes on in the infrared spectrum, leaving us free to utilize the visible spectrum to display interactive software.
Since most hobbyists can't afford multiple projectors (i don't even own one, just borrowed it from dr.eel), my design uses a ceiling mount that swivels so that the projectorcan be used either in standard mode (say for watching movies) or can be aimed downwards, bouncing off a reflector and onto the multitouch display screen.
The screen itself can be constructed from hardware store materials and hand tools. Excluding the projector and modified webcam (commodity items these days), the onlything complicated is the software. Halfway through this project, I was happy to discover that there is thriving DIY community which has already undertaken the task ofwriting the image processing code and several cool open source demos which can be found here:
touchlib
http://www.instructables.com/id/Interactive-Multitouch-Display/
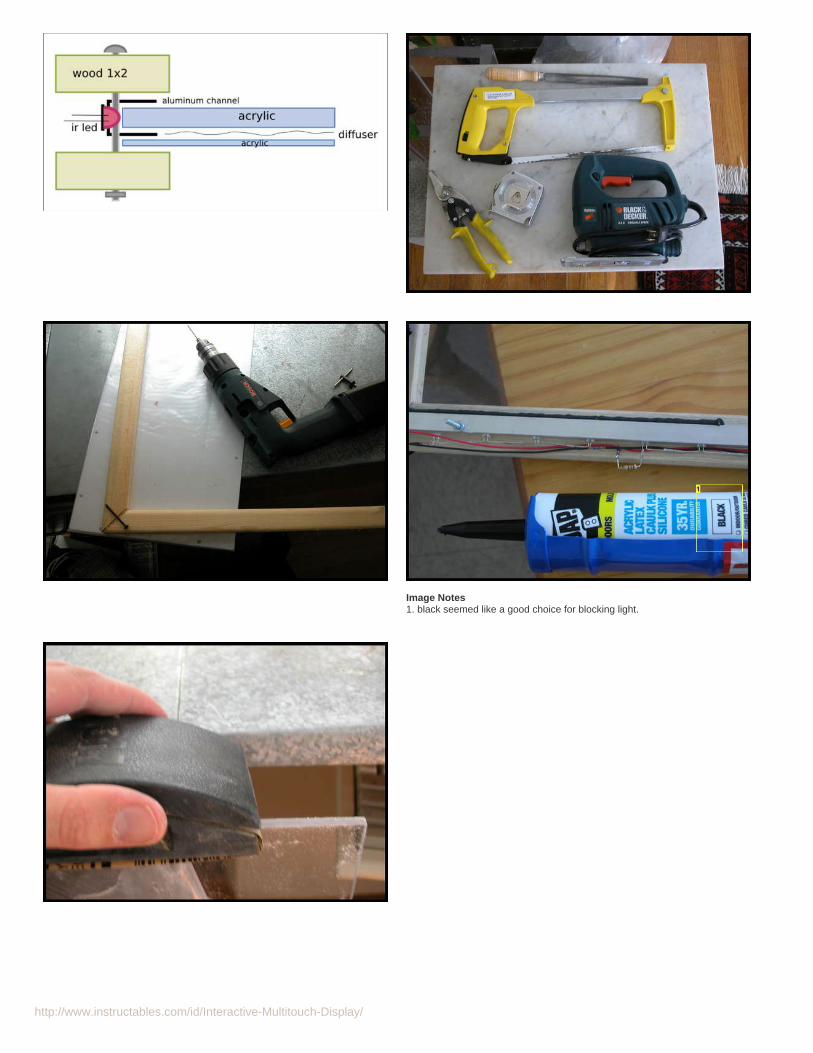
Image Notes1. black seemed like a good choice for blocking light.
http://www.instructables.com/id/Interactive-Multitouch-Display/
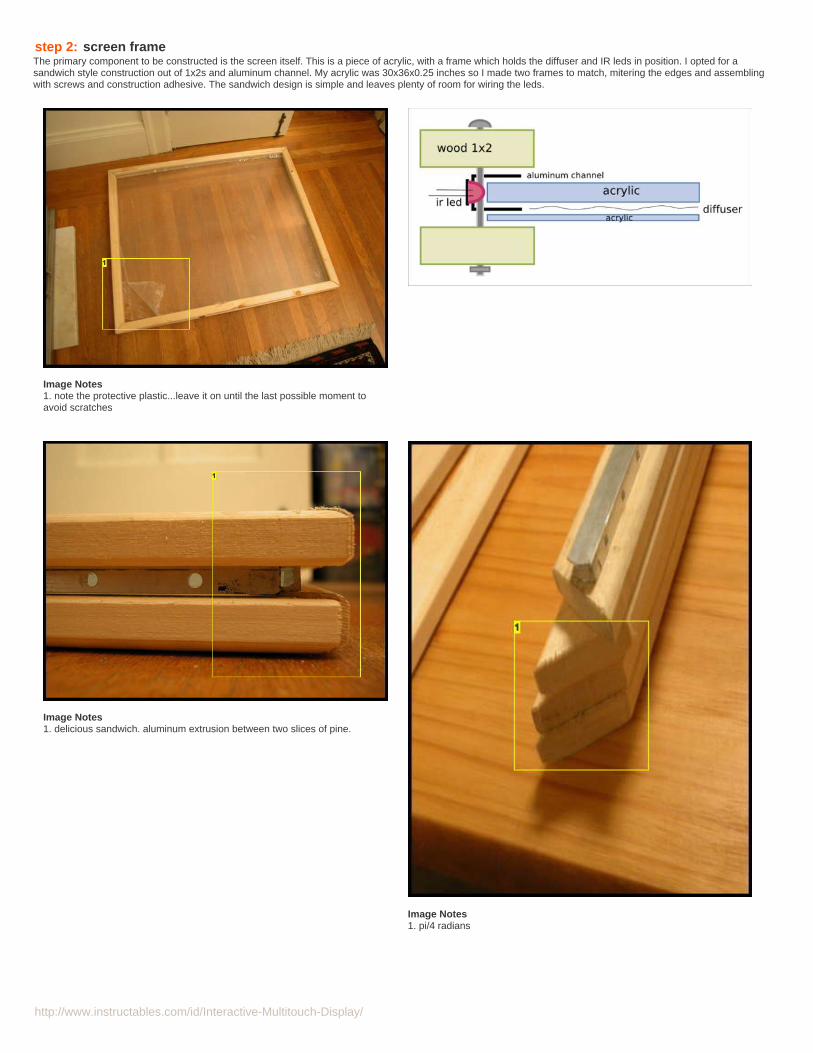
step 2: screen frameThe primary component to be constructed is the screen itself. This is a piece of acrylic, with a frame which holds the diffuser and IR leds in position. I opted for asandwich style construction out of 1x2s and aluminum channel. My acrylic was 30x36x0.25 inches so I made two frames to match, mitering the edges and assemblingwith screws and construction adhesive. The sandwich design is simple and leaves plenty of room for wiring the leds.
Image Notes1. note the protective plastic...leave it on until the last possible moment toavoid scratches
Image Notes1. delicious sandwich. aluminum extrusion between two slices of pine.
Image Notes1. pi/4 radians
http://www.instructables.com/id/Interactive-Multitouch-Display/
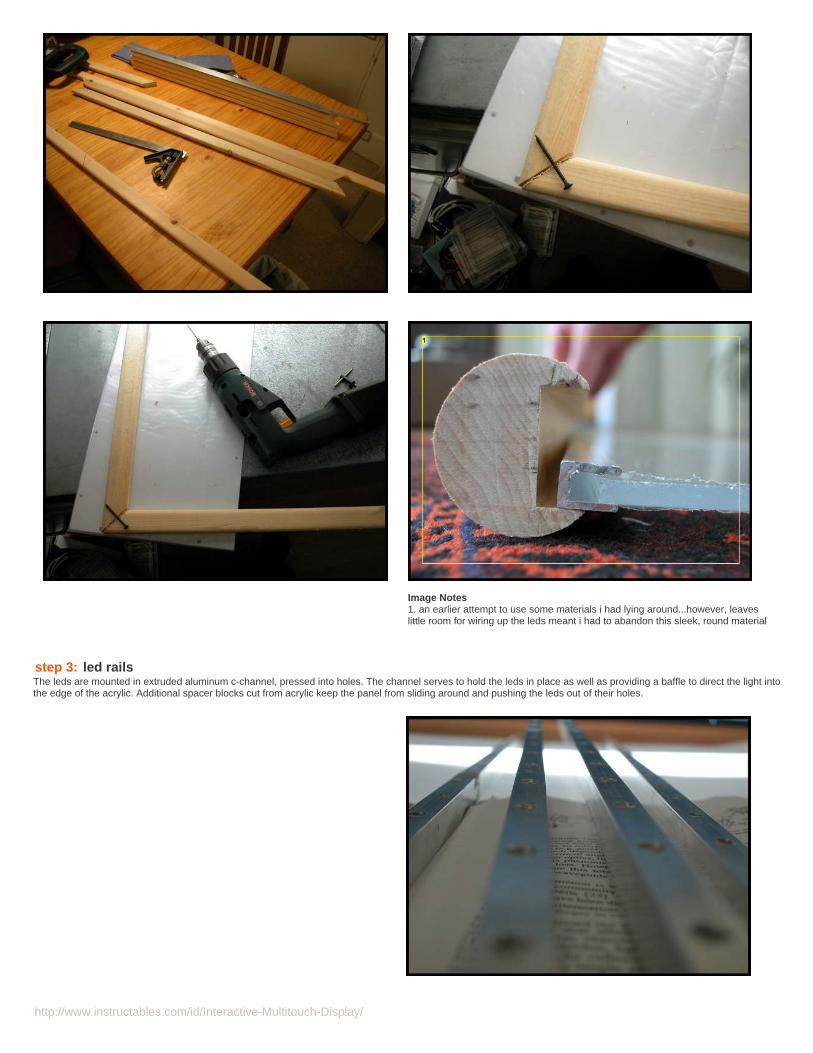
Image Notes1. an earlier attempt to use some materials i had lying around...however, leaveslittle room for wiring up the leds meant i had to abandon this sleek, round material
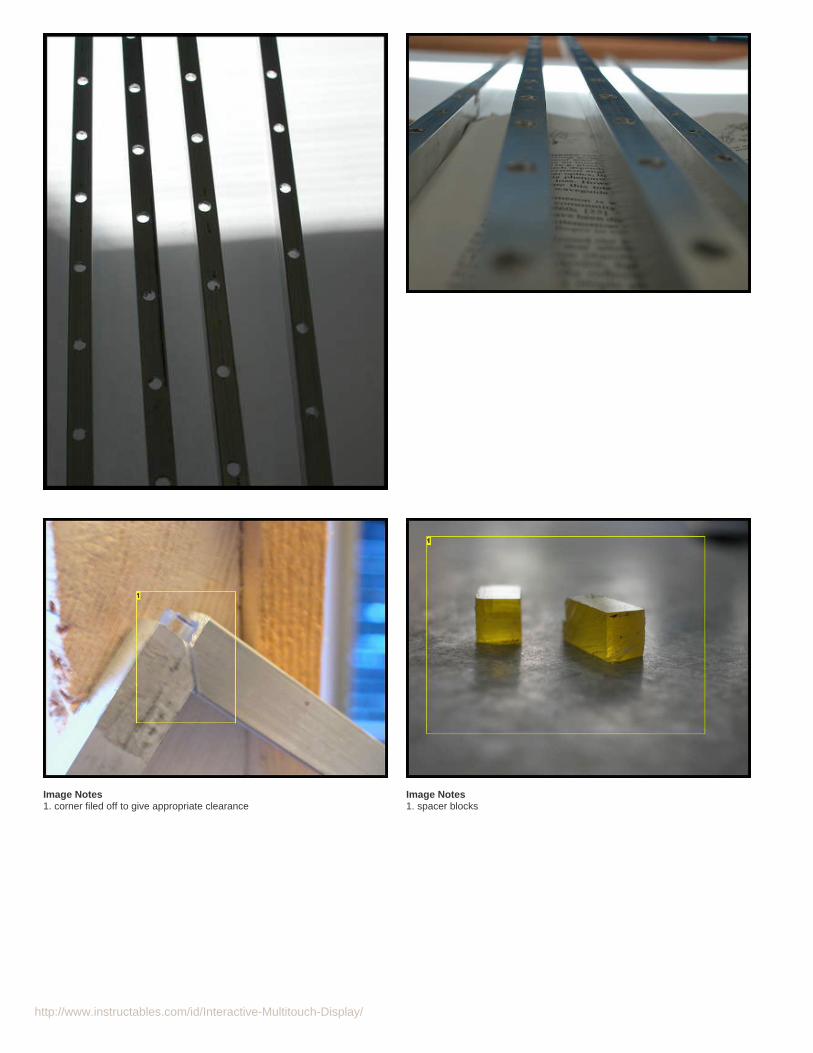
step 3: led railsThe leds are mounted in extruded aluminum c-channel, pressed into holes. The channel serves to hold the leds in place as well as providing a baffle to direct the light intothe edge of the acrylic. Additional spacer blocks cut from acrylic keep the panel from sliding around and pushing the leds out of their holes.
http://www.instructables.com/id/Interactive-Multitouch-Display/
Image Notes1. corner filed off to give appropriate clearance
Image Notes1. spacer blocks
http://www.instructables.com/id/Interactive-Multitouch-Display/
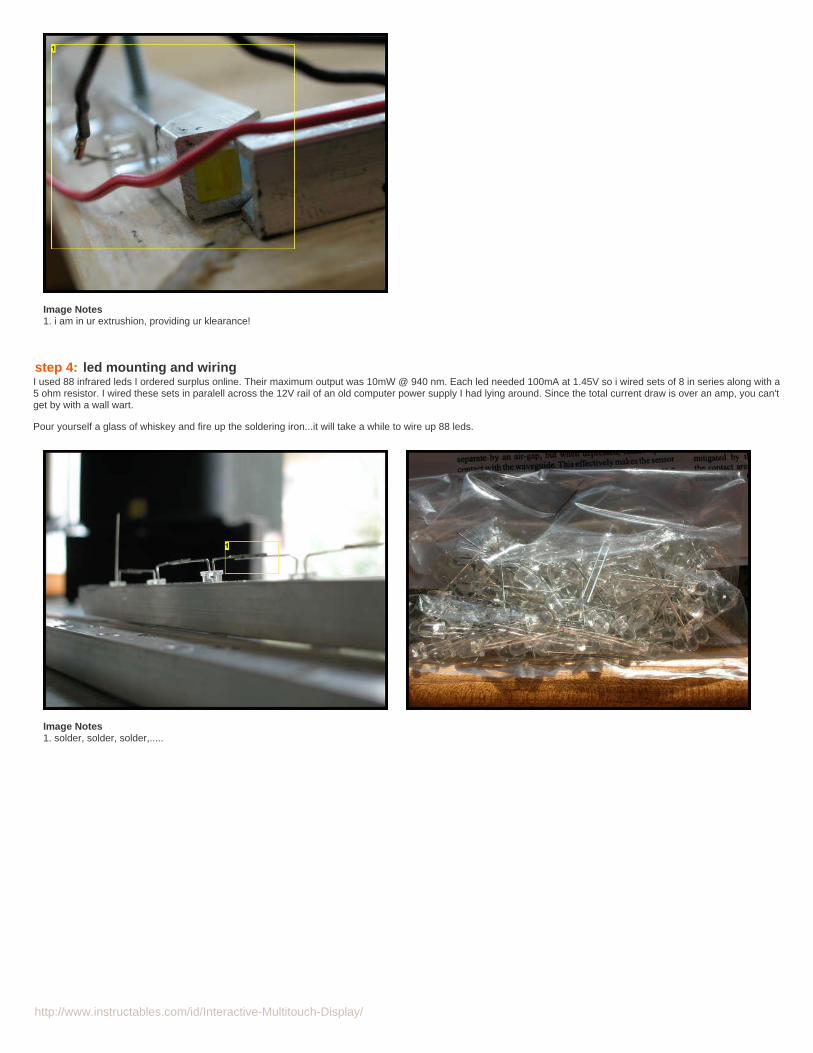
Image Notes1. i am in ur extrushion, providing ur klearance!
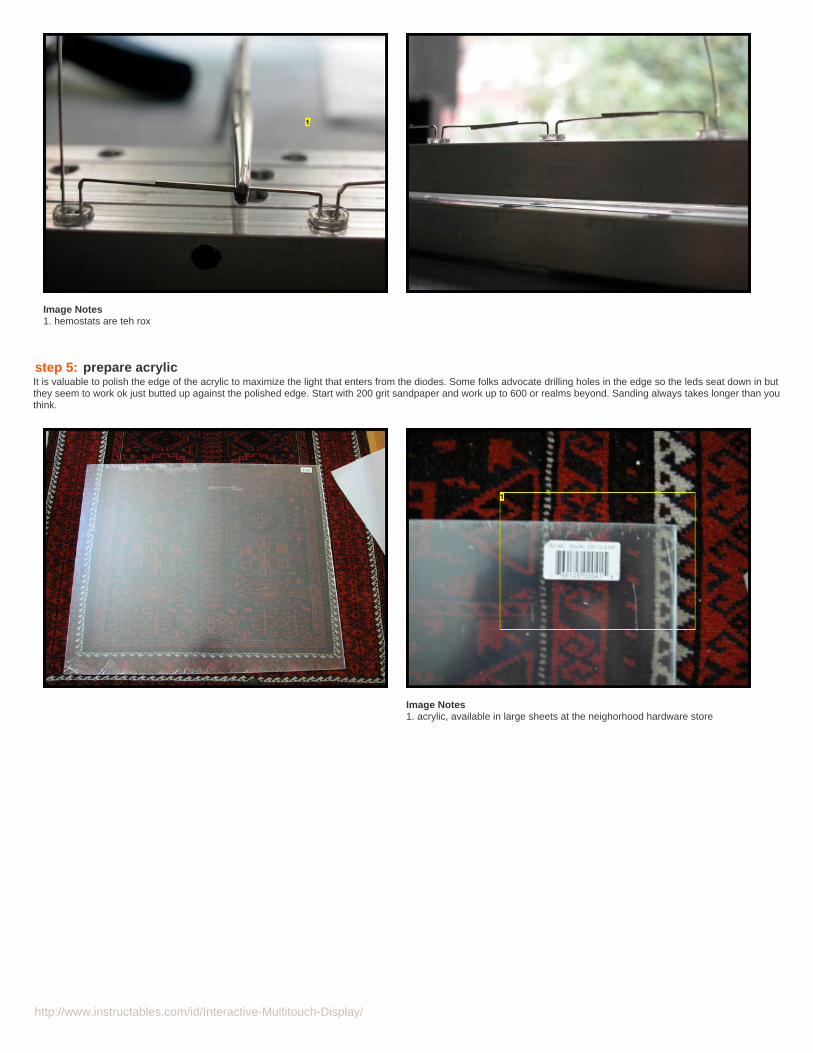
step 4: led mounting and wiringI used 88 infrared leds I ordered surplus online. Their maximum output was 10mW @ 940 nm. Each led needed 100mA at 1.45V so i wired sets of 8 in series along with a5 ohm resistor. I wired these sets in paralell across the 12V rail of an old computer power supply I had lying around. Since the total current draw is over an amp, you can'tget by with a wall wart.
Pour yourself a glass of whiskey and fire up the soldering iron...it will take a while to wire up 88 leds.
Image Notes1. solder, solder, solder,.....
http://www.instructables.com/id/Interactive-Multitouch-Display/
Image Notes1. hemostats are teh rox
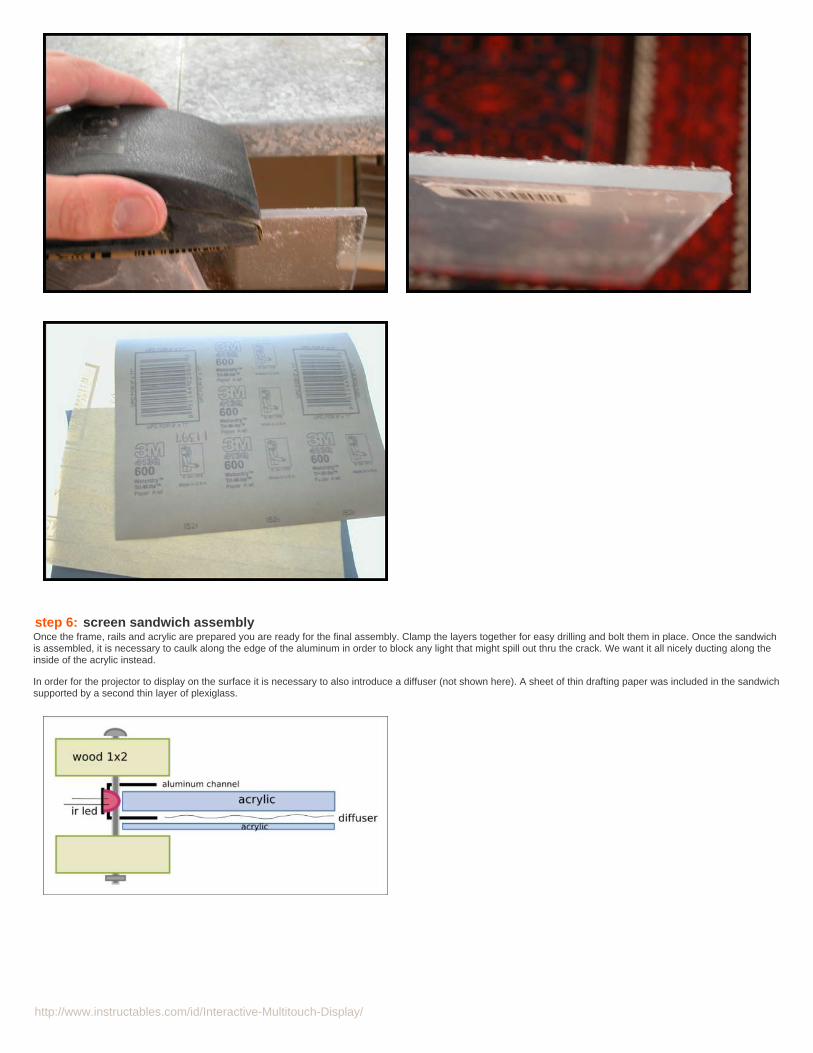
step 5: prepare acrylicIt is valuable to polish the edge of the acrylic to maximize the light that enters from the diodes. Some folks advocate drilling holes in the edge so the leds seat down in butthey seem to work ok just butted up against the polished edge. Start with 200 grit sandpaper and work up to 600 or realms beyond. Sanding always takes longer than youthink.
Image Notes1. acrylic, available in large sheets at the neighorhood hardware store
http://www.instructables.com/id/Interactive-Multitouch-Display/
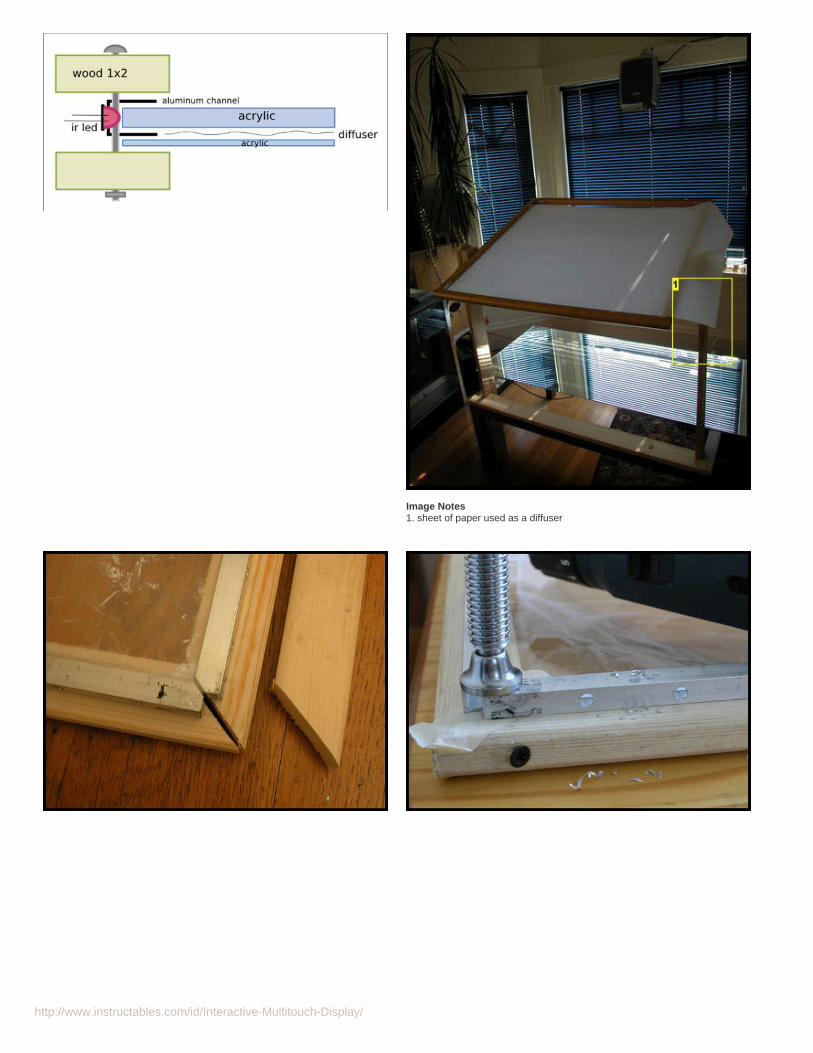
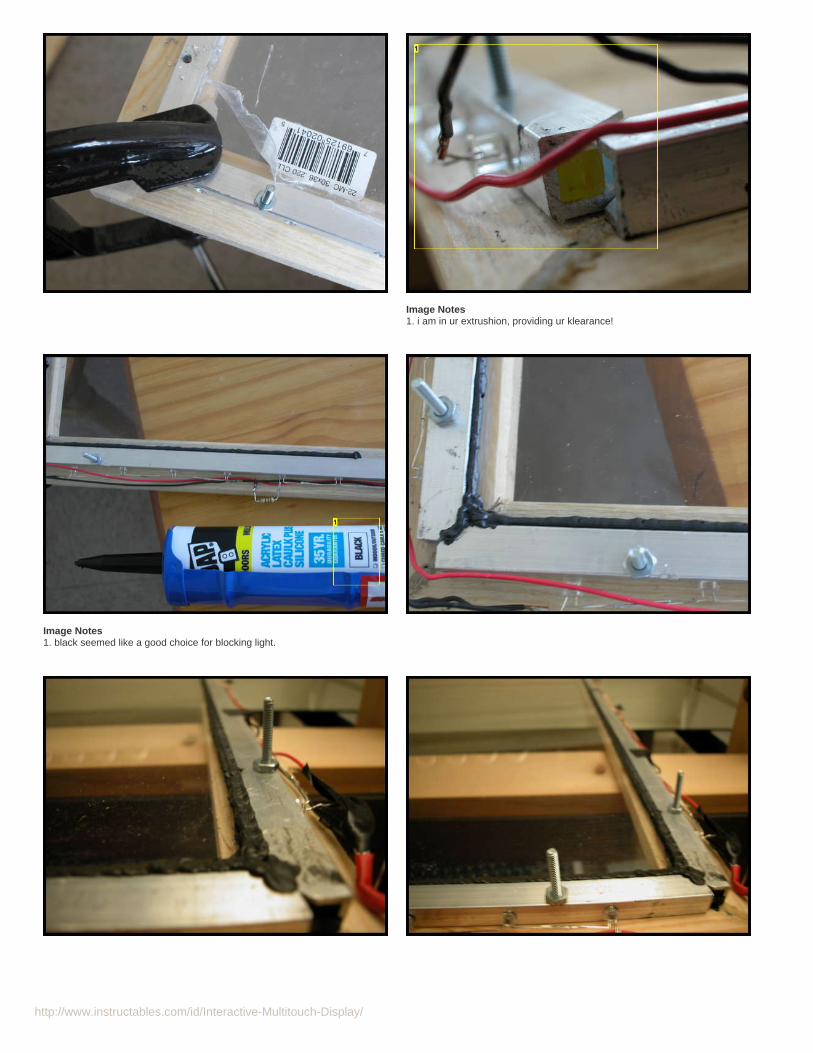
step 6: screen sandwich assemblyOnce the frame, rails and acrylic are prepared you are ready for the final assembly. Clamp the layers together for easy drilling and bolt them in place. Once the sandwichis assembled, it is necessary to caulk along the edge of the aluminum in order to block any light that might spill out thru the crack. We want it all nicely ducting along theinside of the acrylic instead.
In order for the projector to display on the surface it is necessary to also introduce a diffuser (not shown here). A sheet of thin drafting paper was included in the sandwichsupported by a second thin layer of plexiglass.
http://www.instructables.com/id/Interactive-Multitouch-Display/
Image Notes1. sheet of paper used as a diffuser
http://www.instructables.com/id/Interactive-Multitouch-Display/
Image Notes1. i am in ur extrushion, providing ur klearance!
Image Notes1. black seemed like a good choice for blocking light.
http://www.instructables.com/id/Interactive-Multitouch-Display/
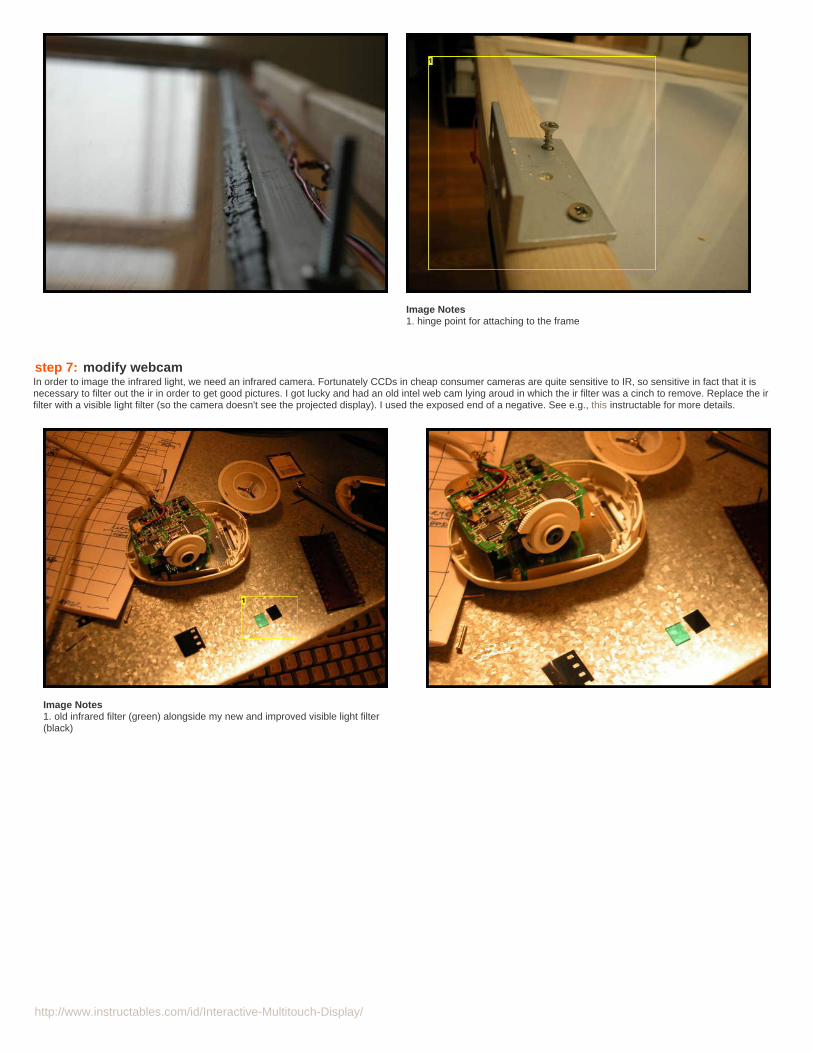
Image Notes1. hinge point for attaching to the frame
step 7: modify webcamIn order to image the infrared light, we need an infrared camera. Fortunately CCDs in cheap consumer cameras are quite sensitive to IR, so sensitive in fact that it isnecessary to filter out the ir in order to get good pictures. I got lucky and had an old intel web cam lying aroud in which the ir filter was a cinch to remove. Replace the irfilter with a visible light filter (so the camera doesn't see the projected display). I used the exposed end of a negative. See e.g., this instructable for more details.
Image Notes1. old infrared filter (green) alongside my new and improved visible light filter(black)
http://www.instructables.com/id/Interactive-Multitouch-Display/
Image Notes1. camera mounts here.
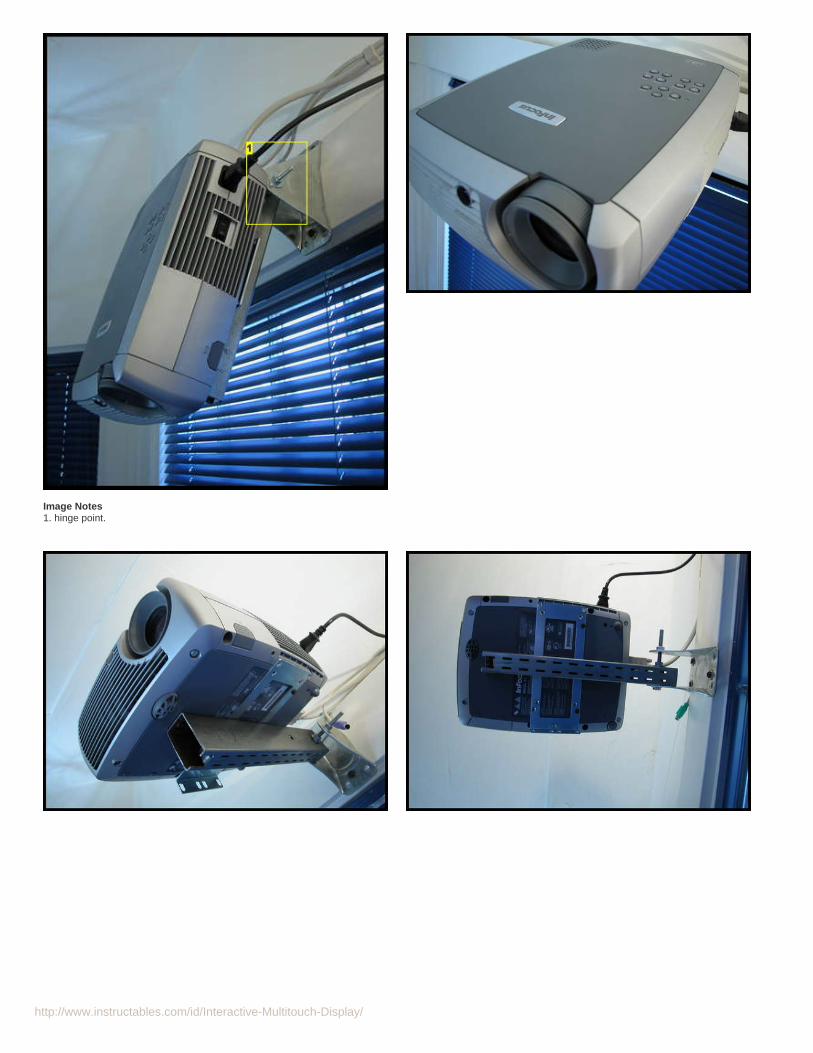
step 8: projector mountA key aspect of my design is the projector mount. It allows dual use, whereby the projector can be used with a standard projection screen, or swiveled down for use withthe mutitouch display. I cobbled something together using scrap metal from the closet. A central support and cross piece with holes drilled to match the mounting holeson the bottom of the projector are attached thru a bolt to the wall. The bolt provides a natural place for the projector to hinge from.
http://www.instructables.com/id/Interactive-Multitouch-Display/
Image Notes1. hinge point.
http://www.instructables.com/id/Interactive-Multitouch-Display/
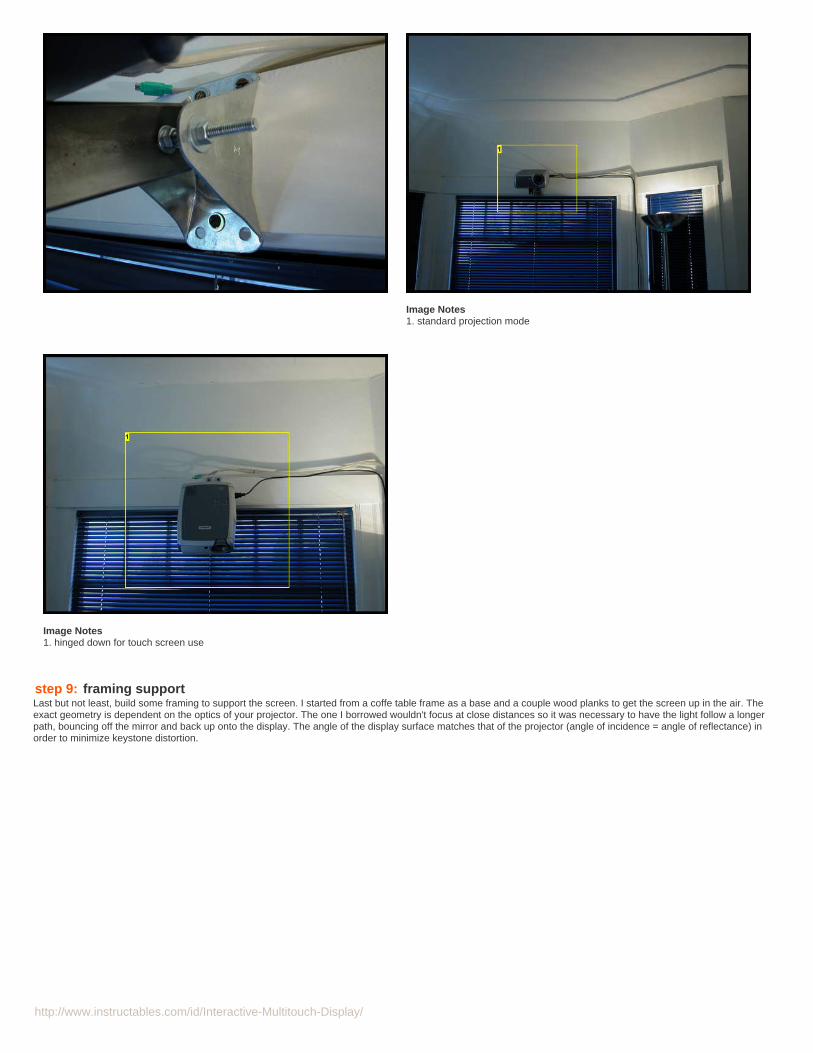
Image Notes1. standard projection mode
Image Notes1. hinged down for touch screen use
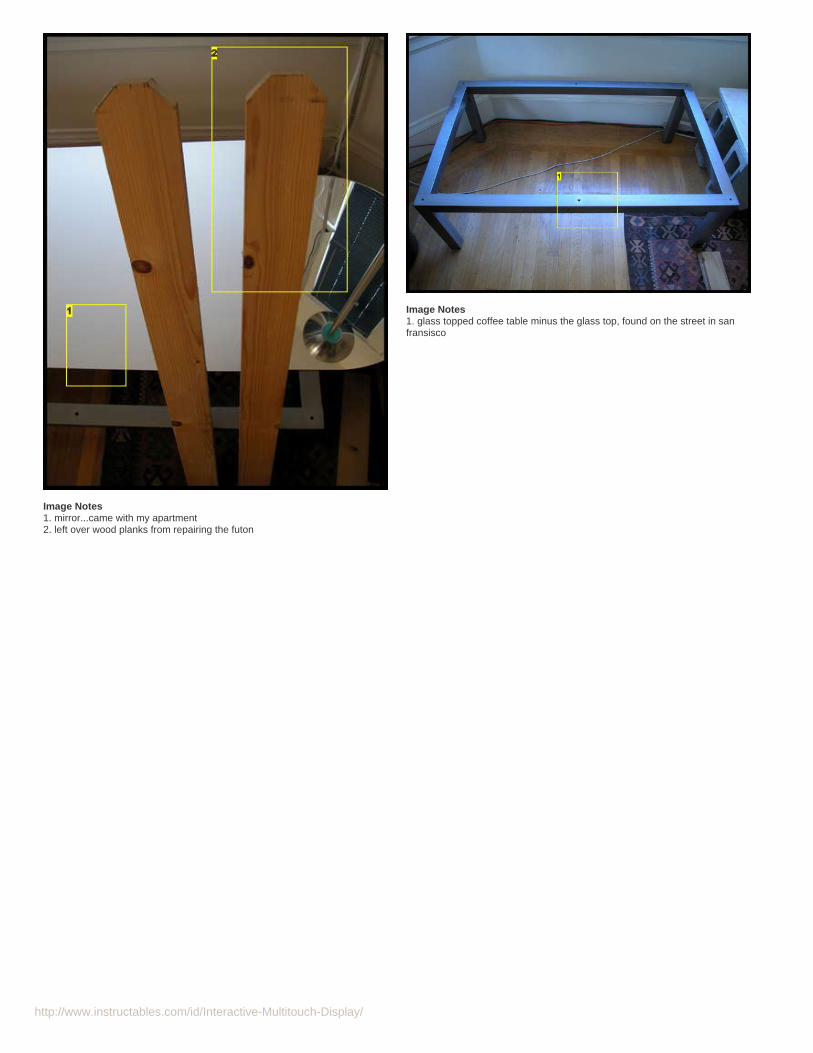
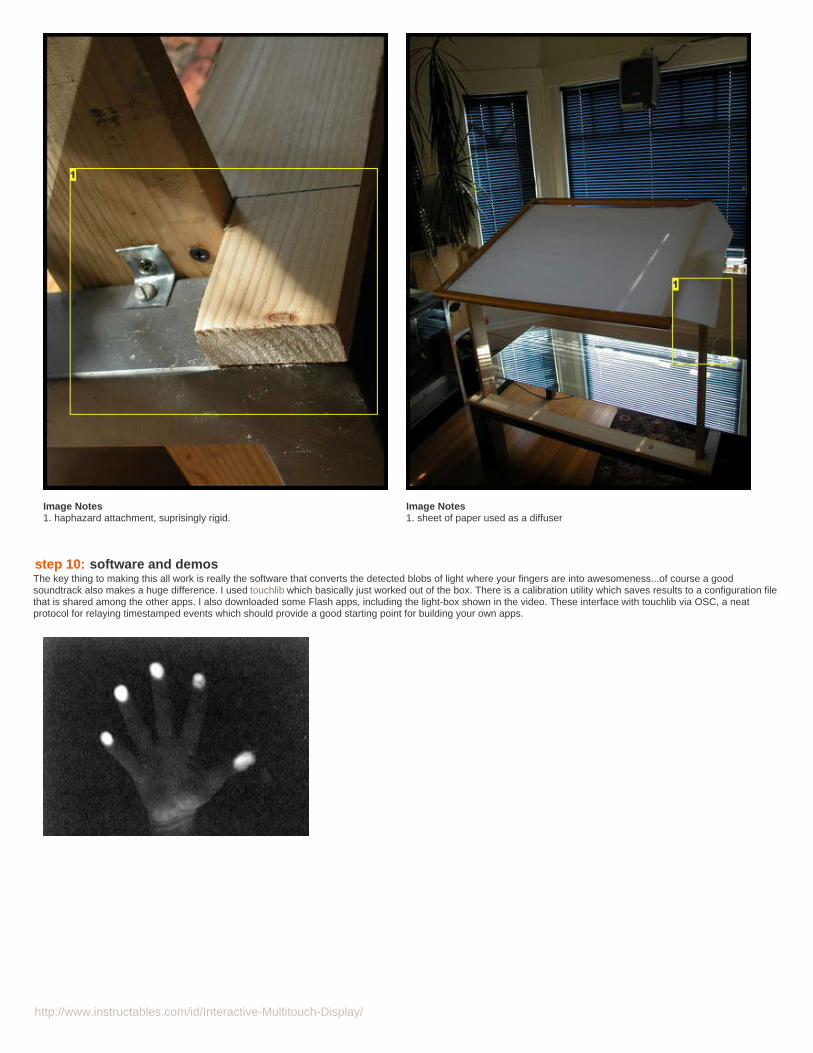
step 9: framing supportLast but not least, build some framing to support the screen. I started from a coffe table frame as a base and a couple wood planks to get the screen up in the air. Theexact geometry is dependent on the optics of your projector. The one I borrowed wouldn't focus at close distances so it was necessary to have the light follow a longerpath, bouncing off the mirror and back up onto the display. The angle of the display surface matches that of the projector (angle of incidence = angle of reflectance) inorder to minimize keystone distortion.
http://www.instructables.com/id/Interactive-Multitouch-Display/
Image Notes1. mirror...came with my apartment2. left over wood planks from repairing the futon
Image Notes1. glass topped coffee table minus the glass top, found on the street in sanfransisco
http://www.instructables.com/id/Interactive-Multitouch-Display/
Image Notes1. haphazard attachment, suprisingly rigid.
Image Notes1. sheet of paper used as a diffuser
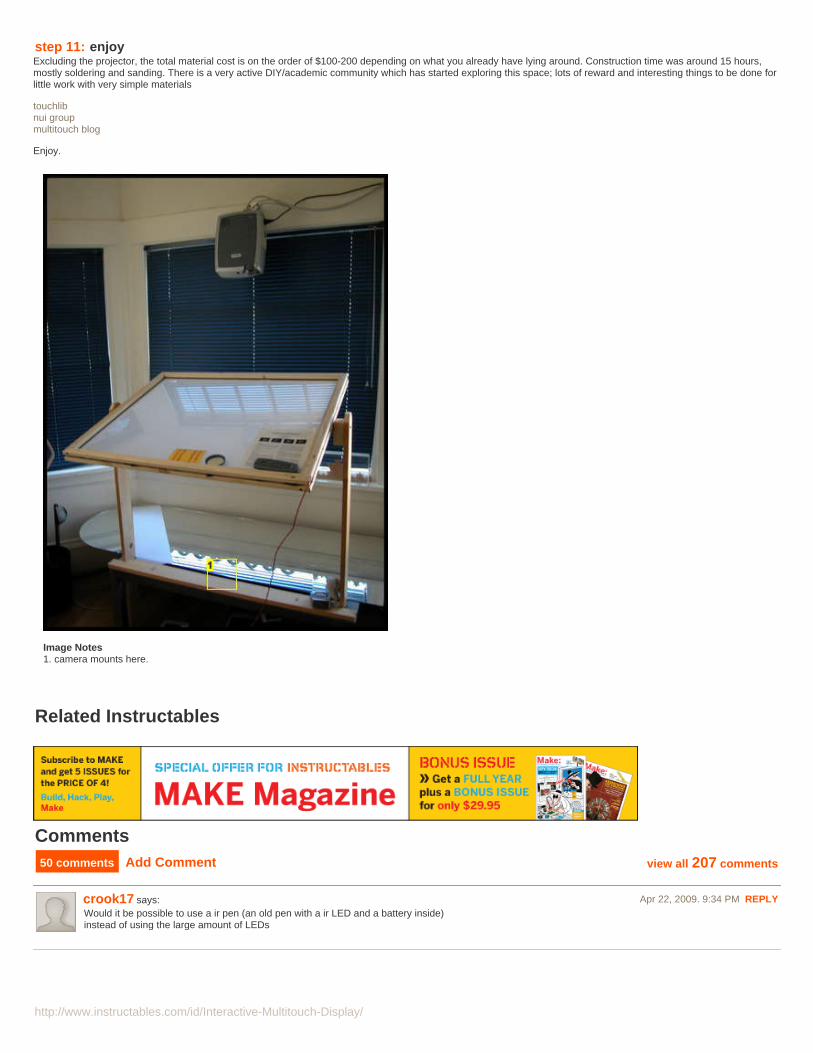
step 10: software and demosThe key thing to making this all work is really the software that converts the detected blobs of light where your fingers are into awesomeness...of course a goodsoundtrack also makes a huge difference. I used touchlib which basically just worked out of the box. There is a calibration utility which saves results to a configuration filethat is shared among the other apps. I also downloaded some Flash apps, including the light-box shown in the video. These interface with touchlib via OSC, a neatprotocol for relaying timestamped events which should provide a good starting point for building your own apps.
http://www.instructables.com/id/Interactive-Multitouch-Display/
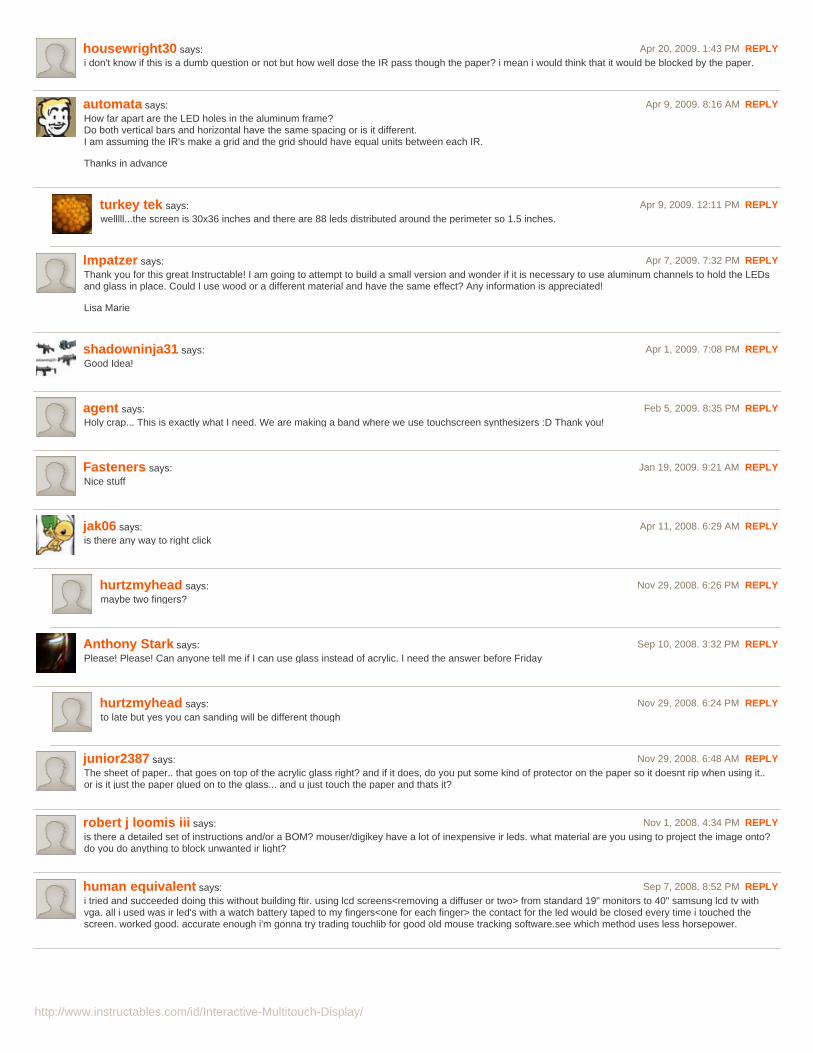
step 11: enjoyExcluding the projector, the total material cost is on the order of $100-200 depending on what you already have lying around. Construction time was around 15 hours,mostly soldering and sanding. There is a very active DIY/academic community which has started exploring this space; lots of reward and interesting things to be done forlittle work with very simple materials
touchlibnui groupmultitouch blog
Enjoy.
Image Notes1. camera mounts here.
Related InstructablesAdvertisementsMake Magazine Special Offer
Comments50 comments Add Comment view all 207 comments
crook17 says: Apr 22, 2009. 9:34 PM REPLYWould it be possible to use a ir pen (an old pen with a ir LED and a battery inside)instead of using the large amount of LEDs
http://www.instructables.com/id/Interactive-Multitouch-Display/
housewright30 says: Apr 20, 2009. 1:43 PM REPLYi don't know if this is a dumb question or not but how well dose the IR pass though the paper? i mean i would think that it would be blocked by the paper.
automata says: Apr 9, 2009. 8:16 AM REPLYHow far apart are the LED holes in the aluminum frame?Do both vertical bars and horizontal have the same spacing or is it different.I am assuming the IR's make a grid and the grid should have equal units between each IR.
Thanks in advance
turkey tek says: Apr 9, 2009. 12:11 PM REPLYwelllll...the screen is 30x36 inches and there are 88 leds distributed around the perimeter so 1.5 inches.
lmpatzer says: Apr 7, 2009. 7:32 PM REPLYThank you for this great Instructable! I am going to attempt to build a small version and wonder if it is necessary to use aluminum channels to hold the LEDsand glass in place. Could I use wood or a different material and have the same effect? Any information is appreciated!
Lisa Marie
shadowninja31 says: Apr 1, 2009. 7:08 PM REPLYGood Idea!
agent says: Feb 5, 2009. 8:35 PM REPLYHoly crap... This is exactly what I need. We are making a band where we use touchscreen synthesizers :D Thank you!
Fasteners says: Jan 19, 2009. 9:21 AM REPLYNice stuff
jak06 says: Apr 11, 2008. 6:29 AM REPLYis there any way to right click
hurtzmyhead says: Nov 29, 2008. 6:26 PM REPLYmaybe two fingers?
Anthony Stark says: Sep 10, 2008. 3:32 PM REPLYPlease! Please! Can anyone tell me if I can use glass instead of acrylic. I need the answer before Friday
hurtzmyhead says: Nov 29, 2008. 6:24 PM REPLYto late but yes you can sanding will be different though
junior2387 says: Nov 29, 2008. 6:48 AM REPLYThe sheet of paper.. that goes on top of the acrylic glass right? and if it does, do you put some kind of protector on the paper so it doesnt rip when using it..or is it just the paper glued on to the glass... and u just touch the paper and thats it?
robert j loomis iii says: Nov 1, 2008. 4:34 PM REPLYis there a detailed set of instructions and/or a BOM? mouser/digikey have a lot of inexpensive ir leds. what material are you using to project the image onto?do you do anything to block unwanted ir light?
human equivalent says: Sep 7, 2008. 8:52 PM REPLYi tried and succeeded doing this without building ftir. using lcd screens<removing a diffuser or two> from standard 19" monitors to 40" samsung lcd tv withvga. all i used was ir led's with a watch battery taped to my fingers<one for each finger> the contact for the led would be closed every time i touched thescreen. worked good. accurate enough i'm gonna try trading touchlib for good old mouse tracking software.see which method uses less horsepower.
http://www.instructables.com/id/Interactive-Multitouch-Display/
azmansami says: Oct 27, 2008. 9:05 AM REPLYhi,i have been thinking of doing the same as my home project. Can you share your experience in more detail? do you have any blog?
addicted-2-weapons says: Oct 18, 2008. 6:06 AM REPLYis acrylic also called perspecs?
rcamp004 says: Oct 8, 2008. 9:08 AM REPLYI've been so inspired by Turkey Tek and Jeff Han that I've been building my own FTIR display since June. I'm not finished but I am documenting the build onmy blog - http://polymathengineering.blogspot.com.I'd like to get comments from you guys out there.
Also- I've found an easier way to build the frame. Canvas stretchers sold at art stores allow you to quickly assemble frames - almost like wooden lego's orKnex. I have those on my blog as well.
Thanks again Turkey Tek!
WTHAI says: Sep 30, 2008. 4:07 PM REPLYYou're pressing down on the thick sheet of acrylic, yes? Not the thin one?
turkey tek says: Sep 30, 2008. 6:09 PM REPLYyes. the thin one is on the backside just holding the diffuser (paper) in place
WTHAI says: Oct 3, 2008. 9:52 PM REPLYAlright. Thanks.
prestonC says: Sep 24, 2008. 3:15 PM REPLYIf the projector is overhead, how are your arms not casting a shadow when they are stretched out over the center?
Shouldn't there be some occlusion from the light cast by the projector?
turkey tek says: Sep 24, 2008. 4:10 PM REPLYthe projector is bouncing off the mirror so the screen is actually illuminated from behind
Pyrozz says: Sep 12, 2008. 3:39 PM REPLYVery awesome. Uhm, how is it that the projected image doesn't interfere with the IR light that the webcam is receiving? Does the filter on the camera filterALL light except the IR?
Pyrozz says: Sep 14, 2008. 3:47 PM REPLYNever mind, I get it (after doing some research).
Llewner says: May 5, 2008. 8:05 AM REPLYIf you want to skip the sanding on the acrylic, you can always flame polish with a blow torch.
Fivesevenx28 says: May 8, 2008. 8:33 PM REPLYhow might i go about doing that?
Zinventor says: Aug 28, 2008. 11:38 AM REPLYget a blowtorch, carfully heat the edges till they are smooth... just be carefull not to burn the edges... that would defeat the purpose... anyways, iprefer drilling little holes to seat the leds, it's easier, and faster...
-Z
http://www.instructables.com/id/Interactive-Multitouch-Display/
redex777 says: Aug 21, 2008. 2:34 AM REPLYGreetings and thanks for this wonderful project!
Just one question/concern:
Judging from your video, the "Pictures" application especially, it seems to lose sensitivity as you put your fingers towards the center of the screen. Could thisbe because the acrylic pane was too large, and the infrared light wasn't able to reach the center as brightly?
...or maybe the light was too diffuse and therefore inaccurate towards the center?
...or maybe im just imagining things, ;-)
turkey tek says: Aug 22, 2008. 9:25 AM REPLYHmmm. I didn't notice that effect myself but it could be the case.
A problem I did encounter with the middle of the screen is thatthere is a reflection of the bright lense of the projector off theback of the acrylic which the camera sees. You can get rid ofthis by subtracting an image of it from your input but if yourfingers cross over the bright spot the tracker can get lost.
DenneyN says: Aug 5, 2008. 1:52 PM REPLYCheck out this site http://nuigroup.com/.They have a forum there that can answer all of your questions.
eevans says: Jul 21, 2008. 12:45 AM REPLYwhat projector did you use
Capm_Crunch says: Jul 17, 2008. 2:30 PM REPLYwould it work if i built this whole touch screen over top of a regular monitor? i can't get a hold of a projector and i want this to be in a large coffee table that iam building. also, i just bought a brand new logitech web cam that has a 1.3 megapixel video capture size. would that work instead of gutting one like youdid?
sambam2006 says: Jun 30, 2008. 6:18 AM REPLYFor the people who are after IR leds then go here. I got mine from there. They come in strips. Easy installation took me five minutes. Shipping takes over aweek. Contact him and leave him a message of your requirements etc.
http://youshare.co.uk/iphoneworld/form1211626325.php
human equivalent says: Jun 10, 2008. 11:29 AM REPLYdoes anyone know if an IR led is bright enough to show up on a webcam through an LCD screen? i dunno if the IR blocker on an lcd is one way or strongenough to block it. trying to build a work-around so ftir is not required, allowing you to use a larger suface without a "deadspot" near the middle of the screen.
rcamp004 says: Jun 23, 2008. 1:43 PM REPLYI recently tried and was successful in seeing the IR led in the remote that came with my Mac Book Pro. I also saw the led from a tv remote light up.I have pics up at http://polymathengineering.blogspot.com.
It's my first blog and I'm documenting my build of an FTIR.This only worked with the camera that came with my MBP though.
Aidin says: Jun 20, 2008. 2:05 PM REPLYHiCan i use glass instate of acrylic ?
rcamp004 says: Jun 23, 2008. 1:41 PM REPLYJefferson Han states in his Paper that Glass has poor optical transmittance for this application.You have to pay for his paper $10 from acm.org
Low Cost multi-touch sensing through Frustrated Total Internal Reflection.You can also check out his site http://cs.nyu.edu/~jhan.
cba20k says: Jun 17, 2008. 2:10 PM REPLYThis instructable is great!
Quick question though. I am not sure how you are attaching the channel to the acrylic. I see that the wood frame sections are bolted to channel, but thatwould not keep the four pieces attached to one another....would it? Sorry if I'm missing something obvious here.
http://www.instructables.com/id/Interactive-Multitouch-Display/
sharath.sridhar says: Jun 5, 2008. 6:48 PM REPLYturkey tek,
Great work. I am planning a similar surface soon. It will be a little modified from your work though. I am more or less looking at a rear projected prototype.Have you tried that one before? I can foresee the projector throw distance as the potential problem and hence will need to use a mirror to shorten thedistance. Another thing would be the modification of the sandwich type screen. I would have to remove the diffuser, but would it be as efficient without one?Any suggestions on this? Have you checked out the recent work of Microsoft, the TouchWall.. They are using such a short throw projector there. I assumethey have a mirror arrangement there.Help me out there.
sambam2006 says: Jun 1, 2008. 7:36 PM REPLYWhat size acrylic did you use?, and what is the thickness of it?
Cheers
sambam2006 says: Jun 1, 2008. 7:34 PM REPLYWhat size acrylic did you use? And whats the thickness of it?
Cheers,
Sam
dunnos says: May 25, 2008. 12:43 AM REPLYi have a question: i wanna make a touch screen with an ir pen just like with the wii remote but i dont have software for a webcam (ir webcam mod)now i found touchlib but it only finds where you put your fingers on an mt mini (other project somewhere on this site) wich are shadowsdo you now anything to make it sensitive to light instead of shadows???please reply fast im making a school prject and it needs to be finished by thursday
chaitanyamuppala says: Nov 2, 2007. 9:05 AM REPLYSomeone commented that this could not be possible with an normal LCD screen.... What if we removed the backlight of the lcd screen and just used the nonopaque screen as the thinner acrlylic sheet in the sandwich?
mythbusterma says: Apr 6, 2008. 5:31 PM REPLYacttly you only need a lcd screen, and underneath it you put a normal light (this serves as the back light for the lcd screen and as the infrared light emitor!
human equivalent says: May 23, 2008. 10:15 PM REPLYi like this lcd idea. i don't have a projector, but i do have a 40" lcd tv. if the guts are similar to a computer lcd, could i remove the layers off the back,backlight it myself and throw a webcam behind it? it has a vga port already, sowhat do ya think?if it works, eventually i'll have a virtual ssl mixingconsole, less the obligatory mortgage.
mythbusterma says: May 24, 2008. 6:38 AM REPLYjust remember to use a normal light bulb, NOT ENERGY EFFICIENT OR FLUORESCENT
lioncour says: May 20, 2008. 7:55 PM REPLYHello!Thank you for an great instructable.There are a few things that I do not understand and was hoping you or someone could help me with.Do you really need the second acrylic plate? Or can you just fasten the diffuser real good, like in a span?I have seen several places that people uses silicon on top of the acrylic, does this act as a combined diffuser and touchscreen?
Good greetings from cold Norway!
turkey tek says: May 21, 2008. 9:34 AM REPLYI think you probably don't need the second plate if you have some other method for attaching/supporting the diffuser.
As far as silicon goes, people have reported that works quite well. I never got around to trying it though so I'm not sure of the details.
sasukeflaze says: May 18, 2008. 3:36 PM REPLYhey turkey, i'm new to this whole thing but i'm looking at making on of these multitouch setups.
you seem to have a bit of lag and maybe resolution problems (which i know can be fixed by getting a better webcam).jeff han's demo of the multi touch setup seems to have...well, no lag at all.
so that leads me to conclude that your computer may be slow? Is that the only thing that effects the lag time?
most importantly though, what are the specs of the computer you use?

http://www.instructables.com/id/Interactive-Multitouch-Display/
view all 207 comments